Leaderboard


Popular Content
Showing content with the highest reputation on 09/26/21 in Posts
-
IGN: felixlalala Discord: JesusChrist#8314 Start offer 2m. 250k min bid No insta. 72hours auction from the first offer. Payment methods: CC -390k and Cash only SOLD TO SEOULMATE FOR 4.5M
 3 points
 -
ok make this more high 15m3 points
-
yeah i bid 15m2 points
-
Yo im selling my snivy 10m Cyan#5247
2 points
-
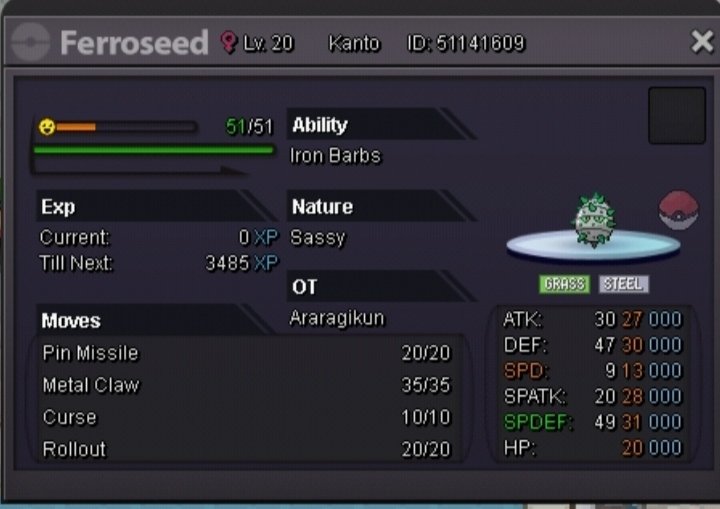
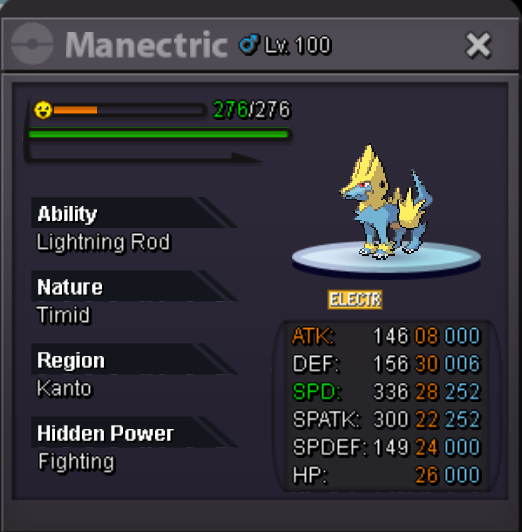
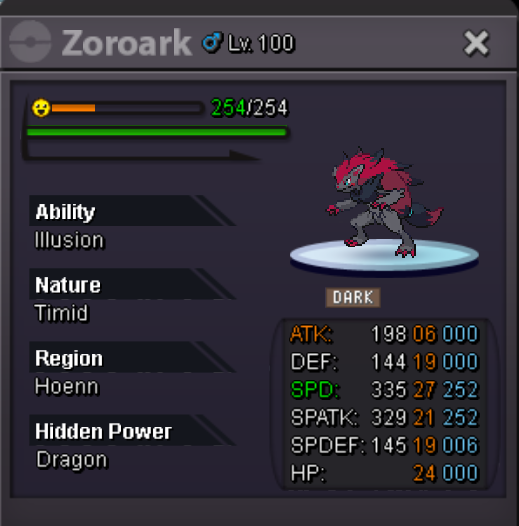
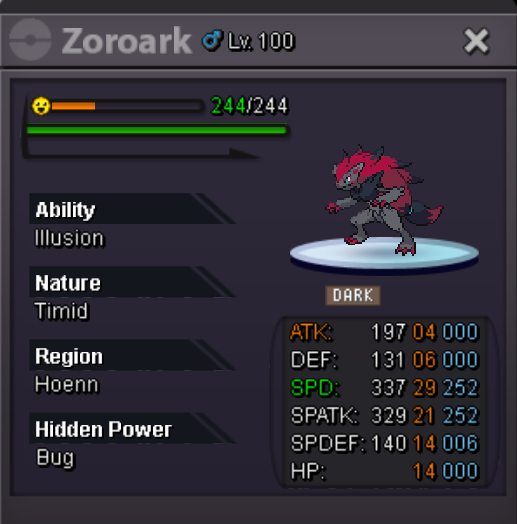
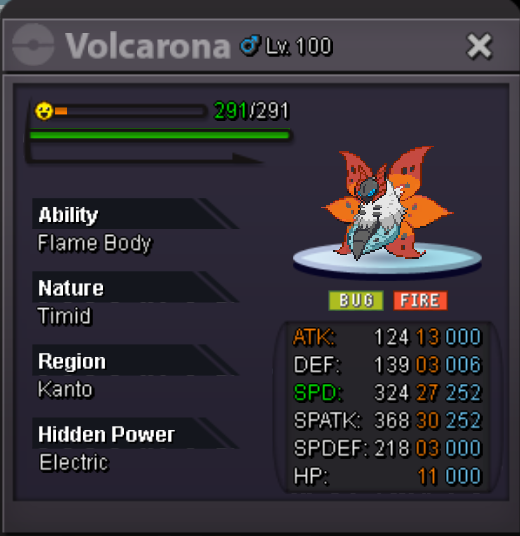
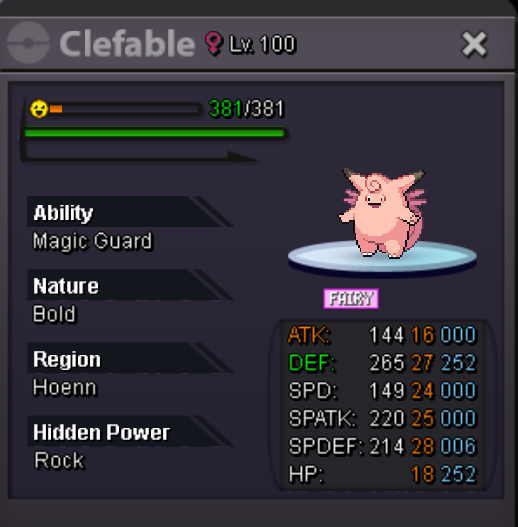
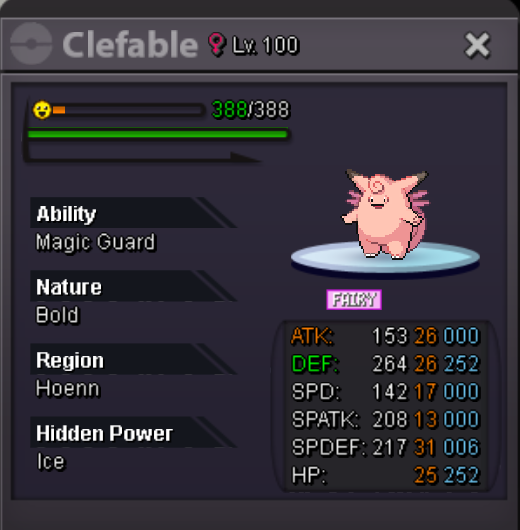
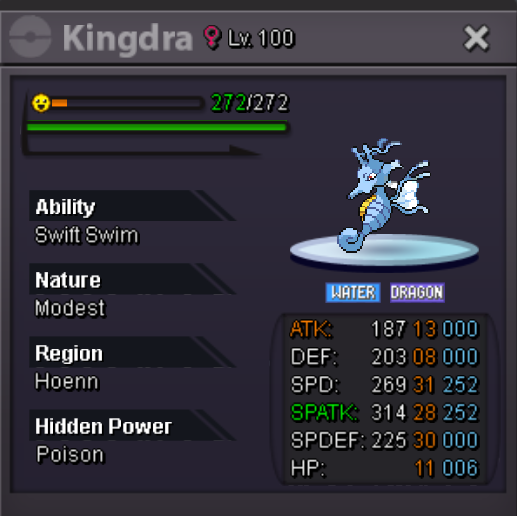
I have finally decided to make this guide after I've continuously seen newbies asking questions on: What are these orange numbers? And the blue numbers? So, how does this count? What does this amount to? Is my pokemon good? Hello, can you rate my pokemon? Is my ability good? Why is this ability not working? Is Hardy nature good? Why is this Brave Gengar so bad? And these questions are literally impossible to answer in a blue Help chat where we can only write about four or five lines at a time, when another newbie will ask another question, and another one, and another one, and so on. Most answers ingame are either short or just get an answer like "herp derp your pokemon does not have 31 ivs in everything thus it's trash even though it's a godly that would sell for a few millions" or really misinformed comments and arguments in All chat that only demotivate users instead of giving legitimate advice. How do we know if a pokemon is good? How do we rate it? Is everything below 20 IVs in everything bad or trash? Does everything really work for story or should we actually bother catching something decent that will not hinder our progress? How do we learn what is good and what is not? Who do we ask when we have doubts? In my opinion, it is better that you learn all these things yourself first, and then, ask people who you trust in, and not the first person you find anywhere. Theory Stats So, what are stats exactly? Stats are these white numbers you can find in your pokemon's description (or card, as you can say). These white numbers are total stats. These numbers are the sum of the EVs, IVs and the growth from the hidden Base Stats formula, which will make your pokemon's stats slowly increase as you level up. Otherwise, without any EV and with very low IV, your pokemon would stop growing after only around 10 to 20 levels. This mathematical formula does the job so you don't have to calculate or get a computer engineering degree to understand why do your pokemon not grow up as much as they should. If you just looked at any base stats and captured any low level pokemon (Caterpie, for example), you would ask: "Wait, why does my Caterpie only have 6 physical attack points at level 5? It has 30 base physical attack, it should start at 30 at level 1, right?" Well, no, son. If it worked like that, you could find a Deoxys Attack with 180 Attack, Special Attack and 150 speed at level 1. You could also find Shuckles with 230 in each Defense at level 1. Doesn't sound very fun to play against, right? Exactly, because it isn't. This formula scales with levels. Your stats start pathetically low and increase exponentially depending on your Base Stats. Shuckle, for example, will gain from 4 to 5 points in each defense stat per level up. You'll see this reflected in the white numbers (Total Stats). This growth will also slowly be affected by your Nature, EV and IV. However, we'll deal with that later :). Not all pokemon grow as fast as others. Higher Base Stats means they will grow faster. If a Pokemon has a really high Base Stat in one stat, that stat will naturally increase absurdly fast (Special Attack on Gengar, Speed on Ninjask, for example). So, how do we know the Base Stats of a pokemon, Bhimoso? If it's invisible, how can we check it? Well, there are people dedicated to datamining the original games and obtaining the number of each stat, or doing a rough calculation of their Base Stats based on their stat growth per level, IV, EV and Nature. Thus, the only thing you have to do to know the Base Stat of any pokemon is checking an online database. For example, we can use pokemondb, bulbapedia, wikidex, smogon... there's a lot of them. However, we will use Bulbapedia, because it also gives us the minimum and maximum stat ranges a pokemon can reach (we'll also deal with that later but, to summarise, it depends on natures, evs, ivs...). We can also use the Pokemon Showdown Calculator to know how many IVS, EVS and what Nature we need for a certain pokemon to reach the specific numbers in a stat we would like it to reach. Let's look at our little friend Bronzong, as an example (it's just an excuse to flex mine, but also for educative purposes). His Base Stats are: 67 in HP, 89 in Attack, 79 in Special Attack, 33 in Speed and 116 in both Defense and Special Defense. These stats are normally hidden unless you check an online database. This means Bronzong can reach 364 points in his Defense stat if he invests 252 EVs in Defense, he is lucky and has 31 IVs in Defense, and he has an Impish/Relaxed/Bold/Lax nature. He has the same Base Stat in both defensive stats: 116. Thus. the same would happen if we had the same conditions in Special Defense. However, not many pokemon happen to have mirrored stats (same Base Stat in two different areas, it is really rare). His Base Stat in HP is way lower: It's a pretty terrible 67. It's not the end of the world, but the poor dude could benefit from some more HP. Since there is no HP beneficial nature or powercreeping one, the only way to get a Max HP Bronzong is to capture one with 31 ivs in HP and invest 252 HP EVs in it. As you can see, since his Base Stat in Speed is very low, his Speed will grow extremely slowly through leveling. Even if we gave him 252 EV and tried to maximise his Speed, he would still be pathetically slow. Thus, there's no point in giving him more Speed, as he is an immortal tank that can set up Light Screens and can benefit from the move Gyro Ball more, which powers him up the slower he becomes. His HP is also a bit depressing, but since his defensive stats are so high, we can still somewhat fix that. In this picture, you can see the Total Stats, IVs, EVs that my Bronzong has. At level 100, he has 334 hp (out of the 338 max he can have, as he is missing 4 IV in HP), 206 Attack, 322 Physical Defense, 102 Speed, 169 Special Attack, 300 Special Defense. His Physical Attack (or Attack) IV is 23, his Defense IV is 31, his Speed IV is 31, his Spatk IV is 25, his Spdef (or Special Defense) IV is 24 and his HP IV is 27. Aside from that, he also has 102 EV in Def, 156 EV in Spdef and 252 EV in HP. As you can see, you cannot see the Base Stats of a Pokemon. But, how do we know he will reach that threshold 100% of the time? Can we see how a pokemon grows over time? Yes, we can! We will see this later in the guide Natures What are Natures? A Nature is a common trait in a Pokémon that in the original games played along some side minigames in Pokémon Emerald and other versions where, depending on their Nature, they would participate in contests and win or lose depending on what they were. For example, the Docile nature used to never want to fight and would almost always lose. However, this is not implemented in PRO (and I hope it never will, because that minigame was an RNG fiesta). The main function of Natures is to boost one stat by 10% and to decrease another stat by 10%. There are 25 natures in total: 5 natures are neutral (because they raise and decrease the same stat. Thus, they have no real use. They give no benefits nor decrease anything, and we don't want to have pokemon without good beneficial natures). No nature increases or decreases HP, so HP only depends on IVs and EVs. (Thank god, because that would be adding a few more natures into this). We can check the table from bulbapedia or learn them alternatively: Attack increasing natures: Adamant, Lonely, Naughty, Brave. Defense increasing natures: Impish, Bold, Lax, Relaxed. Spatk increasing natures: Modest, Mild, Rash, Quiet. Spdef increasing natures: Careful, Sassy, Gentle, Calm. Speed increasing natures: Jolly, Hasty, Naive, Timid. We also have to learn which natures decrease each stat. Attack decreasing natures: Bold, Modest, Calm, Timid. Defense decreasing natures: Lonely, Mild, Gentle, Hasty. Spatk decreasing natures: Adamant, Impish, Careful, Jolly. Spdef decreasing natures: Naughty, Lax, Rash, Naive. Speed decreasing natures: Brave, Relaxed, Quiet, Sassy. In PRO, you will see the natures highlighted like this. The Impish nature benefits Defense and decreases Special Attack. The stat which will be increased is highlighted in green, and the one being decreased is highlighted in orange. (Some people say this is red or brown, but I have eyesight issues and I cannot actually tell which colour this is). If the nature is a neutral one (Serious, Hardy, Quirky, Docile, Bashful), all stats will appear white. You will also be able to see the Nature in the Nature section of your pokemon information (Wow, who wondered?). How do we know the best nature for our pokemon? We should study their Base Stats, Movesets, and what are they good at. Are they really good fast sweepers who don't care about defenses and just want to wipe out anything in their path? Then we'll choose an offensive nature. (Modest, Rash, Mild, Timid, Hasty, Naive Gastly). Are they really good tanks who don't care about physical damage, or they just want to stall you until the end of your existence? (Bold, Calm, Sassy, Relaxed, Careful, Impish Chansey). There's a lot of natures and choices to have and you are the one who makes the decisions. You can run mixed damage sets with natures that decrease Spdef or Def and increase Atk or Spatk, there's physical attackers, stallers, wallbreakers... Study the base stats and movesets that the pokemon you want to train has, and then decide. You're the one who has to make the choices. If you want others' opinions on each pokemon's nature, ask for it! Abilities What is an Ability? An Ability is an inherent power all pokemon have. All pokemon have an ability. Some of them only have one (Gastly with Levitate), others only have two (Bulbasaur with Overgrow and Chlorophyll) and sometimes they have three (Bronzong with Heatproof, Levitate and Heavy Metal). All pokemon come with an ability when captured. If a pokemon only has one ability, it will always have that one. There's no going around it. If a pokemon has two abilities, it will have these two, and if a pokemon has three, then three. Some abilities are more useful than others. As you can see, Bronzong has three abilities. The ability Levitate, for example, makes a pokemon immune to Ground Type attacks. Lightningrod does the same to Electric moves, but also increases your Spatk by one stage after being hit by one. Flash Fire does the same but for Fire Types. Volt Absorb and Water Absorb make a pokemon immune to Electric, Motor Drive does the same... you see the point. Some abilities are insanely good because they help out a lot of pokemon to defend against their weakness. Some abilities make them immune to certain status (Limber, Immunity, Own Tempo, Insomnia). However, there are also some abilities that are completely useless. Truant is an ability that makes you only be able to attack once every two turns (you attack, you do nothing, you attack, you do nothing, you attack, you do nothing), Illuminate literally does NOTHING in battle, and so on. There are really broken abilities like Sturdy or Mold Breaker, and there are stupid abilities that you wonder how they even exist. So, how are we going to hunt for the right ability for our pokemon? Well, we need to study which of the abilities can our pokemon have, and which one helps it better. For example, Guts in Rattata is way better than Run Away, Levitate is way better in Bronzong than Heatproof, Lightningrod is way better than Static in Pikachu. Search and look at what each ability in your pokemon can do and choose which one you want to use. EVs EVs or Effort Values are the blue numbers in any pokemon you see. These values can be modified, increased, reset, reduced, fixed, changed... they're amazing. They work as a modifier for all of your pokemon in order to improve them as much as you want. You gain EVs for defeating wild pokemon, trainer pokemon, using proteins or vitamins in your pokemons. Every 4 EV in one stat, your stat will get increased by 1 at level 100. You can have a max of 510 EV between all stats of your pokemon. In a single stat, the maximum amount of EV you can allocate is 252. Thus, at level 100, if you allocate 252 EV in that stat, it will increase by 63. (252 divided by 4). You can decide how to change these whenever you want. You can modify them as you wish by using EV Reducing berries. These can be found in any route, in Viridian Maze and in the Safari EV Zone. These are: Pomeg Berry, which will reduce your HP EV by 10. Qualot Berry, which will reduce your Defense EV by 10. Kelpsy Berry, which will reduce your Atk EV by 10. Grepa Berry, which will reduce your Spdef EV by 10. Hondew Berry, which will reduce your Spatk EV by 10. Tamato Berry, which will reduce your Speed EV by 10. Example of berries in my bag. As you can see, my Bronzong has 102 EV invested into Defense, 156 into Special Defense and 252 into HP. Divide each one by 4 and you'll be able to find out how much it adds up at level 100. All wild Pokemon, once defeated, will grant you 1, 2 or 3 EV in one stat. Some grant 1 EV in 1 stat and another one in another. There are really weird combinations. They always give an EV of their highest overall Base Stat. For example, Snorlax gives HP EVs, while Gengar gives Spatk EVs. Evolved forms usually give more EVs than unevolved forms. As I said, these 2 give 3 HP EVs and 3 Spatk EVs, respectively. If you hold a Macho Brace, the EVs you gain will be doubled. If the EV in one stat is 99 or below, you can use a vitamin to increase that stat's EVs by 10. However, if you try to use a vitamin once that stat's EV are atleast 100, or the Pokemon already has the maximum amount of EVs (510), you will not be able to. They can be purchased in department stores. These vitamins are: HP UP, which will increase your HP EV by 10. Protein, which will increase your Atk EV by 10. Iron, which will increase your Def EV by 10. Zinc, which will increase your Spdef EV by 10. Calcium, which will increase your Spatk EV by 10. Carbos, which will increase your Speed EV by 10. Example of vitamins in my bag. IVs IVs or Individual Values are these orange numbers you see on a pokemon when you capture them. These points, once the pokemon is captured, CANNOT BE CHANGED IN ANY WAY. These are NOT like EVs. Once you capture the pokemon, the IVs will remain there FOREVER. FOREVER! They can ONLY be changed in Legendary Pokemon through the use of Reroll Tickets. These can be obtained through the Solaceon or the Pewter Museum quests. Once you catch the pokemon, start praying for the love of god that it has good IVs. IVs range from 1 to 31. 1 to 5 is qualified as horrendous, 5 to 10 really bad, 10 to 15 is bad, 15 to 20 is acceptable in some circumstances, 20 to 25 is epic to super good, 25 to 28 is godly and 28 to 31 is legendary. It's how I personally qualify them, but it's a basic way to understand the ranges of what we can call good IVs. Example of an incredibly good IV Bronzong. Example of an error in the Matrix where my luck completely ran out and I found the worst IVs ever. IVs will slowly add up to your stats upon level-ups and upon reaching 100, they will apply fully. What I mean by this is: once your pokemon hits 100, if they had 30 IV in attack, their attack will have increased by 30, being added up as you went along leveling it up. At level 5, it's obvious that you wouldn't get suddenly 30 in attack. It will increase as you level up. For example, if you have 31 IV in HP, you would gain an extra point every 3-4 levels, until you reached 100 and all the 31 points were all applied to the stat. Clearer Example: Pokemon A has 15 HP at level 2. At 5, he might have 20 (Base Stats formula + any EVs + 1 IV out of these 31). This repeats while he grows: at 8, he might have 25 or 26, and the same thing happens. If you still don't understand this, I will leave an example on two pictures: Shuckle with only 1 IV at level 100. His HP would otherwise be 150 without any EV investment. Shuckle with 31 IV at level 100. As you can see, the extra 30 points in HP IVs made it go from 151 to 181: Exactly 30. These 30 will slowly add up as you level up. Stat Growths After having read all the wall of text before, let's do some experimentation! We will do this with Pikachu. This is a great example as Pikachu is the most famous Pokémon and he is a great example. We will do some tests with him. We will be using the following calculator to know his stats at any level we want. https://calc.pokemonshowdown.com/ We will assume your Pikachu is complete garbage. Your Pikachu has a neutral nature (thus, does not increase or decrease any stat). His IV are 1 in everything (the lowest possible in PRO), he has no EV training and he is at level 5. You can already notice how much faster his Speed increases in comparison to his other stats. Now, let's assume you go around leveling it up. You fight random pokemon in the wild and you level up to level 20 and get some random EV in random stats. Well, our little Pikachu is now growing! This is pretty nice. He's still a bit garbage, but atleast he is somewhat usable. Let's check him at levels 50, 75 and 100! Wow, he's getting better! His stats are still a bit terrible, though. Here, his stats actually start looking decent. That's not bad! One final push for level 100! We finally have him at 100, nice! Though... his stats are a bit disappointing. His EVs are all spread around making no sense, he has no benefitial nature, he doesn't even hold an item, his IVs are pathetic. This pokemon is basically worthless aside from helping you out to defeat the Elite Four or to rush Story. You wouldn't really be able to sell this for even 20k in any Pokémon Market. You can notice how Base Stats are making certain stats grow faster over time. Even though his Spatk has more EV invested into it than his Speed EV, he has the same IV in both stats, and his Speed is WAY better than his Special Attack. Man, this is disappointing. We want a better Pikachu! We will now grab a Rash Synch and go to Viridian Forest until we catch another good one. And we find an almost Godly one! Compare this one with the one we caught. This one has 25 IV in everything, it holds a Light Ball, its ability is amazing and it has a really good nature. The one that was garbage had 18 HP, 10 Attack, 9 Defense, 10 Spatk, 10 Spdef and 14 Speed. This one has 19 HP, 11 Attack, 10 Defense, 12 Spatk, 9 Spdef and 15 Speed. The nature helps it a bit: it has a bit less Special Defense but more Special Attack. At just level 5, we already have a noticeable difference. Now, we will carefully EV train it and level it to 25, 50, 75 and 100. We will give it 252 EV in Spatk, 252 EV in Speed and 4 in ATK. Let's see how it grows! See the monstruosity that has now our Pikachu become: With the right nature, correct EV spread, nice IVS, ability and leveling. our Pikachu has 205 HP (4 more than the garbage one), 141 Attack (5 less than the garbage one), 110 Defense (10 more than the garbage one), 212 Spatk (way more than the 148 of the garbage one), 117 Spdef (just 5 less than the garbage one) and 273 Speed (way more than the garbage one too). We can use this calculator to literally check what any pokemon will have at any level, with any items, test out EV, IV and nature combinations to know if we reach the Speed we need, what nature we can use, what will our stats look like at 100 in the future when we have fully trained our Pokemon and how we need to train it to reach that point. We should use this to plan ahead what we will train and how we will train in order to make our Pokemon absurdly overpowered. Stat Stages Now that you’ve read this, you should take a look at how stat increases and drops work. Each stat drop or increase in Attack, Defense, Special Defense, Special Attack, Speed is a 50%. If your stat is lowered or increased, it’s by one stage. If it says sharply, it’s by two stages (whether down or up) or three stages. Growl would lower our Attack by one stage (50%), but then we could Swords Dance, which would increase our Attack by two stages. Our Attack would go first to 0% (neutral) and to 50%, since it would’ve gone from -50% to 50% increase. Still confused? Well. let’s explain it better. You start at 0 stage drops or increases. Moves or abilities such as Intimidate can lower or increase your stats in battle (Defiant, Intimidate, Lightninrod, Speed Boost, Weak Armor, etc). The limits are 6 stage drops or 6 stage increases. Thus, you can have your stats lowered or increased up to 6 stages. For example, if I growl an opponent 6 times, his Attack will be decreased by 300%. However, if he uses Swords Dance once, his Attack will go back to having been decreased only 4 stages (-200% Attack, or -4, as we can say it). If he uses it once more, he’ll be at -2 stages, and if he uses it again, he’ll be back at 0 stage drops. It’s quite easy to understand if you just count up and down. They don’t work on real percentages: Stage Drops (and %) are not very real. If your stat is increased by a stage, each stage is a multiplier or a divider by .5. So you can understand it properly: +6 stages = x4 to the stat that has been increased by that amount of stages. +5 stages = x3.5 to the stat that has been increased by that amount of stages. +4 stages = x3 to the stat that has been increased by that amount of stages. +3 stages = x2.5 to the stat that has been increased by that amount of stages. +2 stages = x2 to the stat that has been increased by that amount of stages. +1 stages = x1.5 to the stat that has been increased by that amount of stages. 0 stages = No changes. This is where you start from. -1 stages = /1.5 to the stat that has been decreased by that amount of stages. -2 stages = /2 to the stat that has been decreased by that amount of stages. -3 stages = /2.5 to the stat that has been decreased by that amount of stages. -4 stages = /3 to the stat that has been decreased by that amount of stages. -5 stages = /3.5 to the stat that has been decreased by that amount of stages. -6 stages = /4 to the stat that has been decreased by that amount of stages. Imagine Golem has 100 Speed. He uses Rock Polish once. He goes to 2 Stages, and his Speed goes to 200. (x2 multiplier). Now the enemy uses Mud Shot and drops your Speed by one stage. He goes at 150 Speed (x1.5 multiplier, you went from 2 stages to 1 stage). Now he Rock Polishes again and he jumps to 3 stages (x2.5 multiplier). His Speed is now 250. See? % don’t apply properly. If it was a %, a 100% increase would’ve meant that his Speed would’ve gone from 150 to 300. It works by Stages, so it goes to 250 instead. % only work based on the TOTAL STAT you see in the numbers in your pokemon’s description. The multiplier will always work on that stat, and it will not work as a %. If it worked on percentages, the 100% increase (or x2 in our real world) would’ve made 150 go to 300, instead of 250. Otherwise, we could exploit this to infinitely increase our stats in battle. Now comes the stupid part. Stages DON’T HAVE THE SAME EXACT MULTIPLIERS WHEN IT COMES TO Evasion and Precision. I put it in caps SO YOU READ IT BETTER. Probably because Evasion and Precision are pure RNG based mechanics and they’d be WAY too broken with classic stat changes (we would abuse Fissure lol). Stages in these two stats work like this: +6 stages = x3 to the stat that has been increased by that amount of stages. +5 stages = x2.6 to the stat that has been increased by that amount of stages. +4 stages = x2.3 to the stat that has been increased by that amount of stages. +3 stages = x2 to the stat that has been increased by that amount of stages. +2 stages = x1.6 to the stat that has been increased by that amount of stages. +1 stages = x1.3 to the stat that has been increased by that amount of stages. 0 stages = No changes. This is where you start from. -1 stages = x0.75 to the stat that has been decreased by that amount of stages. -2 stages = x0.6 to the stat that has been decreased by that amount of stages. -3 stages = x0.5 to the stat that has been decreased by that amount of stages. -4 stages = x0.42 to the stat that has been decreased by that amount of stages. -5 stages = x0.375 to the stat that has been decreased by that amount of stages. -6 stages = x0.33 to the stat that has been decreased by that amount of stages. https://bulbapedia.bulbagarden.net/wiki/Statistic I suggest you give the entire thing a read. Obtaining the right Nature. So, how do we control the Nature we get when we capture any pokemon? Quick answer: we don't. We try our best against the RNG Gods. If we have no Synchronise pokemon, we will just battle or obtain wild pokemon. These pokemon will have a 4% chance of having any nature. (Since there are 25 natures, each one has a 4% chance of appearing in a pokemon in the wild). Thus, if you capture 25 of the same pokemon without a Synchronise pokemon, it's possible that 20 or more of these don't share a common nature. I heavily suggest you get Synchs as earliest as possible and you synch everything you can for story to progress much easier. If you don't have Synchs, try to only use good nature pokemon for story, or you'll suffer. A Natu with the Synchronise ability. How do we then obtain beneficial natures for us, then? Well, Synchs! What are Synchs, you may ask? Well, we are talking about Pokémon with the ability Synchronise. This ability is really rare: only a few pokemon have this nature. However, Natu is an incredibly common pokemon which may also posess this nature. Synchronise has two effects, one inside of battle and one outside of battle. The ability Synchronise will allow your pokemon to apply the same status condition you are afflicted by if your opponent uses a status move on you. Example: Natu goes in a battle. Duskull uses Will-o-wisp. Oh no, Natu is burned! Then, Synchronise activates and Duskull will also be burned. This is a neat ability! However, it has many issues, but it's actually just one. Synchronise inside of battle will have NO effect against an opponent who is immune to the same status you are inflicted by. For example, if a Fire Pokémon burns your Natu, the Fire Pokémon won't be burned. If a Poison or Steel Pokémon poisons your Natu, the Poison or Steel Pokémon will not be poisoned. If an Electric type paralyses your Natu, the Electric pokemon will not be paralysed. Synchronise cannot freeze or make the opponent fall asleep. Also, Synchronise will ONLY activate inside of battle in the same turn you're afflicted by a status condition. Thus, you can't paralyse your Natu on purpose in a wild battle, then flee, and then summon it to instantly paralyse the wild pokemon you want to catch. It doesn't work like that. However, we're interested in its out of battle effect: If a pokemon with the ability Synchronise is in the first slot of our party, 50% of all wild pokemon will have the same nature as this Pokemon. This also works if the pokemon is in the second slot of our party. However, if that's the case, the first pokemon must be fainted for this to work. For example: If Natu is in the first slot of your party, 50% of wild pokemon will share the same nature. If it's Modest, 50% of the wild pokemon will be Modest. However, if Natu is in the second slot, the ability will not work UNLESS the first pokemon is defeated. If it's fainted, it will work. If the pokemon is healthy, Synchronise WON'T WORK. Thus, if we want to hunt Gastly with a Timid nature, we will organise our team like this: Example of a synch. 1st Slot: Synchronise Pokemon 2nd Slot: Thunder Wave / Stun Spore / Spore / Whatever you want to use 3rd Slot: False Swiper. (Optionally, fuse 2 and 3 into one by using Breloom with Spore). If we want to repel trick: (There are guides on forums on how to do this already) 1st Slot: Pokemon with the level we want to repel trick (Must be fainted) 2nd Slot: Synchronise Pokemon 3rd and 4th Slot: Same as above 2nd and 3rd slot. And that's it. Good luck hunting! Small note: You can change the nature of a Legendary Pokemon through the use of a ticket to any nature you wish. This is not available for normal Pokemon, however. How to hunt for Abilities So, how do we hunt the ability we want? Well, it can be either simple and perfectly easy (Gastly, for example, only has one ability. Thus, we don't need to worry. It will always have the same ability), a bit hard (one ability and one ha) and a nightmare (two abilities + ha). If a pokemon only has one ability, it will always have it (it can change when it evolves though, Gastly's Levitate becomes Cursed Body on Gengar.) However, if we're trying to hunt anything else, we will have to check if it's a normal ability or a hidden ability. If it's a normal ability, we have to check if the pokemon has two, or just one. Then, we factor in the chances. The normal chances of finding a Hidden Ability pokemon are just a measly 5% of the times you'll encounter the pokemon. Thus, if the pokemon has just one more normal ability, it will have a 95 % of having the normal ability and a 5% of having its hidden one. If it has two normal abilities and a hidden one, each normal ability will have a 47.5% chance, and the hidden one will still have a 5% chance of appearing. You can check the abilities of each pokemon in the pokedex. The normal abilities will be found in the first two slots in a blue font, while their hidden ability is found on an orange font. Example of a pokemon with a single ability. (100% chance) Example of a pokemon with a normal ability and a hidden ability. (95% and 5% chance respectively, with BMS 75% and 25%). Example of a pokemon with two normal abilities and a hidden ability (47.5% for both of the normal ones, 5% for the hidden one, 32.5% for the normal ones and 25% for the hidden one with BMS). Then, how do we increase our chances? Well, we can purchase a Black Medallion (or BMS) from the Coin Shop for just 40 Coins so that for the next 72 hours we use the item, we will have a 25% chance of finding a hidden ability on any wild pokemon we find. However, this is bad if we actually want to hunt the normal ability of a pokemon, since we will decrease the normal abilities' chance to get a higher chance of hunting a hidden ability. We can buy a Coin Capsule from other players to purchase a Black Medallion or we can also donate to the game to keep it going Abilities can also ONLY be changed in a legendary pokemon through the use of an Ability Capsule. How to train EVs Now that we know what EVs are, we now need to focus on training. We first will aim towards what we want to train. We have to consider: Are we training a Gastly? Or a Slowpoke? Do we want to train it offensively or deffensively? Are we trying to build a tank or an offensive steamrolling monster? Let's take an example. We want to train our cool Arcanine as a physical sweeper. We want it to be fast and strong offensively. Our idea is to invest 252 EVs into Attack and 252 EVs into Speed. We will leave the 4 other Evs into HP, as we need to fill something out for an extra point. We now will decide if we want to use any vitamins to increase the stat's EVs into 100. If we want, we will use Proteins and Carbos until they reach 100 EV in each stat. If not, we will learn to do it the Classic Way. We will first equip a Macho Brace. We will google what pokemon give Attack and Speed EVs. We see that Digletts and Dugtrios and Zubats in Diglett Cave give us Speed EVs. This is pretty nice, they normally faint in a single hit and, even though they're fast, we will also gain EVs upon defeating them. If we equip Macho Brace to double our EV gain in exchange for temporarily having our pokemon be slower, we will gain 2 Speed EVs per Diglett and Zubat and 4 Speed EVs per Dugtrio. Make the maths to count how many pokemon it will take us to get these stats to 252 EVs each. The Macho Brace can be obtained by talking to one of the people in front of Goldenrod Pokecenter and giving them a Drowzee for it. A Macho Brace. However, when we go and do the same in Tohjo Falls vs Goldeen and Seaking who give us Attack EVs, we think: man, this is so painful and slow. Can't we make this faster? We can! We will go to Fuchsia City and enter the Safari Zone. We will now talk to the Guard and ask him to pay to enter the EV Zone Training. While this may be a bit expensive, we will quickly notice the difference: All wild pokemon are level 10 pokemon which give 3 EVs each. If we equip a Macho Brace, we gain 6 EV per pokemon. Doing simple maths, we find out that we only need to defeat 42 of the same pokemon or the same EV pokemon to reach the maximum amount of EVs in a single stat. Fuchsia's Safari Zone Entrance. Option 3: EV Training Area EV Training Area 1 EV Training Area 2. We will level up our pokemon to around 40 or 50 so he can faint everything in one hit. We will use EV Berries to remove any unwanted EVs in our pokemon. (Those berries can be obtained in Viridian Maze and other places around the world. Also, they're also present to be picked up in the EV Zone Training Area in Safari). We will now enter the Safari EV Zone Training Area. In the first area we spawn, we can talk to the guard to teleport to the second area or we can purchase healing items in case we forgot and we want to stay training for a long time. We can also purchase a 24 hour pass to make the EV training incredibly cheap and be able to use it all day for an absurdly low price. The area to the south in the first area is the Attack zone. The pokemon in the Grass there only give Attack EVs. The pokemon in the northeastern area give Speed EVs. The pokemon in the northwestern one give Spdef EVs. You can read the signs and also pick up the berries next to them: they indicate which EVs each zone gives. Talk to the guard to teleport to the second area. The small grass above the small lake is the Defense EV training zone. The area to the southeast to it is the HP EV Zone. Finally, the area to the north of the HP EV zone is the Spatk one, the final one of the place. This is the best area in the entire game by far to try and grind up your pokemon. Getting bad IVs: what can we do? Can we fix them? Quick answer: you can't. If you got bad IVs, you have two choices: you cry and stop hunting, or you overcome it, throw the pokemon into a bin, and move on. Life is not fair, luck is not a controllable factor and you have to continue even if RNG kicks you in the face. I've had a 28+ IV pokemon in everything ruined because its most important stat was 01. It's just a roulette. You can get incredibly unlucky. So, how do we work around this? Well, we examine the pokemon and what it really needs. If we are looking for a pokemon for PVP, it must have the highest IVs it possibly can in all important areas, 99.9% of the time. For example, to PVP with a Gengar, we need it to have a +speed nature and 31 IV in Speed, and 252 speed EVs. Why? Well, because a Gengar with that combination will be the maximum and perfect speed for its speed tier (speed tier = a common speed that some pokemon in PVP might share. Imagine you're facing another Gengar in PVP. Your Gengar has 30 IV in speed, +speed nature, 252 ev in speed and at 100. The enemy Gengar has 31 IV in speed, +speed nature and 252 ev in speed. What will happen? You will ALWAYS lose that fight. Because he is just a single point faster. But a single point in speed can mean everything from losing or winning a PVP game. This is not as present or important as in the other attack stats (though it's still an important factor). Speed IV are the most important IV in the majority of pokemon. This factor is only ignored on extremely slow pokemon that, no matter what you do, they'll be slower than a turtle or my hair growth as I'm balding every single day more than the day before. Some pokemon actually want to be slower: Tanks that use the move Gyro Ball (which powers up the slower you are) want to be super slow to literally oneshot some stuff by surprise. (I mean, most of the time, you won't, but it hurts a LOT.) For PVP, my suggestion is that all important IV are either 20 or above. If you need speed and you run a Speed nature, it must be 31. ALWAYS. The only exception if you need to lower your Speed IV value to use a certain IV like HP Fire at 30 speed IVs. If you use an offensive nature (modest, adamant, etc), you should have the focused stat on atleast 25+ ivs. If you're on a tank, its defenses should all be 20+ together with HP. Then, come the exceptions. There are sweepers who don't care about defenses such as Gengar, Infernape or others, whose defenses are paper frail. Their only interest is to steamroll through you and hit before you do. These pokemon don't care about their bulk: they only need the maximum amount of Attack, Spatk and Speed IVs as much as they can. These have a bit of flexibility when it comes to defensive stats. There are pokemon like Ferrothorn or Steelix who want -speed natures and low speed IVs so as to deal more damage spamming Gyro Ball, whose damage increases the slower you are. For Bosses, my suggestion is that only the most important IVs are either 20 or above too. For example, you don't need to worry about Chansey having a decent Speed IV to outspeed other tanks in PVP as you're just fighting an NPC, or Clefable having a decent Speed tier against another pokemon for the same reason. If you run Tanks in bosses, just worry about having 20+ in each defense and HP, and a decent nature. And that's everything you need for them. For offensive pokemon, it might depend: If you use a Destiny Bond Gengar, you only need a high speed and a good nature. And that's it. You'll only want it to be fast and die in one hit so it is sacrificed and you can freely kill anything the boss might throw at you. It all depends on the pokemon. Check what function each pokemon does and decide if the Defense or the Attack IVs are necessary or not. Chansey does not need Atk, neither does Gengar. Very different pokemon can share similarities when it comes to needing certin IVs or not. For PVE content and story, try to have all important IVs above 15 or 20 with a decent/good/useable nature. The rest of the IVs can be worked around. It's always better to have them as high as possible, though. In my honest opinion: You should only EV train and focus on pokemon that have good natures, decent or good IVs, will be usable for E4, Bosses or sidequests or PVP after the 4th Kanto Badge. However, remember that Pokemon is supposed to play for fun, and you should be playing for fun. You don't have to use Meta Pokemon always, or only PvP viable pokemon and never use anything else. You must use what you love and you have fun with. Otherwise, you'll last two or three days playing this game. Focus on having fun. and enjoying the game. Not all pokemon are bad. That a Gastly is Timid with 20+ IV in everything doesn't make it bad, it's just not usable in PVP. Some pokemon are near perfection, but due to a single point, they can no longer sometimes be used in PVP. However, it doesn't make it become trash for no reason. The pokemon is still godly. You should still train these pokemons and try to sell them. Or maybe make an army of pokemon and have fun and play with whatever you love the most. If you're playing through Story, try to get decent natures in your pokemon. Try to capture good pokemon with good natures, abilities and IVs so that you can either EV train them later on or level them to 100 and use them for any purpose. Bad pokemon are also fun to use. Who would think that a bad pokemon like Furret would end up becoming a godly and essential part of most Boss Teams? Many bad pokemon will surprise you! I hope you have enjoyed this guide. This has taken me many days to write and release, but I hope this reaches to as many people as possible. I am now satisfied with this enough to publish it.
1 point
-
Welcome everyone to the Newbie Walkthrough Guide on How to beat Kanto! This guide will be aimed towards NEWBIE PLAYERS who struggle getting through Kanto and to start building teams, capturing stuff and how to complete the game, enjoy it and unlock extra areas, quests and obtain all optional stuff to make their PRO stay fun and long. This guide can also help out experienced players, but it's not the intention here. I wanted to write a guide for Newbies that includes: What pokemon you should get, why you should get them, what items could you get, what specific strategies you can use (5 Geodudes and 1 Magnemite vs Giovanni, for example), why should you go to this place and not this other one, and more. I will go IN DEPTH to help newbies get through the game and obtain anything that can be helpful for them. This guide will NOT be just a "go to this place, beat Brock using Water types, then go to the east, beat Mt Moon" and so on. It will have detailed info on what pokemon to use, when or not to evolve your pokemon, what stuff you can buy from shops to help you out and will also have links to other forum guides to help out. WELCOME TO POKEMON REVOLUTION ONLINE! If you're reading this guide, it means you've just started playing PRO and you've checked forum guides for help or someone has redirected you from the official discord (WHICH YOU SHOULD JOIN, BECAUSE IT HAS VERY IMPORTANT TOOLS AND HELP AND A SUPPORT CHANNEL TO HELP YOU OUT, A BOT THAT GIVES YOU A LOT OF INFO TO PLAY THE GAME AND ANNOUNCEMENTS FOR THE GAME, AND IF I WRITE THIS IN CAPS IT'S BECAUSE I'M HIGHLIGHTING HOW IMPORTANT IT IS. JOIN IT: https://discord.gg/98pMNxq ) Before you begin, make sure to read PRO's rules: https://pokemonrevolution.net/forum/forum/161-pro-rules/. The most important rules that you need to remember now are: -Do not use an inappropriate username, IN ANY LANGUAGE. -Do not be toxic nor antagonistic towards other users. -Do not troll in any chat. -Speak English in all chats EXCEPT Other chat (it's called like that lol). -Do not use third party software such as keyboard macros or bot programs. And there are more rules you should definitely check out. Please make sure you read ALL rules before you begin playing. For example, don't enter trade chat or participate in trades without reading Trade Rules. These are some of the most important ones you should remember for now. Important tips during your adventure: -Evolving your pokemon will make them require way more experience to level up than their preevolved forms. Some pokemon function differently than their preevolutions. Some change their main attacking side, some go from defensive to offensive. Some pokemon's movesets become really bad upon evolving, some become really good. Check the pokedex data and ask for opinions before you evolve your pokemon. In some extreme cases, people avoid evolving your pokemon until level 90 or above, so that you level your pokemon extremely fast during your adventure, and then you Rare Candy the last levels to 100. However, as a newbie, you will find many situations where you'll have to evolve early to beat a specific fight (for example, evolving Metapod into Butterfree will let you gain access to new moves that can beat Brock. However, you might struggle to level up Butterfree since it requires more experience. Here's a few examples: Clefairy learns incredible moves via level up, but Clefable barely learns anything good. Learn all the important moves before you evolve it. You can unlock a preevolution move tutor in the mid to lategame to not have to worry about evolving too early. Magikarp does not learn any good moves via level up, but its evolution Gyarados learns amazing moves. However, Gyarados is very hard to level up. due to its EXP requirement. Trapinch is a very slow but hard hitting attacker. However, Vibrava becomes much faster but loses attack until it evolves again into Flygon. Dusclops is a very strong tank, but once it evolves, it becomes a way less tanky physical attacker that deals much more damage. -Rare Candies are items you should never waste before levels 90 or above, where the experience to level up is really, REALLY high. Keep them for that time because they are also very valuable to sell. There are other valuable items such as PP Up and PP Max that are really valued for the late stages of the game. If you're not sure if spending an item early in the game is worth it, ask for second opinions. -Don't be afraid to use small healing items during story (Potion, Antidote). However, don't buy them from any shops. They are not worth the investment. A single Escape Rope will teleport you to your last visited pokecenter for 550 pokedollars and will also fully heal your team. Buy a few, spend some training time in any place you'd like and then use an Escape Rope to heal. -While it is true that Story's difficulty is nothing compared to the lategame, try to find good natures, abilities and decent IVs for your pokemon as you progress through it. Many of the pokemon you find can be later recycled to sell them in Trade Chat, use them against Bosses or if lucky enough, even in PvP. -Using pokemon with bad natures, abilities and IVs instead of hunting for better pokemon will just make your life harder. Why should you settle with bad pokemon if it's going to make your Story adventure harder? You might have to spend entire days training a single trash pokemon for a single fight than hunting a new one in just a few minutes that might require just an hour to train from scratch. Never settle for bad pokemon, it will just make you lose time and waste hours on pokemon you will never use again. -Don't be afraid to ask for help, but if you ask for help, make sure to ask multiple people and not just one person. If possible, look for experienced PvE and PvP players. Some PvE players can know PvE strats that PvP players don't know and viceversa. Pokemon such as Wigglytuff have incredible PvE movesets and usages that PvP players don't know about. Some pokemon are only viable in PvP and some are only viable in PvE. Make sure to ask multiple people when you need help. -Join a newbie friendly guild in forums that will help you throughout your adventure. Don't be afraid to ask for help. If someone is not willing to help you, find someone who does. At the same time, don't expect everyone to spoonfeed you throughout every single step in story. You're supposed to grow up and learn by yourself too. Nobody will be your parent here and hold your hand every five minutes. You're not a baby. -Try to not rush through the story just to get to the Lategame or you will burn out and drop the game. There's activities to do throughout the entire game's story that are repeatable content. There's also events. This is an MMORPG you can start and stop and continue whenever you want. Take your time and enjoy things. -Capture all kinds of pokemon and experiment with them. Many pokemon have multiple usable sets, moves, utilities that you can only find out if you try them out. Arbok, for example, is an amazing PvE pokemon for both the Early game and for Bossing. However, it's seen as useless in PvP. Many pokemon that are often ignored by PvP players will help in your PvE adventure. Furthermore, many quests in the game ask you to fill up your Pokedex data to obtain legendary pokemon and complete certain tasks. Let's begin! But, what exactly is PRO? PRO is a Pokemon MMORPG based on the original Pokemon games with new additions (and by new, I mean that there's so much stuff to do you will get lost wandering around. You will play through the four initial regions (Kanto, Johto, Hoenn, and Sinnoh), and then there's dozens of places to explore that are sidequest related or extras, such as Sevii Islands, Eumi Islands, Breezy Waterfalls, Eriyadu, Vulcan Island... you get the point. PRO is a gigantic MMORPG. For now, we will stick to Kanto, since it's what this guide aims at. You just created your account and are ready to go! (if you have not, register your account here: https://pokemonrevolution.net/home ) You will now download the game and create the character you want to play as. (https://pokemonrevolution.net/download ). (and if you're unlucky and your internet goes off while you create your character, you start as a bald guy. Yes. It happened to me.) Choose whichever appearance you want! You'll get a prompt asking you if you're sure about this. You appear somewhere strange... what is this place? Well, your only way is to continue and interact with the pokemon and people you see (wow, a Mew? And some special trainers? What is going on?) Talk to Oak who is blocking your way and talk to the Red NPC that you will see to join a language chat (optionally). Now, go and check the trainer fight that is going on and when the event ends you'll be teleported to Pallet Town. The Beggining: your first steps! When you spawn in, you'll go downstairs in your house and talk to your mother. You'll then leave and try to leave the town but of course, you have no pokemon and that means you can't leave (unless you want to be beaten up by random trainers). You're forced to go to Oak's lab and pick up a pokemon. You can choose between four starters: Bulbasaur, Charmander, Squirtle or Pikachu. You can only choose Pikachu if you first talk to the three other starters in their pokeballs and choose NO. My opinion is: CHOOSE WHICHEVER YOU WANT TO HAVE FUN WITH. You're SUPPOSED TO HAVE FUN IN THIS GAME. However, choosing certain pokemon CAN make the game way harder, but there are ways to solve it. You'll also be able to obtain and hunt all starters way later in the game infinitely, so do not worry! Keep in mind you can hunt ALL starters in the wild in future areas. Do not worry about your choice: it will not have permanent consequences. If you refuse to choose all three starts by checking them and clicking the NO option, you will be able to pick Pikachu. The only benefit you get from picking Pikachu is the access to an extra mini-quest for Ash's hat. That's it. Nothing else. My opinion on each starter: Bulbasaur is, in my opinion, the best starter. However, it has its risks. Pokemon that can defeat Water, Ground and Rock types can be powerleveled easily in this MMORPG (during both Story and the Lategame). Bulbasaur defeats the first and second gym easily (however, Misty's Starmie can surprise you), it resists the third and fourth gyms (it does a decent job as Grass resists Grass and Electric), it is neutral in the fifth gym, but gets completely destroyed in the last three gyms. Bulbasaur is tanky, it learns Leech Seed, Sleep Powder and Poison Powder (which are amazing to capture pokemon early on), Vine Whip is a decent attack and it will get you through the first two gym as if they were nothing. The only bad things he has is his weaknesses (mother of god: flying, fire, ice, psychic, these kinda hurt), he's somewhat slow, but he is pretty tanky and fun to use. He is EXTREMELY easy to powerlevel (to absurd extents where you can level him up 10 to 20 extra levels if needed.) If you want information on natures (which are ESSENTIAL) click here: https://pokemonrevolution.net/forum/topic/152671-natures-abilities-ev-iv-and-stats-for-newbies-the-guide/?tab=comments#comment-840375 We won't talk about EV or IV yet in this topic, but just keep in mind: the higher these orange numbers in your pokemon are (From 1 to 31), the better it will be. It is generally advised to focus on pokemon with 20 or higher IVs in each important stat. Some pokemon require more stats to work than others. For example, Shuckle only requires high SPDEF, DEF and HP. Some pokemon like Gyarados require everything except SPATK. Some only require high HP like Ditto. It's all individual cases! Good natures for Bulbasaur's Story are: Rash, Mild (best, because Bulbasaur's moveset is both mixed: Special and Physical attacks. However, his moveset is better on the physical side), Lonely, Naughty (powers up physical moves more, but does not decrease special moves, which is Adamant's issue, and the opposite happens with a Modest nature). Relaxed and Sassy are acceptable since his speed is slow but his bulk is great, and he becomes tankier, which makes him survive a lot of battles he shouldn't be able to (and it will be easier to powerlevel him), Bold and Calm are also okay, since he becomes tankier, but he loses either physical or special attack. We don't want to lose too much damage either. Bulbasaur's useful moveset. Squirtle is the next option I think of. This is the safest starter and the safest choice. He's also my second favourite starter in Kanto in case you hadn't noticed Bulbasaur's presence above. Squirtle learns not super good moves, but still usable ones: Water Gun at level 7 (destroys Brock completely), Withdraw (to spam defense increases versus brock and other stuff), Bubble (why does he learn Water Gun at level 7 but Bubble at level 13? Questions science can't answer) and Bite at 16. His moves are... just okay. Nothing special, sadly. He's tanky, he destroys Brock, helps versus Misty since he resists Water but completely drowns in the third and fourth gym, which are his weaknesses. He does good in the seventh gym but is neutral on the others. He can also learn Water Type moves so you can travel around like Surf and similar stuff. The best natures for Squirtle are: Bold/Calm (These are the best natures. We want Squirtle to be a tank, his physical damage does not matter, we sometimes use Bite through story to flinch opponents, we don't care about its damage. We want it to be TANKY). Relaxed/Sassy (same reason as above, we sacrifice his slow speed even more to make him tanky and bite opponents harder). Timid/Modest/Quiet (sacrifice speed or physical attack for extra special attack, which will make you hit harder). All remaining natures are either bad or terrible. Squirtle's useful moveset... not so much though. Charmander is... the risky choice. He's the hardest hitting, but he's the hardest to train (BY FAR, BY A LARGE MARGIN, HE IS PAINFUL TO TRAIN), learns decent moves (he learns Dragon Rage at level 16, which steamrolls through the first gyms, but he's still godly awful at the beggining. You need to get him support pokemon to get through the first two gyms because he's TERRIBLE there. He will get oneshot by a single attack (unless you manage to overlevel him or get good ivs on him). He's just awful. However, after the first two gyms, he becomes a pokemon beating machine which steamrolls through the entire story (until you reach the Elite Four). If you're willing to go with Charmander, get the Dragon Rage TM in Viridian Maze. It's the only way to make him usable before the third gym. Charmander shares the same exact natures as Pikachu: Lonely/Naughty if you want to increase your physical damage and decrease one of your already pathetic defense stats (which don't matter since you'll get destroyed if you get hit even once), Rash/Mild if you want to increase your special damage output and also decrease one of your defenses, Modest/Adamant if you will go either the special or the physical attacking way, Hasty/Naive if you want to increase your speed to hit first and destroy while decreasing your defense and Jolly/Timid to increase your speed and sacrifice the physical or special attack stat you won't use. Any other natures are COMPLETELY USELESS for the two. Charmander can you learn something THAT IS NOT A FIRE TYPE MOVE, FOR THE LOVE OF GOD Pikachu is the last choice. I don't even know where to start with this guy. He's either the biggest garbage in pokemon starter existence (still better than Chikorita lol), or he's a super fast somewhat usable sweeper/support guy for Kanto story. Pikachu levels up fast, Thundershock is a nice leveling up move and he's extremely easy to powerlevel him when surfing or fighting Flying or Water pokemon while fishing. Quick Attack is also good, it just deals next to no damage. Electro Ball is an extremely overpowered move to level up and defeat slower pokemon, which is nice, but most Water types and Flying types are fast. Electro Ball's power increases if you're way faster than your pokemon but decreases if you're slow. Thunder Wave or Nuzzle are absolutely needed so he can paralyse wild pokemon to capture them or cripple anything annoying you face (*cough cough starmie in the second gym), and the next parts of his moveset are amazing in comparison to the other three (Charmander's and Bulbasaur's are acceptable, but Squirtle's is horrendous). For Pikachu natures, read the paragraph above. After that, he can also learn Double Team (which makes you annoyingly evasive, but if they hit you anyway you're dead because Pikachu's deffenses are GARBAGE. Spark is a good Thundershock upgrade and Nuzzle is the upgraded and OBLIGATORY version of Thunder Wave, since it always paralyses and deals damage. It helps a LOT to capture pokemon and to defeat trainers. Discharge and Thunderbolt are both amazing moves for him, Slam is useless and Wild Charge is a really strong move, but it will take some hp after every use. However, it's worth it. To summarise: His moveset is really good, but any ground type literally laughs at him while he can't do ANYTHING to them. His bulk is horrendous too. If you manage to get a Light Ball from a wild Pikachu in Viridian Forest (which is... dumb, because you could've just not chosen Pikachu as a starter and captured one there), you can equip it to DOUBLE his physical and special attack and make him a monster. He will then be usable. But we will cover this later. It has a 5% chance to hold it in Viridian Forest, so you can try and steal it with the move Thief or by capturing wild Pikachus. Good luck! Helo ma name is Pikachu im a cool mascot! I'M ALSO USELESS. Almost. We'll try to make him work, don't worry. We will not worry about their abilities for now. The battle will start once you try to leave the town with your pokemon. Jackson has an annoying Eevee which, if you have horrible luck (and this is likely to happen with Charmander and Pikachu, due to them having lower defensive stats), you'll faint and lose. If you win, you get a free level up which is GREAT for the first two routes. The result of the fight does not matter, the story will continue anyways. The issue is that losing makes you lose a LOT of money and the free level up. From now on, if you're going to 100% lose any fight against a NPC, LOG OUT WHILE IN BATTLE. You'll be teleported to the last visited pokecenter (or your mom's house) AND YOU WILL NOT LOSE ANYTHING. Logging out against a wild pokemon will not teleport you, you will appear in the same place and have completely avoided the fight. Use this to your advantage! So, now we have our starter pokemon! But what the hell are all those numbers? Jesus christ, THERE'S SO MUCH INFORMATION. (Note, this one is one I bought from trade chat, that is why it's level 14). So, let's go slowly one by one! First, we have the name of the pokemon: Bulbasaur. In PRO, you cannot rename your pokemon (for more than obvious reasons, imagine people naming them after racist terms). Afterwards, we directly have the gender of your pokemon. There is no breeding in PRO! Unfortunately (and fortunately), you cannot have 6x31 IV pokemon, which would completely ruin the economy, and you cannot breed easy shinies either. However, gender affects a few things: the ability Cute Charm, the move Attract and certain Pokemon can only evolve towards certain other pokemon if the gender is the right one. Next, we have the region of the pokemon. Big note: THIS IS WHERE THE POKEMON WAS CAUGHT, NOT WHERE THE POKEMON POKEDEX REGION IS! You CAN find other region pokemon in Kanto, and so on in other regions. This is important because if you are traded a pokemon from another region, you will be completely unable to use them until you unlock that region. Next to it we have the pokemon's ID. This ID is used by PRO to identify a pokemon. This is often used to be able to find a lost pokemon! To the right we also find an empty box. This empty box is the Held Item! Pokemon can hold items. These items can provide passive or active bonuses to your pokemon. Next we have the ability. We can check the effects of abilities in the pokedex (or in Bulbapedia). Abilities are passive or active bonuses our pokemon can have. MOST abilities are very good or useful in a lot of situations, but there's also really, REALLY bad abilities (Truant, for example). Next is the Nature. Natures grant a 10% boost to one stat and a 10% decrease to another stat. This mechanic is one of the easiest bonuses to farm for and to look for in your pokemon. You'll always prioritise good natures when you hunt for pokemon! We also have the EXP indicator. The Current EXP you have is the EXP you've earned up to that point. To be honest, that stat is pretty useless and pointless, because what we must focus for is in the "Till Next": the EXP we need to reach the next level! We also have the OT indicator. This shows who is the player that originally caught that pokemon. Close to it we also have the pokemon's types. There are 18 types (if we exclude the Shadow Type) a pokemon can have. Each type has their own resistances, weaknesses and immunities. It is important you learn the type chart to take full advantage of your pokemon and to not immediately lose fights you could otherwise win easily! If you ever have doubts on which natures and abilities you should use on your pokemon, you can also use this guide I made! If you want to take some time and read about the basics of pokemon (what do these numbers mean, what's the blue, orange, white number, what's an ability, a nature, and so on), please read this guide. For now, we have nothing else to do in Pallet Town, so we will head onto route 1. We will come back later! Route 1 has the first pokemon of the game. Look behind some of the trees in the route: some of them have hidden items! Ironically, we are only interested in two pokemon: Sentret (Which spawns in the morning and day time but not night time, who are very common and we need to capture one for a mission), and Rattata. We need to ignore Rattatas for now, they do not give us any benefits. I suggest you use the Reborn Bot from Discord (https://discord.com/invite/98pMNxq) to know what pokemon spawn in each area. If you write ^s Route 1 , you'll get a list of all the pokemon that spawn in Route 1, at what time, what method (grass, headbutt, surfing, fishing), rarity (the higher the tier, the rarer they are: tier 1 is the easiest to find, tier 9 is the hardest), their level range, their MS requirement (if it says NO, it means you don't need a membership active in your account to find them, and if they hold any items). My recommendation is that you actually try and hunt all possible pokemon (for fun, enjoy the game! Catch them all! Having different pokemon will help you out in the lategame as some side areas and quests require that you've completed a lot of your Pokedex). Capture some Sentret, Rattata and beat some of the pokemon you find. Try to level up to level 7 or 8, and heal up constantly in Viridian Pokecenter. Grab all berries in the route! As you can see in the picture below, you have some information to see: At the top left you have your Team. Your team is formed by up to 6 pokemon that you can change whenever you want by visiting any Pokecenter (or Daycare, and there are some buildings where you can access a PC). Talk to any PC to change your team composition. At the bottom left you have five tabs: PvP The PvP Tab has the section where you can choose to fight people in Ranked PvP or Unranked PvP. Ranked PvP is the mode where almost everyone participates with competitive PvP Teams. You must follow the https://pokemonrevolution.net/forum/topic/31283-ranked-pvp-rules/ Unranked PvP is the same as Ranked PvP. However, Unranked PvP HAS NO RULES. This is a for fun queue you can use to practice with friends or whoever wants to practice before getting into Ranked PvP. Beware that these two modes require you to have 6 level 100 pokemon. If you want to battle anyone with your low level pokemon, it is indeed possible! There are other ways you can battle anyone, even as soon as you get your initial starter. Backpack This is your classic Pokemon Backpack. There are different sections in your Backpack. The Misc tab is the section where most items go to. They can be really different: Move enhancing items like Gems, Type enhancers (Black Belt, Blackglasses), Plates, PvP items (Choice Items, Assault Vest, etc), Diggable items (Evolution Stones, Fossils). The next section is the Balls bag section (this sounds so wrong lol). Here you can find your desired balls. To your most loved Pokeballs, to the expensive Ultraballs, to Greatballs, Lureballs, Moonballs, Netballs... and so on. This is where all Balls go to. Each ball has different effects when you use them to capture a pokemon. For now, you must only know that Pokeballs are, by far, the best for newbies, the more cost effective, the easiest to pay and obtain and the ones that will help you the most. Use your Balls wisely, don't waste them on something that is not worth it! If you want to read more about each Ball and their individual effects. The next section is the Medicine collection: All healing and consumable items go here. These items can be used on your pokemon to heal them, level them up (Rare Candies) increase their PP (Leppa Berries, Ethers, Elixirs, PP Ups and so on). They're the healing items. You should always try to carry a LOT of berries and pick them all up, because sooner or later they'll be useful. While Leppa Berries may seem incredibly common, they will be extremely useful in some parts of the game (Get ready for Mt Pyre lol). Next we have the TMs/HMs section. Here we have to do some mentions: The TMs work like in the first 4 generations. Once you use it, it is consumed and it will disappear from your bag. You can purchase TMs, find them in the overworld, purchase them from Tutors and so on. They are like in the original games. While you do not have to worry much as you will always be able to buy extra copies of a TM, you have to worry about the fact that they're consumed upon usage. Thus, think really carefully if you want to teach a TM to a pokemon before you use it! The HMs in PRO are infinite AND removable. Thus, you can change HMs anytime, You do not need to worry about going to any tutors anymore! You can just replace your HM move easily. The next section is the Key Items section. This section will have both Key Items (Bicycle, Old Rod, and so on) from the original games, new Key Items and additionally, the Tools you buy from other players or directly from the Coin Shop. For example, the Battering Ram, which will allow you to Headbutt Trees without having a pokemon with Headbutt in your party. The Mounts and cosmetics section is the second to last one. This one will hold all custom items that you can use for better transportation and to dress up properly. The last section is the Eggs section. However, since there's no Eggs section, this feature just doesn't exist. (I wonder why it was never removed). Pokedex The Pokedex displays a lot of information about each individual pokemon: -Information on the Pokemon's Base Stats. This highlights at what is each individual pokemon good at. For example, Gengar is very good at being a fast Special Attacker. Golem is a very slow physical attacker with a high defense stat. In the picture above you can see the ATK, DEF, SPDEF, SPATK, SPDEF, HP base stats of Bulbasaur. These are based on a hidden formula that tells the game how much their stats will normally grow level by level. You can make these strats increase by training them accordingly. Thus, it's up to you what each pokemon becomes! Pokemon like people are naturally at some things and some others they're terrible at. Analyse each pokemon individually! -The Height and Weight of the pokemon. These can be important for sidequests and for specific moves like Low Kick which depend on your Weight. -Their name -Their abilities. Each ability in the game has a different function. Some pokemon share the same ability. Some have unique abilities. Each ability is different and there are only a few that do exactly the same. The abilities in blue are the pokemon's normal abilities. The orange one is their hidden ability. Finding a pokemon with a hidden ability is Rare, compared to its common abilities. -Their level up moveset. Each pokemon learns moves at different levels. Each pokemon learns moves in a different way than others. Some pokemon require tutors for the same moves another pokemon would just learn by level up. -Their spawn locations and where they can be hunted + what methods do you need to use to find them. Note that there are special mechanics such as Dig Spots, Headbutts and Excavations where you can find these pokemon alternatively. -On the left, you have the Owned data (this means you had that pokemon atleast once in your PC OR did a specific quest that gave you that pokemon's data. This is indicated with the Pokeball. The seen data (means you fought against this pokemon once against an NPC or in the wild) Evolved (this means you evolved a specific pokemon into their evolution atleast once in the past). This is indicated by a star. Trainer Card As you can see, your Trainer Card is like your real life ID. It shows your: -Ingame name -Guild -Playtime -Registration date -Total pokemon you have in your boxes -If you have an active or inactive membership -Your Doctor Quest rank -Your Excavation Quest rank -The amount of badges you have -Your cosmetics -Your Pokedollars -Your PvP and PvE coins. Social The Social Tab is where all your friends can be found. Here you also have some Emotes you can use so your character reacts with them, your guild, the members of your guild, your guild management options and your ignore list! Let's begin our adventure! Viridian City Missions, catching useful pokemon and getting to Pewter! Once you reach Viridian City, there are a lot of new tasks to do. Once you've caught the pokemon above, you can show Sentret to the policeman so you get a bit of extra money. After that, go to the southwest of the city. You'll see a bridge there. Cross the bridge and grab the pokeball to obtain a Rare Candy. This item makes your pokemon level up once every time you use it. DO NOT USE IT. KEEP IT IN YOUR BAG. We will use this way later in the game to either become rich or level up your pokemon. Rare Candy here. After that, we have a lot to do: our access to route 2 is blocked until we defeat or lose against Jackson in the Pokemon Academy in Viridian. If you only go with your starter at level 8, you'll get destroyed. We will now check the poketime before we do anything: The poketime is at the top right of your screen, and it also shows the time in real life. Five minutes of poketime equals to one minute in real life, so a minute of poketime equals to twelve seconds in real life. (QUICK MATHS BRO). We COULD capture a Pidgey with both IVS in Atk and Speed higher than 15 to trade it for an Oddish, but it's a complete waste of pokeballs. You need to get lucky, instead of just going straight and capturing one in Viridian Forest. If you want, try your luck and capture a Pidgey with atleast 15 IV in Attack and Speed and give it to Madeline. You can find them in Route 1. I do not recommend this because you can just catch Oddish in Viridian Forest during Night time instead. I recommend Bold, Calm, Modest, Timid, Rash, Mild, Relaxed or Sassy natures for Oddish for story and PVE. If it's day or morning in poketime, we will catch Nidoran Male and Nidoran Female in Route 22. If it's night time, we will catch Poliwag. The best natures for both Nidorans are: Lonely, Naughty, Hasty, Naive. Adamant and Jolly are also usable, but we want Nidoking or Nidoqueen to be able to Surf later on, and they will decrease your spatk a bit. Timid and Modest should be avoided for now. All other natures are less usable. For Poliwag, it depends: If you want Poliwrath, a tanky physical attacker which is also a fighting type (he's terrible, but I love the dude), you need Adamant, Jolly, Relaxed, Sassy, Impish or Careful. If you want to go for Politoed natures: Modest, Timid, Calm or Bold. Route 22 entrance. Keep in mind that, from now on, I do NOT suggest you evolve ANY pokemon unless they're completely useless otherwise (Abra, Magikarp, Beldum) until you have access to TMs or Tutors way later in the game. If you evolve a pokemon, they will need an absurd amount of experience. You could level a Gastly from 50 to 100 in the same time you'd level a Gengar from 90 to 100. The different is absurd. You can powerlevel them faster without evolving them and then evolving them at level 90+. Their rapid growth will compensate their terrible stats. If you want to have fun, however, and you REALLY want that cool sweet Charizard burning everything, then evolve it and have fun. It's just my recommendation. Have fun and try whatever you want! I also would evolve really bad pokemon with bad natures (but why would you train them in the first place when you can hunt better pvpable or super good versions later on?). Route 22. Poliwag, Nidorans here. After you've caught one of each, train them until level 8. Go to Viridian Academy and face Jackson. His Eevee hits really hard and is tanky, so I suggest using Poison Sting with the Nidorans to poison it, Leer to lower its defense and destroy it afterwards, Growl to reduce its attack to pathetic levels, and if you trained your Nidorans enough, you can Double Kick it hard. If you win, you'll be able to go to Route 2. If you lost, you can go and talk to his mother in Pallet Town, and it will unlock the way to Pewter City. If you feel you're still struggling with the Early Game, I suggest you go back to Route 22 and catch a Psyduck, a Slowpoke, a Mankey and multiple Natu with the ability Synchronise. The ability Synchronise makes it so that, once you place the pokemon with this ability in the first slot of your party, 50% of the wild pokemon will share the same nature as your Synchronise pokemon. This can be used early in Kanto to hunt for PvP and very good story pokemon early on in your adventure. Here you have all the natures a pokemon can have and why they are good or not: +SPEED: Timid, Naive, Hasty, Jolly. These natures are incredibly good and used for fast attackers or fast support pokemon. +ATK: Adamant, Lonely, Naughty, Brave. These natures are very good, used for either fast physical, mixed or slow attackers. +SPATK: Quiet, Rash, Mild, Modest. These natures are also very good, used for special, mixed, fast or slow attackers. +DEF: Bold, Impish, Relaxed. These natures are very good, used for defensive pokemon. +SPDEF: Calm, Careful, Sassy. Also very good natures, used for defensive pokemon. NOT GOOD NATURES UNDER ANY CIRCUMSTANCE: Lax, Gentle: these increase a defensive stat and decrease the other one. On an offensive pokemon this is completely useless because it doesn't increase your power output or the damage you deal. On a defensive or support pokemon, they are useless because you just gain defense on one side to lose it on the other. Hardy, Serious, Quirky, Bashul, Docile: these natures do not increase any stats. These bring no bonuses. While they're acceptable for story, why would you settle for this instead of finding a nature that actually boosts a stat? It is important that you try to get decent to good natures for your pokemon. Each pokemon specialises in something different, remember that. Some are physical attackers, some are special attackers, some are support pokemon. Check the base stats of a pokemon to guide yourself on what they are good for. There are only very few exceptions to this rule. Mankey requires Lonely, Naughty, Adamant, Hasty, Naive or Jolly. Slowpoke requires Bold, Relaxed, Calm or Sassy. Psyduck requires Timid, Modest, Naive, Hasty, Rash or Mild. These three are very good examples. Psyduck is a special attacker that is also an utility pokemon. Slowpoke is a tank that uses special attacks and is an utility pokemon. Mankey is a physical fast attacker. Mankey is clearly a physical attacker. Psyduck is a fast special attacker and utility pokemon. Slowpoke is a great tank and slow special attacker. Beware that, even though Slowpoke has a lower SPATK than ATK, when it evolves it gains a ton of SPATK. Let's go back to Viridian School now. School After you've done this, talk to the police woman in Viridian. Tell her you want the Thief mission (after you've completed the Sentret one), to gather Rattata hair. Teach Thief to one of the Nidorans (preferably, the male one), and go to route 1. You need your Nidoran to have NO ITEMS equipped. Use Thief against wild Rattatas. Sometimes, you'll steal a Rattata Hair. You can defeat the Rattatas with Thief, it will always steal the item if they have it, no matter if they are fainted or not by your attack. When you get a Rattata Hair, click on your pokemon on the top left (Where your pokemon list is) and click on the item it is holding. The hair will go into your bag. Then, keep hunting Rattatas until you have stolen three Rattata Hair by using thief on all of them. Bring the Rattata hair to the Officer Jenny in Viridian to get a huge reward. It's time to move onto the forest! Officer Jenny wants to give you work for FREE EASY MONEEEEY Route 2, Viridian Forest, Missions and Pewter City, defeating Brock. Route 2 sadly has nothing of interest for us (for now, it will later on!). We will come back to headbutt some pokemon for a quest in Pewter. You can use this route to train vs Kakuna and Metapod for some really high exp. Catching a Snubbull during night time is optional, he can help you later on in the game. He learns the elemental fangs and has some nice moves. Try to catch it with a Brave, Adamant, Lonely or Naughty natures. All other natures for it are a bit disappointing. Additionally, if you can, you should catch a few Hoppip with the natures Timid, Jolly, Hasty or Naive. This pokemon is an extremely good lategame tool that is used to catch wild pokemon with Stun Spore, Sleep Powder, but is also used to level up other pokemon with Toxic, Leech Seed and Memento, but is also a great boss and NPC debuffer with Flash, Cotton Spore, Worry Seed, Stun Spore, and is also an amazing story pokemon as it has access to physical, special and utility moves with decent stats. We will now go north and enter Viridian Forest. We have some stuff to tackle here: defeat Bug Catcher Gerald for the mission in Viridian. Viridian Exit to Route 2 (finally the old man stopped harassing us.) With this, all Viridian quests will be done. You'll have obtained a good chunk of money which we'll save for the bycicle. In Viridian Forest, we want to hunt a single Budew in the morning and day times (he's a bit hard to find) which we will use for the first and second gyms. In the night time, we'll hunt for an Oddish. We also will hunt a Pikachu (if it was not our starter. Check the first section for Pikachu natures!). We want a Modest, Rash, Mild, Timid, Hasty or Naive Budew. Oddish can also work with these natures, but he can also run Bold and Calm, since its evolution Vileplume can benefit from them. We need the Pikachu for a mission in Pewter City. Note here: if you are bored enough and hunt for Pikachu, with the natures mentioned at the beggining of this guide, there is a small chance that you find a Light Ball in one of the wild Pikachu in Viridian Forest. It is VERY recommended that you equip this item to Pikachu because it will DOUBLE its ATK and SPATK stats in battle. This makes Pikachu an absolute monster in story (whenever he doesn't suck). If you find a Light Ball, be sure to equip it to a good Pikachu you find. Route 2 Bug Trainer Gerald for the quest. He hides, afraid of us T-Posing and ASSERTING DOMINANCE to win against him and get some money. Our other interest place here is the gigantic maze. The maze is found in the top left of the entrance from Route 2 south (so, from Viridian). It's a big tree with a fat hiker on its front. Behind the tree on its left, there's a Rare Candy. We will enter the tree and fight the rocket dude that is inside. Then, we will go to the left and down to teach Headbutt to our Nidoran who we also taught Thief before. This will give us the prize of another mission in Pewter City. After this, we can fight our way until we reach Pewter City, if we have done all previous steps. It's just a long way of being poisoned by trainers and Weedles (these damn Weedles). BIG NOTE HERE: Carry ONE Escape Rope in case you accidentally get lost in the maze. At this stage in the game you don't have access to the TM Flash and it is very easy to get lost inside. I'll leave the map linked if you dare enter it, but you may never escape it. Entrance to the Maze. To the left of where I stand, there's a hidden Rare Candy. Press spacebar when you're looking at it to grab it. We will ignore the Pokestops for now. We cannot use them until we get our 4th badge. Headbutt Tutor to the bottom left. 2000 pokedollars per usage. Where the Headbutt Tutor is there will be a Rocket Grunt you can defeat when you get here for the first time. The chat hides the entrance to the Maze. We found the way to Pewter! Jenny ready to give us SOME MORE MONEEEEY in exchange for... weird tasks. It's time to face Brock. If you chose Pikachu or Charmander, you can investigate the Viridian Maze to its depths to find an abandoned pokemon in a pokeball which contains either a Horsea (nice to have, pretty useful too), Bellsprout (just decent grass pokemon) or Growlithe (amazing pokemon, but terrible for the first two gyms). Otherwise, use any of the mentioned pokemon that we have found in the routes before that can help us: Psyduck, Slowpoke, Poliwag (Water types), Hoppip, Budew, Oddish (Grass types), Mankey (Fighting type), Nidoran Male and Female (while they are Poison type and Poison is weak to Ground, Brock uses NO Ground type attacks. Furthermore, Nidorans learn Double Kick which wrecks Brock). You can also teach the TM for Dragon Rage to Charmander. However, there's an issue: Brock's pokemon, Geodude and Onix, have a chance to have Sturdy as their ability. Dragon Rage deals a fixed amount of damage: it will always lower the opponent's hp by 40. So, no matter if you were level 5 and your opponent was level 100, if they have 40 hp or less and you use Dragon Rage, you'll defeat them. The issue is that Sturdy prevents the opponent from defeating you in a single hit. If you use dragon rage when Geodude or Onix have their hp bar completely full, THEY WILL SURVIVE. And they will destroy you with a Rock Tomb move. If you will use Charmander, first use a pokemon to lower their hp, and then use Dragon Rage to finish them off. Pikachu has no way of doing anything in this fight, don't even bother. The only thing Pikachu can do in this fight is to use Tail Whip to reduce Geodude and Onix's defensive stats. Bulbasaur and Squirtle can spam moves and still win. Use Stun Spore, then Leech Seed, then Synthesis to heal and spam Vine Whip with Bulbasaur. Repeat this strategy against the two. With Squirtle, use Withdraw a few times, heal it up, proceed to spam Water Gun. Level 10 to 12 should be more than enough for this gym. Don't overlevel too much, try it at level 10! Recommended types of attacks you should use for this gym: Water - Water types are extremely effective here. Geodude and Onix (both of Brock's pokemon) are 4 times weak to Water. Rock is weak to Water, so is Ground. Geodude and Onix are double type pokemon, which means they have 2 types, not just one. If a pokemon shares a weakness in both of their types, the damage is quadrupled (4 times the normal damage). Slowpoke, Psyduck, Poliwag and Squirtle will have a really easy time in this gym. Grass - Grass types are extremely effective too. For the same reasons, both Geodude and Onix are very weak to Grass. Grass is very effective against Ground and Rock types. Not only that, but Rock types in generally have pretty bad Special Defense. Grass is mainly a Specially oriented attacking type and also a defensive type at the same type. It completely wrecks Brock. Budew, Oddish, Bulbasaur, Paras and Hoppip can easily beat this gym. Keep in mind that Paras is both Grass and Bug. Bug is weak to Rock. Also beware that Hoppip is Grass and Flying. Flying is weak to Rock. Fighting - On a more secondary type, Fighting also beats Rock super effectively, but is neutral against Ground. It's still a very good type to use! For this fight, I can recommend Mankey and both Nidoran. They learn Fighting type attacks that are very useful. Keep in mind Rock types have really big Physical Defensive stats and your attacks might not damage them much! This is the basic type chart. It follows very simple logic. Water beats the Ground because it floods it. Water also breaks Rocks by eroding them. Grass grows from the Ground and breaks its way through, same with Rocks. Very strong fighters can easily break rocks! CONGRATULATIONS, YOU JUST BEAT THE FIRST GYM! Talk to the police woman and receive the last mission reward. We will heal up in Pewter, talk to the policeman for the Headbutt and Pikachu rewards. Then, we will talk to her again and ask her if we can take the Headbutt quest again to hunt for a Silcoon. We will headbutt Viridian City, Viridian Forest, Route 2 and Route 1 trees to find a Silcoon. Hello lady Silcoon! Headbutting in Route 1 To Headbutt, your pokemon needs to have atleast 150 happiness. This action also happens in other moves such as Dig. All pokemon are captured with 70 base happiness. You gain 1 happiness every time you defeat a wild pokemon and 5 happiness every time you level up the pokemon. You lose 5 happiness if your pokemon faints. You can check the happiness of a pokemon by writing /happy and the number of the position of the pokemon in your team in the chat and pressing enter. If your nidoran is in the first place, you'll write: /happy 1. If your Nidoran is in the third place of your team, you'll write /happy 3. (without the ., obviously). We want Nidoran to reach 150 happiness by defeating wild pokemon and leveling it up until it reaches 150 happiness (remember not to forget headbutt or thief or you'll have to pay a lot of money to get them back). Headbutt the trees in the zones indicated above until you find a Silcoon, catch it and go get your reward! You will also need to have defeated the First Badge in Kanto! Write the command as in the picture and press enter. Now, we will backtrack to Pallet Town. Headbutt these trees (there are more in the Town). You can get all three starters to spawn from these trees. This is an amazing way to get the other starters in the game before the second gym badge. You can also get Exeggcute which is a really strong Grass type that also knows Psychic type moves and has a lot of utility moves to help you out through your adventure. We will then try headbutting in route 1 to try and find Pinsir, an incredibly powerful bug type pokemon (in fact, one of the strongest in the game) which will steamroll through anything in the early game. His abilities: Hyper Cutter makes its attack not be lowered. If it has Mold Breaker, it will IGNORE Geodude's and Onix's ability Sturdy, and thus, you will be able to defeat them in a single hit. If it has Moxie, it will gain a physical attack boost every time it defeats a pokemon. This one is the best ability, but the other two are also amazing for him. At level 8 he learns Seismic Toss, which deals the same damage to the opponent as your level. Thus, if he is level 12, he will always deal 12 health to your opponent. At level 15 he learns Revenge, which is a Fighting type move that doubles its damage if you have received a hit before. He has really good moves and learns a lot of useful stuff! You can also try headbutting in Route 22 for evolved pokemon forms, Viridian City and Route 2 for other rare pokemon and some useful support stuff like Venonat, Viridian Forest to get a Heracross (if you find one, it's a gift from the gods), and Pewter City for an early Golbat. Keep in mind that evolved or pokemon that cannot evolve need more experience to level up in order to compensate for their overpowered stats. I was lucky Route 3, Mt Moon and getting to Cerulean City. So here we are in route 3, finally advancing! We finished the long grind versus Brock, we can continue onwards onto our big adventure! If you finished the first two cities missions, of course, and picked up all the stuff I mentioned in this guide (you don't need to capture all the pokemon I mentioned, they're just options, however, completing the Pokedex is essential for many sidequests later in the game). The wild pokemon here are... forgettable, to say the least. We have a certain option which has very big drawbacks: the only interesting pokemon here is Arbok. Of course we can go and catch all other pokemon in the previous routes too for fun (we'll eventually need to fill the entire pokedex for sidequests). The first noticeable spot are the Dig spots just below the route's entrance from Pewter. These Dig spots respawn every 72 hours and you can dig them to obtain prizes such as Nuggets, other monetary items, healing items, fossils, evolution stones... They are absolutely necessary to progress through PRO and maintain your economy to get through the game. I will link my own money guide here so you can understand how important they are. Dig Spots in Kanto are found in Route 3, Mt Moon, Rock Tunnel, Diglett Tunnel and Routes 14 and 15. Talk to the rock in the picture to obtain a stardust, sellable later for some nice money. These dig spots were already dug, and this stone has a Stardust. Remember to use dig on these spots every 3 days! They'll appear as cracks in the ground. Arbok spawns frequently and he knows the elemental fangs, which are extremely overpowered moves combined with an evolved pokemon. The drawback? He's not very strong, but he's still useful. If you want to include him in your team as a last resort, capture him with a Adamant, Naughty or Lonely, Hasty, Naive or Jolly nature. He can hit hard and he can help out with a lot of coverage thanks to these fangs. We can relearn all of these level 1 moves in the move relearner in Cerulean. We want our Arbok to ALWAYS have Intimidate and the moves Ice Fang, Thunder Fang, Fire Fang and Crunch. After fighting our way to the Mt Moon Pokecenter, we can finally find a place to rest! We can now heal up here. Don't forget to interact with the small hole to the left of the Pokecenter! The route was disappointingly empty, in my opinion, but whatever. We can buy a Magikarp from the salesman here! However, each one costs 2.5k... this is not really worth it at all. You're also running on luck to get a good one. We can catch any Magikarp with just one pokeball, which is 200 pokedollars. We can get 12 Magikarps for the same price. However, this one can have a special attack. Show the Magikarp you bought and he will give it a special move. As you can see, my Magikarp is complete garbage, not worth the pokedollars AT ALL, and it got Dragon Rage, which is really nice, but pokemons will now start surviving the 40 fixed damage Dragon Rage deals. We will now enter Mt Moon. There's a lot to investigate, so we will start slowly. Right when we enter, we can find these Dig Spots. We will grab them later on in the game. Above this hiker, there's a pokeball, you can pick it up! We're now going to check out the wild pokemon spawns here, as there are some interesting things to capture. We willl keep the Dig Spawns outside of the question since we can't dig for now. Our interests are: Four Geodudes with Sturdy (yes, FOUR. We will use a cheese strategy with them later in the game). Different pokemon appear in each floor, but we will first focus on Mt Moon 1F, the entrance. One of them should/must be Adamant, Brave or Naughty. Acceptably, we can also get an Impish or Relaxed one. Careful or Sassy can also work. However, we really want an Adamant, Brave or Naughty one. They must all have Sturdy. To know if they have Sturdy, we have to hit them with a really strong attack. If they would normally faint, a text will pop up saying that the pokemon survived with 1 HP thanks to Sturdy. We want four of them with Sturdy and we will include one in our party with the correct nature. We must hit Geodude hard enough to normally faint it in a single hit from full HP. If we see this message and he survives, it means he has Sturdy. We will capture this one. If it's bad, we will keep it in our PC for way later. If it's good, we'll put it in our party. We also really, REALLY want a Paras. This will be our other HM Slave aside from Nidoking and it will aid us in the future. We want a Brave/Quiet Paras, Relaxed, Sassy also work. Modest could be acceptable, but not Adamant. Even if his moveset is mostly physical, it is way easier to train him with special attacks. Effect Spore is its best ability, but it is not obligatory. It sometimes might accidentally poison an enemy we don't want to poison. The move Spore is the only move in the game that will make an opponent fall asleep with 100% accuracy. We will make Paras learn Absorb (to level up fast against rock and ground types such as Geodude or against water types, then Cut, Flash and Spore. When Paras is fully leveled, we will substitute Absorb with False Swipe. We have three more optional pokemon to capture. (we could also capture Zubat, but we'll go back later to these low level zones and capture all the missing pokemon). The first one is Sandshrew. He is a really bulky, tanks physical hits like a truck, and has an insanely varied movepool. He is also a pure ground type which makes him only slightly weak to grass and water. His movepool is absurd for store: Poison Sting as a reliable poison condition to wear down enemies, Rollout as a Rock type attack that increases in power each turn (and since he's so bulky, he will for sure tank some hits), Fury Cutter (this move is absolutely disgusting in the early game. Each time you use it successfully, it doubles in power. It will start oneshotting pokemon after the fourth move.) which also counters grass pokemon, and Magnitude at level 14, which is an absurdly hard hitting Ground type move. We also want him because at level 30 he learns the move Dig for free, which we can show to the police officer in Cerulean to get a reward from a quest. He also learrns Sand Tomb which traps enemies (useful for catching Abra) and deals % damage each turn, Gyro Ball, a Steel type move that hits harder if you're slow (and boy is Sandshrew slow), Swords Dance (I have no idea why does it learn this move, but it makes your attack skyrocket), Sandstorm (DARUDE just kidding, it activates your abilities when used and summons sandstorm) and finally, Earthquake This guy is an absolute UNIT of a pokemon. He's a BOSS. However, he does not have Sturdy (the most overpowered ability in PVE together with Mold Breaker), and his abilities do NOT work UNLESS sand is on the field. If you want to capture one and use one, try the natures Adamant, Brave, Relaxed, Impish, Sassy or Careful. Try not to use Lonely or Naughty because they lower its bulk. We want one that can stay for a long time in the field while hitting hard. The next optional pokemon is an absolute MONSTER and UNIT of a pokemon. TBhimhis pokemon is Onix. His physical defense stat reaches absurd points for this stage in the game, he's a bit fast (surprisingly) and he learns really good utility moves. If you find a level 10 to 12 Onix, it might have Curse, which will boost its physical damage and physical resistance to insane levels. You NEED to capture it with the Sturdy ability. It's the same reasoning as Geodude: having a free turn to do anything you want (unless you get fainted by a mold breaker or multi hit move) is insanely advantageous. At level 16, you learn Stealth Rock, which is an amazing setup move for some gyms and specific battles (Stealth Rocks will destroy the 7th gym and Lance and Lorelei in the Elite Four). He also learns cool support moves: Gyro Ball is nice for Steelix when it evolves (by the way, who is a godly physical tank), Smack Down is cool since it's the only Rock type attack that has 100% accuracy, Dragonbreath is... pathetic, but the paralyse chance is appreciated. Screech is a nice defense lowering move, and he also will learn other powerful moves upon level-up. However, he has a big issue: he does not learn ANY ground type moves until you level him up a lot. Thus, Geodude outclasses him heavily to beat the third gym easily. If we catch an Onix, we want to catch one with the natures Relaxed or Impish. Brave or Adamant are also viable, however, we want him to focus on being an absolute immortal tank. Careful and Sassy are also usable to make it impossible to defeat. All other natures are bad. The last pokemon we will want to capture is the ABSOLUTE DEGENERACY. This pokemon is called Clefairy. It might look like a cute pokemon, but let me just tell you: this guy is a complete degenerate, he's toxic, he's obnoxious to play against and his moveset is so insane that you can never know what he will do. He has so many options it's not even funny. His evolution, Clefable, is a monster in the PvP battles in PRO. He's just that good that, if you happen to come across it, you should ALWAYS try your luck and find it. The natures for this guy are: Bold/Calm (if you get one of these two, you hit the jackpot), Relaxed/Sassy (amazing for story, not usable for PvP), or Modest (if you feel like trolling a bit). The point of this guy is to be an immortal tank that spams Cosmic Power and then has useful support moves (healing ones like Wish) and a few specially oriented attacking moves while equipped with Leftovers. This guy can solo almost everything in any place by just spamming six Cosmic Powers (so both his defenses are maxed out) and he is just unstoppable. His moveset is also insane, try teaching any TM because he learns ALMOST EVERYTHING possible. You can only encounter him in the Night time (20:00 to 04:00 in Poketime). This is one of the pokemon that introduces you to poketime cycles to learn how to hunt a pokemon in specific times. One minute in real life equals to five minutes in poketime. Do the maths yourself to see if you can wait until morning or night or you'd rather wait for another moment! Let's now investigate! Dig spots when we enter Mt Moon. They're to the bottom left of the entrance. (Onix what are you looking at, bruh?) We will go down the next stairs in the picture below. This is an optional route where we can find a Star Piece (VERY IMPORTANT, THIS GIVES US A LOT OF MONEY. PICK IT UP, IT'S IN A POKEBALL), and some Dig Spots at the end. Below these stairs, there's also a pokeball with an Escape Rope. We can pick it up, optionally. The Star Piece will be found here, in front of my character. It's in a pokeball. Below it, there's a pokeball with a Water Gun TM (this would've been useful for the first gym...). Dig spots in the same place as the Star Piece, just go below and grab the ladder. It's just to show them, we can't use them right now. We will now go back to the ladder we climbed down from and go to the northeast. We'll find more Dig Spots and an old man there. We will now find the next ladder. This one is also optional and brings us to another optional zone with Dig Spots which we'll visit way later in the game. Last Dig Spots in Mt Moon. We'll finally reach this point. We can now only continue from here! The next small part is just a straightforward line. Oh, there's a Rocket Grunt! What are they doing here? Let's fight them and move on! We have to beat them all! The way is just straightforward towards the left now. We finally made it here... We have defeated the second Rocket Grunt here after clearing the optional ones. We have this Super Nerd blocking the way. He wants to take the fossils, oh, no! WE NEED TO SAVE LORD HELIX! WE MUST FACE THE WRATH OF THE INFIDEL DOME SEEKERS! In my opinion, both fossils are great, but do not worry. We can get them later on via dig spots infinitely, so do not worry about which one you choose. We can't even revive them until the seventh badge so... who cares? Generally, Omanyte is better than Kabutops due to how broken Shell Smash is, but Kabutops is also really nice. Choose whichever you want! I chose Helix. Be careful, this fight can be hard! Yes, we're out! Finally! Interact with that small hole in the wall and talk to the Cleffa to obtain its dex data. We'll use that hole to travel back later on. We will now get to Cerulean City but we will backtrack to Mt Moon to pick up something pretty special. This is optional. However, this pokemon is one of the best pokemon in PRO, and if we can, we should try our luck and get a good one: Bronzor. If you're willing to spend some time trying to find it and praying to the lord that you get lucky enough, try to hunt it. It appears in Mt. Moon B1F all day long. You can see the floor and area where you are just below the poketime, on the top right of your screen. Bronzor is an amazing tank with an incredible typing which can also have an ability that either removes one weakness entirely (Levitate) or makes him tank fire type hits better (Heatproof). Then there's Heavy Metal, which we won't use at all because it's borderline useless on him. If we capture Bronzor, we want it to have Confuse Ray, Iron Defense (optionally, this will make him undefeatable), an attacking move (anything works, Psywave for example) and Hypnosis. We will use him for multiple fights later on and we will also use him in the lategame as a Boss Screen Setter and as an immortal obnoxious tank. We will later on change his moveset. We want him to have the following natures: Bold, Impish, Relaxed, Calm, Careful or Sassy. If you get one, almost all gyms in Kanto will be way easier to deal with. Second Gym, Misty's Starmie, Grinding and Routes 24-25 Yay, we finally made it to Cerulean! The cave was long and very annoying and filled with a lot of annoying Rock types and Zubats. We now heal up in Cerulean and set out sight onto the second gym. So, how do we tackle it? The second gym is the Water gym. The Rock gym had a glaring weakness to both Water and Grass since almost all the pokemon there also had the Ground type. In this Water gym, we can find different typings: Water is the most common type in all of Pokemon. Water can be followed by almost any type. In Kanto, we already have a lot of combinations: Poliwrath is Water Fighting, Tentacruel is Water Poison, Slowbro Water Psychic... you get the point. Misty can be a problem, and we have two options: we either go to Route 24 and 25 and we grind, or we grind before we go there and we train hard for it. Since Water is only weak to Electric and Grass, our options are severely limited. There's many things we should explore: -Routes 24 and 25 have many cool useful options. Route 24 is used to EV train your pokemon. EV training allows you to train the specific stats of a pokemon to your liking depending on what your pokemon needs and the pokemon you fight. I only recommend that you EV train good pokemon whose IVs are high, have the right natures and abilities and that you'll use throughout the Story and other regions. For now, you should forget about EV training unless you accidentally come across a very good pokemon. Here's the link for the EV stats and total stats explanation. Here's another useful guide for EVs. Route 25 has a few interesting pokemon (Grass types, Bug types, Abra + Kadabra). -Headbutts in past areas and in new areas. Some of the pokemon can be extremely useful for your adventure. -Officer Jenny Quests -New pokemon to be hunted (Route 4 too!) -2nd gym: Misty's Water Type gym. Let's go over the most important things first: -Officer Jenny -Headbutts (quick rundown) -Route 4, Route 24 and Route 25 -Misty's Gym Since at this point we're poor, we might as well make some money! We'll start with Officer Jenny's missions. Jenny has three missions to offer us. -Effort train a pokemon. Following what I said just above, you can complete this mission once you have trained one of the stats of one of your pokemon until 50 EVs into a single stat or above. In your pokemon description, one of its blue numbers must be atleast 50 or above. This can be accomplished by defeating wild pokemon over and over. This mission can be a bit boring and slow. To make it worth it, I suggest you train a Water or Grass type in Mt Moon against Sandshrew, Sandslash, Geodude, Graveler and Onix so you are prepared for Misty. All of these award Defense EV points, useful for some of the pokemon inside! In exchange, she will give you 5000 pokedollars. -Teach a pokemon the move Dig (part 1) and show her 2 Gems (part 2). This quest cannot be done until you've beaten Misty (unless you catch a Sandshrew in Mt Moon and level it up until it learns Dig, but you cannot use this move outside of battle until you've beaten the third badge). After you beat the Cerulean Gym, similar to the original games, you'll be given the TM for Dig. In this game, Dig is used to dig up diggable patches which give you money items, pokeballs, repels, gems and also spawn rare pokemon. You can buy the TM in any Department Store or you can train a Sandshrew or Diglett so they learn the move. She will give you pokedollars once you show her a pokemon that has learned this move AND once you show her a few gems you have obtained through Dig Spots. -Show her a Clefairy with Cute Charm. These can easily be found in Mt Moon. Bring one to her to obtain 7500 pokedollars! Additionally, there is a Moon Stone in the entrance from Route 3, at the top left corner. You can evolve Clefairy, Nidorino or Nidorina very early in PRO if you feel you need a big hitter early in the game! You will be given additional pokedollars if you show the Clefairy to Laila in Vermillion's City Library, after you have beaten the 2nd badge. Going back to Headbutts, we now have access to multiple new things. You should really go back to Pallet Town and Headbutt from there: Pallet Town, Routes 1, 2, 22, 3, and 4. Bug Types can be useful for Misty's gym to defeat her Starmie, but also Exeggcute, which is a Grass type and also a Psychic type, so it resists both of Starmie's Water Pulse and Psyshocks. As a famous philosopher would say: The topic is now eggs. -Route 4, Route 24 and Route 25 Let's explore each area by turns.
1 point
-
Everything listed is up for auction!!!!!!! Time will be 48 hours from first S.o No Insta!!!!!!!!! Accept cash or Coin Capsule=360k IGN: JinksLIT Discord:JinksLIT#6809 Infernape: S.o- 500k Min BId: 200k Talonflame: S.o- 250k Min BId:100k Basculin: S.o- 200k Min BId: 100k Floatzel: S.o- 250k Min BId: 100k Garchomp H.a: S.o- 400k Min BId: 100k Darmanitan: S.o- 300k Min BId: 100k Ampharos: S.o- 300k Min BId: 200k Glalie: S.o- 200k Min BId: 100k Palossand: S.o- 300k Min BId: 100k Pangoro IF: S.o- 300k Min BId: 100k Stoutland: S.o- 300k Min BId: 100k Banette: S.o- 600k Min BId: 150k Stunfisk: S.o- 250k Min BId: 100k
1 point
-
Starting offer 2m Min bid 250k No insta Ends 48h after first bid Payment methods : Poke$, cc (360k) Ign :Henrypart Discord : Henrypart #2866 Starting offer 2m Min bid 250k No insta Ends 48h after first bid Payment methods :Poke$, cc(360k) Ign :Henrypart Discord : Henrypart #2866 Starting offer 1.5m Min bid 250k No insta Ends 48h after first bid Payment methods :Poke$, cc(360k) Ign :Henrypart Discord : Henrypart #2866
1 point
-
Hey just a random suggestion not sure if it's possible for the Devs to do/how much effort is needed for something so small. However I think it would be a cool idea if we could get Pokémon Icons where the Pokéball icons are My bad example :kappa: I think it would be a pretty nice addition especially for random battles since sometimes you might forget what mons the opponent has switched in and out. Once the Pokémon has fainted you can return the Icon to the original fainted pokeball icon or a black outline of the icon (I don't have an example sorry) Anyways that's my suggestion. I know some of the players might disagree but it doesn't hurt making a suggestion. Thank you!1 point
-
Starting: 8M Minimum Raise: 500K Insta: No Ending Point : 3 days from first bid Accepted Payment(s) ; CC(380K), and Cash.
1 point
-
Close pls1 point
-
ACCEPT PAYMENT Pokedollars Coin capsule= 400k Start offer: 2m Min bid: 500k No insta 48hrs after 1st bid
1 point
-
1 point
-
Start Durant1 point
-
1 point
-
Start torkoal and snorlax.1 point
-
Start Chansey.1 point
-
400k for 29/291 point
-
Start darmanitan bro1 point
-
750K1 point
-
13m1 point
-
7.5m1 point
-
700k1 point
-
650K1 point
-
12,5m1 point
-
12m1 point
-
S.O 700k Insta 1M5 Min bid 100k 48 hours after first bid CC:400k RR:700k
1 point
-
@Superdistro1 You were punished for False Offering. Not only you've retracted your bid but you also never had the means to follow through with it. Please familiarise yourself with the Auction Rules to prevent further infractions in the future. @Zeskyr Since the first offer turned out to be false, the auction hasn't started yet. Apologies for the inconvenience. Good luck.1 point
-
600k1 point
-
WELCOME TO CATTO SHOP Shop rules: All trade rules must be followed, fake offering will be reported. Price are not negotiable. __________ Payment methods: Pokedollars. Coin Capsule. (380k) IV Re-roll Ticket. (700k) N Re-roll Ticket. (350k) __________ Contacts: IGN: Lamdoan94 Discord: L.A.M.B#0953 FULLY TRAINED: UNTRAINED: [EMPTY} SOLD: THANK YOU FOR SHOPPING WITH US :3
1 point
-
ty bros i appreciate a lot1 point
-
1 point
-
Bump1 point
-
0 points
-
0 points
-
I offer 9'800'000 pokedollars.0 points
-
0 points
-
I offer 9'400'000 pokedollars.0 points
-
0 points
-
0 points
-
0 points
-
0 points
-
0 points
-
0 points
-
0 points
-
0 points
-
0 points
-
Im very interested, answer me on discord0 points
-
garchomp def 06 accept 20rc + 200k okay ?0 points

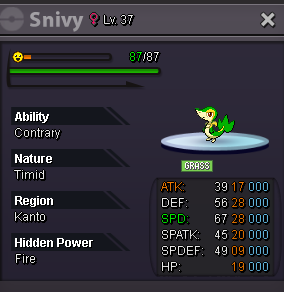
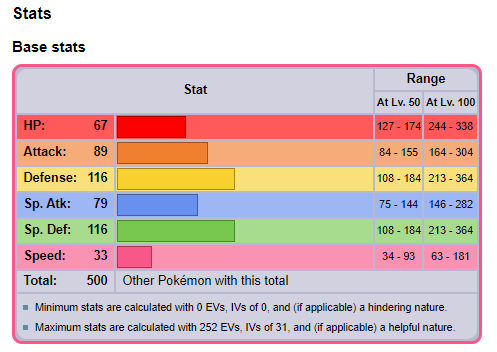
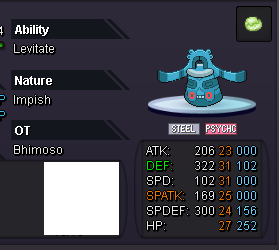
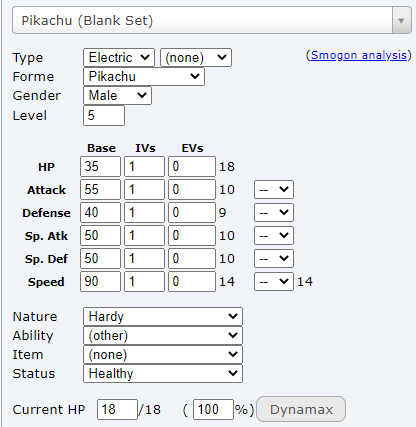
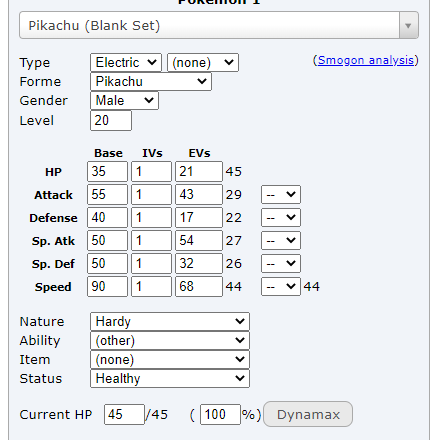
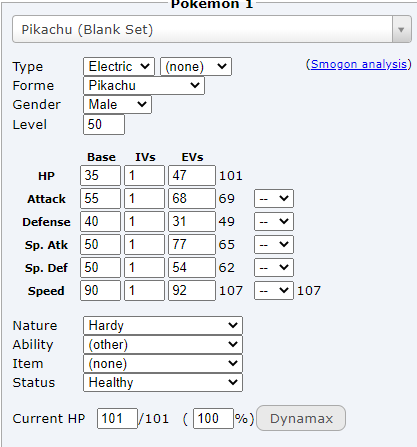
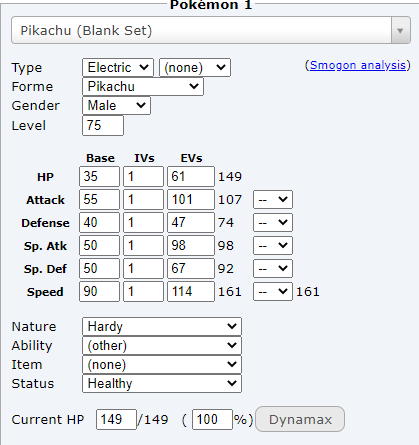

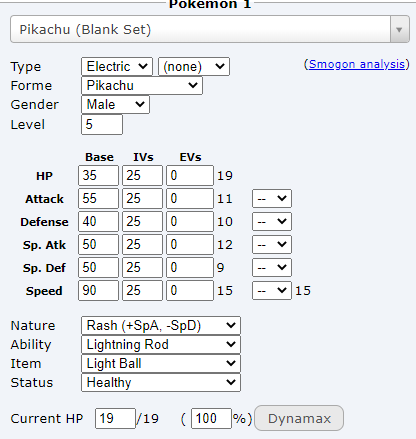
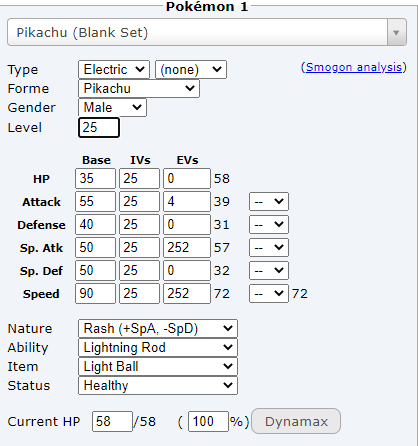
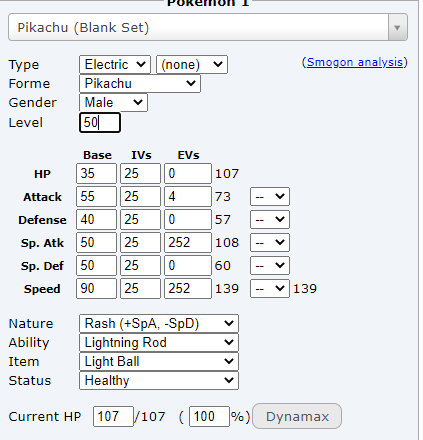
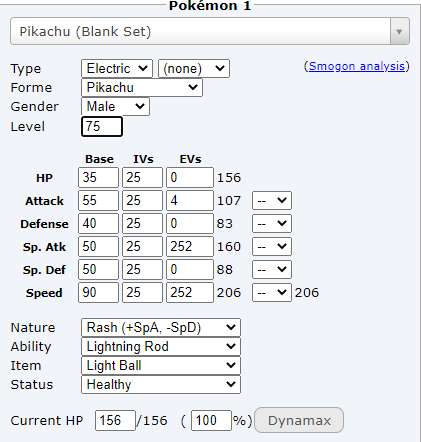
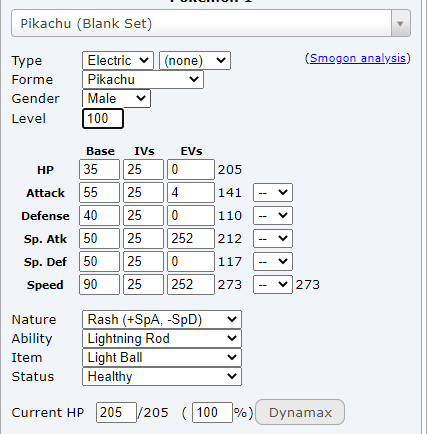

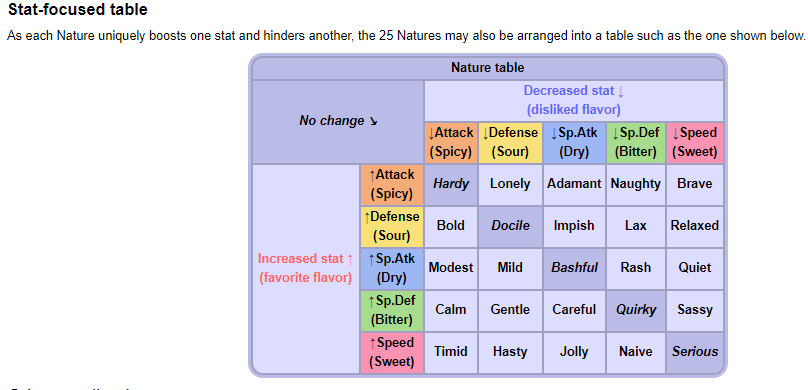
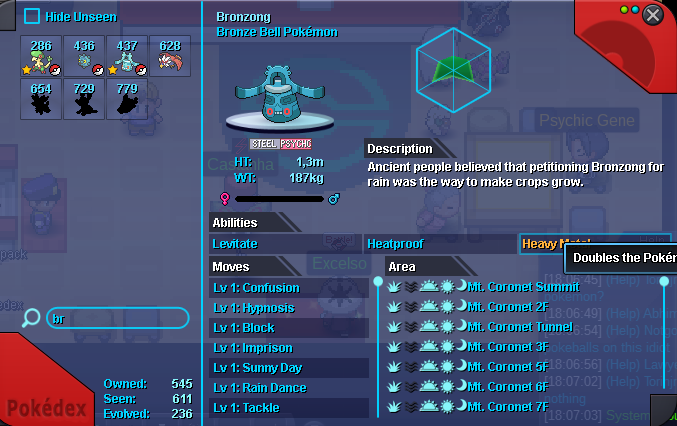
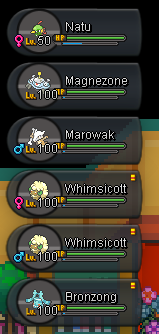
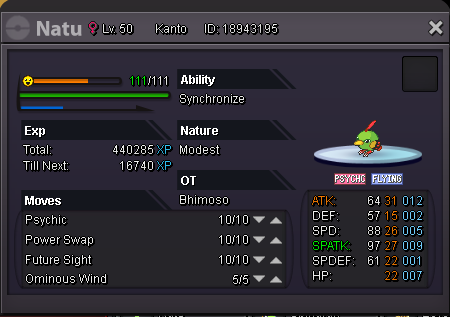
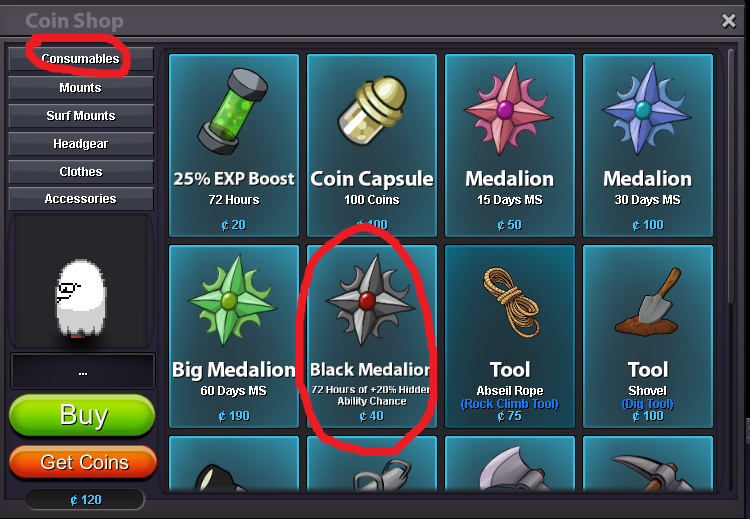


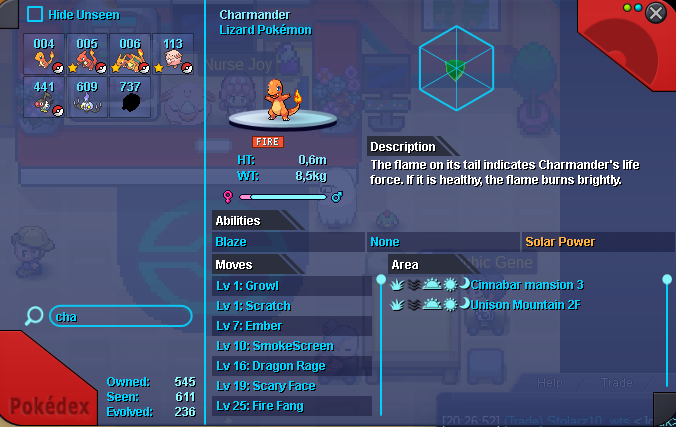
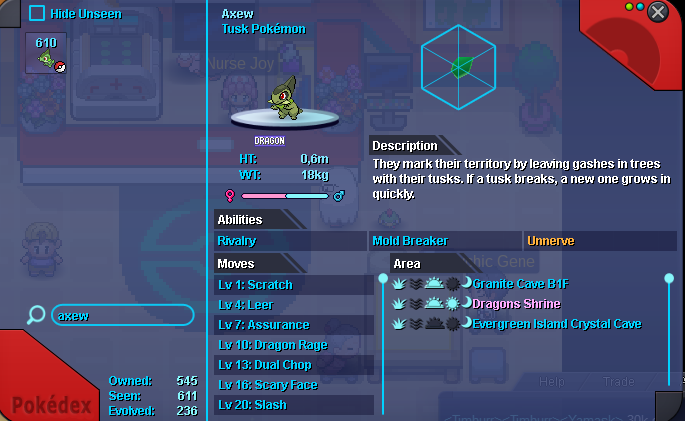
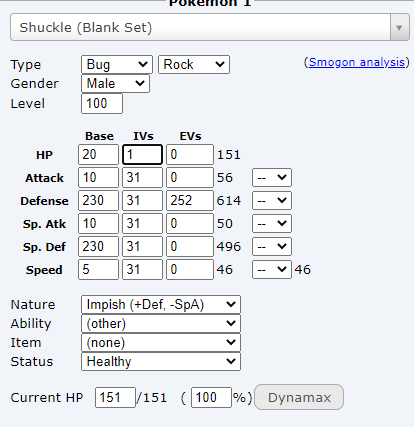

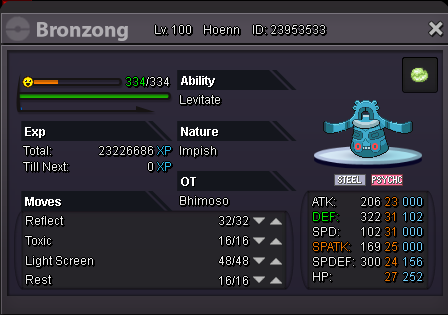
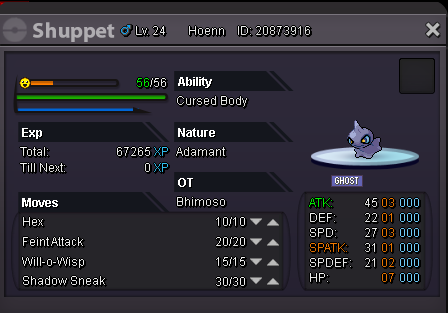

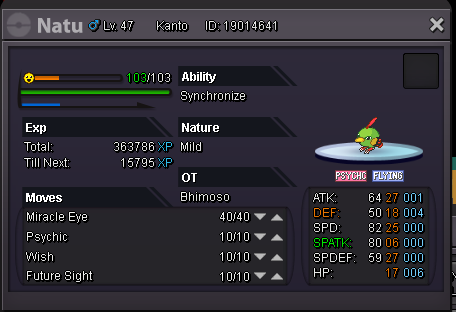

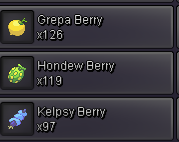


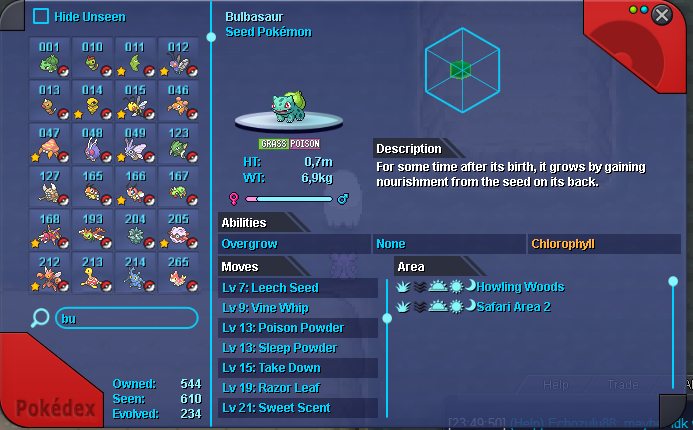


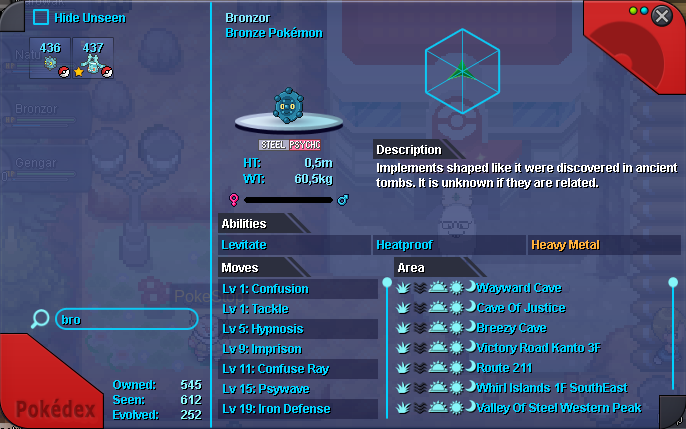


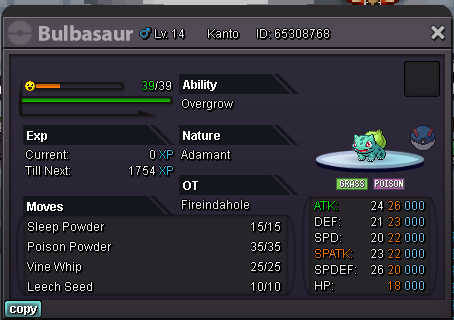
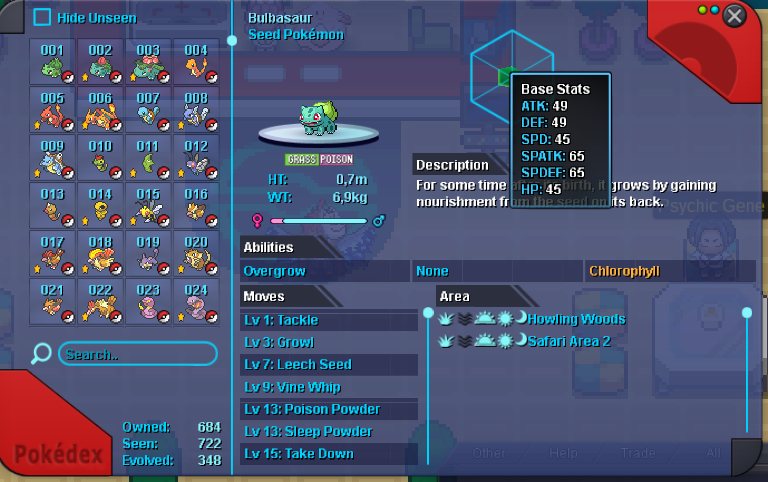


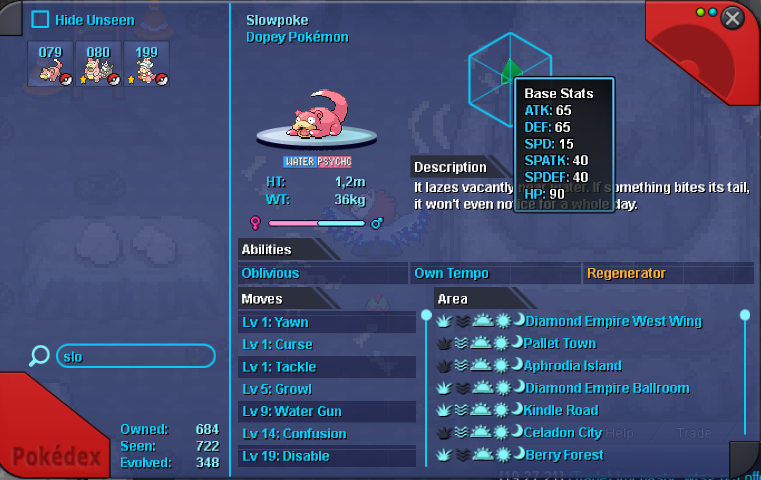


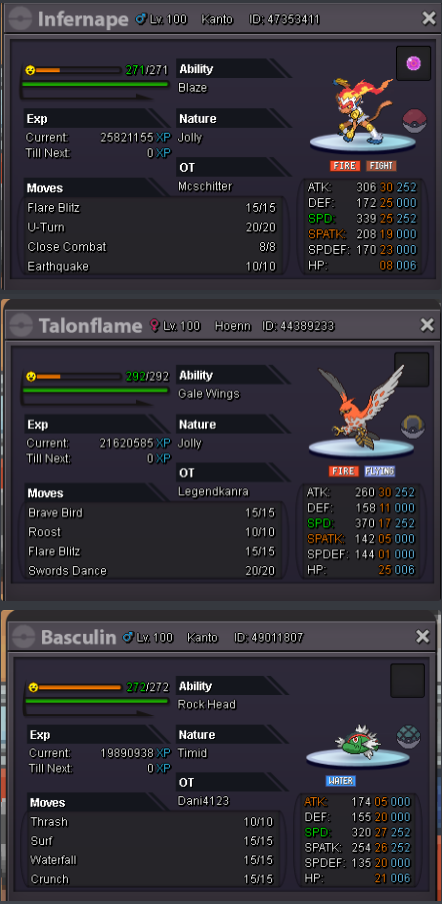
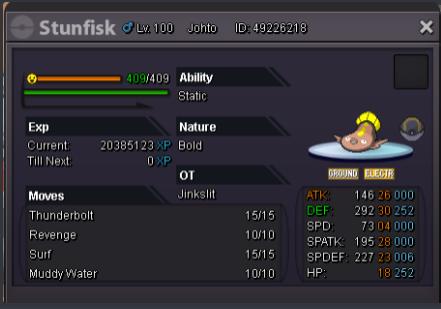
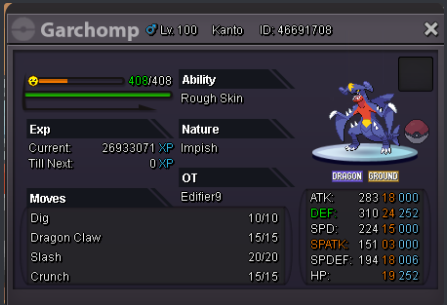
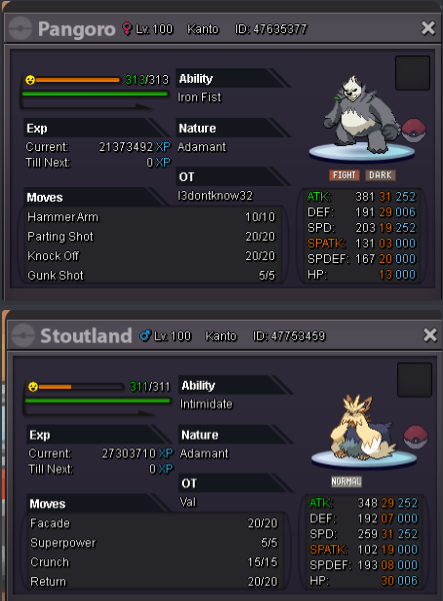

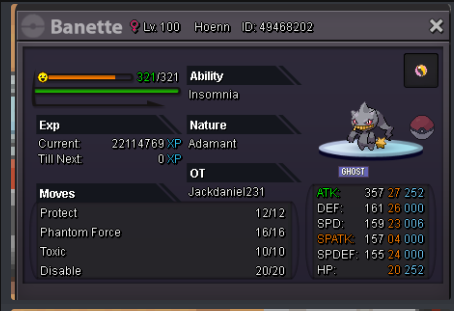
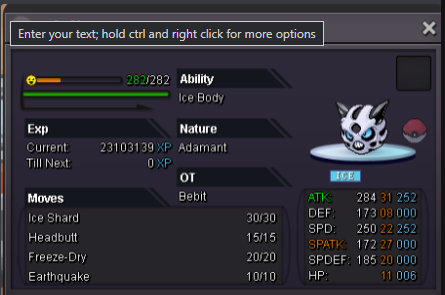


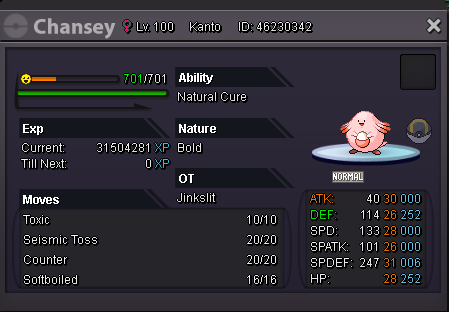
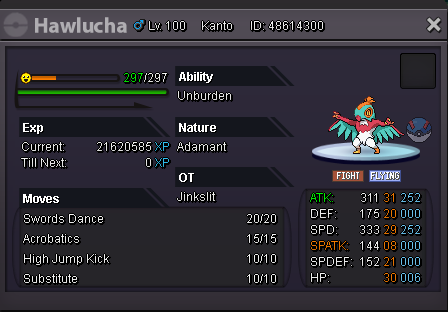
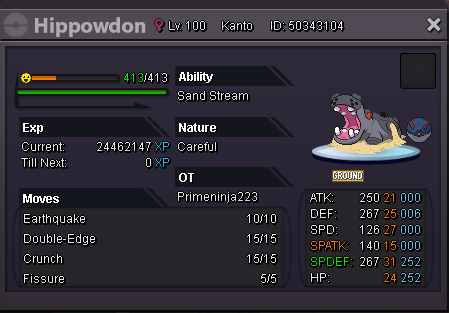


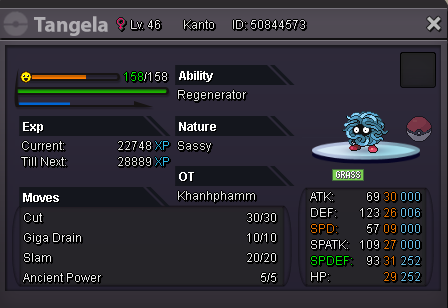
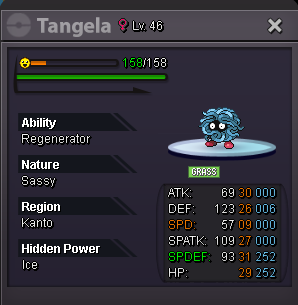

.thumb.jpeg.a555c7b353fd230174b5a4e75cc24e01.jpeg)