Search the Community
Showing results for tags 'finished'.
-
All you need to know about Berries What are Berries? All Berries and their functionalities Mini-quests|Shops Kanto Berry Tower Goldenrod Berry Shop Hoenn Berry Shop Sinnoh Berry Shop Mt. Pyre Leppa Berries Berry Master in Hoenn [*]All Berrytree locations [*]Other ways to obtain Berries Helditems Headbutts [*]The Berry-holding Pokemon in PRO (Cherubi) - Cheri Berries cure paralysis - Chesto Berries cure sleep - Pesha Berries cure poison - Rawst Berries cure burn - Apear Berries cure freeze - Leppa Berries restore 10 Power Points (PP) - Oran Berries restore 10 Hit Points (HP) - Persim Berries cure confusion - Lum Berries cure all Status conditions and confusion - Sitrus Berries restore 25% Hit Points (HP) - Pomeg Berries lower the HP-EVs by 10 and raise the Happiness by 2 - Kelpsy Berries lower the ATK-EVs by 10 and raise the Happiness by 2 - Qualot Berries lower the DEF-EVs by 10 and raise the Happiness by 2 - Hondew Berries lower the SpATK-EVs by 10 and raise the Happiness by 2 - Grepa Berries lower the SpDEF-EVs by 10 and raise the Happiness by 2 - Tamato Berries lower the SPD-EVs by 10 and raise the Happiness by 2 - Occa Berries reduce the incoming super-effective Fire-type damage by 50% - Passho Berries reduce the incoming super-effective Water-type damage by 50% - Wacan Berries reduce the incoming super-effective Electric-type damage by 50% - Rindo Berries reduce the incoming super-effective Grass-type damage by 50% - Yache Berries reduce the incoming super-effective Ice-type damage by 50% - Chople Berries reduce the incoming super-effective Fighting-type damage by 50% - Kebia Berries reduce the incoming super-effective Poison-type damage by 50% - Shuca Berries reduce the incoming super-effective Ground-type damage by 50% - Coba Berries reduce the incoming super-effective Flying-type damage by 50% - Payapa Berries reduce the incoming super-effective Psychic-type damage by 50% - Tanga Berries reduce the incoming super-effective Bug-type damage by 50% - Charti Berries reduce the incoming super-effective Rock-type damage by 50% - Kasib Berries reduce the incoming super-effective Ghost-type damage by 50% - Haban Berries reduce the incoming super-effective Dragon-type damage by 50% - Colbur Berries reduce the incoming super-effective Dark-type damage by 50% - Babiri Berries reduce the incoming super-effective Steel-type damage by 50% - Roseli Berries reduce the incoming super-effective Fairy-type damage by 50% - Chilan Berries reduce the incoming Normal-type damage by 50% - Liechi Berries raise the ATK stat by one stage if your Pokémon is below 25% HP - Ganlon Berries raise the DEF stat by one stage if your Pokémon is below 25% HP - Salac Berries raise the SPD stat by one stage if your Pokémon is below 25% HP - Petaya Berries raise the SpATK stat by one stage if your Pokémon is below 25% HP - Apicot Berries raise the SpDEF stat by one stage if your Pokémon is below 25% HP - Lansat Berries raise the critical hit ratio by two stages if your Pokémon is below 25% HP - Starf Berries raise a random stat by two stages if your Pokémon is below 25% HP Find the Berry Tower located on Route 13 -> [spoiler=Berry Tower location] Once you are inside you can either choose between the Normal- or the Elite-challenge The Normal-challenge is for free and requires a full team of Pokémon below level 50. All Enemy Pokémon are level 30. Simply by talking to the NPC on the right side in the Berry Tower you can start the challenge -> [spoiler=Normal-challenge NPC] After that you will be teleported in a room full of NPC, beat them all and reach the end -> [spoiler=Normal-challenge room] At the end there is a NPC waiting for you who will reward you with a random amount of EV-reducing Berries (5-15) -> [spoiler=Normal-challenge reward] [*]The Elite-challenge costs 2000$ and requires a full team of Pokémon above level 50. All Enemy Pokémon are level 75. Simply by talking to the NPC on the right side in the Berry Tower you can start the challenge -> [spoiler=Elite-challenge NPC] After that you will be teleported in a room full of NPC, beat them all and reach the end -> [spoiler=Elite-challenge room] At the end there is a NPC waiting for you who will reward you with either 5 of each EV-reducing Berry or 25 of one -> [spoiler=Elite-challenge reward] [*]Both challenges have a 24 hours cooldown before you can do them again. Find the Goldenrod Flower Shop located in Goldenrod City right next to the Gym Once you are inside talk to the "Berry Seller" -> [spoiler=Dialogue] Now you have to go to Route 6 and beat the Pumpkin Boss -> Team: Requirements: 1 Level 100 Pokémon Cooldown: 12 days Travel back to the Goldenrod Flower Shop and talk to the Berry Seller -> [spoiler=Dialogue] You now have unlocked the ability to buy EV-reducing Berries in exchange for 3k$ each -> [spoiler=EV-Berry Shop] This is not a quest rather another way to obtain Berries Travel to Route 104 and visit the Route 104 House -> [spoiler=House Location] Talk to Shelbie and she will seel you 5 Berries for 100$, the Berries change weekly but have a one day cooldown -> [spoiler=Dialogue] This is not a quest rather another way to obtain Berries Travel to Route 208 and visit the Route 208 House -> [spoiler=House Location] Talk to Berry Master Vince and he will seel you 5 Berries for 100$, the Berries change weekly but have a one day cooldown -> [spoiler=Dialogue] During the Hoenn-story you have overcome the Mt. Pyre challenge which basically is a series of Trainers that want to battle you and can't heal yourself or refill PP. Mr. Leppa is located in Mt. Pyre 3F shortly before the challenge, he offers you 50 Leppa Berries for 30k$. Given the nature of the challenge I highly suggest buying those Leppa Berries -> [spoiler=Dialogue] This is a one-time-deal, so it has no cooldown. Visit the Berry Master on Route 123, he will give you a few Berries for free every day -> [spoiler=Berry Master's house] Simply talk to him and receive your Berries -> [spoiler=Dialogue] [spoiler=All Kanto Berrytree locations] [spoiler=Route 1 (Oran Berry|Pecha Berry)] 1-3 Oran Berries | 1-3 Pecha Berries [*][spoiler=Route 2 (Sitrus Berry)] 1-3 Sitrus Berries [*][spoiler=Viridian Forest (Oran Berry|Pecha Berry|Leppa Berry|Cheri Berry)] 1-3 Oran Berries | 1-3 Pecha Berries | 1-3 Leppa Berries | 1-3 Cheri Berries [*][spoiler=Viridian Forest Maze (Pomeg Berry|Kelpsy Berry|Qualot Berry|Hondew Berry|Grepa Berry|Tomato Berry)] 3-6 Pomeg Berries | 3-6 Kelpsy Berries | 3-6 Qualot Berries | 3-6 Hondew Berries | 3-6 Grepa Berries | 3-6 Tomato Berries Map: [*][spoiler=Route 3 (Oran Berry|Leppa Berry)] 2-6 Oran Berries | 1-3 Leppa Berries [*][spoiler=Route 4 (Leppa Berry|Lum Berry)] 1-3 Lum Berries | 2-6 Leppa Berries [*][spoiler=Route 6 (Oran Berry|Sitrus Berry)] 2-6 Oran Berries | 2-6 Sitrus Berries [*][spoiler=Route 7 (Sitrus Berry)] 1-3 Sitrus Berries [*][spoiler=Route 8 (Lum Berry|Rawst Berry|Persim Berry|Leppa Berry)] 2-6 Leppa Berries | 1-3 Rawst Berries | 1-3 Persim Berries | 1-3 Lum Berries [*][spoiler=Route 9 (Sitrus Berry|Leppa Berry|Pecha Berry)] 1-3 Sitrus Berries | 1-3 Leppa Berries | 1-3 Pecha Berries | [*][spoiler=Route 11 (Persim Berry|Chesto Berry)] 1-3 Persim Berries | 1-3 Chesto Berries [*][spoiler=Ruute 14 (Lum Berry)] 2-6 Lum Berries [*][spoiler=Route 15 (Pecha Berry|Leppa Berry)] 1-3 Leppa Berries | 1-3 Pecha Berries [*][spoiler=Route 21 (Rawst Berry)] 2-6 Rawst Berries [*][spoiler=Route 25 (Rawst Berry|Aspear Berry)] 1-3 Rawst Berries | 1-3 Aspear Berries [spoiler=All Johto Berrytree locations] [spoiler=Route 29 (Oran Berry)] 1-3 Oran Berries [*][spoiler=Route 30 (Oran Berry|Pecha Berry)] 1-3 Oran Berries | 1-3 Pecha Berries [*][spoiler=Route 31 (Leppa Berry|Persim Berry)] 1-3 Leppa Berries | 1-3 Persim Berries [*][spoiler=Route 32 (Cheri Berry|Chesto Berry|Oran Berry|Lum Berry|Leppa Berry)] 1-3 Cheri Berries | 1-3 Chesto Berries | 1-3 Oran Berries | 1-3 Leppa Berries | 1-3 Lum Berries [*][spoiler=Route 35 (Lum Berry)] 1-3 Lum Berries [*][spoiler=Route 36 (Sitrus Berry|Leppa Berry)] 1-3 Leppa Berries | 1-3 Sitrus Berries [*][spoiler=Route 37 (Cheri Berry|Chesto Berry|Pecha Berry)] 1-3 Chesto Berries | 1-3 Pecha Berries | 1-3 Cheri Berries [*][spoiler=Route 38 (Lum Berry|Oran Berry)] 1-3 Lum Berries | 1-3 Oran Berries [*][spoiler=Route 42 (Sitrus Berry|Lum Berry)] 1-3 Sitrus Berries | 1-3 Lum Berries [*][spoiler=Lake of Rage (Lum Berry)] 12-36 Lum Berries [*][spoiler=Route 44 (Aspear Berry|Lum Berry)] 2-6 Aspear Berries | 1-3 Lum Berries [*][spoiler=Route 45 (Lum Berry)] 1-3 Lum Berries [spoiler=All Hoenn Berrytree locations] [spoiler=Route 102 (Oran Berry|Pecha Berry)] 1-3 Pecha Berries | 1-3 Oran Berries [*][spoiler=Route 103 (Cheri Berry|Leppa Berry|Oran Berry)] 1-3 Cheri Berries | 1-3 Oran Berries | 1-3 Leppa Berries [*][spoiler=Route 104 (Leppa Berry|Cheri Berry|Pecha Berry|Oran Berry)] 1-3 Leppa Berries | 2-6 Cheri Berries | 2-6 Pecha Berries | 3-9 Oran Berries [*][spoiler=Route 110 (Cheri Berry|Leppa Berry)] 2-6 Cheri Berries | 1-3 Leppa Berries [*][spoiler=Route 111 North (Cheri Berry|Pecha Berry|Chesto Berry)] 1-3 Cheri Berries | 1-3 Pecha Berries | 1-3 Chesto Berries [*][spoiler=Route 114 (Sitrus Berry|Oran Berry|Leppa Berry)] 1-3 Sitrus Berries | 1-3 Oran Berries | 1-3 Leppa Berries [*][spoiler=Route 115 (Lum Berry|Persim Berry|Oran Berry|Pecha Berry|Kelpsy Berry|Tomato Berry|Pomeg Berry)] 1-3 Lum Berries | 1-3 Persim Berries | 1-3 Oran Berries | 1-3 Pecha Berries | 2-6 Kelpsy Berries | 2-6 Tomato Berries | 2-6 Pomeg Berries [*][spoiler=Route 116 (Oran Berry|Chesto Berry|Cheri Berry|Sitrus Berry)] 1-3 Oran Berries | 1-3 Chesto Berries | 1-3 Cheri Berries | 1-3 Sitrus Berries [*][spoiler=Route 118 (Sitrus Berry|Pecha Berry|Oran Berry)] 1-3 Sitrus Berries | 1-3 Pecha Berries | 1-3 Oran Berries [*][spoiler=Route 123 (Sitrus Berry|Pecha Berry|Rawst Berry|Leppa Berry)] 3-9 Sitrus Berries | 1-3 Pecha Berries | 1-3 Rawst Berries | 1-3 Leppa Berries [*][spoiler=Lilycove CIty (Oran Berry|Chesto Berry|Persim Berry|Leppa Berry|Lum Berry|Cheri Berry)] 1-3 Oran Berries | 1-3 Chesto Berries | 1-3 Persim Berries | 1-3 Leppa Berries | 1-3 Lum Berries | 1-3 Cheri Berries [spoiler=All Sinnoh Berrytree locations] [spoiler=Route 205 (Lum Berry|Sitrus Berry)] 1-3 Lum Berries | 1-3 Sitrus Berries [*][spoiler=Route 207 (Oran Berry|Sitrus Berry|Lum Berry|Cheri Berry)] 1-3 Oran Berries | 1-3 Sitrus Berries | 1-3 Lum Berries | 1-3 Cheri Berries [*][spoiler=Route 208 (Rawst Berry|Pecha Berry)] 2-6 Rawst Berries | 1-3 Pecha Berries [*][spoiler=Route 209 (Lum Berry|Leppa Berry|Oran Berry)] 1-3 Oran Berries | 4-12 Lum Berries | 2-6 Leppa Berries [*][spoiler=Route 210 (Leppa Berry|Lum Berry)] 2-6 Leppa Berries | 2-6 Lum Berries [*][spoiler=Route 210 North (Sitrus Berry|Pecha Berry|Lum Berry)] 2-6 Pecha Berries | 2-6 Sitrus Berries | 1-3 Lum Berries [*][spoiler=Route 211 (Leppa Berry)] 3-12 Leppa Berries [*][spoiler=Route 215 (Oran Berry|Leppa Berry|Pecha Berry|Sitrus Berry)] 1-3 Oran Berries | 1-3 Leppa Berries | 1-3 Pecha Berries | 1-3 Sitrus Berries [*][spoiler=Route 214 (Sitrus Berry|Cheri Berry|Rawst Berry)] 2-6 Sitrus Berries | 1-3 Cheri Berries | 1-3 Rawst Berries [*][spoiler=Route 213 (Pecha Berry|Cheri Berry|Sitrus Berry|Leppa Berry)] 1-3 Pecha Berries | 1-3 Cheri Berries | 1-3 Sitrus Berries | 1-3 Leppa Berries [*][spoiler=Pastoria City (Lum Berry|Leppa Berry)] 2-6 Lum Berries | 2-6 Leppa Berries [*][spoiler=Route 212 North (Qualot Berry|Hondew Berry|Pecha Berry|Oran Berry)] 1-3 Qualot Berries | 1-3 Hondew Berries | 1-3 Oran Berries | 1-3 Pecha Berries [*][spoiler=Route 218 (Cheri Berry|Qualot Berry|Grepa Berry)] 1-3 Cheri Berries | 1-3 Qualot Berries | 1-3 Grepa Berries [*][spoiler=Route 224 (Cheri Berry|Pecha Berry|Grepa Berry|Lum Berry)] 1-3 Cheri Berries | 1-3 Pecha Berries | 1-3 Greppa Berries | 1-3 Lum Berries [*][spoiler=Route 228 (Rawst Berry|Pomeg Berry|Grepa Berry|Sitrus Berry)] 1-3 Rawst Berries | 1-3 Pomeg Berries | [/img] 1-3 Grepa Berries | 1-3 Sitrus Berries [spoiler=You can find all Cherubi Helditems here ->] Cherubi #Map Area Daytime Rarity MS Level Item Amazon Forest Land M/D Tier 1 No 10-14 Hondew Berry Eterna Forest Land M/D/N Tier 1 No 11-14 Shuca Berry Ilex Forest Land M/N Tier 1 No 5-9 Rindo Berry Jagged Pass Land M/D/N Tier 1 No 18-22 Charti Berry Lake Verity Land M/D/N Tier 1 No 2-5 Coba Berry Nap Forest Land M/D/N Tier 1 No 42-45 Grepa Berry Pal Park Land M/D/N Tier 1 No 20-25 Lum Berry Petalburg Woods Land M/D/N Tier 1 No 5-7 Chesto Berry Route 103 Land M/D/N Tier 1 No 2-4 Oran Berry Route 11 Land M/D Tier 1 No 15-18 Chople Berry Route 110 Land M/D/N Tier 1 No 12-15 Aspear Berry Route 112 Land M/D/N Tier 1 No 14-18 Starf Berry Route 115 Land M/D/N Tier 1 No 22-26 Payapa Berry Route 117 Land M/D/N Tier 1 No 13-16 Qualot Berry Route 119A Land M/D/N Tier 1 No 22-28 Petaya Berry Route 119B Land M/D/N Tier 1 No 22-28 Wacan Berry Route 123 Land M/D/N Tier 1 No 29-33 Kelpsy Berry Route 14 Land M/D/N Tier 1 No 26-30 Pomeg Berry Route 16 Land M/D/N Tier 1 No 22-24 Kebia Berry Route 211 Land M/D/N Tier 1 No 13-17 Tamato Berry Route 222 Land M/D/N Tier 1 No 41-45 Lansat Berry Route 224 Land M/D/N Tier 1 No 52-56 Passho Berry Route 228 Land M/D/N Tier 1 No 52-56 Salac Berry Route 230 Land M/D/N Tier 1 No 47-51 Roseli Berry Route 25 Land M/D/N Tier 1 No 12-14 Chilan Berry Route 28 Land M/D Tier 1 No 33-37 Persim Berry Route 3 Land M/D/N Tier 1 No 5-9 Occa Berry Route 30 Land M/D Tier 1 No 3-5 Ganlon Berry Route 33 Land M/D Tier 1 No 7-11 Haban Berry Route 35 Land M/D/N Tier 1 No 10-15 Kasib Berry Route 37 Land M/D/N Tier 1 No 16-20 Rawst Berry Route 38 Land N Tier 1 No 15-17 Leppa Berry Route 39 Land M/D/N Tier 1 No 17-21 Tanga Berry Route 43 Land M/N Tier 1 No 16-20 Sitrus Berry Route 47 Land M/D/N Tier 1 No 30-34 Liechi Berry Route 6 Land D Tier 1 No 13-17 Apicot Berry Route 7 Land D Tier 1 No 16-20 Cheri Berry Route 9 Land M/D/N Tier 1 No 13-16 Yache Berry Trainers Valley Land M/D/N Tier 1 No 45-50 Colbur Berry Valley Windworks Land M/D/N Tier 1 No 11-14 Pecha Berry Viridian Forest Land M/D Tier 1 No 4-8 Babiri Berry Credits: SaradaX (She was a huge help with her previous guide)
-
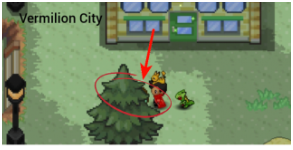
 Psyduck-hat How do I start the quest-line? All Psyduck locations [spoiler=Route 12 (Location1)] [spoiler=Route 20 (Location2)] [spoiler=Celadon CIty (Location3)] [spoiler=Vermilion City(Location4)] Thanks Giorgio25 for the missing Vermilion City picture
-
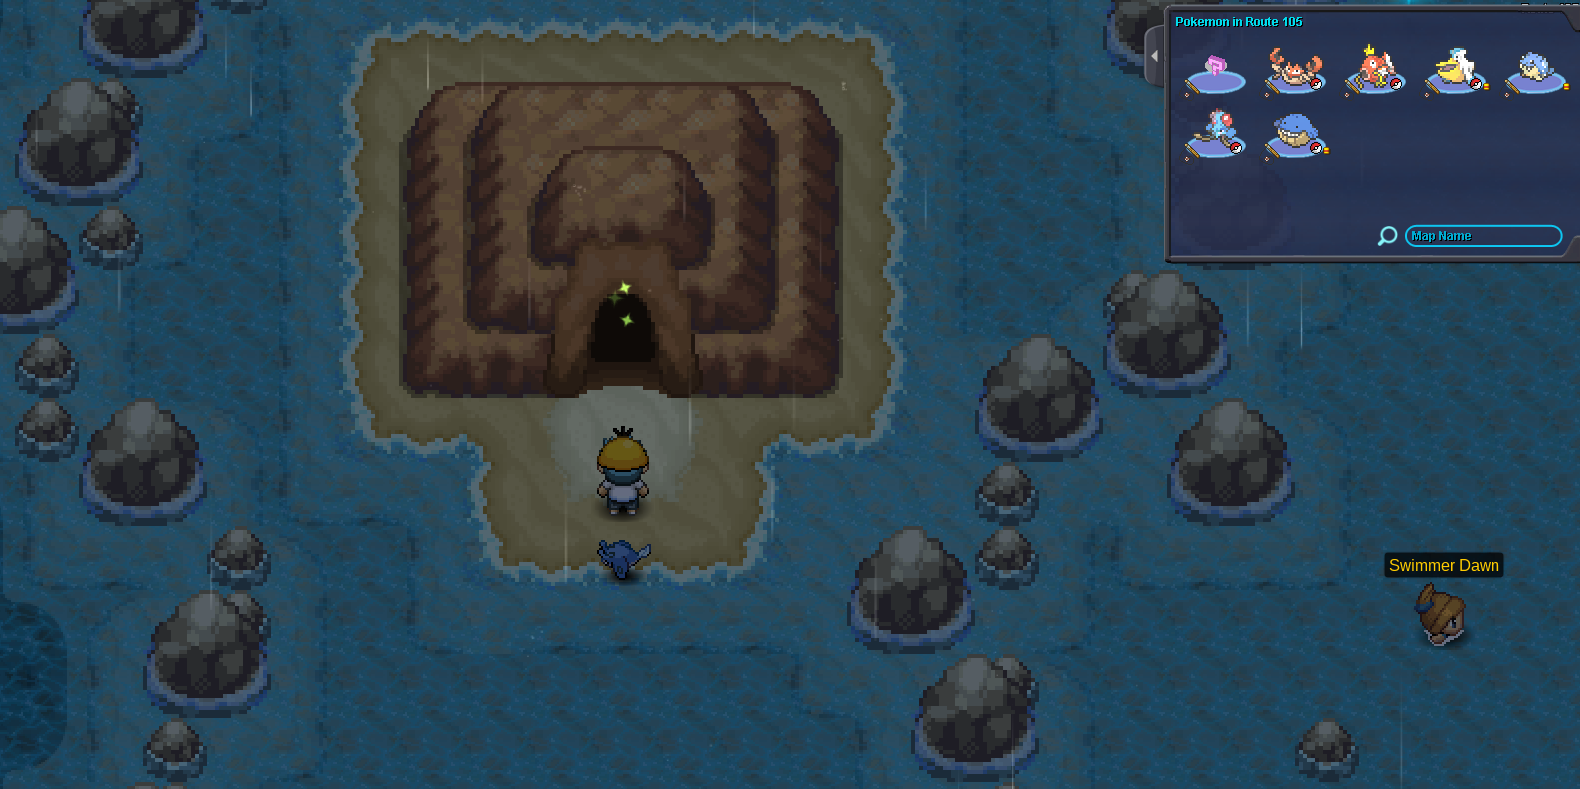
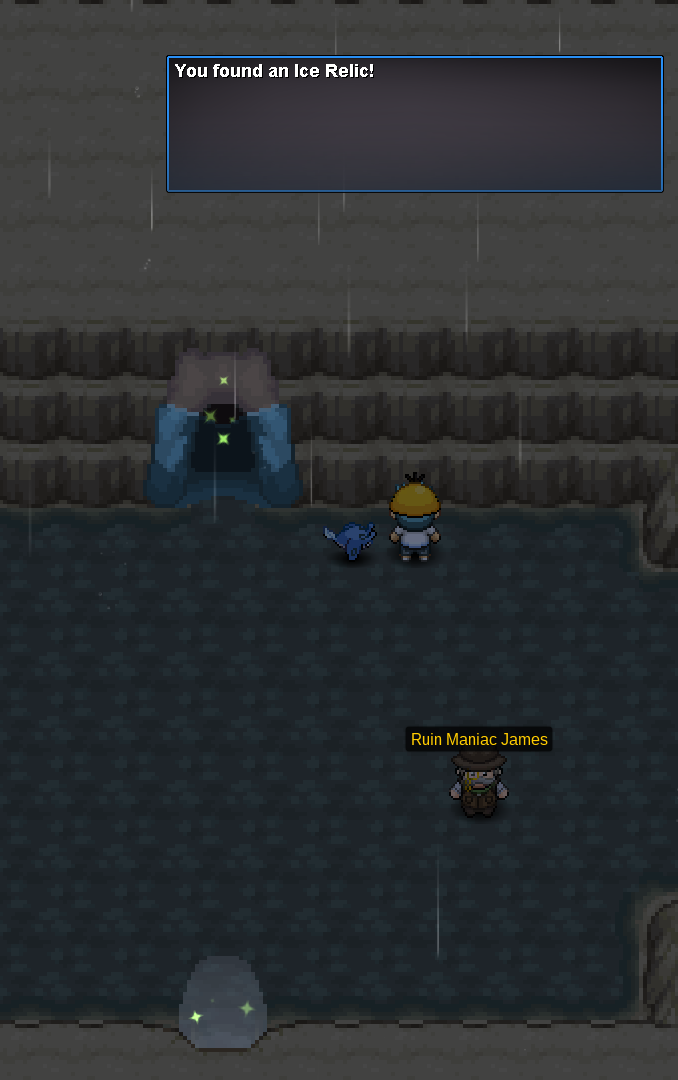
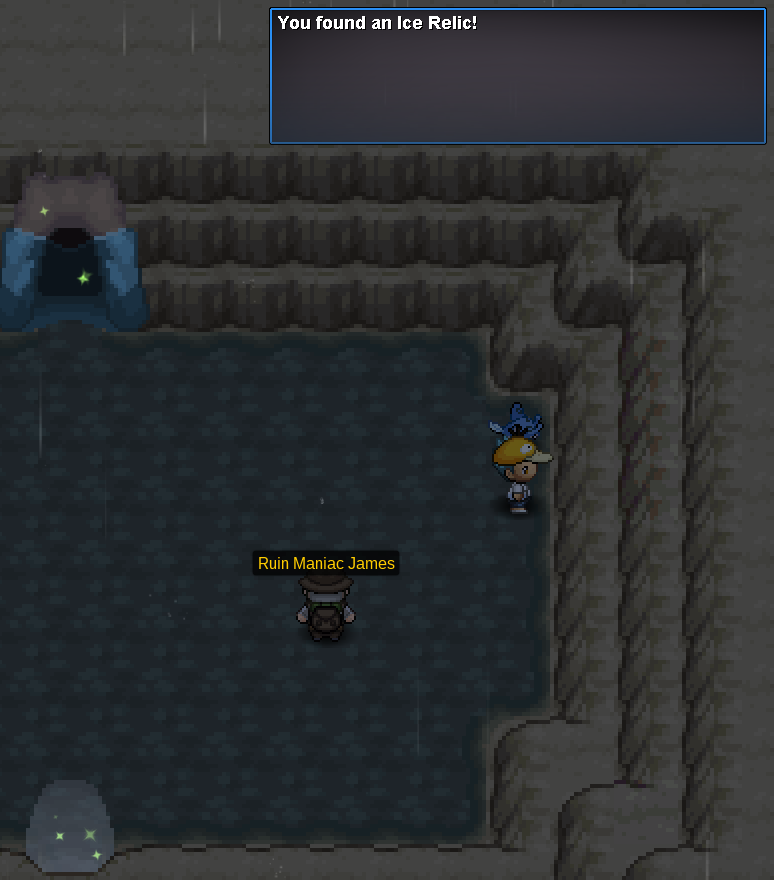
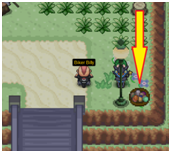
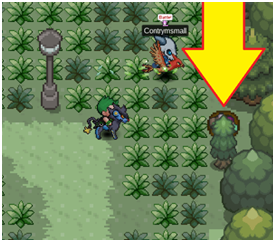
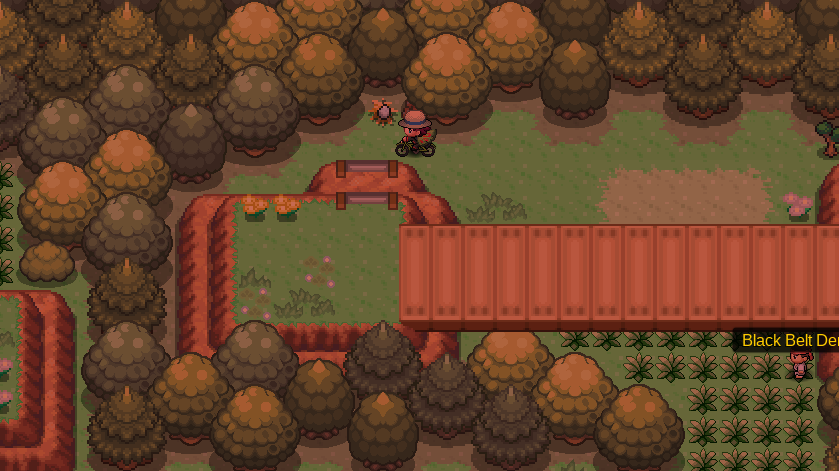
How to get Registeel, Regirock or Regice Requirements Quest-line FAQ Access to Trainers Valley Hoenn Champion 250+ hours seen-data of Registeel, Regirock AND Regice Go to Trainers Valley and travel to the south-side of the map, a new entrance was added there. Go into the Trainers Valley Cave and talk with the NPC "Apo" [spoiler=Dialogue] He is asking for Panpour, Pansear & Pansage with each 90IVs in total Panpour #Map Area Daytime Rarity MS Level Item Safari Johto Wet Zone Land M/D/N Tier 6 No 17-22 Leaf Stone ##### Pansear #Map Area Daytime Rarity MS Level Item Safari Johto Mountain Zone Land M/D/N Tier 6 No 17-21 Fire Stone ##### Pansage #Map Area Daytime Rarity MS Level Item Safari Johto Grass And Swamp Zone Land M/D/N Tier 6 No 17-21 Leppa Berry Now you need to get one of the keys, each has an individual key that you get in their respective caves Registeel - east of Fortree City on Route 120 - Ancient Tomb Regice - Route 105 - Island Cave Regirock - south in Route 111 Desert - Desert Ruins [*]Speak with the NPC "Ruin Maniac <Name>" [spoiler=Images] [*]Find the three Relics (Note that this is just for Registeel, Regirock's and Regice's Relic's are on different location but follow the same principal) [spoiler=Location 1] [spoiler=Location 2] [spoiler=Location 3] [*]After you found all three Relics, talk to the NPC again and you will receive the key [*]Travel back to Trainers Valley [*]Travel through the map and go visit the north-east-side of the map [spoiler=Exact location] [*]Talk to the NPC called Ruins Keeper [*]In the Underground Ruins, you will have to spell either the following: Registeel - S|T|E|E|L Regice - I|C|E Regirock - R|O|C|K [*]The order does not matter: [spoiler=Example for Registeel] [*]After you completed this part of the quest a NPC called Golem Guardian will appear [spoiler=Golem Guardian] [*]show him your key [spoiler=proof that you own the key] [*]get your sync and catch your new friend! Can I get two Regice when I already have one from the Xmas-event? Yes, you can indeed get it twice now. [*]Can I get more than one? No, you can only obtain one Golem. [*]I lost | I dc'd | my computer crashed | PRO Servers went down and I failed to catch my Golem, what can I do now? The Nikola Boss is updated; beat him and get another chance!
- 18 replies
-
- 12
-

-
 Requirement: Hoenn Champion Notice: -If you have already a key you only can trade the Key for the next -For example you have the ``Stone key`` and talk to the guy with the ``Metal key`` you must give him the ``Stone key`` for the ``Metal key``. -You can t see the key in your Backpack. - There can be a bug that he says you only have 2 relic but you know that you collected all 3 of them. if that's the case: Then you must hope for a patch. If you do not want this bug to happen, you should address the guy after each relic. Key Effects: https://pokemonrevolution.net/forum/topic/103273-url Stone Key Location: Route 111 Desert Relic Locations: Metal Key: Location: Route 120 (Ancient Tomb) Relic Locations: Frozen Key: Location: Route 105 (Island cave) Relic Location:
-
Just did a video guide about having Rotom in Honey-trees : Credits: Kaminokage Honey Trees How can I obtain "Honey"? How can I interact with the trees? Where are all Honey trees? How do I get good Pokemon/Chain mechanic explained What are the rewards? Combee #Map Area Daytime Rarity MS Level Item Leev Town Land M/D/N Tier 4 No 20-24 Honey Route 205 Land M/D/N Tier 4 No 11-14 Honey Route 218 Land M/D/N Tier 4 No 28-31 Honey Vespiquen #Map Area Daytime Rarity MS Level Item Route 218 Land M/D/N Tier 6 Yes 28-31 Honey Click here for the gif and then press F5 https://i.imgur.com/jshXQ6I.gif Kanto [spoiler=Viridian Forest]Click here for image and then press F5 [spoiler=Route 12]Click here for image and then press F5 [spoiler=Celadon CIty]Click here for image and then press F5 [spoiler=Route 15]Click here for image and then press F5 [spoiler=Route 25(not working currently)]Click here for image and then press F5 [*]Johto [spoiler=Route 35]Click here for image and then press F5 [spoiler=Route 37]Click here for image and then press F5 [spoiler=Route 43]Click here for image and then press F5 [spoiler=Route 45 (down below)]Click here for image and then press F5 [*]Hoenn [spoiler=Route 104 (right side of Petalburg Woods)]Click here for image and then press F5 [spoiler=Route 116]Click here for image and then press F5 [spoiler=Route 117]Click here for image and then press F5 [spoiler=Route 121]Click here for image and then press F5 [*]Sinnoh [spoiler=Route 205]Click here for image and then press F5 [spoiler=Route 212 North]Click here for image and then press F5 [spoiler=Route 218]Click here for image and then press F5 [spoiler=Route 229]Click here for image and then press F5 Kanto Viridian Forest - Bug Route 12 - Dark Celadon CIty - Grass Route 15 - Normal [*]Johto Route 35 - Normal Route 37 - Bug Route 43 - Grass Route 45 - Dark [*]Hoenn Route 104 - Normal Route 116 - Bug Route 117 - Grass Route 121 - Dark [*]Sinnoh Route 205 - Grass Route 212 North - Dark Route 218 - Normal Route 229 - Bug Results Pokémon - Hoppip Pokémon - Caterpie Pokémon - Teddiursa Pokémon - Ledyba Pokémon - Skitty Pokémon - Sunkern Pokémon - Wurmple Pokémon - Sentret Pokémon - Zigzagoon Pokémon - Combee Pokémon - Pinsir Pokémon - Pansage Pokémon - Foongus Pokémon - Shroomish Pokémon - Heracross (Bug type chain) Pokémon - Aipom Pokémon - Budew Pokémon - Cottonee Pokémon - Venipede Pokémon - Rotom Pokémon - Haunter (@Night, Dark type chain) Pokémon - Shuppet (@Night, Dark type chain) Pokémon - Sableye (@Night, Dark type chain) Pokémon - Buneary (Normal type chain) Pokémon - Munchlax (Normal type chain) Pokémon - Turtwig (Grass type chain) Credits: Kaminokage, Belzebel, Leitah
-
 Hi little boys!, to people who do not know about Pokemon Revolution Online. I want to help you to advance in history, here i send you videos of everything you have to do. I hope i can help you, see you next time! ¡Hola muchachitos!, a las personas que no saben sobre Pokemon Revolution Online les quiero brindar ayuda para que avancen en la historia, aquí les envío vídeos de todo lo que tienen que hacer. Ojalá la puedas ayudar, ¡Hasta la próxima! : 3 Link Kanto Video Walktrough: Part 1: Part 2: Part 3: Part 4: Part 5: Part 6: Part 7: Part 8: Part 9: Courtesy of Navochan17 Cortesía de Navochan17
- 1 reply
-
- 1
-
-
Hello and welcome to this quick and easy guide on how to download and run PRO for windows! If you liked this guide or thought it was helpful, leave a like and show others that would be interested in this. Hopefully by the end of reading all of this I have helped you. ★ [spoiler=First step: Going to the downloads page.] [spoiler=First step: Going to the downloads page.] Head over to the link provided here: https://pokemonrevolution.net/ and then click on "download" (Picture down below). ★ [spoiler=Second step: Finding the right download link for you.] [spoiler=Second step: Finding the right download link for you.] You should be on the "download" portion now. Please select any of the Windows Client options to continue, for the sake of this guide I will be using the win x64 MediaFire option, I recommend you use one of the MediaFire Options. ★ [spoiler=Third step: Downloading the file.] [spoiler=Third step: Downloading the file.] Now you should be at the download website, if you chose the MediaFire option like I suggested, it will look something like the below picture. Now from here all you need to do is click on "Download" *please note to click the "Download" option like the one highlighted in the picture below!* ★ [spoiler=Fourth step: Opening the file.] [spoiler=Fourth step: Opening the file.] Now you will see it downloading, if on Chrome it will be on the bottom left of the browser, if on explorer it will pop up in bottom middle if I recall correctly. Either way once it is done, double click the file. *File should look like below or similar* After double clicking the file, it will look like below, and then double click the "PRO64" or if you did the winx32 option it will say "PRO32". ★ [spoiler=Fifth step: Extracting the file.] [spoiler=Fifth step: Extracting the file.] Now you should have a popup that looks like the below image, and then click on "extract all". And then this will popup, and press "extract" again, also make sure the "Show extracted files when complete" option is checked. ★ [spoiler=Sixth step: Launching PRO.] [spoiler=Sixth step: Launching PRO.] Now it should look like below, and double click the pokeball icon like indicated, this will now launch PRO! *I recommend pinning the Pokeball icon to your taskbar for ease of access instead of having to re open the file every time you would like to play PRO.* And now you are able to launch and play PRO, hope this helped some of you!
-
. Hello and welcome to the guide about PvE Coins. This guide contains the information what PvE Coins are, what they can do and where you can get them. PvE Coins can be obtained by doing some repetitive quests, spread around the whole maps of PRO. They can be used to get rare Mounts, Clothes or Reroll Tickets, that are otherwise obtainable via either PvP Coins or you have no other way of getting that item. You can also get and synchronize rare Pokémon that are only dropped by bosses. Celadon Mart 4 (Kanto) Goldenrod Mart 5 (Johto) Lilycove Department Store 2F (Hoenn) Veilstone Department Store 4F / Battle Tower Entrance in Fight Area (Sinnoh) Saffron City, Silph Co. 1F (Kanto) Goldenrod City (Johto) Mauville City (Hoenn) Battle Tower Entrance in Fight Area (Sinnoh) Once you require PvE Coins, they will be displayed on your Trainer Card. Please keep in mind that you might have to relog in order to have new-required PvE Coins displayed on your Trainer Card. The PvE Coin Master picks 5 Pokemon out of the following 26 Pokemon every week. You will be able to synchronize and catch them. [spoiler=List of all available Pokemon] Alomomola , Bulbasaur , Charmander , Chespin , Chimchar , Dratini , Eevee , Fennekin , Foongus , Froakie , Gible , Goomy , Heracross , Larvitar , Mudkip , Oshawott , Piplup , Porygon , Rotom , Snivy , Solosis , Squirtle , Torchic , Treecko , Turtwig The following consumeable items and Mounts can be bought at the PvE Coin Master: [spoiler=List of all available Items] [spoiler=Available Items] 1 Coin: Focus Sash, White Herb, Power Herb 2 Coins: Air Balloon 8 Coins: Honey [spoiler=Chuck] Machamp, Infernape, Mienshao, Conkeldurr, Poliwrath, Breloom [spoiler=Elm] Corsola, Togekiss, Meganium, Typhlosion, Feraligatr, Tyranitar [spoiler=Erika] Ferrothorn, Volcarona, Ludicolo, Celebi, Torterra, Tangrowth [spoiler=George] Arcanine, Stoutland, Granbull, Houndoom, Manectric, Lucario [spoiler=Koichi] Lucario, Hitmonchan, Hitmontop, Hitmonlee, Gallade, Pangoro [spoiler=Lorelei] Abomasnow, Starmie, Articuno, Weavile, Lapras, Slowbro [spoiler=Naero] Togekiss, Snorlax, Mr. Mime, Blissey, Electivire, Magmortar [spoiler=Oak] Easy Difficulty Rotom, Venusaur, Charizard, Blastoise, Tauros, Dragonite Medium/Hard Difficulty Rotom-Wash, Venusaur, Charizard, Blastoise, Tauros, Dragonite [spoiler=Pumpkin King] Shuckle, Ludicolo, Rattata, Yanmega, Roserade, Bisharp [spoiler=Shamac] Swampert, Swellow, Goodra, Lapras, Cinccino, Latias [spoiler=Tigerous] Salamence, Keldeo, Dragonite, Jirachi, Tyranitar, Conkeldurr Legendary Dog Guardians [spoiler=Entei Guardian] Entei, Infernape, Reshiram, Gliscor, Serperior, Chandelure [spoiler=Raikou Guardian] Zekrom, Excadrill, Raikou, Quagsire, Eelektross, Magnezone [spoiler=Suicune Guardian] Kyurem, Suicune, Avalugg, Walrein, Azumarill, Mamoswine Double Bosses [spoiler=Shary/Shaui] Shary Flareon, Mienshao, Meloetta, Latias, Jolteon, Togekiss Shaui Shaymin-Sky, Conkeldurr, Dragonite, Alakazam, Greninja, Azelf ! Currently Not Available ! Thank you for reading. Please let me know your feedback and things that might have changed or are not in the guide yet. . [spoiler=Thread-Log] 14th of June, 2018 - Creation of the Thread 27th of January, 2019 - Update of the Thread, adding new ways of getting PvE Coins 28th of January, 2019 - Fixed a few minor issues - Colours used: Headline 1 - Headline 2
-
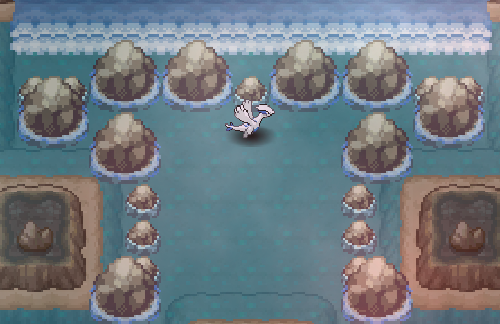
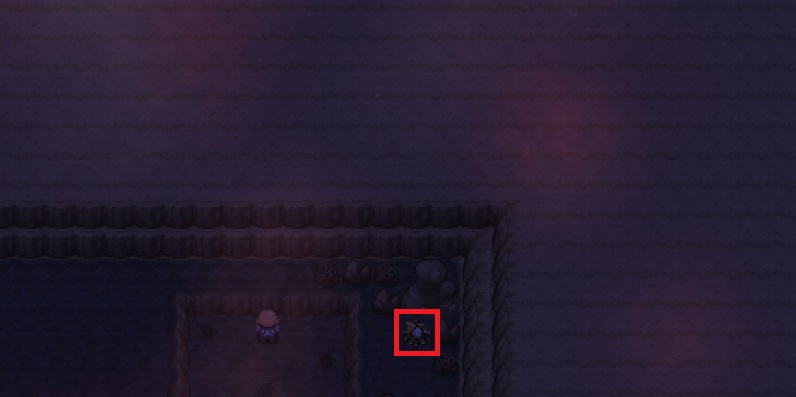
Hey and welcome to the Sinnoh Underground guide! The Sinnoh Underground was introduced very recently and I decided to make a guide about it! This guide will contain tips and tricks, items you need for the daily quests, rewards, hints and so further. General Information The Sinnoh Underground is located in Eterna City, the house next to the Pokémon Center. Once you enter the house you will need to talk to Explorer Stanley. He will ask you if you want to enter the Underground for a fee of 2.000 Pokédollars. After talking to him you will be teleported to a room with four different ladders and you will be given one drill, that you can use only once. This is the main room where you have to catch Pokémon that you need to get hints. There is also a Pokémon remover that can remove one of the caught Pokémon, without leaving the map. In the four different caves there are two NPCs each, who randomly give one of three different types of hints. You either need to give them an item, battle them or catch a Pokémon for them. Each room also has four holes, and you need the drill to unlock one of the holes. You only have one try, so you need the hints to limit the amount of possible holes. What do you need? Different Hints Rewards 1 - 3 PvE Coins 3 - 6 Tiny Mushrooms/3 - 4 Pearls Sail Fossil/Helix Fossil/Claw Fossil/Dome Fossil/Old Amber/Jaw Fossil Additional Tips If you only get hints for the location of the room and not the holes (Tier 2 hints), you have a chance of 25% to find the Treasure Room. If you find any of the Tier 3 hints, you have to find the correct location of the hole and therefor have a chance of 100% to find the Treasure Room. I want to thank Nanoluck for helping me out with this guide. Also thanks to PurpleMauth for his help with screenshots for this guide. Nanoluck and I had to research a lot for this guide and I tried to present it as well as I could. If you have any questions regarding this guide, please let me know. Also please let me know if you find anything that is not already listed in that guide.
- 11 replies
-
- 14
-
-
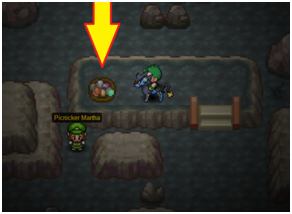
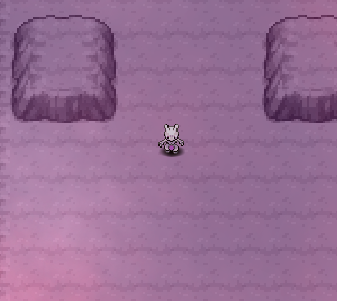
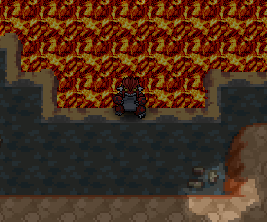
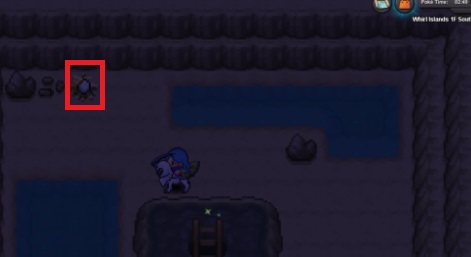
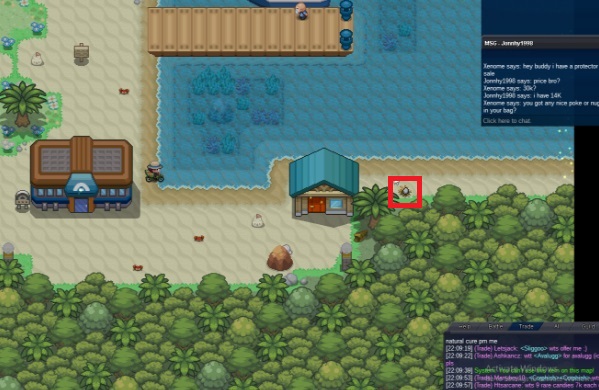
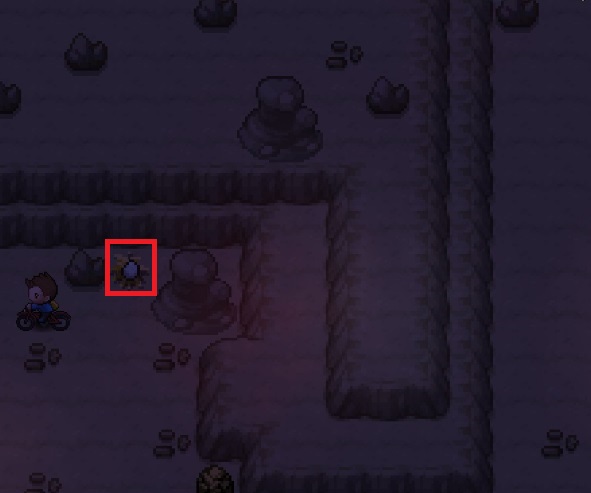
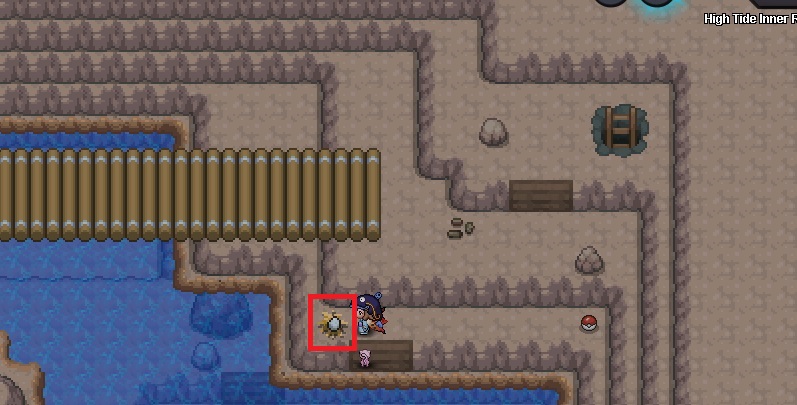
Vulcan Island Part 2 The side-quest Hidden items Spawns Tuber Twins Finish the main quest (Click here) Talk to Ahoks wife [*]Go back to Vulcan Island shore and visit the Vulcan Cove (bring Surf, Rock Smash, Flash and a team out of level 100 with you) [*]Go south and go into the Cave (Vulcan Island Cave B1F] [*]Talk to the Scientist James [*]Find the 4 sample locations in the cave (these rocks spawn randomly, please post yours if yours are different) [spoiler=Location 1(north above James)] [spoiler=Location 2(north above Regi)] [spoiler=Location 3(north above Jim)] [spoiler=Location 4(right next to Jon)] [spoiler=Location 5(south of Evan)] [*]Talk to James again after you found all 4 [*]Go into the Vulcan Cave B2F, little south-east of James [*]Talk to James again [*]Talk to Manaphy and beat it [*]Talk to the NPC down below [*]Go back to Ahoks wife and talk to her :) Enjoy your reward [spoiler=north in Vulcan Cave B1F (Rare Candy)] [spoiler=north-east in Vulcan Cave B1F(some Leftovers)] [spoiler=close to Wyatt(1x PP Max)] [spoiler=south below Dennis(Wailmer)] [spoiler=Vulcan Cove]Vulcan Cove #Pokemon Area Daytime Rarity MS Level Item Staryu Fish (Super Rod) N Tier 7 No 45-52 - Corphish Land D Tier 8 No 45-52 - Krabby Land M/D/N Tier 2 No 45-52 - Marill Land M/D/N Tier 6 No 45-52 - Sandile Land D Tier 8 No 45-52 - Slowpoke Land M/D/N Tier 1 No 45-52 - Wingull Land M/D/N Tier 2 No 45-52 - Marill Surf M/D/N Tier 5 No 45-52 - Slowpoke Surf M/D/N Tier 2 No 45-52 - Tentacruel Surf M/D/N Tier 3 No 45-52 - Seaking Surf/Fish (Good Rod) M/D/N Tier 6 No 45-52 - Goldeen Surf/Fish (Old Rod) M/D/N Tier 2 No 45-52 - Tentacool Surf/Fish (Old Rod) M/D/N Tier 1 No 45-52 - [spoiler=Vulcan Cave B1F]VVulcan Cave B1F #Pokemon Area Daytime Rarity MS Level Item Bagon Land M/D Tier 8 No 45-52 - Deino Land N Tier 8 No 45-52 - Dugtrio Land M/D/N Tier 4 No 45-52 - Machoke Land M/D/N Tier 3 No 45-52 - Machop Land M/D/N Tier 1 No 45-52 - Mawile Land M/D/N Tier 7 No 45-52 - Onix Land M/D/N Tier 2 No 45-52 - Pineco Land M/D/N Tier 8 No 45-52 - Rhydon Land M/N Tier 6 No 45-52 - Rhyhorn Land M/D Tier 5 No 45-52 Protector [spoiler=Vulcan Cave B2F]Vulcan Cave B2F #Pokemon Area Daytime Rarity MS Level Item Cryogonal Land M/D/N Tier 9 No 45-52 Nevermeltice Cubone Land M/D/N Tier 5 No 45-52 - Diglett Land M/D/N Tier 1 No 45-52 - Geodude Land M/D/N Tier 1 No 45-52 Everstone Marowak Land M/D/N Tier 7 No 45-52 - Phanpy Land M/D/N Tier 4 No 45-52 - Roggenrola Land M/D/N Tier 8 No 45-52 Everstone Frillish Surf D Tier 9 No 45-52 - Horsea Surf M/D/N Tier 2 No 45-52 - Lumineon Surf M Tier 8 No 45-52 - Marill Surf M/D/N Tier 6 No 45-52 - Poliwag Surf M/D/N Tier 2 No 45-52 - Poliwhirl Surf M/D/N Tier 5 No 45-52 - Slowpoke Surf M/D/N Tier 1 No 45-52 - Staryu Surf N Tier 7 No 45-52 - Fight against both and win of course to get a reward (6 days cooldown) [*]Big Mushroom [*]Tiny Mushroom
-
Hello and welcome to the Sinnoh Elite Four guide. Hopefully this will help you if you are having a hard time with it. Good luck! -------------------------------------------------- Recommended Pokémon (can use Pokémon from previous regions) Gyarados Gengar Clefable Honorable Mentions How to get mentioned moves Recommended Healing Items Elite Four Aaron - Bug-type Galvantula, Vespiquen, Heracross, Scizor, Yanmega, Drapion You can set up Calm Minds with Clefable on Galvantula, heal up with Potions and Softboiled if necessary. You have to be at a high amount of Hit Points against Scizor, otherwise you won't survive its attack. Bertha - Ground-type Whiscash, Golem, Hippowdon, Excadrill, Gliscor, Rhyperior You can set up Dragon Dances with Gyarados on Whiscash, heal up with Potions if necessary. Dragon Dancing three times should be enough to sweep Bertha's team. Flint - Fire-type Infernape, Ninetales, Houndoom, Rapidash, Darmanitan, Magmortar If your Gyarados has Intimidate as ability, you can set up one Dragon Dance on Infernape and start sweeping, however, be careful as it has Thunder Punch. If it crits you while setting up, revive it to full HP and try again. You can proceed to sweep Flint's team. Lucian - Psychic-type Alakazam, Mr. Mime, Sigilyph, Girafarig, Bronzong, Gallade Set up one Dragon Dance with Gyarados on Alakazam, and start sweeping. Slowbro won't die to any of Gyarados' attack, so let it die against it and use Gengar to kill it with Shadow Ball. Let Gengar die, survive your Gyarados to max HP and kill Gallade with it. Champion Cynthia Togekiss, Milotic, Spitiromb, Lucario, Roserade, Garchomp You can use Gyarados to set up one Dragon Dance against Togekiss and kill it with Ice Fang or Waterfall. Set up one or two more Dragon Dances against Milotic, heal up if necessary. Then start to sweep. Keep Gyarados as healthy as possible as Lucario has Extreme Speed, which is a priority move that Gyarados is not able to outspeed. Hope you were able to beat Sinnoh's E4 with the help of this Guide. If you have any questions feel free to reply to this thread. Special thanks to @ShinyCelebi who helped me with this guide.
-
Lending feature What is the Lending feature? How does it work? FAQ 1. What is the maximum duration that I can borrow a Pokemon? You can choose between 1 minute and 30days 23 hours and 59 minutes. [*]2. Can I use the borrowed Pokemon in PVP? Yes you can use them in PVP and in PVE. [*]3. What happens if the time runs out during a battle? The Pokemon will return to the original owner after the battle. [*]4. I borrowed someone my Pokemon that was holding a Life Orb, but the Life Orb didn't come back to me? This is not possible as the item gets removed before you lend the pokemon, check your Backpack please. [*]5. Will the money return I used during the lending trade? No it will not, be careful regarding scams here. [*]6. Can I trade borrowed Pokemon? No, they are greyed out in chat and you can't even click on them. They are not trad-eable under any circumstances. [*]7. What is the requirement to use this feature? You simply need to be able to use the Trade feature in the first place. (4th Kanto Badge) [*]8. Can I trade legendary Pokemon with this feature? No, legendary Pokemon remain untradeable. They were never tradeable and never will be. [*]9. What happens during Server crashes? The Pokemon returns at the set time, if the server crashes at the exact of its return; then the Pokemon will be in your last box. [*]10. My friend changed the EV's, Moveset and evolved it, what can I do? The Pokemon returns the same way you gave it to him, so everything resets back! [*]11. Can I release the Pokemon that was given to me? No, lent Pokemon can not be released or deleted. [*]12. Is there a region lock for borrowed Pokemon? You are able to trade region-locked pokemon however if you have not finished said region the Pokemon will be locked in your box. [*]13. The user I lend my Pokemon to received a ban, what can I do? You simply have to wait it out, the Pokemon will return on the set date. [*]14. Do lend Pokemon give Dex data? Yes, they do give the owned data, the seen data AND the evolve data if you decide to evolve the Pokemon (note Q.10) [*]15. What if I only have borrowed Pokemon in my party at the time when the timers is over? If your party only consisted of borrowed Pokemon, you will end up with a party without Pokemon. BE CAREFUL HERE. [*]16. What if someone transfers to another server while lending my Pokemon? Server transfers are not possible while lending a Pokemon. [*]17. Can I cancel the lending process early? You can now cancel the process early after finishing the lending process by pressing on "Send back now", shown at the Pokémon Card. Remaining time will also be shown next to it. [*]18. What happens if my Box is full? There are up to 1000 Pokemon shown and can go further than that but you have to release Pokemon to a number below 1000 to able to use your lended Pokemon again. Your Pokemon is not lost.
- 56 replies
-
- 20
-
-
Hello and welcome to the Hoenn Elite Four guide. Hopefully this will help you if you are having a hard time with it. Good luck! -------------------------------------------------- Recommended Pokémon (can use Pokémon from previous regions) Gyarados Gengar Clefable Honorable Mentions How to get mentioned moves Recommended Healing Items Elite Four Sidney - Dark-types Mightyena, Shiftry, Zoroark, Cacturne, Sharpedo, Absol You can set up with Gyarados or Clefable with two Dragon Dances or two Calm Minds, respectively. Heal up if necessary and proceed to sweep. Phoebe - Ghost-types Dusclops, Banette, Sableye, Chandelure, Mismagius, Dusknoir You can set up with Gyarados, after two Dragon Dances you can proceed to sweep Phoebe's team. Heal up if necessary. Use Earthquake against Chandelure, otherwise you risk getting burned. Glacia - Ice-types Abomasnow, Froslass, Beartic, Vanilluxe, Glalie, Walrein Set up with Clefable, after two Calm Minds you can proceed to sweep the whole team. You risk getting frozen by Abomasnow, however. Healing up against it might be necessary. Another option is using Snorlax, its Thick Fat ability weakens Ice-type attacks. Drake - Dragon-type Altaria, Flygon, Kingdra, Haxorus, Dragalge, Salamence You can set up with Gyarados or Clefable, with two Dragon Dances or Calm Minds, respectively. You can sweep from this point forward. Kingdra can be problematic for Gyarados, you might need a Fairy-type to deal with it. Dragalge can be problematic for Clefable if it is faster or Clefable gets crit. Gyarados is able to revenge kill it with Earthquake, however. Champion Steven Skarmory, Claydol, Aggron, Cradily, Armaldo, Metagross Gyarados is able to set up easily on Skarmory, three Dragon Dances are enough. Watch out for Aggron's Sturdy, Cradily's and Armaldo's Ancient Power. If Gyarados is able to kill all 5 previous Pokémon, Metagross should die to a +3 Earthquake. Snorlax is capable of beating Aggron, Cradily and Armaldo, if Gyarados died. Heal up the Gyarados when Snorlax is on the field and try to Intimidate the Metagross to reduce its damage output. Snorlax should always be able to tank at least two hits from it. Hope you were able to beat Hoenn's E4 with the help of this Guide. If you have any questions feel free to reply to this thread. Special thanks to @ShinyCelebi who helped me with this guide.
-
 Updated 20/12/2021 for toxic behaviour It might be best if somebody adds this to their leveling guide to avoid clutter, so I'm putting this in WIP for now. I've been using this method for over a year, but even after so long it doesn't seem as though the method is well-publicized. So, I decided to make a short guide myself. Video: https://www.youtube.com/watch?v=BuijK_ZA1mw tl;dr: Leech Seed, Leech Seed, Leech Seed, Toxic, Toxic, Memento, swap to your low-level pokemon. Memento method All you need: Jumpluff or Whimsicott. You can probably also use Lilligant and Cherrim if you teach them Healing Wish rather than Memento. - Toxic - Leech Seed - Memento/Healing Wish Execution is simple, just note that you can't use any damaging skills if you want the HP to be accurate, so spam Leech Seed or a non-damaging move (e.g. synthesis) until turn 4; Turn 1: Leech Seed deals 2/16 HP. (14/16 remaining) Turn 2: Leech Seed deals 2/16 HP. (12/16 remaining) Turn 3: Leech Seed deals 2/16 HP. (10/16 remaining) Turn 4: Toxic deals 1/16 HP. (9/16 remaining) Leech Seed deals 2/16 HP. (7/16 remaining) Turn 5: Toxic deals 2/16 HP. (5/16 remaining) Leech Seed deals 2/16 HP. (3/16 remaining) Turn 6: Memento faints your Jumpluff. Toxic deals 3/16 HP. (0/16 remaining) At this point, the enemy pokemon will usually have <15 HP remaining because most pokemon won't have HP divisible by 16. Switch in your low-level pokemon. Leech Seed will immediately take the remaining HP, fainting the enemy pokemon before it has a chance to attack. This works because the game currently recognizes the switch following Memento as part of the 'same turn' that Memento was used, instead of starting a new turn. Advantages: - Doesn't involve focus sash, false swipe, or sturdy. - Importantly, doesn't rely on priority moves, making it much easier to train many low-level pokemon. Depending on your EXP buffs and your luck with encounters, it takes less than an hour to get Magikarp from 5 to 95. Disadvantages: - Doesn't work against poison or grass-types, since they'll be immune to Toxic/Leech Seed. - Jumpluff has poor defensive typing/defensive stats and takes a lot of damage from rock/flying/poison, making Cerulean Cave land difficult when compared to water. Lilligant/Cherrim/Whimsicott won't have problems with rock, but Jumpluff is way more accessible to most players. - Your Jumpluff are going to hate you.
 -
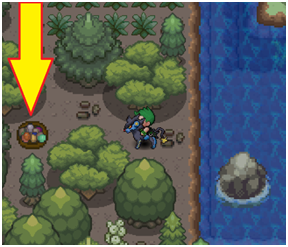
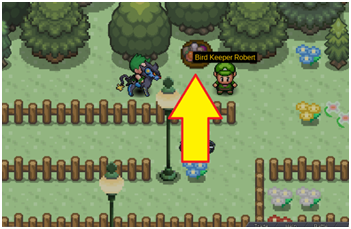
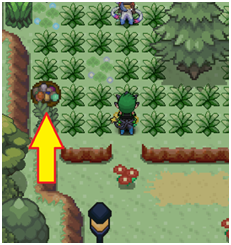
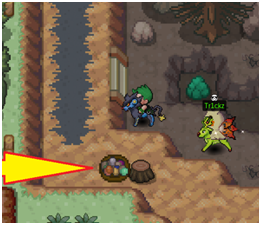
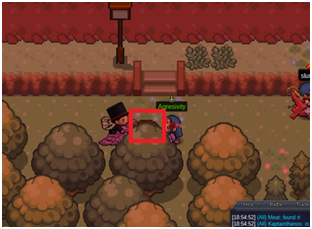
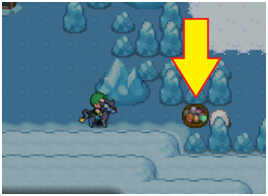
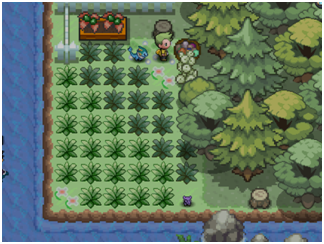
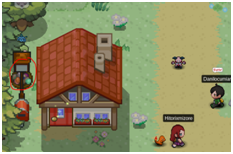
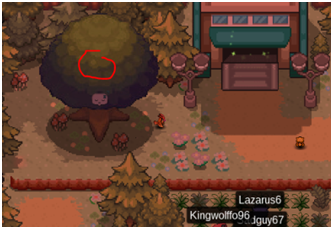
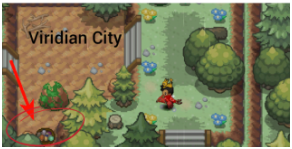
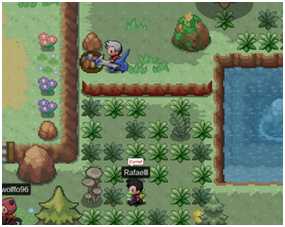
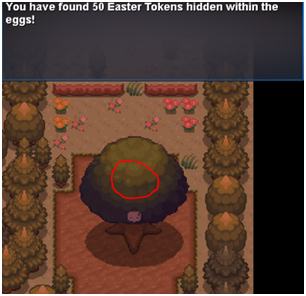
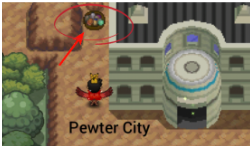
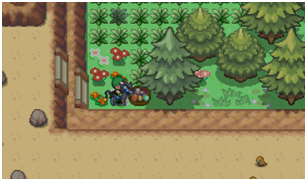
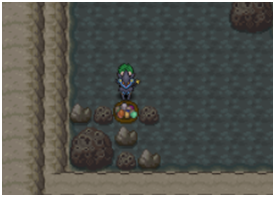
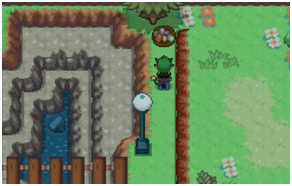
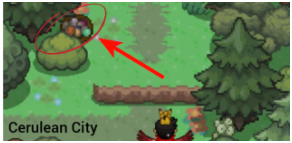
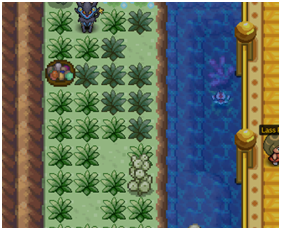
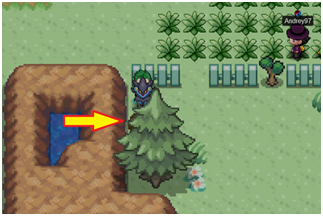
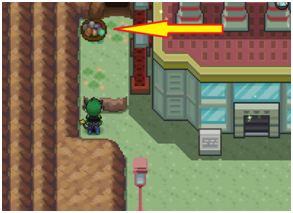
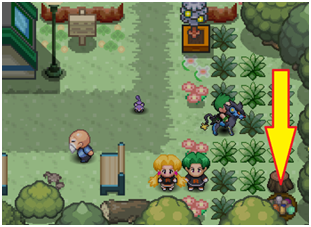
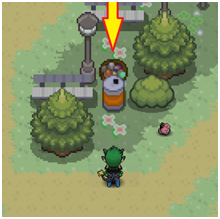
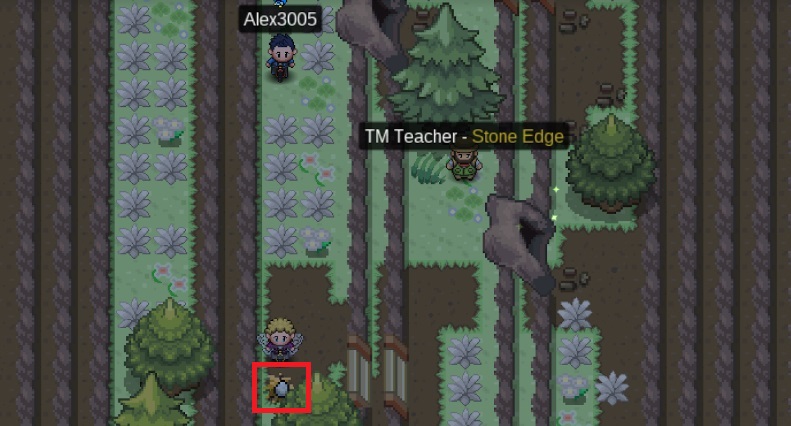
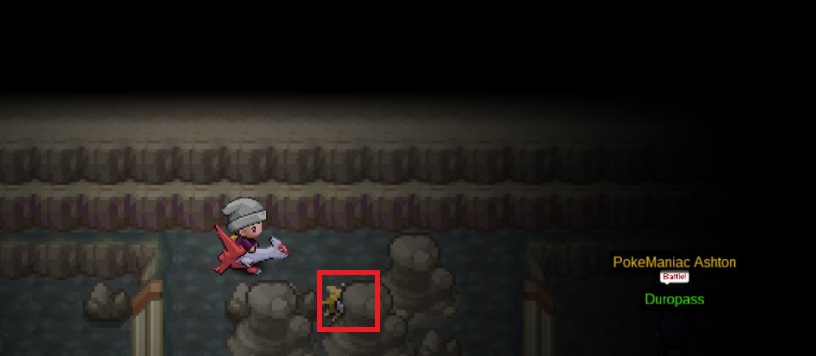
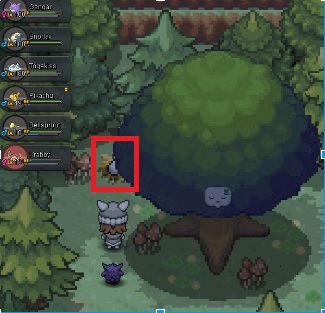
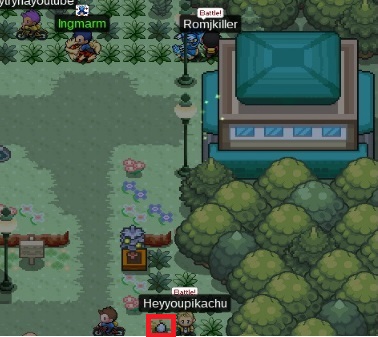
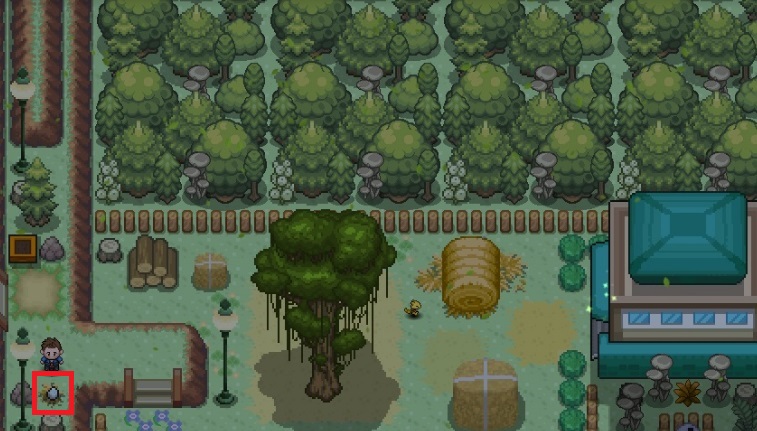
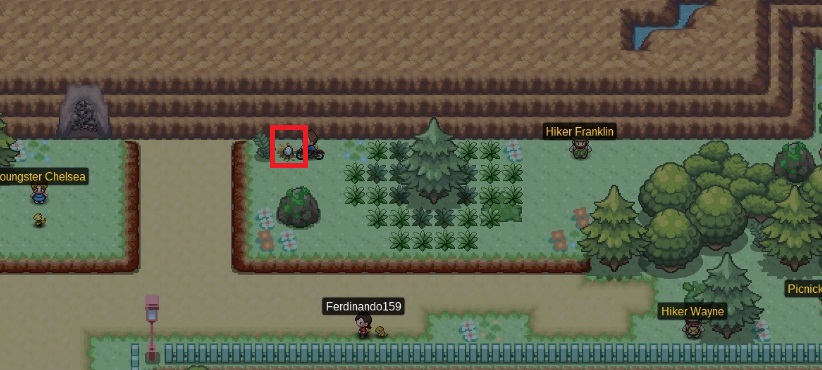
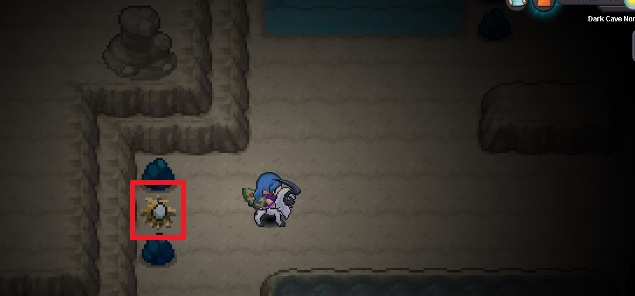
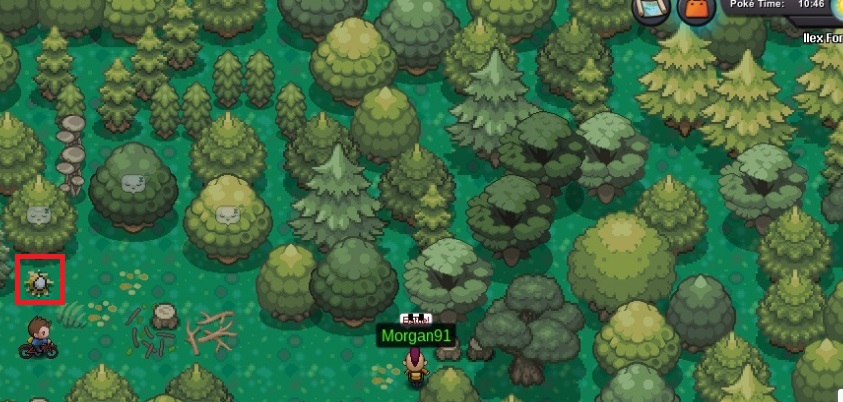
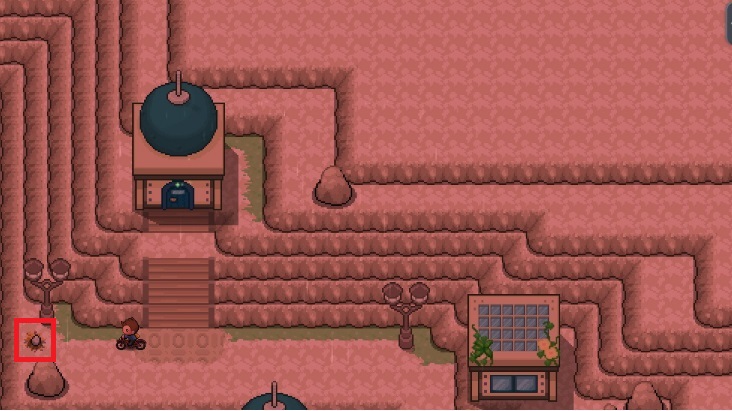
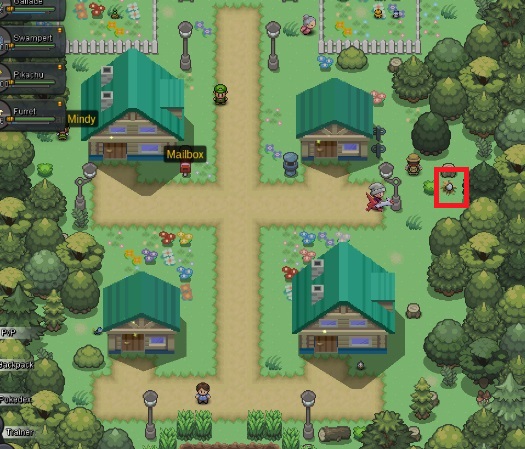
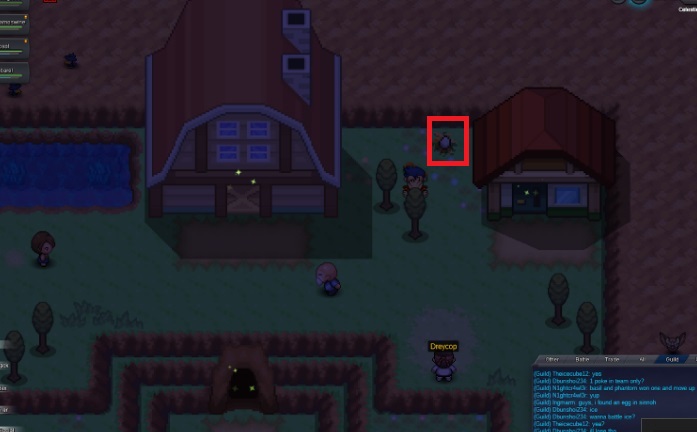
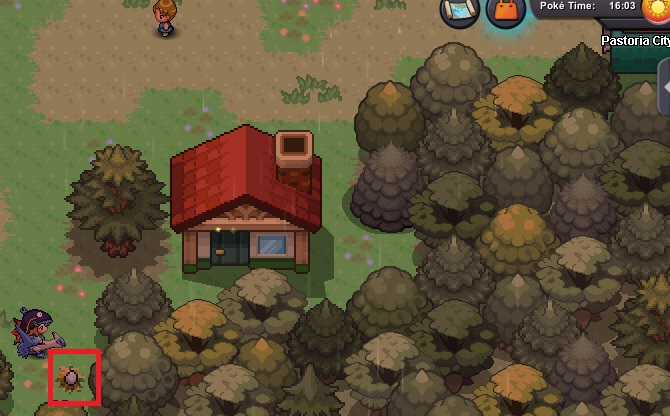
 **Don't forget to leave a like** Here is a guide to finds all 2019 Easter Eggs in Kanto. Bring 2 Escape Rope (or use Escape Trick) Need Flash, Cut, Surf (Dig would help you too) Talk to this guy to start the quest (in breezy town, house 2) : I place them to find them all in one easy travel from Vermillion [spoiler=Rewards] In the egg basket : 25 or 50 Easter Tokens per basket 1 Egg : 1 x PP UP 4 Eggs : 5 x great ball 7 Eggs : 5 x hyper potions 10 Eggs : 5 x Revive 14 Eggs : 10 x friend ball 17 Eggs : 10 x Focus Sash 20 Eggs : 5 x revival herb 24 Eggs : 3 x Big Mushroom 27 Eggs : 5 x rare candy 30 Eggs : 5 x PP max 34 Eggs : 10 x level ball 37 Eggs : 10 x fast ball 40 Eggs : 1 x Master ball [spoiler=Locations] [spoiler=Vermillion] [spoiler=Route 11] [spoiler=Route 12 (Raika Famous Hiding Spot)] [spoiler=Route 13] [spoiler=Route 14] [spoiler=Route 15] [spoiler=Fuschia] [spoiler=Route 19 (Arcanine Farm)] [spoiler=Seafoam Island B1F (Use Fuschia Entrance)] [spoiler=Route 20] [spoiler=Cinnabar] [spoiler=Route 21] [spoiler=Pallet Town] [spoiler=Route 1 (Behind Tree)] [spoiler=Viridian (Enter Poke Center)] [spoiler=Route 22] [spoiler=Indigo Plateau (Use Escape Rope After)] [spoiler=Route 2] [spoiler=Viridian Forest] [spoiler=Pewter] [spoiler=Route 3] [spoiler=Mt Moon B1F (First Ladder)] [spoiler=Route 4] [spoiler=Cerulean] [spoiler=Route 24] [spoiler=Route 25]Here you can see the fabulous Haneroze !!! [spoiler=Route 5] [spoiler=Route 9] [spoiler=Route 10] [spoiler=Rock Tunnel (Use Lavender Entrance)] [spoiler=Lavender] [spoiler=Pokemon Tower B5] [spoiler=Route 8] [spoiler=Saffron (Enter Poke Center)] [spoiler=Route 7] [spoiler=Celadon] [spoiler=Route 16] [spoiler=Route 17] [spoiler=Route 18 (Use Escape Rope After)] [spoiler=Route 6 (Back to Vermi)] Special thanks to Blaze, Madtrainer, Norg83, CrosbieL for helping me to gather all the spots. This guide would not have been possible without them. Long life to Phoenix Guild (Silver Server)! Also thanks to waleed1301, I learned 8 pictures came from him! Sorbet #0883
- 33 replies
-
- 45
-
-
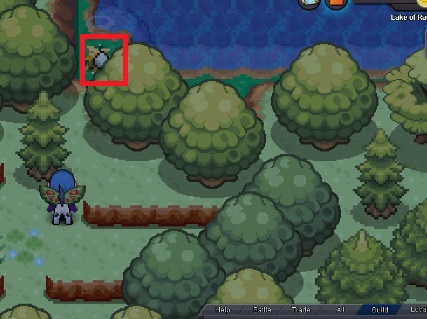
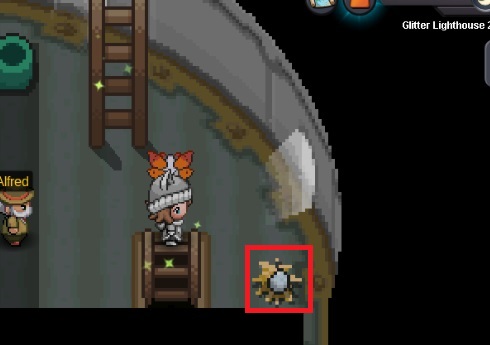
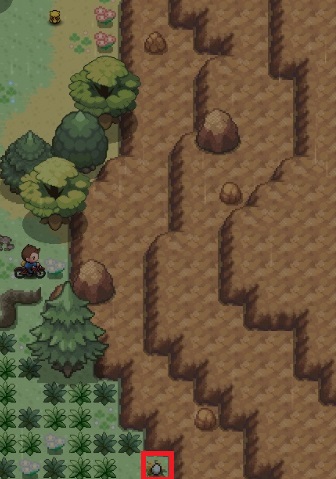
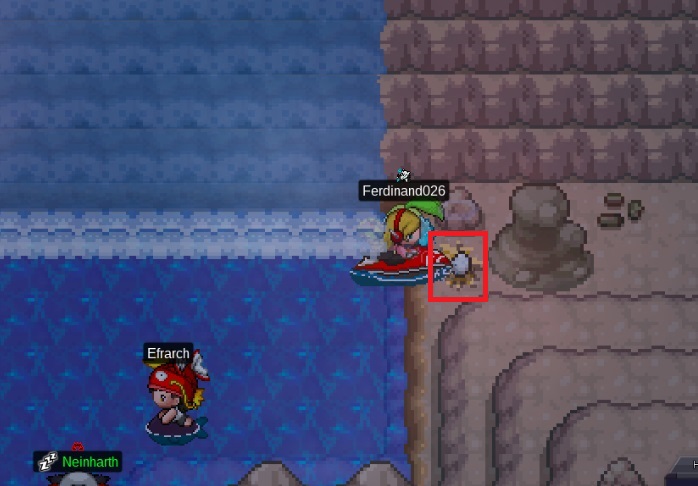
Here is the location of all the 40 eggs that can be found through this event, thanks to all the people that helped me with finding the eggs and to the tips that you guys gave me to improve this post since it was the first complex post I ever did here Hope this will help you guys and good luck with your hunt! Cities: Routes: Other Places:
-
Official discord bot for Pokemon Revolution Online Introduction How to get the Reborn onto your server All commands explained and showcased [spoiler=List of all available commands] ^server | ^defaultserver ^channel ^remindme | ^remindme list | ^remindme delete ^remindtime ^poketime ^bguide ^hideot | ^hidemoves | ^hideall | ^hp | ^ivs ^ladder | ^guildladder | ^timeladder ^up ^dex ^evspots | ^msspawns | ^spawns | ^repel ^info | ^item ^guildseasons | ^pvpseasons ^inspect | ^memberlist ^boss ^cooldowns ^smogon | ^ts ^mostused | ^mostpaired | ^mostadded ^invites | ^clear | ^help Own a discord server or have admin permissions on a discord server, this step is self-explanatory Go to the official PRO discord bot page Scroll down and click on "invite now" Select your server, allow all permissions and press "Authorize" Confirm that you are not a robot get started on your discord Click here for the gif and then press F5 Click here for the gif and then press F5 Click here for the gif and then press F5 Click here for the gif and then press F5 Click here for the gif and then press F5 Click here for the gif and then press F5 ^evspots [spoiler=^evspots Kanto]#EV Map Area Daytime Pokemon ATK Route 24 Surf M/D/N Krabby, Goldeen ATK, SPD Pokemon Tower 2F Land M/D/N Spinarak, Ratata, Patrat DEF Mt. Moon Land M/D/N Geodude, Onix, Sandshrew, Sandslash DEF Viridian Forest Land M/D Kakuna, Metapod DEF, HP Celadon City Surf M/D/N Koffing, Grimer HP Viridian Forest Land M/D/N Hoothoot, Caterpie SPATK Route 6 Surf M/D/N Psyduck, Golduck SPATK, HP Route 6 Surf M/D/N Psyduck, Golduck, Slowpoke SPD Route 16 Land M/D Ratata, Raticate, Pidgey, Pidgeot, Spearow, Fearow SPD Digletts Cave Entrance 1/2 Land M/D/N Diglett, Dugtrio, Zubat SPD, SPATK Power Plant Land M/D/N Magnemite, Magneton, Voltorb, Electrode SPDEF Route 19/20 Surf M/D/N Tentacool, Tentacruel SPDEF Vermilion City Surf M/D/N Tentacool, Tentacruel [spoiler=^evspots Johto]#EV Map Area Daytime Pokemon ATK Tohjo Falls Surf M/D/N Goldeen, Seaking ATK Dark Cave North Surf M/D/N Krabby, Goldeen, Seaking ATK Route 40 Surf M/D/N Krabby ATK Mt. Silver Exterior Land M/D Arbok, Dodrio, Dodou, Ursaring DEF Route 45 Land M/D/N Geodude, Graveler DEF Mt. Silver 1F Land M/D/N Graveler, Steelix, Onix DEF, HP Mt. Silver 1F Land M/N Graveler, Steelix, Onix, Quagsire HP Ruins of Alph Land, Surf N Quagsire, Wooper SPATK Dragons Den Surf M/D/N Horsea, Psyduck, Golduck SPATK Ilex Forext Surf M/D/N Psyduck, Golduck SPD Mt. Mortar 1F Land M/D/N Rattata SPDEF Mt. Mortar 1F Surf M/D/N Tentacool, Tentacruel SPDEF Cherrygrove City Surf M/D/N Tentacool, Tentacruel [spoiler=^evspots Hoenn]#EV Map Area Daytime Pokemon ATK Fiery Path Land M/D/N Machop ATK Route 112 Land M/D/N Machop, Machoke, Mankey, Sawk, Tyrogue ATK, SPD Mt. Pyre 1/2/3/4F Land M/D/N Rattata, Patrat, Shuppet DEF Rusturf Tunnel Land M/D/N Geodude SPATK Route 104 Land M/D/N Psyduck SPATK, SPD Route 119a Land M/D/N Gloom, Oddish, Zigzagoon, Linoone SPD Route 102 Land M/D/N Zigzagoon, Surskit SPD Route 118 Land M/D/N Aipom, Electrike, Linoone, Wingull, Zigzagoon, Raticate, Manectric SPD, SPATK Route 110 Land N Wingull, Zigzagoon, Oddish SPD, SPATK Route 110 Land N Oddish, Gloom, Zigzagoon, Linoone SPDEF Route 108 Surf M/D/N Tentacool, Tentacruel [spoiler=^evspots Sinnoh]#EV Map Area Daytime Pokemon ATK, SPD Sendoff Spring Surf M/D/N Goldeen, Gyarados, Magikarp, Poliwhirl, Seaking DEF Iron Island 1F Land M/D/N Cubone, Marowak, Rhyhorn, Sandshrew, Sandslash, Torkoal HP Oreburgh Gate 1F Land M/D/N Ducklett, Hariyama, Hoothoot, Makuhita, Noctowl SPATK, SPD Lake Acuity Land M/D/N Chingling, Froslass, Golduck, Noctowl, Psyduck, Sneasel, Snover SPATK, SPD Lake Acuity Surf M/D/N Golduck, Magikarp, Poliwhirl, Psyduck, Wingull SPDEF Route 204 Surf M/D/N Frillish, Lombre, Lotad, Politoed, Tentacool, Tentacruel [*]^msspawns [spoiler=^msspawns]#MS-only Pokemons #Pokemon Map Area Daytime Rarity Level Item Cubone Abandoned Desert Village Land M/D/N Tier 6 Yes 10-14 Geodude Abandoned Desert Village Land M/D/N Tier 1 Yes 10-14 Houndour Abandoned Desert Village Land N Tier 9 Yes 10-14 Machop Abandoned Desert Village Land D Tier 1 Yes 10-14 Makuhita Abandoned Desert Village Land M/D/N Tier 4 Yes 10-14 Trapinch Abandoned Desert Village Land M/D Tier 9 Yes 10-14 Snover Acuity Lakefront Land M/D/N Tier 9 Yes 35-39 Pichu Amazon Forest Land M/D/N Tier 8 Yes 10-14 Petilil Berry Forest Land M/D Tier 8 Yes 51-56 Glameow Bond Bridge Land N Tier 6 Yes 29-37 Litwick Burned Tower Floor 2 Land M/D/N Tier 8 Yes 13-17 Meditite Burned Tower Floor 2 Land M/D/N Tier 9 Yes 18-22 Magmar Burned Tower Top Floor Land D Tier 9 Yes 14-18 Wailmer Cherrygrove City Surf/Fish (Super Rod) M/D/N Tier 6 Yes 10-14 Shuckle Cianwood City Surf M/D/N Tier 7 Yes 20-26 Azurill Desert Lagoon Surf/Fish (Super Rod) M/D/N Tier 5 Yes 12-18 Cubone Desert Lagoon Land M/D/N Tier 6 Yes 12-18 Doduo Desert Lagoon Land M/D Tier 1 Yes 12-18 Dunsparce Desert Lagoon Land M/D/N Tier 3 Yes 12-18 Ekans Desert Lagoon Land M/D Tier 1 Yes 12-18 Hippopotas Desert Lagoon Surf N Tier 8 Yes 20-26 Hippopotas Desert Lagoon Land M/D Tier 8 Yes 20-26 Lotad Desert Lagoon Surf/Fish (Super Rod) M/D/N Tier 5 Yes 12-18 Murkrow Desert Lagoon Land N Tier 8 Yes 12-18 Phanpy Desert Lagoon Land M Tier 4 Yes 12-18 Poliwag Desert Lagoon Surf/Fish (Good Rod) N Tier 1 Yes 12-18 Sandshrew Desert Lagoon Land M/D/N Tier 1 Yes 12-18 Sandslash Desert Lagoon Land M/D/N Tier 2 Yes 12-18 Surskit Desert Lagoon Surf/Fish (Super Rod) M/D/N Tier 5 Yes 12-18 Totodile Desert Lagoon Surf/Fish (Super Rod) D Tier 8 Yes 12-18 Wooper Desert Lagoon Surf/Fish (Old Rod) M/D/N Tier 1 Yes 12-18 Mawile Diamond Domain 1F Land M/D/N Tier 9 Yes 21-25 Carbink Diamond Domain Main Cave Land M/D/N Tier 9 Yes 21-25 Lotad Dock Island Surf M/D/N Tier 5 Yes 10-14 Psyduck Dock Island Surf M/D/N Tier 1 Yes 10-14 Corphish Dragons Den Surf M/D/N Tier 7 Yes 45-49 Gligar Dragons Den B1F Land M/D Tier 7 Yes 40-55 Gligar Dragons Den Entrance Land M/D/N Tier 8 Yes 45-49 Axew Dragons Shrine Land M/D/N Tier 8 Yes 60-64 Buizel Eterna City Surf M/D/N Tier 6 Yes 20-30 Whirlipede Eterna Forest Land M/D/N Tier 8 Yes 11-14 Magikarp Ever Grande City Fish (Old Rod) M/D/N Tier 2 Yes 20-25 Roggenrola Fiery Path Land M/D/N Tier 8 Yes 20-23 Skiddo Five Isle Meadow Land M/D/N Tier 8 Yes 10-14 Lotad Four Island Surf/Fish (Super Rod) M/D/N Tier 6 Yes 5-35 Lapras Frozen Cave Surf M/D/N Tier 8 Yes 20-25 Politoed Fuchsia City Fish (Super Rod) M/D/N Tier 7 Yes 20 Timburr Granite Cave 1F Land M/D Tier 8 Yes 15-18 Axew Granite Cave B1F Land M/N Tier 8 Yes 16-18 Cubchoo High Tide Entrance Room Land M/D/N Tier 9 Yes 30-38 Noibat High Tide Entrance Room Surf N Tier 8 Yes 30-38 Beldum Hoenn Safari Zone Area 2 Land M/D/N Tier 9 Yes 33-36 Litleo Hoenn Safari Zone Area 4 Land M/D/N Tier 9 Yes 28-32 Fletchinder Hoenn Safari Zone Area 6 Land M/D Tier 8 Yes 28-32 Sneasel Icefall Cave 1F Land M/D/N Tier 7 Yes 30-34 Carnivine Ilex Forest Land M/D/N Tier 9 Yes 5-9 Foongus Ilex Forest Land M/D Tier 8 Yes 11-13 Scraggy Iron Island B1F L Land M/D/N Tier 8 Yes 32-36 Pawniard Iron Island B1F R Land N Tier 8 Yes 25-29 Mawile Iron Island B2F L Land M/D/N Tier 8 Yes 32-36 Riolu Iron Island Exit Room Land M/D/N Tier 9 Yes 10-14 Darumaka Jagged Pass Land M/D Tier 9 Yes 18-22 Slugma Jagged Pass Land M/D/N Tier 4 Yes 18-22 Spinda Jagged Pass Land M/D/N Tier 4 Yes 18-22 Spoink Jagged Pass Land M/D/N Tier 6 Yes 18-22 Feebas Jura Cave Surf M/D/N Tier 7 Yes 25-29 Zangoose Jura Cave Land M/D/N Tier 8 Yes 20-24 Shellos Kalijodo Cave B2F Surf M/D/N Tier 9 Yes 20-26 Numel Kindle Road Land M/D/N Tier 6 Yes 34-38 Buizel Knot Island Surf/Fish (Super Rod) M/D/N Tier 6 Yes 34-38 Goldeen Knot Island Surf/Fish (Super Rod) D Tier 1 Yes 34-38 Wailmer Knot Island Surf/Fish (Super Rod) M/D/N Tier 6 Yes 34-38 Wobbuffet Lake Valor Land M/D/N Tier 8 Yes 35-39 Vullaby Leev Town Land M/N Tier 9 Yes 25-29 Corphish Leev Town Entrance Surf M/D/N Tier 7 Yes 20-24 Golett Lost Tower 4F Land N Tier 9 Yes 17-27 Lapras Love Island Surf M/D Tier 8 Yes 13-17 Cubchoo Low Tide Entrance Room Land M/D/N Tier 9 Yes 30-38 Druddigon Meteor Falls 1F 1R Land M/D/N Tier 9 Yes 14-20 Deino Meteor Falls B1F 1R Land M/D Tier 8 Yes 25-30 Bagon Meteor Falls B1F 2R Land M/D/N Tier 8 Yes 22-27 Igglybuff Moon 1F Land M/D/N Tier 9 Yes 19-23 Inkay Moon B1F Land M/D/N Tier 7 Yes 19-23 Frillish Mossdeep City Surf M/D/N Tier 8 Yes 28-36 Dwebble Mt. Coronet 2F Land M/D/N Tier 9 Yes 38-43 Aron Mt. Coronet 3F Land M/D/N Tier 9 Yes 38-43 Durant Mt. Coronet 6F Land M/D/N Tier 9 Yes 38-43 Rufflet Mt. Coronet 6F Land M/D Tier 8 Yes 38-43 Bonsly Mt. Coronet 7F Land M/D/N Tier 9 Yes 38-43 Binacle Mt. Coronet B1F Surf/Fish (Super Rod) M/N Tier 8 Yes 10-15 Roggenrola Mt. Coronet B1F Land M/D/N Tier 9 Yes 33-38 Gible Mt. Coronet North Land M/N Tier 9 Yes 5-16 Snover Mt. Coronet Summit Land M/D/N Tier 8 Yes 40-43 Nosepass Mt. Ember Ruby Path B1F Land M/D/N Tier 9 Yes 34-40 Nosepass Mt. Ember Ruby Path B2F Land M/D/N Tier 9 Yes 34-40 Magby Mt. Ember Summit Path 2F Land M/D/N Tier 8 Yes 30-38 Bronzor Mt. Mortar Lower Cave Land M/D/N Tier 5 Yes 13-17 Chingling Mt. Mortar Lower Cave Land M/D/N Tier 6 Yes 13-17 Rattata Mt. Mortar Lower Cave Land M/D/N Tier 1 Yes 13-17 Bronzor Mt. Pyre Exterior Land M/D/N Tier 4 Yes 24-29 Elgyem Mt. Pyre Exterior Land M/D/N Tier 9 Yes 24-29 Growlithe Mt. Pyre Exterior Land M/D/N Tier 4 Yes 24-29 Elgyem Mt. Pyre Summit Land M/N Tier 9 Yes 21-26 Growlithe Mt. Pyre Summit Land M/D/N Tier 5 Yes 21-26 Zubat Mt. Pyre Summit Land M/D/N Tier 1 Yes 21-26 Larvitar Mt. Silver 2F Land D Tier 8 Yes 50-55 Absol Mt. Silver 3F Land M/D/N Tier 9 Yes 20-28 Larvitar Mt. Silver 3F Land D Tier 8 Yes 48-56 Skarmory Mt. Silver Exterior Land M/D Tier 9 Yes 32-40 Zangoose Mt. Silver Exterior Land M/N Tier 7 Yes 32-40 Larvitar Mt. Silver Lower Mountainside Land M Tier 9 Yes 48-52 Larvitar Mt. Silver Moltres Chamber Land D Tier 9 Yes 45-52 Larvitar Mt. Silver Upper Mountainside Land D Tier 9 Yes 52-55 Noibat Nap Cave Land N Tier 8 Yes 45-50 Noibat Nap Cave B1F Land N Tier 8 Yes 45-50 Munchlax Nap Forest Land M/D/N Tier 9 Yes 42-45 Corphish Nap Shore Surf M/D Tier 8 Yes 42-45 Budew National Park Land M Tier 5 Yes 15-19 Durant National Park Land N Tier 8 Yes 15-19 Sewaddle National Park Land D Tier 8 Yes 10-14 Espurr Old Chateau 1F Land M/D/N Tier 10 Yes 14-19 Patrat Old Chateau 1F 1F Land M/D Tier 2 Yes 11-14 Rattata Old Chateau 1F 1F Land M/D Tier 2 Yes 11-14 Patrat Old Chateau 1F 2R Land M/D Tier 2 Yes 11-14 Rattata Old Chateau 1F 2R Land M/D Tier 2 Yes 11-14 Patrat Old Chateau 2F Land M/D Tier 2 Yes 11-14 Rattata Old Chateau 2F Land M/D Tier 2 Yes 11-14 Patrat Old Chateau 2F 1R Land M/D Tier 2 Yes 11-14 Rattata Old Chateau 2F 1R Land M/D Tier 2 Yes 11-14 Patrat Old Chateau 2F 2R Land M/D Tier 2 Yes 11-14 Rattata Old Chateau 2F 2R Land M/D Tier 2 Yes 11-14 Patrat Old Chateau 2F 3R Land M/D Tier 2 Yes 11-14 Rattata Old Chateau 2F 3R Land M/D Tier 2 Yes 11-14 Patrat Old Chateau 2F 4R Land M/D Tier 2 Yes 11-14 Rattata Old Chateau 2F 4R Land M/D Tier 2 Yes 11-14 Patrat Old Chateau 2F 5R Land M/D Tier 2 Yes 11-14 Rattata Old Chateau 2F 5R Land M/D Tier 2 Yes 11-14 Aron Oreburgh Mine B1F Land M/D/N Tier 8 Yes 6-10 Croagunk Pal Park Land D Tier 9 Yes 26-33 Pumpkaboo Pattern Bush Land N Tier 9 Yes 10-15 Corphish Petalburg City Fish (Super Rod) M/D/N Tier 8 Yes 25 Cottonee Petalburg Woods Land M/D/N Tier 8 Yes 10-13 Duskull Pokemon Tower 5F Land M/D/N Tier 6 Yes 21-23 Shuppet Pokemon Tower 6F Land M/D/N Tier 6 Yes 21-23 Duskull Pokemon Tower Underground Land N Tier 6 Yes 12-16 Gastly Pokemon Tower Underground Land M/D/N Tier 4 Yes 12-16 Litwick Pokemon Tower Underground Land M/D/N Tier 8 Yes 17-21 Misdreavus Pokemon Tower Underground Land M/D/N Tier 5 Yes 12-16 Rattata Pokemon Tower Underground Land M/D/N Tier 1 Yes 12-16 Shuppet Pokemon Tower Underground Land M/D/N Tier 6 Yes 12-16 Spiritomb Pokemon Tower Underground Land M/D/N Tier 8 Yes 12-16 Zubat Pokemon Tower Underground Land M/D/N Tier 2 Yes 12-16 Pachirisu Power Plant Land D Tier 9 Yes 23-26 Kangaskhan Rock Tunnel 1 Land M/D Tier 8 Yes 20-24 Shinx Route 1 Land M/D/N Tier 9 Yes 2-6 Dedenne Route 10 Land M/D/N Tier 9 Yes 20-23 Corphish Route 102 Fish (Super Rod) M/D/N Tier 8 Yes 2-4 Shellos Route 103 Surf M/D/N Tier 8 Yes 5-7 Frillish Route 105 Fish (Super Rod) M/D/N Tier 8 Yes 20 Clauncher Route 106 Fish (Good Rod) M/D/N Tier 8 Yes 25-31 Skrelp Route 107 Fish (Super Rod) M/D/N Tier 7 Yes 20-35 Frillish Route 108 Fish (Super Rod) M/D Tier 8 Yes 20-35 Clauncher Route 109 Fish (Super Rod) M/D/N Tier 8 Yes 32-35 Trubbish Route 110 Land M/D/N Tier 9 Yes 12-15 Sandile Route 111 Desert Land M/D/N Tier 7 Yes 25-29 Trapinch Route 111 Desert Land M/D/N Tier 8 Yes 25-29 Sawk Route 112 Land M/D Tier 9 Yes 14-18 Skorupi Route 114 Land M/D Tier 8 Yes 21-25 Zangoose Route 114 Land N Tier 9 Yes 15-19 Clefairy Route 115 Land M/D/N Tier 2 Yes 22-26 Misdreavus Route 115 Land N Tier 5 Yes 22-26 Corphish Route 117 Fish (Super Rod) M/D/N Tier 7 Yes 30-35 Tympole Route 117 Land M/D/N Tier 8 Yes 13-16 Absol Route 118 Land M/D/N Tier 9 Yes 25-29 Frillish Route 119A Surf M/D/N Tier 7 Yes 33-37 Feebas Route 119B Surf M/D/N Tier 7 Yes 22-28 Snorlax Route 12 Land M/D/N Tier 8 Yes 25 Duskull Route 121 Land N Tier 6 Yes 26-29 Corphish Route 123 Surf/Fish (Super Rod) M/D/N Tier 7 Yes 29-33 Crawdaunt Route 123 Surf/Fish (Super Rod) M/D/N Tier 7 Yes 29-33 Alomomola Route 124 M/D/N Tier 8 Yes 25-35 Frillish Route 126 Fish (Super Rod) M/D/N Tier 8 Yes 32-33 Relicanth Route 126 Fish (Good Rod) M/D/N Tier 8 Yes 32-33 Frillish Route 127 Fish (Super Rod) M/D/N Tier 8 Yes 28-36 Ducklett Route 13 Land M/D Tier 6 Yes 24-30 Qwilfish Route 13 Surf/Fish (Super Rod) M/D/N Tier 5 Yes 24-30 Alomomola Route 130 Fish (Super Rod) M/D Tier 8 Yes 28-36 Frillish Route 130 Fish (Super Rod) N Tier 8 Yes 28-36 Frillish Route 131 Fish (Super Rod) M/D/N Tier 8 Yes 31-33 Frillish Route 131 B Fish (Super Rod) M/D/N Tier 8 Yes 32-34 Frillish Route 133 Fish (Super Rod) M/D/N Tier 8 Yes 30-34 Alomomola Route 134 Fish (Super Rod) M/D/N Tier 7 Yes 37-41 Ditto Route 14 Land M/D/N Tier 6 Yes 30 Staryu Route 19 Fish (Super Rod) M/N Tier 6 Yes 23-28 Staryu Route 19 Surf/Fish (Super Rod) N Tier 6 Yes 28-35 Taillow Route 2 Land M Tier 8 Yes 5-7 Spritzee Route 201 Land M/D/N Tier 8 Yes 2-4 Swirlix Route 201 Land M/D/N Tier 8 Yes 2-4 Riolu Route 203 Land M/N Tier 8 Yes 8-12 Frillish Route 204 Surf M/D/N Tier 8 Yes 3-13 Shelmet Route 204 Land M/D/N Tier 9 Yes 5-9 Espurr Route 205 Land M/D Tier 8 Yes 11-14 Pineco Route 205 Land M/D/N Tier 8 Yes 11-14 Blitzle Route 206 Land M/N Tier 9 Yes 15-19 Stunky Route 206 Land M/D/N Tier 5 Yes 15-19 Vulpix Route 209 Land M/D/N Tier 6 Yes 17-21 Lapras Route 21 Surf/Fish (Super Rod) D Tier 8 Yes 25-30 Mr. Mime Route 21 Land M/D/N Tier 8 Yes 25-30 Kricketune Route 210 Land M/D/N Tier 5 Yes 17-20 Swablu Route 211 Land D Tier 9 Yes 13-17 Inkay Route 213 Land M/D Tier 8 Yes 20-22 Gligar Route 215 Land M/D/N Tier 8 Yes 22-26 Bergmite Route 216 Land M/D/N Tier 9 Yes 33-37 Snover Route 216 Land M/D/N Tier 9 Yes 33-37 Bergmite Route 217 Land N Tier 9 Yes 35-39 Furfrou Route 217 Land M Tier 9 Yes 35-39 Snover Route 217 Land M/D/N Tier 9 Yes 35-39 Vanillite Route 217 Land D Tier 9 Yes 35-39 Ditto Route 218 Land M/N Tier 6 Yes 28-31 Vespiquen Route 218 Land M/D/N Tier 6 Yes 28-31 Glameow Route 222 Land M/D/N Tier 4 Yes 41-45 Purugly Route 222 Land M/D/N Tier 8 Yes 41-45 Binacle Route 223 Surf M/D/N Tier 8 Yes 30-44 Duskull Route 224 Land M/N Tier 6 Yes 52-56 Hawlucha Route 224 Land M/D/N Tier 8 Yes 30-34 Archen Route 226 Land N Tier 8 Yes 51-55 Chikorita Route 226 Land M/D/N Tier 8 Yes 51-55 Gligar Route 227 Land N Tier 8 Yes 53-57 Heatmor Route 227 Land M/D/N Tier 8 Yes 53-57 Pineco Route 229 Land M/D/N Tier 9 Yes 47-51 Shellos Route 26 Surf M Tier 8 Yes 25-27 Buizel Route 28 Surf/Fish (Super Rod) M/D/N Tier 6 Yes 33-37 Heracross Route 28 Land M/D/N Tier 9 Yes 33-37 Shinx Route 29 Land D Tier 9 Yes 2-4 Starly Route 32 Land M/D Tier 8 Yes 10-12 Heracross Route 33 Land M/D/N Tier 9 Yes 13-17 Murkrow Route 33 Land N Tier 8 Yes 7-11 Buizel Route 34 Surf/Fish (Super Rod) M/D/N Tier 6 Yes 11-15 Togepi Route 34 Land M/D/N Tier 8 Yes 11-15 Mareep Route 35 Land M/D/N Tier 2 Yes 10-15 Shinx Route 36 Land D Tier 8 Yes 21-22 Gothita Route 37 Land M/D/N Tier 8 Yes 21-25 Burmy Route 38 Land M/D/N Tier 6 Yes 15-17 Exeggcute Route 39 Land M/D/N Tier 4 Yes 17-21 Buizel Route 4 Surf/Fish (Super Rod) M/N Tier 6 Yes 8-12 Pineco Route 4 Land N Tier 8 Yes 8-12 Aipom Route 42 Land M/D/N Tier 6 Yes 14-16 Heracross Route 42 Land M/D Tier 9 Yes 14-16 Pineco Route 43 Land M/D/N Tier 8 Yes 21-25 Buizel Route 45 Surf/Fish (Super Rod) M/D/N Tier 6 Yes 35 Skarmory Route 45 Land M/D/N Tier 9 Yes 35 Feebas Route 49 Surf M/D/N Tier 9 Yes 35-39 Totodile Route 49 Land M/D/N Tier 9 Yes 35-39 Shinx Route 5 Land N Tier 9 Yes 15 Togepi Route 5 Land M/D Tier 8 Yes 18-23 Buizel Route 6 Fish (Super Rod) M/D/N Tier 6 Yes 13-17 Nidoran M Route 9 Land M/N Tier 2 Yes 13-16 Nidorina Route 9 Land M Tier 4 Yes 13-16 Primeape Route 9 Land M/D/N Tier 4 Yes 13-16 Buizel Ruins Of Alph Fish (Super Rod) M/D Tier 6 Yes 18-25 Smeargle Ruins Of Alph Land M/D/N Tier 7 Yes 26-33 Tauros Safari Area 2 Land M/D Tier 5 Yes 12-14 Eevee Safari Area 3 Land N Tier 9 Yes 25-27 Eevee Safari Area 3 Land M Tier 9 Yes 25-27 Snorlax Safari Area 3 Land M/N Tier 8 Yes 20-24 Chansey Safari Exclusive Land M/D/N Tier 8 Yes 21-25 Dratini Safari Exclusive Surf M Tier 8 Yes 21-25 Exeggcute Safari Exclusive Land M/D/N Tier 4 Yes 21-25 Gyarados Safari Exclusive Surf M/D/N Tier 5 Yes 21-25 Lotad Safari Exclusive Surf M Tier 5 Yes 21-25 Magikarp Safari Exclusive Surf M/D/N Tier 2 Yes 21-25 Marill Safari Exclusive Surf/Fish (Super Rod) N Tier 5 Yes 21-25 Marill Safari Exclusive Land M/D/N Tier 4 Yes 21-25 Paras Safari Exclusive Land M/D Tier 1 Yes 21-25 Pinsir Safari Exclusive Land M/D/N Tier 8 Yes 21-25 Poliwag Safari Exclusive Surf/Fish (Good Rod) M/D/N Tier 1 Yes 21-25 Poliwag Safari Exclusive Land M/D/N Tier 1 Yes 21-25 Rhyhorn Safari Exclusive Land M/D/N Tier 4 Yes 21-25 Scyther Safari Exclusive Land M/D/N Tier 7 Yes 21-25 Slowpoke Safari Exclusive Surf/Fish (Old Rod) M/D/N Tier 2 Yes 21-25 Starly Safari Exclusive Land D Tier 8 Yes 21-25 Sylveon Safari Exclusive Land D Tier 9 Yes 21-25 Tynamo Safari Exclusive Land M/D/N Tier 9 Yes 26-31 Umbreon Safari Exclusive Land N Tier 9 Yes 21-25 Venonat Safari Exclusive Land M/N Tier 1 Yes 21-25 Wooper Safari Exclusive Surf/Fish (Good Rod) M/D/N Tier 1 Yes 21-25 Wooper Safari Exclusive Land M/D/N Tier 1 Yes 21-25 Zubat Safari Exclusive Surf N Tier 1 Yes 21-25 Smeargle Safari Johto Grass And Swamp Zone Land M/D/N Tier 8 Yes 17-21 Darumaka Safari Johto Mountain Zone Land N Tier 9 Yes 22-25 Magmar Safari Johto Mountain Zone Land M/D Tier 8 Yes 17-21 Cubchoo Safari Johto Snow Zone Land M/D/N Tier 9 Yes 15-19 Lapras Safari Johto Snow Zone Surf/Fish (Super Rod) D Tier 8 Yes 15-19 Corphish Safari Johto Wet Zone Fish (Super Rod) M/D/N Tier 7 Yes 17-22 Tympole Safari Johto Wet Zone Land M/D/N Tier 9 Yes 17-22 Vanillite Seafoam B1F Land M/D/N Tier 9 Yes 31-34 Cubchoo Seafoam B4F Land M/N Tier 8 Yes 36-40 Lapras Seafoam B4F Surf/Fish (Super Rod) M/D/N Tier 8 Yes 36-40 Basculin Secret Nap Area Surf/Fish (Super Rod) M/D/N Tier 8 Yes 52-57 Munchlax Secret Nap Area Land M/D/N Tier 7 Yes 45-50 Munchlax Sendoff Spring Land M/D/N Tier 9 Yes 53-57 Skorupi Sinnoh Safari Area Zone 1 Land M/D Tier 8 Yes 24-28 Croagunk Sinnoh Safari Area Zone 2 Land M/D/N Tier 8 Yes 24-28 Marill Sinnoh Safari Area Zone 3 Land M/D/N Tier 5 Yes 24-28 Venipede Sinnoh Safari Area Zone 3 Land M/D/N Tier 8 Yes 24-28 Marill Sinnoh Safari Area Zone 4 Land M/D/N Tier 5 Yes 24-28 Emolga Sinnoh Safari Area Zone 5 Land D Tier 9 Yes 24-28 Goomy Sinnoh Safari Area Zone 5 Land N Tier 8 Yes 24-28 Marill Sinnoh Safari Area Zone 5 Land M/D/N Tier 5 Yes 24-28 Mienfoo Sinnoh Victory Road B1F Land M/D/N Tier 8 Yes 30-34 Scraggy Sinnoh Victory Road B1F Deep Entrance Land M/D/N Tier 9 Yes 50-54 Timburr Sinnoh Victory Road B1F Deep Exit Land M/D/N Tier 9 Yes 50-54 Munna Sleeping Path Land M/D/N Tier 7 Yes 42-45 Froslass Snowpoint Temple B4F Land M/D/N Tier 8 Yes 50-54 Froslass Snowpoint Temple B5F Land M/D/N Tier 8 Yes 50-54 Magby Stark Mountain Entrance Land M/D/N Tier 9 Yes 10-14 Magby Stark Mountain Entrance Pt Land M/D/N Tier 9 Yes 54-58 Heatmor Stark Mountain Main Cavern Pt Land M/D/N Tier 9 Yes 56-60 Whismur Three Isle Path Land M/D/N Tier 4 Yes 10-20 Ducklett Trainers Valley Surf/Fish (Super Rod) M/D/N Tier 5 Yes 45-50 Starly Treasure Beach Land M Tier 9 Yes 34-38 Delibird Unknown Place Land N Tier 1 Yes 55-60 Zangoose Unknown Place Land M/D/N Tier 9 Yes 55-60 Ferroseed Valley Of Steel Eastern Peak Land M/D Tier 9 Yes 40-44 Klefki Valley Of Steel Western Peak Land M/N Tier 8 Yes 25-29 Drifloon Valley Windworks Land M/D/N Tier 9 Yes 11-14 Helioptile Valley Windworks Land M/D/N Tier 8 Yes 11-14 Shelmet Valor Lakefront Land M/D Tier 9 Yes 24-28 Staryu Vermilion City Fish (Super Rod) N Tier 6 Yes 13-18 Sableye Victory Road Hoenn 1F Land M/D/N Tier 9 Yes 42-48 Aron Victory Road Hoenn B1F Land N Tier 9 Yes 42-48 Mawile Victory Road Hoenn B1F Land M/D/N Tier 8 Yes 50-54 Drilbur Victory Road Kanto 2F Land M/D/N Tier 8 Yes 44-49 Makuhita Victory Road Kanto 2F Land M/D/N Tier 4 Yes 40-43 Numel Victory Road Kanto 2F Land M/D/N Tier 5 Yes 40-43 Makuhita Victory Road Kanto 3F Land M/D/N Tier 4 Yes 40-43 Numel Victory Road Kanto 3F Land M/D/N Tier 6 Yes 40-43 Gyarados Water Labyrinth Fish (Super Rod) M/D/N Tier 4 Yes 20-30 Hoppip Water Labyrinth Surf D Tier 1 Yes 10-20 Horsea Water Labyrinth Surf/Fish (Super Rod) M/D/N Tier 2 Yes 10-20 Magikarp Water Labyrinth Fish (Old Rod) M/D/N Tier 2 Yes 10-20 Psyduck Water Labyrinth Surf/Fish (Good Rod) M Tier 1 Yes 20-30 Shellder Water Labyrinth Fish (Super Rod) D Tier 6 Yes 15-25 Tentacool Water Labyrinth Surf/Fish (Old Rod) M/D/N Tier 1 Yes 10-20 Tentacruel Water Labyrinth Surf/Fish (Super Rod) M/D/N Tier 3 Yes 29-39 Gyarados Water Path Fish (Good Rod) M/D/N Tier 1 Yes 40-44 Qwilfish Water Path Fish (Super Rod) M/D/N Tier 5 Yes 40-44 Remoraid Water Path Fish (Super Rod) M/D/N Tier 6 Yes 40-44 Seadra Water Path Surf/Fish (Super Rod) M/D/N Tier 4 Yes 40-44 Tentacool Water Path Surf/Fish (Old Rod) M/D/N Tier 1 Yes 40-44 Tentacruel Water Path Surf/Fish (Super Rod) M/D/N Tier 2 Yes 40-44 Bunnelby Wayward Cave Land M/D/N Tier 8 Yes 20-25 Gible Wayward Cave Land M/N Tier 8 Yes 5-15 Gligar Whirl Islands 1F Northwest Land M Tier 8 Yes 23-27 Marill Whirl Islands B1F Land M/D/N Tier 4 Yes 22-26 Click here for the gif and then press F5 Click here for the gif and then press F5 Click here for the gif and then press F5 Click here for the gif and then press F5 Click here for the gif and then press F5 Click here for the gif and then press F5 Click here for the gif and then press F5 Click here for the gif and then press F5
-
Vulcan Island data Hidden items Vulcan Island Shore Vulcan Path Vulcan Forest Kalijodo Path Mt. Summer Exterior | Mt. Summer Exterior 2 [*]Spawns Vulcan Island Shore Vulcan Path Vulcan Forest Mt. Summer Exterior Mt. Summer Exterior 2 Mt. Summer 1f 2 Mt. Summer 1f Mt. Summer 2f 2 Mt. Summer 2f Mt. Summer 3f Mt. Summer 4f 2 Mt. Summer 4f Kalijodo Path Kalijodo Lake Kalijodo Cave Entrance Kalijodo Cave B1F Kalijodo Cave B2F Vulcan Island shore [spoiler=Vulcan Island shore] [spoiler=1x Calcium]Click here and then press F5 [spoiler=2x Greatballs]Click here and then press F5 [spoiler=1x Full Heal]Click here and then press F5 [spoiler=1x Miracle Seed]Click here and then press F5 [spoiler=1x Pokeball]Click here and then press F5 [spoiler=1x HP Up]Click here and then press F5 [spoiler=1x Protein]Click here and then press F5 [*]Vulcan Path(needs a screenshot) [spoiler=Vulcan Path] [spoiler=1x Ultra Ball]In a grove before the bridge. [spoiler=1x Rare Candy]Click here and then press F5 [spoiler=1x Rare Candy]Click here and then press F5 [spoiler=1x Blue Ball Flaeron (1:500 Shiny chance)]Click here and then press F5 [*]Vulcan Forest [spoiler=Vulcan Forest] [spoiler=1x Pokeball]Click here and then press F5 [spoiler=1x Pokeball]Click here and then press F5 [spoiler=1x Pokeball]Click here and then press F5 [spoiler=1x Greatball]Click here and then press F5 [spoiler=1x Moonstone]Click here and then press F5 [spoiler=2x Rare Candy]Click here and then press F5 [spoiler=1x PP Max]Click here and then press F5 [spoiler=1x Ultraball]Click here and then press F5 [spoiler=1x Pokeball]Click here and then press F5 [spoiler=1x Leafstone]Click here and then press F5 [spoiler=1x Rare Candy]Click here and then press F5 [*]Kalijodo Path [spoiler=Kalijodo Path] [spoiler=3x Pokeballs]Click here and then press F5 [spoiler=1x Pokeball]Click here and then press F5 [spoiler=1x HP Up]Click here and then press F5 [spoiler=1x Stardust]Click here and then press F5 [*]Mt. Summer Exterior | Mt. Summer Exterior 2 [spoiler=Mt. Summer Exterior | Mt. Summer Exterior 2] [spoiler=1x Ultraball]Click here and then press F5 [spoiler=1x Nugget]Click here and then press F5 [spoiler=1x TM100 Overheat]Click here and then press F5 Credits: Walrosskastanie (Reborn Bot) / HuskySM
-
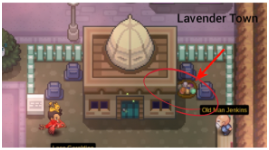
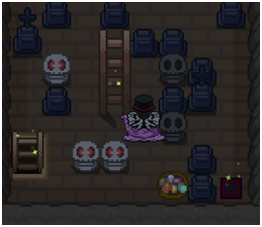
⋯⋯⋯⋯⋯⋯⋯⋯⋯⋯⋯⋯⋯⋯⋯⋯⋯⋯⋯⋯⋯⋯⋯⋯⋯⋯⋯⋯⋯⋯⋯⋯⋯⋯⋯⋯ ⋯⋯⋯⋯⋯⋯⋯⋯⋯⋯⋯⋯⋯⋯ Mini bosses have a random cooldown between one and four days and the availability can be checked in the bottom left house of Lavender Town by Mystic Meg, or in the house right next to the Costume Mart on the top left in Ecruteak City by Mystic Mog. Mini Bosses are a thing to get the caught data from Pokemon that are currently not catchable. ⋯⋯⋯⋯⋯⋯⋯⋯⋯⋯⋯⋯⋯⋯ ▹ Hoenn Champion ⋯⋯⋯⋯⋯⋯⋯⋯⋯⋯⋯⋯⋯⋯ Mewtwo Ho-Oh Lugia Rayquaza Kyogre Groudon ⋯⋯⋯⋯⋯⋯⋯⋯⋯⋯⋯⋯⋯⋯ Gyarados does well against all of the listed Mini Bosses, but Primal Kyogre. Ferrothorn can also beat and wear down bulkier Mini Bosses such as Primal Kyogre and Lugia with Leech Seed. Reflect and Light Screen support can also help the attackers to survive the hits of the legendary Pokémon better. Prankster Thunder Wave is also nice to cripple the opponents speed stat. Chansey walls all of the Mini Bosses above and can wear them down with Toxic. ⋯⋯⋯⋯⋯⋯⋯⋯⋯⋯⋯⋯⋯⋯ ⋯⋯⋯⋯⋯⋯⋯⋯⋯⋯⋯⋯⋯⋯
-
Greetings fellow trainers: I wrote a guide about this back in 2016 and due to how the streaming scene has changed it's time to provide more updated information about how to stream on Twitch. So I won't string along a wall of text with images and information like I had in my old thread. The reason for this is streaming has become much easier to get started and there are some great people who have created videos on how to set up you're stream. So I won't be re-inventing the wheel here, but providing information to guides created by people who provide information about everything from which programs to download to setting up everything down to the specific settings. Without further adieu let's get into the meaty stuff. Below you will find the steps needed to get set up to streaming on Twitch. There are three points in which we will touch on and they are the following Creating a Twitch Account. Downloading a streaming program Getting your stream to work. Notifications and Overlays Creating a Twitch Account Creating a Twitch account is very simple and easy. If you click on this LINK you will be taken to a quick easy guide on how to create a Twitch Account. Once you have created your account proceed to the next step which is downloading a streaming program. Downloading a Streaming Program So there are a few streaming programs out there to use currently. A majority of streamers use OBS which is a free program to use. You can download OBS by clicking this LINK. Now that we have a Twitch Account and OBS downloaded lets dive into the best part of streaming. Which is getting your stream on Twitch so your viewers can watch you play PRO. Getting Your Stream to Work So Just last month a group of people who's main focus is to help old and new streamers get their OBS settings set up correctly to optimize their computers and provide a great streaming environment . The YouTube group called Gaming Careers have a handy set of playlists which break down setting up OBS. Their most recent video on setting OBS up can be found by clicking this Once you have finished setting up OBS let's take a venture into setting up notifications and overlays. Notifications and Overlays Now that we have a Twitch account, OBS downloaded, and have OBS set to stream on Twitch let's get into Notifications and Overlays. I personally really like using Player.me. They have a great playlist which breaks down how their overlays work and how to get them into your OBS. The playlist can be viewed on YouTube by clicking this and if you are already past creating the overlays and want to add them to OBS you can watch their OBS video by clicking this Frequent Asked Questions "FAQ" Question: Where should I stream PRO under? Answer: Most players will stream it under Sun & Moon.
-
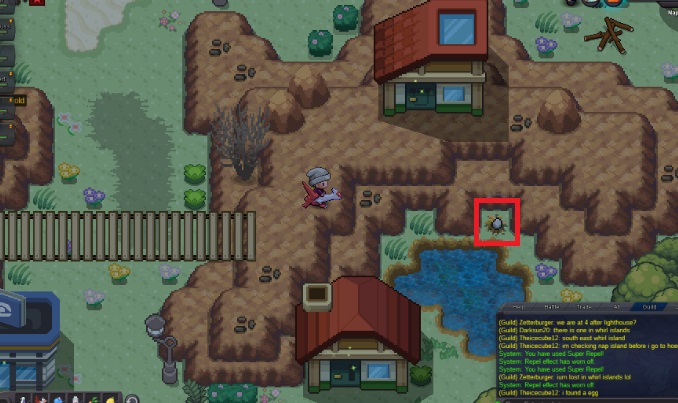
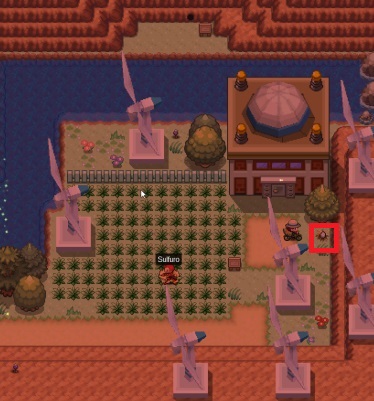
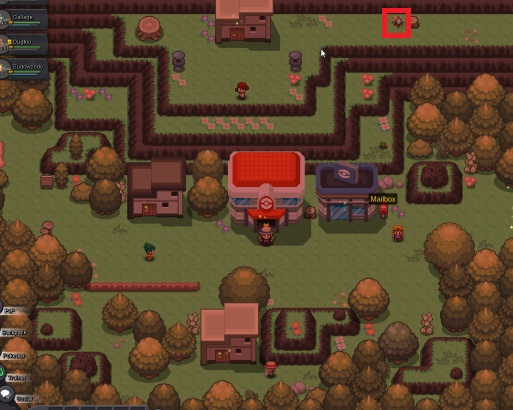
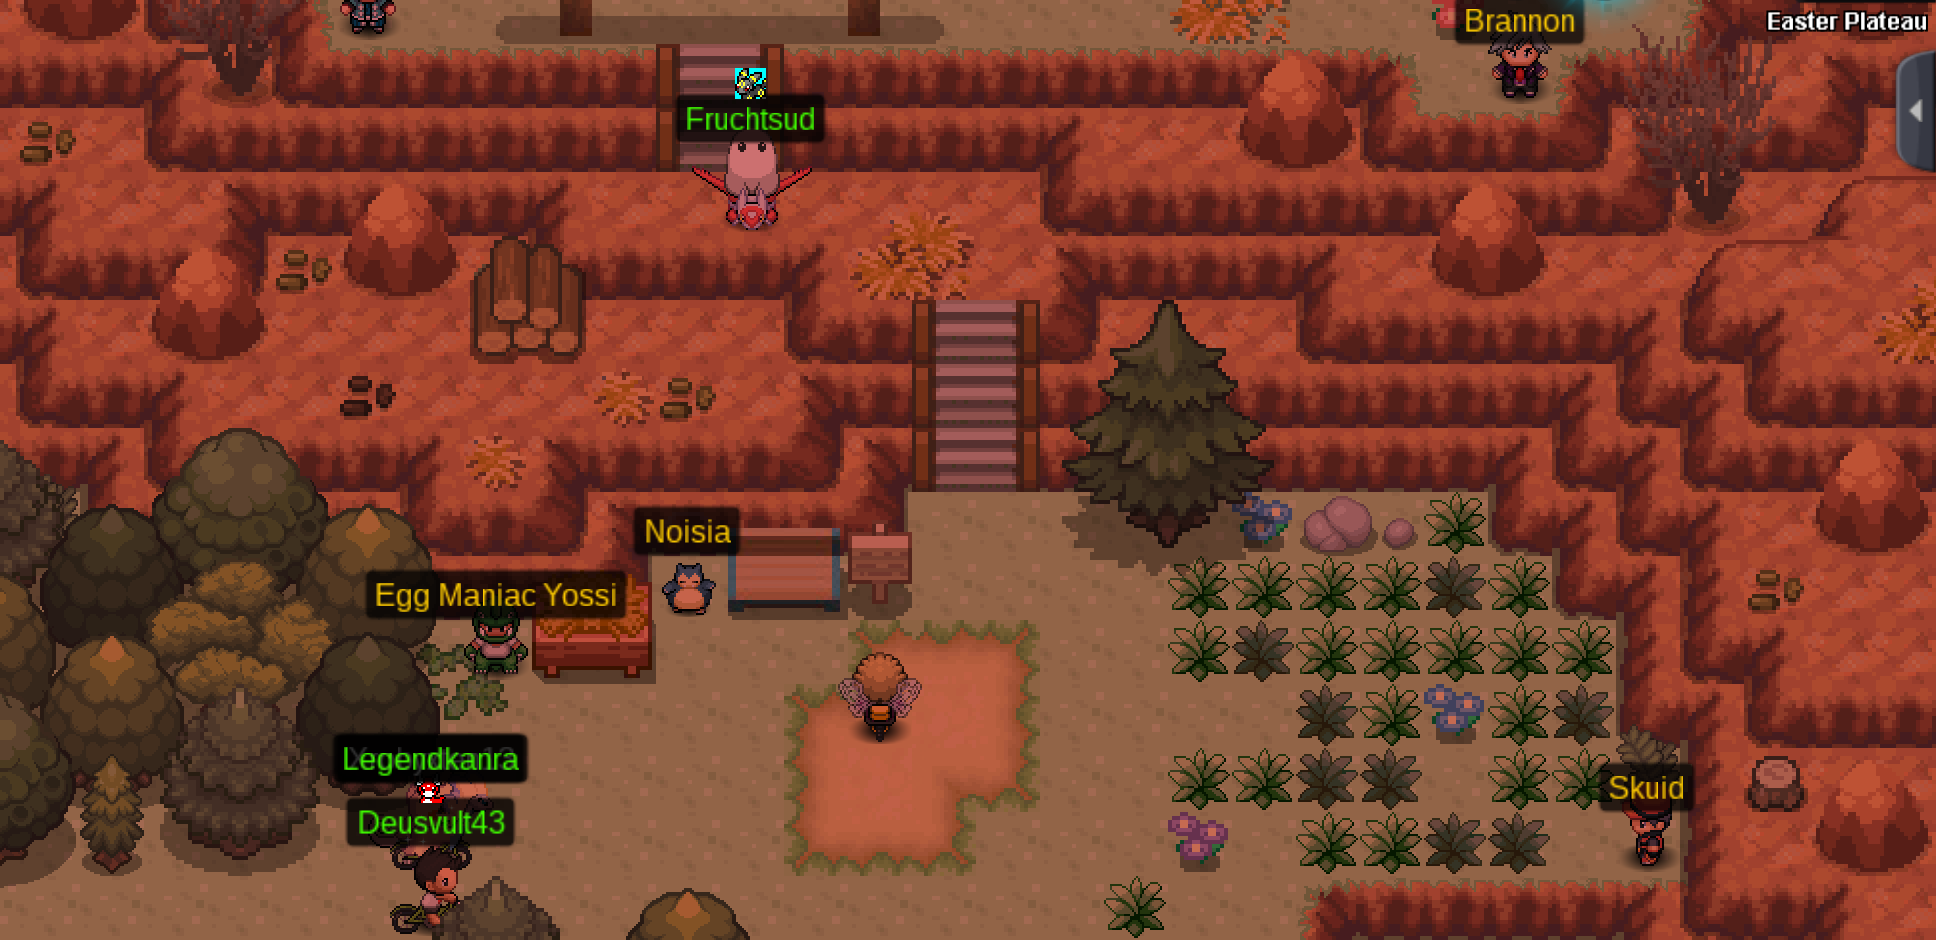
GOLD SERVER PRESENTS.. WhiteSyndicate's Easter Egg Hunt Guide Welcome to our Easter Egg Hunt Guide, please find below locations of all known easter egg locations! if you have a location we dont know about please share a screenshot so it can be added to the list! This Guide is now complete with all egg locations :) While your at it, why not take a look at our Guild Portfolio? You can find the link in my signature :) Make sure to talk to the egg maniac at Easter plateau via vermilion city to start the quest! For people having issues with the egg maniac: Kanto Locations: Johto Locations: Hoenn Locations: Sinnoh Locations: Special Egg Locations: Rewards:
- 27 replies
-
- 12
-
-
Pewter Museum's fossil quest [*]Go to Pewter City and visit the Museum (located in the north of Pewter City) [*] [*]Speak with the NPC called "Curator Nenius" [*] [*]You have to donate following fossils: Claw Fossil Dome Fossil Helix Fossil Old Amber Root Fossil [*]After you donated all 5 fossils, the NPC will award you 1x Reroll ticket Dig spots (Rock Tunnel 2) Brock Boss there is a chance to get one by breaking down rocks in any of the 6 Excavation sites Excavation sites (available through the shop after 4800 discoveries) for 300 artifacts One is available during the Celebi quest through an NPC in Ruins of Alph Dig spots (Rock Tunnel 1 | Slowpoke Well L1) Brock Boss there is a chance to get one by breaking down rocks in any of the 6 Excavation sites One is available during the Celebi quest through an NPC in Ruins of Alph One is available during the Kanto story in Mt. Moon Helditem 1% for the Kabuto spawn Dig spots (Mt. Moon B2F | Slowpoke Well L1) Brock boss One is available during the Kanto story in Mt. Moon there is a chance to get one by breaking down rocks in any of the 6 Excavation sites One is available during the Celebi quest through an NPC in Ruins of Alph Helditem 1% for the Omanyte spawn Dig spots (Route 3 | Slowpoke Well L1) Brock boss there is a chance to get one by breaking down rocks in any of the 6 Excavation sites Excavation sites (available through the shop after 4800 discoveries) for 400 artifacts Dig spots (Rock Tunnel 2 | Mt. Mortar 1F) Brock Boss there is a chance to get one by breaking down rocks in any of the 6 Excavation sites Excavation sites (available through the shop after 4800 discoveries) for 300 artifacts One is available during the Celebi quest through an NPC in Ruins of Alph
-
Vulcan Island How to go to Vulcan Island Requirements Travel NPC's [*]Main questline How to reset your questline Magma variation Rewards (crowdsourced) Aqua variation Rewards (crowdsourced) [*]Rin Boss & Lime Boss [*]Challenger Rick (daily quest) Daily quest Rewards Speak with the Mayor Ahok, he is located in Vulcanic Town House 1 (the first house right of the Pokecenter) [*]Go to the Vulcan Forest, follow the path to Mt. Summer Exterior and speak with the Magma Grunt [*]Go to the Kalijodo Lake and speak with the Aqua Grunt [*]Fight your way through the Kalijodo Cave until you reach the Team Aqua Leader [*]Fight the Team Aqua Grunt Leader Politoed | Ludicolo | Swampert | Staraptor | Porgyon-z | Landorus [*]Find all 8 Gems in the Kalijodo Cave [*]Speak with the Magma Grunt outside of the Kalijodo Cave [*]Go back to the Vulcan Forest and follow the path to Mt. Summer Exterior [*]Fight your way up the Mt. Summer and talk to the Team Magma Grunt Leader [*]Go back and speak with the Mayor Ahko Team Magma Grunt Leader Team Magma Set Red/Black Summer clothes Green/Black Summer clothes White/Red Summer clothes White/Blue Summer clothes Mayor Ahko Feebas Hat Slowking Crown Shellos Hat Chinchou Hat Politoed Hat Magikarp Hat Qwilfish Hat Speak with the Mayor Ahok, he is located in Vulcanic Town House 1 (the first house right of the Pokecenter) [*]Go to the Kalijodo Lake and speak with the Team Aqua Grunt [*]Go to the Vulcan Forest, follow the path to Mt. Summer Exterior [*]Fight your way up to the Mt. Summer Summit [*]Defeat the Team Magma Grunt Leader Flareon | Camerupt | Raichu | Porygon 2 | Gardevoir| Heatran [*]Speak with the Aqua Grunt in Mt. Summer 4F2 and take the Mythical Core [*]Search for Mt. Summer Chamber R2 or R5 (unconfirmed if it is random or could be somewhere else and put your Mythical Core on the sacred stone [*]Talk to the Aqua Grunt in front of the Cave located in Mt. Summer Exterior [*]Find the Team Aqua Grunt Leader in Kalijodo Cave B2F [*]Go back and speak with the Mayor Ahko Team Aqua Grunt Leader Team Aqua Set Green/Black Summer Clothes Black/Red Summer Clothes Mayor Ahko Slowking Crown Whiscash Hat Chinchou Hat Rin Boss Location: Vulcan Island shore Team: Volcarona | (Bug Buzz, Flamethrower, Quiver Dance, Giga Drain) Mega Charizard X | (Dragon Claw, Wing Attack, Flare Blitz, Shadow Claw) Moltres | (Flamethrower, Ancient Power, Air Slash, Roost) Infernape | (Flare Blitz, Mach Punch, Thunder Punch, Acrobatics) Magnezone | (Thunderbolt, Tri Attack, Flash Cannon, Thunder Wave) Volcanion | (Hydro Pump, Flamethrower, Sludge Bomb, Earth Power) Rewards: 3 PVE coins, 80 summer points Cooldown: 3 days Lime Boss Location: Kalijodo Lake Team: Volcarona | (Bug Buzz, Flamethrower, Quiver Dance, Giga Drain) Mega Charizard Y | (Heat Wave, Air Slash, Dragon Pulse, Earth Power) Entei | (Sacred Fire, Stone Edge, Iron Head, Toxic) Blaziken | (High Jump Kick, Brave Bird, Flare Blitz, Knock Off) Magnezone | (Thunderbolt, Tri Attack, Flash Cannon, Thunder Wave) Reshiram | (Draco Meteor, Heat Wave, Psychic, Earth Power) Rewards: 3 PVE coins, 80 summer points, Wailmer Mount, 100 bonus summer points if you beat both bosses Cooldown: 3 days Summer Hats W-Sea Shellos Hat | 250 points E-Sea Shellos Hat | 250 points Chinchou Hat | 250 points Politoed Hat | 250 points Poliwhirl Hat | 250 points Wooper Hat | 250 points Qwilfish Hat | 250 points Whiscash Hat | 250 points Feebas Hat | 250 points Magikarp Hat | 250 points Slowking Crown | 300 points Consumables Rare Candy | 150 points Revive | 130 points Hyper Potion | 110 points Clothes Summer Clothes W-B | 350 points Summer Clothes W-R | 350 points Summer Clothes W-G | 350 points Summer Clothes B-R | 350 points Summer Clothes B-G | 350 points Summer Clothes B-B | 350 points
- 89 replies
-
- 13
-
-
SUMMARY I. Introduction II. What are IVs? III. Method 1 : TOTAL 5 IVs IV. Probability for TOTAL 1 to 6 IVs V. Method 2 : IV Probability VI. References I. Introduction As we can notice, it’s very hard a find an epic PKM: Have the right ability, have the right nature, and have epic IVs. The concept of epic depends of each person, we don’t have the same perception of what PKM is epic or not. We have an idea of the probability to find one PKM with the rarity tiers (it’s not precise sadly), we know the probability for ability (H.A. = 5%), we all use Synchronize to find the right nature with 50% probability, but nobody did a guide about the probability for IVs. So, I decided to post two methods to apprehend the rarity of different PKM based on IVs. It’s not really a guide, there is no method to have better IVs on PKM, and my post will not give the answer to the big question: “Is my PKM epic?”. All my guide is only one indicator of rarity. II. What are IVs? IVs means Individual Value, you can find it on your PKM in orange : IVs are predefined values from 1 to 31, they are random generated when you engage a PKM in the wild. You can’t change it, a PKM born and die with his IVs. With a value from 1 to 31 in the 6 different statistics, there are 31^6 = 887 503 681 combinations of IVs. It means every PKM is almost unique for his IVs. Other interesting fact: the combination 31 in each stats has a probability of 1 / 887 503 681. And the sum of the ID PKM for Red, Blue and Yellow Server is around 50m, so we are not even close to find one perfect PKM in IVs :devil: What is the point to have “good” IVs? The all point to have “good” IVs is to have better stats for fight. You can see the formula to calculate the statistic of a PKM : Formula from https://bulbapedia.bulbagarden.net/wiki/Statistic I will take an example with the statistic ATK for a PKM lv 100 with 80 Base Stat (average of Base Stat), 252 EV and Adamant nature: [/b] ATK = ( ( ( 2 * base + IV + EV/4 )* Lv ) / 100 + 5 ) * Nature ATK = ( ( ( 2 * 80 + IV + 252/4 ) * 100 ) / 100 + 5 ) * 1,1 ATK = ( ( (223 + IV ) + 5 ) * 1,1 ATK = 250,8 + IV *1,1 So, in lv 100, the IVs will add 1 stat for each IV. And for a bonus nature, it will add 1,1 stat for each IV. If my PKM, in the example, has 26 in IVs ATK, he will have 250,8 + 28,6 = 279,4 ATK. To resume, having goods IVs in each stats can help in fight, but the influence is not huge. So, you don’t need the perfect IVs on your PKM, you just need to have correct IVs. III. Method 1: TOTAL 5 IVs. I will base this part of the guide on the majority of PKM : for a lot of PKM, one statistic is useless. An example: For Scyther, the statistic SPATK is useless, he can have 1 or 31 IVs, this statistic will never be use. So, the TOTAL 5 IVs is the sum of his IVs except the useless statistic. In my example, for Scyther : TOTAL 5 IVs = 50 (ATK 15 + DEF 04 + SPD 01 + SPDEF 13 + HP 17) The same method can be use with another TOTAL IVs, depends of the PKM you select. Imagine, I don’t like this Scyther, his ability and nature are perfect, but his IVs seems bad for me. I don’t care about having 31 in ATK and SPD, I just want have a TOTAL 5 IVs = 120 at least. But, before I chase one with this TOTAL 5 IVs, I want to estimate how much time I will take to chase it. So, I need to calculate the probability to have at least a TOTAL 5 IVs = 120. How can I calculate it? The IVs are randomly generate like dices, it’s as if I have 5 dices with 31 sides and I want the number of time I can have the sum 120 for this dices. The probability is determinate by this formula: With : s = sum wanted => 120 n = number of dices => 5 x = number of sides => 31 k = all value undivided 0 to (s – n) / x So, I need to do the sum of probability TOTAL 5 IVs = 120 to 155, and I will have my probability to have a TOTAL 5 IVs = 120 at least. Lucky me, I have Excel. And the answer to the sum of probability TOTAL 5 IVs = 120 to 155 is 2,296%. So, if I want a Scyther with a sum of 120 in his 5 useful stats, I have 2,296% to have it. In average, I need to catch 44 Scyther Technician Adamant before I can have one with TOTAL 5 IVs = 120. What is the point to know this? The TOTAL 5 IVs is one indicator of rarity, it will no help to chase better IVs, you can be lucky and find it in first try or catch 500 before have it. But, it’s a tool for decision-making: Should I buy or chase? The TOTAL 5 IVs gives you a view of how much time you will take for chase a PKM, and help you determinate the price you can pay for buying a PKM. It can be also a tool for chasing a PKM: for a PKM rarity tiers 1, it’s easy to catch a lot, so for a first selective sorting of your catches, you can decide what percentage of PKM you will release before looking in specifics IVs. For example : I will keep only the 10% better PKM in TOTAL 5 IVs, the 10% matches to TOTAL 5 IVs = 107. So, I will release all PKM under this sum and only after I will look in specifics IVs. Because even if a Scyther has 31 in ATK and SPD, with TOTAL 5 IVs = 107, he will have only 45 in the rest of his stats. The TOTAL 5 IVs has a big disadvantage, this method doesn’t take into account specifics stats. Two PKM can have the same TOTAL 5 IVs, but one can have 31 in a vital statistic when the other PKM will have 1. It’s up to you to use your brain after using the method x) IV. Probability for TOTAL 1 to 6 IVs In the previous part, we saw what is the TOTAL 5 IVs, in this part, i publish the probabilities associates to each TOTAL IVs. It's easy to use, you look for the TOTAL IVs you want and go look to the sum to know what is his "rarity". For example: TOTAL 5 IVs = 90 => 32,222%, it means that 32,222% of PKM has same or better TOTAL 5 IVs than him. The red lines delimit the percentages: 1% / 2% / 3% / 5% / 10% / 20% / 30%. TOTAL 1 IVs TOTAL 2 IVs TOTAL 3 IVs TOTAL 4 IVs TOTAL 5 IVs TOTAL 6 IVs I share the Excel i used, so you can use it too. You can download it with this link: https://www.dropbox.com/s/e4dvjolkk5p1b26/PROBABILITY IVS.xlsx?dl=0 In the right top, you can click on download. If something is wrong with the Excel or the uploader, tell me. Or you can use the online calculator i made : T5IVs Calculator by Kaminokage : http://fsogame.free.fr/tools/calct5ivs.php V. Method 2 : IV Probability As we saw previously, the TOTAL 5 IVs doesn’t take into account specifics stats, so another method exist to evaluate one PKM. You can calculate directly the probability for specifics IVs. The formula is : This formula is good if you want to use the 6 IVs to calculate your probability, but if you want only 5 IVs (for example: Scyther again), you can remove the part with the useless stats (SPATK for Scyther). This easy remove is explain because you don’t care about your SPATK, you can have 1 or 31 it’s the same: if IVs SPATK = 1, so (32-1)/31 = 1, and multiply by 1 changes nothing to the probability x) I will take an example of using this method: Same than before, I want a Scyther, but this time I want in IVs: At least 30 in ATK At least 20 in DEF At least 30 in SPD At least 20 in SPDEF At least 20 in HP I calculate his probability: IVs Proba = ((32-ATK)/31)* ((32-DEF)/31)* ((32-SPD)/31)* ((32-SPDEF)/31)* ((32-HP)/31) IVs Proba = ((32-30)/31)* ((32-20)/31)* ((32-30)/31)* ((32-20)/31)* ((32-20)/31) IVs Proba = (2/31)* (12/31)* (2/31)* (12/31)* (12/31) IVs Proba = 0,000241432 = 0,0241% So, it means than 0,0241% of Scyther will have exactly or better than the IVs I want. So I need to farm in average 4142 Scyther to have it. This method seems nice, but it has disadvantage too. You can’t use it for evaluate the value of your PKM. This method is too much selective. I will take another example to explain it: My dear Scyther, again, if I calculate his IVs Proba with this method I obtain: 14,6894% This result seems absurd, it would mean 85,32% of Scyther are worse than him. It’s because, with this method, only better IVs than 17 in HP are selected. A lot of part of Scyther are deleted without taking care of the rest of his IVs. It’s the same for a PKM with 31/1/1/1/1/1 in IVs, the method will only select the PKM with 31 IVs in ATK, so the result will be 3,2258%. Even if the value seems nice, the PKM is trash. So, again, it’s up to you to use your brain after using the method x) You can find in my Excel a Calculator for this IVs Proba. VI. References Formula for statistics : https://bulbapedia.bulbagarden.net/wiki/Statistic Link to my Excel : https://www.dropbox.com/s/e4dvjolkk5p1b26/PROBABILITY IVS.xlsx?dl=0 T5IVs Calculator by Kaminokage : http://fsogame.free.fr/tools/calct5ivs.php Thanks you for reading, if you see some errors or want to add an other method (or something else) to this post, don't hesitate to contact me :) And sorry for my english, it's not my native language :(
-
EDIT: this is a video that has help the amigos (former richest players in the whole game) to make many cash, it has some useful tips worth watching even if it got posted long ago The Amigos Discord server Join link https://discord.gg/WPgy9WJ ☆☆☆Tips by Kaminokage☆☆☆ 'First, i want to add : To price check PKM, it's easy. Just calculate for each PKM how many hours it takes in average to farm it. Find an hourly wage. And with your time and the hourly wage, you have your price. So, now you know how much you have to sell, and how much you can buy, easy game" ☆ "Don't farm PKM others players already farm if you want to resell. For example: For Xmas Event, don't farm Dratini ! Everybody farm it, just buy a Dratini on Trade if you want one, price will be very low. It will cost you less to buy it than farm it." ☆ "Tip to buy a PKM : No need to lower price ! If you want a PKM, it's because you need it for PVP or collection. It's hard to find goods PKM, don't lose time because you are skinflint. Just calculate the time you will need to farm the PKM, and with the hourly wage you will know if the price is too much or not. For example: your hourly wage can be Cerulean Cave; there you can make 20k per hour without MS. If you see a PKM that will make farm 50 hours in average : 50* 20k = 1m. If the price is lower than 1m, buy it, if the price is higher farm yourself" ---------------------------------- Thanks for reading, I Wish to improve this Guide/Tips and any more useful Ideas/Tips for anything releated to selling and buying, please comment them below your aid is very appriciated This guide has helped us a lot to the point that we have now reach over 200m+

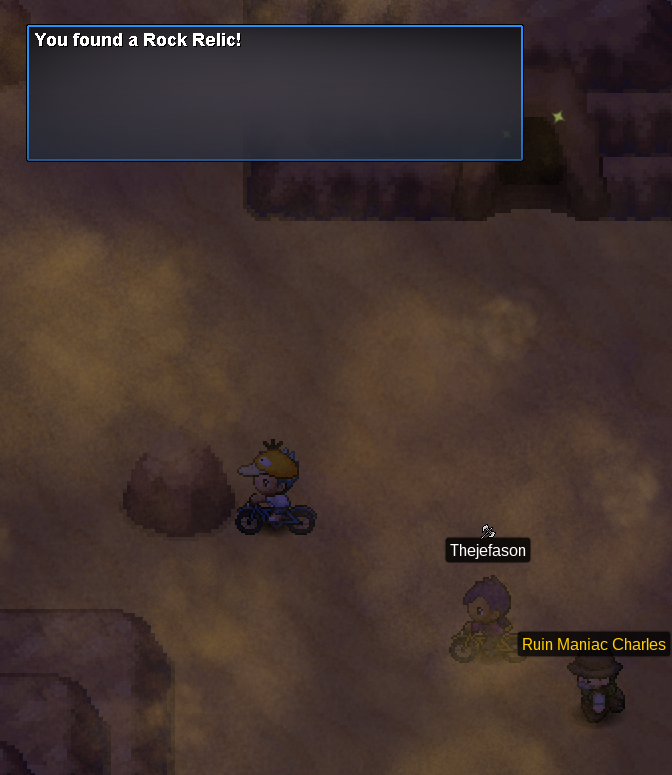
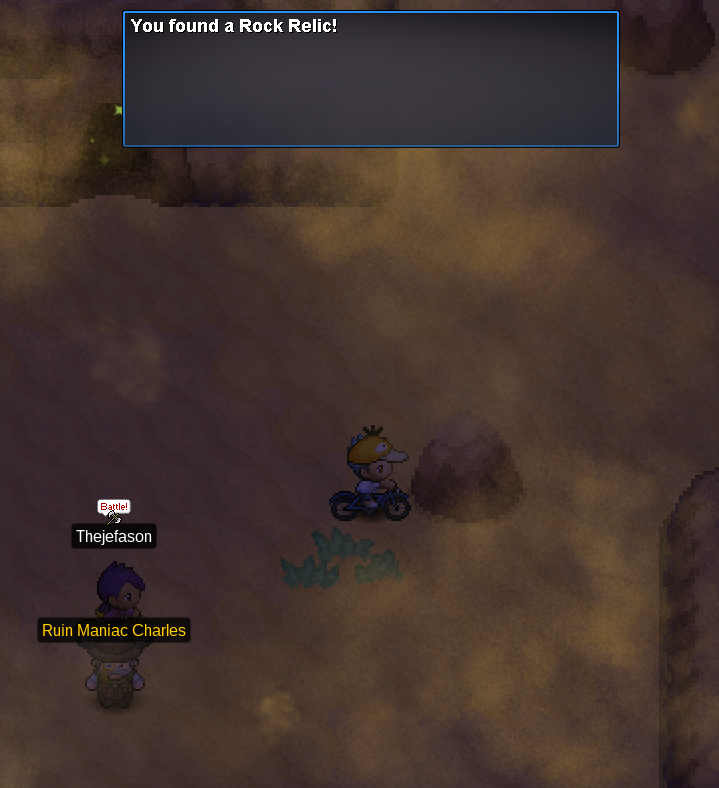
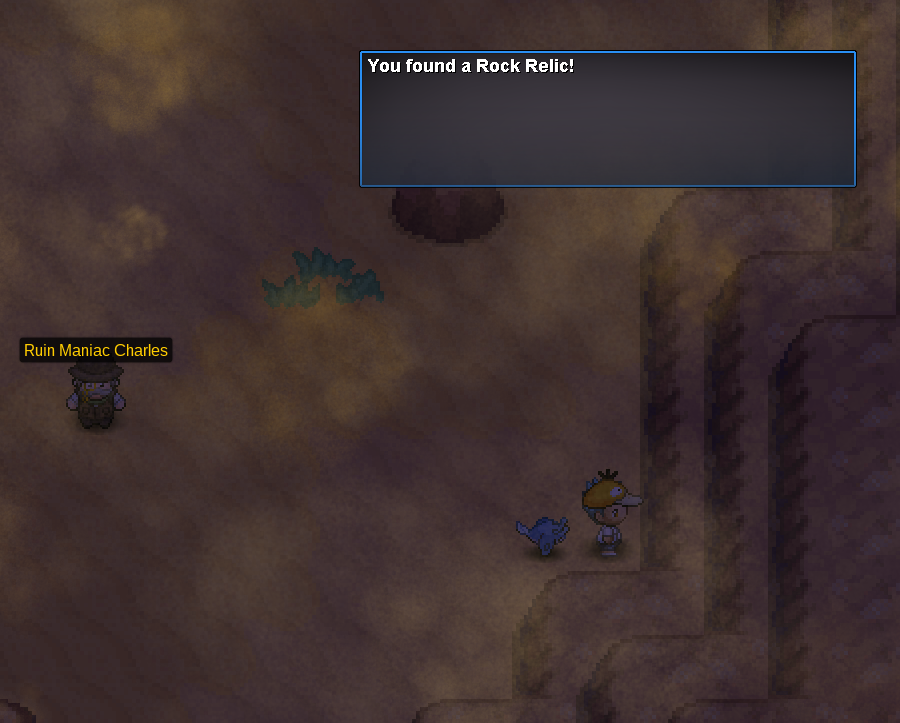
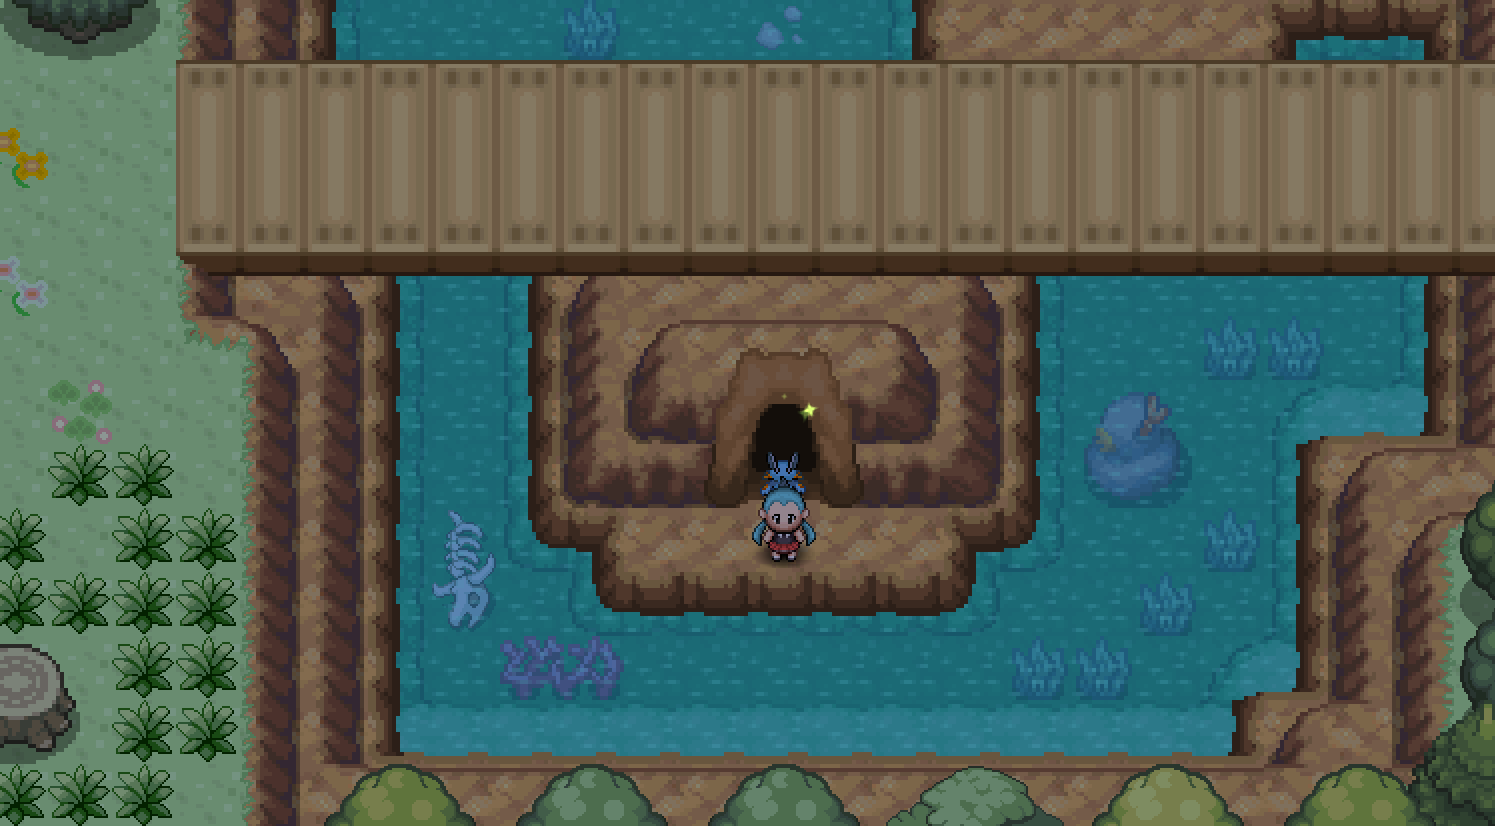
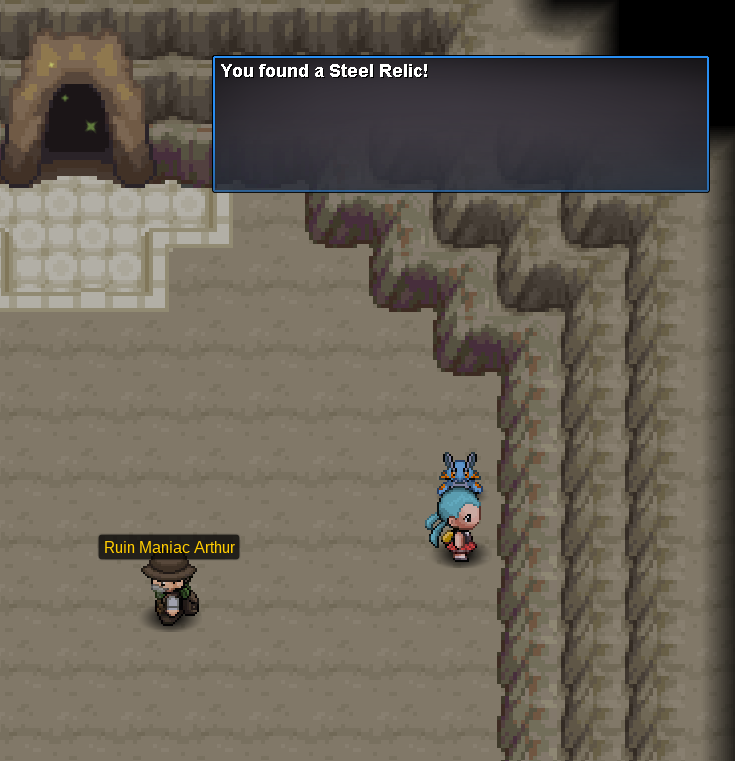
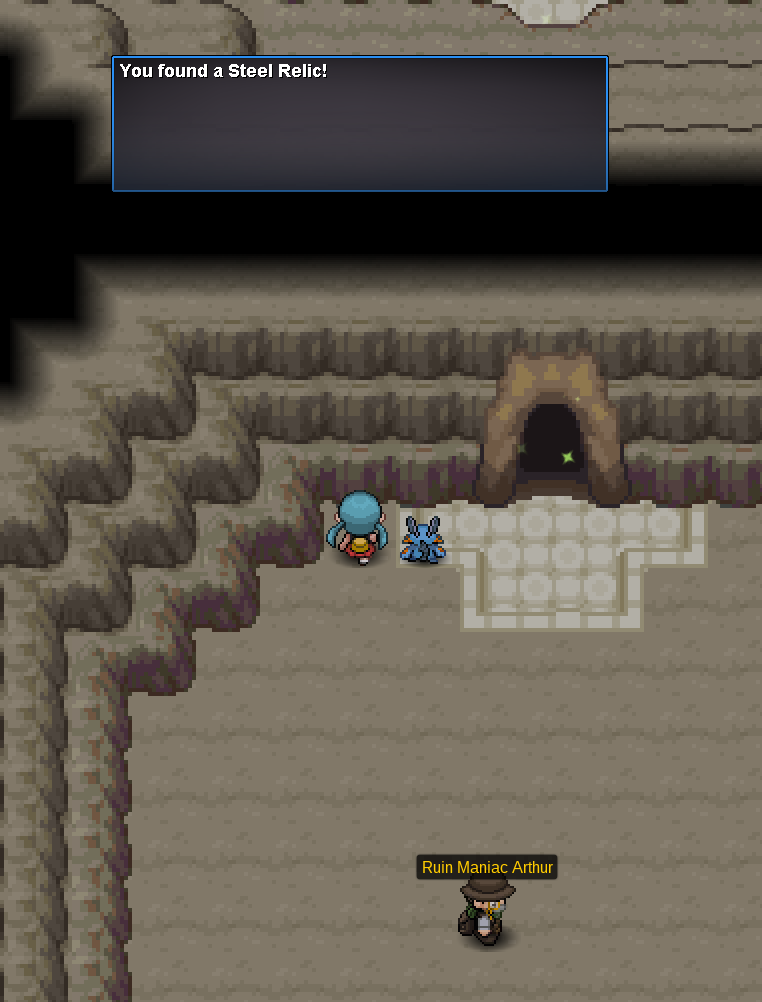
.jpg.659116a66ab78dcf8985d8e05baceb86.jpg)