Search the Community
Showing results for tags 'staff guides'.
-
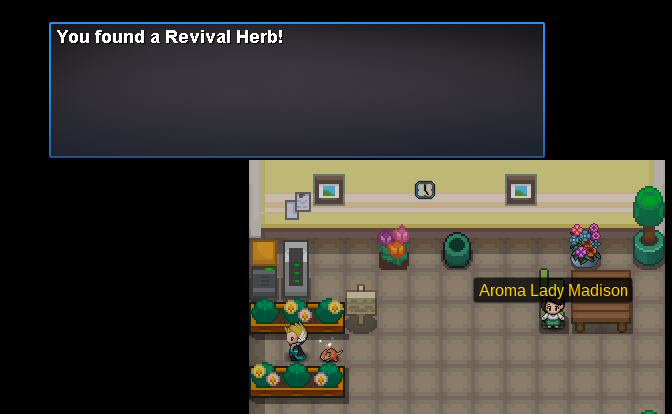
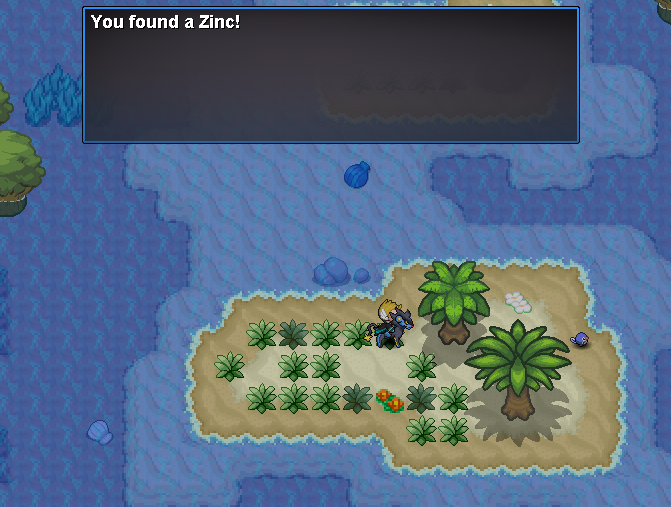
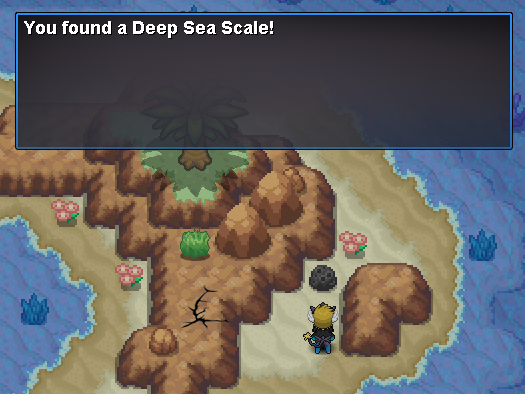
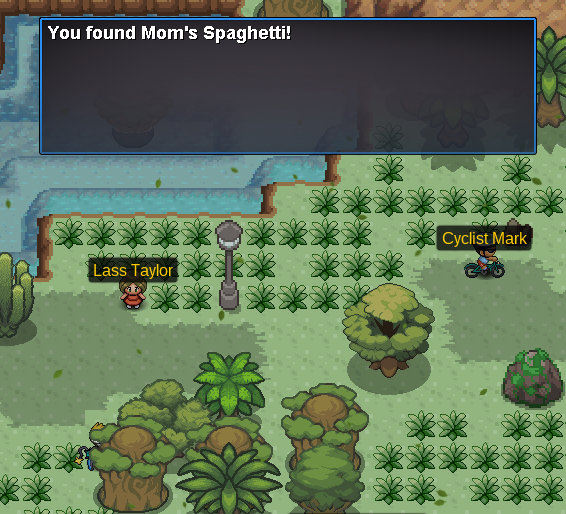
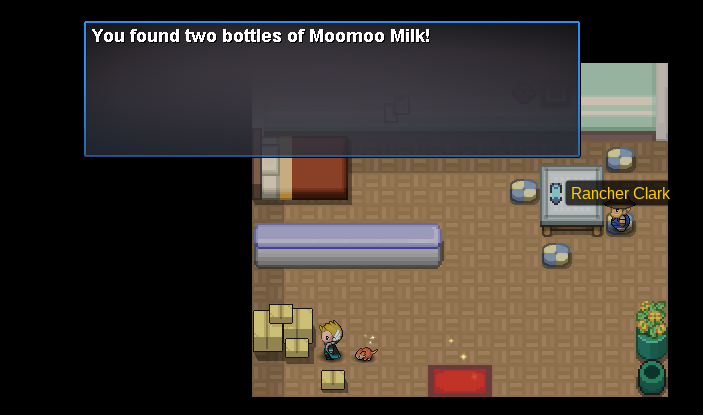
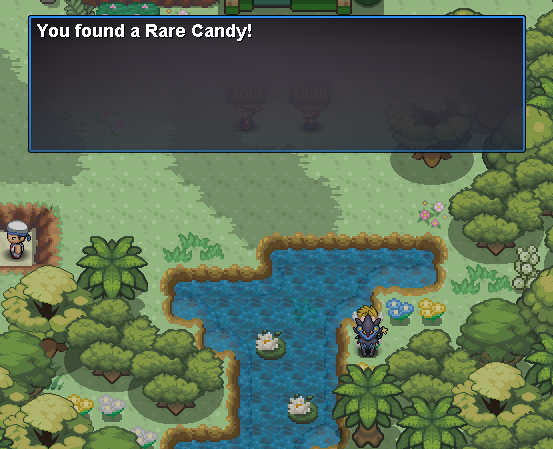
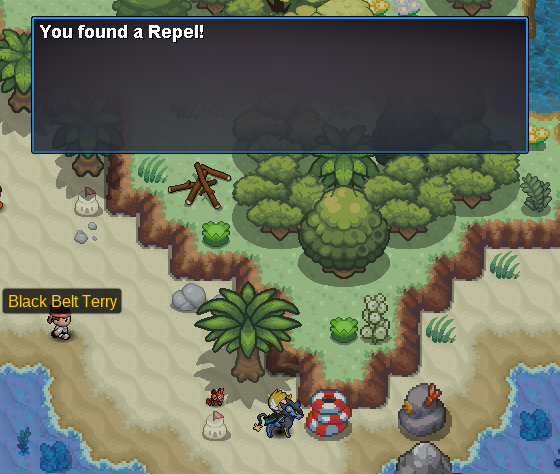
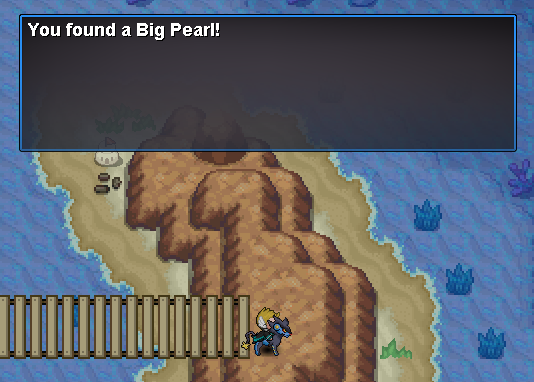
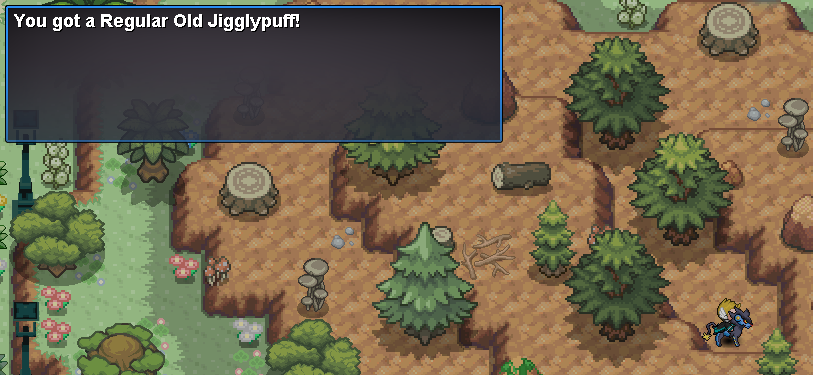
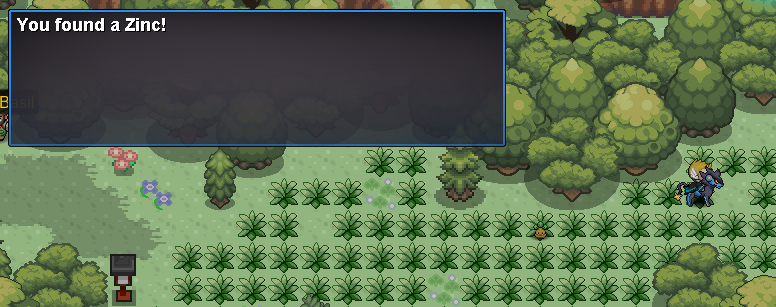
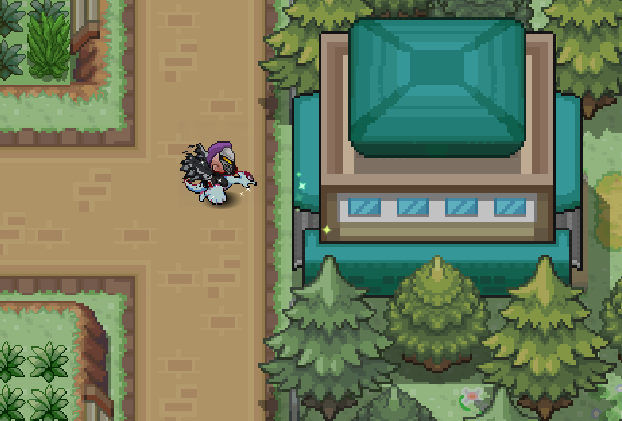
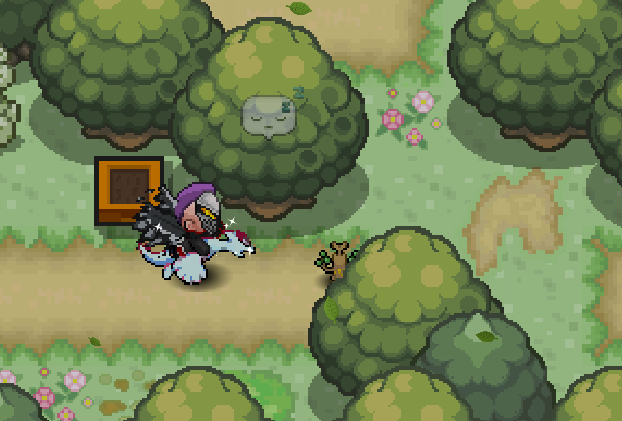
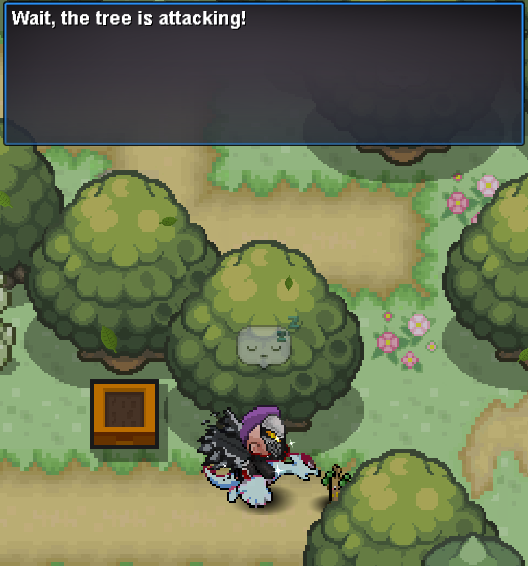
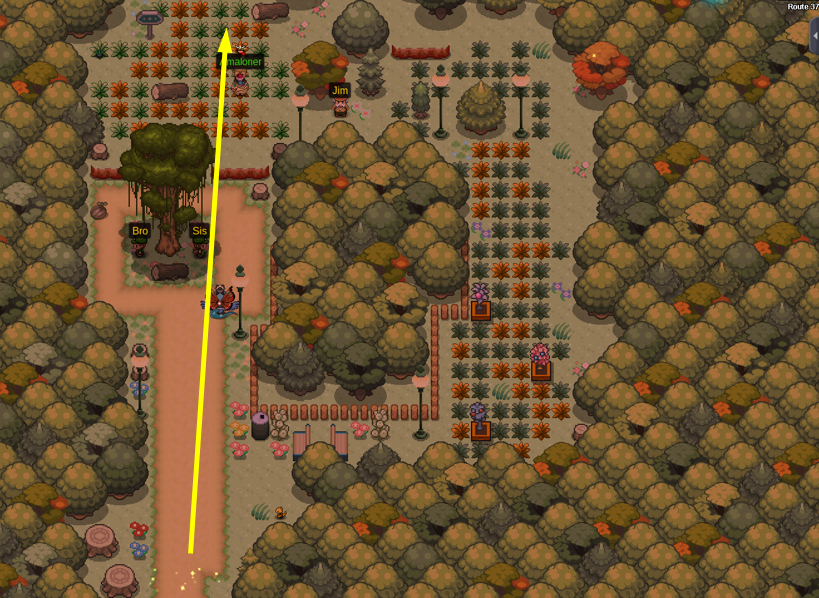
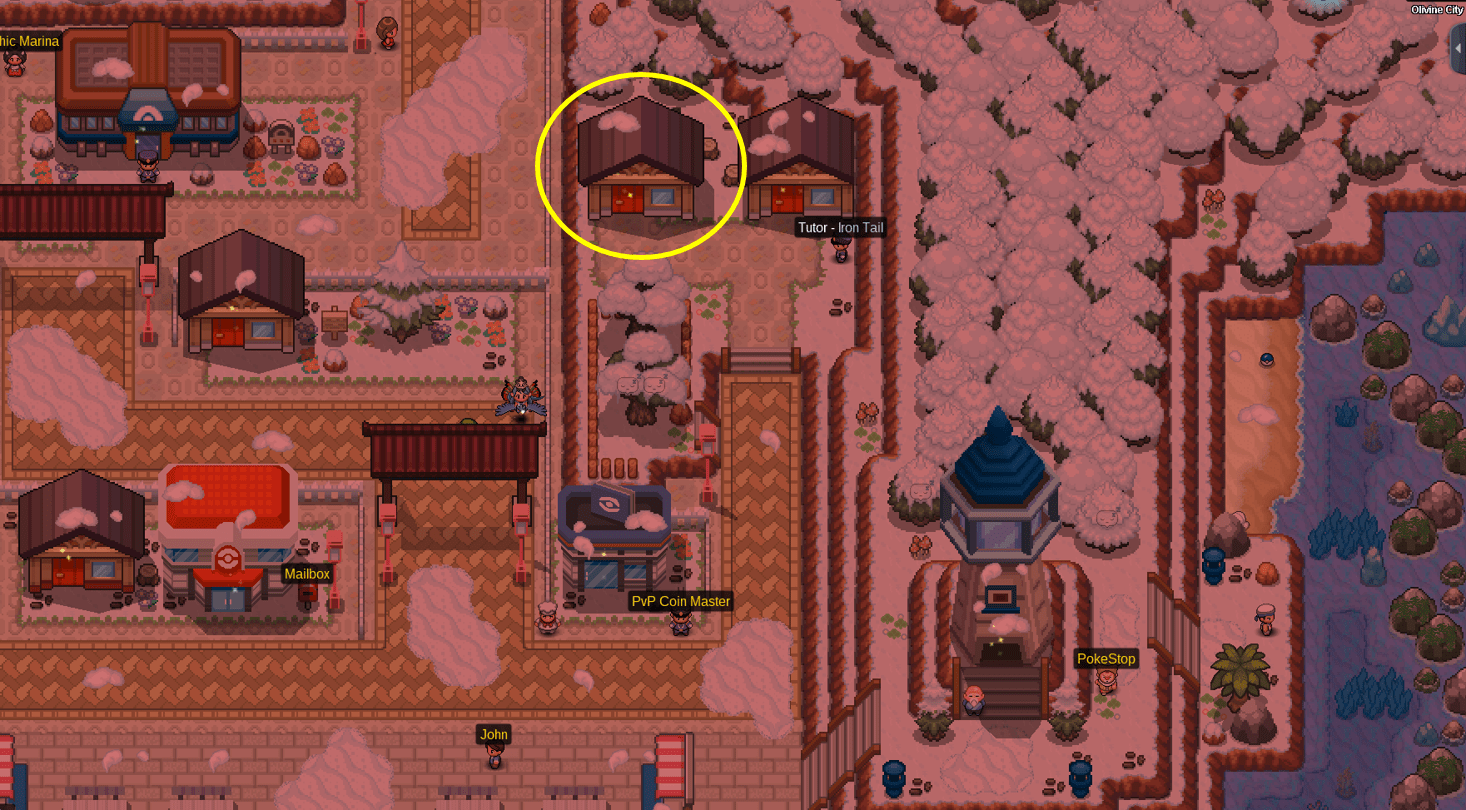
Hey there and welcome to the Nap Island Walkthrough! This guide will cover every quest you will find on this small island. Nap Island will give you the ability to travel between Johto and Hoenn without spending money. Requirement: You will need to be Hoenn Champion to be able to enter the island. How to access: You will have to either go South in Route 41 or North in Route 125. Once you are in Nap Town talk to Claire. She will ask you to help her with something; upon accepting, she will tell you that her cute and adorable Pokémon ran away to bother other people and she will ask you to bring her Pokémon back. Head to the Sleeping Path and you will find a Jigglypuff in front of Nap Cave's entrance. Interact with Jigglypuff and it will start singing; you will then fall asleep giving it the time to run away. Go through Nap Cave to reach the Secret Nap Area where you will spot Jigglypuff. Here you will meet Claire's boyfriend and after talking to him, Jiglypuff will run away again. Talk to Stephan another time and he will battle you. He has a Luxray. After defeating Stephan, you will need to head to Nap Forest where you will meet Jigglypuff in the bottom-right corner of the map. Defeat Jigglypuff to help Stephan catch it and then reach Claire who will thank you for the help. Upon talking to Stephan, he will reward you with a Rocky Helmet. On Nap Shore, you'll find the Elite 4 of Nap Island. It is composed of four kids and the Champion Rin; defeat them all to receive some rewards! Jonathan is the first member of the Nap Island Elite 4. He specializes in Grass type Pokémon. Leavanny, Vicreebel, Shiftry, Exeggutor, Ferrothorn, Whimsicott After defeating him, he will give you a Meadow Plate and you will be allowed to face the second member of the Elite 4. Dylan is the second member of the Nap Island Elite 4. He specializes in Rock type Pokémon. Rhyperior, Crustle, Cradily, Solrock, Tyranitar, Gigalith After defeating him, he will give you a Dawn Stone and you will be allowed to face the third member of the Elite 4. Benjamin is the third member of the Nap Island Elite 4. He specializes in Bug type Pokémon. Scolipede, Armaldo, Heracross, Yanmega, Durant, Galvantula After defeating him, he will give you a Wide Lens and you will be allowed to face the fourth member of the Elite 4. Noam is the fourth member of the Nap Island Elite 4. He specialized in Water type Pokémon. Slowking, Carracosta, Walrein, Whiscash, Crawdaunt, Lanturn After defeating him, he will give you TM 105 - Scald and you will be allowed to face the Champion of the Elite 4. Rin is the Champion of the Nap Island Elite 4. Garchomp, Slaking, Volcarona, Magnezone, Gengar, Gyarados After defeating her, she will give you a Slakoth! Inside the house on the right of Nap Town's Pokecenter, two old people are waiting for someone to help them; talk to the Old Lady Simone to start this quest. She will ask you to bring her the ingredients needed to make a remedy for her sick husband; the only medic on Nap Island. All these ingredients can be easily gathered around the island. Revival Herb Zinc Moomoo Milk Deep Sea Scale If you don't have already a Pokémon that knows the move Aromatherapy, you can catch a Paras in Nap Forest. After bringing her all the ingredients, her husband will feel better and he will reward you giving you the possibility to catch his Munna. Inside the house on Sleeping Path, a young boy who wants to become a rapper is listening to music. His mom hid his dinner because he doesn't want to start his journey. After helping him, he will reward you with $10,000. There are a few items and an abandoned Pokémon that you can pick up during your stay on Nap Island. Route 49 Nap Shore Nap Town Route 135 Sleeping Path Nap Cave Nap Cave B1F Secret Nap Area Nap Forest

- 12 replies
-
- 12
-

-
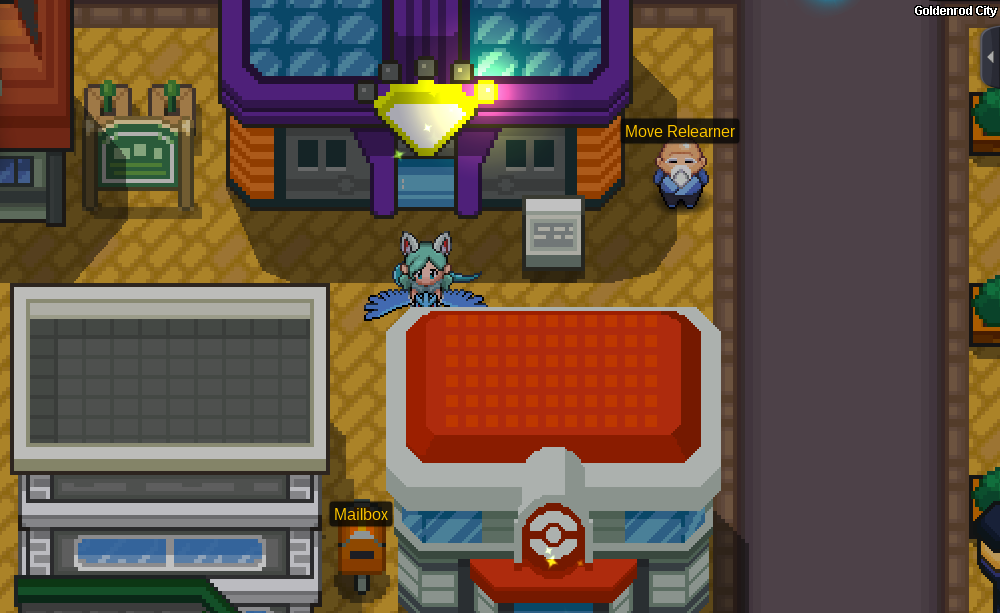
Location Game corner in Goldenrod City Requirements How to use Rewards Syncable Pokemon Shiny Pokemon Random Prizes
-
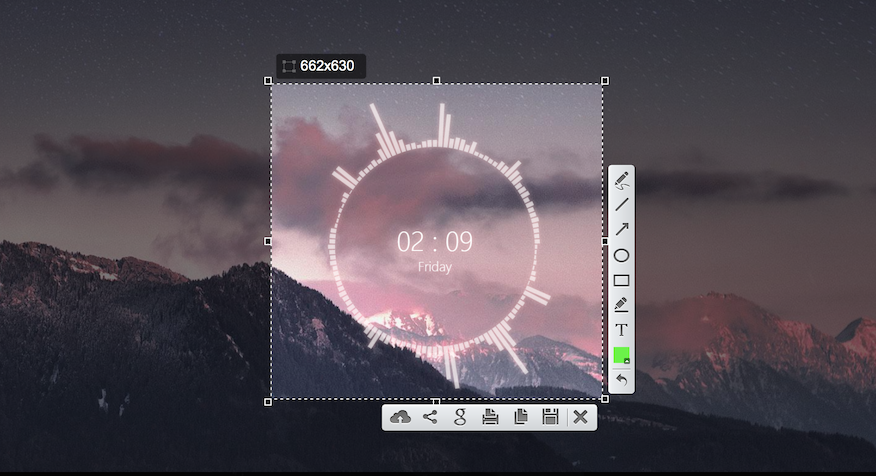
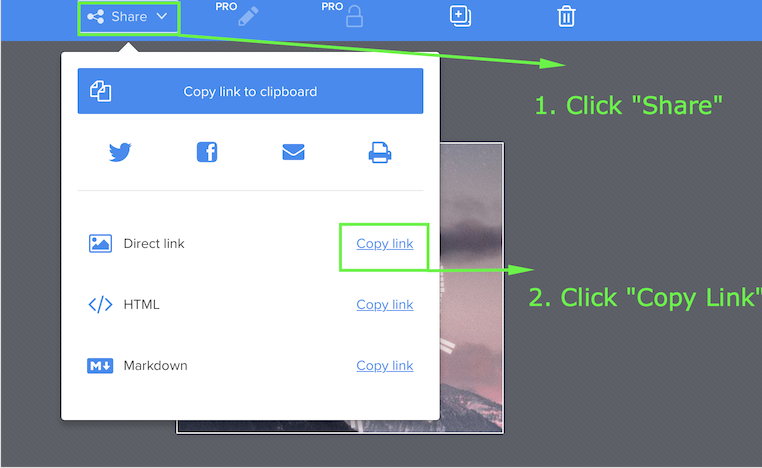
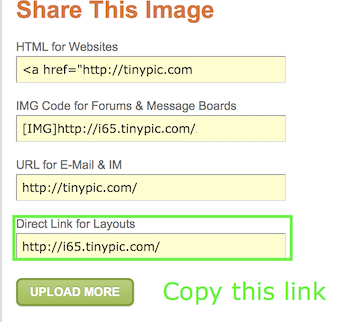
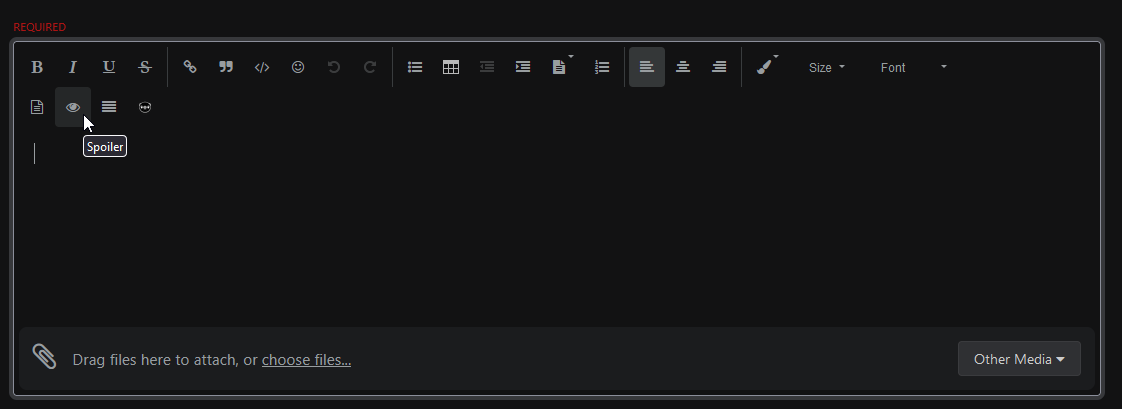
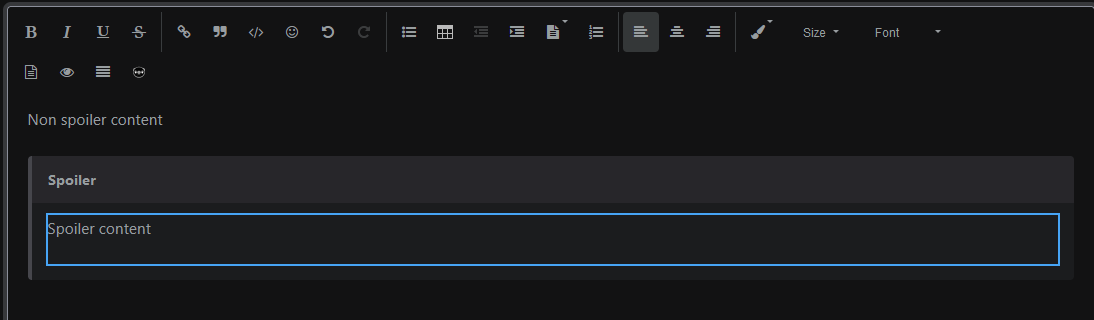
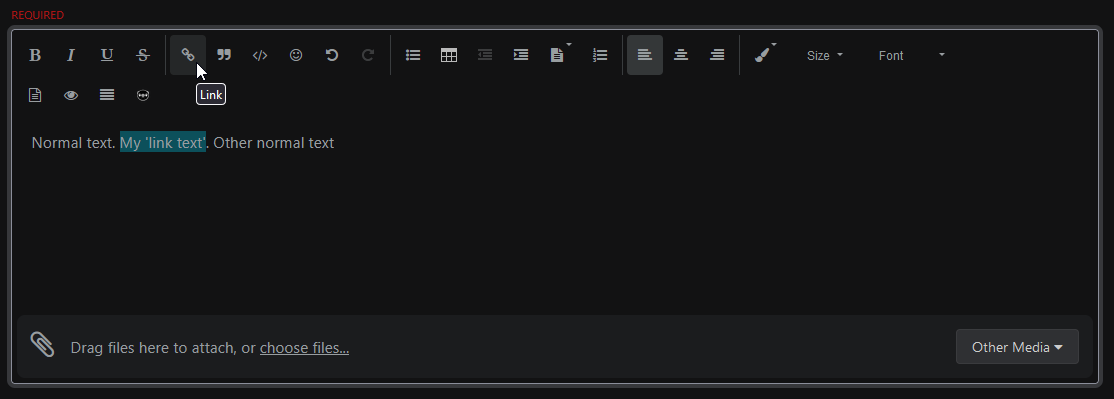
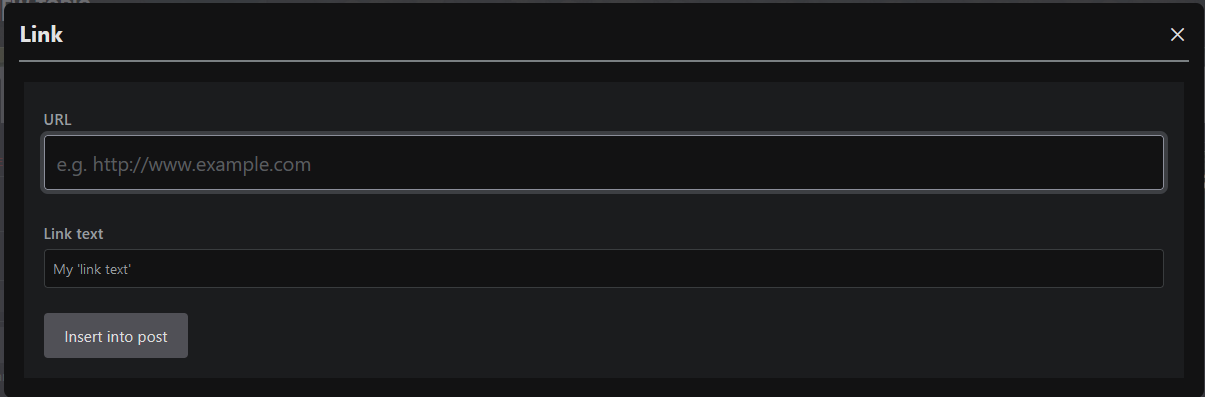
Hi there and welcome to the Forum Images Guide. This guide is designed to help you understand how to attach photos to your threads. It will also discuss the common screen capture applications and how to use them. If you choose to use Lightshot, the first thing you're gonna want to do is download the application below. Download: Lightshot Step 1: Press "PrntScr" on your Keyboard. This will make your screen darker, to allow you to take a screenshot. *For Macs, you'll have to set a hotkey in Lightshot Preferences (Example) Step 2: Left click and drag your mouse over the desired area Step 3: Select the Copy Option Step 4: Go onto your thread and paste by clicking (Ctrl/Cmd+V) or by pressing right click and clicking paste. If you choose to use Gyazo, the first thing you're gonna want to do is download the application below. Download: Gyazo Step 1: Click on the Gyazo Icon, this will bring up a selector. Step 2: Left click and drag your mouse over the desired area Step 3: Your browser will open to a link with your screenshot. Copy the direct link. *The browser link is not the direct link. Please follow the steps below. Step 3: Go onto your thread, select the "Other media" button and pick 'Insert image from URL' and simply add the URL in the new window. If you choose to use Tinypic, the first thing you're gonna want to do is visit the website below. Website: Tinypic Step 1: Choose Your File/Link and Upload it. *If you're uploading a link, Please be sure to select "URL" for the File Type and paste the Link under "URL". *Link must be in .png/.jpg. Step 2: Copy the Direct Link Step 3: Go onto your thread, select the "Other media" button and pick 'Insert image from URL' and simply add the URL in the new window. Spoilers are a very good way to make your thread look cleaner. Usually, this is used for very large photos or if you have a lengthy thread with numerous photos. Below is how you add a spoiler. Step 1: Select "Spoiler" Step 3: Put the image in between the spoiler tags. Hyperlinks are a very good way to avoid messy links on your thread. Usually, this is used for redirecting someone to another thread or website. Below is how you add a Hyperlink. Step 1: Type the word/sentence you wish to hyperlink, highlight it and click the 'link button'. *You can also format (Bold/Italicize/Underline) this text so it's easily noticeable! Step 2: Enter your link.
-
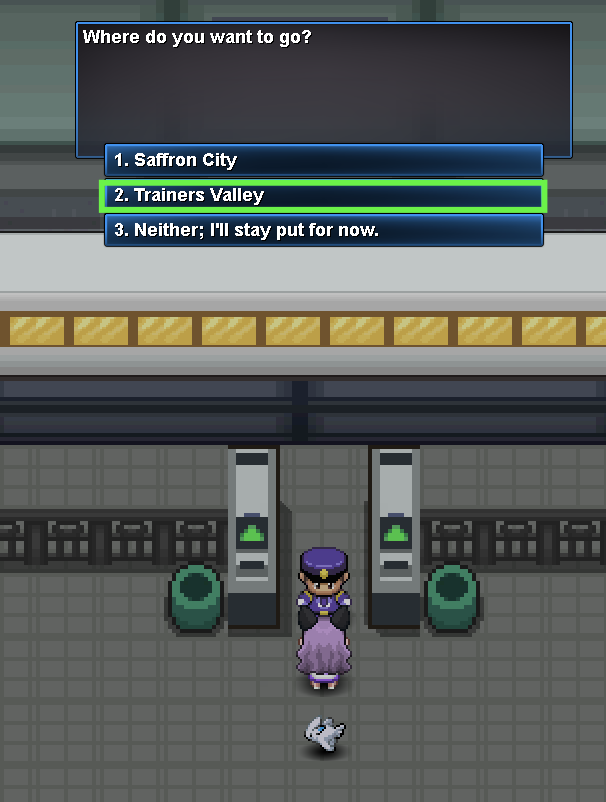
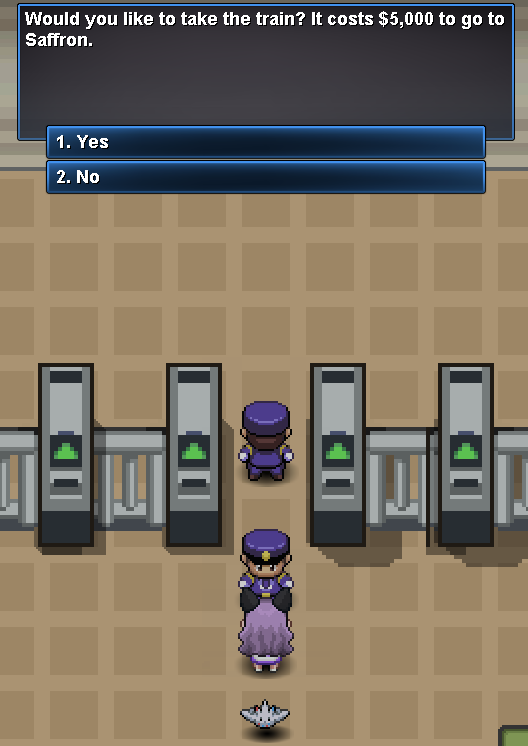
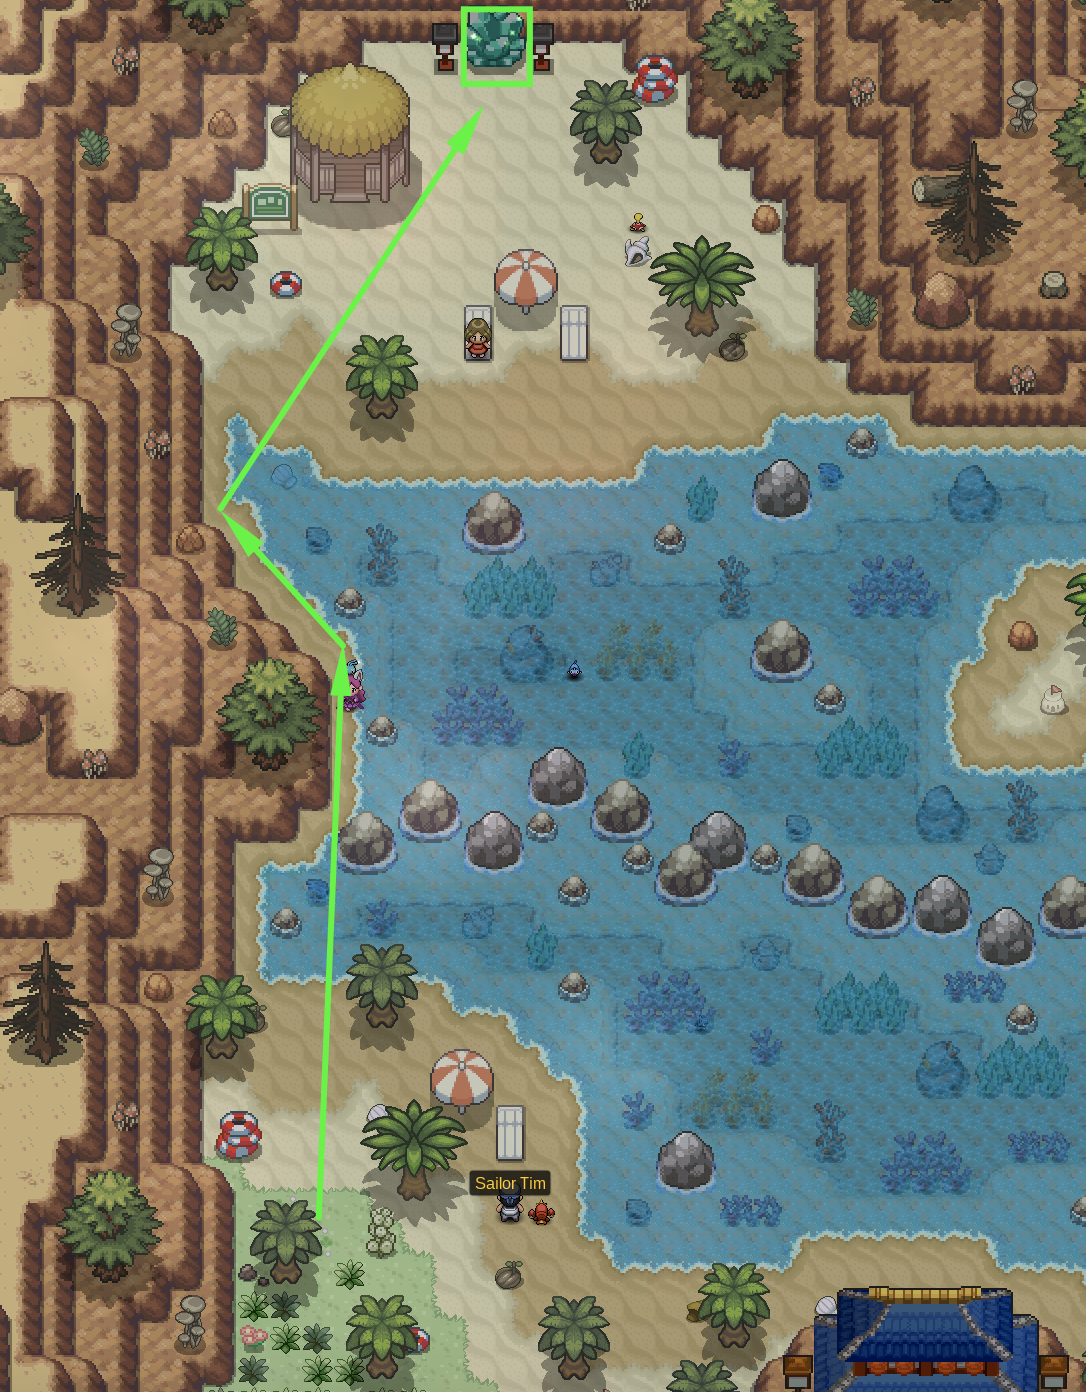
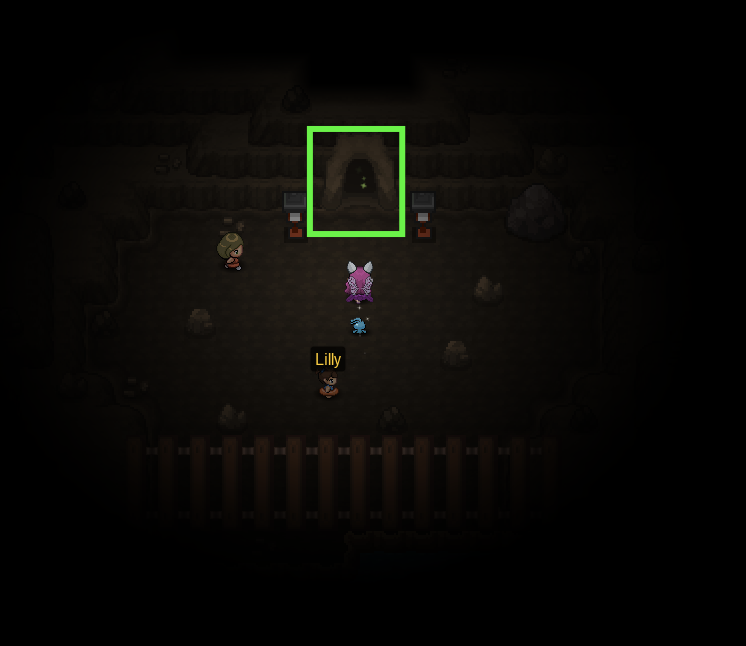
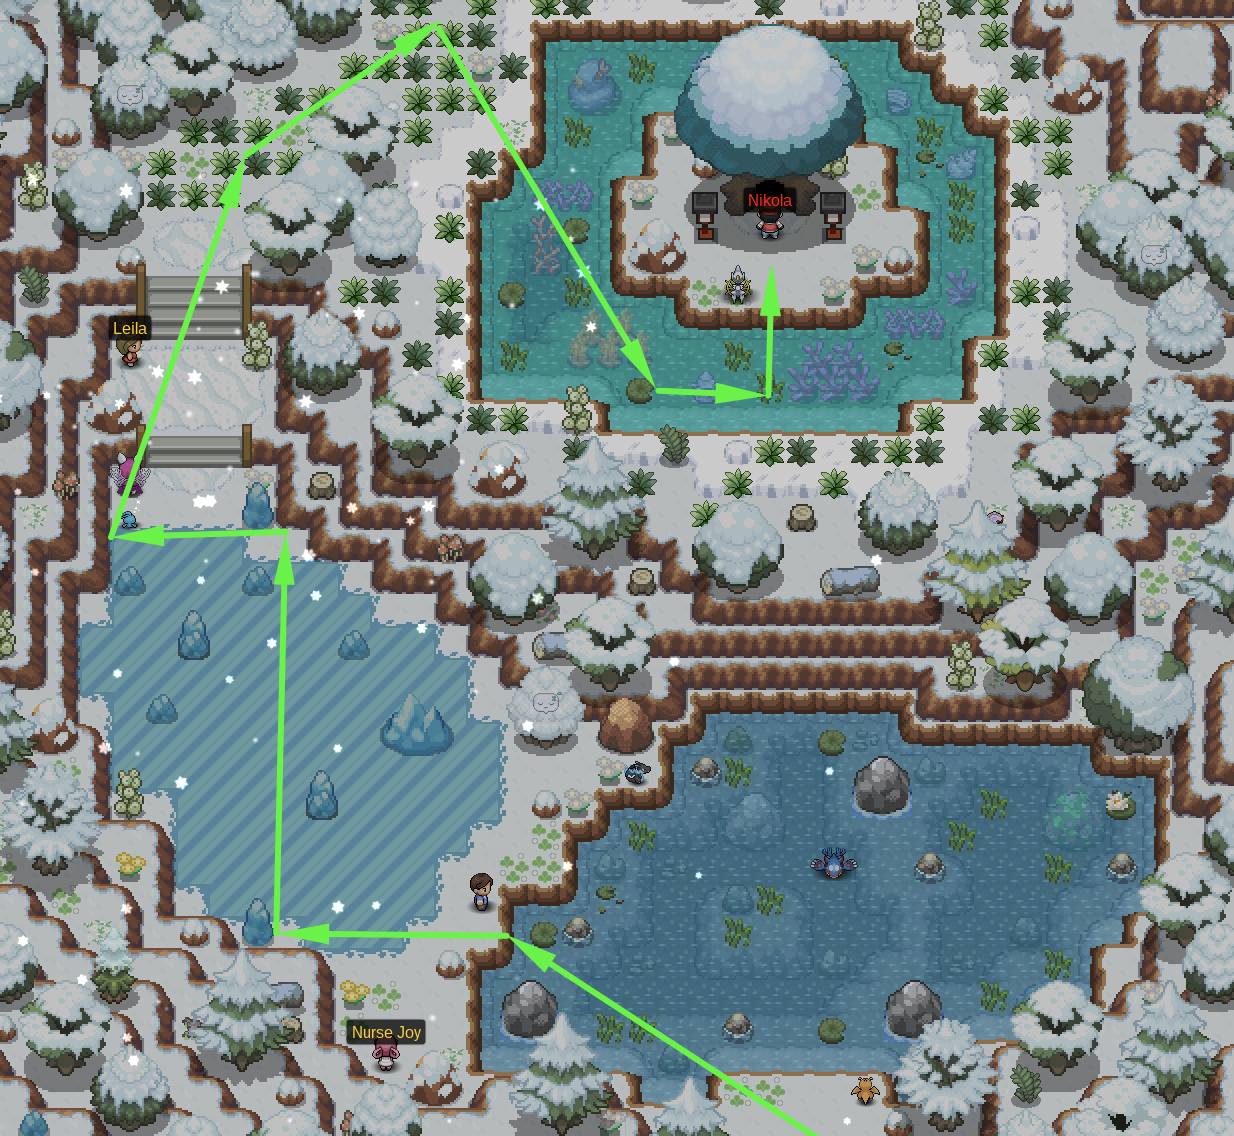
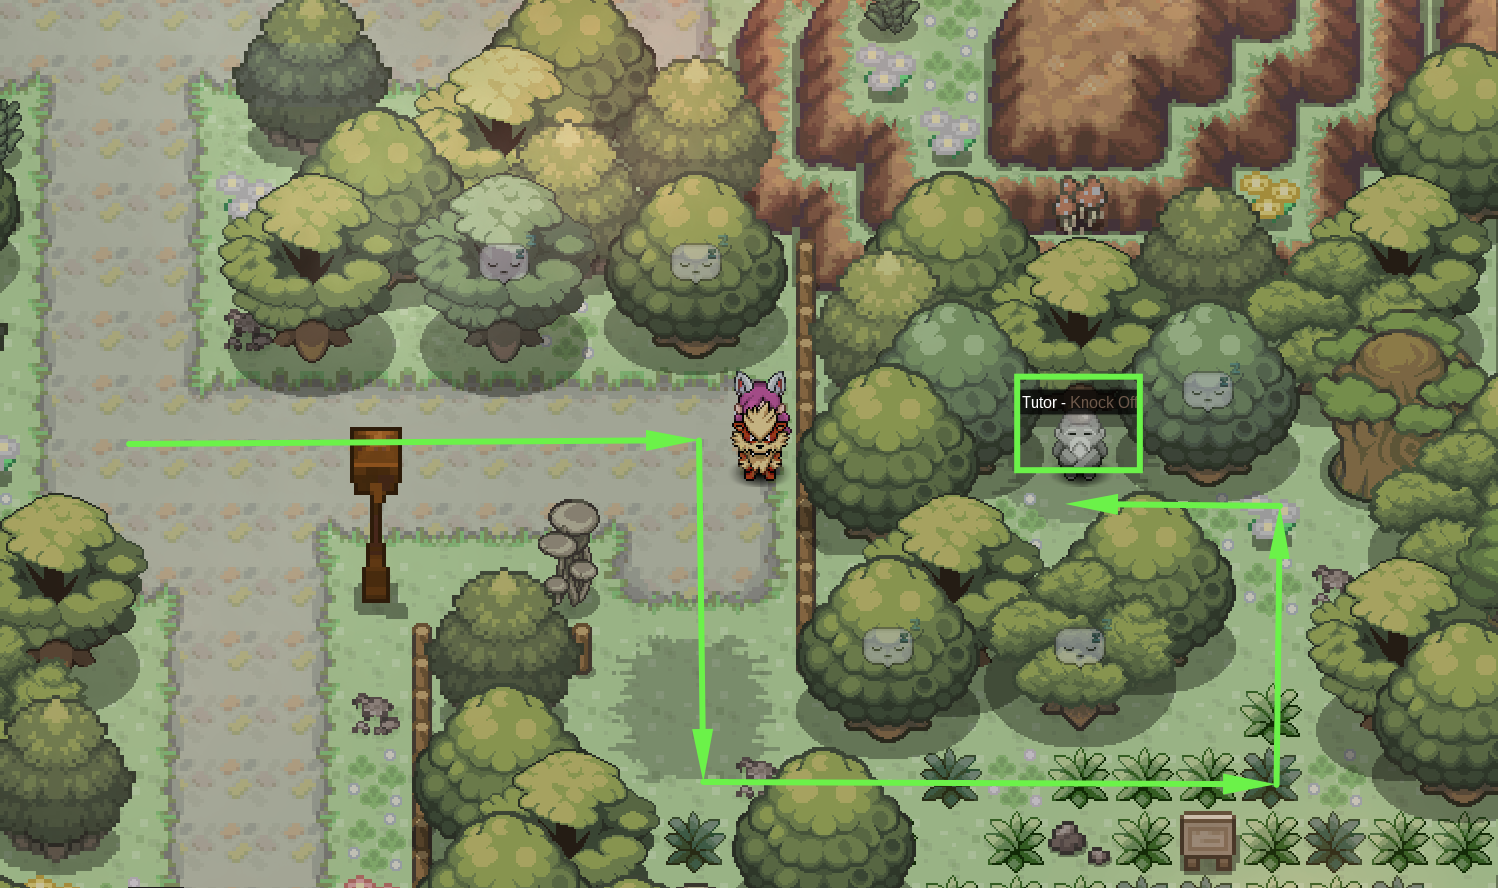
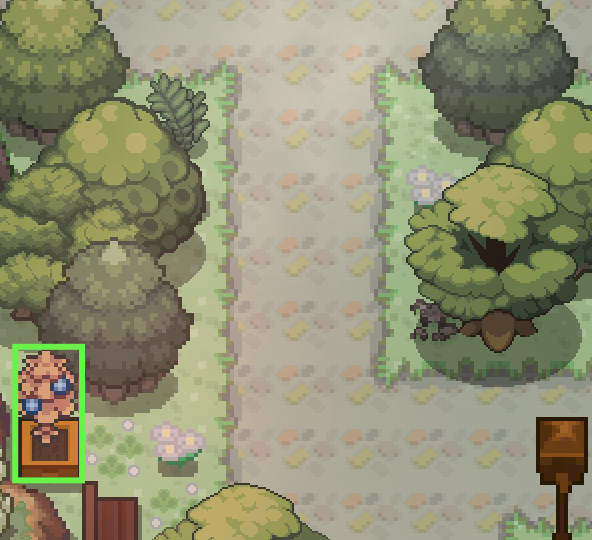
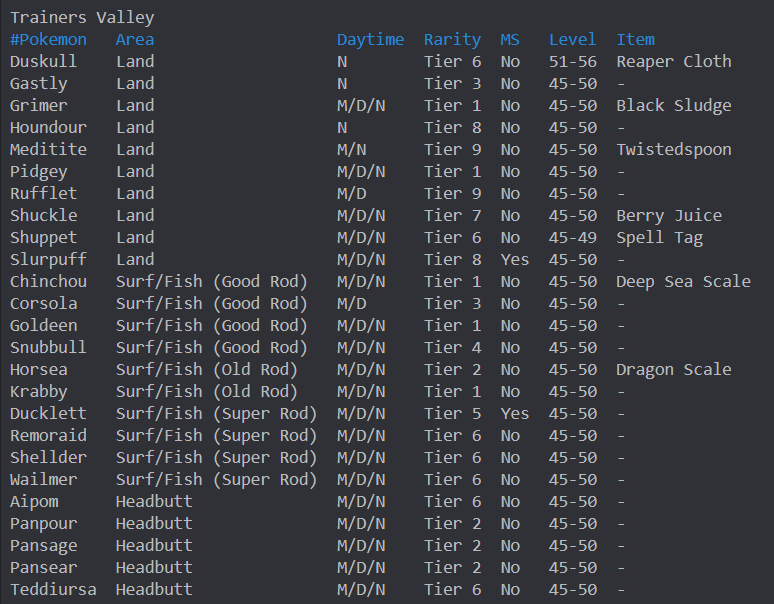
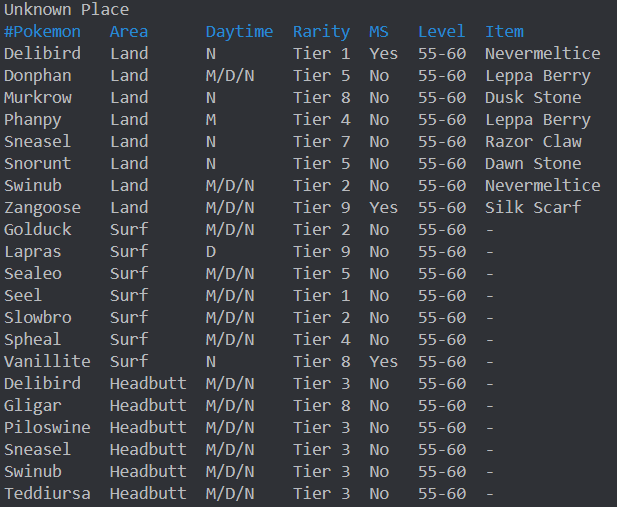
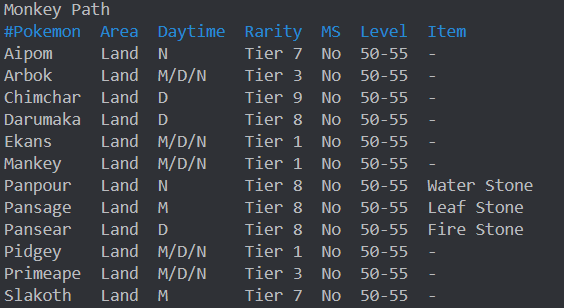
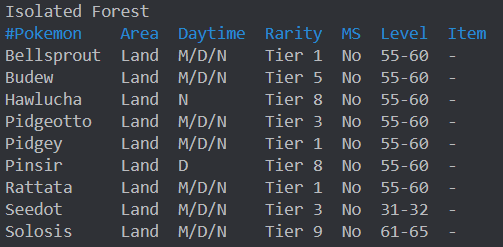
Hi there and welcome to the Trainer's Valley Guide! This guide will teach you about the different areas in Trainer's Valley. It will also inform you on pokemon and the NPCs there. ✻ Fought Red at Mount Silver. ✻ Completed Subway Quest. ✻ Caught data of 120 Kanto Pokemon. ✻ 38 Evolved Pokemon. *Please ensure you have met all requirements. Step 1: Go to the Saffron/Goldenrod Train Station. Step 2: Take the train for 5k. Step 3: Select the Trainer's Valley Option for an extra 10k. Location: East of Pokecenter TMs for Sale: Step 1: Head to the burrow at the wall east of Trainer's Valley. Step 2: Head north from the beach towards the crystal. Step 3: You will enter a cave. Make sure you have Flash. Go north until you find the exit. Step 4: Make your way up to Nikola. Region: Kanto Location: Unknown Place Cooldown: 21 Days Requirements: Failed to catch a legendary from its quest. Rewards: Chance to catch the legendary you failed to catch. Team: Mewtwo Rayquaza Kyogre Deoxys Arceus Groudon Description: Cave to enter Unknown Place Access Point: Crystal on the Beach east of Trainer's Valley Spawns: Description: Cave to enter Monkey Path, apart of Regi Quest. Access Point: Stop house south of Trainer's Valley Spawns: Description: Grassland South of Trainer's Valley, Apart of Regi Quest. Requirements: Show Pansage, Pansear, Panpour (Each 90+ total IVs) to Apo. They need to have your OT. Access Point: South Exit of Trainer's Valley Cave. Spawns: Description: Underground Ruins of Trainer's Valley, Apart of Regi Quest. Requirements: Access to Monkey Path, Hoenn Champion, 250 hours of playtime, and the Regi trio seen data (Regice, Regirock, Registeel). Access Point: Stop house south of Trainer's Valley. Spawns: Description: Forest South of Monkey Path. Requirements: Access to Monkey Path. Access Point: South of Monkey Path. Spawns: Location: East of Trainer's Valley, along the road. Cost: 15,000 Pokedollars Location: East of TM Vendor Berry Yield: Lum Berry, Sitrus Berry Location: Along the main road Berry Yield: Oran Berry Trainer's Valley Number of Headbutt Trees: 16 Trees Cooldown: 12 hours Spawns: -Ariados -Xatu (Morning, Day) -Murkrow (Night) -Jumpluff -Aipom -Bagon (Morning, Day) -Sableye (Night) Unknown Place Number of Headbutt Trees: 9 Trees Cooldown: 12 hours Spawns: -Snover -Sneasel -Jynx -Cubchoo -Cryogonal
-
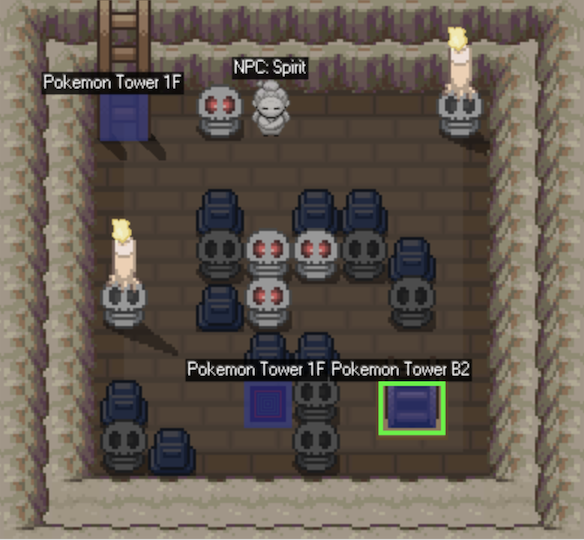
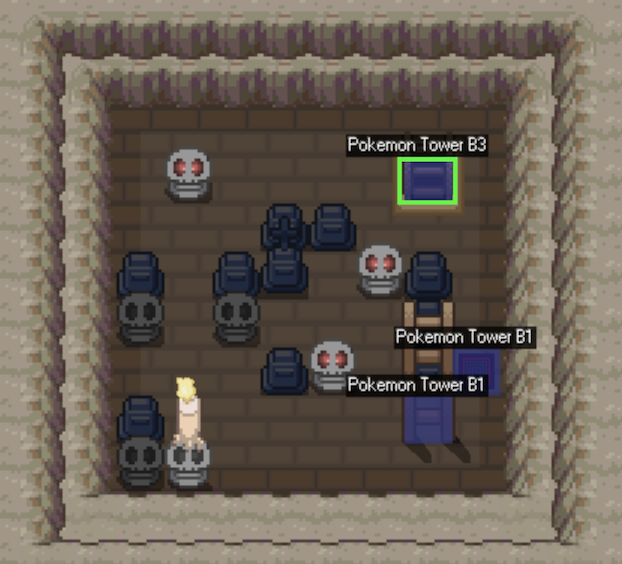
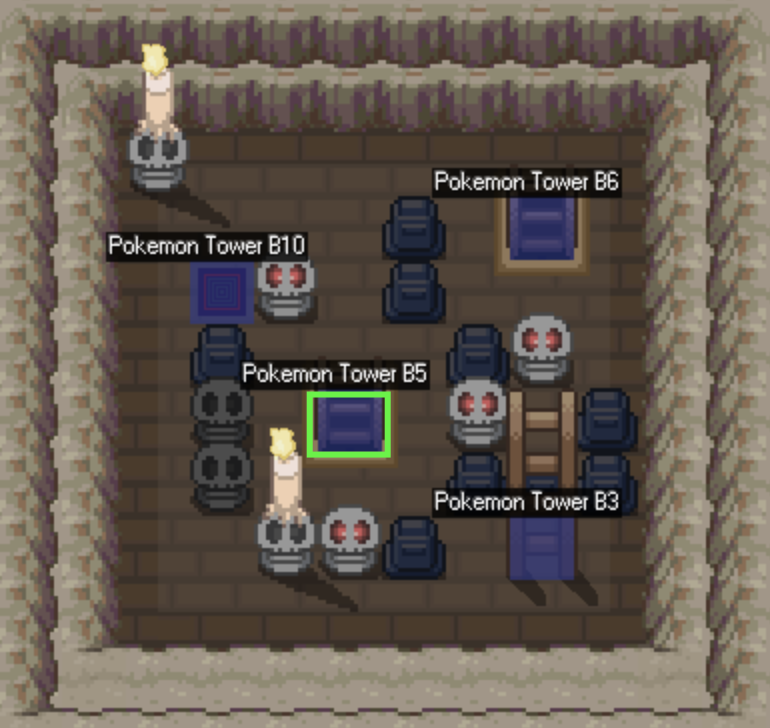
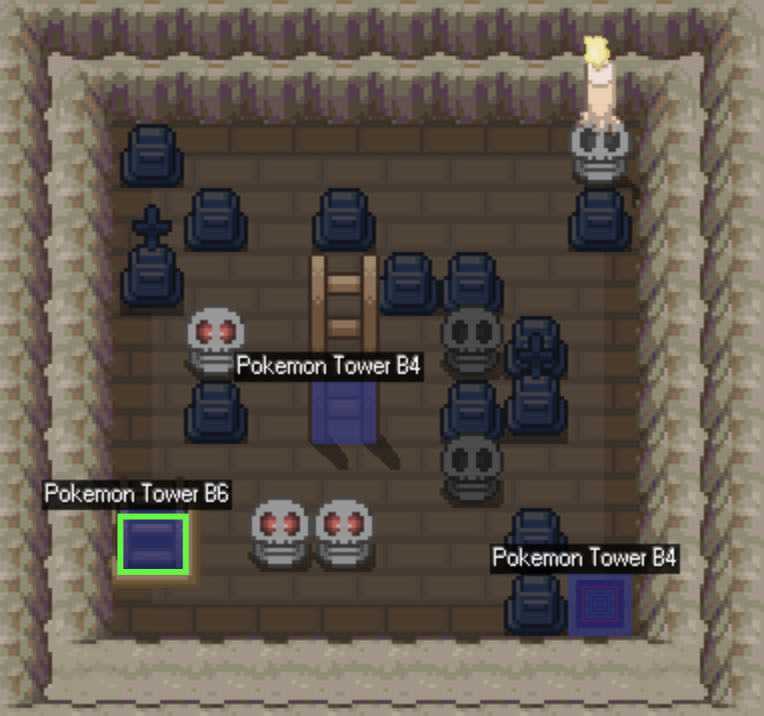
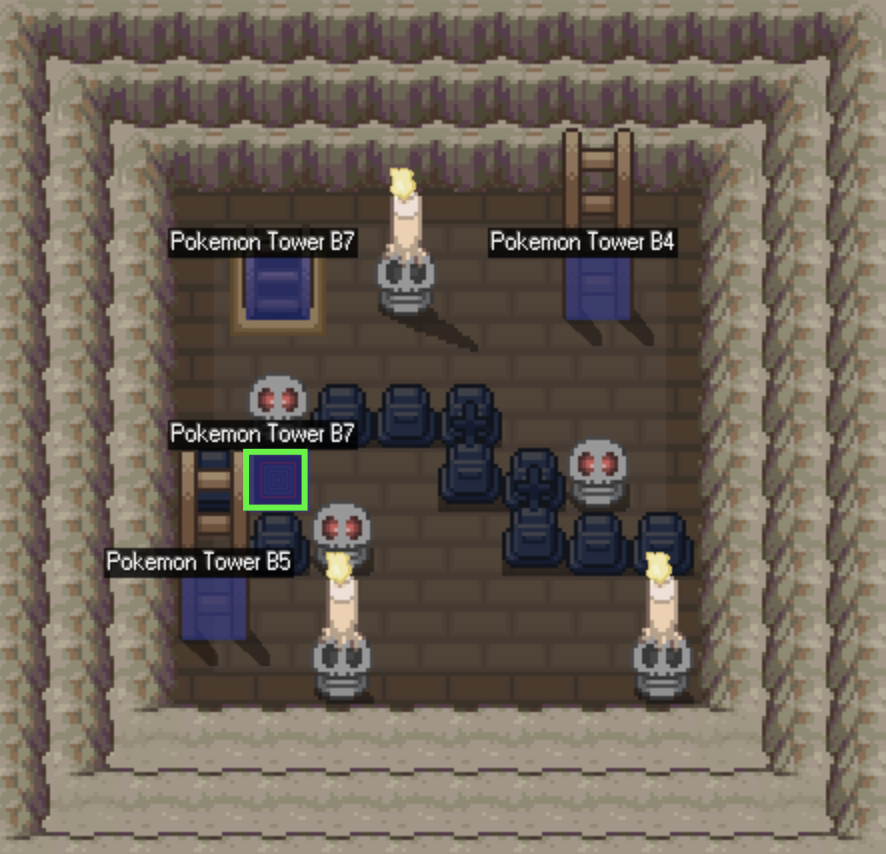
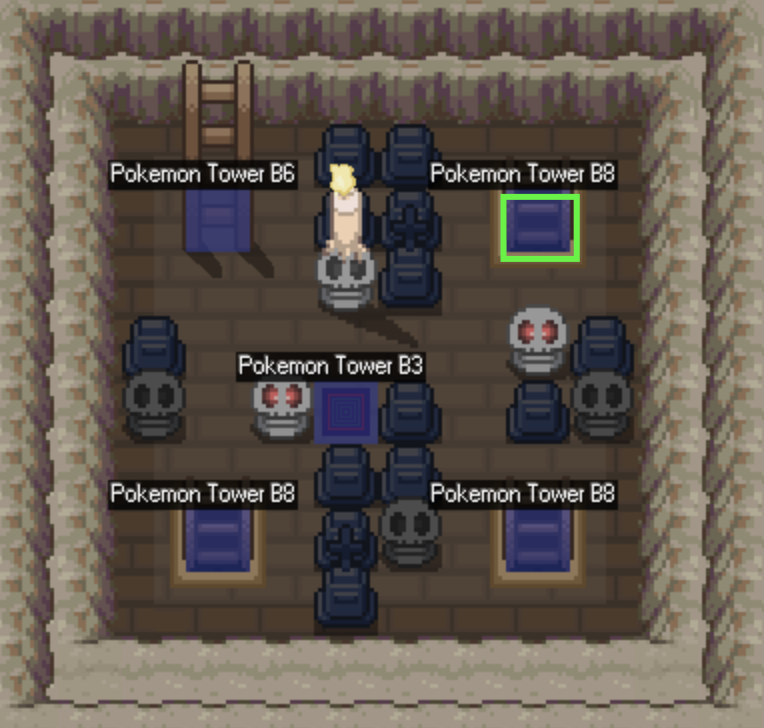
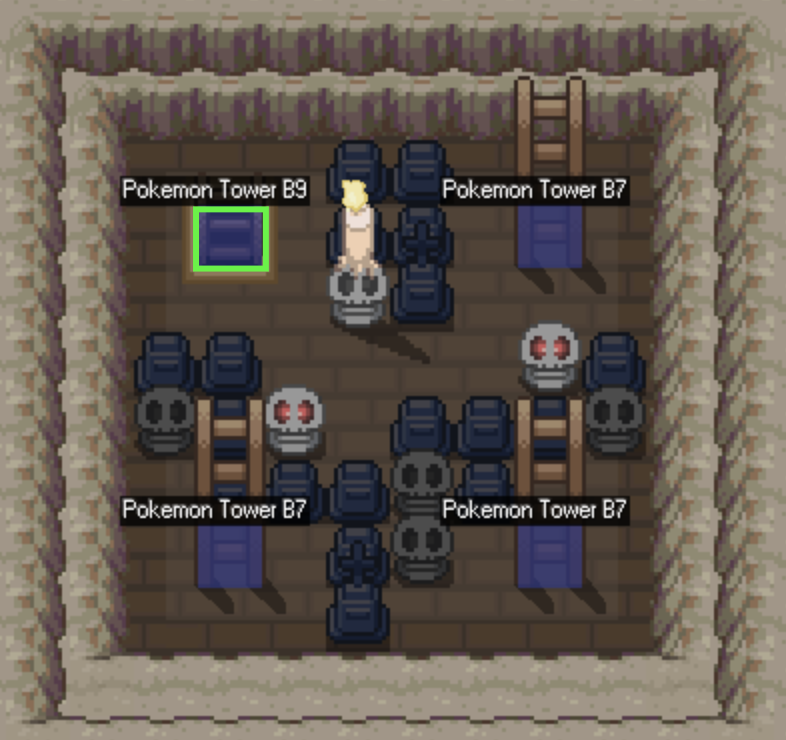
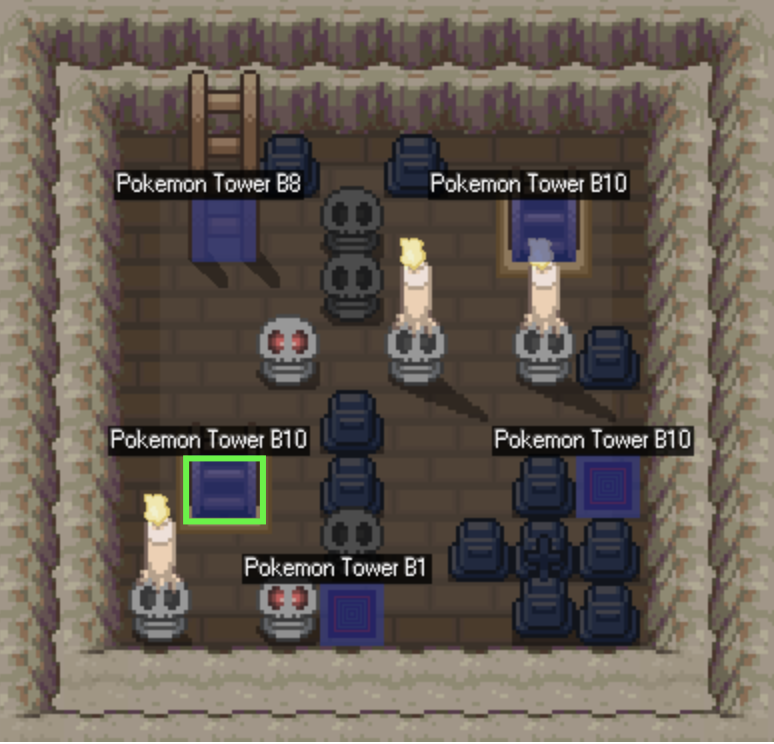
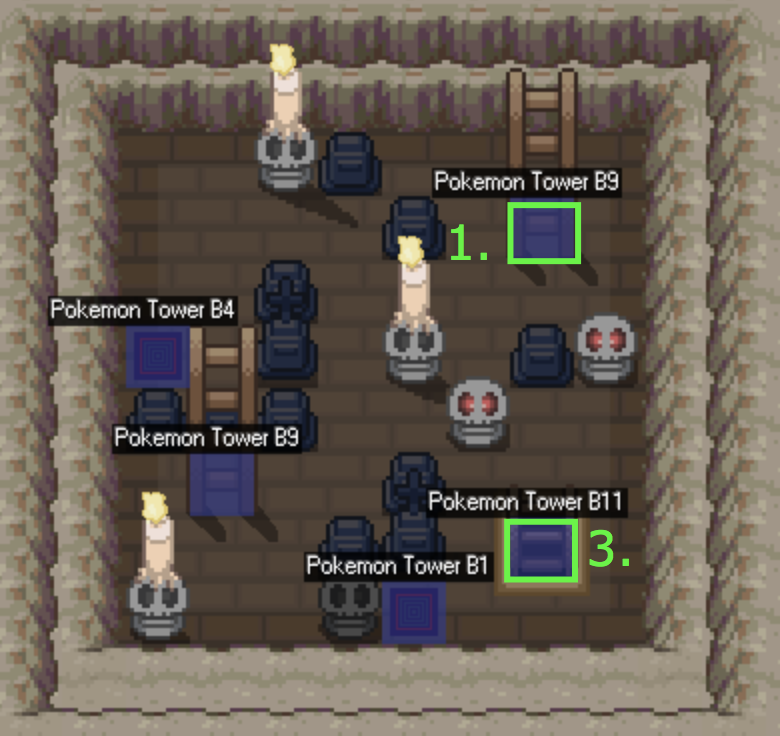
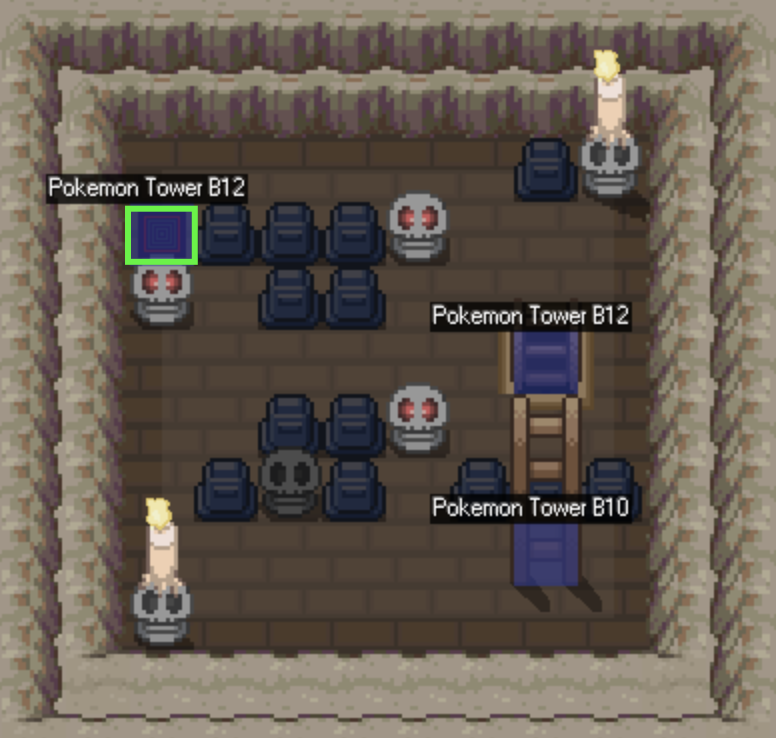
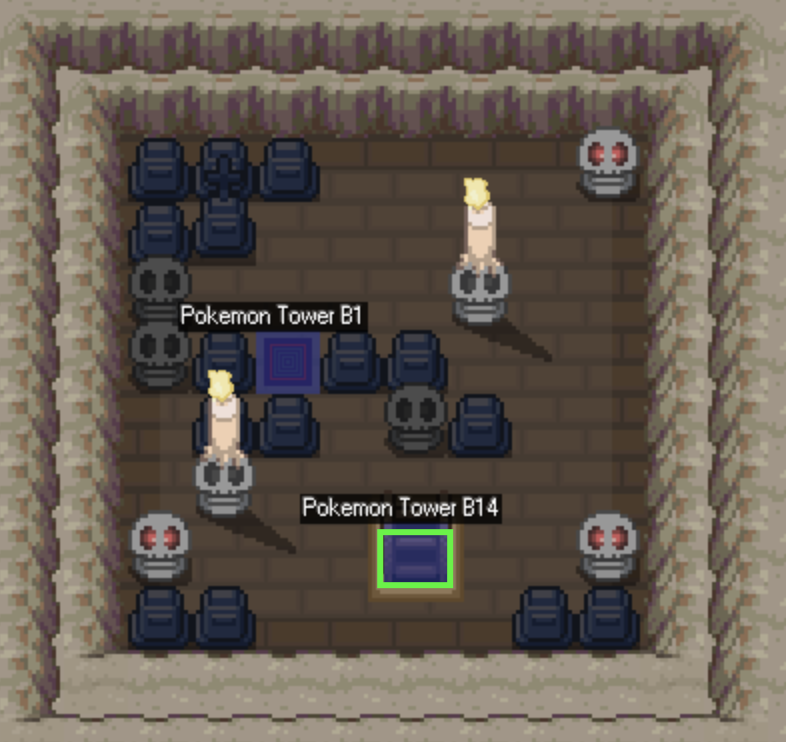
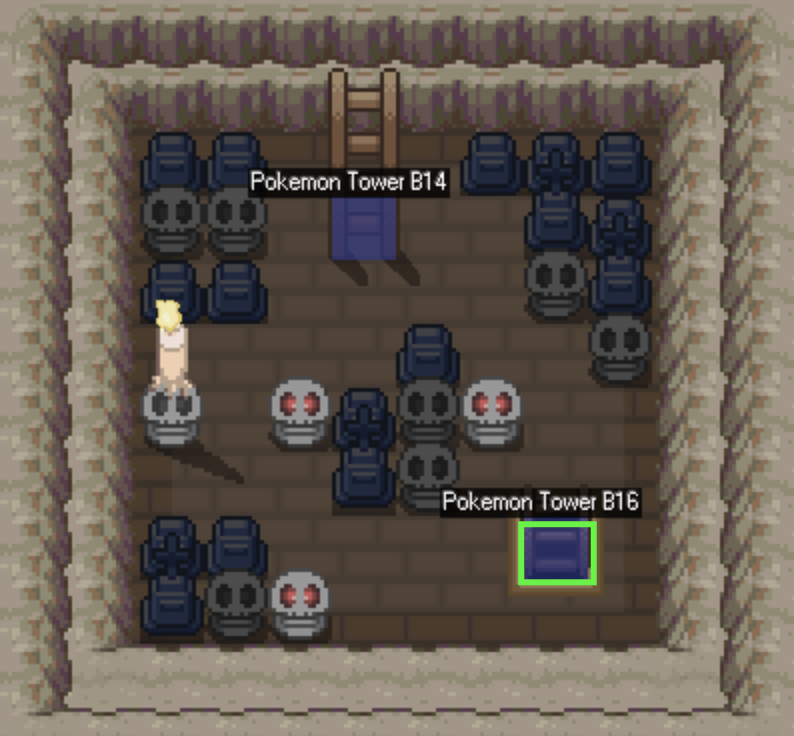
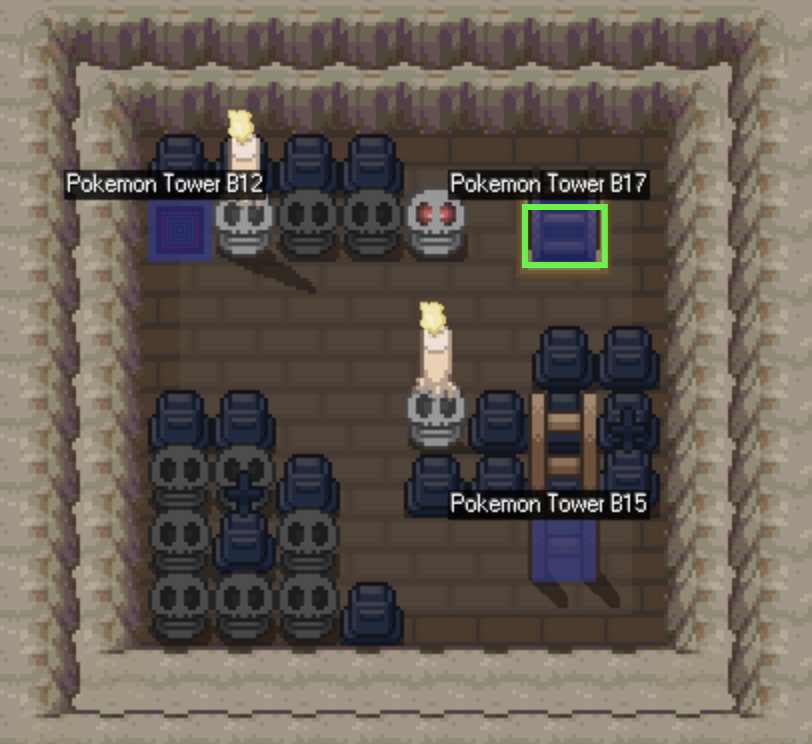
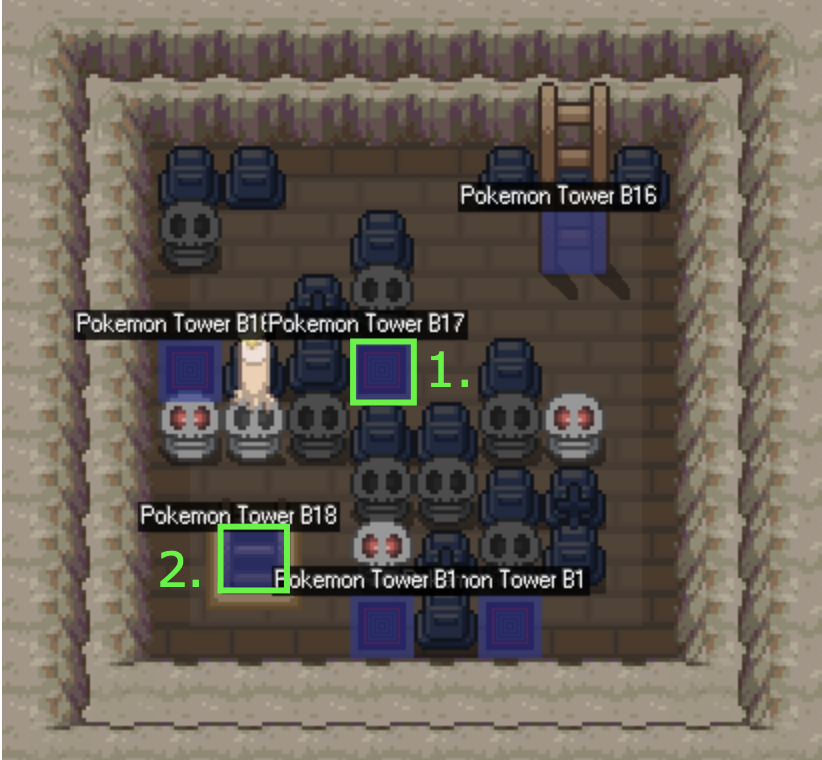
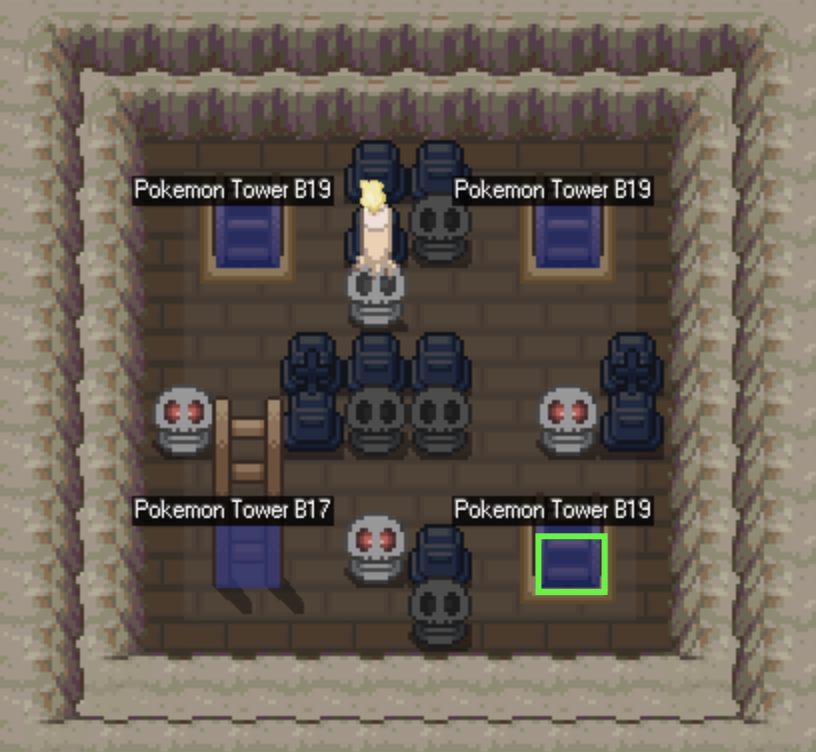
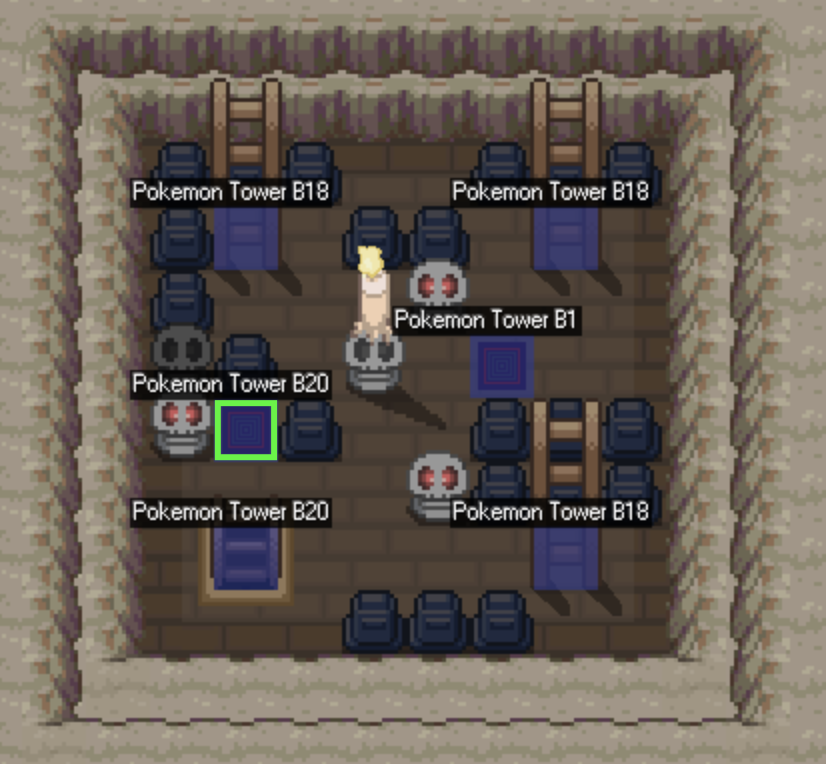
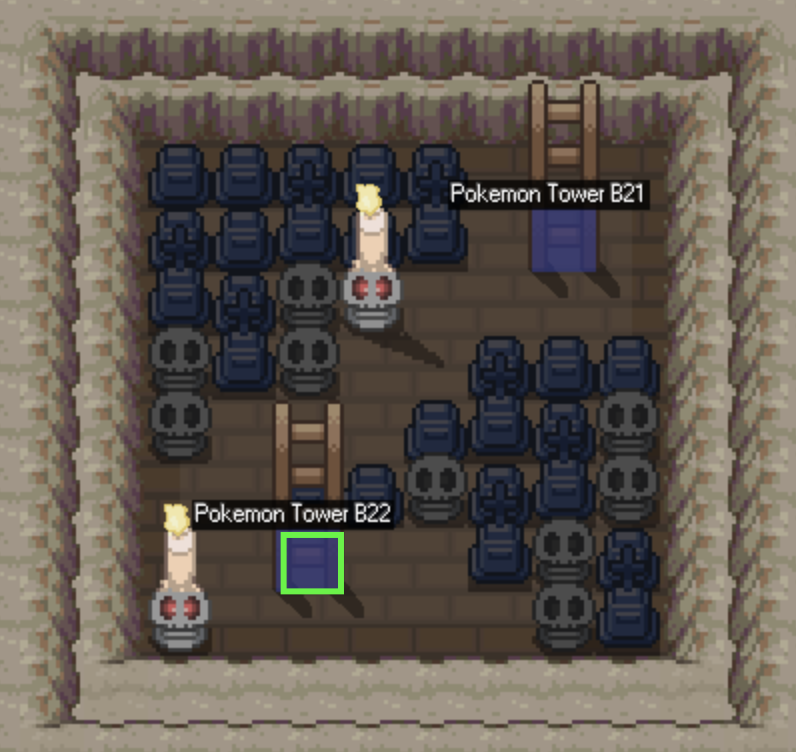
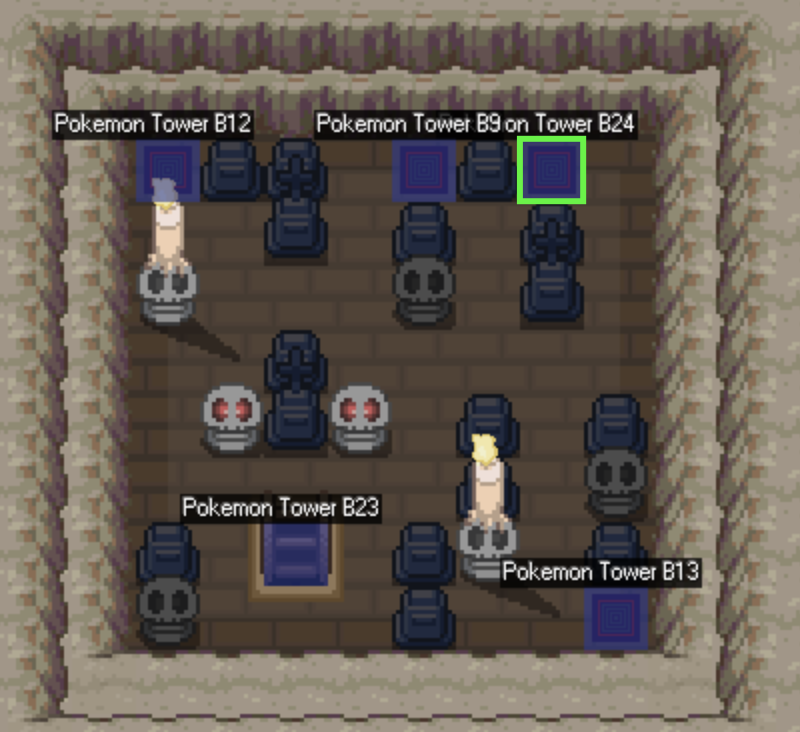
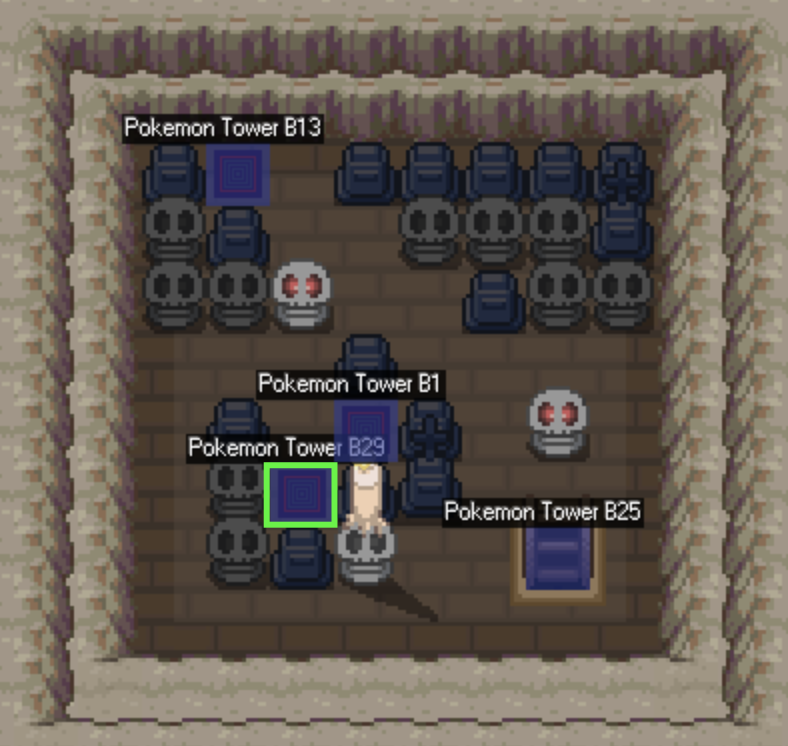
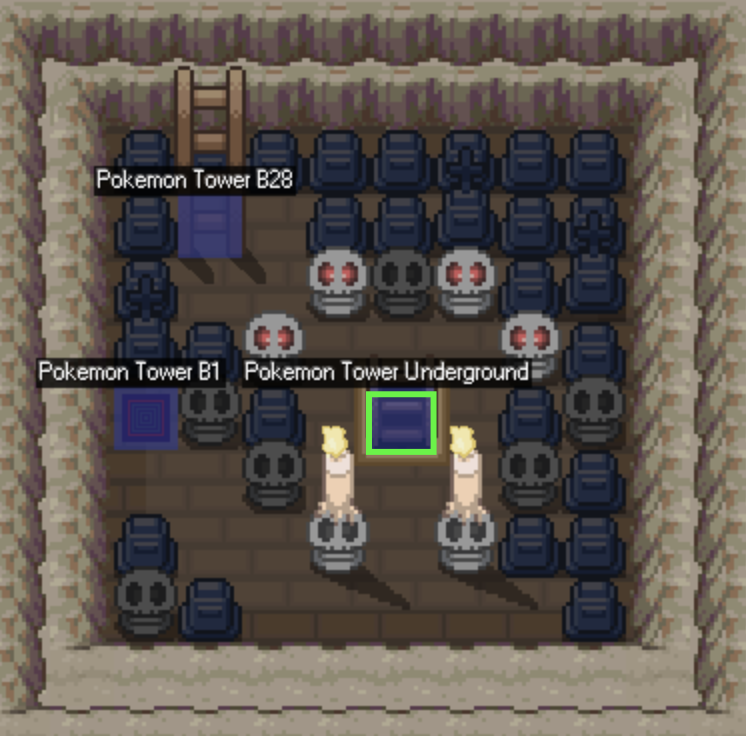
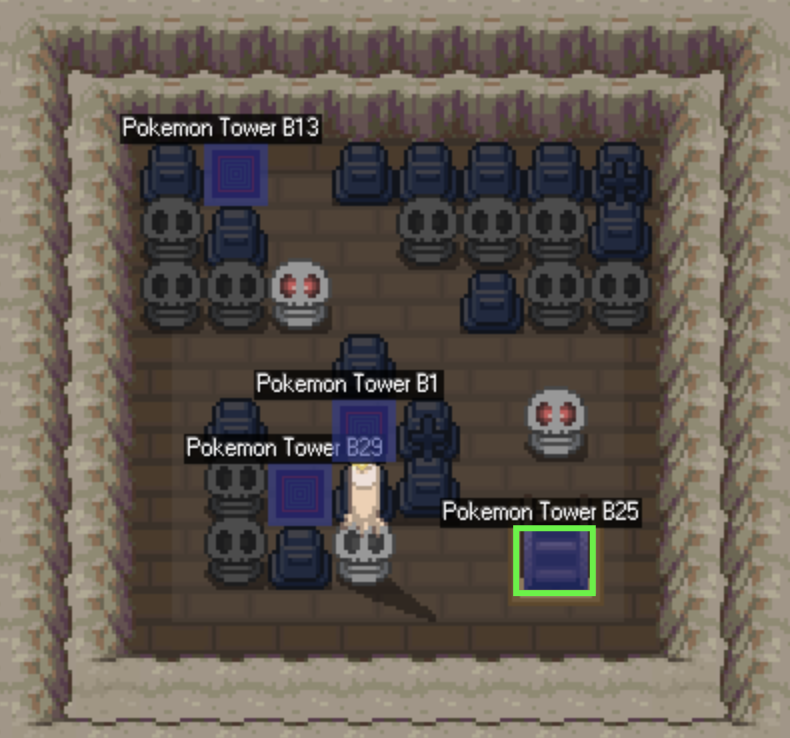
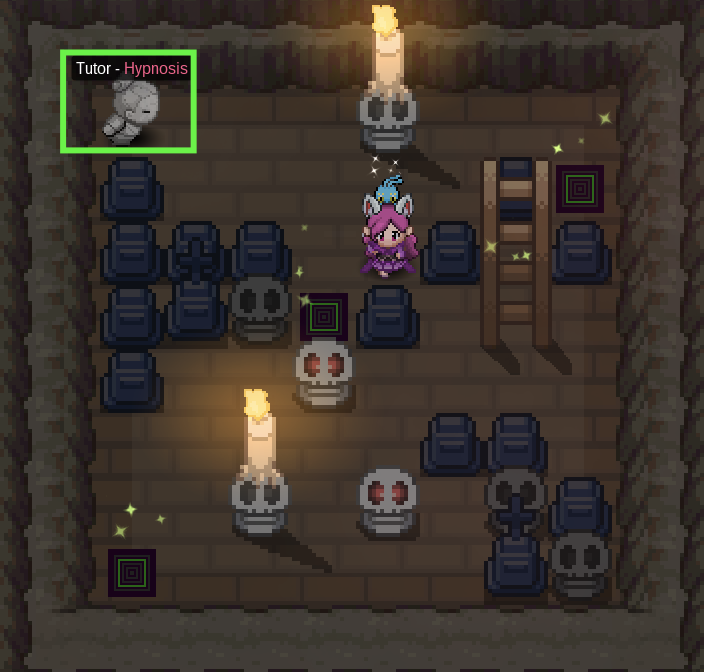
Hi there and welcome to the Pokemon Tower Underground Guide! This guide will help you navigate the underground's maze. Along with that, it'll also inform you on the pokemon you can obtain in the area. Please remember that you require active membership to access the lowest level of the Underground. Region: Kanto City: Lavender Town Access Point: Pokemon Tower 1F [spoiler=Lavender Tower Underground] The Underground can be quite tricky. There are 29 Floors before the Underground. The images below will teach you which teleport pad or ladder to take for each floor. [spoiler=B1-B8] B1: Take the ladder at the lower right corner. [spoiler=B1] B2: Take the ladder at the top right corner. [spoiler=B2] B3: Take the teleporter directly below the ladder. Afterwards, take the teleporter at the lower left corner. Finally, take the ladder at the lower right corner. [spoiler=B3] B4: Take the ladder in the middle. [spoiler=B4] B5: Take the ladder at the lower left corner. [spoiler=B5] B6: Take the teleporter in the middle. [spoiler=B6] B7: Take the ladder at the top right corner. [spoiler=B7] B8: Take the ladder at the top left corner. [spoiler=B8] [spoiler=B9-B16] B9: Take the ladder at the lower left corner. [spoiler=B9] B10: Take the ladder at the top right corner. Once at B9, take the teleporter closer to the right side of the room. Once back at B10, take the ladder at the lower right corner. [spoiler=B10] B11: Take the teleporter at the top left corner. [spoiler=B11] B12: Take the teleporter at the top right corner. [spoiler=B12] B13: Take the only ladder in the room. [spoiler=B13] B14: Take the only descending ladder in the room. [spoiler=B14] B15: Take the ladder at the lower right corner. [spoiler=B15] B16: Take the ladder at the top right corner. [spoiler=B16] [spoiler=B17-B29] B17: Take the teleporter nearest to the ladder. Afterwards, take the ladder at the lower left corner. [spoiler=B17] B18: Take the ladder at the lower right corner. [spoiler=B18] B19: Take the teleporter closer to the left side of the room. [spoiler=B19] B20: Take the teleporter closer to the right side of the room. [spoiler=B20] B21: Take the ladder at the top right corner. [spoiler=B21] B23: Take the ladder at the lower left corner. [spoiler=B23] B22: Take the teleporter at the top right corner. [spoiler=B22] B24: Take the teleporter at the lower left corner. [spoiler=B24] B29: Take the ladder closer to the right of the room. [spoiler=B29] Location: Pokemon Tower B12 Cost: 12,000 Pokedollars [spoiler=Hypnosis Tutor] Item: Dusk Stone Cooldown: Does not respawn Location: Pokemon Tower B25 Directions: [spoiler=Dusk Stone Directions] B24: Take the ladder at the lower right corner. [spoiler=Duskstone B24] B25: Interact with the front of the grave west of the ladder in the center. [spoiler=Dusk Stone B25] The easiest way to find pokemon that spawn in an area is by using the Reborn Bot. You may access the Reborn Bot in the PRO Official Discord or you may invite it to your own server. Nevertheless, here is the list of pokemon that you may obtain in the Pokemon Tower Basement and Underground. The Basement levels does not require active membership, while the Underground does. Updated as of August 16th, 2018 Basement: [spoiler=Pokemon Tower Basement Spawns] Pokemon Tower B1 #Pokemon Area Daytime Rarity MS Level Item Gastly Land M/D/N Tier 5 No 10-14 - Rattata Land M/D/N Tier 1 No 10-14 - Zubat Land M/D/N Tier 1 No 10-14 - Underground: [spoiler=Pokemon Tower Underground Spawns] Pokemon Tower Underground #Pokemon Area Daytime Rarity MS Level Item Duskull Land N Tier 6 Yes 12-16 Reaper Cloth Gastly Land M/D/N Tier 4 Yes 12-16 - Litwick Land M/D/N Tier 8 Yes 17-21 - Misdreavus Land M/D/N Tier 5 Yes 12-16 Spell Tag Rattata Land M/D/N Tier 1 Yes 12-16 - Shuppet Land M/D/N Tier 6 Yes 12-16 Spell Tag Spiritomb Land M/D/N Tier 8 Yes 12-16 - Zubat Land M/D/N Tier 2 Yes 12-16 -
- 1 reply
-
- 3
-
-
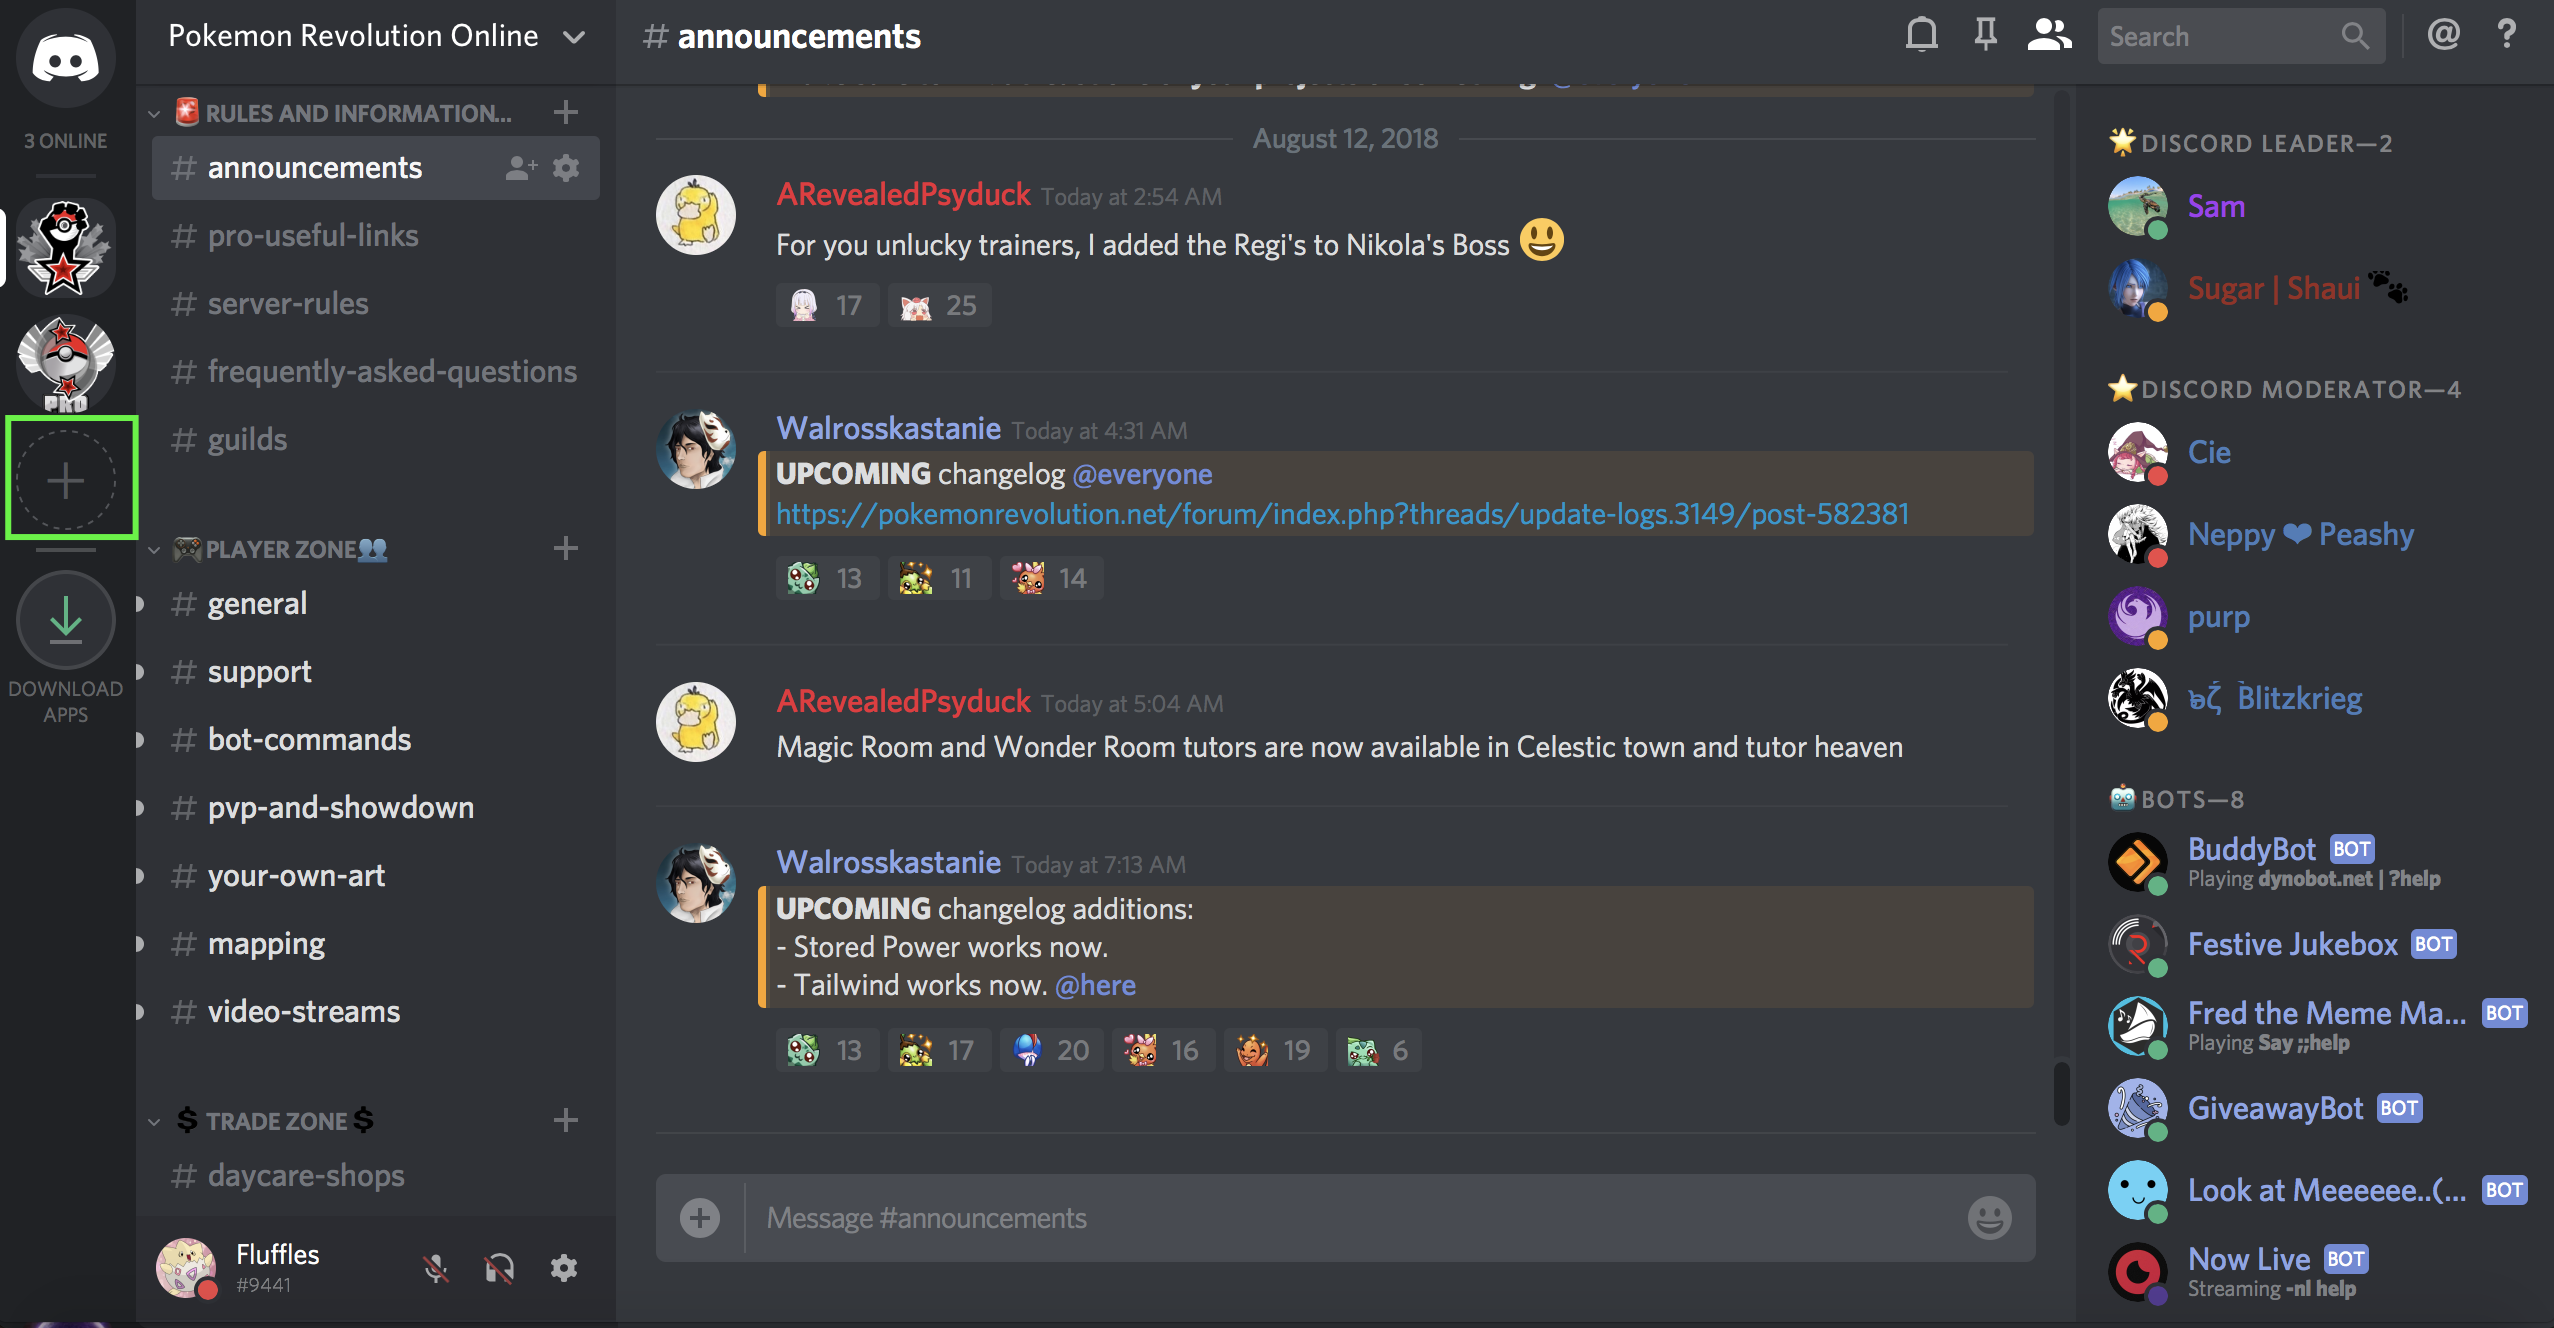
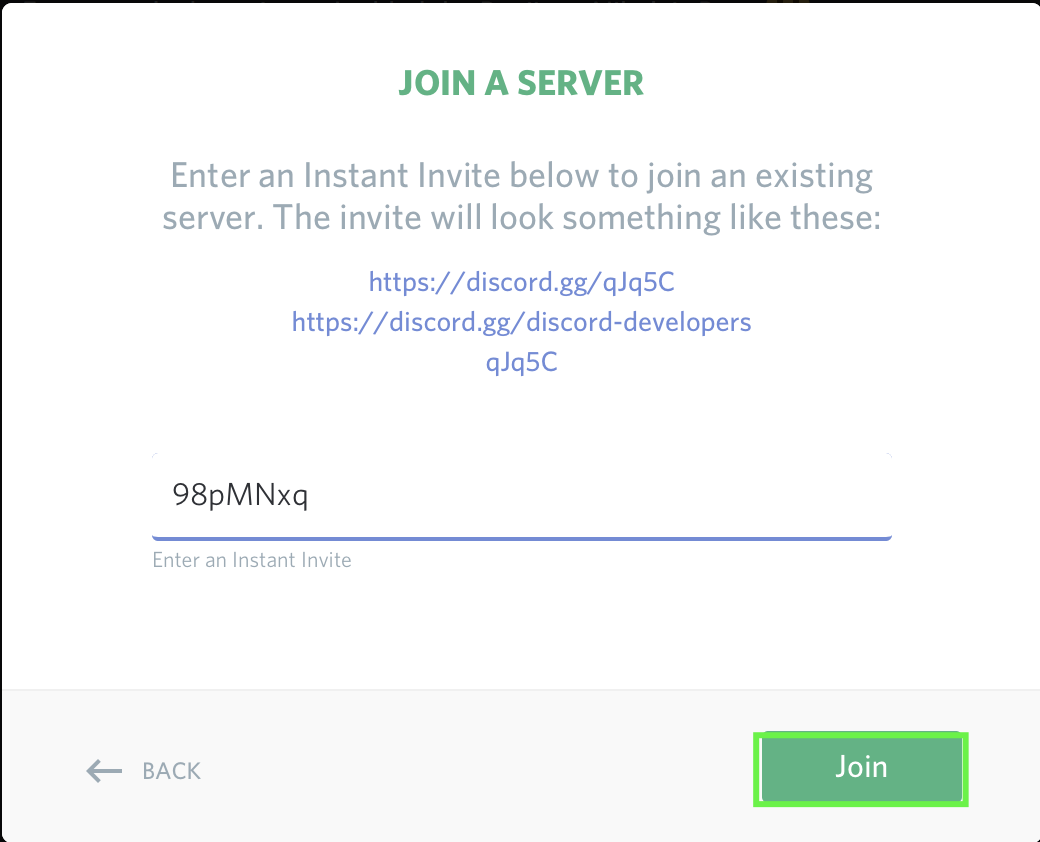
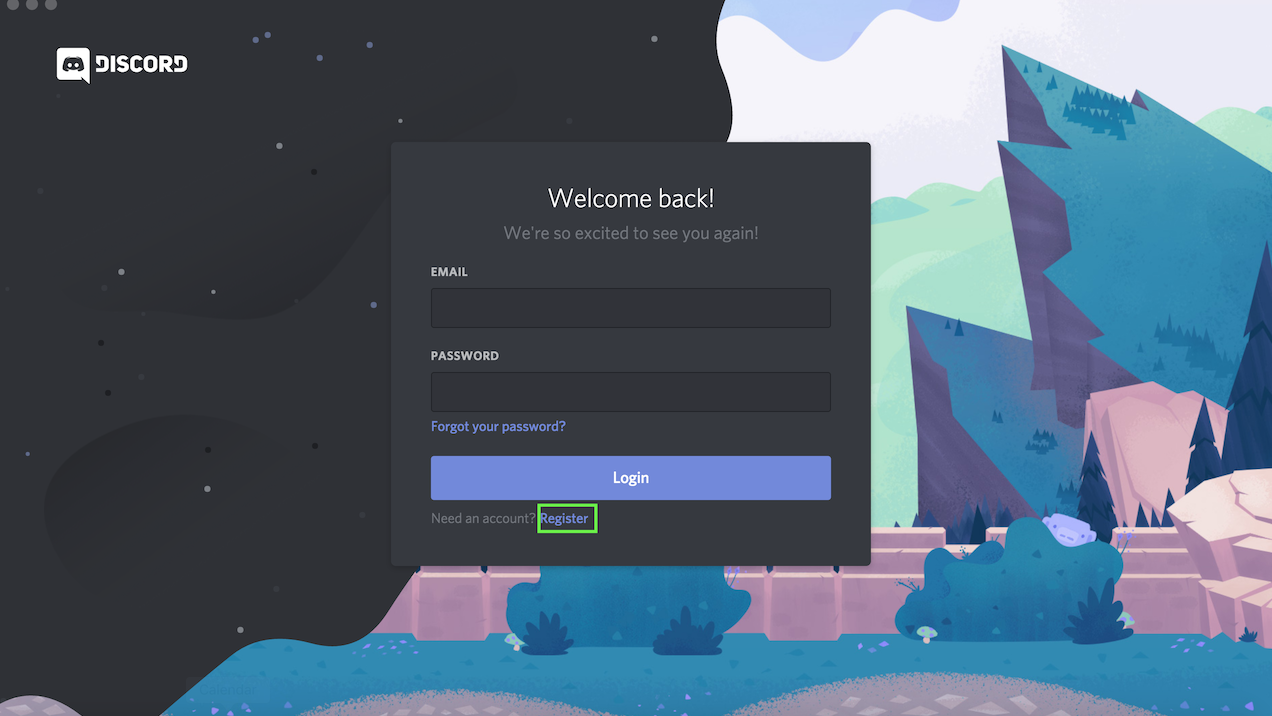
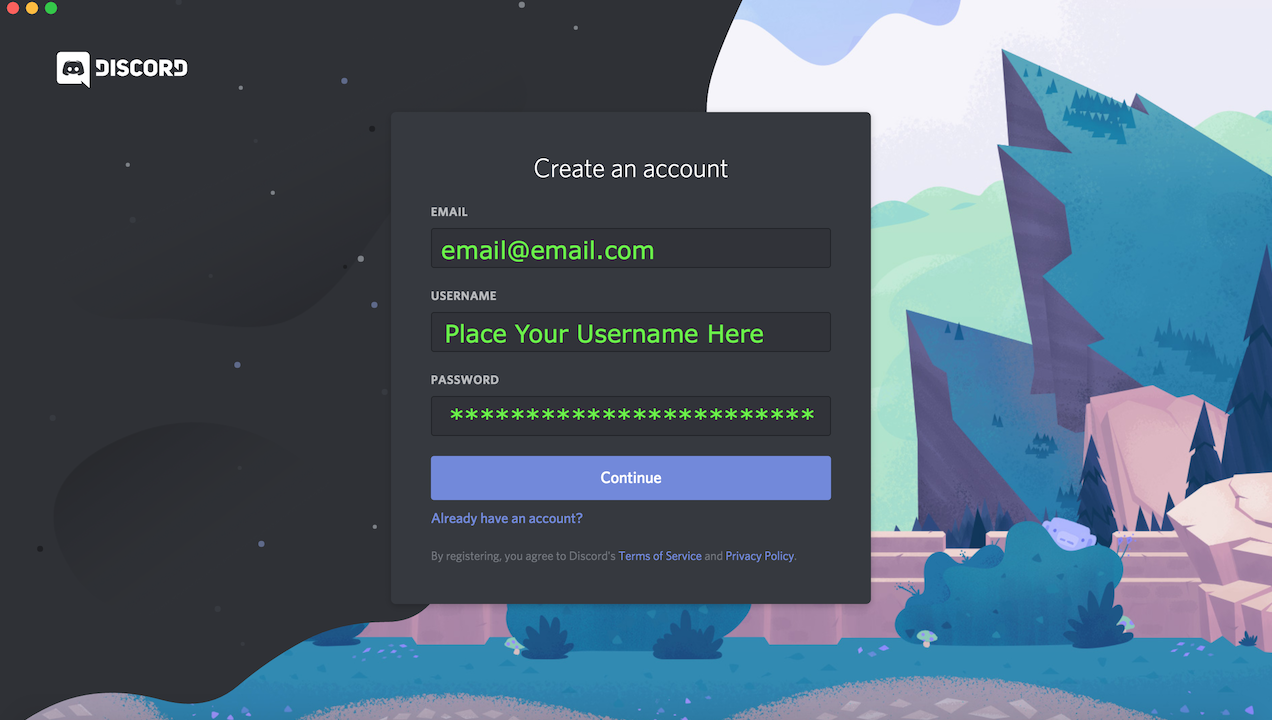
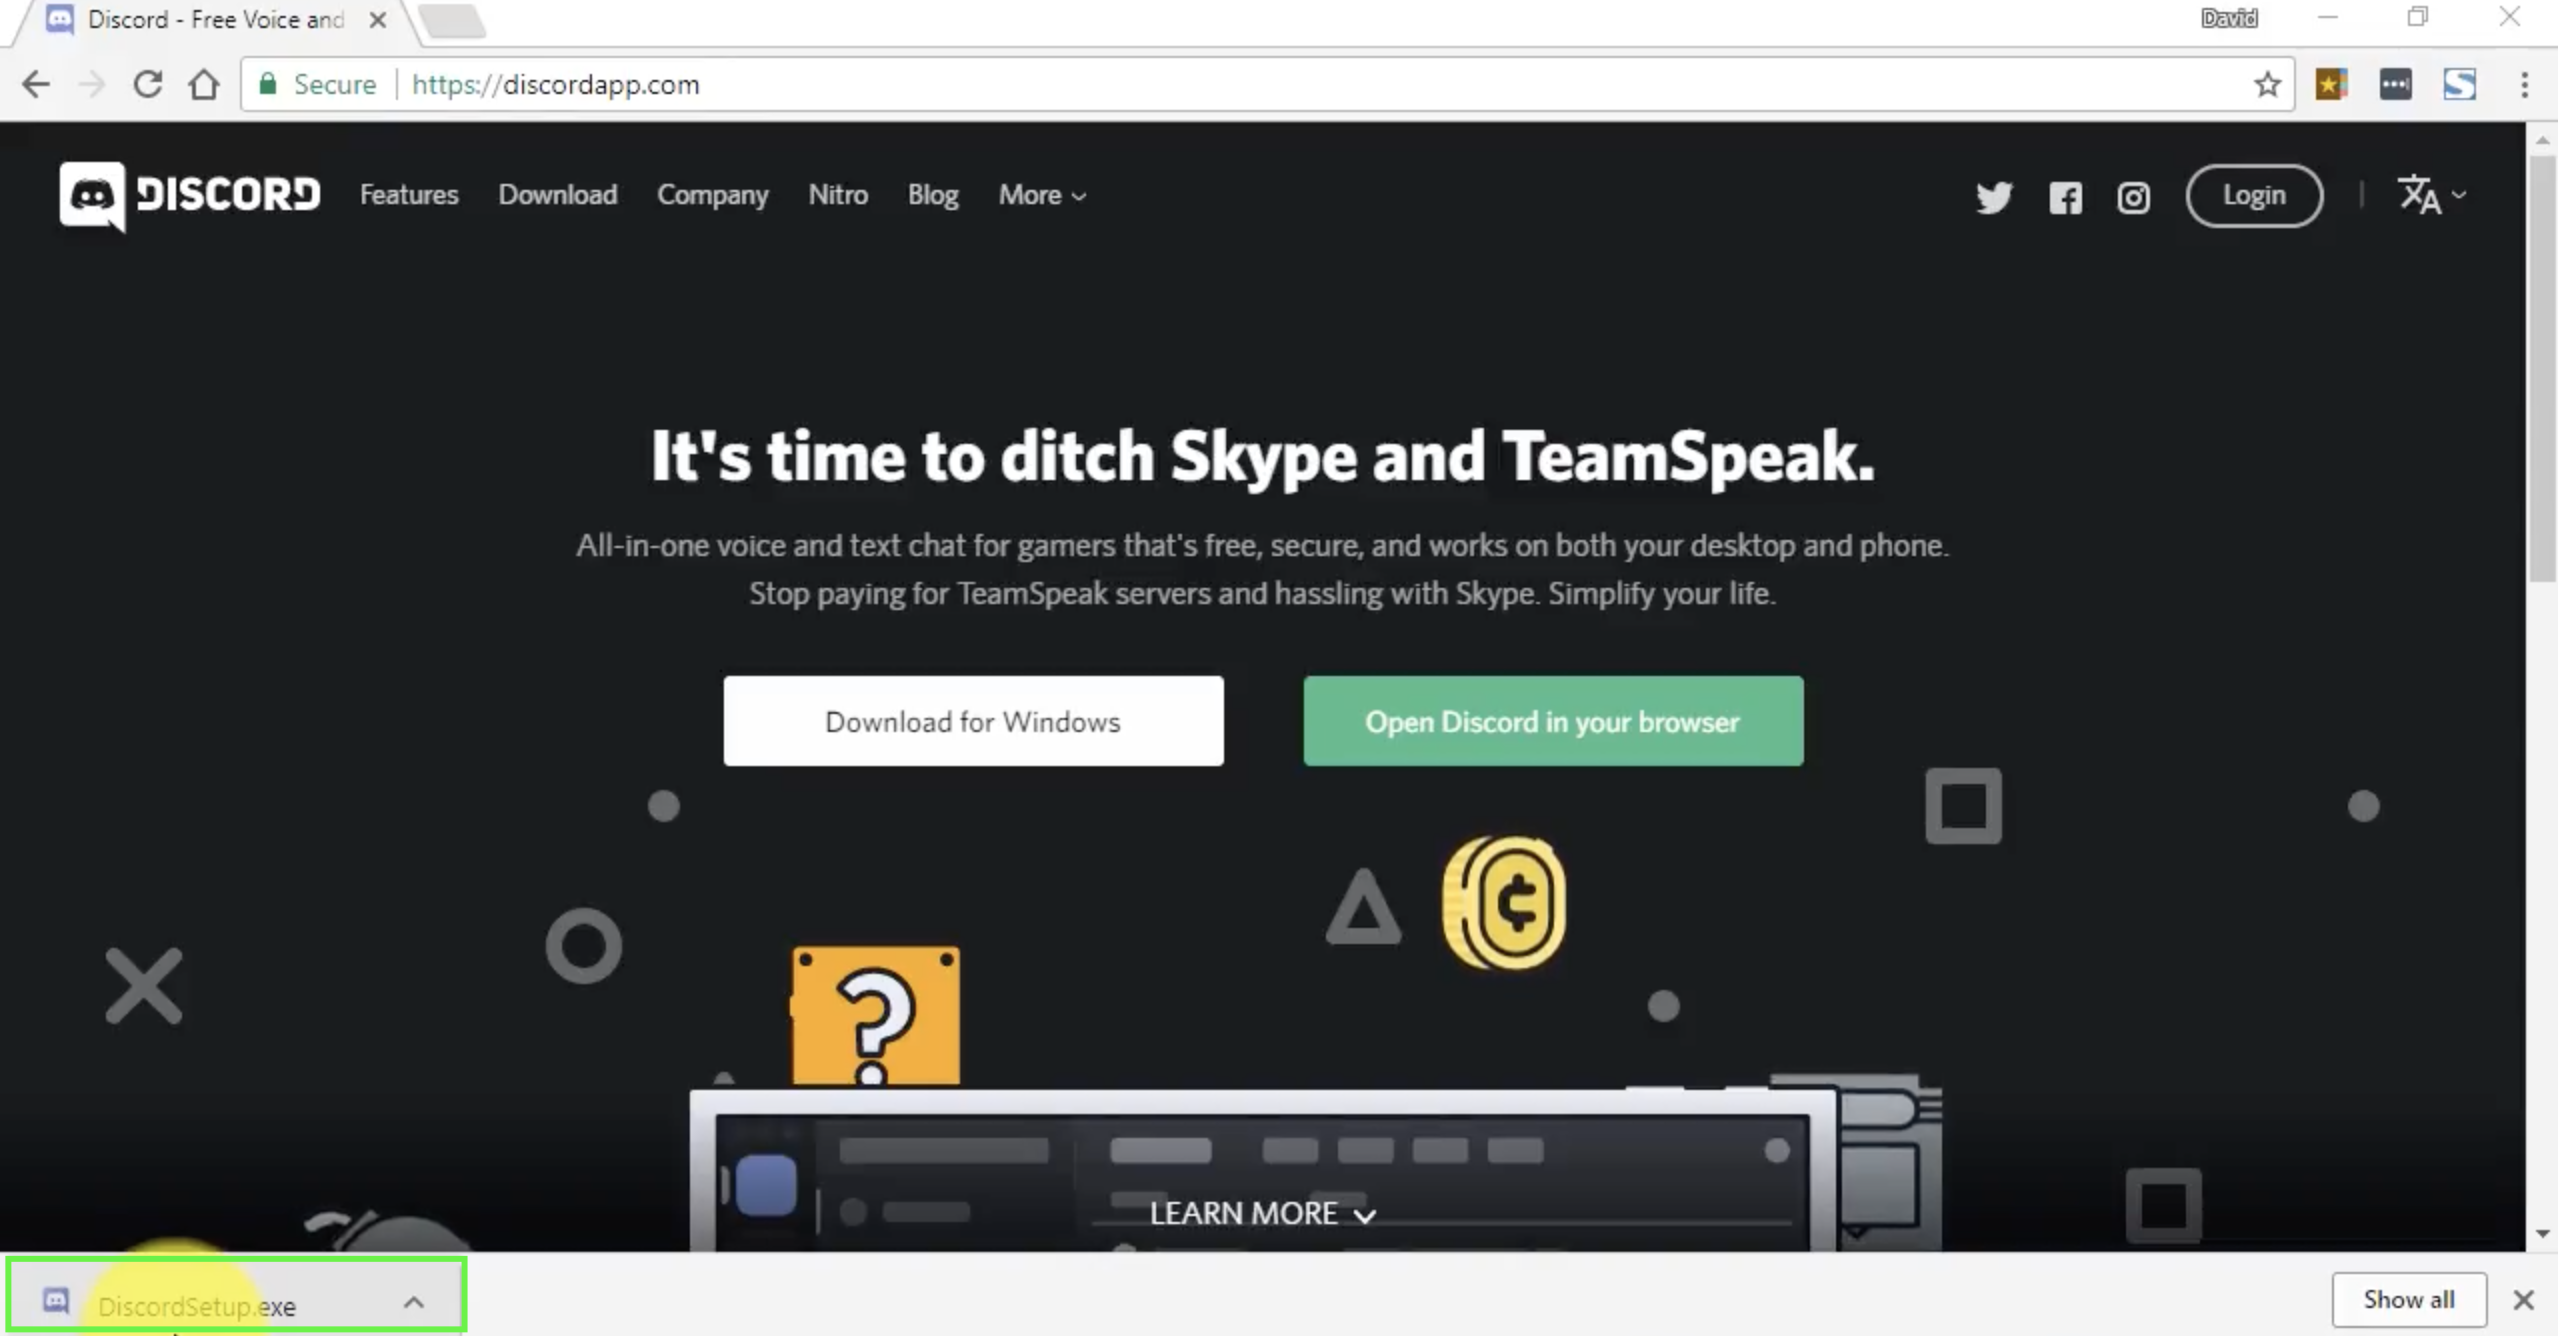
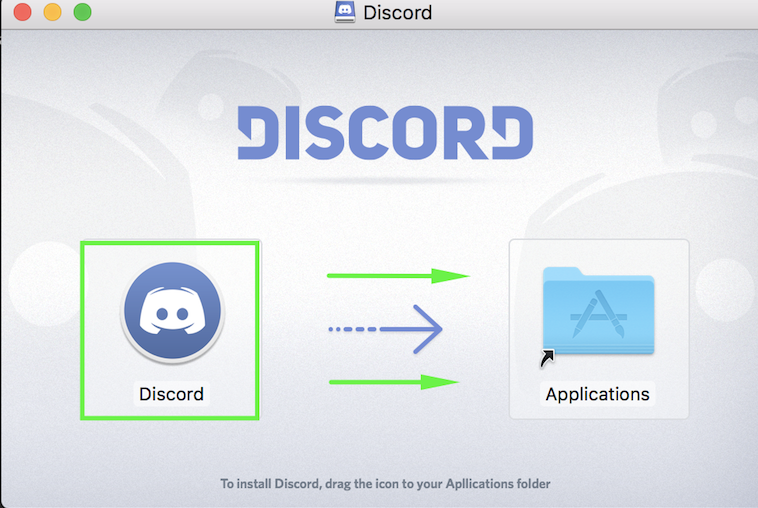
Hi there and welcome to the PRO Discord Guide! This guide will teach you all you need to know about our Official Discord Server. This will also teach you how to install Discord on your computer. Step 1: Go to the Official Discord Website and click Download. *The download provided will change depending on your Operating System. Step 2: Look for Discord Setup and double click it. Wait for the discord app to appear. Macs: Open the .dmg file and drag the Application in your Applications folder. Step 1: Click Register after opening Discord Step 2: Fill in the information and click "Continue". Invite Link: PRO Official Discord Chatting Requirements: You must have been in the server for over 10 minutes. Assigning yourself a Server: Use the command ?rank <Gold/Silver Server> in #bot-commands. REMINDER: Please read the Server Rules before anything else. Step 1: Click on the plus (+) icon and select join a server. Step 2: Select 'Join Server'. Step 3: Input the invite code (98pMNxq) and click join. Alternatively, you can simply click on the hyperlink above to join the Discord. Below are the different channels in the PRO Official Discord. Player Hosted Events: Promotions for events run by players. Discord Events: Information on events run by Discord Staff. Announcements: Important information, Updates, and Maintenance notices on Discord and PRO. Pro Useful Links: Guides created by the community that may be of help. Server Rules: PRO's Official Discord rules. Frequently Asked Questions: Answers to commonly asked questions by the community. Guilds: List of guilds on each server for you to check out and join. General: This is the server's main chat for communicating with others. Support: Assistance with support-related issues may be asked here. Bot Commands: All bot commands excluding Fredboat's are to be done here. PvP and Showdown: Discussion on PvP and Showdown-related topics and strategies. Your Own Art: Show off your art to the community. Mapping: Discussion on maps and how to make them. Video Streams: Advertisements of PRO-related Youtube Videos or Twitch Streams. Daycare Shops: Daycare Services on both servers. Trades and Prices Silver: Trade-Related Discussion and Promotions for Silver. Trades and Prices Gold: Trade-Related Discussion and Promotions for Gold. VC: Fredboat commands, channel for mic-muted players in VC. VC1: Voice channel limited to 50 players. VC2: Voice channel limited to 10 players. Streaming: Voice Channel for players who are streaming. Music Channel: Voice Channel for players listening to music. Prefix: ? Invite Link: Dyno Primary Function: Support Commands: [spoiler=Dyno Commands]?appeal: Provides a link to Discipline Appeals. ?bugcenter: Provides a link to the Bug Resolution Center. ?cloudflare: Provides a link to a small VPN. ?complaint: Provides a link to the General Complaint Area. ?cosmetics: Provides a link to the Clothing and Mounts Showcase. ?crashissues: Provides a link to solutions for crash issues. ?dashboard: Provides a link to the Dashboard. ?downloads: Provides a link the PRO's Downloads. ?evohelp: Provides a link to the Evolution Megathread and Uncoded Evolutions. ?evzones: Provides an image guide on EV Zones. ?forum: Provides a link to the Forums. ?ghostqueue: Provides an explanation for what a ghost queue is. ?gs: Provides a link to General Support. ?images: Provides a link to the Forum Images Guide. ?invite: Provides the invite link for the PRO Official Discord. ?legends: Provides a link for the Legendary Megathread. ?media: Provides links for our official media accounts. ?mee6: Provides information on the discord's leveling system. ?membership: Provides information on the Benefits of Membership. ?merge: Provides information on the server merge. ?moves: Provides a link for the TM and Tutors Guide. ?notcoded: Provides a link for the List of Uncoded Moves. ?register: Provides a link to Registration. ?report: Provides a link to the Report Center. ?restore: Provides a link to the Restore Pokemon Megathread. ?rollback: Provides a link to the Rollback Thread. ?rules: Provides a link to PRO's Rules. ?serverdown: Provides an explanation for the server being down. ?status: Provides a link to Server Status. ?stuck: Provides solutions for if you are stuck. ?suggestions: Provides a link to the Suggestions Sub-forum. ?updatelog: Provides a link to the Update Logs. ?wiki: Provides a link to the Official PRO Wiki. Prefix: ;; Invite Link: Fredboat Primary Function: Music Commands: [spoiler=Fredboat Commands];;play <url/keywords>: Plays music from the given URL or keyword. ;;queue: Displays the queue of the current tracks in the playlist. ;;nowplaying: Displays the currently playing track. ;;skip: Removes the currently playing track from the queue. ;;voteskip: Votes to skip the current track. Must have at least 50% of the votes. ;;pause: Pauses the player. ;;resume: Resumes the player. ;;join: Makes FredBoat join your current voice channel. ;;leave: Makes FredBoat leave the current voice channel. ;;repeat: Changes the repeat mode. Run this command for more info. ;;shuffle: Toggles shuffle mode. ;;reshuffle: Reshuffles the queue. ;;fwd <time>: Forwards the track by the given amount of time. ;;rew <time>: Rewinds the track by the given amount of time. ;;seek <time>: Sets the position of the track to the given time. ;;restart: Restarts the currently playing track. ;;history: Shows history of recently played tracks. Prefix: ^ Invite Link: Reborn Bot Primary Function: In-Game Aid Commands: [spoiler=Reborn Commands]^bguide: Provides a Beginners Guide on Pokemon Technicalities ^boss: Provides information on a boss. ^cooldowns: Provides cooldowns on bosses, excavation, bug catching, and subway tickets for a player. ^dex: Provides pokedex information on a pokemon. ^hp: Provides the hidden power of a pokemon given a screenshot of IVs. ^info: Provides information on an item, move, or ability. ^inspect: Provides information on a Player. ^item: Provides information on pokemon that can hold an item. ^ivs: Provides the IVs of a pokemon. ^memberlist: Provides a list of members of a guild. ^msspawns: Provides a list of member-ship only pokemonn. ^poketime: Provides the current time in-game. ^repel: Provides a list of pokemon available from the repel trick. ^spawn: Provides a list of areas where a pokemon spawns. ^defaultserver: Sets a server as your default server. ^smogon: Provides PvP information on a pokemon from Smogon. ^timeladder: Provides a list of players with the most playtime. ^guildladder: Provides a list of the top 10 Guilds this season. ^guildseasons: Provides a list of the top 10 Guilds in past seasons. ^ladder: Provides a list of the top 25 Players in Ranked PvP this season. ^mostadded: Provides a list of players whom have added the most in opponents-information ^mostpaired: Provides a list of the most paired pokemon in PvP. ^mostused: Provides a list of the most used pokemon in PvP. ^pvpseasons: Provides a list of the top 25 Players in Ranked PvP in past seasons. ^ts: Provides a list of most used teams.
-
Hey and welcome to this guide! This guide contains all obtainable items in PRO (and a few more), their location, their effect and simply information if the item works. The thread is supposed to be helpful when you are searching for a specific item and don't know where to find it. The items are listed in alphabetical order, just open the spoiler with the opening latter of your searched item and look for it, you can additionally use CTRL+F for a faster search. You won't find any TMs or HMs here as there is a TM/HM and Move Tutor Guide for them. Also customization items are not included here. All underlined words are links, they will send you most usually to some guides since the locations of the items are mentioned here but not the exact way to get them. A-Z The guide is not fully complete!!! Its almost impossible to add all locations to obtain a particular item, but you can help with that! If you notice any missing, wrong information or mistakes, feel free to leave a comment at this thread or send me a PM. Sources:
-
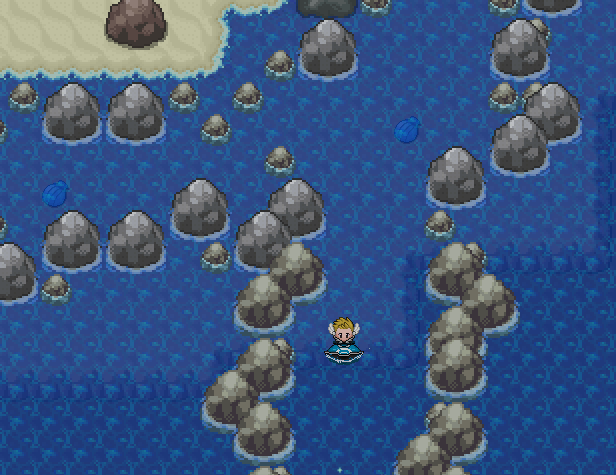
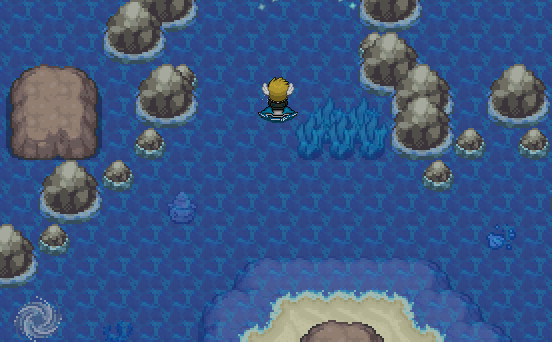
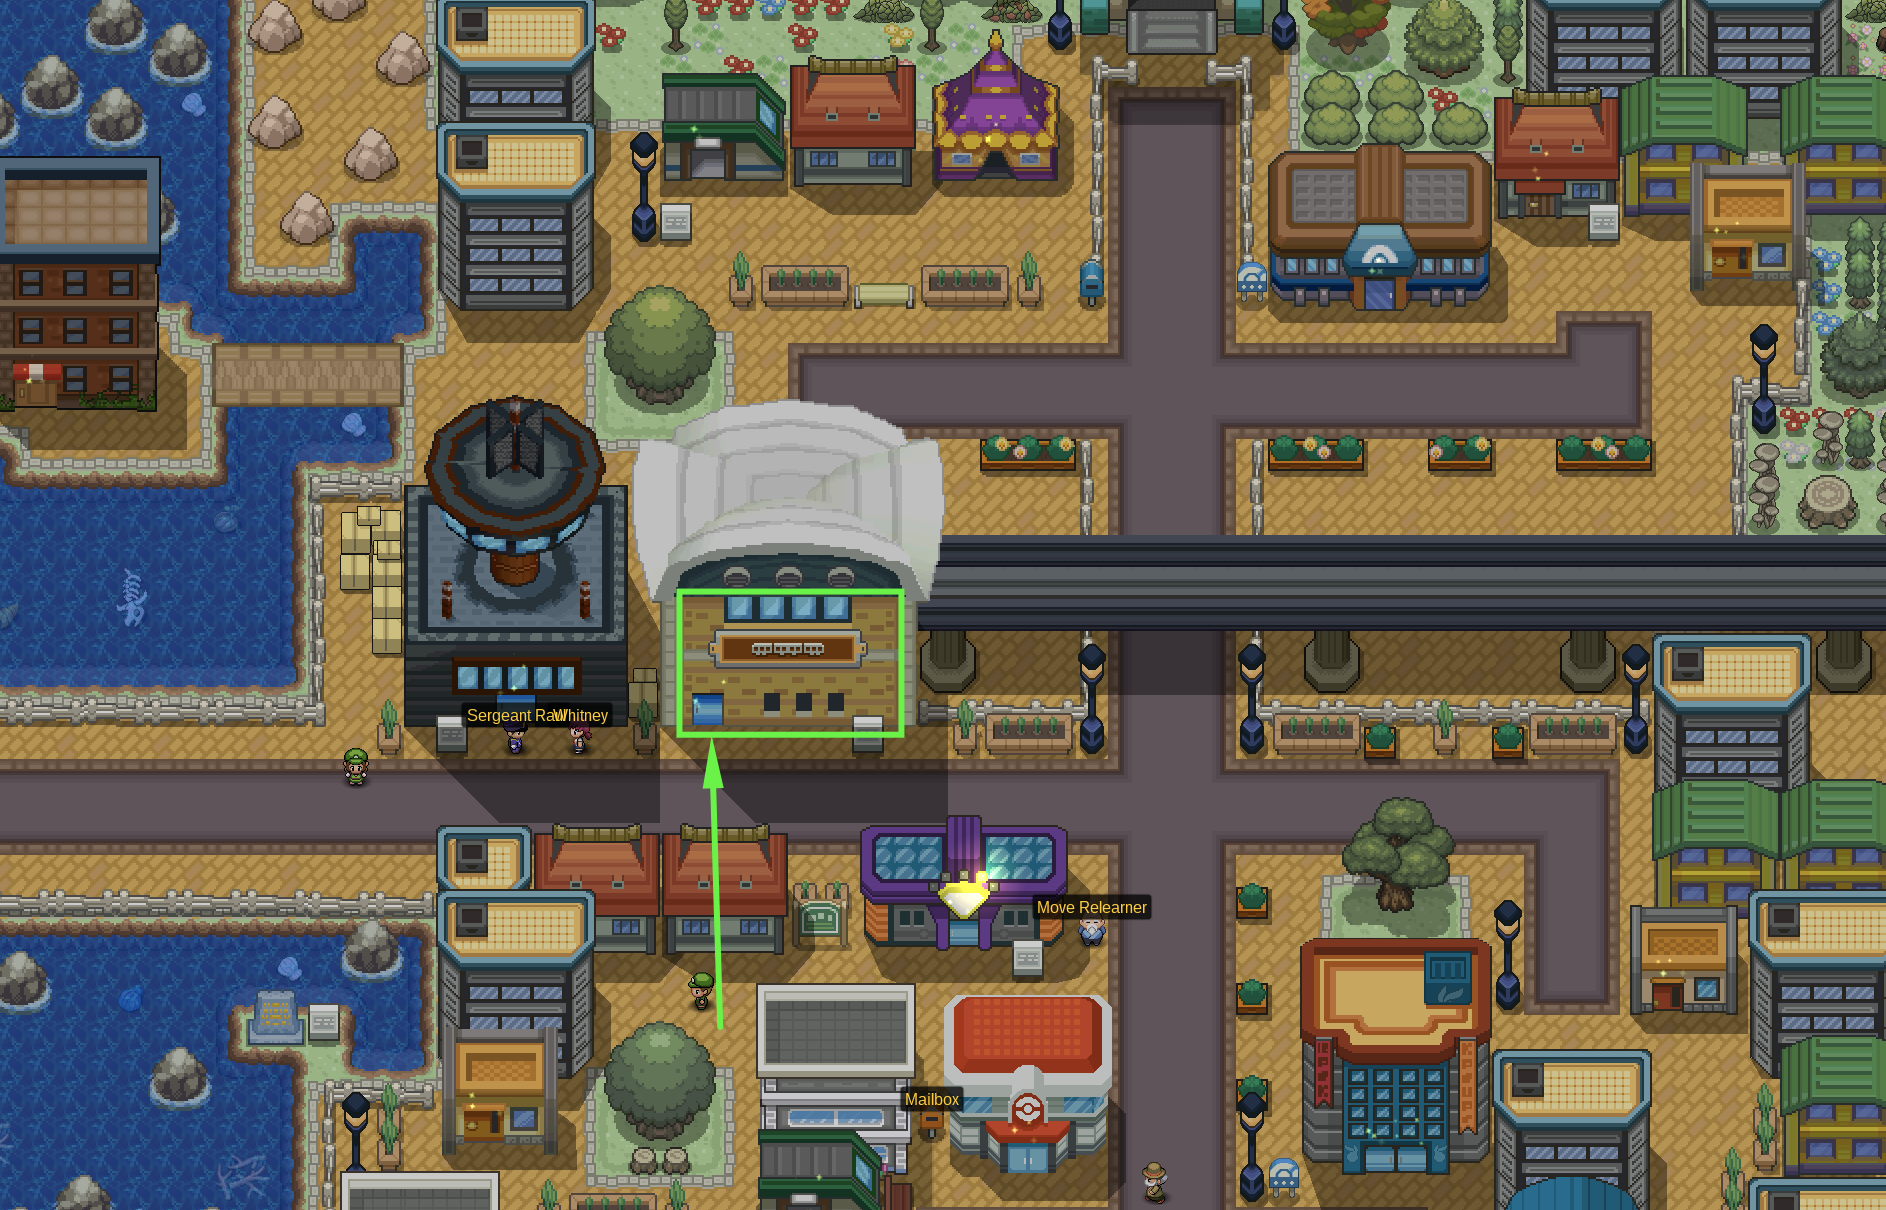
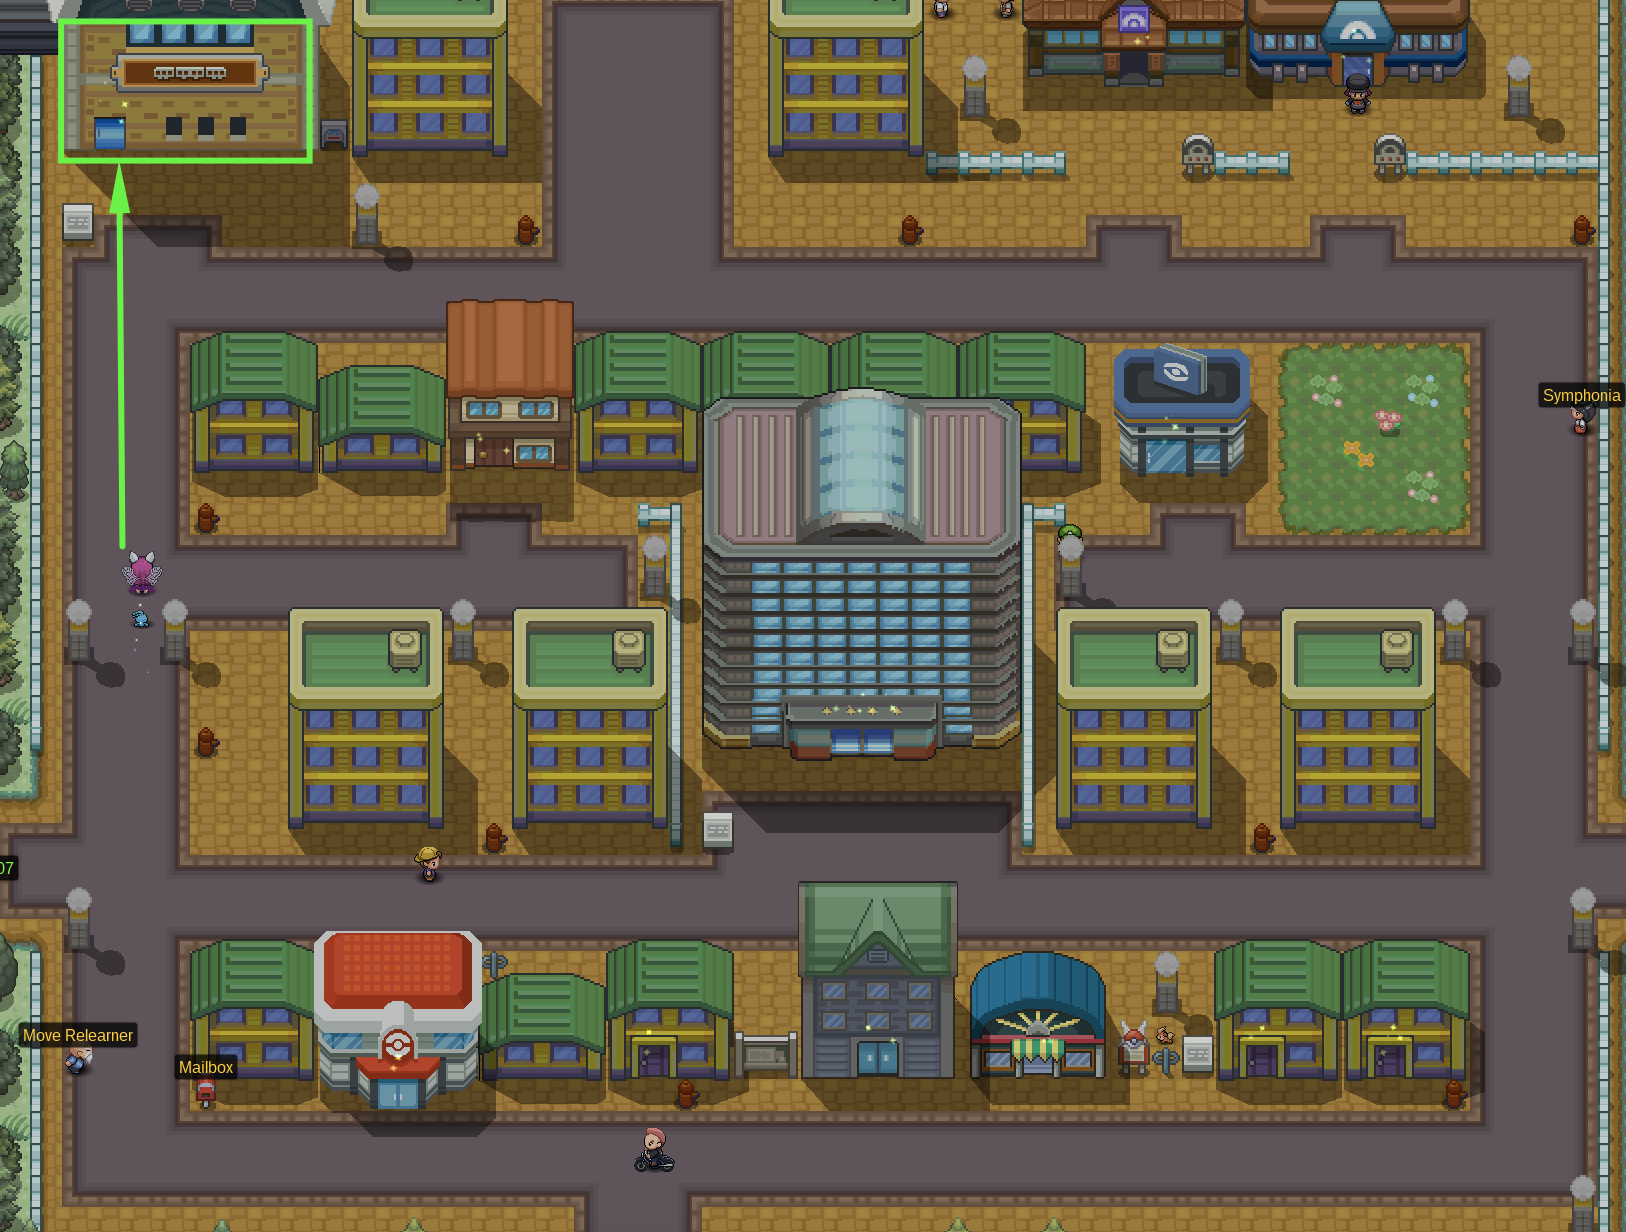
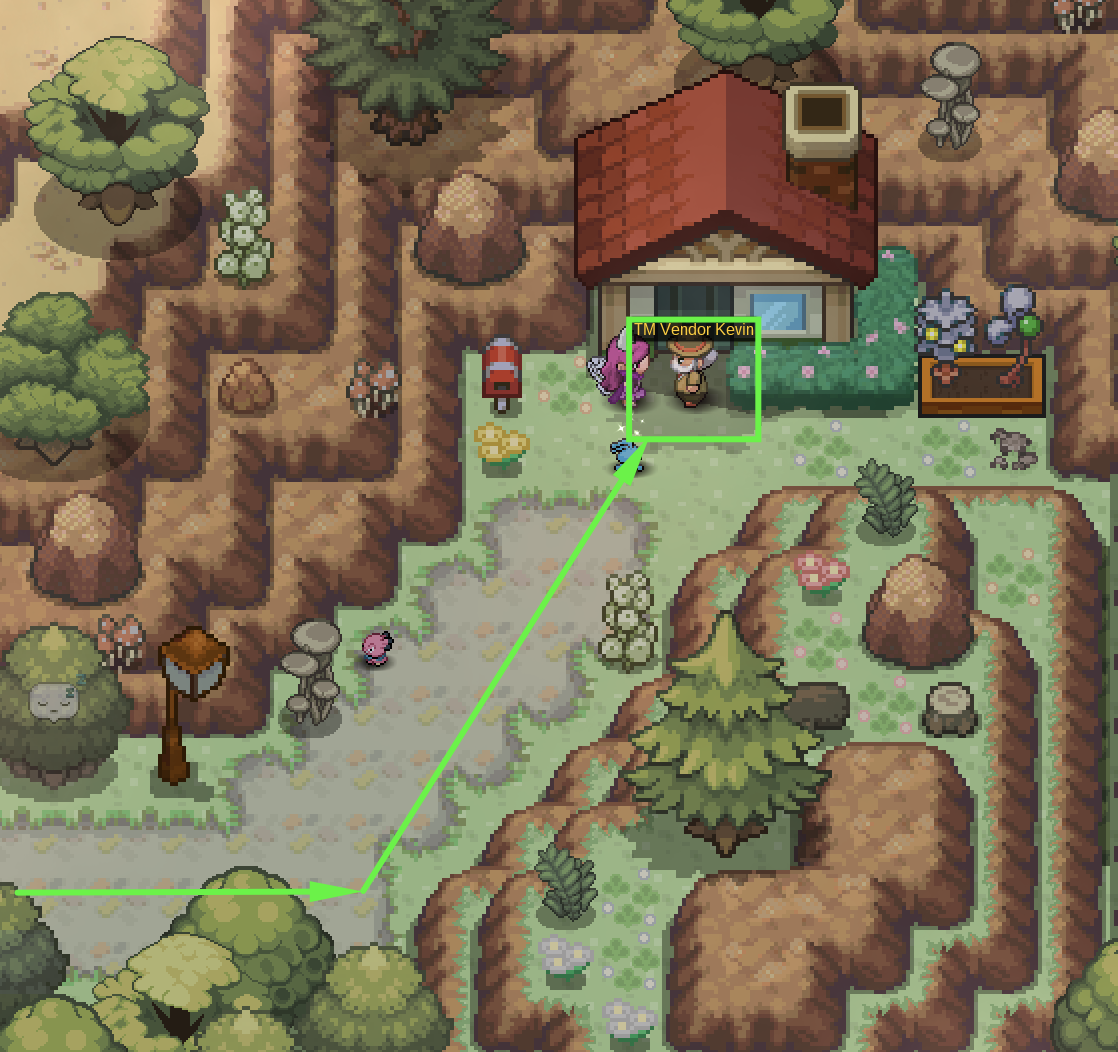
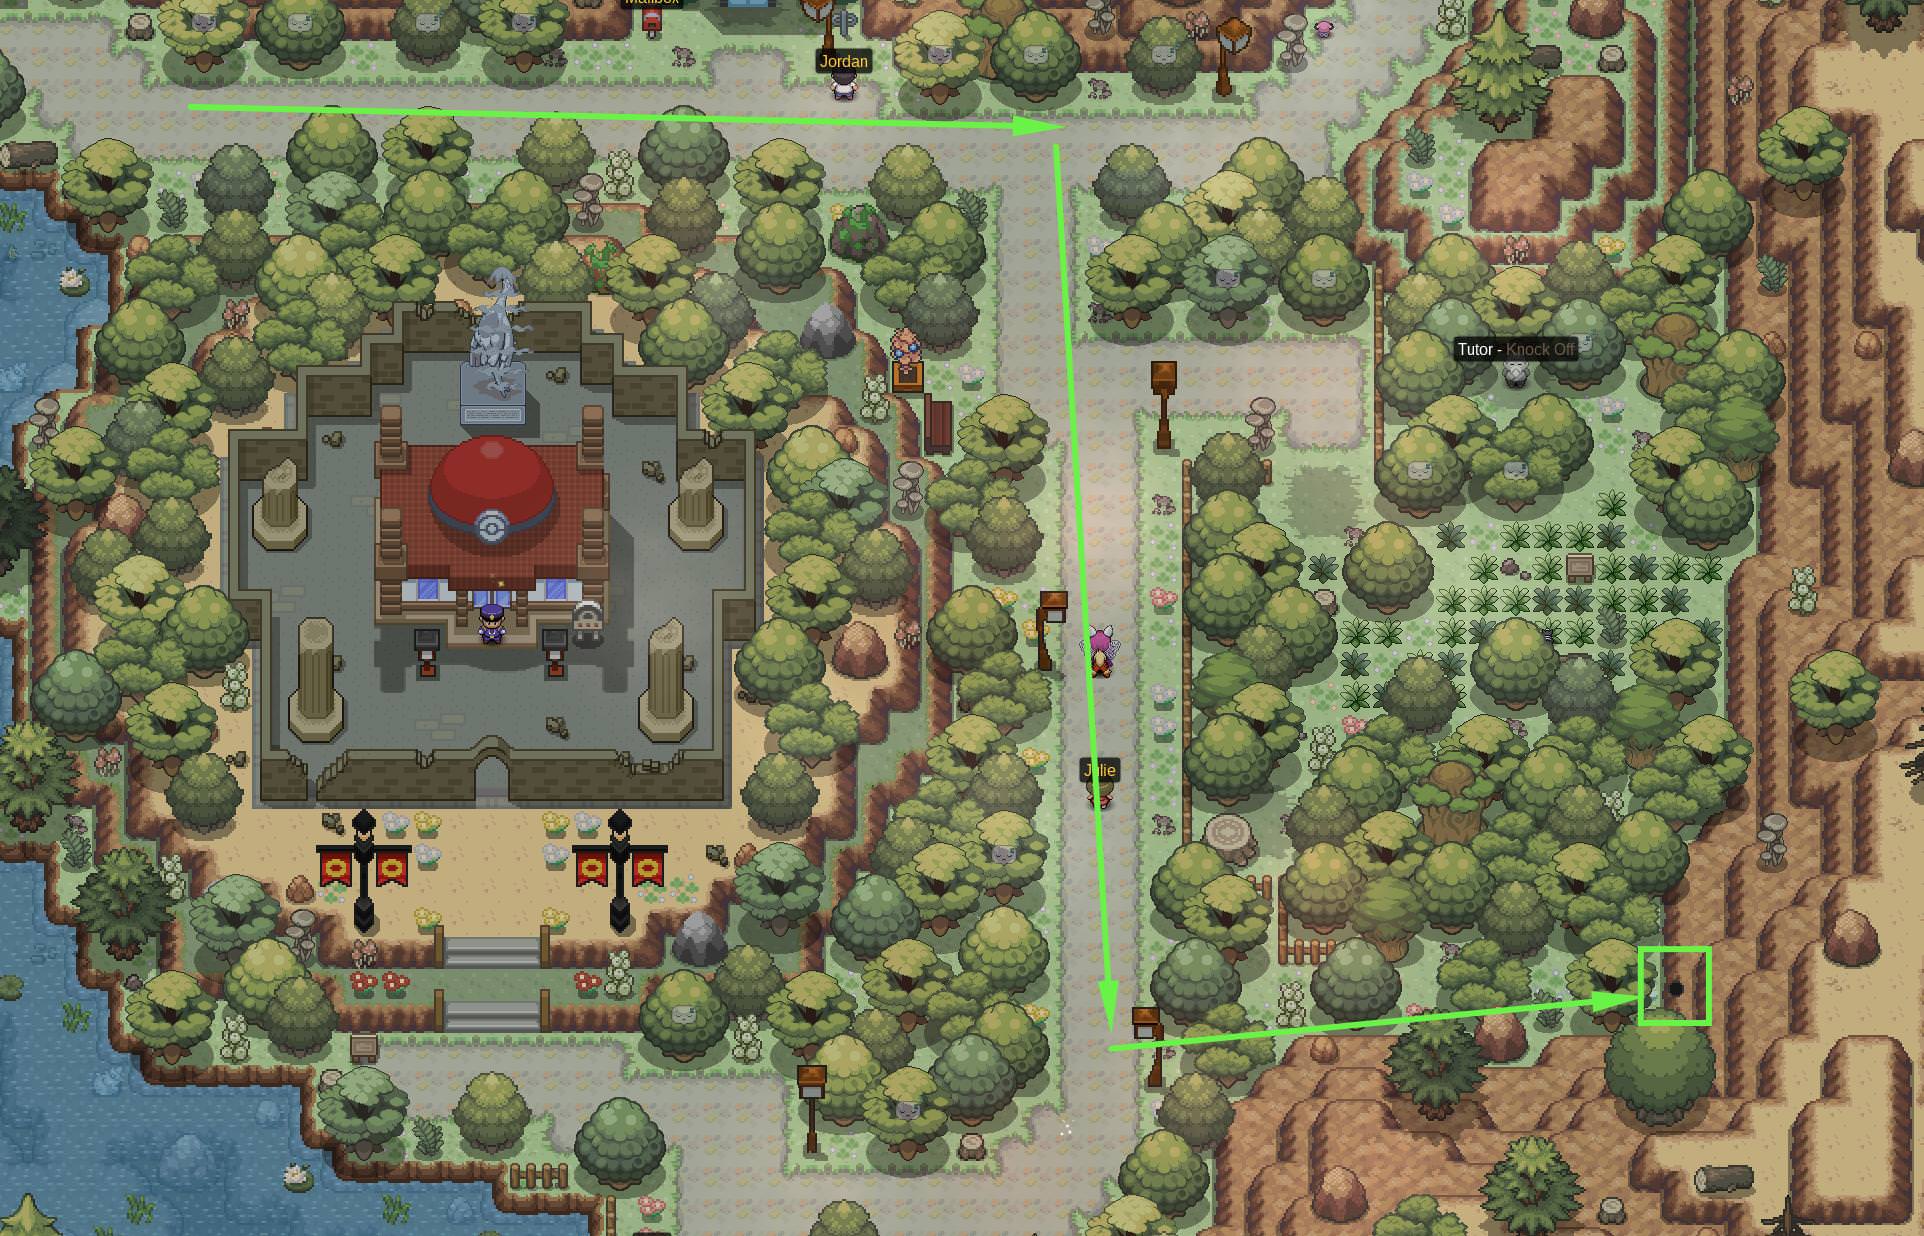
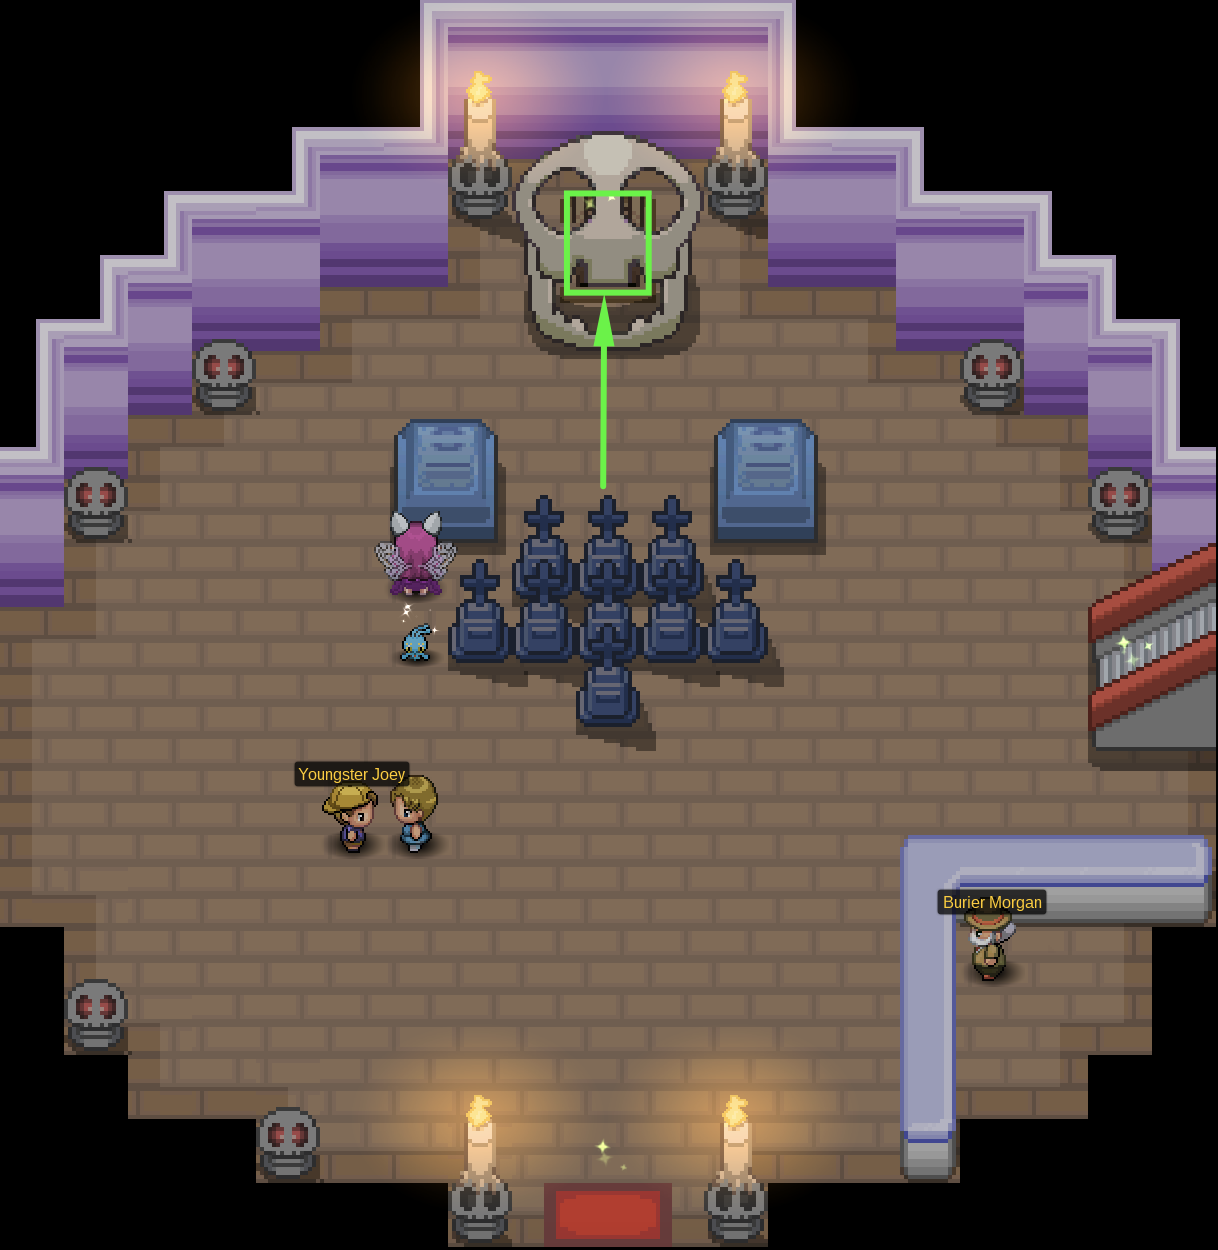
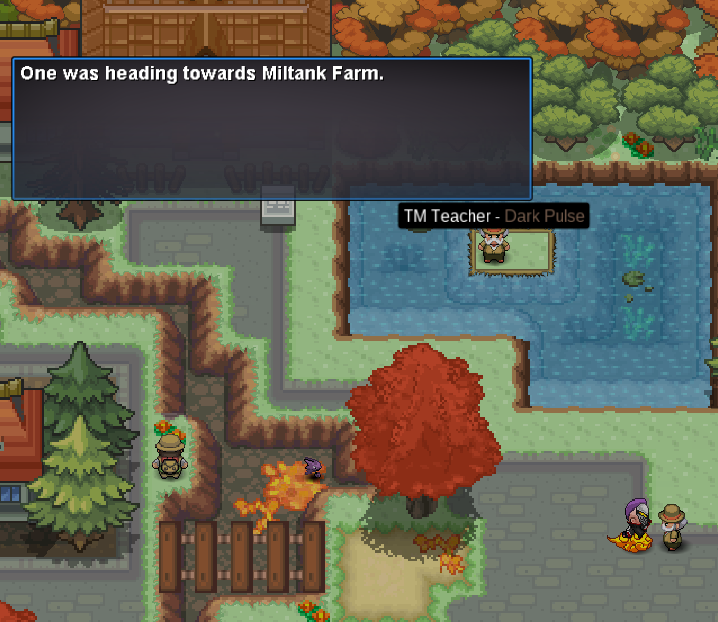
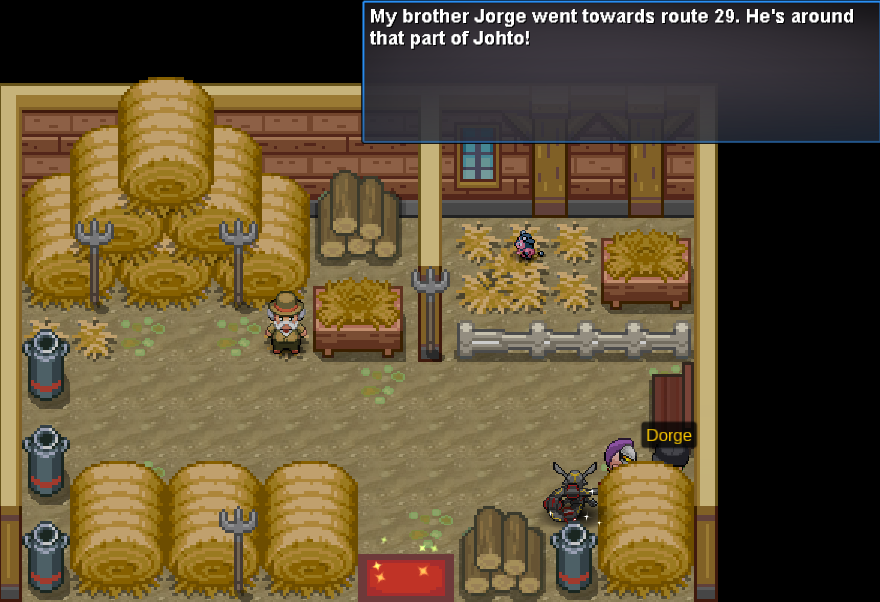
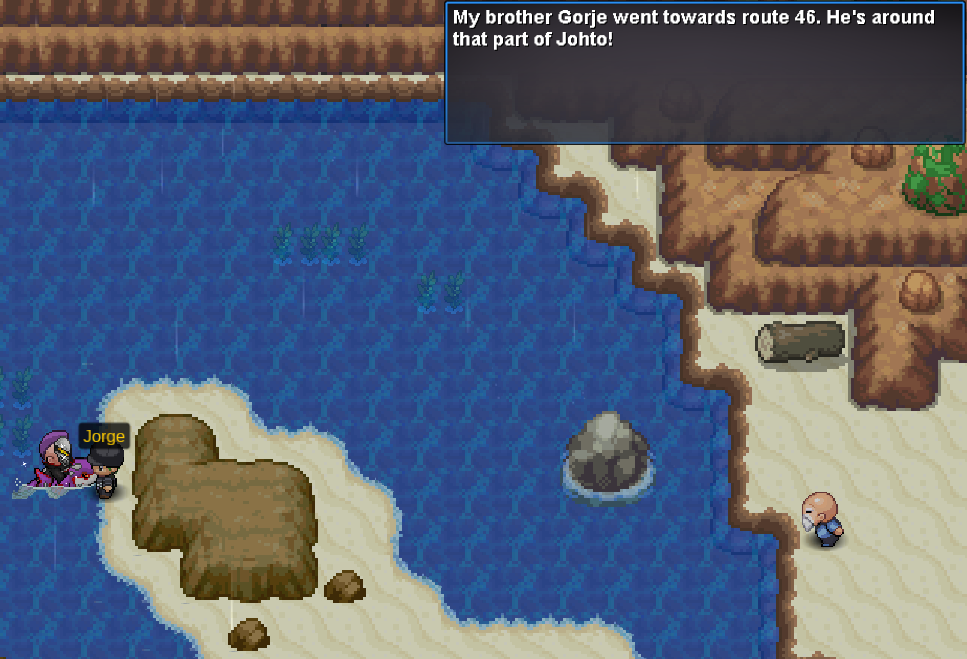
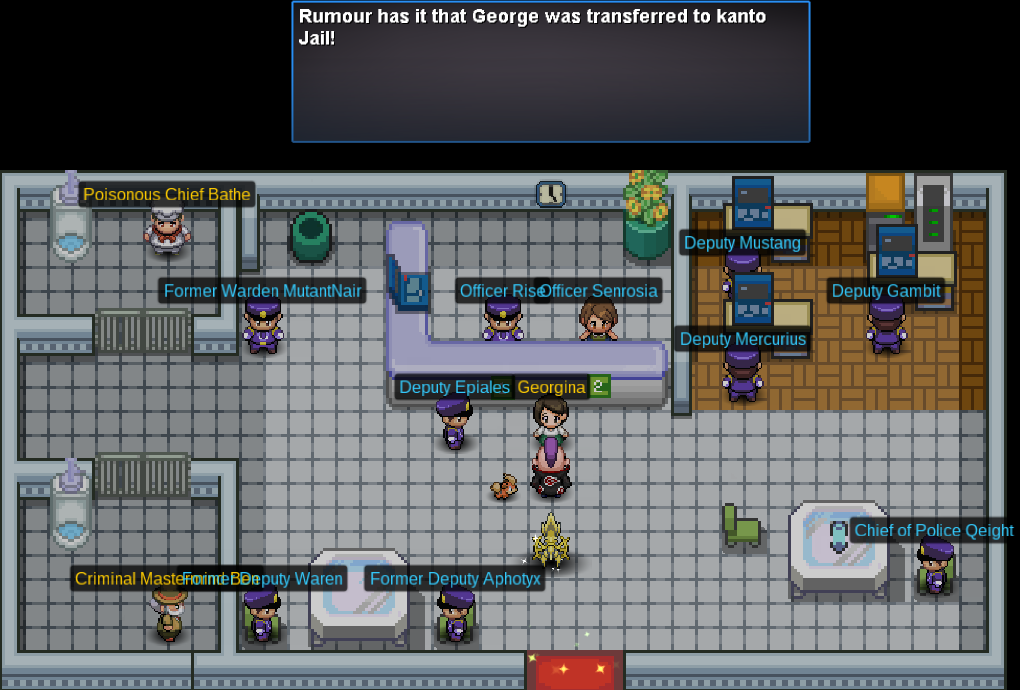
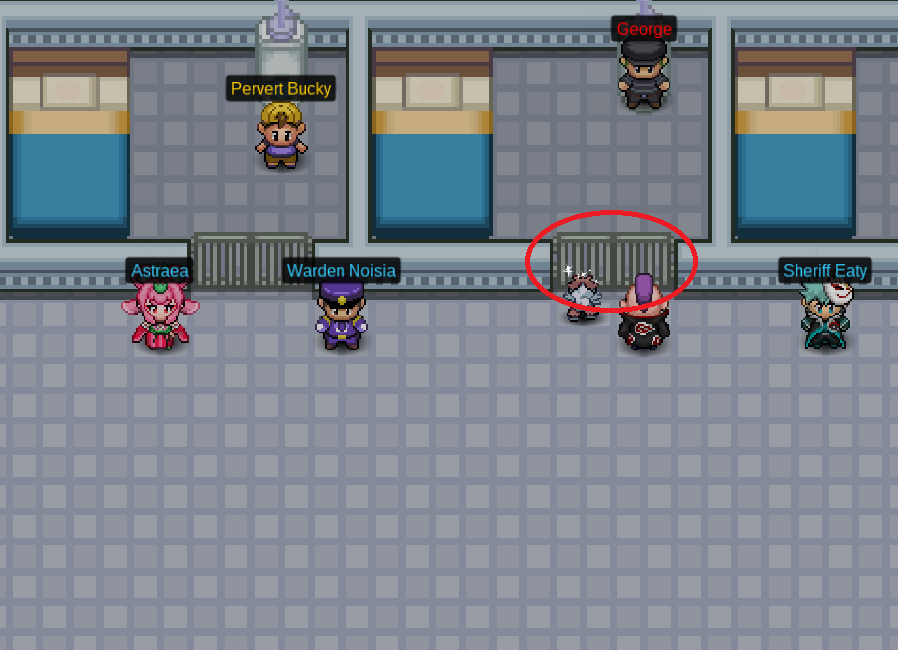
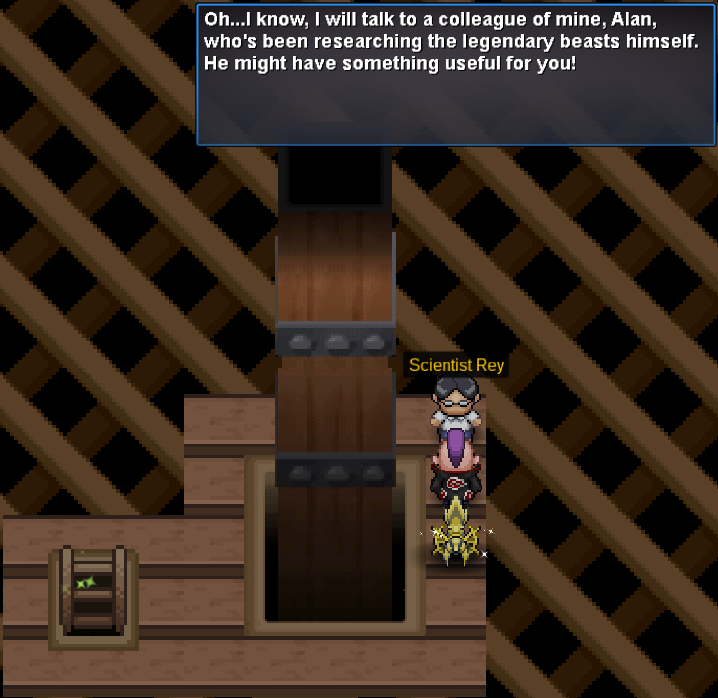
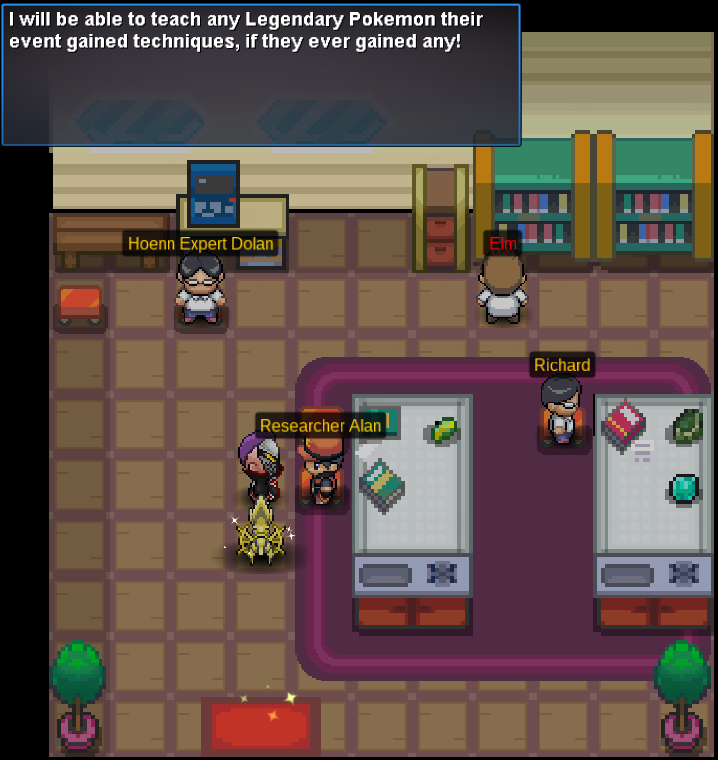
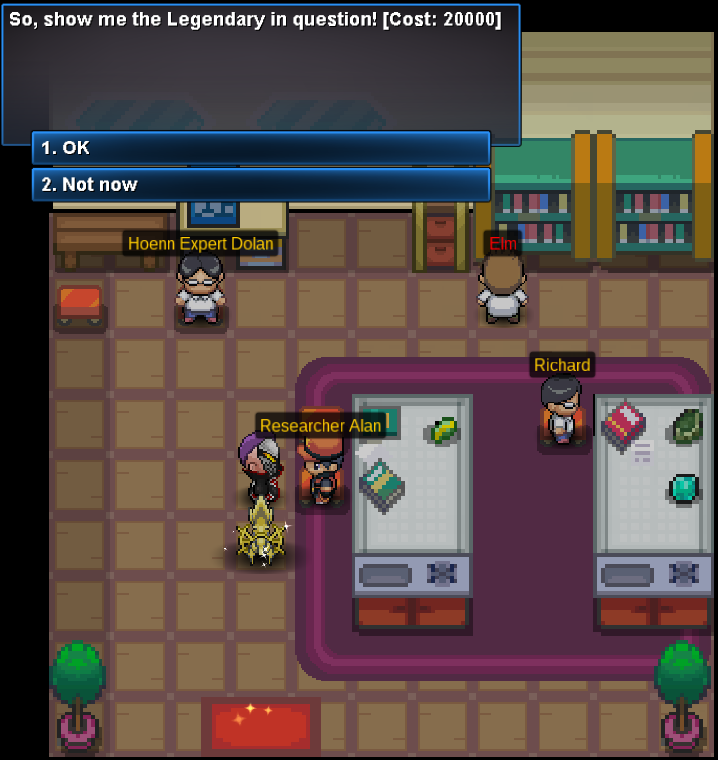
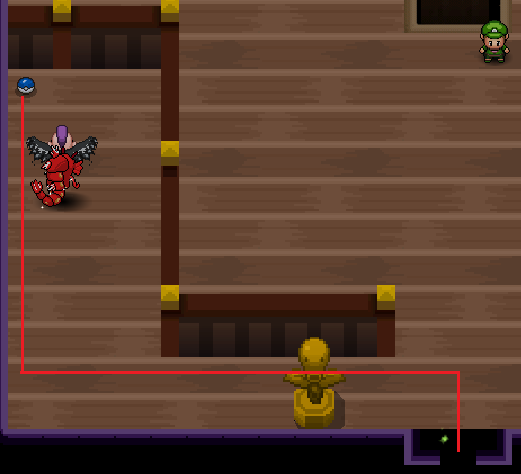
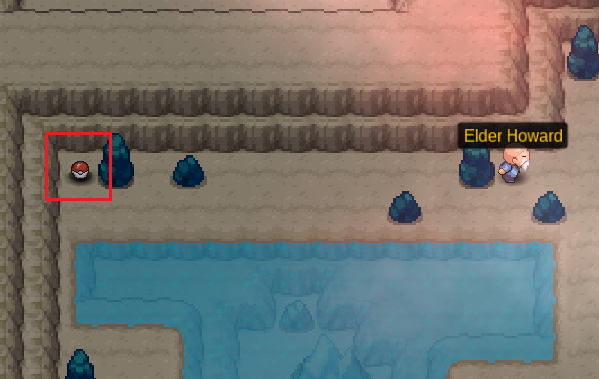
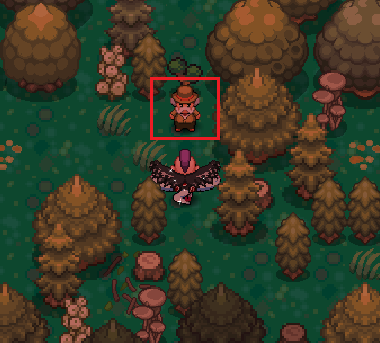
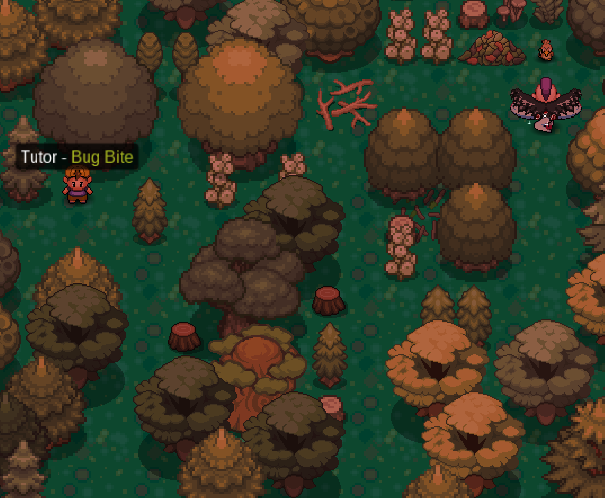
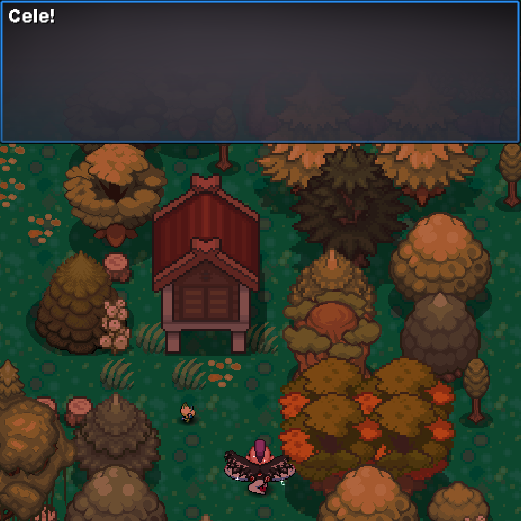
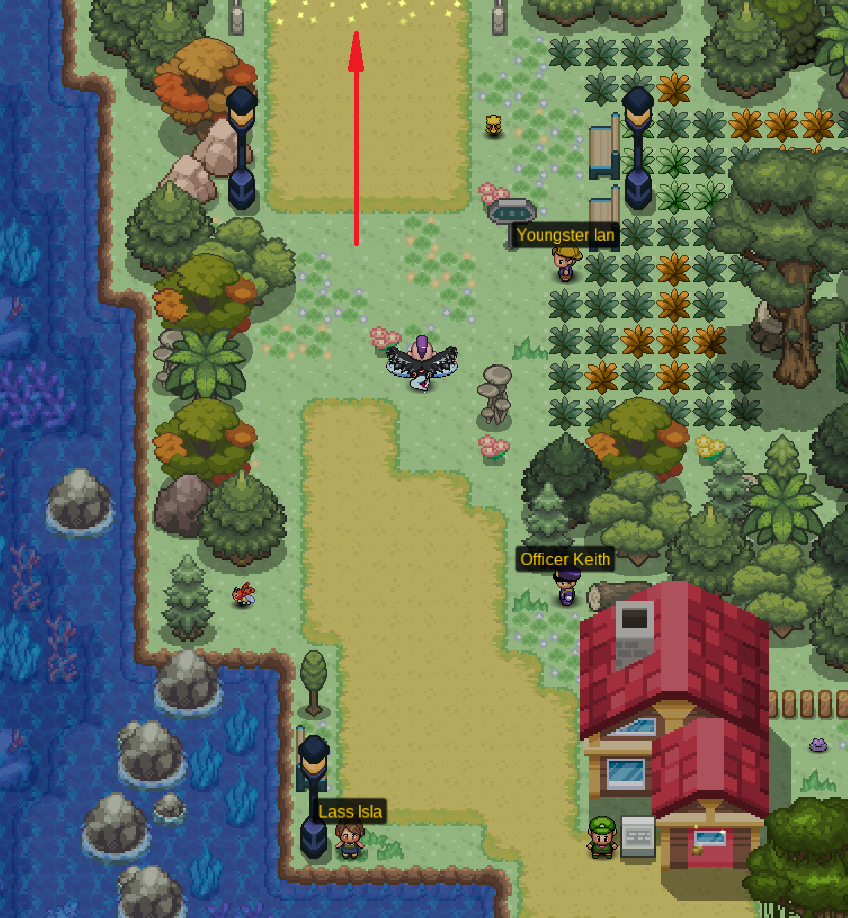
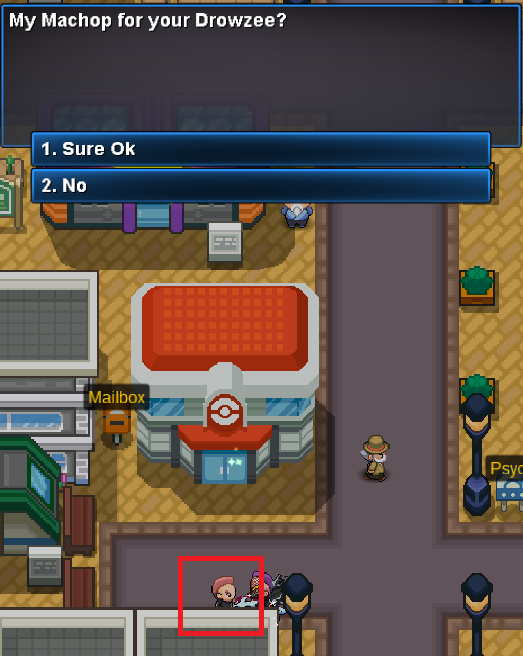
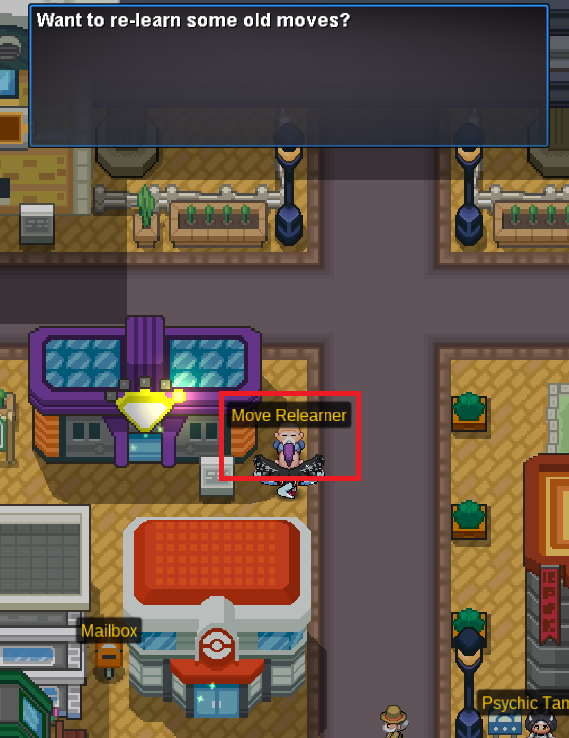
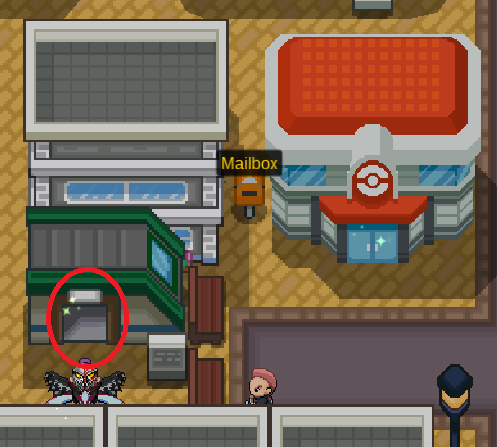
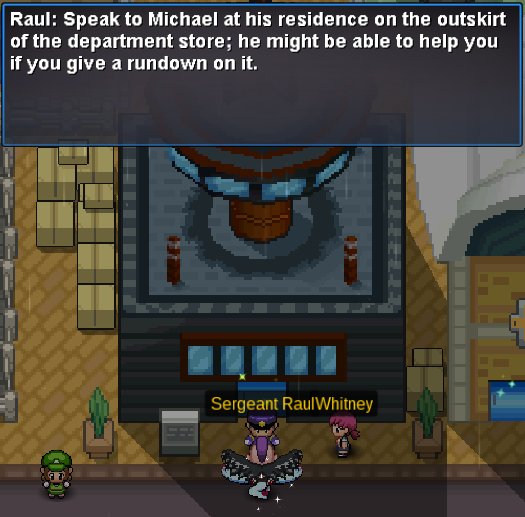
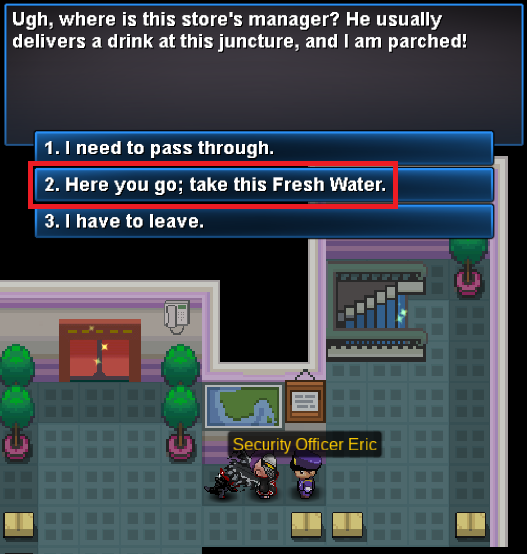
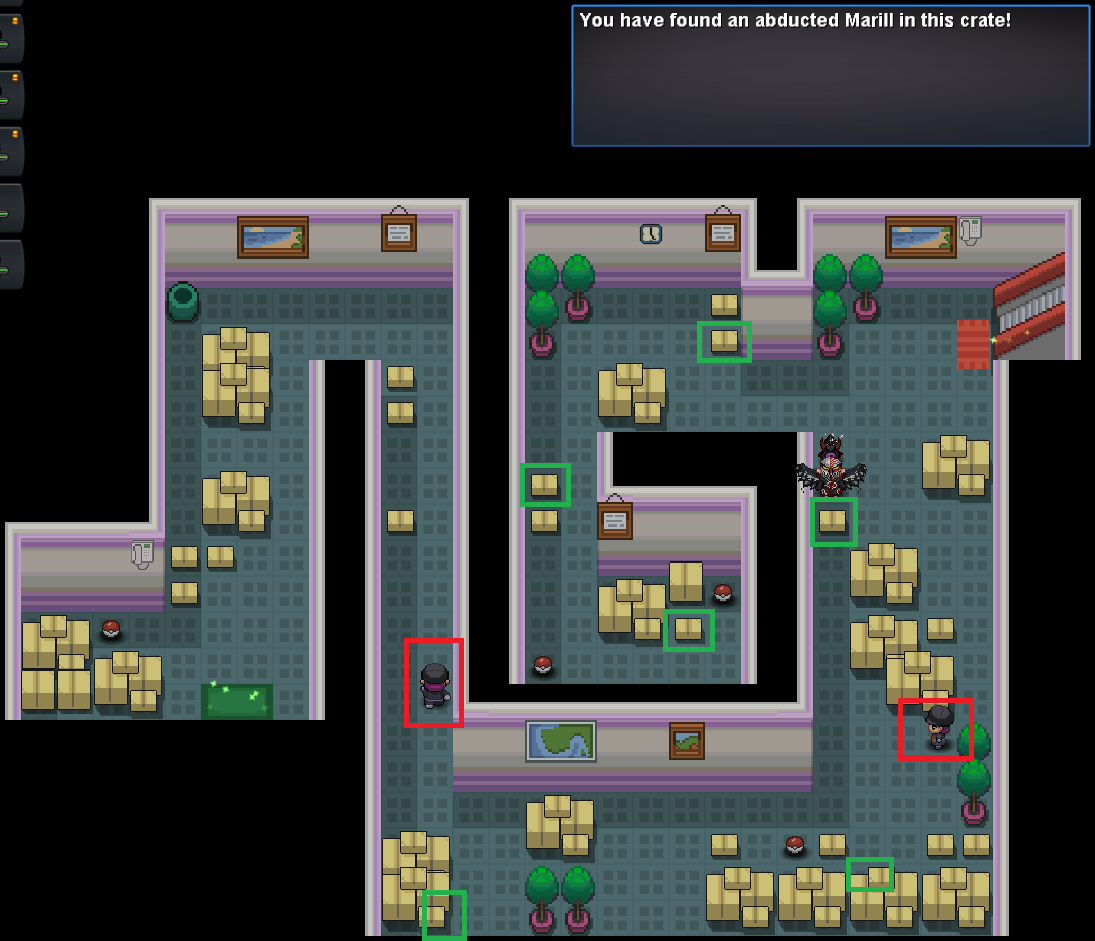
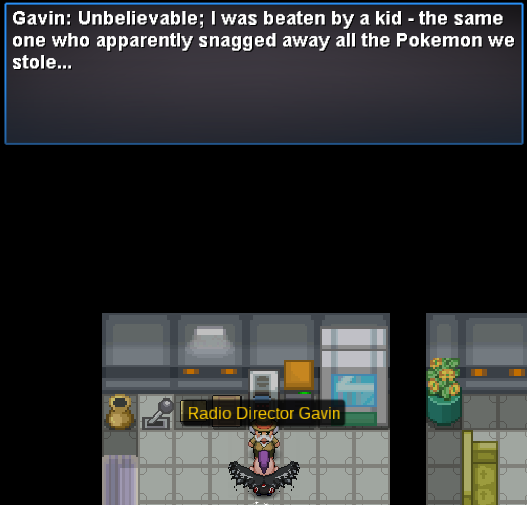
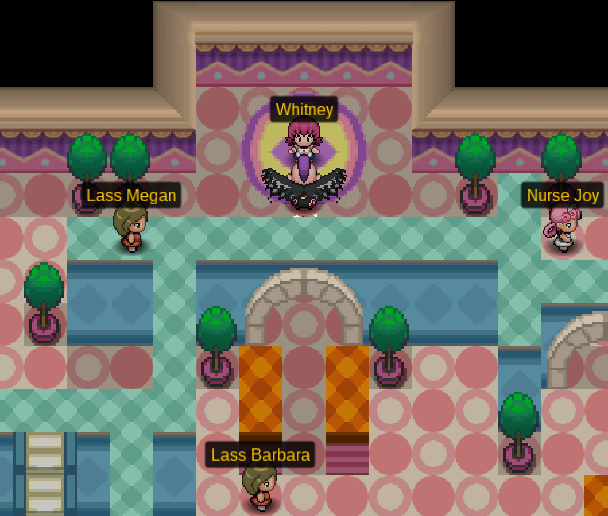
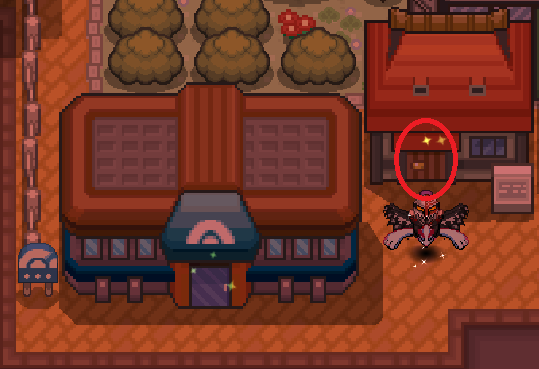
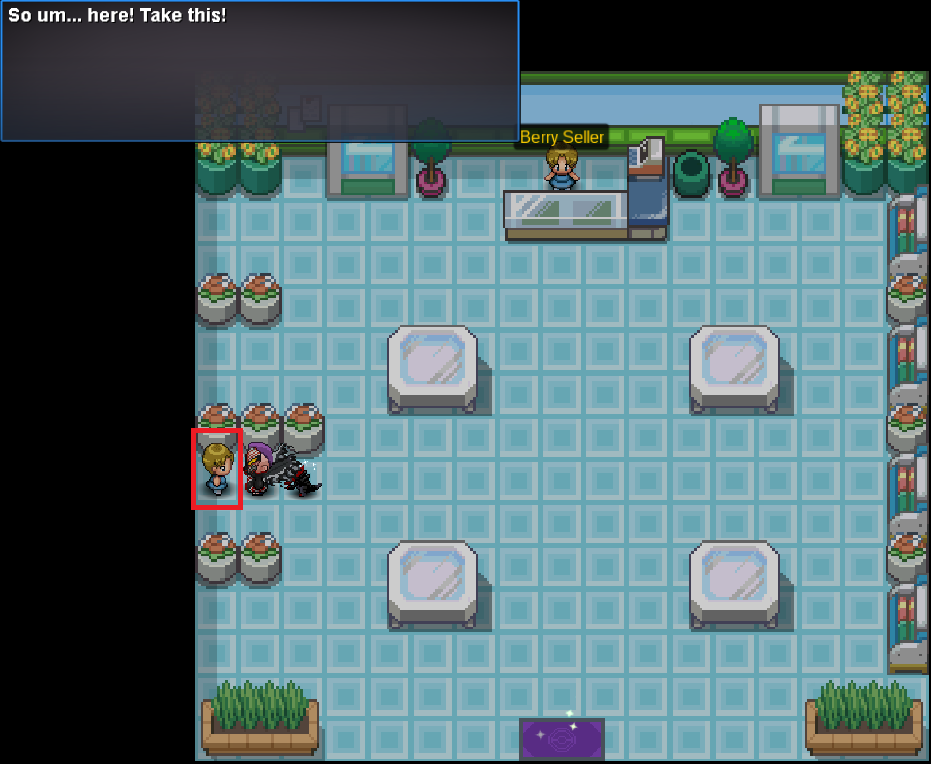
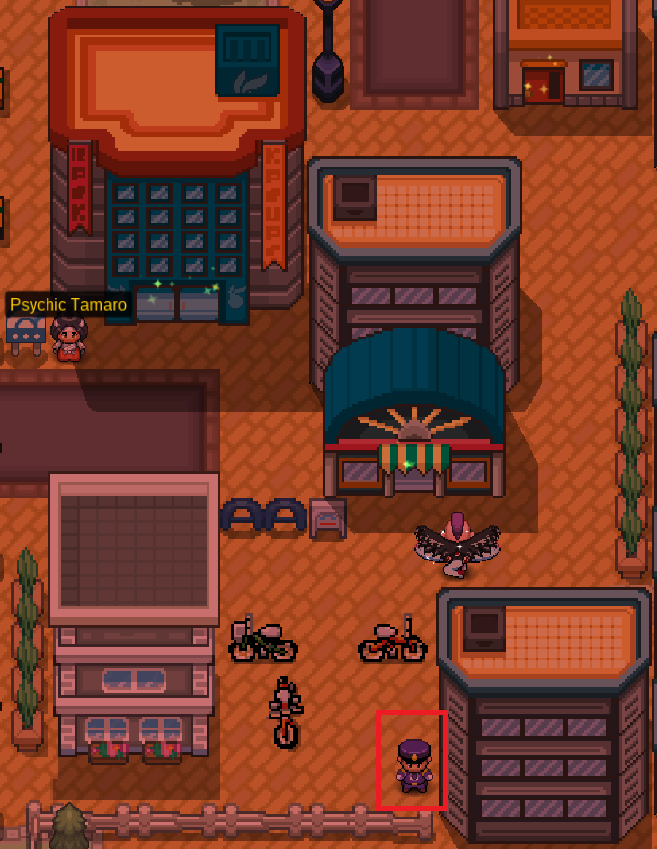
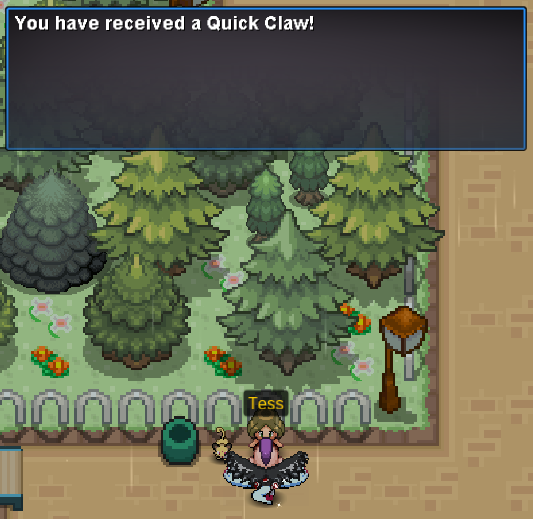
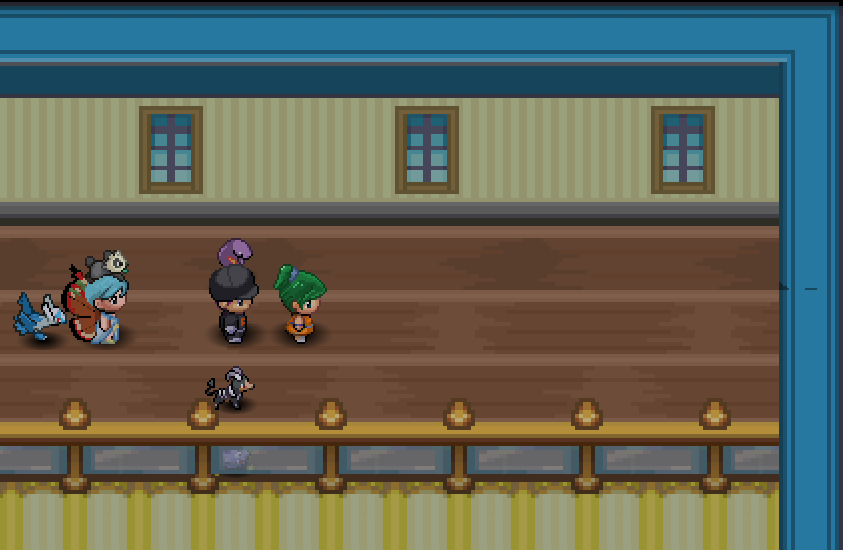
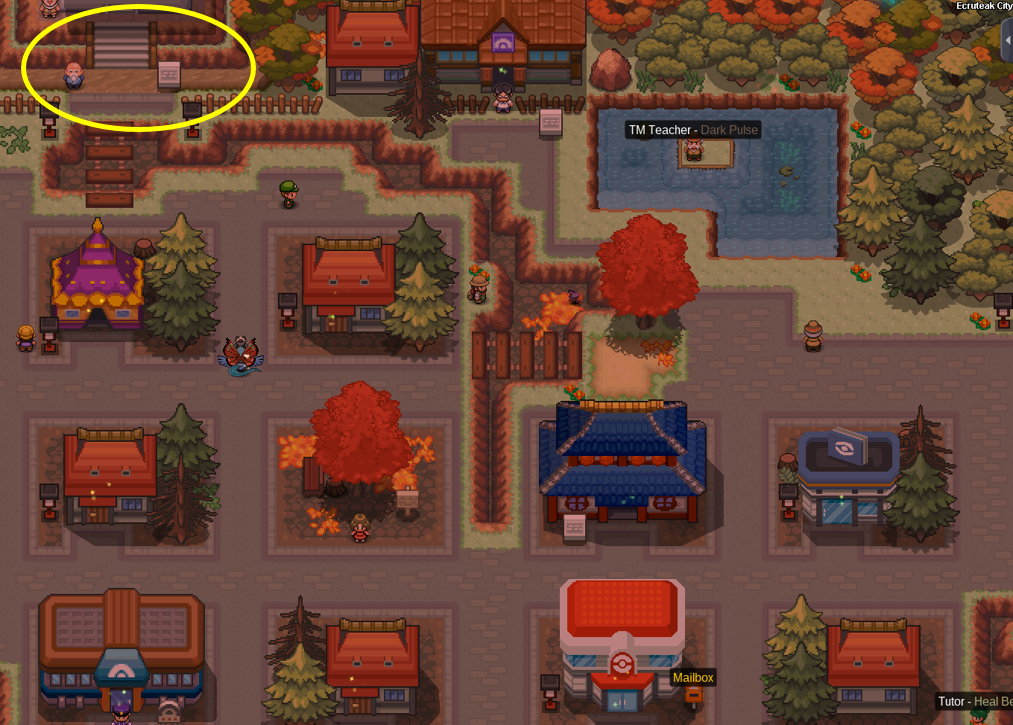
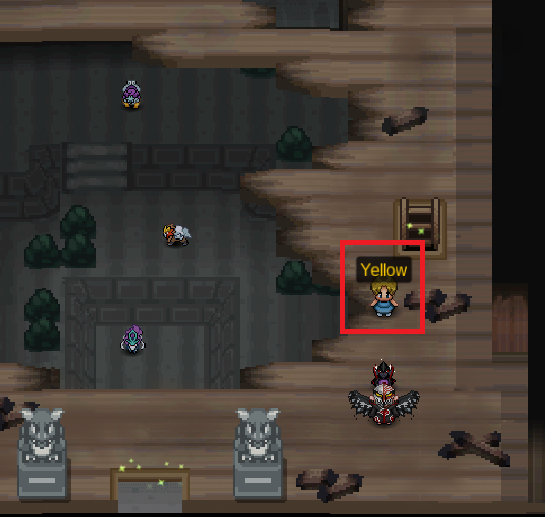
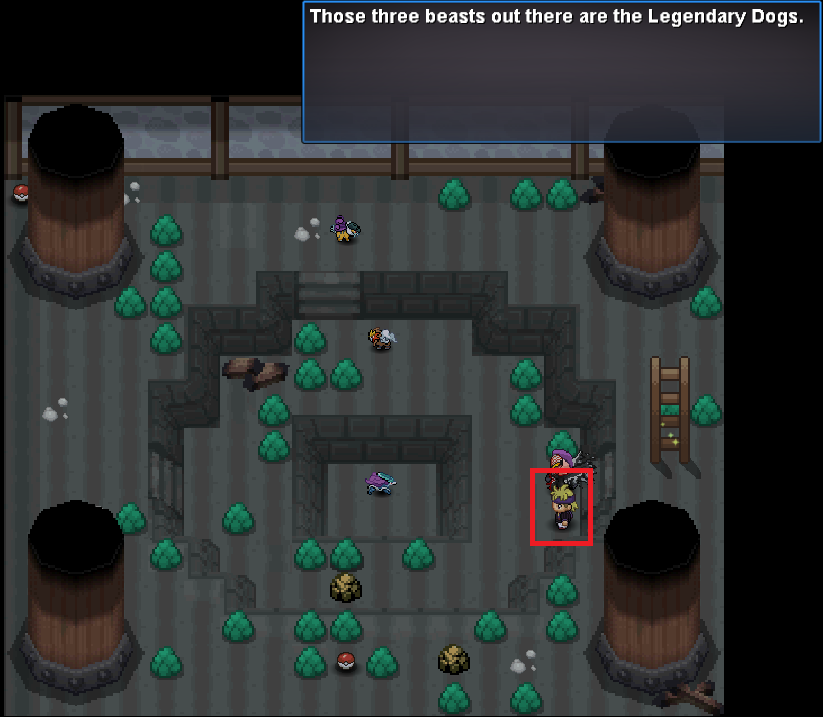
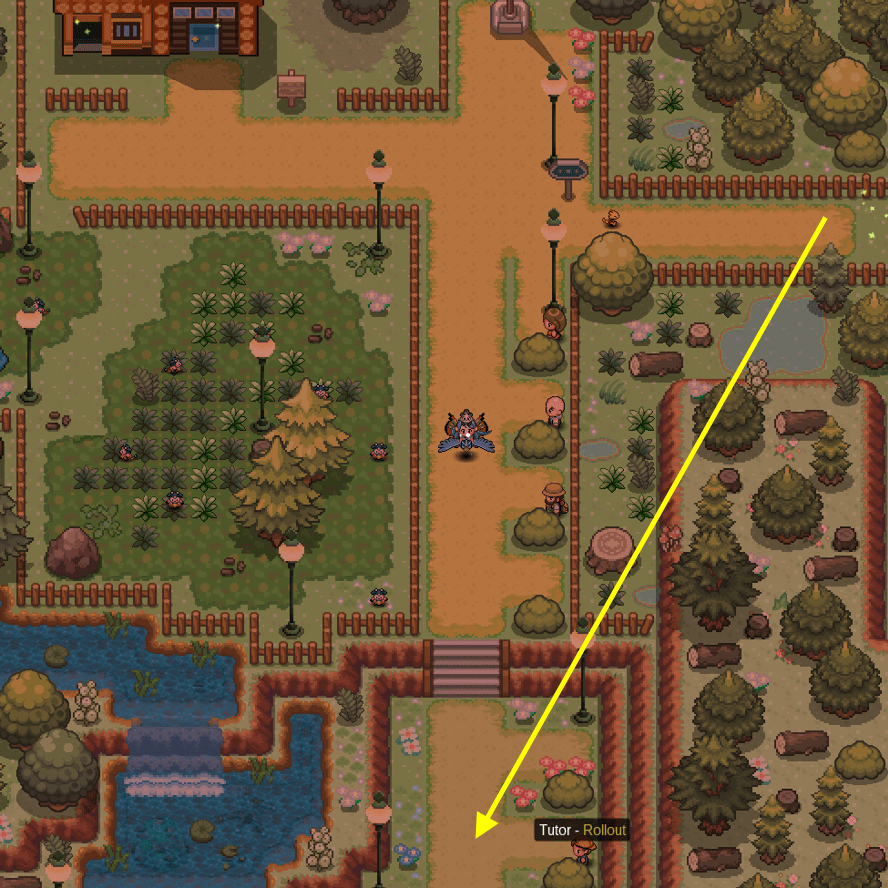
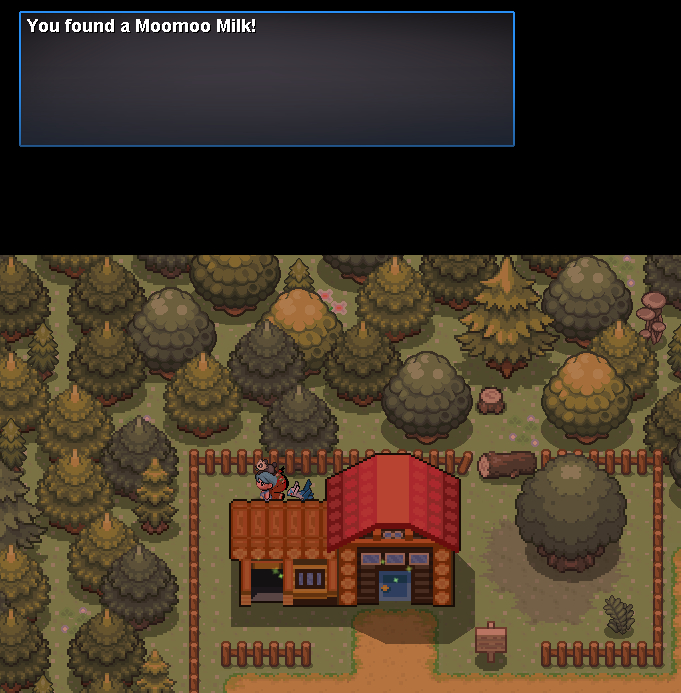
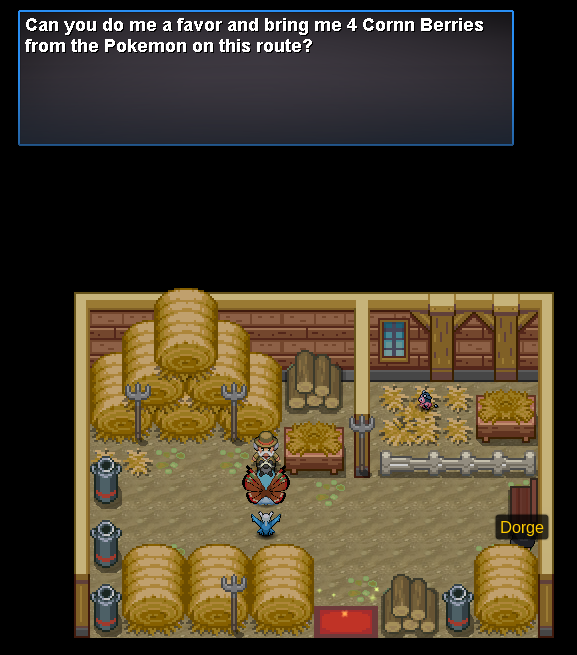
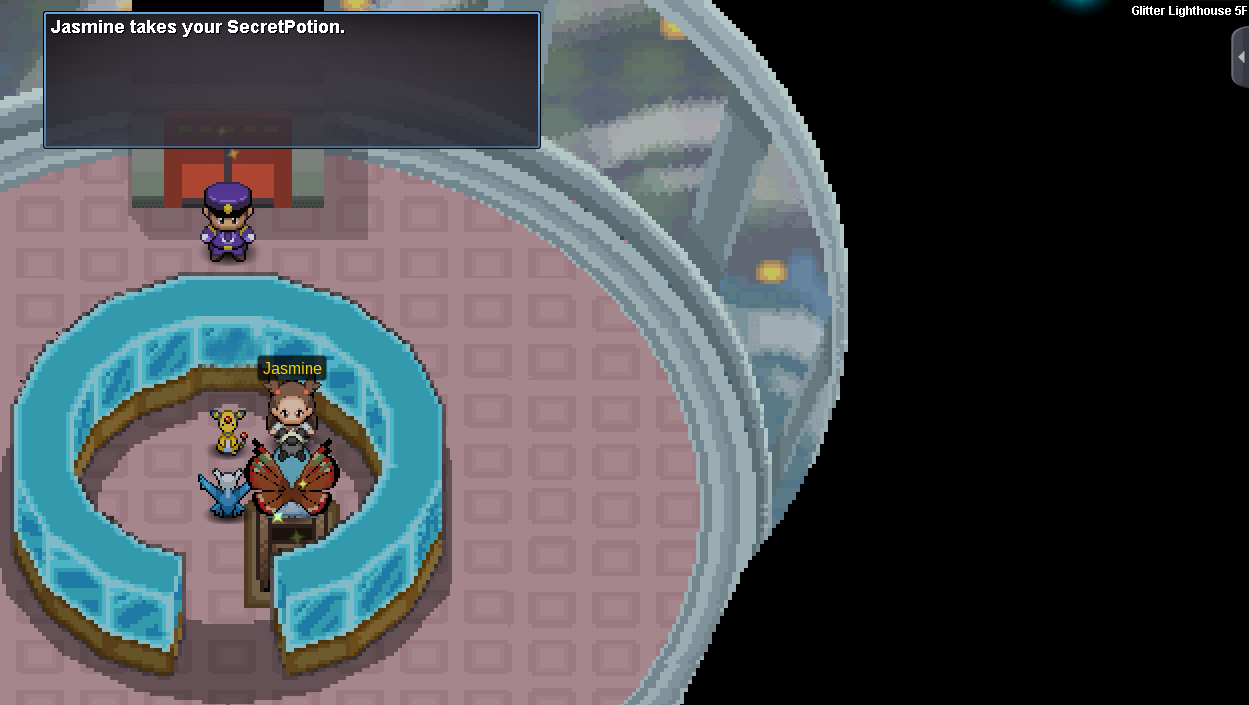
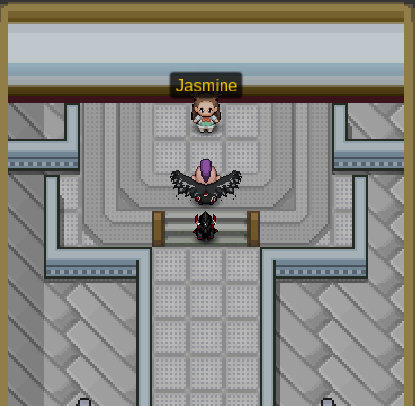
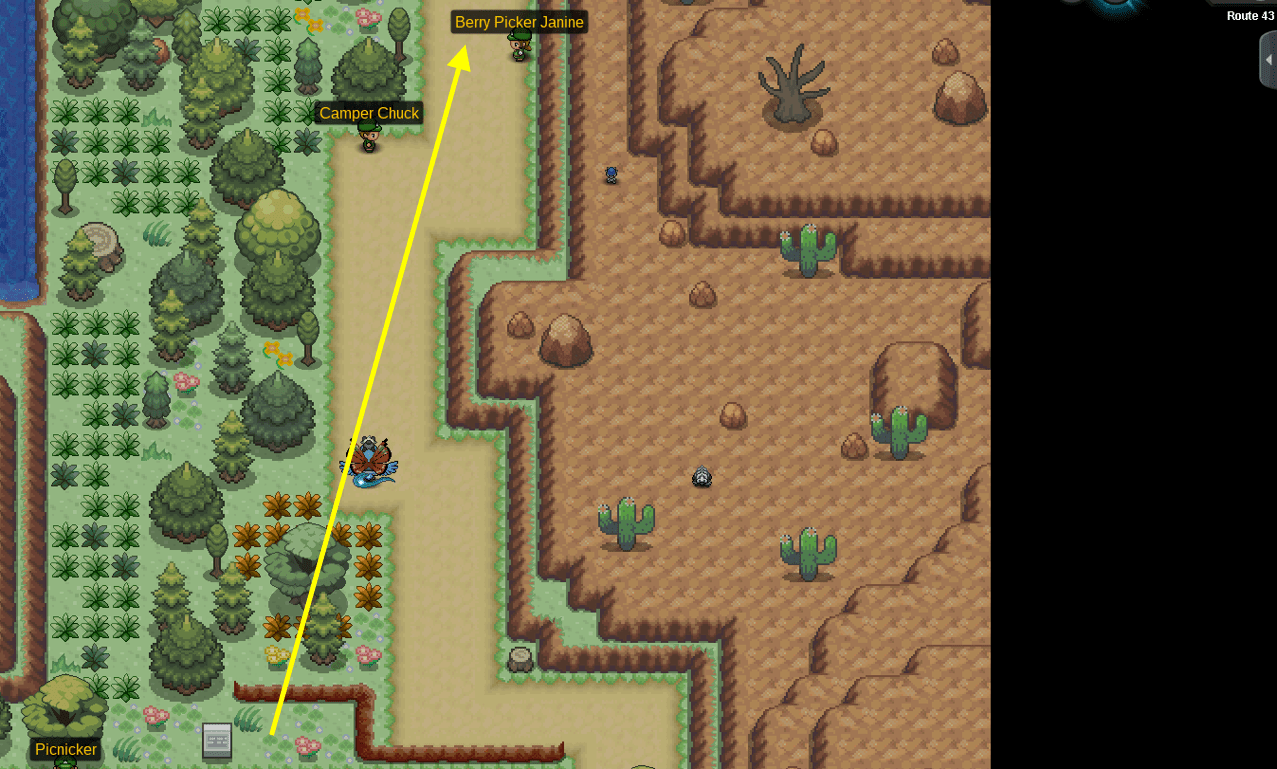
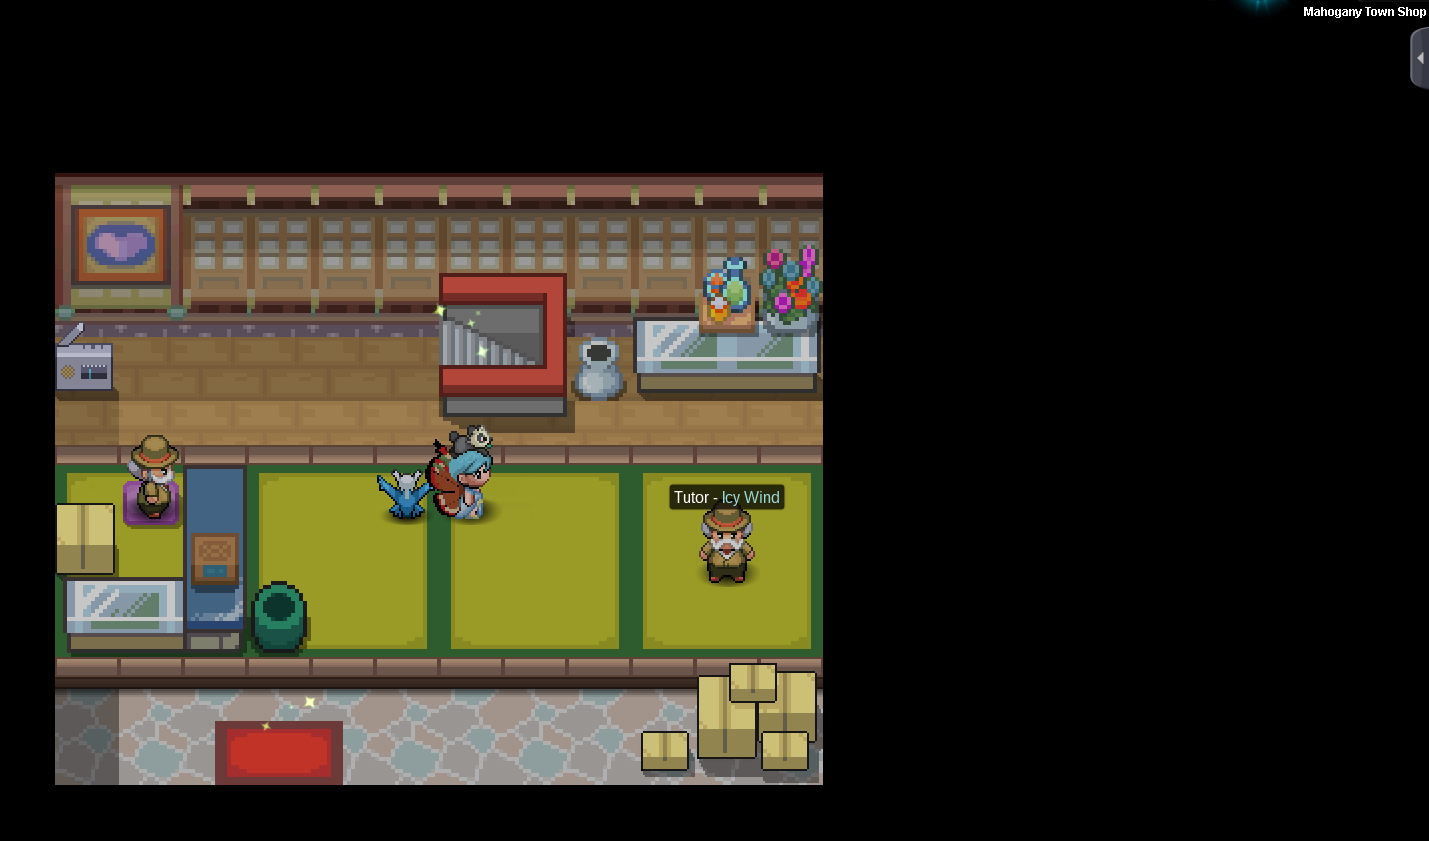
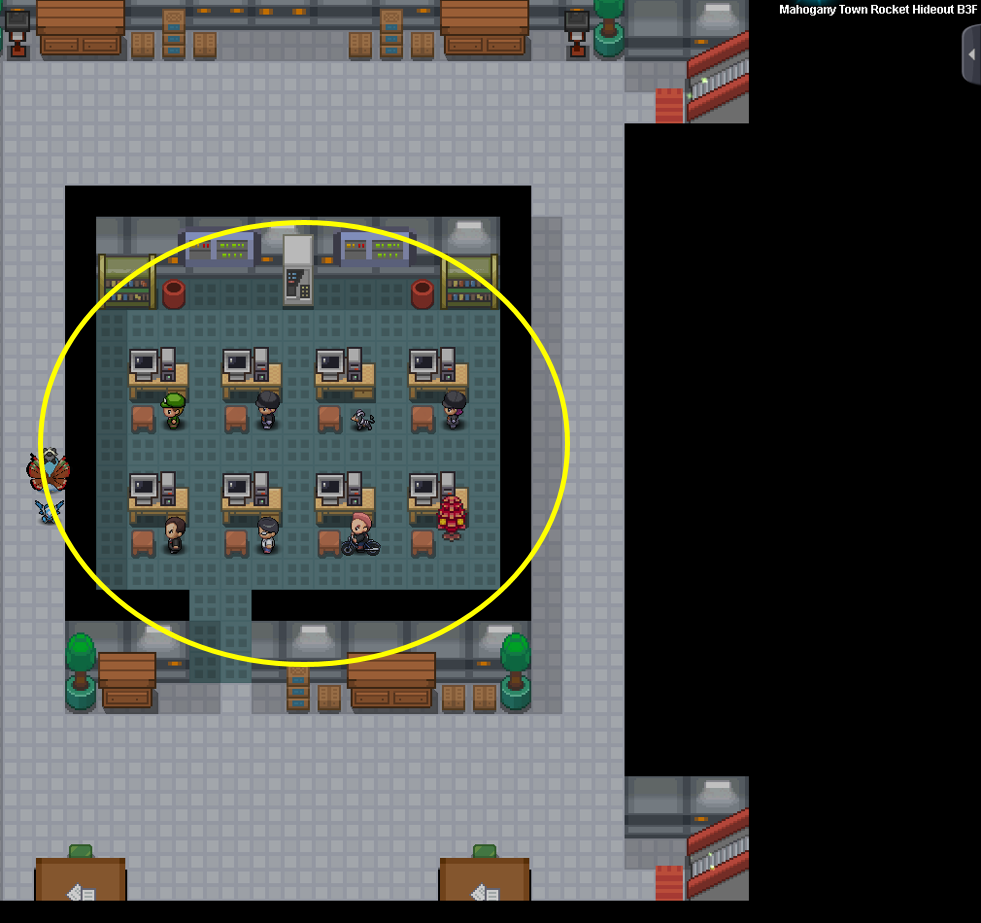
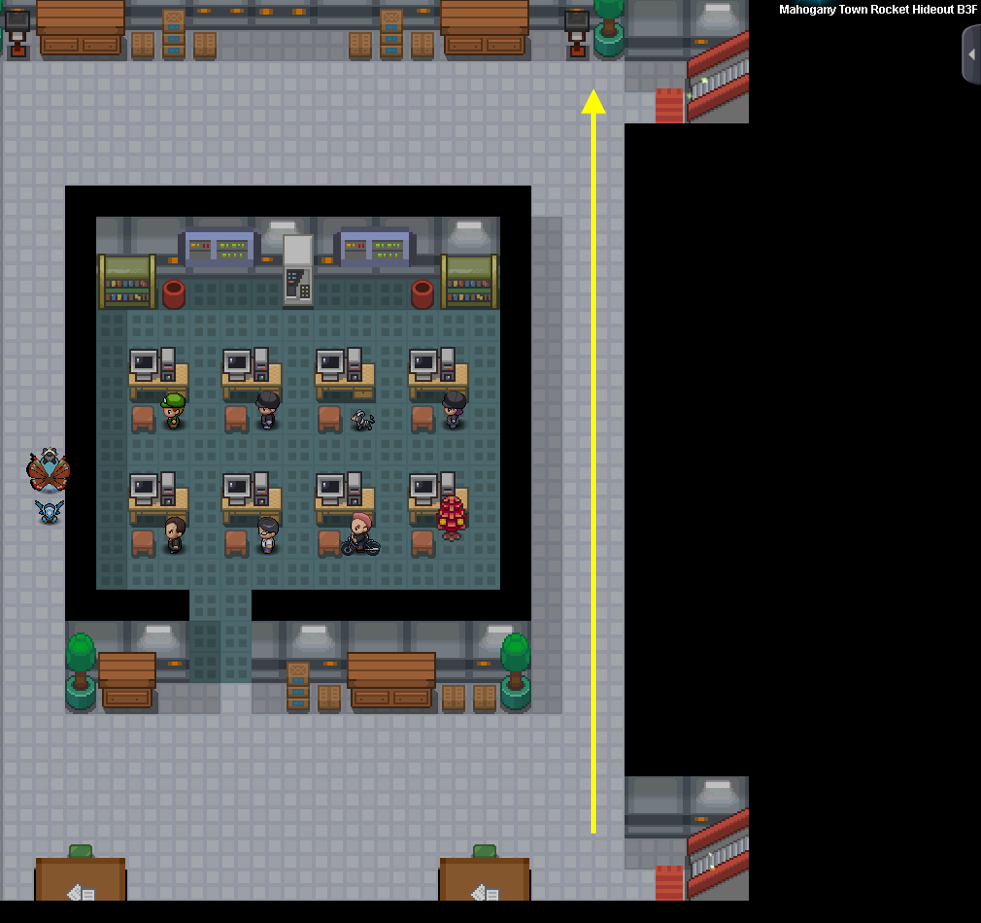
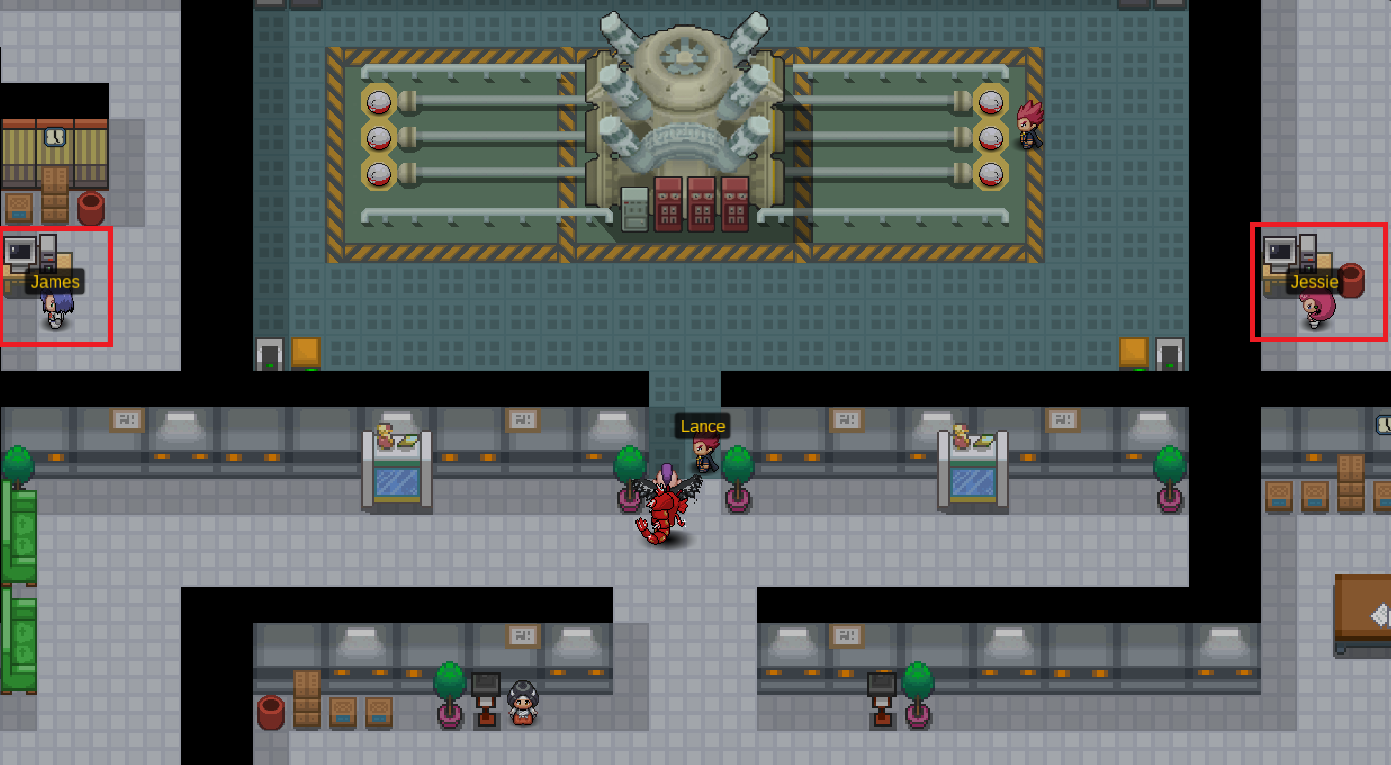
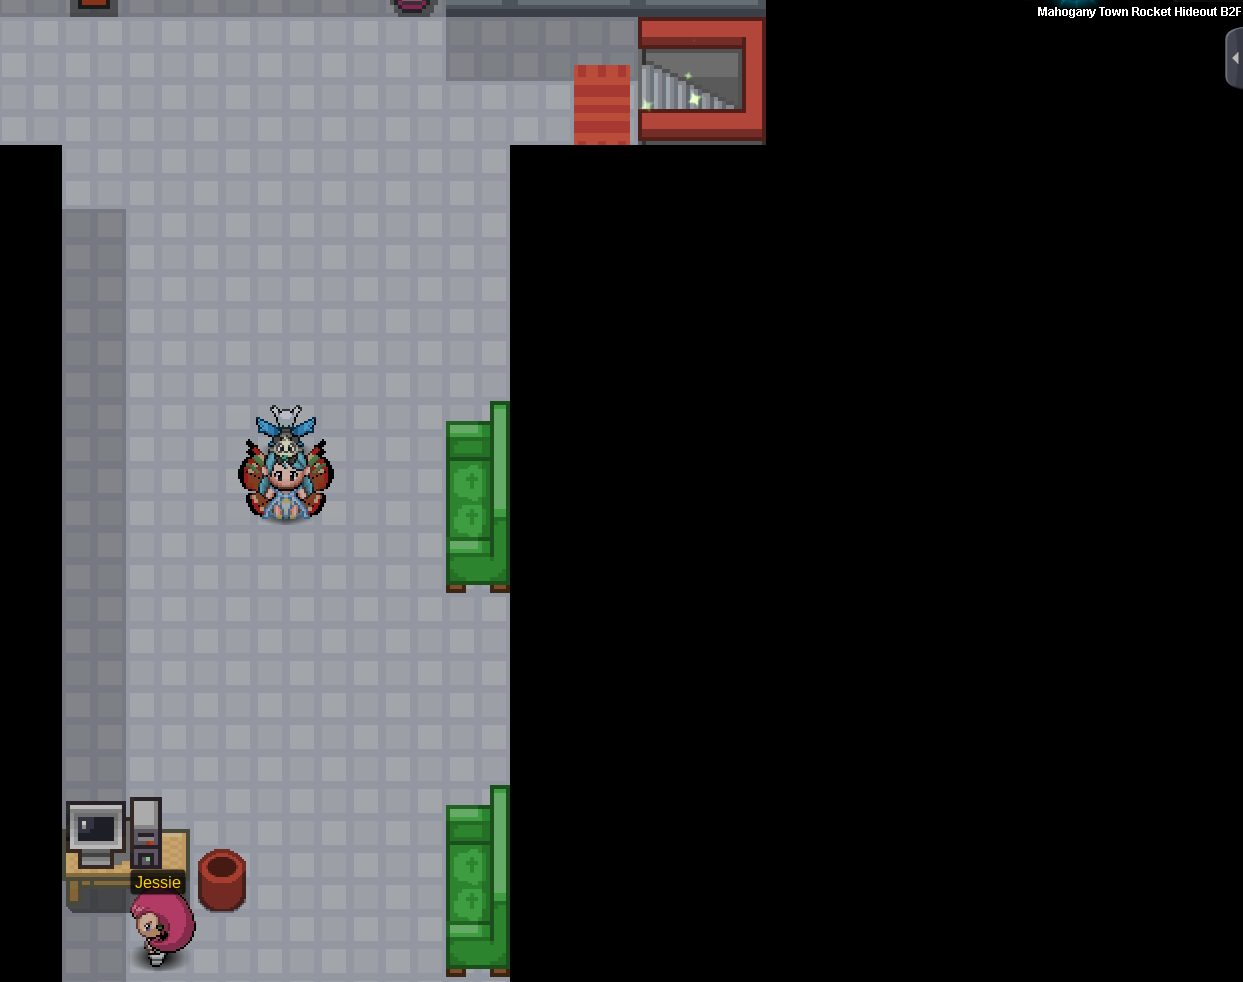
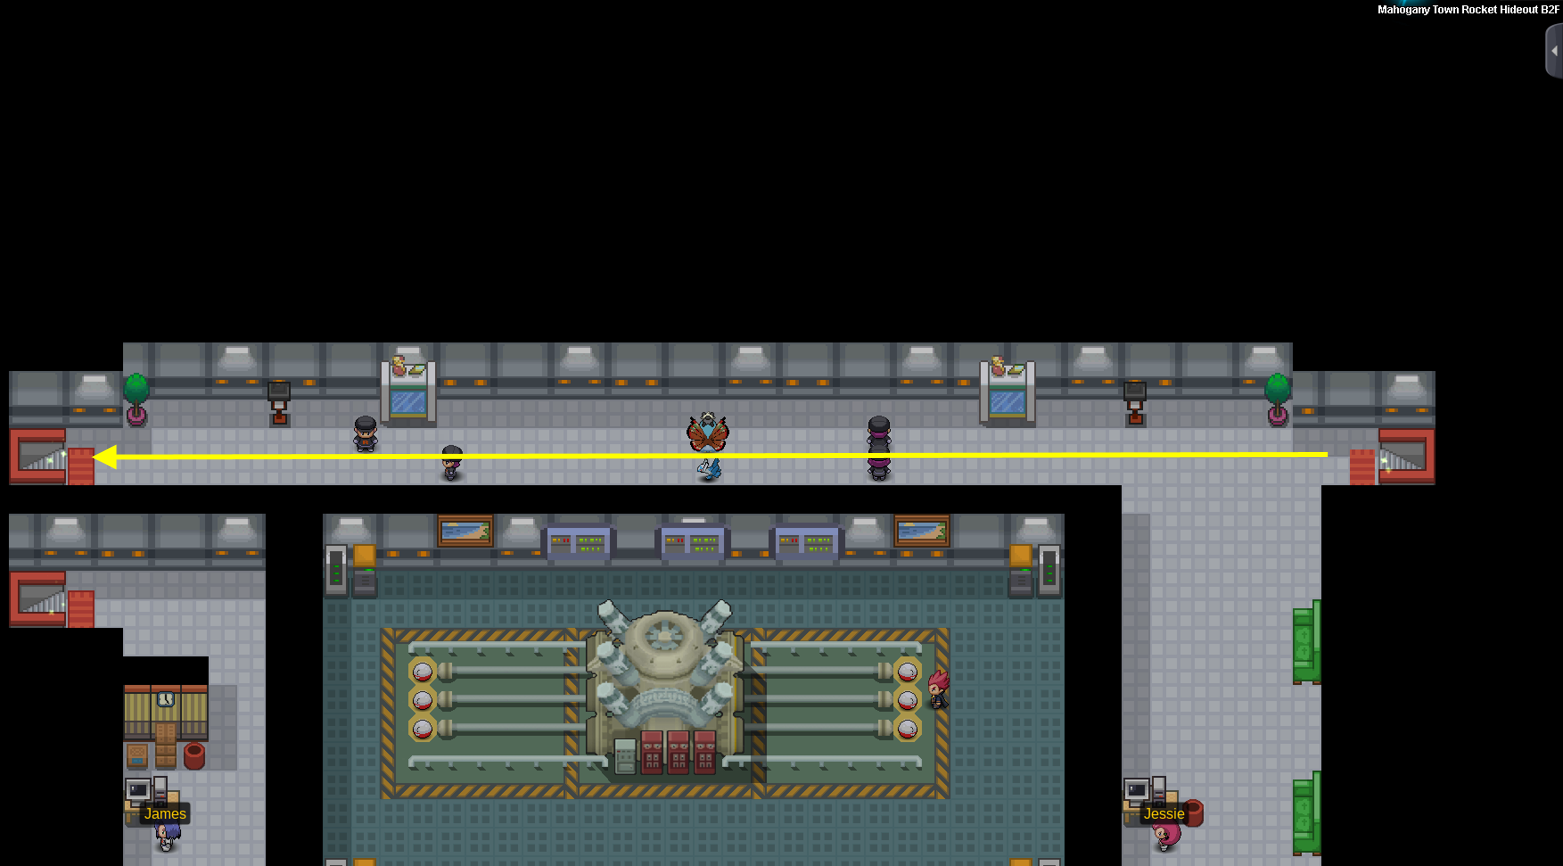
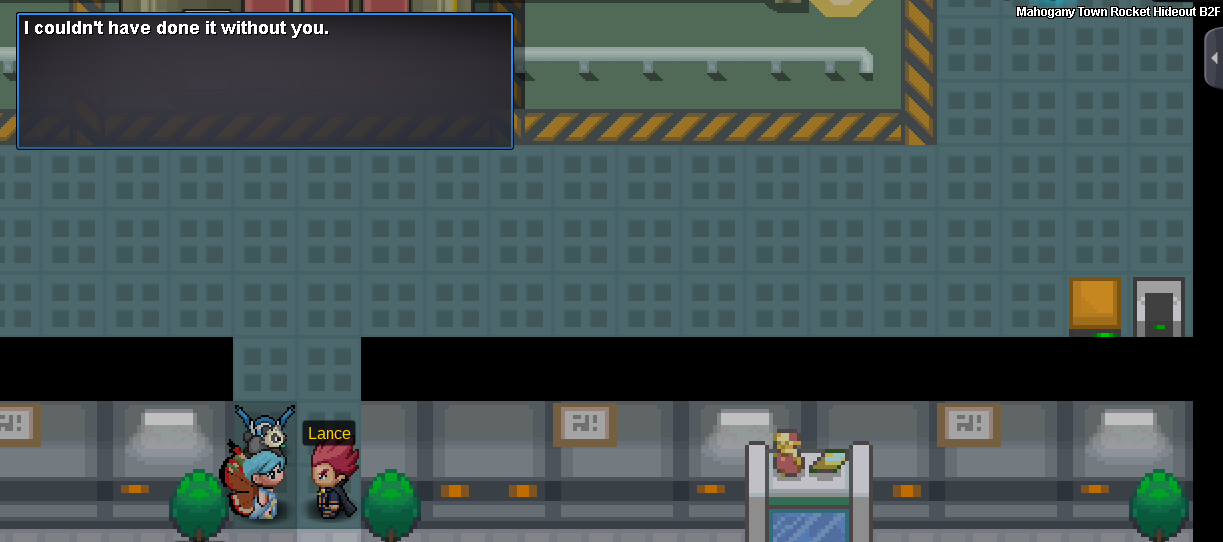
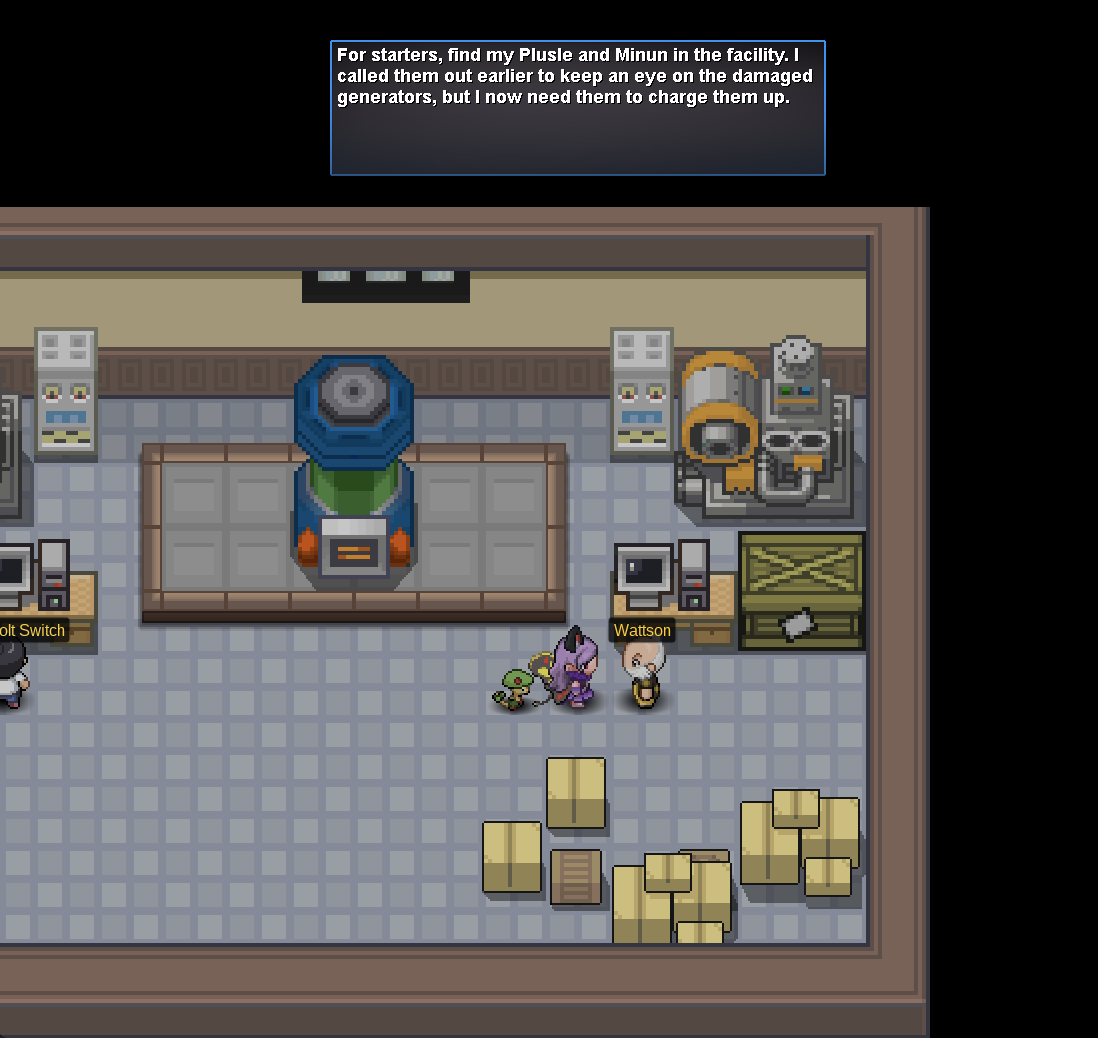
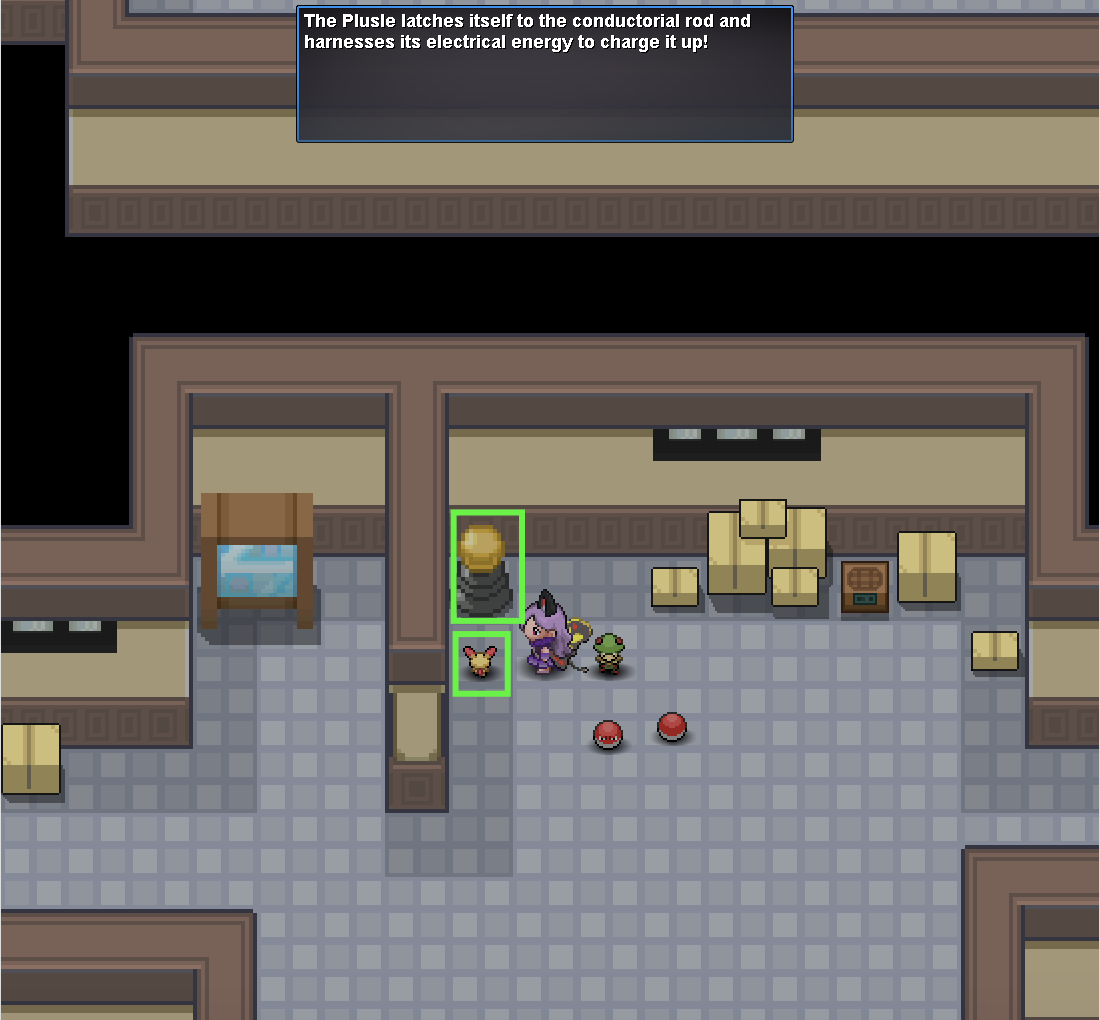
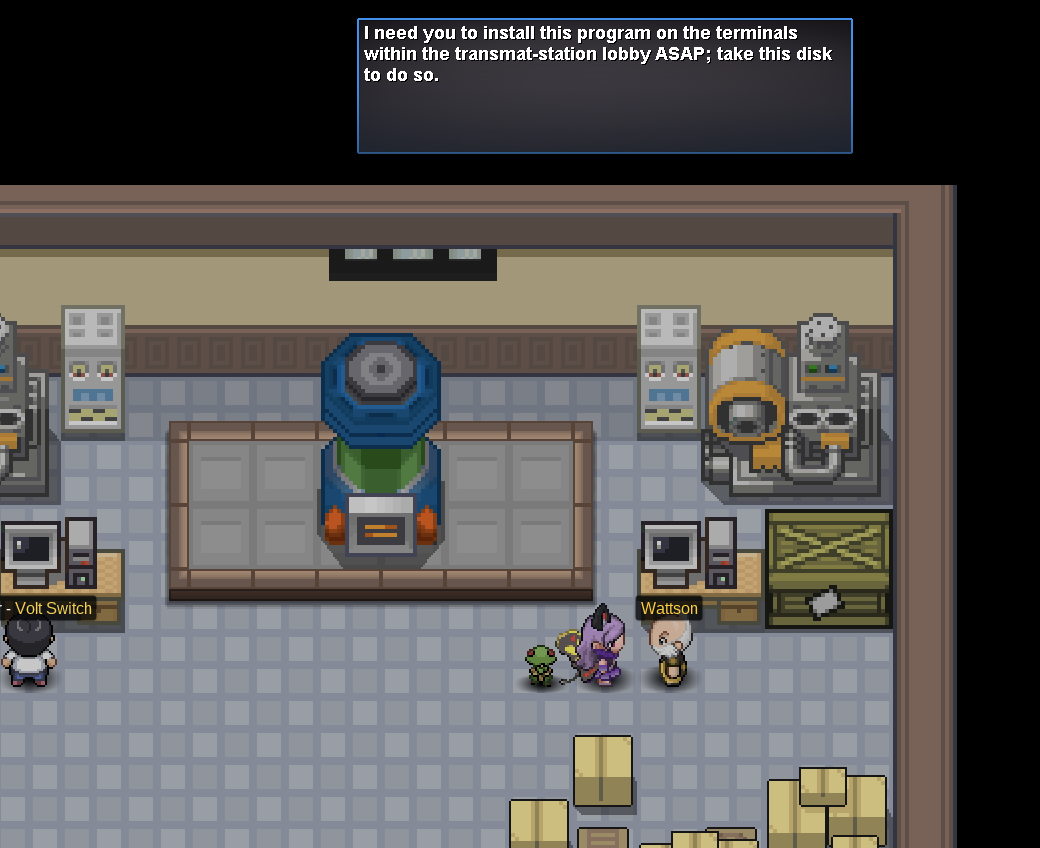
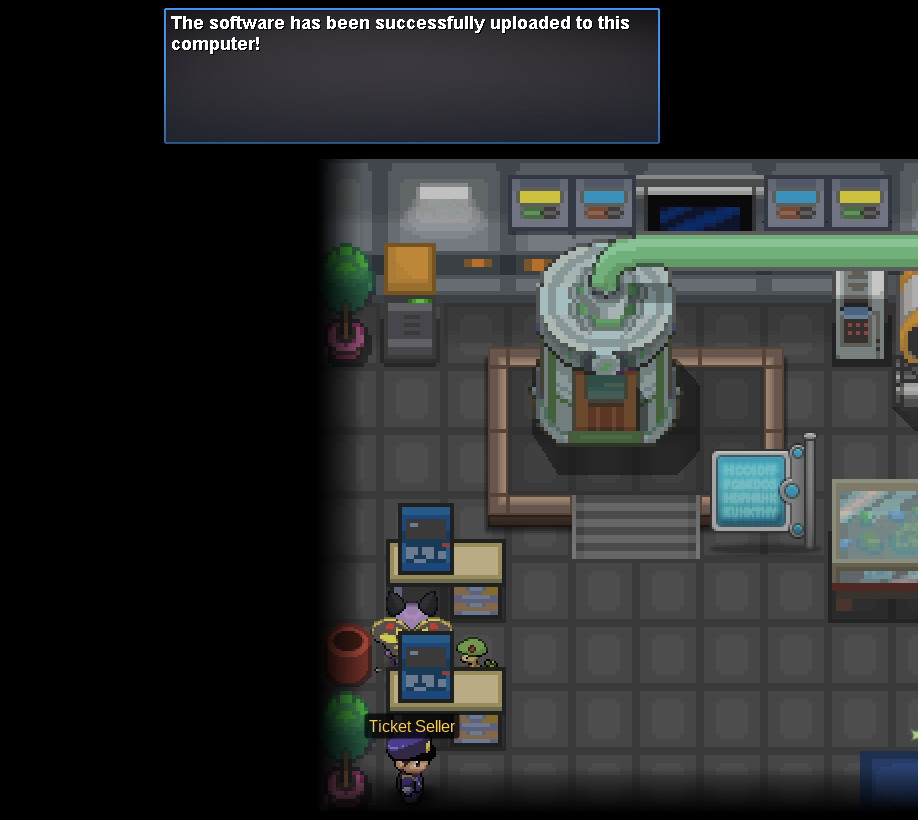
⋯⋯⋯⋯⋯⋯⋯⋯⋯⋯⋯⋯⋯⋯⋯⋯⋯⋯⋯⋯⋯⋯⋯⋯⋯⋯⋯⋯⋯⋯⋯⋯⋯⋯⋯⋯⋯⋯⋯⋯⋯⋯⋯⋯⋯⋯⋯⋯⋯⋯⋯⋯⋯⋯⋯⋯⋯⋯ Welcome to the updated Legendary Event Moves Tutor Quest Guide! This quick walkthrough will cover everything you need to be able to teach the following legendaries certain moves, at the cost at $20,000 Pokedollars each move. Celebi: Nasty Plot Entei: Flare Blitz, Howl, Extreme Speed Raikou: Aura Sphere, Weather Ball, Extreme Speed Suicune: Air Slash, Extreme Speed Phione: Tail Glow REQUIREMENT: You’ll need to have caught one of the three legendary dogs in order to invoke this quest and have at least 200 Hours of playtime to finish it. If you haven't caught a legendary dog already, look at the Legendary Megathread for more information. Note: Scientist Rey, which was previously located at the Bell Tower Rooftop, has been moved to Bell Tower Floor 10 due to the addition of the Ho-Oh miniboss. Therefore, the images including Scientist Rey may slightly differ due to the location difference, but the dialogue and quest is the same regardless. ⋯⋯⋯⋯⋯⋯⋯⋯⋯⋯⋯⋯⋯⋯⋯⋯⋯⋯⋯⋯⋯⋯⋯⋯⋯⋯⋯⋯⋯ To start the quest, you will need to visit the Guardian's area where you caught your respective dog at. If, upon entry of the cave, you do not receive the dialogue to start the quest, try again with your legendary dog in the first slot of your party. Afterward, head to Bell Tower Floor 10 and talk to Scientist Rey. He claims that thieves have stolen the bell pieces and asks that you retrieve them. The only hint he gives you is to ask around in Ecruteak City for more information on where the thieves have gone. With that information, go to Ecruteak City and talk to an Old Man, who directs you to the Miltank Farm. At the Miltank Farm, you'll need to battle Thief Dorge. He has a Granbull at Level 120. Upon defeating him, he tells you to go after his brother Jorge, who went towards Route 29. Then, go to Cherrygrove City and head to the small island on the left to battle Thief Jorge. He has a Furfrou at Level 100. Upon defeating him, he tells you to go after his brother Gorje, who went towards Route 46. Afterward, go to Route 45 and battle Swimmer Thief Gorje. He has a Stoutland at Level 100. Upon defeating him, he tells you to go after his brother Gregorius, who went towards Violet City. Then, head to Violet City and battle Thief Gregorius. He has a Arcanine at Level 100. Upon defeating him, he tells you to go after Georgina, who was caught by the Goldenrod Police. Head to the Goldenrod Jail. Now, you'll need to fight Thief Georgiana at the Goldenrod Police Station. She has a Mightyena at Level 100. Upon defeating her, she tells you that George has been transported to the Kanto Jail. Then, go to Pewter City Jail and speak with Warden Noisia. Noisia will give you special permission to challenge George. Make sure you're ready to defeat George! If you get defeated, George has a 1-day cooldown, and if you defeat him, he'll have a normal 12-day boss cooldown. Remember, you need to have at least 200 hours of playtime in order to challenge George. You can find all Infos about George including his Line up and Moveset here. To get to George after you've been given permission, click on the gate highlighted below, and the game should push you inside his cell. Once you've defeated all the thieves successfully, go back to Scientist Rey on the Bell Tower Floor 10. As he doesn't know how to properly repay you, he refers you to Researcher Alan, who may have something 'useful' for us; for us, that means that we can learn event moves for our legendaries now! After finishing the quest steps above, head to Ruins Research Center and talk to Researcher Alan. He now will teach any legendary their event gained techniques! Good luck!
- 24 replies
-
- 10
-
-

-
✖︎ This guide will help you to find a preview of all : ▪︎ Clothes ▪︎ Mounts ▪︎ Cosmetics ▪︎ Wings ▪︎ Hats ▪︎ Exclusive items... ...findable in-game to customize your character. ✖︎ If you look for a specific item, feel free to ask in the in-game Trade channel or by creating a topic in our Trade Zone sub-forum. ✖︎ All the basic Coin Shop clothes and hats are not included in this guide since you can already see the preview in-game. ✖︎ You may find Ctrl+F or Ctrl+F useful, if you're seeking a specific item. ✖︎ Due to the consequent amount of items, the page might take time to load. Contributors : 9oomy, Gouseru, Calahan, Neroli Absol S Absol Aerodactyl S Aerodactyl Arcanine S Arcanine Aurorus S Aurorus Bicycle Bicycle Blue Bicycle Green Bicycle Yellow Charizard S Charizard Dodrio S Dodrio Fearow S Fearow Glaceon S Glaceon Houndoom S Houndoom Luxray S Luxray Manectric S Manectric Ninetales S Ninetales Rapidash S Rapidash Stantler S Stantler Sylveon S Sylveon Talonflame S Talonflame Togekiss S Togekiss Umbreon S Umbreon Latias Latios Xmas Stantler Zombie Charizard H Rapidash Mount Xerneas Mount Yveltal Mount
-
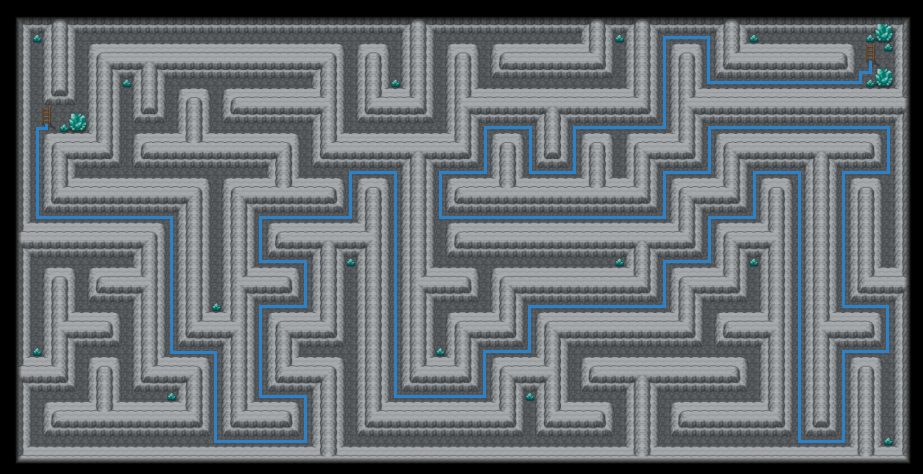
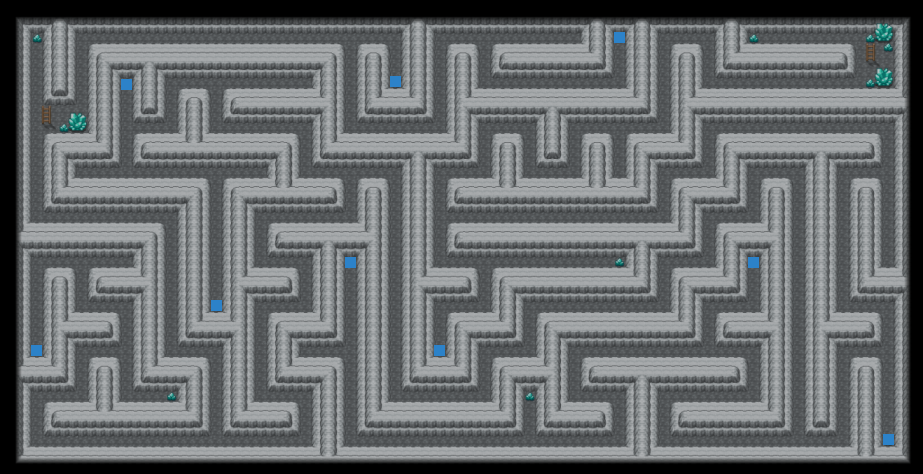
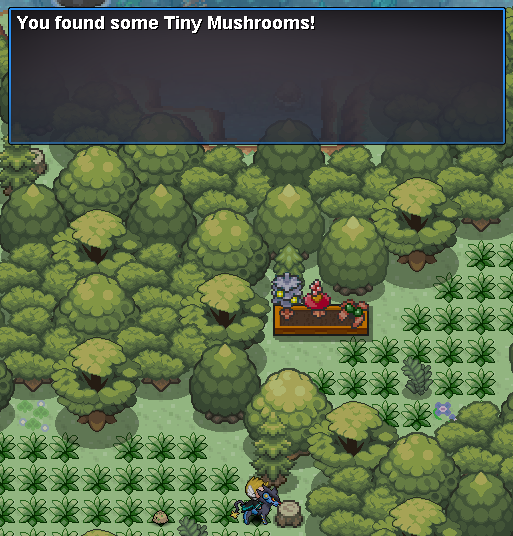
PRO useful links We've had a useful links channel on the PRO discord for quite a while now and while fixing the links for it I realised that not everyone has access to the discord server and that these links, as the name suggests, are rather useful for players so I here it is, PRO useful links forum edition. This is not a full list of useful links, there are just too many threads for me to go through them all looking for ones that can be helpful to members so if you know of a thread that you think should be on this list then reply to this thread with the link and I will look through it before deciding whether to add it or not, please do not add links for guides that are similar to ones that we already have posted unless they are more in depth and contain content that the ones we already have linked do not have on them. Index Rules Important links General game guides Kanto guides Johto guides Hoenn guides Sinnoh guides Catching and training pokemon Legendaries Non content guides Social media Rules Game rules Forum rules Ingame chat rules Trade rules PvP rules Important links Client download Installing pro on android Installing pro on linux Installing pro on mac Server status Read before making a support post Hit by a rollback How to make a report Appeal center Restore pokemon megathread Evolution request megathread List of available ingame commands List of evolutions coded differently in pro List of broken/not coded moves and abilities List of pokemon banned in PvP PvP viability ranking General game guides Complete PRO pokedex PRO wiki How to access specific areas Slot machine gambling guide Headbutt spawn list Dig spots Fossils Repel trick List of TMs and move tutors All you need to know about berries Pokestop locations Creating and managing a guild Benefits of membership Clothing and mount showcase Happiness guide How to unlock egg moves Complete pokemon egg move list EV, IV, nature and basic stats Gen 7 mechanics guide Item maniac Clothing and Mounts Showcase Location of Hidden Items (Vulcan Island included) Kanto guides Complete Kanto walkthrough How to beat E4 Kanto SS Anne (story quest) Celadon rocket hideout (story quest) How to get HM01 cut & HM03 Surf (story quests) How to get Ash's hat (need Pikachu starter) Doctor pokemon quest Free Arcanine mount quest Thief quest Officer Jemy bounty quest Celadon daily quest Viridian maze map Pokemon tower maze Eevee-lutions quest BILL'S BOOK - IMPORTANT, PLEASE READ!! Subway quest Johto guides Complete Johto walkthrough How to beat E4 Johto Goldenrod city walkthrough (story quest) Free teddiursa hat Bug catching contest Hoenn guides Complete Hoenn walkthrough Hoenn gym and E4 guide Valley of steel Excavation sites Teleport quest Farming tiny mushrooms Abandoned ship quest Shoal cave Rachel's friends quest (item trading) Trainer school master quiz How to access sootopolis Free Cubchoo hat (NO LONGER AVAILABLE) Petalburg maze Sinnoh guides Getting to Sinnoh quest Complete Sinnoh walkthrough Solaceon daily quest (news reporter) Jubilife trainer school - missing students quest (story quest) Sinnoh region hidden items & pokemon Additional area guides Pinken island guide Mt. Silver guide Sevii island guide Sevii islands video guide Lost cave guide Nap island video guide Catching, training & trading pokemon Tips for hunters How to false swipe ghost pokemon EV training hotspots How to level pokemon fast Trading tips & tricks Legendaries and bosses Legendary pokemon megatread Boss guide Latias and Latios locations How to get Mew How to get one of the lake guardians How to get Heatran Non-content guides PRO discord guide How to record your screen and upload a video Red server trade & price check discord server PRO social media Youtube Instagram Twitter Special thanks to Shaui for helping with this list by providing a bunch of links that I didn't originally have.
-
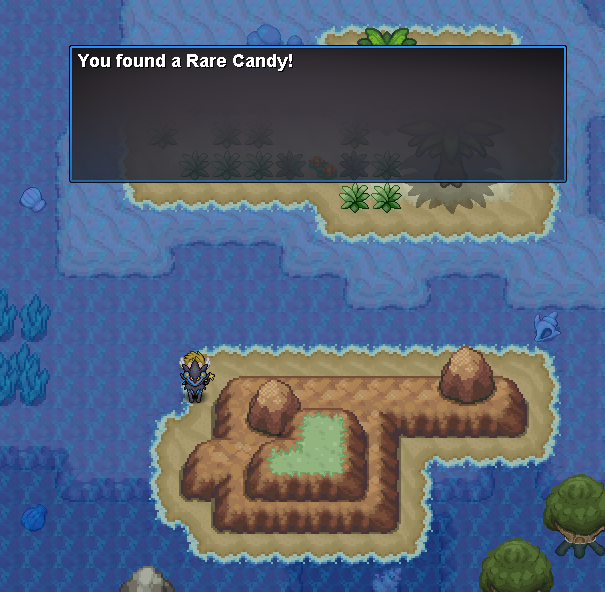
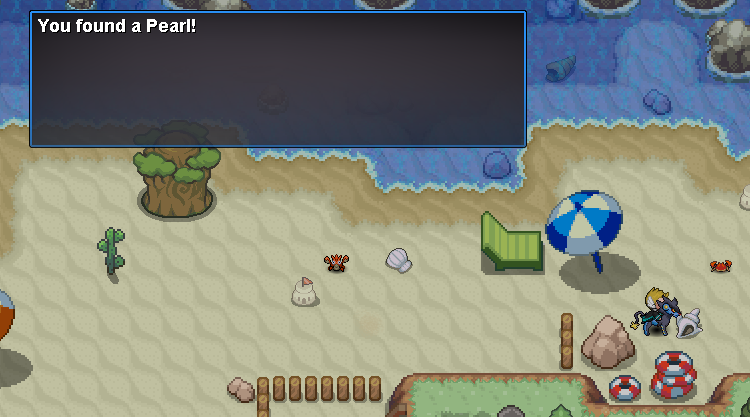
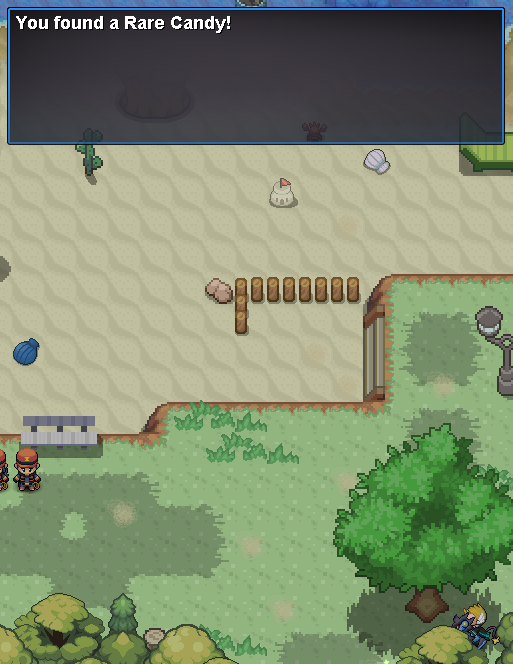
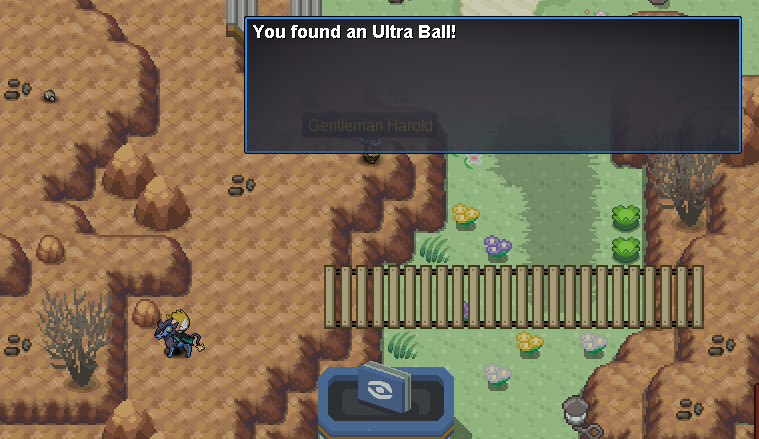
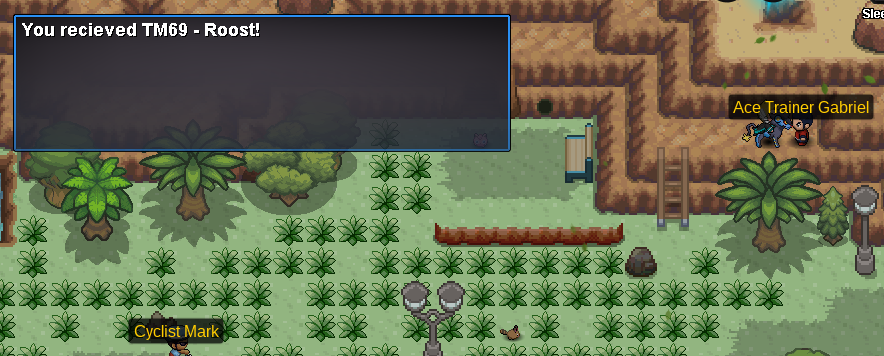
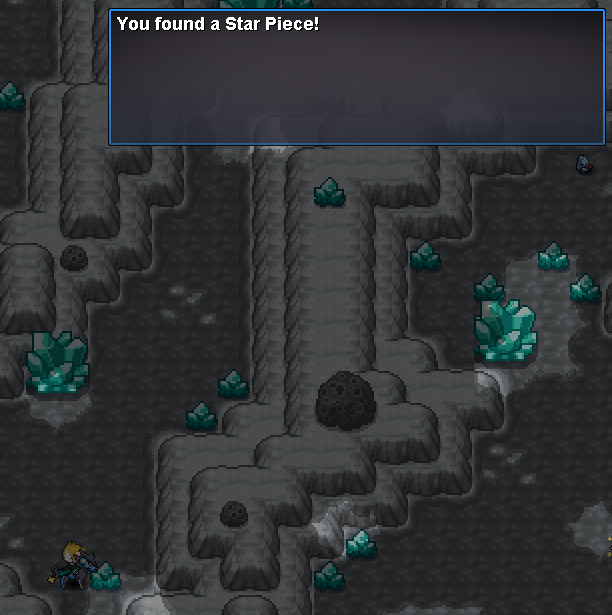
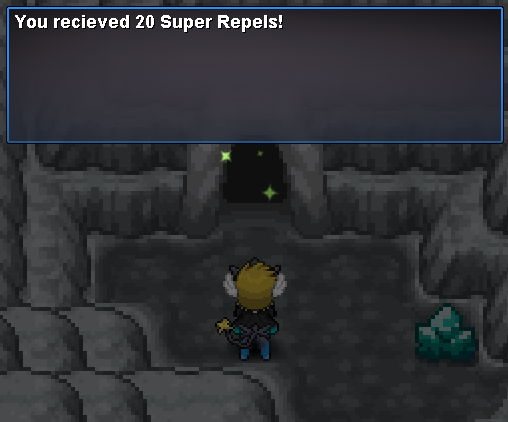
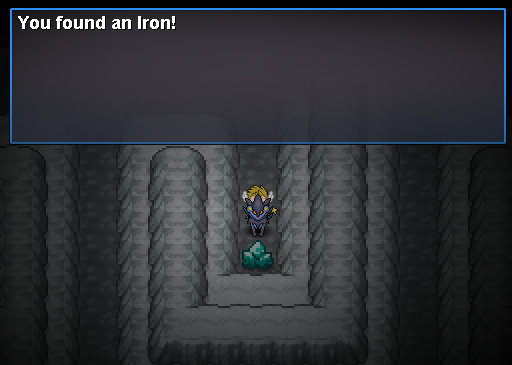
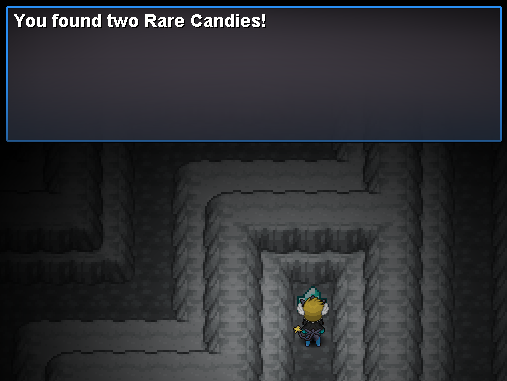
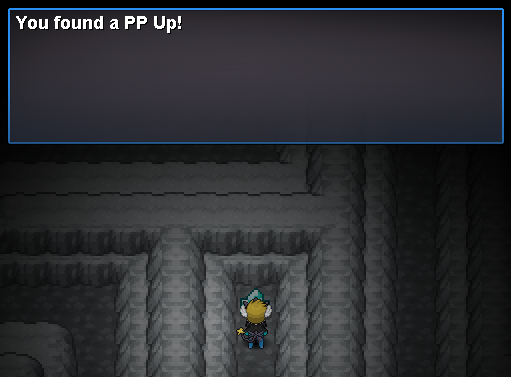
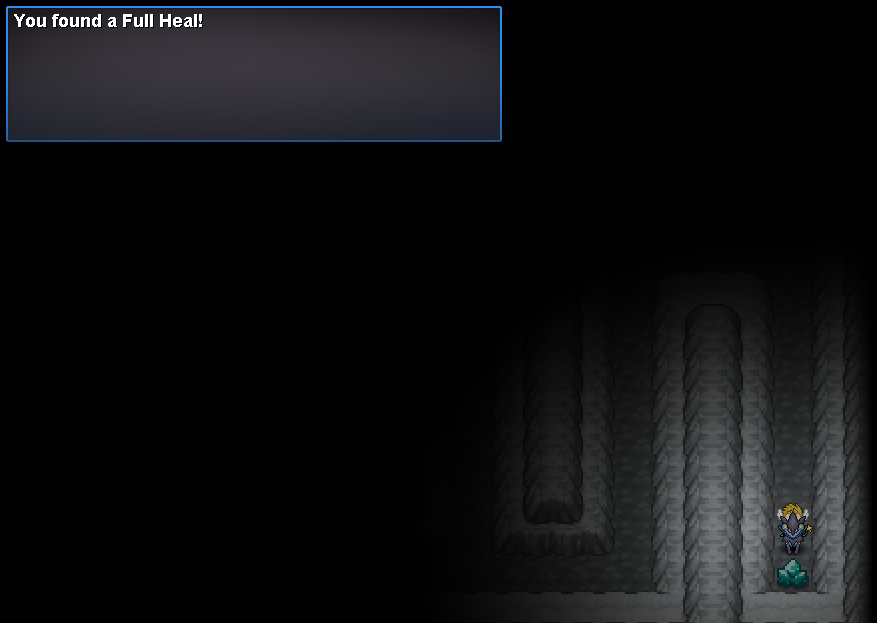
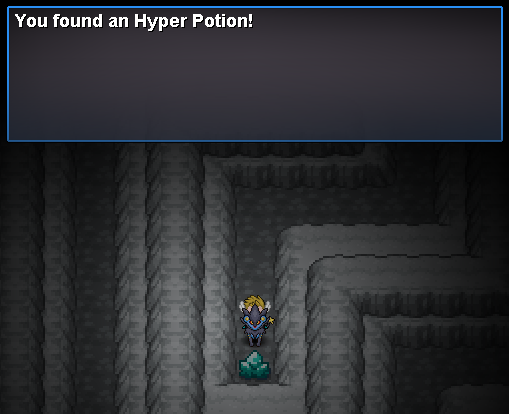
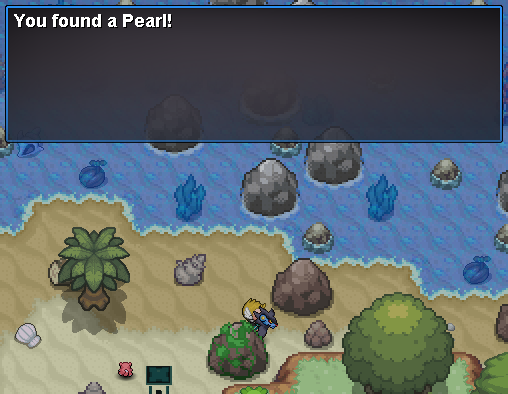
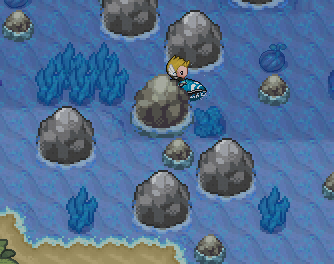
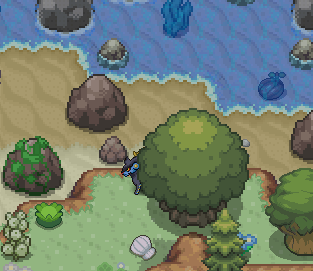
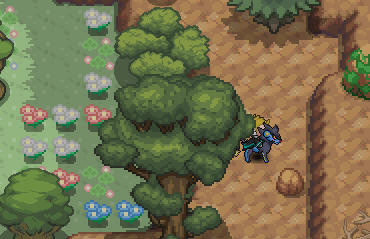
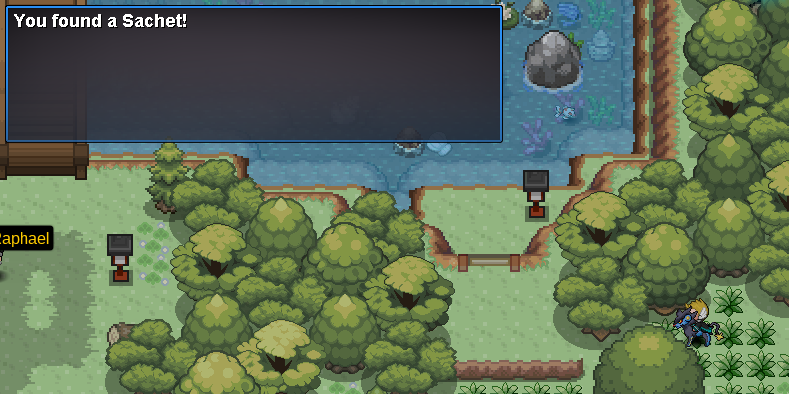
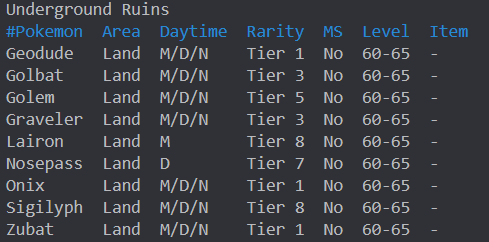
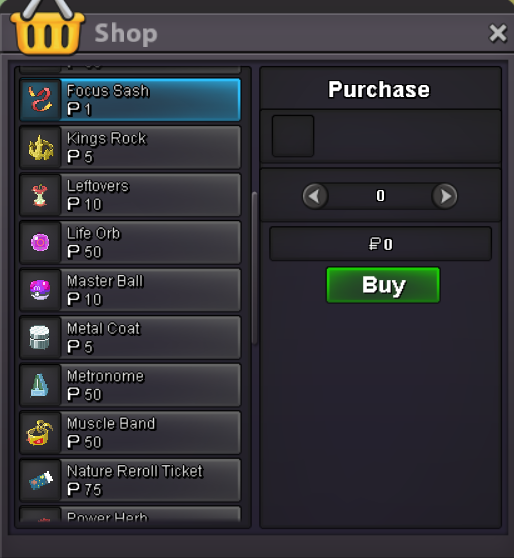
__________________________________________________________________ You are obligated to start here in order to complete the quest, the fragments won't appear until you activate the script by talking to Fossil Maniac Charles ・Be sure to be Hoenn Champion before starting this quest, this is the first requirement. ・Go Route 114 in Hoenn, find Fossil Maniac Charles in his house and talk to him about the permit. ・You now have to collect 6 different fragments spreaded around all the excavation sites (excluding the Wondrous Site). Please note that you don't have to enter in the sites. Get a Pokemon with Rock Smash (can be found in Mauville City) or a Pick Axe and hit all the breakable rocks around the enter of the sites. The fragment that you're looking for is hidden in one of the rocks. [spoiler=Site Locations] Haunted Site⎪Rusturf Tunnel⎪Near Verdanturf Town Mineral Site⎪Route 115⎪North Rustboro City Feral Site⎪Fiery Path⎪East Lavaridge Town Glacial Site⎪Route 103⎪North Oldale Town Natural Site⎪Route 119A⎪South Fortree City Historical Site⎪Route 111 Desert⎪East Lavaridge Town Wondrous Site⎪Route 114⎪West Fallarbor Town ・Once you have the 6 fragments, come back to Route 114 and talk again with Fossil Maniac Charles. He will ask you to pay 100.000 Pokedollar in order to buy the permit. ・ You are now owner of the Archaeologist Permit and can start visiting the different sites ! _____________________________________________________________________ There are different tiers of expertise in archaeology. The tier depends on the discoveries you have made. You get 1 "Discovery Point" by smashing the rocks inside each site. With every tier you get access to more Pokemon and items. You can verify your tier by talking to Gingery Jones in Glacial Site. If you encounter a spawn you're not "expert" enough to get, the Pokemon will flee or the item gets destroyed. You'll however gain a "Bonus Discovery Point" each time you'll encounter a Pokemon who fled or if the item gets destroyed. As the range of the bonus may differ according to the tier of the encountered Pokemon, I won't specify the said bonus. There's also one Shiny Rock per site, you need to have the item Pickaxe (75c in the shop) to find something there. Besides the Pokemons from normal rocks, you can find exclusive Pokemon and items. Be careful and don't hope finding a Shiny Pokemon in this special rock according to its name. All Pokemon in Excavations Sites are Shiny Locked ! _________________________________ In every site you'll find some Artifact Pieces that can be traded in Historical Site for items by talking to Gingery Jones. [spoiler=Available Items] Fossils : → Root Fossil (300) → Claw Fossil (300) → Old Amber (400) → Sail Fossil (500) → Jaw Fossil (500) → Skull Fossil (750) → Armor Fossil (750) Vitamins (10 per 75 Artifact Pieces) : → Protein → Calcium → Carbos → PP Up → Iron → Zinc → HP Up Medicinal Herbs (price for 35 Artifact Pieces) : → Heal Powder (30) → Energy Powder (24) → Energy Root (14) → Revival Herb (6) Special items : → Grip Claw (150) → Protector (250) → Reaper Cloth (250) → Focus Sash (30) → Wide Lens (150) → Air balloon (30) TM moves : → TM23 - Dragon Rage (150) → TM27 - Fissure (150) → TM69 - Roost (125) → TM81 - Brick Break (125) → TM115 - Shadow Claw (100) ___________________ Cooldown before re-spawn of rocks is 22 hours real time. The necessary Discoveries for the tiers are based on doing the excavation without Membership and without Pick Axe. The schedules to meet the different Pokemon are based on the in-game Poke Time. If nothing is specified, it means that the Pokemon spawns all the time. Don't forget that all findable Pokemon in Excavation Sites are Shiny Locked. Haunted Site [spoiler=Location : Rusturf Tunnel] • Tier 0 • Gastly (12:00 - 23:59) Shuppet (00:00 - 11:59) • Tier 1 • (1,200 Discoveries) Misdreavus (12:00 - 23:59) Duskull (00:00 - 11:59) • Tier 2 • (2,400 Discoveries) Golett (00:00 - 11:59) • Tier 3 • (3,200 Discoveries) Litwick (12:00 - 23:59) • Findable common items • Ultra ball Rare Candy Escape Rope Repel All fossils • Shiny Rock • Misdreavus (12:00 - 23:59) Duskull (00:00 - 11:59) Golett (00:00 - 11:59) Litwick (12:00 - 23:59) Lunatone (00:00 - 12:59) Aron Reaper Cloth (2%) TM115 - Shadow Claw (2%) Rare Candy (5%) All fossils (1%) After 5000 discoveries : Move Tutor → Sucker Punch for 10k by talking to Gingery Jones. Mineral Site [spoiler=Location : Route 115] • Tier 0 • Onix • Tier 1 • (1,000 Discoveries) Nosepass • Tier 2 • (1,600 Discoveries) Durant Drilbur (5%) • Tier 3 • (3,200 Discoveries) Klink (2%) • Findable common items • Rare Candy Escape Rope Fresh Water All fossils • Shiny Rock • Nosepass Durant Drilbur (10%) Klink (7%) Rare Candy Grip Claw TM81 - Brick Break All fossils (1%) After 5000 Discoveries : Move Tutor → Explosion for 10k by Talking to Gingery Jones. Feral Site [spoiler=Location : Fiery Path] • Tier 0 • Houndour (13:00 - 23:59) Numel (00:00 - 11:59) • Tier 1 • (2,400 Discoveries) Zangoose (00:00 - 12:59) Torkoal (13:00 - 23:59) • Tier 2 • (3000 Discoveries) Heatmor (13:00 - 23:59) • Tier 3 • (3,200 discoveries) Deino (00:00 - 12:59) Mawile (00:00 - 12:59) Pawniard (13:00 - 23:59) • Findable common items • Rare Candy Escape Rope Repel All fossils • Shiny Rock • Houndour (13:00 - 23:59) Numel (00:00 - 11:59) Torkoal (13:00 - 23:59) Deino (00:00 - 12:59) Heatmor (13:00 - 23:59) Zangoose (00:00 - 12:59) Mawile (00:00 - 12:59) Pawniard (13:00 - 23:59) Litleo (5%) (13:00 - 23:59) Rare Candy (5%) TM23 - Dragon Rage Grip Claw All fossils (1%) Once you reach 2,400 Discoveries, you'll have access to Boss Gingery Jones. Glacial Site [spoiler=Location : Route 103] • Tier 0 • Wailmer • Tier 1 • (1,200 Discoveries) Snorunt • Tier 2 • (2,400 Discoveries) Clauncher • Tier 3 • (3,600 Discoveries) Bergmite • Tier 4 • (4,800 Discoveries) Cyrogonal Vanillite • Findable common items • Rare Candy Fresh Water All fossils (you have to be MS) • Shiny Rock • Snorunt Clauncher Bergmite Smoochum (10%) Cyrogonal Vanillite (5%) TM 105 - Scald Rare Candy (5%) Wide Lens All fossils (1%) Talk to Gingery Jones, he will tell you how many Discoveries you have. This is the only NPC that will give you this information. Natural Site [spoiler=Location : Route 119A] • Tier 0 • Seedot • Tier 1 • (1,200 Discoveries) Shroomish • Tier 2 • (1,800 Discoveries) Skiddo • Tier 3 • (2,400 Discoveries) Deerling • Tier 4 • (3,200 Discoveries) Ferroseed • Findable common items • Rare Candy Fresh Water All fossils • Shiny Rock • Seedot Shroomish Skiddo Ferroseed Deerling Macho Brace Rare Candy (5%) TM15 - Hyper Beam All fossils (1%) After 5000 Discoveries : Move Tutor → Super Fang for 10k by talking to Gingery Jones. Historical Site [spoiler=Location : Route 111 Desert] • Tier 0 • Makuhita • Tier 1 • (1,200 Discoveries) Meditite Sawk (4%) Throh (4%) • Tier 2 • (3,200 Discoveries) Sandile • Tier 3 • (4,000 Discoveries) Mienfoo • Findable common items • Rare Candy Ultra ball All fossils • Shiny Rock • Makuhita Meditite Sawk (4%) Throh (4%) Mienfoo Focus Sash TM138 - Sleep Talk Rare Candy (5%) All fossils (1%) After 6000 Discoveries you can revive Kanto, Hoenn and Kalos fossils by talking to Gingery Jones for 10k per revive. Wondrous Site [spoiler=Location : Route 114] • Tier 0 • Swablu • Tier 1 • (1,200 Discoveries) Snubbull • Tier 2 • (2,400 Discoveries) Axew Dedenne • Tier 3 • (3,200 Discoveries) Klefki • Findable common items • Ultra ball Rare Candy Escape Rope Repel All fossils • Shiny Rock • Swablu Snubbull Dedenne Klefki Rare Candy (5%) Shiny Stone (1%) Macho Brace (1%) All fossils (1%) Contribution Leitah, for giving me a lot of useful information to complete this guide. Sharlank, original owner of the former version of the guide : Hoenn Excavation Sites Spawn Tymerod, and his revamped version of the guide : Hoenn Excavation Sites
-
Hello there! Many of you may not know about a trick for catching certain pokemon, both in the actual Pokemon games and in PRO. This method is known as the Repel Trick. It is is an efficient way to find rare Pokemon and works with any repel.
- 17 replies
-
- 16
-
-
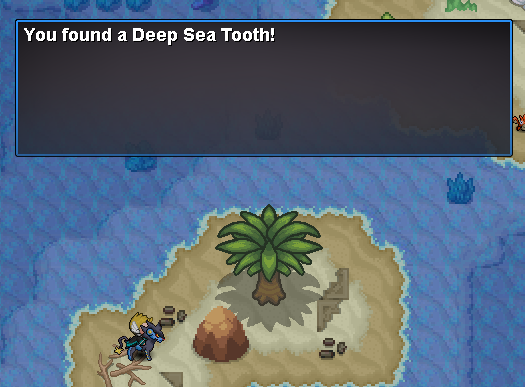
_____________________________________________________________________________________________________________________________________ _____________________________________________________________________________________________________________________________________ ✦ Finding the keys ✦ Scanner & The Storage Unit ✦ Heading to Slateport Museum ✦ Hidden Items ✦ Contributions _____________________________________________________________________________________________________________________________________ To start the quest, you need to head to Route 108 and enter the Abandoned Ship. Upon entering, you'll notice that you're in the Abandoned Ship Exterior. There's nothing too special about this place except that there is an Aqua Tail Move Tutor. However, you notice the room on the top floor is locked and needs six keys in order to be unlocked. Start exploring the ship, battling trainers, and familiarizing yourself with the various rooms to look for the captain office keys. The specific locations for each key is shown below, with their map name included to help you find them: [spoiler=Locations of All Keys][spoiler=Abandoned Ship 1F Room 1] [spoiler=Abandoned Ship 1F Room 2] [spoiler=Abandoned Ship B1F]You need to interact with the stray Wingull in order to pick up this key. [spoiler=Abandoned Ship B1F Room 4] [spoiler=Abandoned Ship B1F Room 3] [spoiler=Abandoned Ship B1F Room 1] After finding all the keys, head up to the Captain's Office. Be ready to battle Captain Bickerstaff! His team is full of Lv40 Pokemon. Upon defeating Captain Bickerstaff, he'll reward you some money, give you the storage unit key and leave you with his Clamperl. _____________________________________________________________________________________________________________________________________ Before you started this quest, you may or may not have talked to Captain Stern in Slateport Museum 1F. Talking to him wasn't necessary to invoke the quest, but Captain Stern mentions that he needs a Scanner, hinting that Wendy has it. So, after completing 'Finding The Keys', we can now head to the Storage Unit in Abandoned Ship B1F. However, it's important to pick up the scanner from Sailor Wendy beforehand, as you cannot pick up the mossy blob otherwise. Yes, this is the Wendy that Captain Stern was talking about. Previously, the door was locked, but since Captain Bickerstaff gave us the key, we can enter it now. Upon entering, you notice a mossy blob on the floor. Weirdly enough, it reacts to the scanner! _____________________________________________________________________________________________________________________________________ Afterward, head back to Slateport Museum and talk to Captain Stern. He'll notice that you have the scanner and will ask for it in return of giving you whatever was in the mossy blob. For all players, it could either be a Deep Sea Tooth or a Deep Sea Scale. Personally, I got a Deep Sea Scale. These are evolutionary items done to evolve Clamperl into either a Huntail or Gorebyss. _____________________________________________________________________________________________________________________________________ Various items are scattered across the ship for the player to loot. After all, what's the point of exploring an abandoned ship without anything to grab? TM 13 - Ice Beam TM 68 - Rain Dance Revives Water Stone Great Ball Escape Rope _____________________________________________________________________________________________________________________________________ I'd like to thank NisseP for his original guide and locations of the keys. I'd also like to thank the Community Coordinators for reviewing this guide. If there's something I'm missing in the guide, such as an item location, feel free to let me know and I'll add it! I couldn't find the artist who drew the beautiful image I used in this guide, but I'd like to credit them as well. Let me know if you can find the artist.
-
Hey, I have created this guide to help players that may need help completing the Johto region. I will cover the Johto region from start to finish in this guide! I hope that you find this guide helpful! I also want to give a shout out to JollyolNathan for making this awesome Kanto Walkthrough. If you need help with Kanto you should check out his awesome guide. Also if you are looking for help with Hoenn, check out Arielgg's awesome Complete Hoenn Walkthrough!!! Also check out Arielgg's awesome Sinnoh walkthrough in case you need help with Sinnoh later!!!! To get the most out of this guide, please use CTRL + F or CMD + F to search for the part that you're looking for. And that's it for my guide I hope it helps you! Below the post will be some links to other guides that contain useful information about different quests and stuff in the Johto region! Big shoutout to Olafkun for helping me get the lost screenshots back!!! I appreciate you soooo much Shoutout to Iriztha, MEBzerg and all of TeamMagma's member for being such an awesome bunch
-
⋯⋯⋯⋯⋯⋯⋯⋯⋯⋯⋯⋯⋯⋯⋯⋯⋯⋯⋯⋯⋯⋯⋯⋯⋯⋯⋯⋯⋯ Where to get TM 104 - False Swipe ? False Swipe is the best attack for hunting because it inflicts damage, but will leave the target with 1 HP. ◦ Route 48 — $4,000 - [special Offer : 5 for $16,000] ◦ Lilycove Department Store 3F — $4,000 ◦ Rustboro Mart — Free on a trainer Where to get TM 45 - Thunder-Wave ? Thunder-Wave is a support attack that will help you to catch a Pokemon, your target will be paralyzed. ◦ Celadon Mart — $2,000 ◦ Trick House Prize Room — Free Where to get TM 62 - Taunt ? Taunt will avoid bad surprise like Perish Song, Teleport, Roar, Whirlwind, etc... ◦ Celadon Mart — $2,000 ◦ Trick House Prize Room — Free ⋯⋯⋯⋯⋯⋯⋯⋯⋯⋯⋯⋯⋯⋯⋯⋯⋯⋯⋯⋯⋯⋯ ▶︎ Kaminokage's comment about technical aspects
-
Pokémon Special Counterparts In Pokémon Revolution Online, some Pokémon from the same species may occur with a different look than you could expect, this Pokémon are meant with having a 'Special Counterpart'. Such Pokémon are, besides their look, not different in any way to their 'normal' looking counterparts. 'Special Counterparts' is a less used term. In players tongue, usually the term 'Form/s' is used, sometiemes with more specifications if needed; 'Want to buy Christmas Form Eevee'. Shiny form Pokémon are also part of the original Pokémon games, spawn very rarely and are noticable by their different colors. Other forms are are mostly Pokémon Revolution Online exclusive Pokémon, created by our artists. They are also rare to find but not as rare as shinies. Usually they can be found randomly like normal Pokémon or can be given by NPC's and some, usually legendaries, are given out by a quest. On the left you see a regular Manaphy. In the middle you see its shiny counterpart and on the right you can see it's PRO exclusive christmas form. Odd's, availability and categories Most forms are only available during special events and/or locations, they are also usually themed to this event's or areas. As this applies to most forms, they can be categorized well and the playerbase does that too. What follows is a small summary of the most basic information. All shown Pokémon sprites are taken from the PRO Wiki page Pokémon Counterparts Shiny Pokémon Shiny Pokemon 'Shinies' The 'usual' shiny Pokémon from the original games Available at any time in the year in the wilderness Their odds to spawn are 1/8192 (0.0122%) Bosses can reward shiny Pokémon, with the option to 'have a higher shiny chance' the chance increases to 1/4096 The karp seller at Route 3 Poké Center has a 1/500 chance to give you a shiny Magikarp Abadoned Pokémon have a 1/500 shiny chance Reviving fossils at labs have a 1/1000 shiny chance They wont be visualized here - they are too many forms as every single Pokémon has a shiny form. If you still want to know how your desired shiny Pokémon looks like, you can for example go to your Poké Dex in-game, search that Pokémon up and then click on the image of the dex data spread sheet. You will not only see the shiny sprite but also all other forms available! In case you don't have the dex entry, you can also search up in the internet as shinies are not PRO exclusive and don't look different than in the original games. Pinkan Pokémon Pinkan Pokémon They are indeed Pink Available at Pinkan Island at any time of the year Their odds to spawn are 1/1500 On Pinkan island only Pinkan and Shiny Pokémon can spawn, no other forms Pinkan island is a special area you first need to have access to: Pinkan island quest Shadow Pokémon Shadow Pokémon They appear dark and gray compared to their normal forms Available at the Forlorn and Ruins of the Vale Nesting Grounds at any time of the year This areas can only be accessed if your guild managed to be in the top 3 of the Dungeon ladder, and then only 1 hour per day untill the ladder is reset Their odds are not revealed Clone Pokémon Clone Pokémon Based on the looks of the clone Pokémon in the first Pokémon movie Only available during the PRO anniversary celebration (Around august/september) at any map where a base form spawns Their odds are not revealed Easter themed Pokémon Easter themed Pokémon Only available during the Easter event at any map where a base form spawns Their odds are not revealed Valentine themed Pokémon Valentine themed Pokémon Only available during the Valentine Day's event at any map where a base form spawns Their odds are not revealed May 4th/Star Wars themed Pokémon May 4th/Star Wars Event Based on the Star Wars day; the forms have something to do with this franchise Available around the Star Wars day (May 4th) at any map where a base form spawns Their odds are not revealed Summer themed Pokémon Summer themed Pokémon Only availabe during the Summer event at any map where a base form spawns Their odds are not revealed Halloween themed Pokémon Halloween themed Pokémon Only available during PRO's Halloween event at any map where a base form spawns Their odds are nor revealed Christmas Themed Pokémon Christmas themed Pokémon Only available during the christmas event at any map where a base form spawns Their odds are not revealed Pikachu World Quest Forms Pikachu World Quest Only available during a Pikachu World Quest at any map where a base form spawns This event happened only once yet and there is no information when it will be repeated Their odds are not revealed April Fool's April Fool's They have no specific theme, but they are made to fool us In the past, all generation 1 Pokémon had their generation 1 sprites for a few days Only available during the April fool (around 1st April) at any mapwhere a base form spawns Their odds are not revealed
-
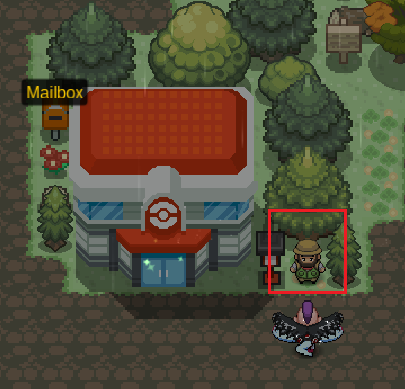
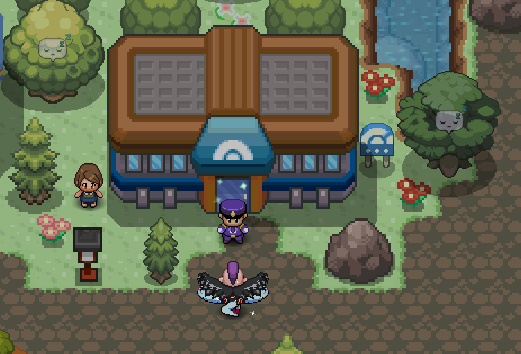
⎯⎯⎯⎯⎯⎯⎯⎯⎯⎯⎯⎯⎯⎯⎯⎯⎯⎯⎯⎯⎯⎯⎯⎯⎯⎯⎯⎯⎯⎯⎯⎯⎯⎯⎯⎯⎯⎯⎯⎯⎯⎯⎯⎯⎯⎯⎯⎯⎯⎯⎯⎯⎯⎯⎯⎯⎯⎯⎯⎯⎯⎯⎯⎯⎯⎯⎯⎯⎯⎯⎯⎯⎯⎯⎯⎯⎯⎯⎯⎯⎯⎯⎯⎯⎯⎯⎯⎯⎯⎯⎯⎯⎯⎯⎯⎯⎯⎯⎯⎯⎯⎯⎯⎯⎯⎯⎯⎯⎯⎯⎯⎯⎯⎯⎯⎯⎯⎯⎯⎯⎯⎯⎯⎯⎯ ⎯⎯⎯⎯⎯⎯⎯⎯⎯⎯⎯⎯⎯⎯⎯⎯⎯⎯⎯⎯⎯⎯⎯⎯⎯⎯⎯⎯⎯⎯⎯⎯⎯⎯⎯⎯⎯⎯⎯⎯⎯⎯⎯⎯⎯⎯⎯⎯⎯⎯⎯⎯⎯⎯⎯⎯⎯⎯⎯⎯⎯ Find a Mail Box next to each PokeCenter or PokeShop across all region. Interact and select "Send Mail". You must fill out all the fields, otherwise you can't send your mail. Also, be careful and don't mix "Mail Title" and "Recipient Username". If you wish to add an item, drag and drop it from your Bag to "Attach Items". Select the amount you want to send and click on the cross once you're done. Click on "Send". Your mail is sent. By closing the "Amount" chat box this is confirming the current amount. A Mail costs 2,000$. ⎯⎯⎯⎯⎯⎯⎯⎯⎯⎯⎯⎯⎯⎯⎯⎯⎯⎯⎯⎯⎯⎯⎯⎯⎯⎯⎯⎯⎯⎯⎯⎯⎯⎯⎯⎯⎯⎯⎯⎯⎯⎯⎯⎯⎯⎯⎯ Click on the item, it will appear in your Bag. Feel free to delete the mail afterwards if you wish. Enjoy mailing ! Credits: PreHax
-
Available ingame commands for PRO players: Green indicates the command line. Blue indicates the argument needed to submit the command. Red indicates an abbreviated way of typing the command. INTERACTION /friend <username> | /fri <username> Usage: Sends a friend request to <username>. Using the command on a friend who is online will remove <username> from your friend's list. /trade<username> Usage: Sends a trade request to <username>. This command can only be used when <username> is on the same map as you. /inspect <username> | /ins <username> Usage: Opens an inspection window of the specified <username>. This command can only be used when <username> is on the same map as you. /battle <username> | /bat <username> Usage: Sends a battle request to <username>. /randombattle <username> Usage: Sends a random battle request to <username>. /ignore <username> | /ign <username> Usage: Ignores all incoming messages from <username>. Using the command on a <username> who you already ignore will unignore them. This command resets every time you log off. /pm <username> Usage: Sends a private message to <username>. Usage: Creates group chat if more usernames are added /pm <username1>,<username2>,<username3> ... /release <party number> | /rele <party number> Usage: Gives you a prompt to release <party number>. You can only use this command in a Pokecenter. /pmoff Usage: Disables all incoming private messages. Relogging or retyping the command will re-enable your messages. /disable | /dis Usage: Disables all incoming battle requests. Relogging or retyping the command will re-enable battle requests. /accept | /acc Usage: Accepts incoming battle requests. /foreveralone Usage: Hides all players around you. Relogging or retyping the command will show players again. DATA /happy <party number> Usage: Displays the happiness value of <party number> in chat. /pokedex | /dex Usage: Displays your caught, seen and evolved data in chat. /online | /on Usage: Displays the current amount of online users on the server that you are logged in to. /who Usage: Displays the current amount of online users on the server that you are logged in to. /save Usage: Saves the data of your Pokemon. Using it has a cooldown. /uptime Usage: Displays how long the server has been up, counting from the last crash/maintenance/restart etc. . BATTLE /pvp Usage: Displays your win/loss/disconnect statistics in chat. /bat <username> | /battle <username> Usage: Sends a battle request to the designated sendee. /randombattle <username> Usage: Sends a random battle request to the designated sendee. /acc Usage: Accepts an oncoming battle request (alternative to the pop-up confirmatory prompt). /dis or /disable Usage: Blocks battle requests. Reuse the same command to re-enable them. /pvp_ready Usage: Allows you to still accept a battle when the team preview does not appear. /surrender Usage: Allows you to surrender a PvP battle. /draw Usage: Allows you to send a draw request to your opponent. If both players agree, nobody gains or loses rating. /accept| /acc <username> Usage: Accepts an oncoming battle request (alternative to the pop-up confirmatory prompt). CHAT /all <message> Usage: Sends <message> to All Chat. /t <message> Usage: Sends <message> to Trade Chat. /b <message> Usage: Sends <message> to Battle Chat. /me <message> Usage: Sends <message> to Local Chat. Adding a space before /me will post the message into the current used channel without the :. For example: /hel <message> Usage: Sends <message> to Help Chat. /guild <message> Usage: Sends <message> to Guild Chat. /oth <message> Usage: Sends <message> to Other Chat. /fr <message> Usage: Sends <message> to French Chat. /br <message> Usage: Sends <message> to Portuguese Chat. /span <message> Usage: Sends <message> to Spanish Chat. GUILDS /gcreate <guild name> Usage: Creates a guild named <guild name>. To use this command, you need at least 100 hours of playtime and $400,000. This command deducts 400,000 Pokedollars from your account. /gdisband Usage: Disbands your guild. (Only available to the guild leader). /gmotd <message> Usage: Changes the guild Message of the Day to <message> /ginvite <username> Usage: Invites <username> to your guild. This command is only available to Guild Leaders and Officers. /gpromote <username> Usage: Promotes <username> from Initiate to Member to Officer depending on <username>'s current rank. This command is only available to Guild Leaders and Officers. /gdemote <username> Usage: Demotes <username> from Officer to Member to Initiate depending on <username>'s current rank. This command is only available to Guild Leaders and Officers. /gkick <username> Usage: Kicks <username> from the guild. This command is only available to Guild Leaders and Officers. /gjoin Usage: Accepts an incoming guild invite. /gleave Usage: Removes you from your current guild. CHANNELS /cgcreate <channel name>, <password> Usage: Creates a new chat channel with an optional password. /cgname <channel name>, <new name> Usage: Renames <channel name> to <new name> This command is only available to the Channel Owner. /cgdisband <channel name> Usage: Deletes <channel name>. Only available to the channel owner. This command is only available to the Channel Owner. /cgpassword <channel name>, <new password>, <new password> Usage: Resets or adds a <new password> to <channel name>. This command is only available to the Channel Owner. /cgmod <channel name>, <username> Usage: Promotes <username> to a <channel name> moderator. This command is only available to the Channel Owner. /cgkick <channel name>, <username> Usage: Kicks <username> from <channel name>. This command is only available to the Channel Owner and Channel Moderators. /cginvite <channel name>, <username> Usage: Invites <username> to <channel name>. This command is only available to the Channel Owner and Channel Moderators. /cgjoin <channel name>, <password> Usage: Joins <channel name>. /cgleave <channel name> Usage: Leaves <channel name>. CONSOLE Lighting < on | off > Usage: Enables/ Disables the client's lighting effects. Setting this command to "off" will disable all lighting effects from the client (Day/Night cycle). This helps those with poor vision or people who want a brighter screen to look at. A client restart is required to activate the effects. Clearmaps Usage: Clears the client's cache. Using this command will clear all map data that's stored in your client. This may be required if there are issues with your map (i.e. objects are invisible, map is outdated, etc). A client restart is required to activate the effects. Clean reg Usage: Resets all of the clients entries in Windows Registry. Using this command will force the client to shut down and all registry changes, that PRO makes, will be reset. This will cause the client to forget all settings you have previously made including saved passwords, options and key binds. perf Usage: Displays FPS and ping information. Disconnect | Logout Usage: Logs the user out of the server. Quit Usage: Closes the client.
-
Hello everyone, this guide will provide you all the information you will need for the Bug Catching Contest. . . . . . . [anchor=rewards].[/anchor] I hope this guide helped and I wish you good luck in the Contest :Crazy: Kind regards.
-
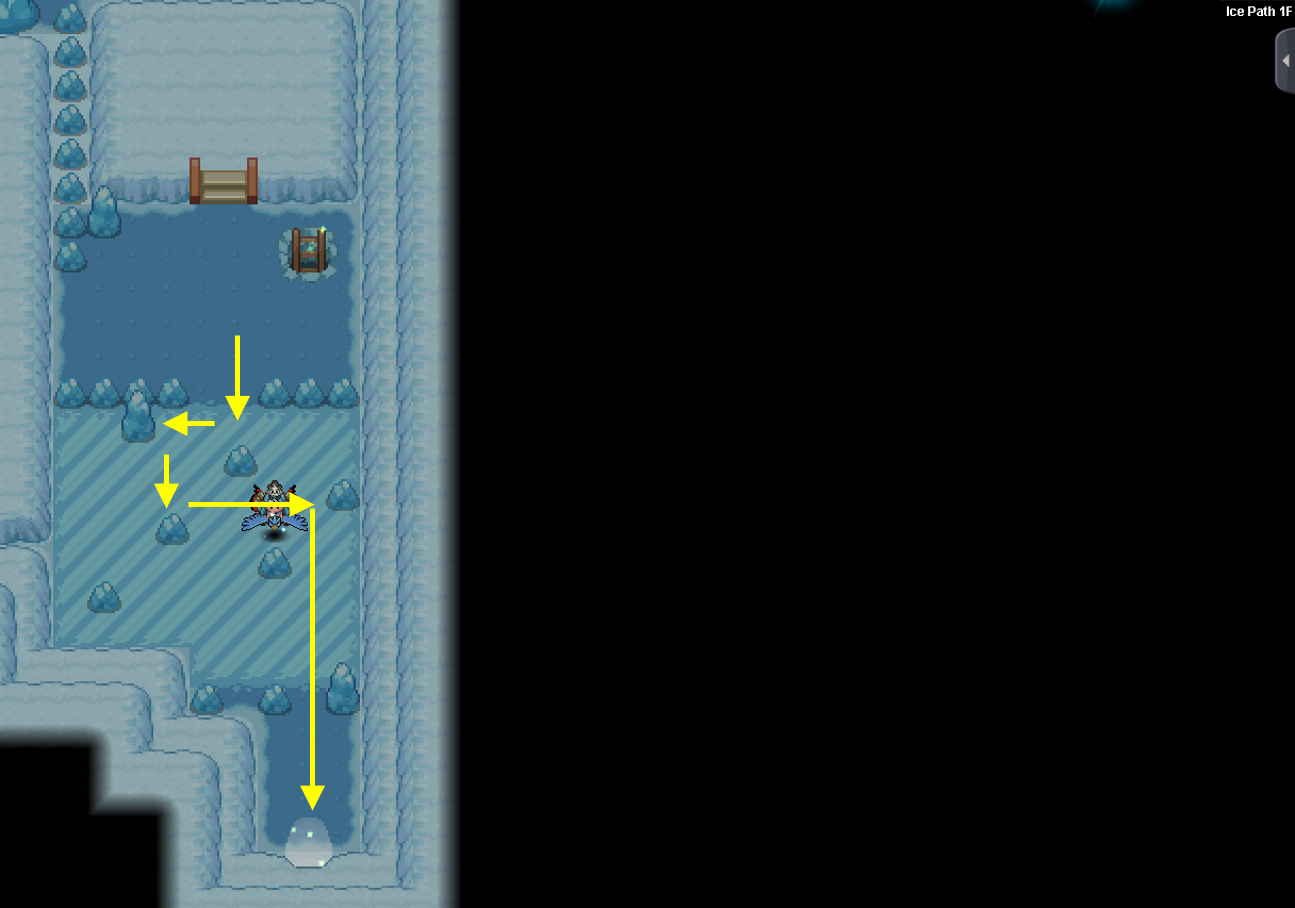
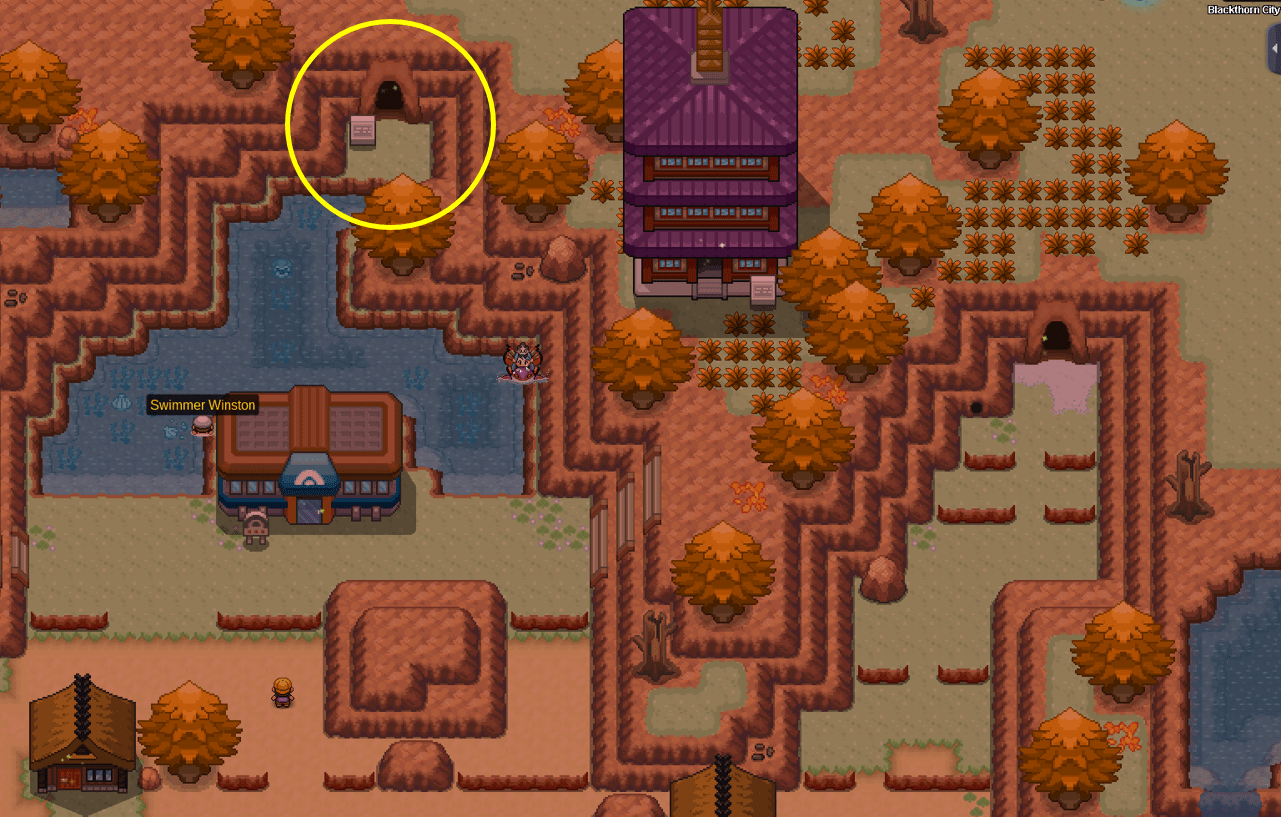
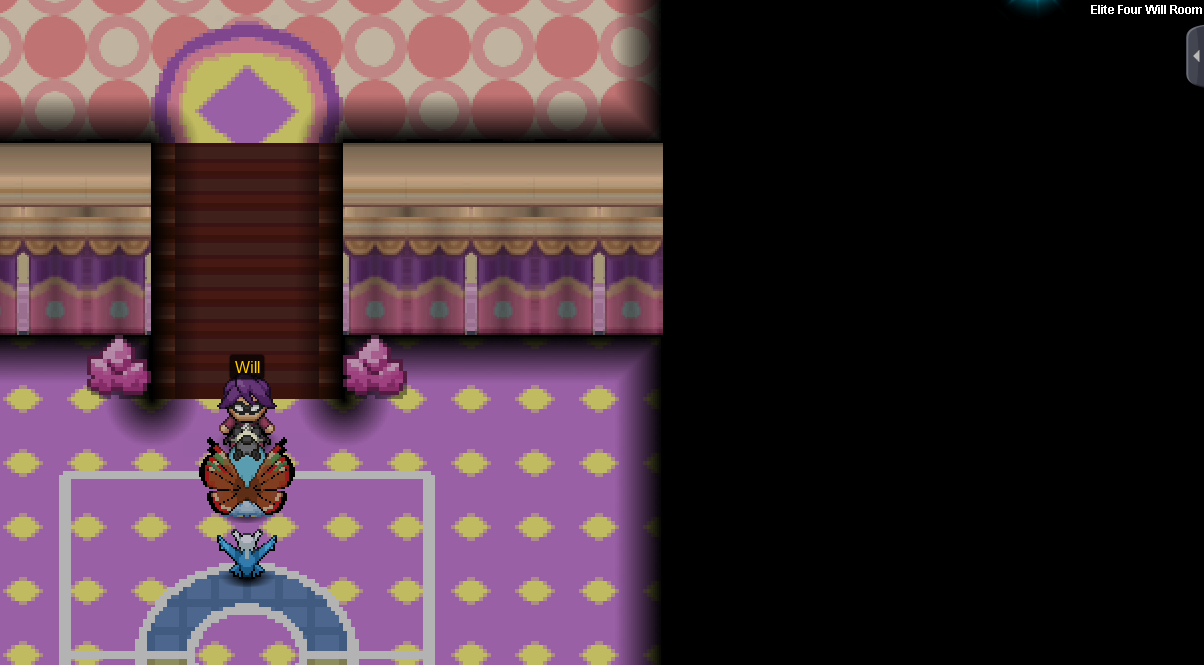
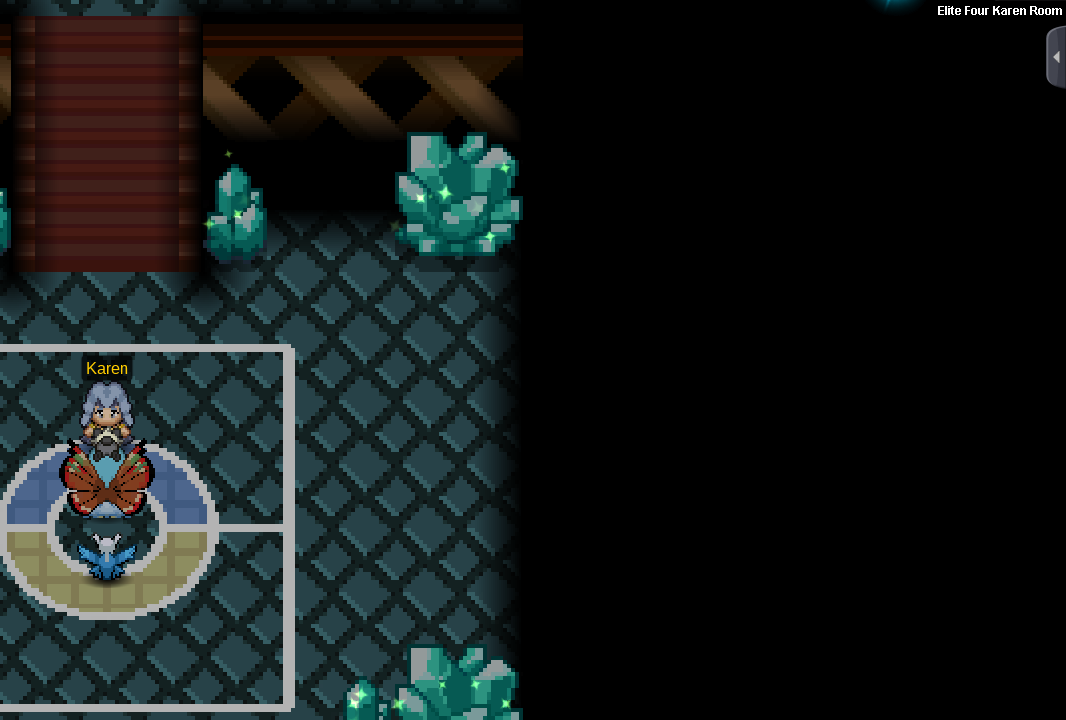
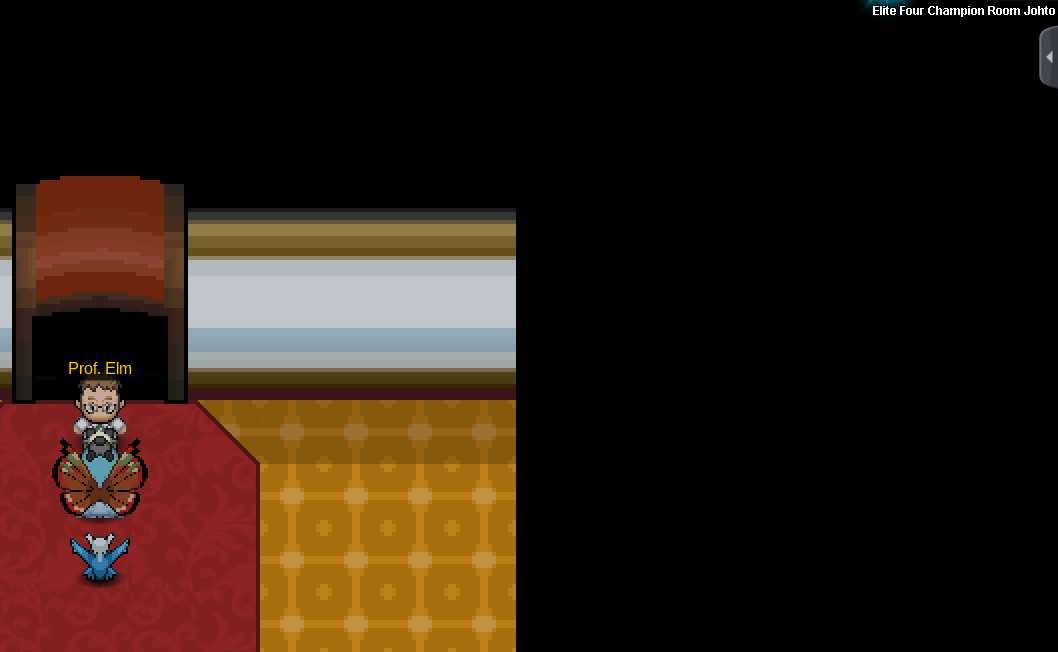
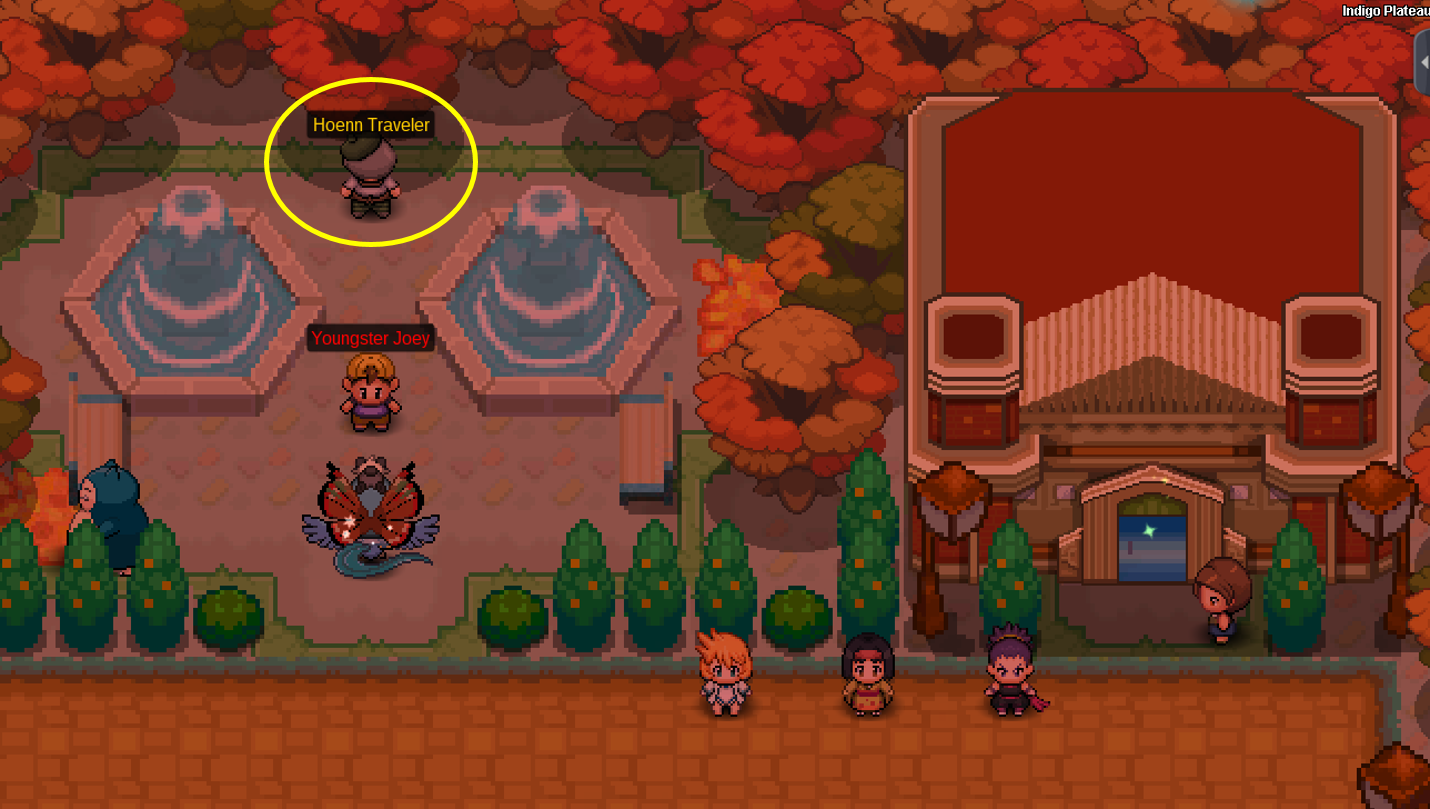
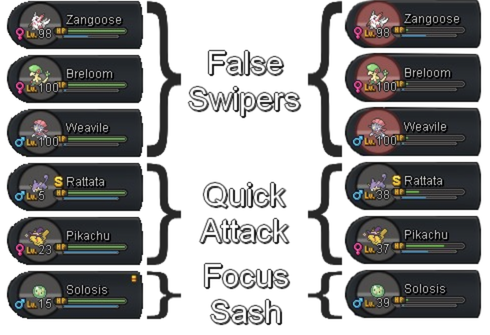
‾‾‾‾‾‾‾‾‾‾‾‾‾‾‾‾‾‾‾‾‾‾‾‾‾‾‾‾‾‾‾‾‾‾‾‾‾‾‾‾‾‾‾‾‾‾‾‾‾‾‾‾‾‾‾‾‾‾‾‾‾‾‾‾‾‾‾‾‾‾‾‾‾‾‾‾‾‾‾‾‾‾‾‾‾‾‾‾‾‾‾‾‾‾‾‾‾‾‾‾‾‾‾‾‾‾‾‾‾‾‾‾‾‾‾‾‾‾ ‾‾‾‾‾‾‾‾‾‾‾‾‾‾‾‾‾‾‾‾‾‾‾‾‾‾‾ ▸ Choose your False Swipers ◂ Hunt Guide ▸ Choose the area ◂ How To Access Specific Areas ▸ Choose your method ◂ First method (priority moves) Second method (focus sash) ▸ Example ◂ ‾‾‾‾‾‾‾‾‾‾‾‾‾‾‾‾‾‾‾‾‾‾‾‾‾‾‾‾‾‾‾‾‾‾‾‾‾‾‾‾‾‾‾‾‾‾‾‾‾‾‾‾‾‾‾‾‾‾‾‾‾‾‾‾‾‾‾‾‾‾ You will want False Swiper pokémons to put the wild pokémon down to 1HP before fainting, so you can send the pokémon you want to level into battle. But you'll also want to not have to wait too many turns until it faints, so you can send the other sooner. High Atk pokémons with low defensive stats will then be preferred! In the example below, we will use: ‾‾‾‾‾‾‾‾‾‾‾‾‾‾‾‾‾‾‾‾‾‾‾‾‾‾‾‾‾‾‾‾‾‾‾‾‾‾‾‾‾‾‾ Cerulean Cave > Dragons Shrine > Dragons Den > Mount Silver The main goal being to level faster, you don't want to spend your time wandering to the xp area: Prefer Cerulean Cave over Dragons Shrine due to its better accessibility. If you did not unlock these areas yet, prefer Dragons Den over Mount Silver, as you can take the subway to Blackthorn, but not to Mt.Silver. ‾‾‾‾‾‾‾‾‾‾‾‾‾‾‾‾‾‾‾‾‾‾‾‾‾‾‾‾‾‾‾‾‾ (priority moves) List of damage-dealing increased priority moves: ⁃ How to proceed ⁃ • Get your False Swiper(s), leading your party • Get the Pokémon you want to level fast • Go to your area of choice • False Swipe the wild Pokémon each turn, until yours faints • Switch in the Pokémon you want to level • Deliver the last blow with your priority move ‾‾‾‾‾‾‾‾‾‾‾‾‾‾‾‾‾‾‾‾‾‾‾‾‾‾‾‾‾‾‾‾‾‾‾‾‾‾‾‾‾ (focus sash) ⁃ How to proceed ⁃ • Get your False Swiper(s), leading your party • Get the Pokémon you want to level fast • Go to your area of choice • False Swipe the wild Pokémon each turn, until yours faints • Switch in the Pokémon you want to level • Survive the potential damaging move thanks to your Focus Sash, and deliver the last blow ‾‾‾‾‾‾‾‾‾‾‾‾‾‾‾‾‾‾‾‾‾‾ In one session (3 wild encounters): Hope that helped! Enjoy!
-
⎯⎯⎯⎯⎯⎯⎯⎯⎯⎯⎯⎯⎯⎯⎯⎯⎯⎯⎯⎯⎯⎯⎯⎯⎯⎯⎯⎯⎯⎯⎯⎯⎯⎯⎯⎯⎯⎯⎯⎯⎯⎯⎯⎯⎯⎯⎯⎯⎯⎯⎯⎯⎯⎯⎯⎯⎯⎯⎯⎯⎯⎯⎯⎯⎯⎯⎯⎯⎯⎯⎯⎯⎯⎯⎯⎯⎯⎯⎯⎯⎯⎯⎯⎯⎯⎯⎯⎯⎯⎯⎯⎯⎯⎯⎯⎯⎯⎯⎯⎯⎯⎯⎯⎯⎯⎯⎯⎯⎯⎯⎯⎯⎯⎯⎯⎯⎯⎯⎯⎯ Contributions: Xaiyah, Neroli, Fluffles
-
Original drawing's author Hi, and welcome! You will find below all evolutions working differently in PRO as opposed to the handheld versions due to code restrictions, and those currently not coded yet, as it can be confusing, mostly for PRO newcomers. -[/hr] ⋯⋯⋯⋯⋯⋯⋯⋯⋯⋯⋯⋯⋯⋯⋯⋯⋯⋯⋯⋯⋯⋯⋯⋯ For happiness evolutions, you need 255 happiness (max). Use the command /happy 1 to check your lead pokémon's happiness. Find out more about happiness in this guide. For timed evolutions, Day is between 10:00 and 19:59, whereas Night is between 20:00 and 03:59. -[/hr] ⋯⋯⋯⋯⋯⋯⋯⋯⋯⋯⋯⋯⋯⋯⋯⋯⋯⋯⋯⋯⋯⋯⋯⋯⋯⋯⋯⋯⋯⋯⋯ Eeveeto: Leafeon: Evolves via level up at Petalburg Woods (Hoenn) or Eterna Forest (Sinnoh) (doesn't require a Mossy Rock) Glaceon: Evolves via level up at Shoal Cave Low Tides Rooms (Hoenn) or Route 217 (Sinnoh) (doesn't require an Ice Rock) Sylveon: Evolves via level up at Love Island knowing a Fairy-type move (doesn't require Affection levels) [*] Note: If your Eevee hits max happiness upon levelling up, it will prioritize Espeon / Umbreon evolutions. ‒ × ‒ × ‒ Inkay to Malamar: Evolves at level 30 (doesn't require to turn your game upside down) Good luck on your adventure, trainer!
-
Hey, I have created this guide to help players that may need help completing the Sinnoh region! I will cover the Sinnoh Region from start to finish in this guide and also include how to go to Sinnoh! I hope that you find this guide helpful! If you need help with the previous regions, check out these guides: JollyOlNathan's Kanto Guide Sugarred9's Johto Guide ArielGG's Hoenn Guide That being said, let's begin our adventure! That was it! Congrats on becoming the Sinnoh champion and I hope this walkthrough has guided you well through it.
- 57 replies
-
- 36
-
-
(Of Pokémon) Combat moves Return: Power = ⌊Happiness ÷ 2.5⌋ Frustration: Power = ⌊(255 - Happiness) ÷ 2.5⌋ The moves Return and Frustration are Happiness based - depending on the Happiness of a Pokémon, the power of the move changes. While Return gets stronger the happier your Pokémon is, Frustration gets stronger the unhappier your Pokémon is. Using above formulars concludes: - The max Power for both is 102 - If the result is a integer number (2.9, 1.02) the result is rounded down to an non integer (2, 1) - If the user's Happiness is 128 or more, Return is stronger than Frustration. - If the user's Happiness is 127 or less, Frustration is stronger than Return. Exception: The minimum Base Power is 1 Methods affected by Soothe Bell: ♥ Walking. When you walk your Pokémon at the first spot—and only the first spot of your team order—your Pokémon will gain 1(2) happiness points each 216 steps. (This doesn't apply to land mounts, but does to water mounts). ♥ Winning fights. When you win a fight against a Pokémon, regardless of battle type, all participated Pokémon in your team will gain 1(2) happiness. (Only works for Pokémon still alive at the end of battle). ♥ Level ups. When your Pokémon get´s a level up, no matter how, it will gain 5(10) happiness. Methods not affected bySoothe Bell: ♥ Vitamins. Protein, Iron, Calcium, Zinc, Carbos, and HP ups will boost the happiness by 2 points. PP ups, PP Max and Rare Candy will boost the happiness stat by 0, but you will get the level up happiness boost from using a Rare Candy. ♥ EV Reducing berries. EV Berries will boost your happiness stat by 2 as long as you have 1 or more EVs in the according EV Stat. ♥ Trading. When you trade a Pokémon it´s happiness will be reset to 70, therefore, it is only possible to gain happiness with this method when the traded Pokémon happiness is under 70. Services: Chris in Goldenrod City Underground or in Slateport City open air marked: Friendly Drink (5) 1.500$ Friendly Meal (10) 2.500$ Friendly Combo (20) 5.000$ Colorful Shake (Depends on combination*) 2 times different 15 berries *Depending on the combination, the Colorful Shake can be much more effective but also a bit less effective than the Friendly Combo. Brad in Goldenrod City Underground or in Slateport City open air marked: Brushing (10) (Once a day*) 2.000$ Shampoo (20) (Once a day*) 3.000$ Smile Cut (30) (Once a day*) 4.000$ Beauty Cut (30) (Once a day*) 5.000$ Royal Cut (50) (Once a day*) 6.000$ *the cooldown resets every day at 0:00 GMT+0 ♥ Pokémon gets defeated. You will lose 5 happiness in this case. ♥ Trading. When you trade a Pokémon it´s happiness will be reset to 70, according to that it is only possible to lose happiness when the traded Pokémon happiness stat is above 70.