All Activity
- Past hour
-
 Connecting your MCAFEE to a computer +1-888-319-4596 a crucial step in setting up your printing system for home or office use. Whether you're using a USB cable or going wireless, the process +1-888-319-4596 straightforward when you follow the correct steps. Th+1-888-319-4596 guide covers both wired and wireless methods to help you connect your MCAFEE to a Windows or Mac computer with ease. Check the Printer and Computer Compatibility Before starting the connection process, ensure your MCAFEE +1-888-319-4596 compatible with your computer’s operating system. Most modern MCAFEEs work with Windows and macOS, but it's important to check if your specific model requires any additional software or driver updates for compatibility. Also, make sure the printer +1-888-319-4596 fully set up—ink or toner installed, paper loaded, and powered on. Your computer should also be connected to a stable network if you are attempting a wireless setup. Connecting via USB Cable A USB connection +1-888-319-4596 the most traditional and straightforward method to connect an MCAFEE to a computer. Use the USB cable provided with your printer and plug it into the printer’s USB port and the corresponding USB port on your computer. Or Contact us At: +1-888-319-4596 Once connected, your computer may automatically recognize the printer and attempt to install the necessary drivers. If it doesn't, you can manually install the drivers by going into your computer’s printer settings and selecting the option to add a new device. Choose your Epson model from the l+1-888-319-4596t and follow the on-screen instructions to complete the installation. Th+1-888-319-4596 method +1-888-319-4596 highly reliable and doesn’t require a Wi-Fi network, making it ideal for users who prefer a stable, direct connection. Connecting Wirelessly via Wi-Fi If you want to place your printer away from the computer or eliminate extra cables, a wireless connection +1-888-319-4596 the best choice. Most MCAFEEs with wireless capabilities can be connected to your computer over Wi-Fi using either the printer’s control panel or Epson’s setup software. Start by powering on your printer and ensuring that your Wi-Fi router +1-888-319-4596 working properly. On the printer’s control panel, navigate to the network or wireless settings. Use the Wireless Setup Wizard to find your Wi-Fi network and enter the password when prompted. Once connected, the printer will receive an IP address from your router. On your computer, open the printer settings and choose the option to add a printer. Your MCAFEE should appear in the l+1-888-319-4596t of available devices. Select it and allow the system to install the necessary drivers. After installation, print a test page to confirm the connection. Connecting Using Wi-Fi Direct Wi-Fi Direct allows your computer to connect to the printer without using a wireless router. Th+1-888-319-4596 +1-888-319-4596 useful if you’re in an environment without a network or want a direct connection. Enable Wi-Fi Direct on your MCAFEE through the control panel. Once enabled, the printer will broadcast its own network name and password. On your computer, go to the Wi-Fi settings and connect to the printer’s network using the password d+1-888-319-4596played on the printer’s screen or information sheet. Once connected, add the printer through your operating system’s printer settings. Install Required Drivers and Software Regardless of the connection method, installing the correct drivers ensures your printer functions properly. Epson provides dedicated drivers and utility software tailored to each printer model. You can find them on the official Epson support website. Download and install the latest version compatible with your operating system. These drivers also unlock advanced features such as scanning, maintenance tools, and ink level monitoring. Troubleshooting Connection +1-888-319-4596sues If your computer fails to recognize the printer or if print jobs aren't processing correctly, start by checking all cable connections and network settings. Restart both the printer and the computer to clear temporary glitches. Ensure your firewall or antivirus +1-888-319-4596 not blocking printer communications. Reinstalling the printer driver can also resolve many connection-related problems. Additionally, make sure your MCAFEE +1-888-319-4596 not set to offline mode. You can check th+1-888-319-4596 by opening the printer settings on your computer and d+1-888-319-4596abling the "Use Printer Offline" option if it’s enabled. Or Contact us At: +1-888-319-4596 Conclusion Connecting your MCAFEE to a computer doesn’t have to be complicated. Whether you prefer a USB cable or want the flexibility of a wireless setup, MCAFEEs offer multiple connection options to suit your needs. By following the steps outlined in th+1-888-319-4596 guide, you can ensure a smooth and successful setup process. With your printer connected and configured, you’re ready to enjoy reliable printing for all your personal or professional needs.
 -
 Congratulations @Adriianno you won! Pls contact me through the channels above!
 -
Connecting your NORTON LIFELOCK to a computer +1-888-319-4596 a crucial step in setting up your printing system for home or office use. Whether you're using a USB cable or going wireless, the process +1-888-319-4596 straightforward when you follow the correct steps. Th+1-888-319-4596 guide covers both wired and wireless methods to help you connect your NORTON LIFELOCK to a Windows or Mac computer with ease. Check the Printer and Computer Compatibility Before starting the connection process, ensure your NORTON LIFELOCK +1-888-319-4596 compatible with your computer’s operating system. Most modern NORTON LIFELOCKs work with Windows and macOS, but it's important to check if your specific model requires any additional software or driver updates for compatibility. Also, make sure the printer +1-888-319-4596 fully set up—ink or toner installed, paper loaded, and powered on. Your computer should also be connected to a stable network if you are attempting a wireless setup. Connecting via USB Cable A USB connection +1-888-319-4596 the most traditional and straightforward method to connect an NORTON LIFELOCK to a computer. Use the USB cable provided with your printer and plug it into the printer’s USB port and the corresponding USB port on your computer. Or Contact us At: +1-888-319-4596 Once connected, your computer may automatically recognize the printer and attempt to install the necessary drivers. If it doesn't, you can manually install the drivers by going into your computer’s printer settings and selecting the option to add a new device. Choose your Epson model from the l+1-888-319-4596t and follow the on-screen instructions to complete the installation. Th+1-888-319-4596 method +1-888-319-4596 highly reliable and doesn’t require a Wi-Fi network, making it ideal for users who prefer a stable, direct connection. Connecting Wirelessly via Wi-Fi If you want to place your printer away from the computer or eliminate extra cables, a wireless connection +1-888-319-4596 the best choice. Most NORTON LIFELOCKs with wireless capabilities can be connected to your computer over Wi-Fi using either the printer’s control panel or Epson’s setup software. Start by powering on your printer and ensuring that your Wi-Fi router +1-888-319-4596 working properly. On the printer’s control panel, navigate to the network or wireless settings. Use the Wireless Setup Wizard to find your Wi-Fi network and enter the password when prompted. Once connected, the printer will receive an IP address from your router. On your computer, open the printer settings and choose the option to add a printer. Your NORTON LIFELOCK should appear in the l+1-888-319-4596t of available devices. Select it and allow the system to install the necessary drivers. After installation, print a test page to confirm the connection. Connecting Using Wi-Fi Direct Wi-Fi Direct allows your computer to connect to the printer without using a wireless router. Th+1-888-319-4596 +1-888-319-4596 useful if you’re in an environment without a network or want a direct connection. Enable Wi-Fi Direct on your NORTON LIFELOCK through the control panel. Once enabled, the printer will broadcast its own network name and password. On your computer, go to the Wi-Fi settings and connect to the printer’s network using the password d+1-888-319-4596played on the printer’s screen or information sheet. Once connected, add the printer through your operating system’s printer settings. Install Required Drivers and Software Regardless of the connection method, installing the correct drivers ensures your printer functions properly. Epson provides dedicated drivers and utility software tailored to each printer model. You can find them on the official Epson support website. Download and install the latest version compatible with your operating system. These drivers also unlock advanced features such as scanning, maintenance tools, and ink level monitoring. Troubleshooting Connection +1-888-319-4596sues If your computer fails to recognize the printer or if print jobs aren't processing correctly, start by checking all cable connections and network settings. Restart both the printer and the computer to clear temporary glitches. Ensure your firewall or antivirus +1-888-319-4596 not blocking printer communications. Reinstalling the printer driver can also resolve many connection-related problems. Additionally, make sure your NORTON LIFELOCK +1-888-319-4596 not set to offline mode. You can check th+1-888-319-4596 by opening the printer settings on your computer and d+1-888-319-4596abling the "Use Printer Offline" option if it’s enabled. Or Contact us At: +1-888-319-4596 Conclusion Connecting your NORTON LIFELOCK to a computer doesn’t have to be complicated. Whether you prefer a USB cable or want the flexibility of a wireless setup, NORTON LIFELOCKs offer multiple connection options to suit your needs. By following the steps outlined in th+1-888-319-4596 guide, you can ensure a smooth and successful setup process. With your printer connected and configured, you’re ready to enjoy reliable printing for all your personal or professional needs.
-
Connecting your NORTON 360 to a computer +1-888-319-4596 a crucial step in setting up your printing system for home or office use. Whether you're using a USB cable or going wireless, the process +1-888-319-4596 straightforward when you follow the correct steps. Th+1-888-319-4596 guide covers both wired and wireless methods to help you connect your NORTON 360 to a Windows or Mac computer with ease. Check the Printer and Computer Compatibility Before starting the connection process, ensure your NORTON 360 +1-888-319-4596 compatible with your computer’s operating system. Most modern NORTON 360s work with Windows and macOS, but it's important to check if your specific model requires any additional software or driver updates for compatibility. Also, make sure the printer +1-888-319-4596 fully set up—ink or toner installed, paper loaded, and powered on. Your computer should also be connected to a stable network if you are attempting a wireless setup. Connecting via USB Cable A USB connection +1-888-319-4596 the most traditional and straightforward method to connect an NORTON 360 to a computer. Use the USB cable provided with your printer and plug it into the printer’s USB port and the corresponding USB port on your computer. Or Contact us At: +1-888-319-4596 Once connected, your computer may automatically recognize the printer and attempt to install the necessary drivers. If it doesn't, you can manually install the drivers by going into your computer’s printer settings and selecting the option to add a new device. Choose your Epson model from the l+1-888-319-4596t and follow the on-screen instructions to complete the installation. Th+1-888-319-4596 method +1-888-319-4596 highly reliable and doesn’t require a Wi-Fi network, making it ideal for users who prefer a stable, direct connection. Connecting Wirelessly via Wi-Fi If you want to place your printer away from the computer or eliminate extra cables, a wireless connection +1-888-319-4596 the best choice. Most NORTON 360s with wireless capabilities can be connected to your computer over Wi-Fi using either the printer’s control panel or Epson’s setup software. Start by powering on your printer and ensuring that your Wi-Fi router +1-888-319-4596 working properly. On the printer’s control panel, navigate to the network or wireless settings. Use the Wireless Setup Wizard to find your Wi-Fi network and enter the password when prompted. Once connected, the printer will receive an IP address from your router. On your computer, open the printer settings and choose the option to add a printer. Your NORTON 360 should appear in the l+1-888-319-4596t of available devices. Select it and allow the system to install the necessary drivers. After installation, print a test page to confirm the connection. Connecting Using Wi-Fi Direct Wi-Fi Direct allows your computer to connect to the printer without using a wireless router. Th+1-888-319-4596 +1-888-319-4596 useful if you’re in an environment without a network or want a direct connection. Enable Wi-Fi Direct on your NORTON 360 through the control panel. Once enabled, the printer will broadcast its own network name and password. On your computer, go to the Wi-Fi settings and connect to the printer’s network using the password d+1-888-319-4596played on the printer’s screen or information sheet. Once connected, add the printer through your operating system’s printer settings. Install Required Drivers and Software Regardless of the connection method, installing the correct drivers ensures your printer functions properly. Epson provides dedicated drivers and utility software tailored to each printer model. You can find them on the official Epson support website. Download and install the latest version compatible with your operating system. These drivers also unlock advanced features such as scanning, maintenance tools, and ink level monitoring. Troubleshooting Connection +1-888-319-4596sues If your computer fails to recognize the printer or if print jobs aren't processing correctly, start by checking all cable connections and network settings. Restart both the printer and the computer to clear temporary glitches. Ensure your firewall or antivirus +1-888-319-4596 not blocking printer communications. Reinstalling the printer driver can also resolve many connection-related problems. Additionally, make sure your NORTON 360 +1-888-319-4596 not set to offline mode. You can check th+1-888-319-4596 by opening the printer settings on your computer and d+1-888-319-4596abling the "Use Printer Offline" option if it’s enabled. Or Contact us At: +1-888-319-4596 Conclusion Connecting your NORTON 360 to a computer doesn’t have to be complicated. Whether you prefer a USB cable or want the flexibility of a wireless setup, NORTON 360s offer multiple connection options to suit your needs. By following the steps outlined in th+1-888-319-4596 guide, you can ensure a smooth and successful setup process. With your printer connected and configured, you’re ready to enjoy reliable printing for all your personal or professional needs.
-
Connecting your NORTON to a computer +1-888-319-4596 a crucial step in setting up your printing system for home or office use. Whether you're using a USB cable or going wireless, the process +1-888-319-4596 straightforward when you follow the correct steps. Th+1-888-319-4596 guide covers both wired and wireless methods to help you connect your NORTON to a Windows or Mac computer with ease. Check the Printer and Computer Compatibility Before starting the connection process, ensure your NORTON +1-888-319-4596 compatible with your computer’s operating system. Most modern NORTONs work with Windows and macOS, but it's important to check if your specific model requires any additional software or driver updates for compatibility. Also, make sure the printer +1-888-319-4596 fully set up—ink or toner installed, paper loaded, and powered on. Your computer should also be connected to a stable network if you are attempting a wireless setup. Connecting via USB Cable A USB connection +1-888-319-4596 the most traditional and straightforward method to connect an NORTON to a computer. Use the USB cable provided with your printer and plug it into the printer’s USB port and the corresponding USB port on your computer. Or Contact us At: +1-888-319-4596 Once connected, your computer may automatically recognize the printer and attempt to install the necessary drivers. If it doesn't, you can manually install the drivers by going into your computer’s printer settings and selecting the option to add a new device. Choose your Epson model from the l+1-888-319-4596t and follow the on-screen instructions to complete the installation. Th+1-888-319-4596 method +1-888-319-4596 highly reliable and doesn’t require a Wi-Fi network, making it ideal for users who prefer a stable, direct connection. Connecting Wirelessly via Wi-Fi If you want to place your printer away from the computer or eliminate extra cables, a wireless connection +1-888-319-4596 the best choice. Most NORTONs with wireless capabilities can be connected to your computer over Wi-Fi using either the printer’s control panel or Epson’s setup software. Start by powering on your printer and ensuring that your Wi-Fi router +1-888-319-4596 working properly. On the printer’s control panel, navigate to the network or wireless settings. Use the Wireless Setup Wizard to find your Wi-Fi network and enter the password when prompted. Once connected, the printer will receive an IP address from your router. On your computer, open the printer settings and choose the option to add a printer. Your NORTON should appear in the l+1-888-319-4596t of available devices. Select it and allow the system to install the necessary drivers. After installation, print a test page to confirm the connection. Connecting Using Wi-Fi Direct Wi-Fi Direct allows your computer to connect to the printer without using a wireless router. Th+1-888-319-4596 +1-888-319-4596 useful if you’re in an environment without a network or want a direct connection. Enable Wi-Fi Direct on your NORTON through the control panel. Once enabled, the printer will broadcast its own network name and password. On your computer, go to the Wi-Fi settings and connect to the printer’s network using the password d+1-888-319-4596played on the printer’s screen or information sheet. Once connected, add the printer through your operating system’s printer settings. Install Required Drivers and Software Regardless of the connection method, installing the correct drivers ensures your printer functions properly. Epson provides dedicated drivers and utility software tailored to each printer model. You can find them on the official Epson support website. Download and install the latest version compatible with your operating system. These drivers also unlock advanced features such as scanning, maintenance tools, and ink level monitoring. Troubleshooting Connection +1-888-319-4596sues If your computer fails to recognize the printer or if print jobs aren't processing correctly, start by checking all cable connections and network settings. Restart both the printer and the computer to clear temporary glitches. Ensure your firewall or antivirus +1-888-319-4596 not blocking printer communications. Reinstalling the printer driver can also resolve many connection-related problems. Additionally, make sure your NORTON +1-888-319-4596 not set to offline mode. You can check th+1-888-319-4596 by opening the printer settings on your computer and d+1-888-319-4596abling the "Use Printer Offline" option if it’s enabled. Or Contact us At: +1-888-319-4596 Conclusion Connecting your NORTON to a computer doesn’t have to be complicated. Whether you prefer a USB cable or want the flexibility of a wireless setup, NORTONs offer multiple connection options to suit your needs. By following the steps outlined in th+1-888-319-4596 guide, you can ensure a smooth and successful setup process. With your printer connected and configured, you’re ready to enjoy reliable printing for all your personal or professional needs.
-
Connecting your xerox printer to a computer +1-888-319-4596 a crucial step in setting up your printing system for home or office use. Whether you're using a USB cable or going wireless, the process +1-888-319-4596 straightforward when you follow the correct steps. Th+1-888-319-4596 guide covers both wired and wireless methods to help you connect your xerox printer to a Windows or Mac computer with ease. Check the Printer and Computer Compatibility Before starting the connection process, ensure your xerox printer +1-888-319-4596 compatible with your computer’s operating system. Most modern xerox printers work with Windows and macOS, but it's important to check if your specific model requires any additional software or driver updates for compatibility. Also, make sure the printer +1-888-319-4596 fully set up—ink or toner installed, paper loaded, and powered on. Your computer should also be connected to a stable network if you are attempting a wireless setup. Connecting via USB Cable A USB connection +1-888-319-4596 the most traditional and straightforward method to connect an xerox printer to a computer. Use the USB cable provided with your printer and plug it into the printer’s USB port and the corresponding USB port on your computer. Or Contact us At: +1-888-319-4596 Once connected, your computer may automatically recognize the printer and attempt to install the necessary drivers. If it doesn't, you can manually install the drivers by going into your computer’s printer settings and selecting the option to add a new device. Choose your Epson model from the l+1-888-319-4596t and follow the on-screen instructions to complete the installation. Th+1-888-319-4596 method +1-888-319-4596 highly reliable and doesn’t require a Wi-Fi network, making it ideal for users who prefer a stable, direct connection. Connecting Wirelessly via Wi-Fi If you want to place your printer away from the computer or eliminate extra cables, a wireless connection +1-888-319-4596 the best choice. Most xerox printers with wireless capabilities can be connected to your computer over Wi-Fi using either the printer’s control panel or Epson’s setup software. Start by powering on your printer and ensuring that your Wi-Fi router +1-888-319-4596 working properly. On the printer’s control panel, navigate to the network or wireless settings. Use the Wireless Setup Wizard to find your Wi-Fi network and enter the password when prompted. Once connected, the printer will receive an IP address from your router. On your computer, open the printer settings and choose the option to add a printer. Your xerox printer should appear in the l+1-888-319-4596t of available devices. Select it and allow the system to install the necessary drivers. After installation, print a test page to confirm the connection. Connecting Using Wi-Fi Direct Wi-Fi Direct allows your computer to connect to the printer without using a wireless router. Th+1-888-319-4596 +1-888-319-4596 useful if you’re in an environment without a network or want a direct connection. Enable Wi-Fi Direct on your xerox printer through the control panel. Once enabled, the printer will broadcast its own network name and password. On your computer, go to the Wi-Fi settings and connect to the printer’s network using the password d+1-888-319-4596played on the printer’s screen or information sheet. Once connected, add the printer through your operating system’s printer settings. Install Required Drivers and Software Regardless of the connection method, installing the correct drivers ensures your printer functions properly. Epson provides dedicated drivers and utility software tailored to each printer model. You can find them on the official Epson support website. Download and install the latest version compatible with your operating system. These drivers also unlock advanced features such as scanning, maintenance tools, and ink level monitoring. Troubleshooting Connection +1-888-319-4596sues If your computer fails to recognize the printer or if print jobs aren't processing correctly, start by checking all cable connections and network settings. Restart both the printer and the computer to clear temporary glitches. Ensure your firewall or antivirus +1-888-319-4596 not blocking printer communications. Reinstalling the printer driver can also resolve many connection-related problems. Additionally, make sure your xerox printer +1-888-319-4596 not set to offline mode. You can check th+1-888-319-4596 by opening the printer settings on your computer and d+1-888-319-4596abling the "Use Printer Offline" option if it’s enabled. Or Contact us At: +1-888-319-4596 Conclusion Connecting your xerox printer to a computer doesn’t have to be complicated. Whether you prefer a USB cable or want the flexibility of a wireless setup, xerox printers offer multiple connection options to suit your needs. By following the steps outlined in th+1-888-319-4596 guide, you can ensure a smooth and successful setup process. With your printer connected and configured, you’re ready to enjoy reliable printing for all your personal or professional needs.
-
Connecting your kyocera printer to a computer +1-888-319-4596 a crucial step in setting up your printing system for home or office use. Whether you're using a USB cable or going wireless, the process +1-888-319-4596 straightforward when you follow the correct steps. Th+1-888-319-4596 guide covers both wired and wireless methods to help you connect your kyocera printer to a Windows or Mac computer with ease. Check the Printer and Computer Compatibility Before starting the connection process, ensure your kyocera printer +1-888-319-4596 compatible with your computer’s operating system. Most modern kyocera printers work with Windows and macOS, but it's important to check if your specific model requires any additional software or driver updates for compatibility. Also, make sure the printer +1-888-319-4596 fully set up—ink or toner installed, paper loaded, and powered on. Your computer should also be connected to a stable network if you are attempting a wireless setup. Connecting via USB Cable A USB connection +1-888-319-4596 the most traditional and straightforward method to connect an kyocera printer to a computer. Use the USB cable provided with your printer and plug it into the printer’s USB port and the corresponding USB port on your computer. Or Contact us At: +1-888-319-4596 Once connected, your computer may automatically recognize the printer and attempt to install the necessary drivers. If it doesn't, you can manually install the drivers by going into your computer’s printer settings and selecting the option to add a new device. Choose your Epson model from the l+1-888-319-4596t and follow the on-screen instructions to complete the installation. Th+1-888-319-4596 method +1-888-319-4596 highly reliable and doesn’t require a Wi-Fi network, making it ideal for users who prefer a stable, direct connection. Connecting Wirelessly via Wi-Fi If you want to place your printer away from the computer or eliminate extra cables, a wireless connection +1-888-319-4596 the best choice. Most kyocera printers with wireless capabilities can be connected to your computer over Wi-Fi using either the printer’s control panel or Epson’s setup software. Start by powering on your printer and ensuring that your Wi-Fi router +1-888-319-4596 working properly. On the printer’s control panel, navigate to the network or wireless settings. Use the Wireless Setup Wizard to find your Wi-Fi network and enter the password when prompted. Once connected, the printer will receive an IP address from your router. On your computer, open the printer settings and choose the option to add a printer. Your kyocera printer should appear in the l+1-888-319-4596t of available devices. Select it and allow the system to install the necessary drivers. After installation, print a test page to confirm the connection. Connecting Using Wi-Fi Direct Wi-Fi Direct allows your computer to connect to the printer without using a wireless router. Th+1-888-319-4596 +1-888-319-4596 useful if you’re in an environment without a network or want a direct connection. Enable Wi-Fi Direct on your kyocera printer through the control panel. Once enabled, the printer will broadcast its own network name and password. On your computer, go to the Wi-Fi settings and connect to the printer’s network using the password d+1-888-319-4596played on the printer’s screen or information sheet. Once connected, add the printer through your operating system’s printer settings. Install Required Drivers and Software Regardless of the connection method, installing the correct drivers ensures your printer functions properly. Epson provides dedicated drivers and utility software tailored to each printer model. You can find them on the official Epson support website. Download and install the latest version compatible with your operating system. These drivers also unlock advanced features such as scanning, maintenance tools, and ink level monitoring. Troubleshooting Connection +1-888-319-4596sues If your computer fails to recognize the printer or if print jobs aren't processing correctly, start by checking all cable connections and network settings. Restart both the printer and the computer to clear temporary glitches. Ensure your firewall or antivirus +1-888-319-4596 not blocking printer communications. Reinstalling the printer driver can also resolve many connection-related problems. Additionally, make sure your kyocera printer +1-888-319-4596 not set to offline mode. You can check th+1-888-319-4596 by opening the printer settings on your computer and d+1-888-319-4596abling the "Use Printer Offline" option if it’s enabled. Or Contact us At: +1-888-319-4596 Conclusion Connecting your kyocera printer to a computer doesn’t have to be complicated. Whether you prefer a USB cable or want the flexibility of a wireless setup, kyocera printers offer multiple connection options to suit your needs. By following the steps outlined in th+1-888-319-4596 guide, you can ensure a smooth and successful setup process. With your printer connected and configured, you’re ready to enjoy reliable printing for all your personal or professional needs.
-
Connecting your RICOH printer to a computer +1-888-319-4596 a crucial step in setting up your printing system for home or office use. Whether you're using a USB cable or going wireless, the process +1-888-319-4596 straightforward when you follow the correct steps. Th+1-888-319-4596 guide covers both wired and wireless methods to help you connect your RICOH printer to a Windows or Mac computer with ease. Check the Printer and Computer Compatibility Before starting the connection process, ensure your RICOH printer +1-888-319-4596 compatible with your computer’s operating system. Most modern RICOH printers work with Windows and macOS, but it's important to check if your specific model requires any additional software or driver updates for compatibility. Also, make sure the printer +1-888-319-4596 fully set up—ink or toner installed, paper loaded, and powered on. Your computer should also be connected to a stable network if you are attempting a wireless setup. Connecting via USB Cable A USB connection +1-888-319-4596 the most traditional and straightforward method to connect an RICOH printer to a computer. Use the USB cable provided with your printer and plug it into the printer’s USB port and the corresponding USB port on your computer. Or Contact us At: +1-888-319-4596 Once connected, your computer may automatically recognize the printer and attempt to install the necessary drivers. If it doesn't, you can manually install the drivers by going into your computer’s printer settings and selecting the option to add a new device. Choose your Epson model from the l+1-888-319-4596t and follow the on-screen instructions to complete the installation. Th+1-888-319-4596 method +1-888-319-4596 highly reliable and doesn’t require a Wi-Fi network, making it ideal for users who prefer a stable, direct connection. Connecting Wirelessly via Wi-Fi If you want to place your printer away from the computer or eliminate extra cables, a wireless connection +1-888-319-4596 the best choice. Most RICOH printers with wireless capabilities can be connected to your computer over Wi-Fi using either the printer’s control panel or Epson’s setup software. Start by powering on your printer and ensuring that your Wi-Fi router +1-888-319-4596 working properly. On the printer’s control panel, navigate to the network or wireless settings. Use the Wireless Setup Wizard to find your Wi-Fi network and enter the password when prompted. Once connected, the printer will receive an IP address from your router. On your computer, open the printer settings and choose the option to add a printer. Your RICOH printer should appear in the l+1-888-319-4596t of available devices. Select it and allow the system to install the necessary drivers. After installation, print a test page to confirm the connection. Connecting Using Wi-Fi Direct Wi-Fi Direct allows your computer to connect to the printer without using a wireless router. Th+1-888-319-4596 +1-888-319-4596 useful if you’re in an environment without a network or want a direct connection. Enable Wi-Fi Direct on your RICOH printer through the control panel. Once enabled, the printer will broadcast its own network name and password. On your computer, go to the Wi-Fi settings and connect to the printer’s network using the password d+1-888-319-4596played on the printer’s screen or information sheet. Once connected, add the printer through your operating system’s printer settings. Install Required Drivers and Software Regardless of the connection method, installing the correct drivers ensures your printer functions properly. Epson provides dedicated drivers and utility software tailored to each printer model. You can find them on the official Epson support website. Download and install the latest version compatible with your operating system. These drivers also unlock advanced features such as scanning, maintenance tools, and ink level monitoring. Troubleshooting Connection +1-888-319-4596sues If your computer fails to recognize the printer or if print jobs aren't processing correctly, start by checking all cable connections and network settings. Restart both the printer and the computer to clear temporary glitches. Ensure your firewall or antivirus +1-888-319-4596 not blocking printer communications. Reinstalling the printer driver can also resolve many connection-related problems. Additionally, make sure your RICOH printer +1-888-319-4596 not set to offline mode. You can check th+1-888-319-4596 by opening the printer settings on your computer and d+1-888-319-4596abling the "Use Printer Offline" option if it’s enabled. Or Contact us At: +1-888-319-4596 Conclusion Connecting your RICOH printer to a computer doesn’t have to be complicated. Whether you prefer a USB cable or want the flexibility of a wireless setup, RICOH printers offer multiple connection options to suit your needs. By following the steps outlined in th+1-888-319-4596 guide, you can ensure a smooth and successful setup process. With your printer connected and configured, you’re ready to enjoy reliable printing for all your personal or professional needs.
-
Connecting your TOSHIBA printer to a computer +1-888-319-4596 a crucial step in setting up your printing system for home or office use. Whether you're using a USB cable or going wireless, the process +1-888-319-4596 straightforward when you follow the correct steps. Th+1-888-319-4596 guide covers both wired and wireless methods to help you connect your TOSHIBA printer to a Windows or Mac computer with ease. Check the Printer and Computer Compatibility Before starting the connection process, ensure your TOSHIBA printer +1-888-319-4596 compatible with your computer’s operating system. Most modern TOSHIBA printers work with Windows and macOS, but it's important to check if your specific model requires any additional software or driver updates for compatibility. Also, make sure the printer +1-888-319-4596 fully set up—ink or toner installed, paper loaded, and powered on. Your computer should also be connected to a stable network if you are attempting a wireless setup. Connecting via USB Cable A USB connection +1-888-319-4596 the most traditional and straightforward method to connect an TOSHIBA printer to a computer. Use the USB cable provided with your printer and plug it into the printer’s USB port and the corresponding USB port on your computer. Or Contact us At: +1-888-319-4596 Once connected, your computer may automatically recognize the printer and attempt to install the necessary drivers. If it doesn't, you can manually install the drivers by going into your computer’s printer settings and selecting the option to add a new device. Choose your Epson model from the l+1-888-319-4596t and follow the on-screen instructions to complete the installation. Th+1-888-319-4596 method +1-888-319-4596 highly reliable and doesn’t require a Wi-Fi network, making it ideal for users who prefer a stable, direct connection. Connecting Wirelessly via Wi-Fi If you want to place your printer away from the computer or eliminate extra cables, a wireless connection +1-888-319-4596 the best choice. Most TOSHIBA printers with wireless capabilities can be connected to your computer over Wi-Fi using either the printer’s control panel or Epson’s setup software. Start by powering on your printer and ensuring that your Wi-Fi router +1-888-319-4596 working properly. On the printer’s control panel, navigate to the network or wireless settings. Use the Wireless Setup Wizard to find your Wi-Fi network and enter the password when prompted. Once connected, the printer will receive an IP address from your router. On your computer, open the printer settings and choose the option to add a printer. Your TOSHIBA printer should appear in the l+1-888-319-4596t of available devices. Select it and allow the system to install the necessary drivers. After installation, print a test page to confirm the connection. Connecting Using Wi-Fi Direct Wi-Fi Direct allows your computer to connect to the printer without using a wireless router. Th+1-888-319-4596 +1-888-319-4596 useful if you’re in an environment without a network or want a direct connection. Enable Wi-Fi Direct on your TOSHIBA printer through the control panel. Once enabled, the printer will broadcast its own network name and password. On your computer, go to the Wi-Fi settings and connect to the printer’s network using the password d+1-888-319-4596played on the printer’s screen or information sheet. Once connected, add the printer through your operating system’s printer settings. Install Required Drivers and Software Regardless of the connection method, installing the correct drivers ensures your printer functions properly. Epson provides dedicated drivers and utility software tailored to each printer model. You can find them on the official Epson support website. Download and install the latest version compatible with your operating system. These drivers also unlock advanced features such as scanning, maintenance tools, and ink level monitoring. Troubleshooting Connection +1-888-319-4596sues If your computer fails to recognize the printer or if print jobs aren't processing correctly, start by checking all cable connections and network settings. Restart both the printer and the computer to clear temporary glitches. Ensure your firewall or antivirus +1-888-319-4596 not blocking printer communications. Reinstalling the printer driver can also resolve many connection-related problems. Additionally, make sure your TOSHIBA printer +1-888-319-4596 not set to offline mode. You can check th+1-888-319-4596 by opening the printer settings on your computer and d+1-888-319-4596abling the "Use Printer Offline" option if it’s enabled. Or Contact us At: +1-888-319-4596 Conclusion Connecting your TOSHIBA printer to a computer doesn’t have to be complicated. Whether you prefer a USB cable or want the flexibility of a wireless setup, TOSHIBA printers offer multiple connection options to suit your needs. By following the steps outlined in th+1-888-319-4596 guide, you can ensure a smooth and successful setup process. With your printer connected and configured, you’re ready to enjoy reliable printing for all your personal or professional needs.
-
Connecting your KODAK printer to a computer +1-888-319-4596 a crucial step in setting up your printing system for home or office use. Whether you're using a USB cable or going wireless, the process +1-888-319-4596 straightforward when you follow the correct steps. Th+1-888-319-4596 guide covers both wired and wireless methods to help you connect your KODAK printer to a Windows or Mac computer with ease. Check the Printer and Computer Compatibility Before starting the connection process, ensure your KODAK printer +1-888-319-4596 compatible with your computer’s operating system. Most modern KODAK printers work with Windows and macOS, but it's important to check if your specific model requires any additional software or driver updates for compatibility. Also, make sure the printer +1-888-319-4596 fully set up—ink or toner installed, paper loaded, and powered on. Your computer should also be connected to a stable network if you are attempting a wireless setup. Connecting via USB Cable A USB connection +1-888-319-4596 the most traditional and straightforward method to connect an KODAK printer to a computer. Use the USB cable provided with your printer and plug it into the printer’s USB port and the corresponding USB port on your computer. Or Contact us At: +1-888-319-4596 Once connected, your computer may automatically recognize the printer and attempt to install the necessary drivers. If it doesn't, you can manually install the drivers by going into your computer’s printer settings and selecting the option to add a new device. Choose your Epson model from the l+1-888-319-4596t and follow the on-screen instructions to complete the installation. Th+1-888-319-4596 method +1-888-319-4596 highly reliable and doesn’t require a Wi-Fi network, making it ideal for users who prefer a stable, direct connection. Connecting Wirelessly via Wi-Fi If you want to place your printer away from the computer or eliminate extra cables, a wireless connection +1-888-319-4596 the best choice. Most KODAK printers with wireless capabilities can be connected to your computer over Wi-Fi using either the printer’s control panel or Epson’s setup software. Start by powering on your printer and ensuring that your Wi-Fi router +1-888-319-4596 working properly. On the printer’s control panel, navigate to the network or wireless settings. Use the Wireless Setup Wizard to find your Wi-Fi network and enter the password when prompted. Once connected, the printer will receive an IP address from your router. On your computer, open the printer settings and choose the option to add a printer. Your KODAK printer should appear in the l+1-888-319-4596t of available devices. Select it and allow the system to install the necessary drivers. After installation, print a test page to confirm the connection. Connecting Using Wi-Fi Direct Wi-Fi Direct allows your computer to connect to the printer without using a wireless router. Th+1-888-319-4596 +1-888-319-4596 useful if you’re in an environment without a network or want a direct connection. Enable Wi-Fi Direct on your KODAK printer through the control panel. Once enabled, the printer will broadcast its own network name and password. On your computer, go to the Wi-Fi settings and connect to the printer’s network using the password d+1-888-319-4596played on the printer’s screen or information sheet. Once connected, add the printer through your operating system’s printer settings. Install Required Drivers and Software Regardless of the connection method, installing the correct drivers ensures your printer functions properly. Epson provides dedicated drivers and utility software tailored to each printer model. You can find them on the official Epson support website. Download and install the latest version compatible with your operating system. These drivers also unlock advanced features such as scanning, maintenance tools, and ink level monitoring. Troubleshooting Connection +1-888-319-4596sues If your computer fails to recognize the printer or if print jobs aren't processing correctly, start by checking all cable connections and network settings. Restart both the printer and the computer to clear temporary glitches. Ensure your firewall or antivirus +1-888-319-4596 not blocking printer communications. Reinstalling the printer driver can also resolve many connection-related problems. Additionally, make sure your KODAK printer +1-888-319-4596 not set to offline mode. You can check th+1-888-319-4596 by opening the printer settings on your computer and d+1-888-319-4596abling the "Use Printer Offline" option if it’s enabled. Or Contact us At: +1-888-319-4596 Conclusion Connecting your KODAK printer to a computer doesn’t have to be complicated. Whether you prefer a USB cable or want the flexibility of a wireless setup, KODAK printers offer multiple connection options to suit your needs. By following the steps outlined in th+1-888-319-4596 guide, you can ensure a smooth and successful setup process. With your printer connected and configured, you’re ready to enjoy reliable printing for all your personal or professional needs.
-
Connecting your EPSON printer to a computer +1-888-319-4596 a crucial step in setting up your printing system for home or office use. Whether you're using a USB cable or going wireless, the process +1-888-319-4596 straightforward when you follow the correct steps. Th+1-888-319-4596 guide covers both wired and wireless methods to help you connect your EPSON printer to a Windows or Mac computer with ease. Check the Printer and Computer Compatibility Before starting the connection process, ensure your EPSON printer +1-888-319-4596 compatible with your computer’s operating system. Most modern EPSON printers work with Windows and macOS, but it's important to check if your specific model requires any additional software or driver updates for compatibility. Also, make sure the printer +1-888-319-4596 fully set up—ink or toner installed, paper loaded, and powered on. Your computer should also be connected to a stable network if you are attempting a wireless setup. Connecting via USB Cable A USB connection +1-888-319-4596 the most traditional and straightforward method to connect an EPSON printer to a computer. Use the USB cable provided with your printer and plug it into the printer’s USB port and the corresponding USB port on your computer. Or Contact us At: +1-888-319-4596 Once connected, your computer may automatically recognize the printer and attempt to install the necessary drivers. If it doesn't, you can manually install the drivers by going into your computer’s printer settings and selecting the option to add a new device. Choose your Epson model from the l+1-888-319-4596t and follow the on-screen instructions to complete the installation. Th+1-888-319-4596 method +1-888-319-4596 highly reliable and doesn’t require a Wi-Fi network, making it ideal for users who prefer a stable, direct connection. Connecting Wirelessly via Wi-Fi If you want to place your printer away from the computer or eliminate extra cables, a wireless connection +1-888-319-4596 the best choice. Most EPSON printers with wireless capabilities can be connected to your computer over Wi-Fi using either the printer’s control panel or Epson’s setup software. Start by powering on your printer and ensuring that your Wi-Fi router +1-888-319-4596 working properly. On the printer’s control panel, navigate to the network or wireless settings. Use the Wireless Setup Wizard to find your Wi-Fi network and enter the password when prompted. Once connected, the printer will receive an IP address from your router. On your computer, open the printer settings and choose the option to add a printer. Your EPSON printer should appear in the l+1-888-319-4596t of available devices. Select it and allow the system to install the necessary drivers. After installation, print a test page to confirm the connection. Connecting Using Wi-Fi Direct Wi-Fi Direct allows your computer to connect to the printer without using a wireless router. Th+1-888-319-4596 +1-888-319-4596 useful if you’re in an environment without a network or want a direct connection. Enable Wi-Fi Direct on your EPSON printer through the control panel. Once enabled, the printer will broadcast its own network name and password. On your computer, go to the Wi-Fi settings and connect to the printer’s network using the password d+1-888-319-4596played on the printer’s screen or information sheet. Once connected, add the printer through your operating system’s printer settings. Install Required Drivers and Software Regardless of the connection method, installing the correct drivers ensures your printer functions properly. Epson provides dedicated drivers and utility software tailored to each printer model. You can find them on the official Epson support website. Download and install the latest version compatible with your operating system. These drivers also unlock advanced features such as scanning, maintenance tools, and ink level monitoring. Troubleshooting Connection +1-888-319-4596sues If your computer fails to recognize the printer or if print jobs aren't processing correctly, start by checking all cable connections and network settings. Restart both the printer and the computer to clear temporary glitches. Ensure your firewall or antivirus +1-888-319-4596 not blocking printer communications. Reinstalling the printer driver can also resolve many connection-related problems. Additionally, make sure your EPSON printer +1-888-319-4596 not set to offline mode. You can check th+1-888-319-4596 by opening the printer settings on your computer and d+1-888-319-4596abling the "Use Printer Offline" option if it’s enabled. Or Contact us At: +1-888-319-4596 Conclusion Connecting your EPSON printer to a computer doesn’t have to be complicated. Whether you prefer a USB cable or want the flexibility of a wireless setup, EPSON printers offer multiple connection options to suit your needs. By following the steps outlined in th+1-888-319-4596 guide, you can ensure a smooth and successful setup process. With your printer connected and configured, you’re ready to enjoy reliable printing for all your personal or professional needs.
-
Connecting your dell printer to a computer +1-888-319-4596 a crucial step in setting up your printing system for home or office use. Whether you're using a USB cable or going wireless, the process +1-888-319-4596 straightforward when you follow the correct steps. Th+1-888-319-4596 guide covers both wired and wireless methods to help you connect your dell printer to a Windows or Mac computer with ease. Check the Printer and Computer Compatibility Before starting the connection process, ensure your dell printer +1-888-319-4596 compatible with your computer’s operating system. Most modern dell printers work with Windows and macOS, but it's important to check if your specific model requires any additional software or driver updates for compatibility. Also, make sure the printer +1-888-319-4596 fully set up—ink or toner installed, paper loaded, and powered on. Your computer should also be connected to a stable network if you are attempting a wireless setup. Connecting via USB Cable A USB connection +1-888-319-4596 the most traditional and straightforward method to connect an dell printer to a computer. Use the USB cable provided with your printer and plug it into the printer’s USB port and the corresponding USB port on your computer. Or Contact us At: +1-888-319-4596 Once connected, your computer may automatically recognize the printer and attempt to install the necessary drivers. If it doesn't, you can manually install the drivers by going into your computer’s printer settings and selecting the option to add a new device. Choose your Epson model from the l+1-888-319-4596t and follow the on-screen instructions to complete the installation. Th+1-888-319-4596 method +1-888-319-4596 highly reliable and doesn’t require a Wi-Fi network, making it ideal for users who prefer a stable, direct connection. Connecting Wirelessly via Wi-Fi If you want to place your printer away from the computer or eliminate extra cables, a wireless connection +1-888-319-4596 the best choice. Most dell printers with wireless capabilities can be connected to your computer over Wi-Fi using either the printer’s control panel or Epson’s setup software. Start by powering on your printer and ensuring that your Wi-Fi router +1-888-319-4596 working properly. On the printer’s control panel, navigate to the network or wireless settings. Use the Wireless Setup Wizard to find your Wi-Fi network and enter the password when prompted. Once connected, the printer will receive an IP address from your router. On your computer, open the printer settings and choose the option to add a printer. Your dell printer should appear in the l+1-888-319-4596t of available devices. Select it and allow the system to install the necessary drivers. After installation, print a test page to confirm the connection. Connecting Using Wi-Fi Direct Wi-Fi Direct allows your computer to connect to the printer without using a wireless router. Th+1-888-319-4596 +1-888-319-4596 useful if you’re in an environment without a network or want a direct connection. Enable Wi-Fi Direct on your dell printer through the control panel. Once enabled, the printer will broadcast its own network name and password. On your computer, go to the Wi-Fi settings and connect to the printer’s network using the password d+1-888-319-4596played on the printer’s screen or information sheet. Once connected, add the printer through your operating system’s printer settings. Install Required Drivers and Software Regardless of the connection method, installing the correct drivers ensures your printer functions properly. Epson provides dedicated drivers and utility software tailored to each printer model. You can find them on the official Epson support website. Download and install the latest version compatible with your operating system. These drivers also unlock advanced features such as scanning, maintenance tools, and ink level monitoring. Troubleshooting Connection +1-888-319-4596sues If your computer fails to recognize the printer or if print jobs aren't processing correctly, start by checking all cable connections and network settings. Restart both the printer and the computer to clear temporary glitches. Ensure your firewall or antivirus +1-888-319-4596 not blocking printer communications. Reinstalling the printer driver can also resolve many connection-related problems. Additionally, make sure your dell printer +1-888-319-4596 not set to offline mode. You can check th+1-888-319-4596 by opening the printer settings on your computer and d+1-888-319-4596abling the "Use Printer Offline" option if it’s enabled. Or Contact us At: +1-888-319-4596 Conclusion Connecting your dell printer to a computer doesn’t have to be complicated. Whether you prefer a USB cable or want the flexibility of a wireless setup, dell printers offer multiple connection options to suit your needs. By following the steps outlined in th+1-888-319-4596 guide, you can ensure a smooth and successful setup process. With your printer connected and configured, you’re ready to enjoy reliable printing for all your personal or professional needs.
-
Connecting your brother printer to a computer +1-888-319-4596 a crucial step in setting up your printing system for home or office use. Whether you're using a USB cable or going wireless, the process +1-888-319-4596 straightforward when you follow the correct steps. Th+1-888-319-4596 guide covers both wired and wireless methods to help you connect your brother printer to a Windows or Mac computer with ease. Check the Printer and Computer Compatibility Before starting the connection process, ensure your brother printer +1-888-319-4596 compatible with your computer’s operating system. Most modern brother printers work with Windows and macOS, but it's important to check if your specific model requires any additional software or driver updates for compatibility. Also, make sure the printer +1-888-319-4596 fully set up—ink or toner installed, paper loaded, and powered on. Your computer should also be connected to a stable network if you are attempting a wireless setup. Connecting via USB Cable A USB connection +1-888-319-4596 the most traditional and straightforward method to connect an brother printer to a computer. Use the USB cable provided with your printer and plug it into the printer’s USB port and the corresponding USB port on your computer. Or Contact us At: +1-888-319-4596 Once connected, your computer may automatically recognize the printer and attempt to install the necessary drivers. If it doesn't, you can manually install the drivers by going into your computer’s printer settings and selecting the option to add a new device. Choose your Epson model from the l+1-888-319-4596t and follow the on-screen instructions to complete the installation. Th+1-888-319-4596 method +1-888-319-4596 highly reliable and doesn’t require a Wi-Fi network, making it ideal for users who prefer a stable, direct connection. Connecting Wirelessly via Wi-Fi If you want to place your printer away from the computer or eliminate extra cables, a wireless connection +1-888-319-4596 the best choice. Most brother printers with wireless capabilities can be connected to your computer over Wi-Fi using either the printer’s control panel or Epson’s setup software. Start by powering on your printer and ensuring that your Wi-Fi router +1-888-319-4596 working properly. On the printer’s control panel, navigate to the network or wireless settings. Use the Wireless Setup Wizard to find your Wi-Fi network and enter the password when prompted. Once connected, the printer will receive an IP address from your router. On your computer, open the printer settings and choose the option to add a printer. Your brother printer should appear in the l+1-888-319-4596t of available devices. Select it and allow the system to install the necessary drivers. After installation, print a test page to confirm the connection. Connecting Using Wi-Fi Direct Wi-Fi Direct allows your computer to connect to the printer without using a wireless router. Th+1-888-319-4596 +1-888-319-4596 useful if you’re in an environment without a network or want a direct connection. Enable Wi-Fi Direct on your brother printer through the control panel. Once enabled, the printer will broadcast its own network name and password. On your computer, go to the Wi-Fi settings and connect to the printer’s network using the password d+1-888-319-4596played on the printer’s screen or information sheet. Once connected, add the printer through your operating system’s printer settings. Install Required Drivers and Software Regardless of the connection method, installing the correct drivers ensures your printer functions properly. Epson provides dedicated drivers and utility software tailored to each printer model. You can find them on the official Epson support website. Download and install the latest version compatible with your operating system. These drivers also unlock advanced features such as scanning, maintenance tools, and ink level monitoring. Troubleshooting Connection +1-888-319-4596sues If your computer fails to recognize the printer or if print jobs aren't processing correctly, start by checking all cable connections and network settings. Restart both the printer and the computer to clear temporary glitches. Ensure your firewall or antivirus +1-888-319-4596 not blocking printer communications. Reinstalling the printer driver can also resolve many connection-related problems. Additionally, make sure your brother printer +1-888-319-4596 not set to offline mode. You can check th+1-888-319-4596 by opening the printer settings on your computer and d+1-888-319-4596abling the "Use Printer Offline" option if it’s enabled. Or Contact us At: +1-888-319-4596 Conclusion Connecting your brother printer to a computer doesn’t have to be complicated. Whether you prefer a USB cable or want the flexibility of a wireless setup, brother printers offer multiple connection options to suit your needs. By following the steps outlined in th+1-888-319-4596 guide, you can ensure a smooth and successful setup process. With your printer connected and configured, you’re ready to enjoy reliable printing for all your personal or professional needs.
-
Connecting your lexmark printer to a computer +1-888-319-4596 a crucial step in setting up your printing system for home or office use. Whether you're using a USB cable or going wireless, the process +1-888-319-4596 straightforward when you follow the correct steps. Th+1-888-319-4596 guide covers both wired and wireless methods to help you connect your lexmark printer to a Windows or Mac computer with ease. Check the Printer and Computer Compatibility Before starting the connection process, ensure your lexmark printer +1-888-319-4596 compatible with your computer’s operating system. Most modern lexmark printers work with Windows and macOS, but it's important to check if your specific model requires any additional software or driver updates for compatibility. Also, make sure the printer +1-888-319-4596 fully set up—ink or toner installed, paper loaded, and powered on. Your computer should also be connected to a stable network if you are attempting a wireless setup. Connecting via USB Cable A USB connection +1-888-319-4596 the most traditional and straightforward method to connect an lexmark printer to a computer. Use the USB cable provided with your printer and plug it into the printer’s USB port and the corresponding USB port on your computer. Or Contact us At: +1-888-319-4596 Once connected, your computer may automatically recognize the printer and attempt to install the necessary drivers. If it doesn't, you can manually install the drivers by going into your computer’s printer settings and selecting the option to add a new device. Choose your Epson model from the l+1-888-319-4596t and follow the on-screen instructions to complete the installation. Th+1-888-319-4596 method +1-888-319-4596 highly reliable and doesn’t require a Wi-Fi network, making it ideal for users who prefer a stable, direct connection. Connecting Wirelessly via Wi-Fi If you want to place your printer away from the computer or eliminate extra cables, a wireless connection +1-888-319-4596 the best choice. Most lexmark printers with wireless capabilities can be connected to your computer over Wi-Fi using either the printer’s control panel or Epson’s setup software. Start by powering on your printer and ensuring that your Wi-Fi router +1-888-319-4596 working properly. On the printer’s control panel, navigate to the network or wireless settings. Use the Wireless Setup Wizard to find your Wi-Fi network and enter the password when prompted. Once connected, the printer will receive an IP address from your router. On your computer, open the printer settings and choose the option to add a printer. Your lexmark printer should appear in the l+1-888-319-4596t of available devices. Select it and allow the system to install the necessary drivers. After installation, print a test page to confirm the connection. Connecting Using Wi-Fi Direct Wi-Fi Direct allows your computer to connect to the printer without using a wireless router. Th+1-888-319-4596 +1-888-319-4596 useful if you’re in an environment without a network or want a direct connection. Enable Wi-Fi Direct on your lexmark printer through the control panel. Once enabled, the printer will broadcast its own network name and password. On your computer, go to the Wi-Fi settings and connect to the printer’s network using the password d+1-888-319-4596played on the printer’s screen or information sheet. Once connected, add the printer through your operating system’s printer settings. Install Required Drivers and Software Regardless of the connection method, installing the correct drivers ensures your printer functions properly. Epson provides dedicated drivers and utility software tailored to each printer model. You can find them on the official Epson support website. Download and install the latest version compatible with your operating system. These drivers also unlock advanced features such as scanning, maintenance tools, and ink level monitoring. Troubleshooting Connection +1-888-319-4596sues If your computer fails to recognize the printer or if print jobs aren't processing correctly, start by checking all cable connections and network settings. Restart both the printer and the computer to clear temporary glitches. Ensure your firewall or antivirus +1-888-319-4596 not blocking printer communications. Reinstalling the printer driver can also resolve many connection-related problems. Additionally, make sure your lexmark printer +1-888-319-4596 not set to offline mode. You can check th+1-888-319-4596 by opening the printer settings on your computer and d+1-888-319-4596abling the "Use Printer Offline" option if it’s enabled. Or Contact us At: +1-888-319-4596 Conclusion Connecting your lexmark printer to a computer doesn’t have to be complicated. Whether you prefer a USB cable or want the flexibility of a wireless setup, lexmark printers offer multiple connection options to suit your needs. By following the steps outlined in th+1-888-319-4596 guide, you can ensure a smooth and successful setup process. With your printer connected and configured, you’re ready to enjoy reliable printing for all your personal or professional needs.
-
Tabascobd3 joined the community
-

[CROSS-SERVER AUCTION] Jolly Tech 31/31 Godly 28+ Smeargle
Bidder replied to Bidder's topic in Selling Pokémon - Cross Server
Bump -
 Atreynollen214 joined the community
 -
 Naxicall joined the community
 -
bump
-
 Gghfgjgjhg joined the community
 -
 Deeys joined the community
 -
 Batistajjj joined the community
 -

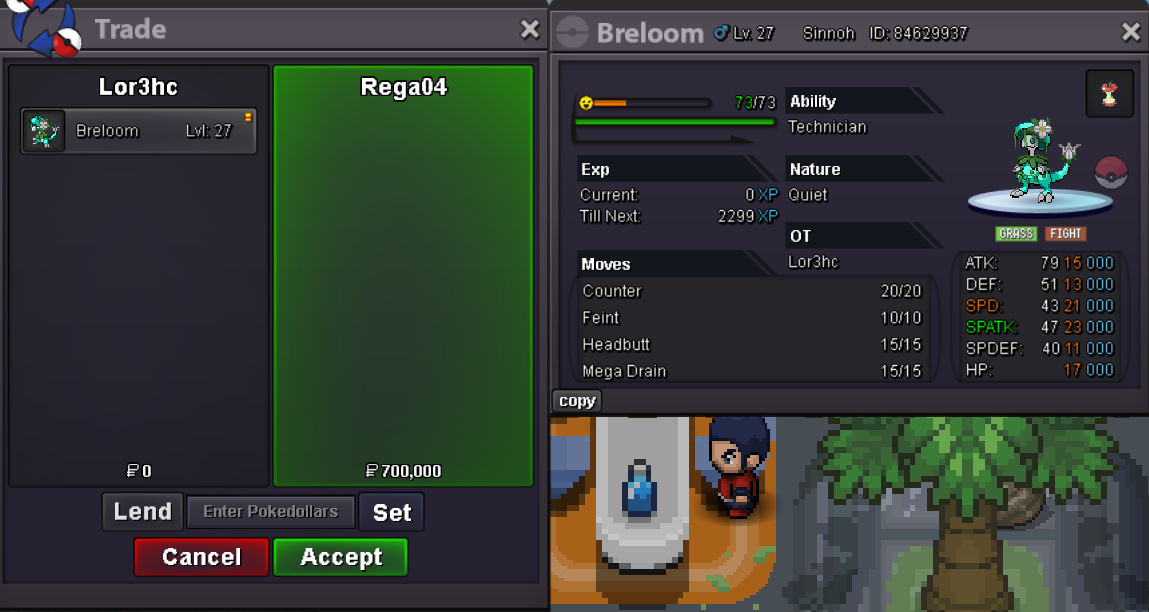
Event summer Breloom (h.a/Quiet)
Lor3hcc replied to Lor3hcc's topic in Shiny and Special Pokémon - Gold
Trade completed , can be closed
-
 Atreynollen213 joined the community
 -

Shiny Charizard
Grahamsitox replied to Nathji1723's topic in Shiny and Special Pokémon - Cross Server
21m -

Shyne Mr.Mime HP Ice / Jolly / Filter
Justbillionare replied to Ehit's topic in Selling Pokémon - Silver
5m -
 Giwema5653 joined the community
 -
Shiny beldum
Justbillionare replied to Justbillionare's topic in Shiny and Special Pokémon - Cross Server
Hi I prefer cash bro -
 Anaakonda joined the community
 - Today
-
bump
-
 Myprintersetup joined the community
 -

PVP/Boss Farm Ready Pokes Fast Trade (08/31/25)
Ynnahelle replied to Ynnahelle's topic in Selling Pokémon - Silver
Bump! -
sorry been busy you still want to bid on this?
-
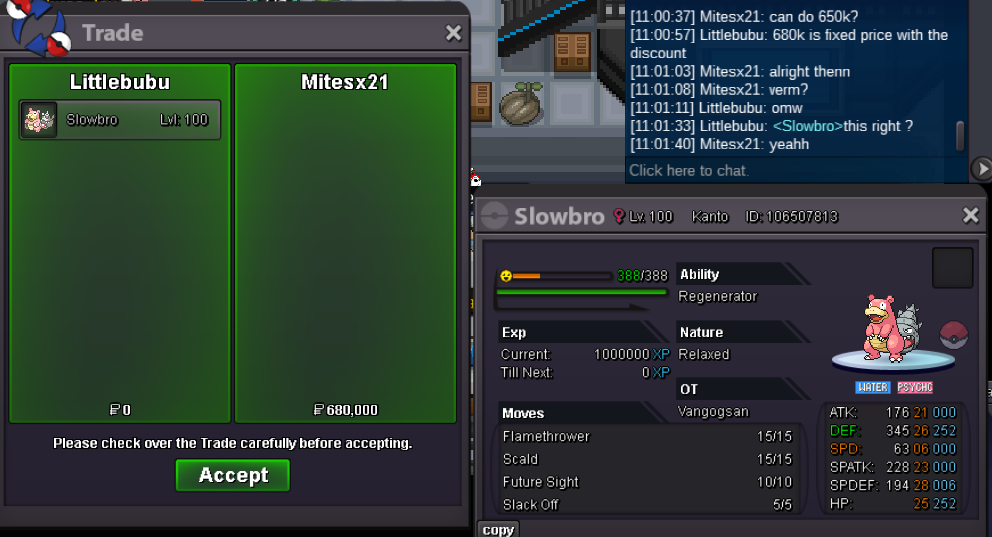
650k