Search the Community
Showing results for tags 'staff guides'.
-
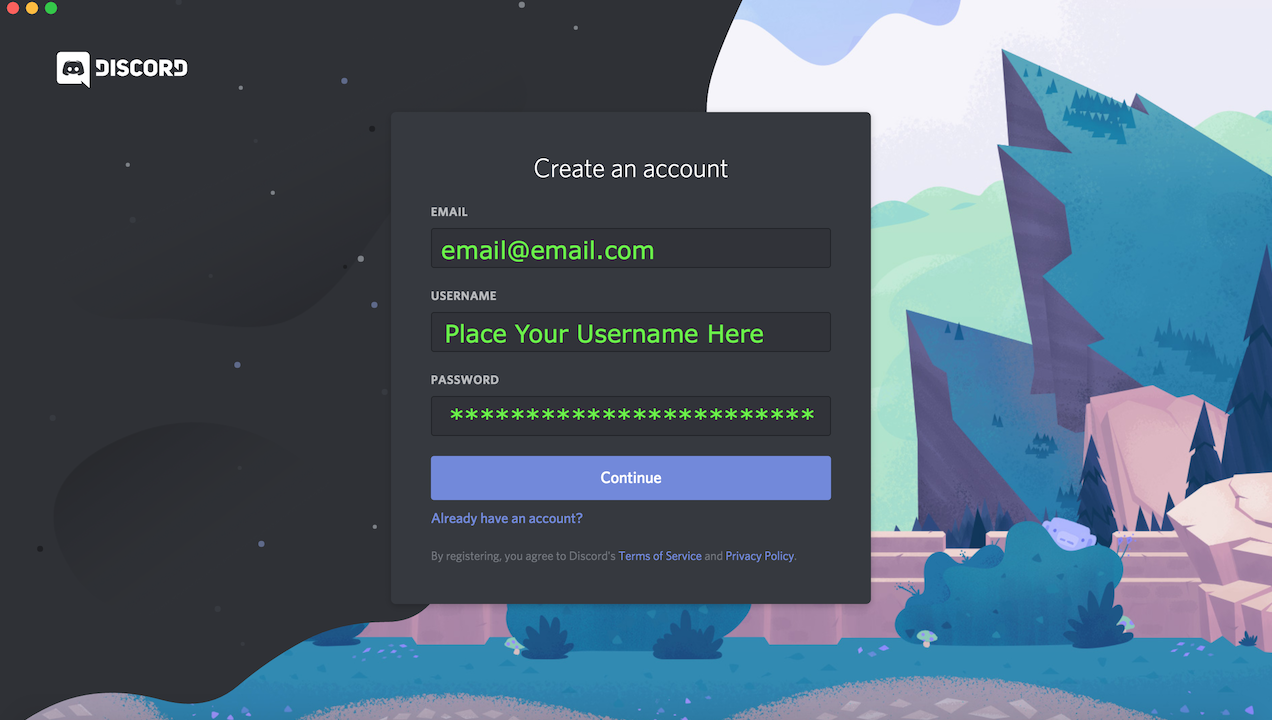
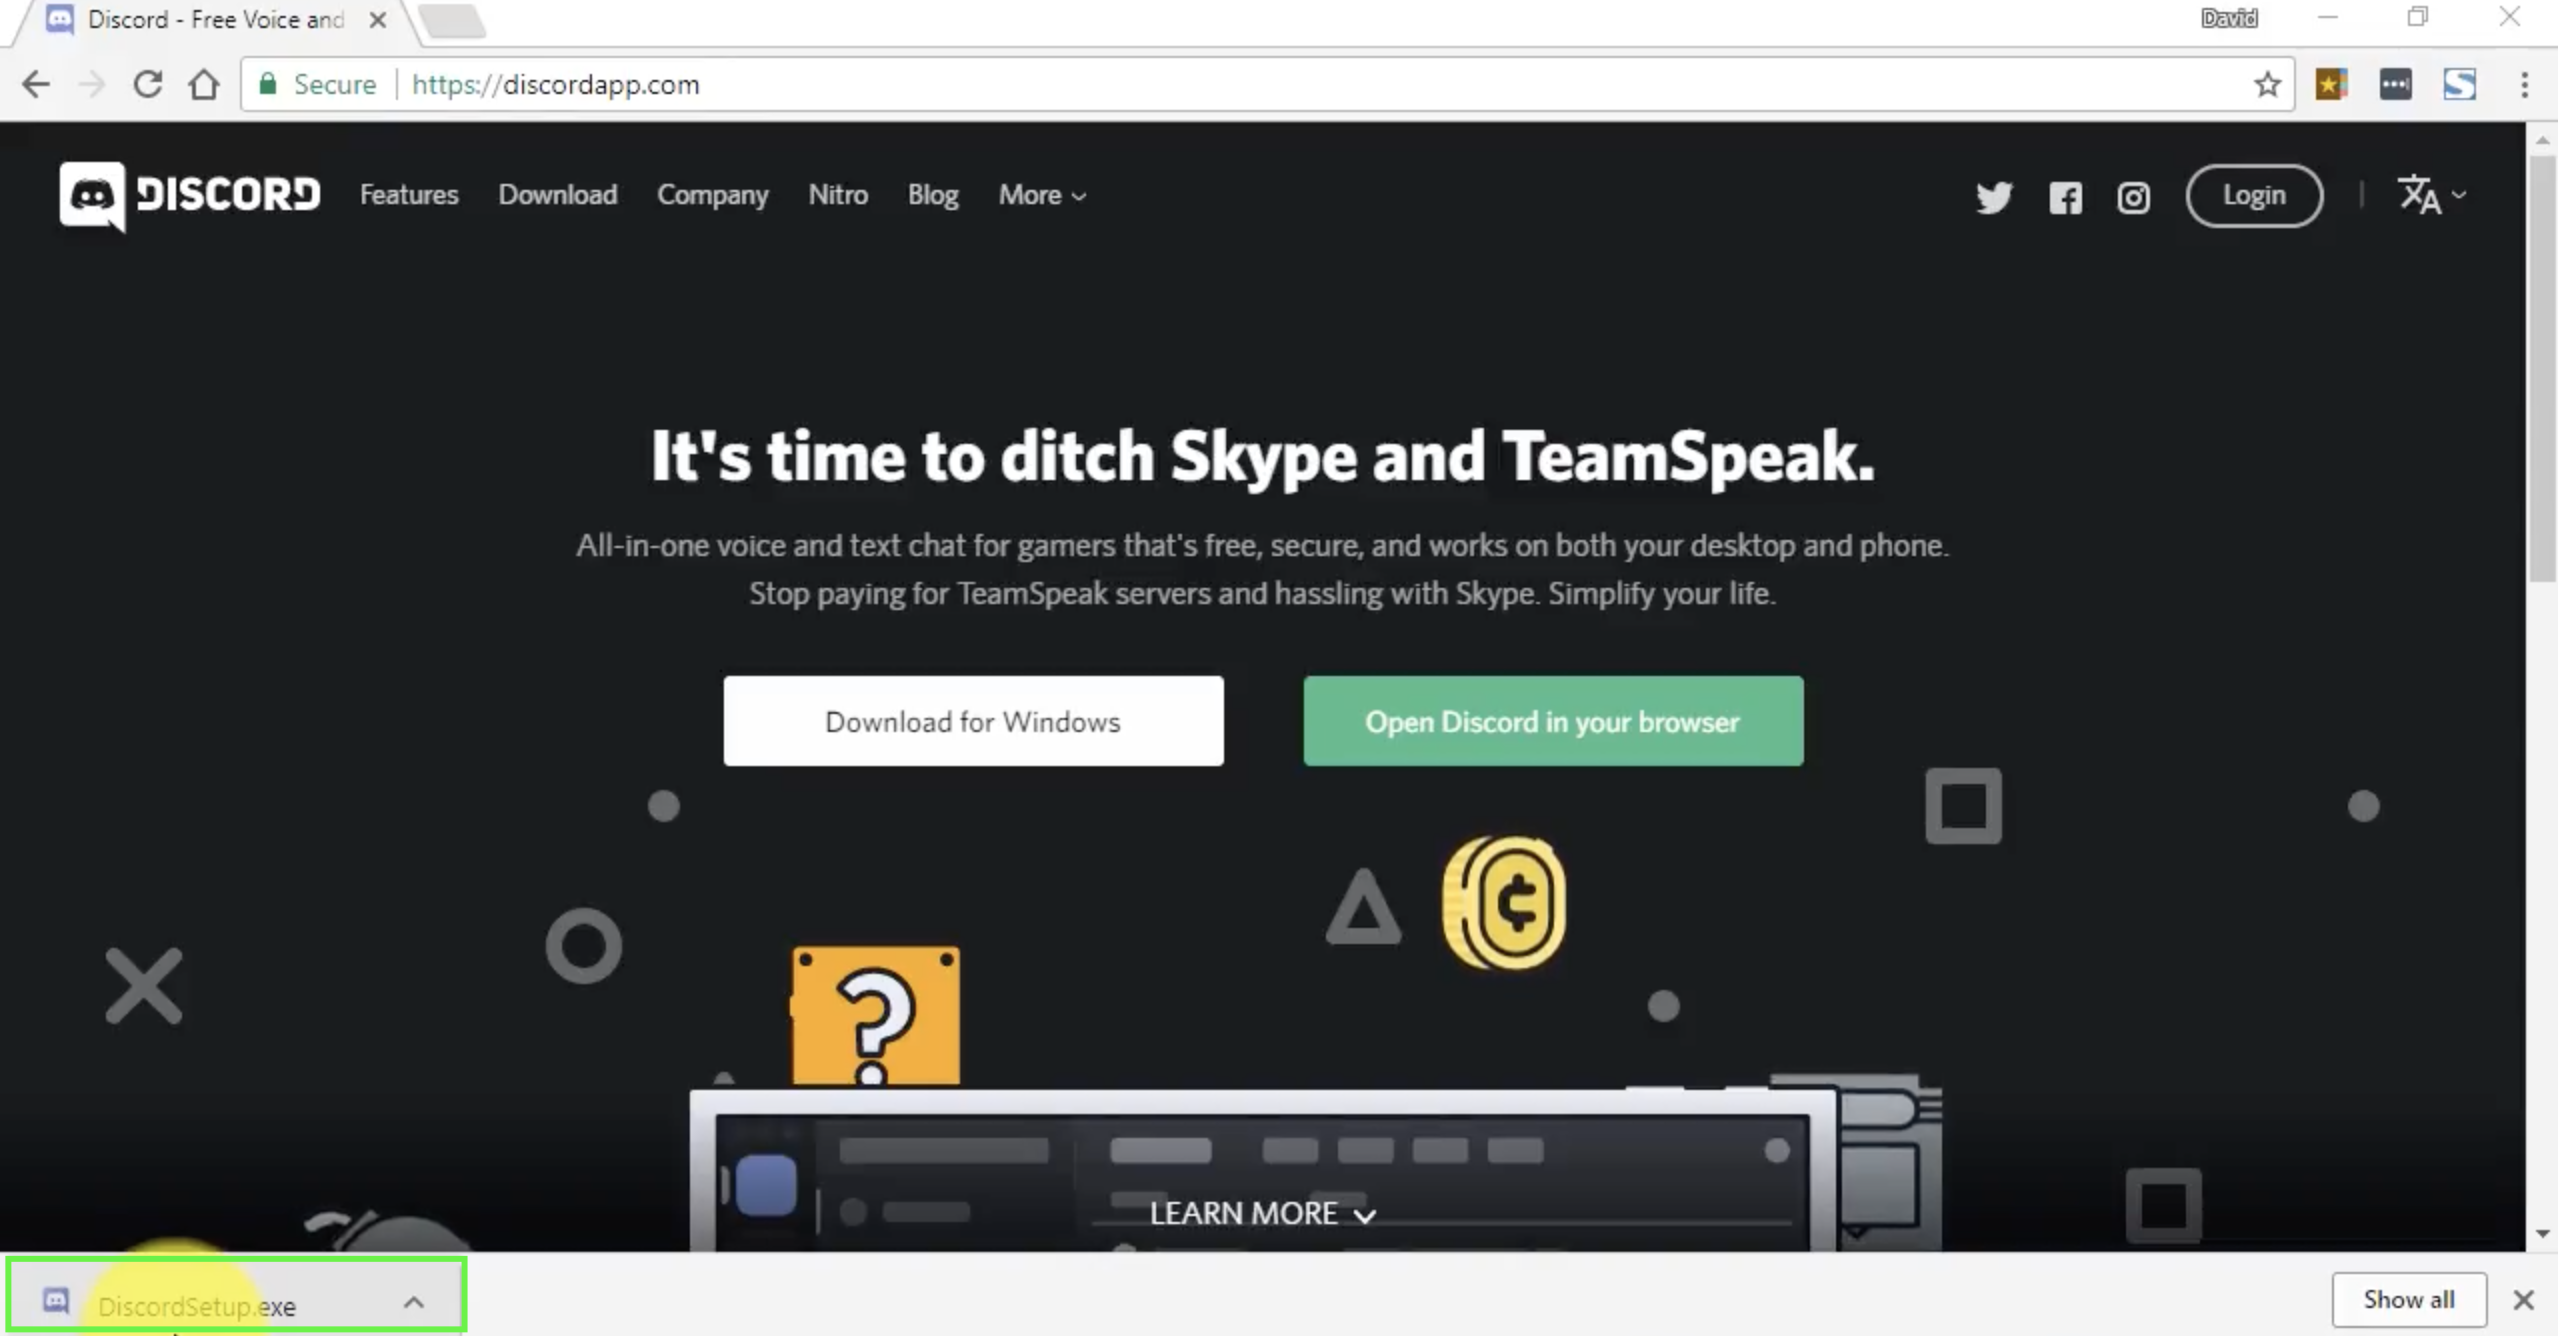
Pro Discord guide The PRO Discord channel is a good tool for all players as well as staff. It allows us to give players information quickly and keep them up to date on disruptions such as maintenance work. There are also a lot of useful tools on the server for players. This guide is to show you how to set up a Discord account, how to join the PRO server and what is available on that server for members. The Discord I have used is the Discord app for windows PC. Downloading Discord and the layout of Discord is different between the PC version and the android version but setting up a Discord account, the pro Discord server and bot commands are the same for both PC and android. To download Discord onto an android device just go into play store, search Discord and download. Index [goto=1]1. Setting up a Discord account[/goto] [goto=2]2. Screen layout[/goto] [goto=3]3. Assigning yourself a server[/goto] [goto=4]4. Discord channel[/goto] [goto=5]5. Events and tournaments[/goto] [goto=6]6. Information[/goto] [goto=7]7. Player zone[/goto] [goto=8]8. Trade[/goto] [goto=9]9. Voice chat[/goto] [goto=10]10. Bot commands[/goto] [anchor=1]1. Setting up a Discord account[/anchor] Go to https://Discordapp.com/ and the screen will look like the image below. Click on the download for windows button, inside the red circle in the picture above and it’ll give you the option to dowload the Discordsetup.exe file shown in the picture below. You select save file and it’ll begin downloading the setup file for Discord. Run the program and follow the instructions in it to download Discord onto your computer. Once Discord is set up and you run the program it will come up with the page in the picture below. You will need to click on the circled register button to create an account. Once that is done you will need to type in your email address and create a username and password before clicking continue as shown below. You will be logged in once that is done and appear at the page in the picture below, you will also need to go into your email account you used and click on the verification link in the email, this step is important as you will not be able to join a server until it is done. Click on join a server and your screen should look like the picture below. You will need to input a instant invite code for the server you wish to join. The invite code for PRO Discord server is: https://discord.gg/TcAdcPx enter it into the box like below and select join. Once you’ve done that you’ll appear on the PRO Discord page in the server rules section. Please read all the rules carefully as they will be enforced by the staff. You will also see a countdown at the bottom of the page, circled in the picture below, this is the amount of time you need to be a member on the server before you can post anything so use that time to read the rules. On the right is a list of the people currently on the server and on the left is a list of the different channels on the server. [anchor=2]2. Screen layout[/anchor] Mute – The button circled in the picture below will mute the channel you are on. It will stop all unread indicators and notifications unless you are specifically tagged. Pinned messages – The button circled in the picture below will open up the pinned message for that channel. These are messages that have been saved so that members can find them easily at a later date. Pinned message often contain either important or helpful information for members. Each channel has different messages pinned and some have no messages pinned at all. It’s recommended that you go through all the channels and read the pinned messages in each. Members list – The button, circled in the picture below, will show/hide the members list side bar Mentions – The circled button in the picture below will show you all posts that you have been tagged in. Help – The help button, circled in the picture below, will open up the help menu. Mute/deafen – These buttons, circled below, are for voice chats. The mute will make it so that everyone else in the chat cannot hear you while deafen make it so that you cannot hear them. Settings – The setting button, circled below, will open up the settings options for you Discord account. [anchor=3]3. Assigning yourself a server[/anchor] The first thing you want to do is to read the server rules page. The top of the server rules page will look like the picture below. Once you read all the rules you want to follow the directions in the red circle in the picture above and connect yourself to the server/s you play on. Scroll down the left hand side until you get to player zone: bot commands, circled yellow. You will need to type into the chat box “?rank your server” as shown in the red circle in the picture below. As you can see, in the yellow circle below, your name will be white before assigning yourself a server to show that you’re not connected to any server. As you can see in the red circle in the picture below, it will come up with a message to tell you that you’ve joined a server. In the yellow circle you will see that the colour of your name has changed. [anchor=4]4. Discord channels[/anchor] There are five sections in the Discord server for general members: events and tournaments, information, player zone, trade and voice chat. All sections are shown in the red circle in the picture below. Each section can be opened and closed also if you have an unread message on one of the channels it is highlighted white as shown in the picture below in the red circle. [anchor=5]5. Events and tournaments[/anchor] The four channels in the events and tournaments section are: Ladder tournament Player hosted events Guess the pokemon event Pokemon trivia event Ladder tournament – this is where the replays for the pro pvp ladder tournaments are posted. The top pvp players on each server at the end of each season are given the option of entering and you can find a link to the table and see how they battled each other in the replays. Player hosted events – this channel is for advertising player hosted events and giveaways. Only staff and Discord mods can post in this section and any requests to post an event needs to be made to one of them. Most of them will be on a specific server and when it is it will be labelled clearly that it is for that server only. Guess the pokemon – This channel was specifically for a guess the pokemon game held on the 24/12/17. Pokemon trivia event – The channel was specifically for a pokemon trivia contest held on the 25/12/17. [anchor=6]6. Information[/anchor] This is probably the most important area on the Discord server and is an area you should always keep an eye on. In the information section is: Announcements Server rules Pro useful links Guilds Announcements – This is where staff keep you up to date on events that are happening behind the scenes. If the servers crash, it is here that they will let you know when they are back up. Maintenance work will be announced in this section as well as events, recruitment and a whole range of other things. Anything pro or Discord related that the staff feel members need to know will be put here and if it’s important they will tag members as well. Server rules – This is where the server rules are. Please read them all as ignorance of the rules is not a valid defence for breaking them. By being on the server you agree to follow these rules so you do need to know them. This is the channel you appear in when you first join the server so you cannot say you didn’t know they were there. Pro useful links – This is the second most useful channel on the server in my opinion. It has a lot of links to different areas on the forum including a lot of guides. It is an excellent resource for any player and even experienced players use them. Story quest guides; game mechanics like repel trick, dig spots, ev and iv explanation thread; game data guides like tm locations and move tutors; and loads more. Guilds – This channel is a list of guild active in game. It has the name of guilds from all three servers and links to their recruitment pages on the forum. If you have a guild and want you guild listed, you need to create a recruitment page and then follow the instructions at the top of the guild channel. [anchor=7]7. Player zone[/anchor] Player zone is the main chat area of the Discord. It is where most players spend their time on the server. Player zone has 7 channels in it: General Support Bot commands Pvp showdown Art Mapping Video streams General – This is the general chatting area on the Discord. You can talk about anything you want here with the other members as long as you stay within the server rules. Support – This is like help chat in game. If you have a problem or game related query post it here and someone will come along and help you. This channel has the same rule as help chat, keep things help related. Bot commands – this is by far the most useful channel on the server for members in my opinion. This is the area where you will type all the bot commands. Dyno bot, reborn bot and all the others. They can all be found and used in this channel. Please see the end of this guide for an abridged list of the bot commands available in the server. Pvp showdown – this channel is for all pvp talk. Talk about teams, moves or tiers, it all goes here. You can also post replays of your battles for others to watch. It’s not just for showdown, video of pro battles can be placed here as well. Art – as the name suggests this channel is for art or art related topics. Show off you work on this channel and advertise art services such as forum signature shop (leave 24 hours between each advertisement). There are some rules to this channel such as no NSFW art and not uploading other people’s art as your own. If you’re going to upload other peoples art make sure you have their permission and that you credit them for it. Mapping – a place to show off you mapping skills. Create your own maps and put them here for scrutiny. Look at the work of the other members as well. There is a mapping program in the pinned messages for you to use. The mapping team may even give you pointers from time to time if asked nicely. Video streams – This channel is used to post your pro videos as well as to advertise your live streams. [anchor=8]8. Trade[/anchor] Please not that you will not be able to write in the trade channel for a server you have not assigned yourself to. There are three channels in the trade section, one for each of the servers and you should only post in the channel for the server you wish to do the trade on. All three channels are the same; the only difference is the server they are for. In the trade section you can: Make a request to buy Put up pokemon & items to sell, please provide a screenshot of the pokemon when you post Advertise or request EV and levelling service advertise you shop on the forum Please note that pro trade rules apply to this channel. Do not spam requests or advertisements and leave at least 24 hours before reposting a previous trade shout. So if you’re selling a Dragonite and a Gyarados you can post both but you can only post each one once in any 24 hour period. [anchor=9]9. Voice chat[/anchor] There are four voice channels in the voice chats section and a text channel to accompany the voice chats. One of the chats is specifically for staff but members can use the other three. To be able to use voice chats you need to reach level 7 on the mee6 bot on the server. [anchor=10]10. Bot commands[/anchor] The two main areas on the server that you will use bot commands are in voice chat for the music bot and in bot commands for the rest. There are a lot of bot commands and some of them will only be available to moderators. Below I have listed the more common used bot commands for members. Dyno bot commands, all the commands in this section need to be prefaced with ? (example ?wiki): Reborn bot commands, all commands in this section need to be prefaced with ^ (example ^spawn route 1): Fredboat bot: This is the bot that is used to play music in the voice chats. All commands for this bot must be prefaced with ;; (example: ;;stop)
-
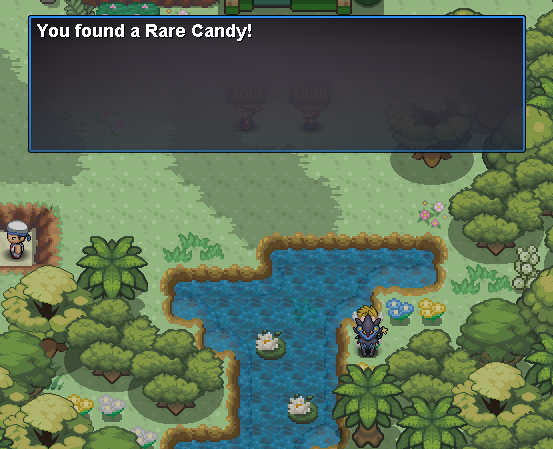
(Of Pokémon) Combat moves Return: Power = ⌊Happiness ÷ 2.5⌋ Frustration: Power = ⌊(255 - Happiness) ÷ 2.5⌋ The moves Return and Frustration are Happiness based - depending on the Happiness of a Pokémon, the power of the move changes. While Return gets stronger the happier your Pokémon is, Frustration gets stronger the unhappier your Pokémon is. Using above formulars concludes: - The max Power for both is 102 - If the result is a integer number (2.9, 1.02) the result is rounded down to an non integer (2, 1) - If the user's Happiness is 128 or more, Return is stronger than Frustration. - If the user's Happiness is 127 or less, Frustration is stronger than Return. Exception: The minimum Base Power is 1 Methods affected by Soothe Bell: ♥ Walking. When you walk your Pokémon at the first spot—and only the first spot of your team order—your Pokémon will gain 1(2) happiness points each 216 steps. (This doesn't apply to land mounts, but does to water mounts). ♥ Winning fights. When you win a fight against a Pokémon, regardless of battle type, all participated Pokémon in your team will gain 1(2) happiness. (Only works for Pokémon still alive at the end of battle). ♥ Level ups. When your Pokémon get´s a level up, no matter how, it will gain 5(10) happiness. Methods not affected bySoothe Bell: ♥ Vitamins. Protein, Iron, Calcium, Zinc, Carbos, and HP ups will boost the happiness by 2 points. PP ups, PP Max and Rare Candy will boost the happiness stat by 0, but you will get the level up happiness boost from using a Rare Candy. ♥ EV Reducing berries. EV Berries will boost your happiness stat by 2 as long as you have 1 or more EVs in the according EV Stat. ♥ Trading. When you trade a Pokémon it´s happiness will be reset to 70, therefore, it is only possible to gain happiness with this method when the traded Pokémon happiness is under 70. Services: Chris in Goldenrod City Underground or in Slateport City open air marked: Friendly Drink (5) 1.500$ Friendly Meal (10) 2.500$ Friendly Combo (20) 5.000$ Colorful Shake (Depends on combination*) 2 times different 15 berries *Depending on the combination, the Colorful Shake can be much more effective but also a bit less effective than the Friendly Combo. Brad in Goldenrod City Underground or in Slateport City open air marked: Brushing (10) (Once a day*) 2.000$ Shampoo (20) (Once a day*) 3.000$ Smile Cut (30) (Once a day*) 4.000$ Beauty Cut (30) (Once a day*) 5.000$ Royal Cut (50) (Once a day*) 6.000$ *the cooldown resets every day at 0:00 GMT+0 ♥ Pokémon gets defeated. You will lose 5 happiness in this case. ♥ Trading. When you trade a Pokémon it´s happiness will be reset to 70, according to that it is only possible to lose happiness when the traded Pokémon happiness stat is above 70.
-
Sevii islands guide For this guide I will first go through the quest to unlock all the islands then I'll go through each island individually to show what you can do on each island. When travelling to the Sevii islands please be aware that when you first get to an island you will not be able to leave the island until you have completed the quest to unlock the next island. You also cannot go to any island right away. At first you can only go to island 1 and once the quest on that island is complete you'll unlock island 2, do the quest on island 2 to unlock island 3 and so forth. There are some high level trainers on the various islands but you should be able to manage them seeing as you will have needed to beat the Kanto E4 to be able to go to the islands. Index Requirements How to get to Sevii islands Island 1 Island 2 Island 3 Island 4 Island 5 Island 6 Island 7 Island 1 extra Island 2 extra Island 3 extra Island 4 extra Island 5 extra Island 6 extra Island 7 extra Requirements To access the Sevii islands you must: Have membership active. Be Kanto champion. A full team of level 70+ pokemon - this is not a requirement but it is recommended. How to get to Sevii islands To access Sevii islands you need to speak to the Sevii Island Transport NPC at Vermilion dock. When you speak to him he will ask you which island you would like to visit. If you select an island you have not unlocked he will tell you that that island is not available yet. Island 1 Island 2 Island 3 Island 4 Island 5 Island 6 Island 7 Island 1 extra Island 2 extra Island 3 extra Island 4 extra Island 5 extras Island 6 extra Island 7 extras That is it for the Sevii island guide. If you know of something that I may have missed then please feel free to reply to the thread and I will edit the guide to include it.
-
This guide will help you pass the E4 easily, it just recommend for all newbie. Good luck! -------------------------------------------------------------------------------------------------------------------------------------- Recommend (can use Kanto Pokemon) Gyarados LV90+ Adamant/Jolly Item: Leftover EV train: 252atk|252spd|6hp Move set: Ice Fang, Dragon Dance, Bounce, Aqua Tail (Bounce teach by move tutor at Lake of Rage by 4000$) Gengar LV 90+ Timid/Modest Item: Black Sludge EV train: 252spatk|252spd|6hp Move set: Thunderbolt, Shadow Ball, Dark Pulse, Psychic (Thunderbolt teach by tm buy at Vermillion City Gym by 3000$) (Psychic teach by tm buy at Saffron City Gym by 3000$) And also don't forget take some backup items Revive x7 (can replace by Revival Herb x 5 with cost more but revive 100% hp), Hyper potion x15 (can replace by Energy roots x15 at Goldenrod Basement with cheaper price), Leppa Berry x10 The more level of your pokemon team, the less buying for backup items Backup team (using for avoiding some unexpected event/tank role with saving slot for revive other pokemon - only using if your core team so poor or you worry about losing) Clefable LV 90+ Bold/Calm/Modest Item: Leftover EV train: 252hp|172def|84spd Move set: Moonblast, Soft-Boiled/Moonlight, Thunder Wave, Ice Beam (Thunder Wave teach by tm buy at Celadon Mart by 2000$) (Soft-Boiled teach by tm buy at Goldenrod Mart by 3000$) (Ice Beam teach by tm buy at Mahogany City Gym by 4000$) E4 Team • Will • Gengar lead with using Shadow Ball for Brozong and Gardevoir, and Dark Pulse for others. Sometimes, Mega Alakazam can outspeed your pokemon, so just give up Gengar for dying and then using Gyarados with Bounce or Clefable with Thunder Wave and then Moonblast for kill • Koga • Gyarados lead with using using Dragon Dance 5-6 times at the beginninng, and then using Bounce for Toxicroak and Mega Beedrill, and using Ice Fang for others. Alternatively, Gengar lead with using Thunderbolt for Skuntank and Mega Beedrill, and Psychic for others • Bruno • Gyarados lead with using using Dragon Dance 5-6 times at the beginninng, and then using Ice Fang/Aqua Tail for Mega Lucario, and using Bounce for others. Alternatively, Gengar lead with using Thunderbolt for Mega Lucario and Psychic for all team • Karen • Gengar lead with using using Thunderbolt for Weavile and Absol. After that, switch to Gyarados with using 5-6 times at the beginning of Spiritomb, and then using Aqua Tail for Mega Houndoom and Ice Fang for others • Lance • Gyarados lead with using 5-6 times at the beginning, and then using Aqua Tail for Charizard, Bounce/whatever moves for Gyarados, and then Ice Fang for others. Alternatively, Gengar lead with using Thunderbolt for Charizard and Gyarados, and Shadow Ball for others. Backup: except Charizard and Gyarados, you can use Ice Beam of Clefable for beat all team dragon Contributors: Windypuff (Creator); Letrix, Shaui
-
Recommend Gengar LV 80+ Timid/Modest Item: Black Sludge EV train: 252spatk|252spd|6hp Move set: Thunderbolt, Shadow Ball/Icy Wind, Psychic (Icy Wind teach by move tutor at Seafoam B4F by 5000$) (Thunderbolt teach by tm buy at Vermillion City Gym by 3000$) (Psychic teach by tm buy at Saffron City Gym by 3000$) Gyarados LV80+ Adamant/Jolly Item: Leftover EV train: 252atk|252spd|6hp Move set: Ice Fang, Dragon Dance, Cruch, Aqua Tail And also don't forget take some backup items Revive x7, Hyper potion x15, Leppa Berry x10 The more level of your pokemon team, the less buying for backup items E4 Team • Lorelei • Gengar lead with using Thunderbolt for beat all team • Bruno • Gengar lead with using Psychic for beat all team • Agatha • Gengar lead with using Thunderbolt for Crobat and Pyschic for all • Lance • Gengar lead with using Thunderbolt for Gyarados and Charizard, while Shadow ball/ Icy Wind for others. Also you can alternatively with Gyarados lead with using Cruch for Gyardos, Aqua tail for Charizard and Ice Fang for others • Blue/Gary • Gyarados lead with using Dragon Dance 2-3 times at the beginning and then using Cruch for Alakazam and Mega Blastoise, Aqua Tail for Arcanine, and then Ice Fang for others
-
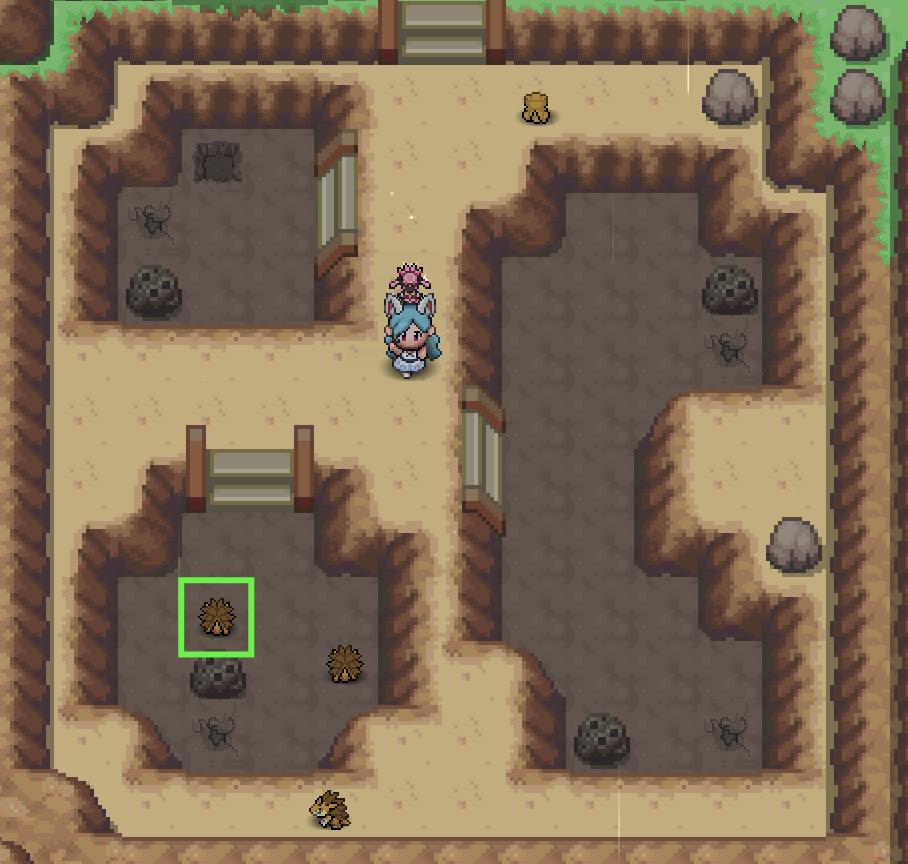
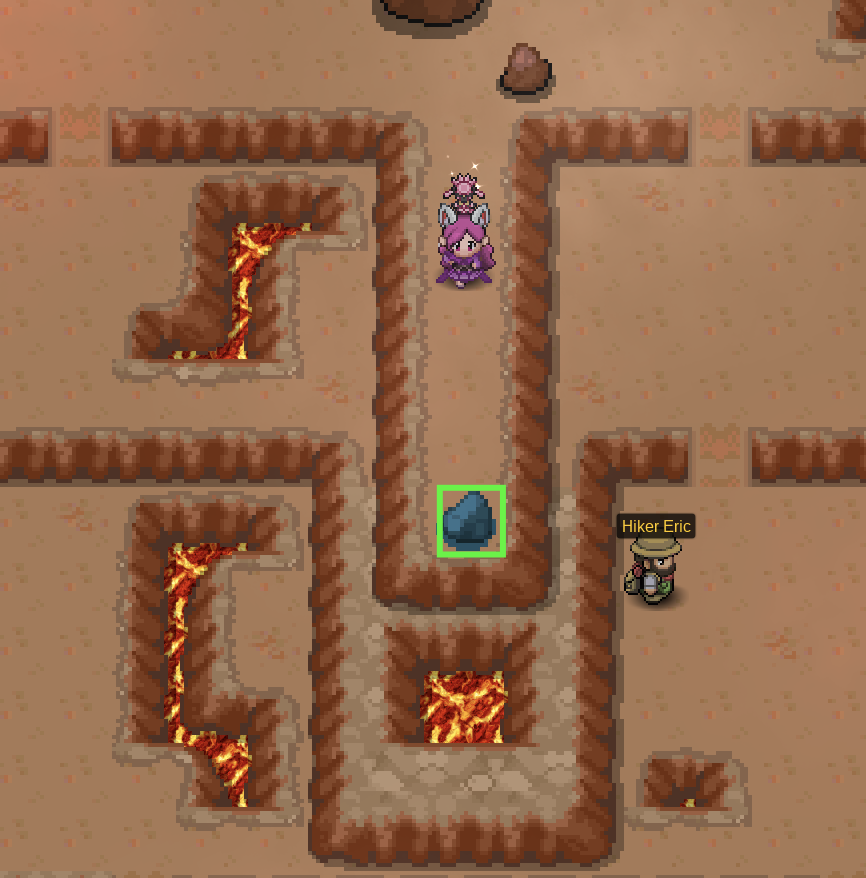
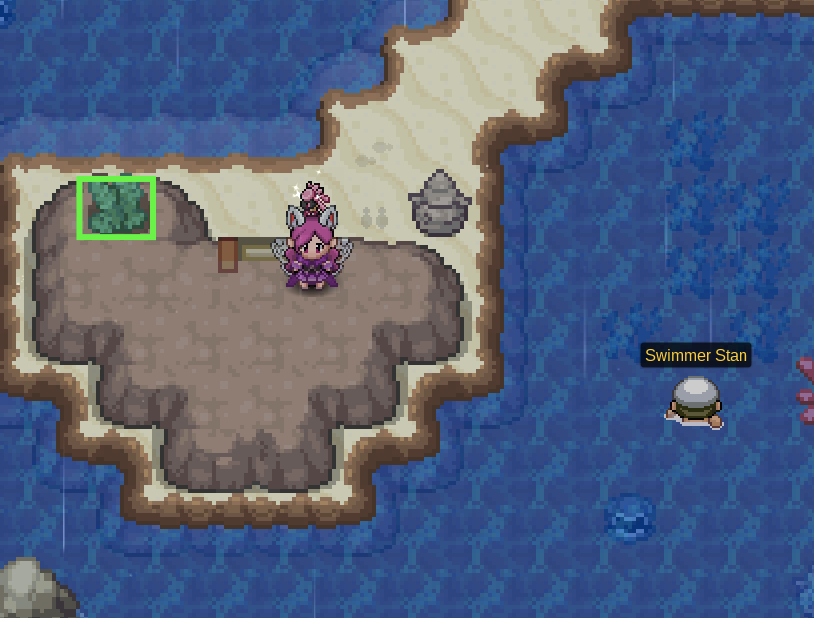
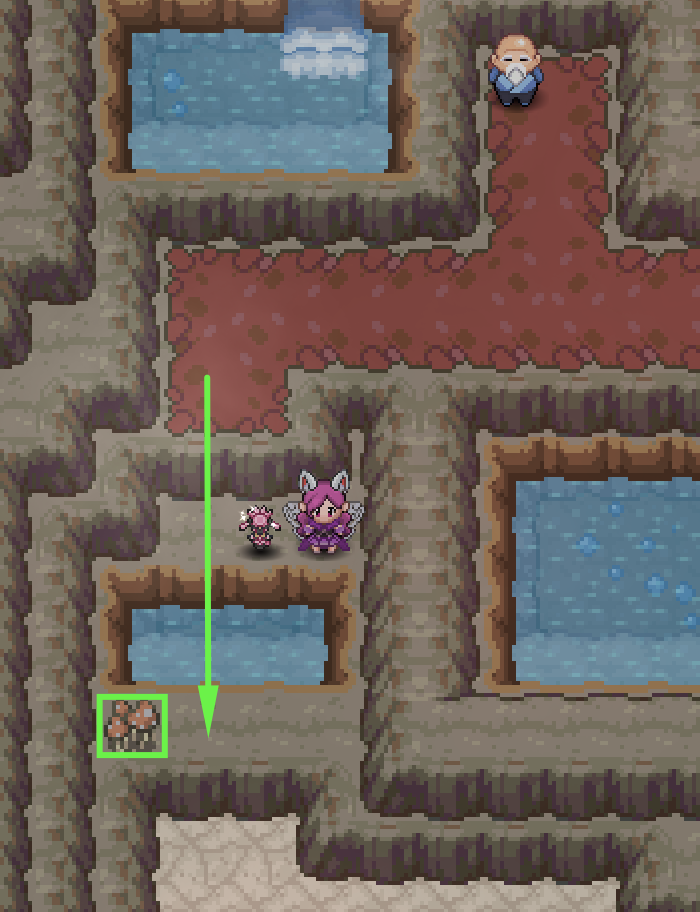
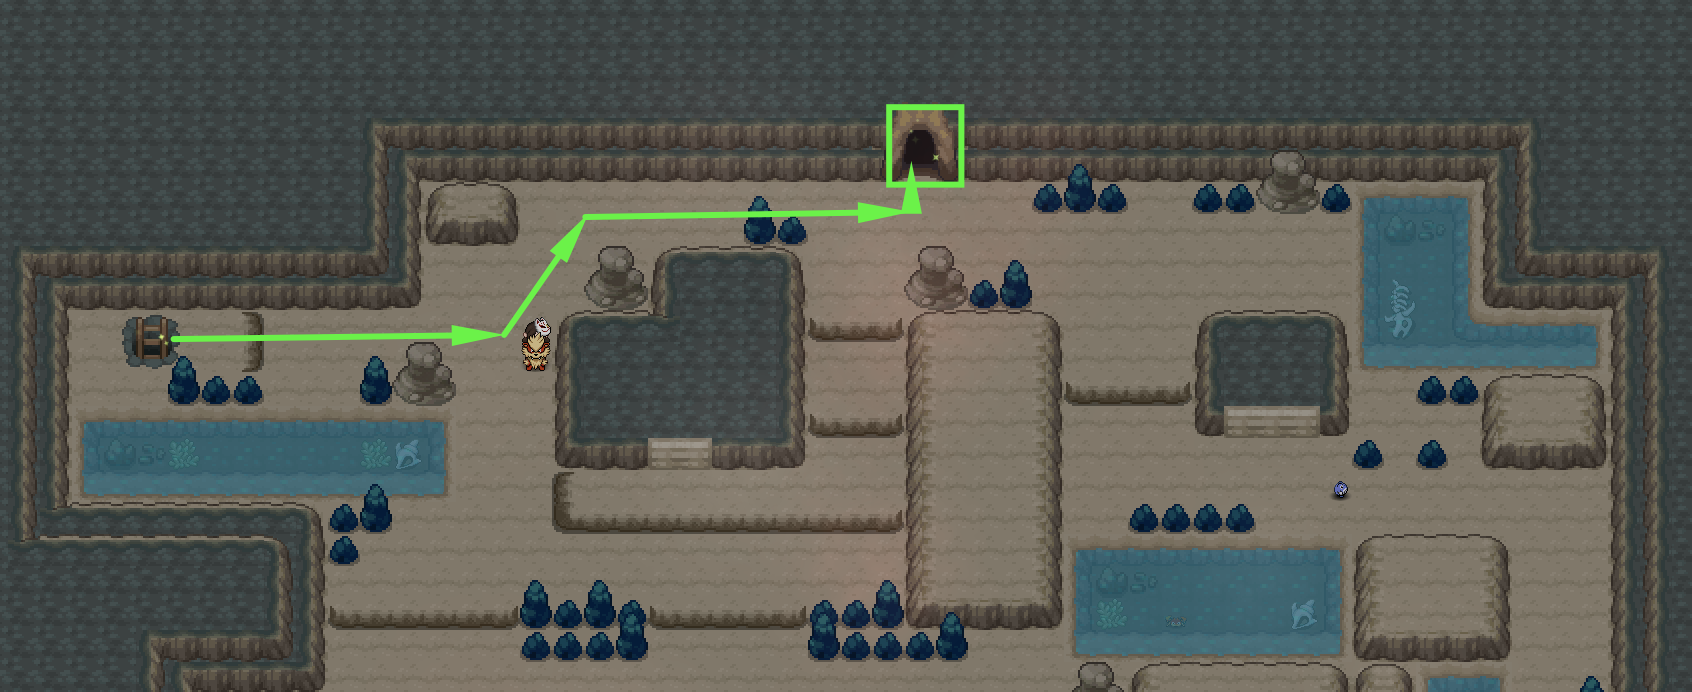
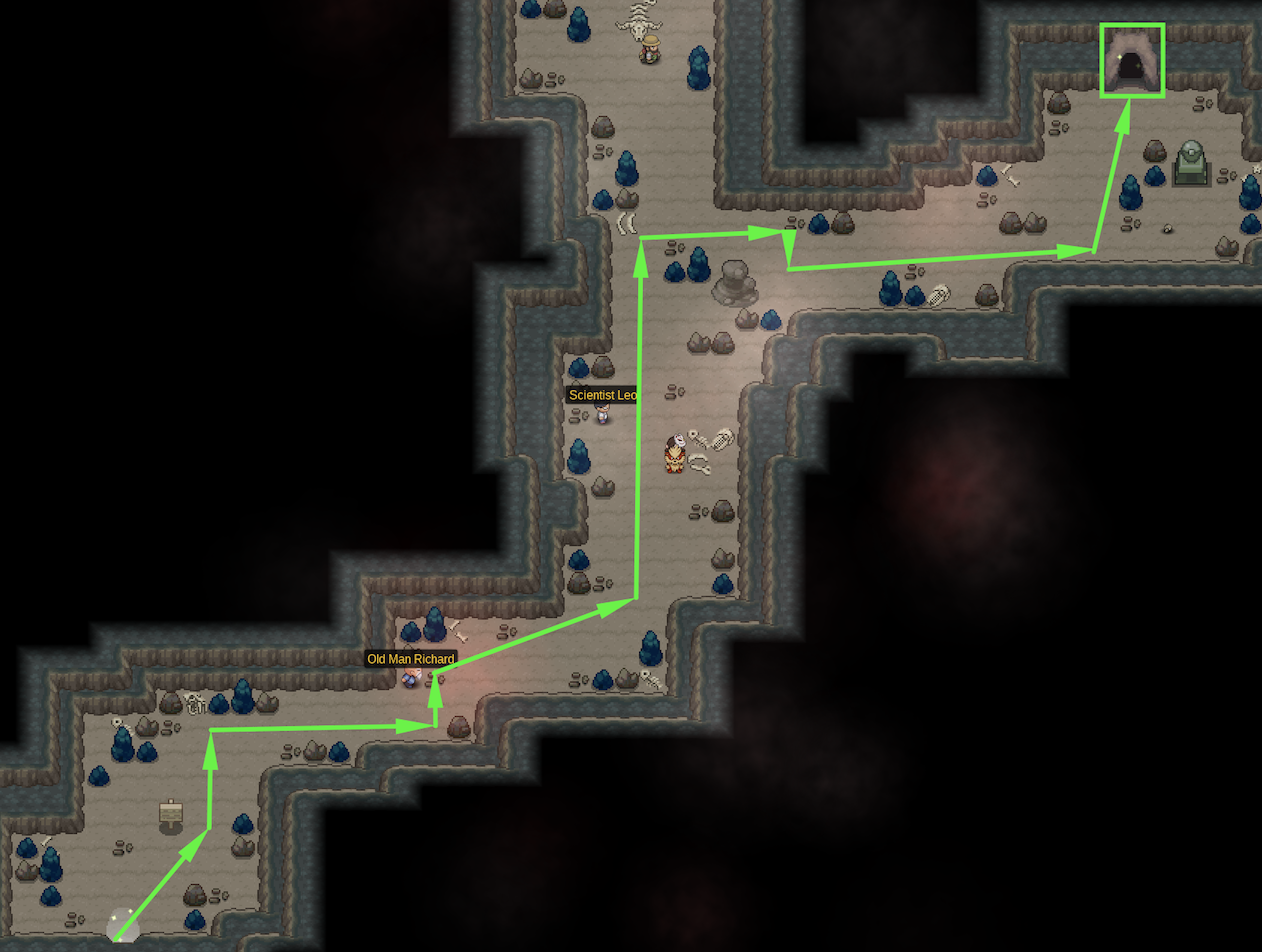
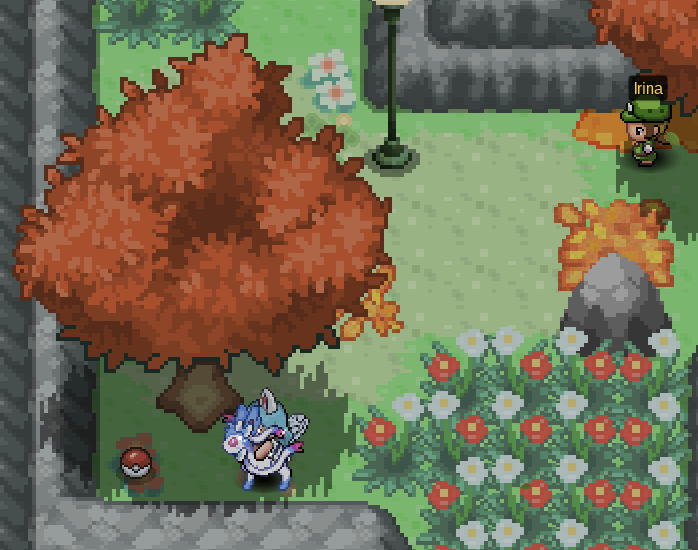
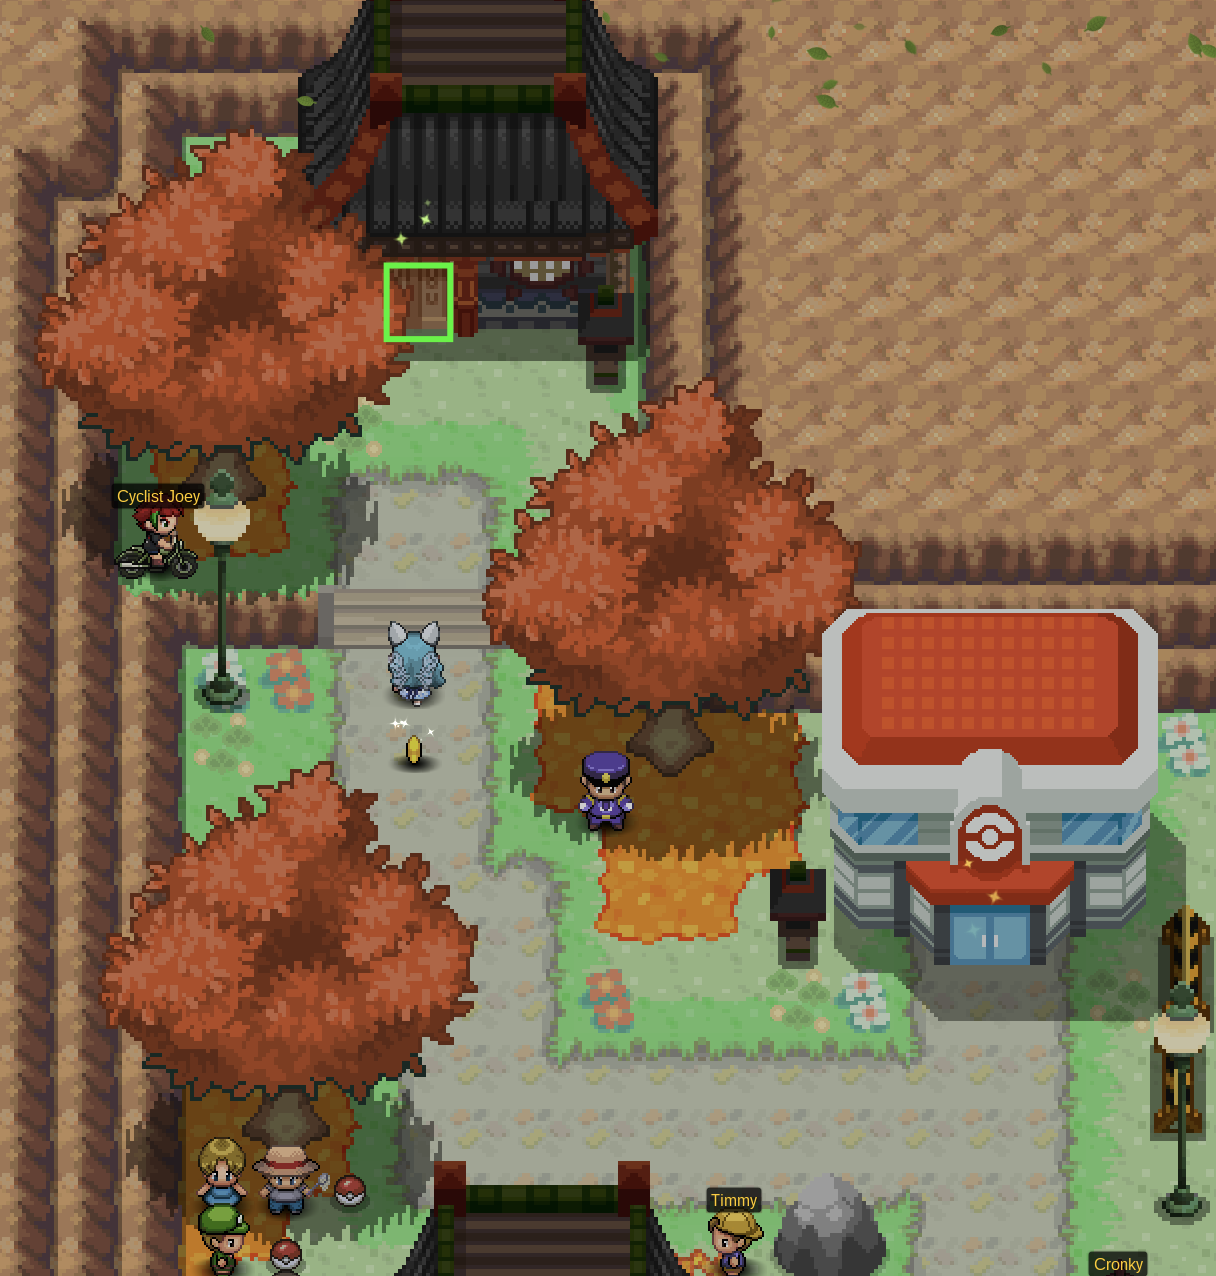
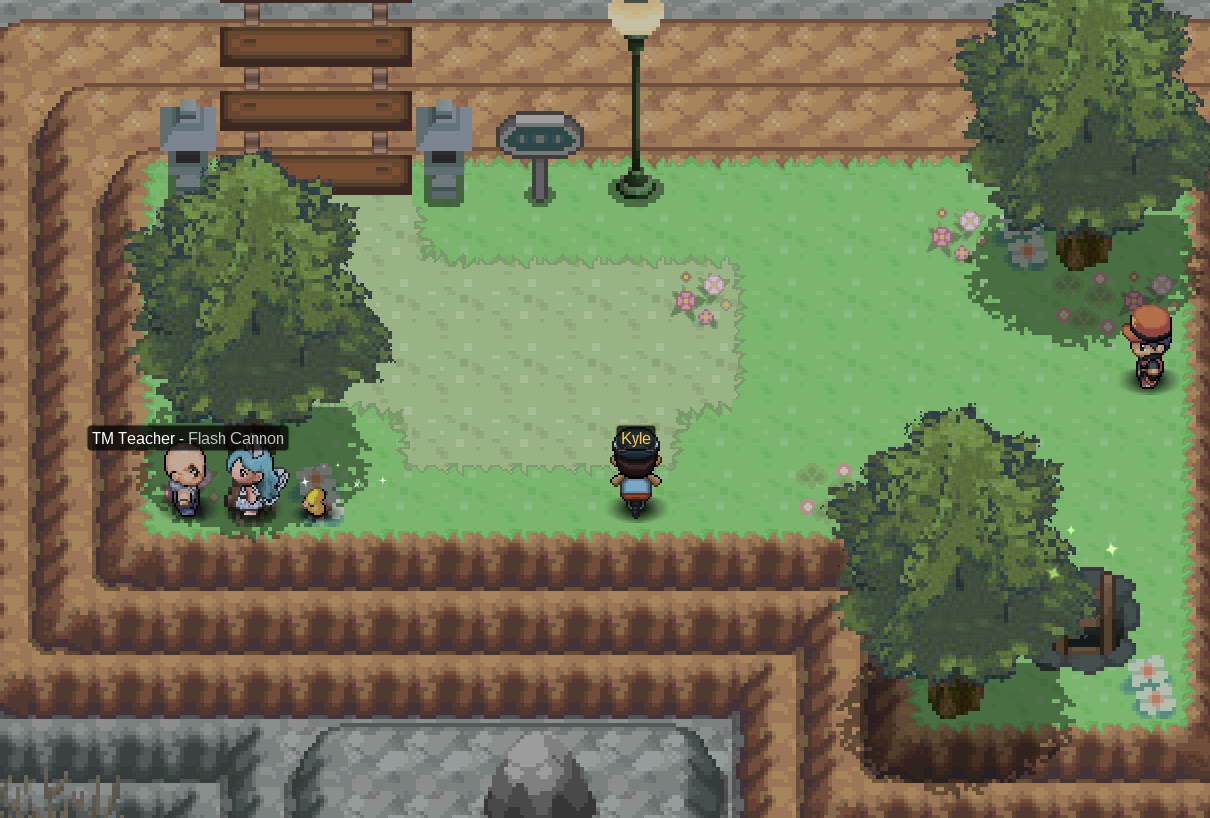
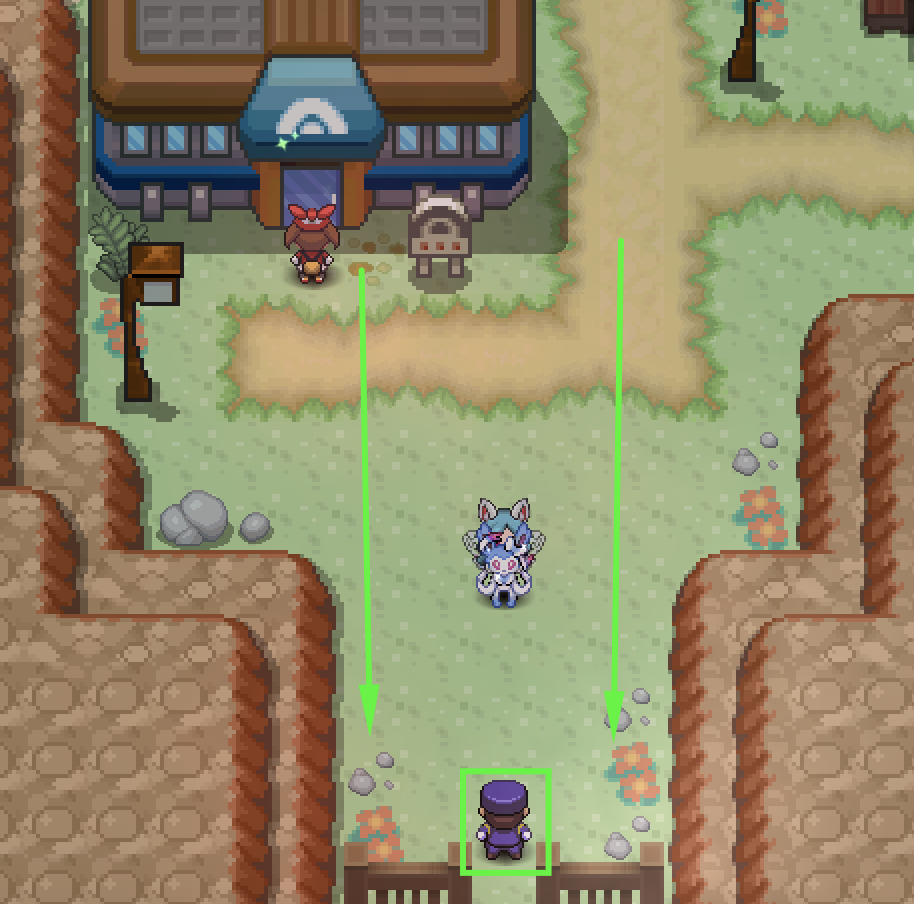
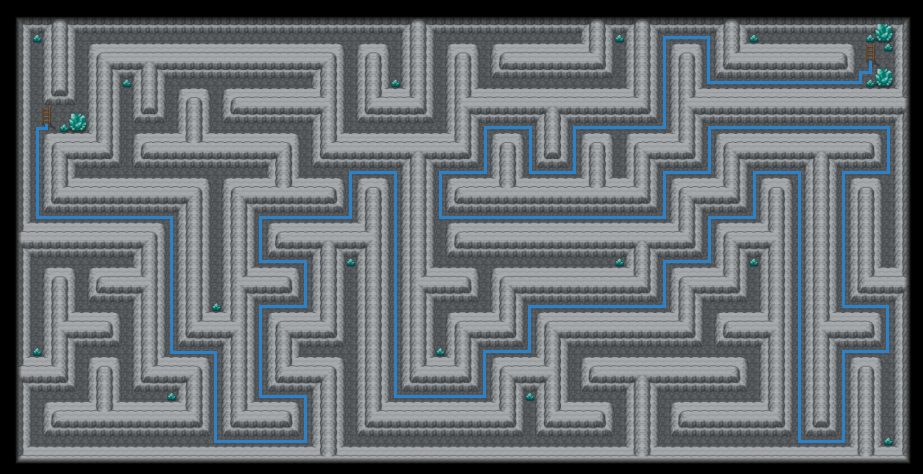
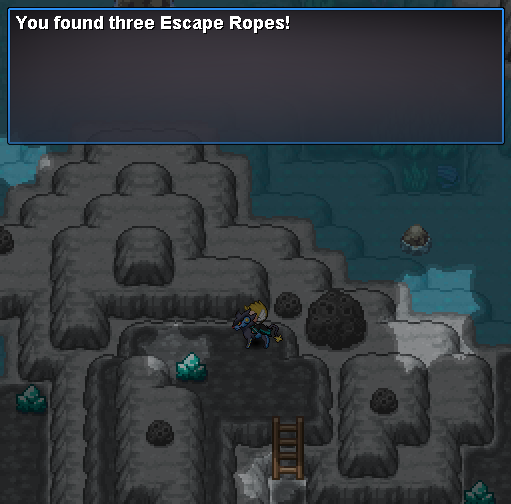
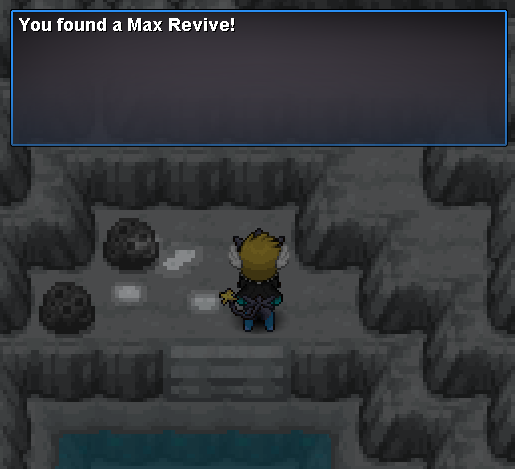
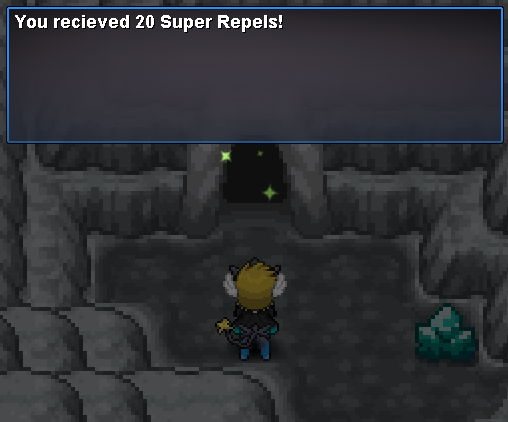
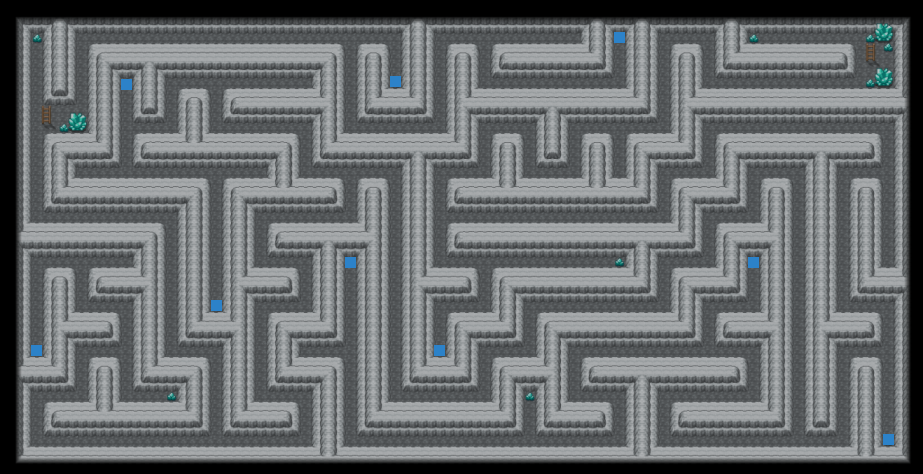
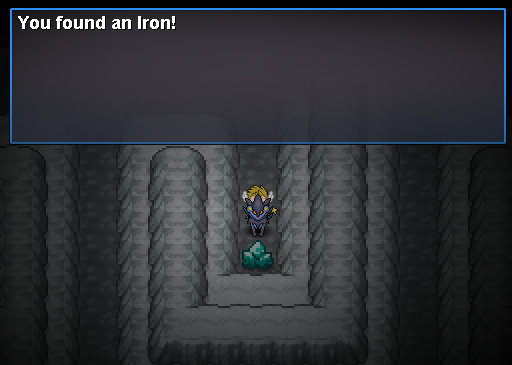
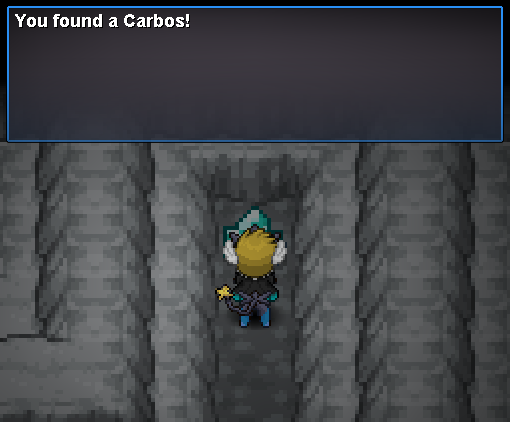
Hi as I see players asking about "Where is eevee", "How to find the key", "How to get out hideout" and so on many times. So I will write this guide. Hope it can help you guys. Thanks Talk with Sergeant Rick for starting quest and option 2 for accept. Then you go to Casino as rocket hideout Talk with Greg and you will be moved to underground, after that talk with him again, and pick up item in table After that go down and you will see elevator, select B2F. Prepare for battle with Jackson, he has 4 pokemon with lv from 23-27. Only the last Umbreon Lv27 is trouble. Using Poliwag with fighting move will beat it easy. And don't forget pick up hidden item - Iron in here. Now you will be prison and every time Team Rocket face to you, they will prison you again and again >_< really annoy... So be careful from now. For escape, you can talk with crate for jump out the room - watch out these two guard outside! The best way is waitting for these 2 guys go up and then u can jump out Follow the green arrows and you will be fine, just beware the guard girl on top and don't forget pick up Black Glasses item. Go upstairs for go back PC to heal or downstairs for continue Now you will in B2F, go right ahead. Watch out this guard! You will see the Maze now. Pickup 3 Max Ether and 1 Pokeball in this map, having battle with team rocket in here too. Follow the green arrow for continue and red arrow for exist Now, you are in the place before prison, go upstairs and fight with 3 NPCs for exp. This floors also have hidden item - 2 super potions and 1 hyper potion Now go downstairs and go back the maze by follow red arrow to the downstairs B3F(as below picture) In B3F, before go down for battle girl NPC and then prepare for Greg battle. I recommend you find some exp before, so let skip it now and go left. You will see the small maze now o_0 Battle with team rocket and pick up TM07 - HornDrill. Go downstairs to B4F and continue battle NPCs for exp. In B4F you will also find Card Key and hidden item - 2 Revives in trash bin After clear this floor go back in upstairs and now you can have battle with Greg. His team order: You almost done now. Go heal and then go to Big Maze at the previous in B2F and then go into elevator , select B4F. Fight with 2 NPCs left in there and then go to find hidden gate. Prepare for fighting with Giovanni around lv 30-35, he is not a joke! His team order is: Be carefull with Persian for Power Gem move. A easy way to win this battle would be by: Using water pokemon level 40+ as One backup pokemon lv35+ that have dig as Make sure pick up item in table after you beat Giovanni. After you defeated Giovanni you automaticly have the password for the machines standing in the team rocket base, eevee is in 1 of them (machine around the basement not only in the room). Here is location of them: After you received Eevee go back to Sergeant Rick for completed quest (and you now cannot get back to hideout anymore). Contributors: Windypuff(Creator); Letrix; Shaui
-
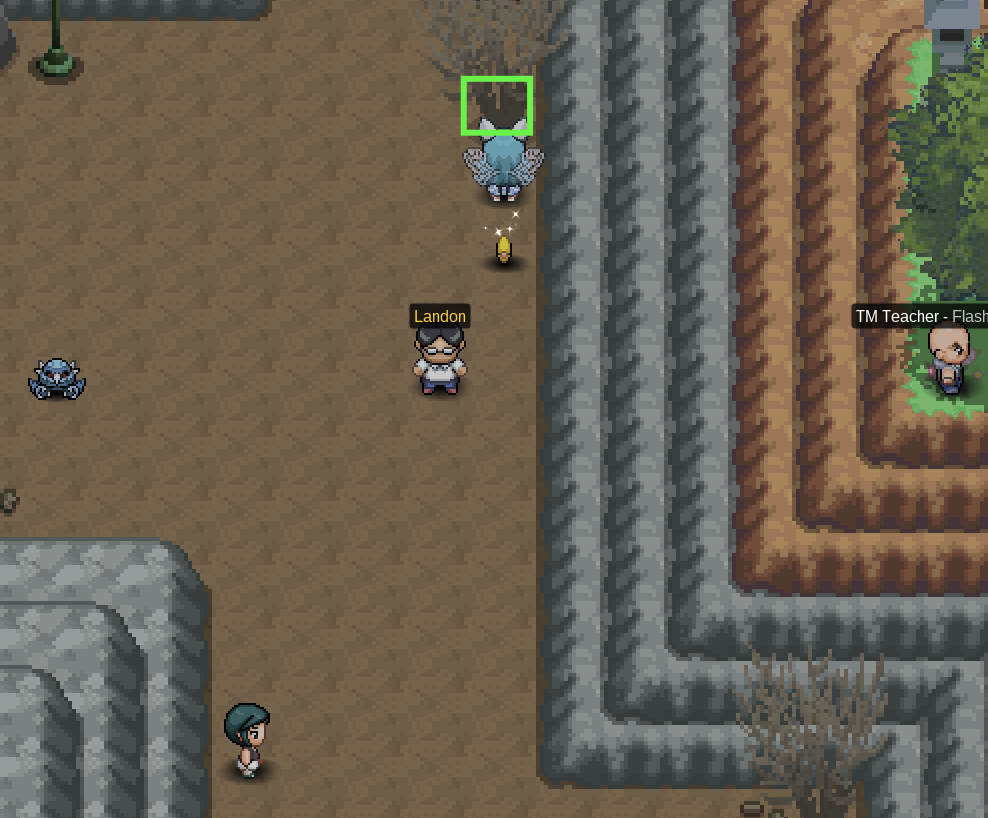
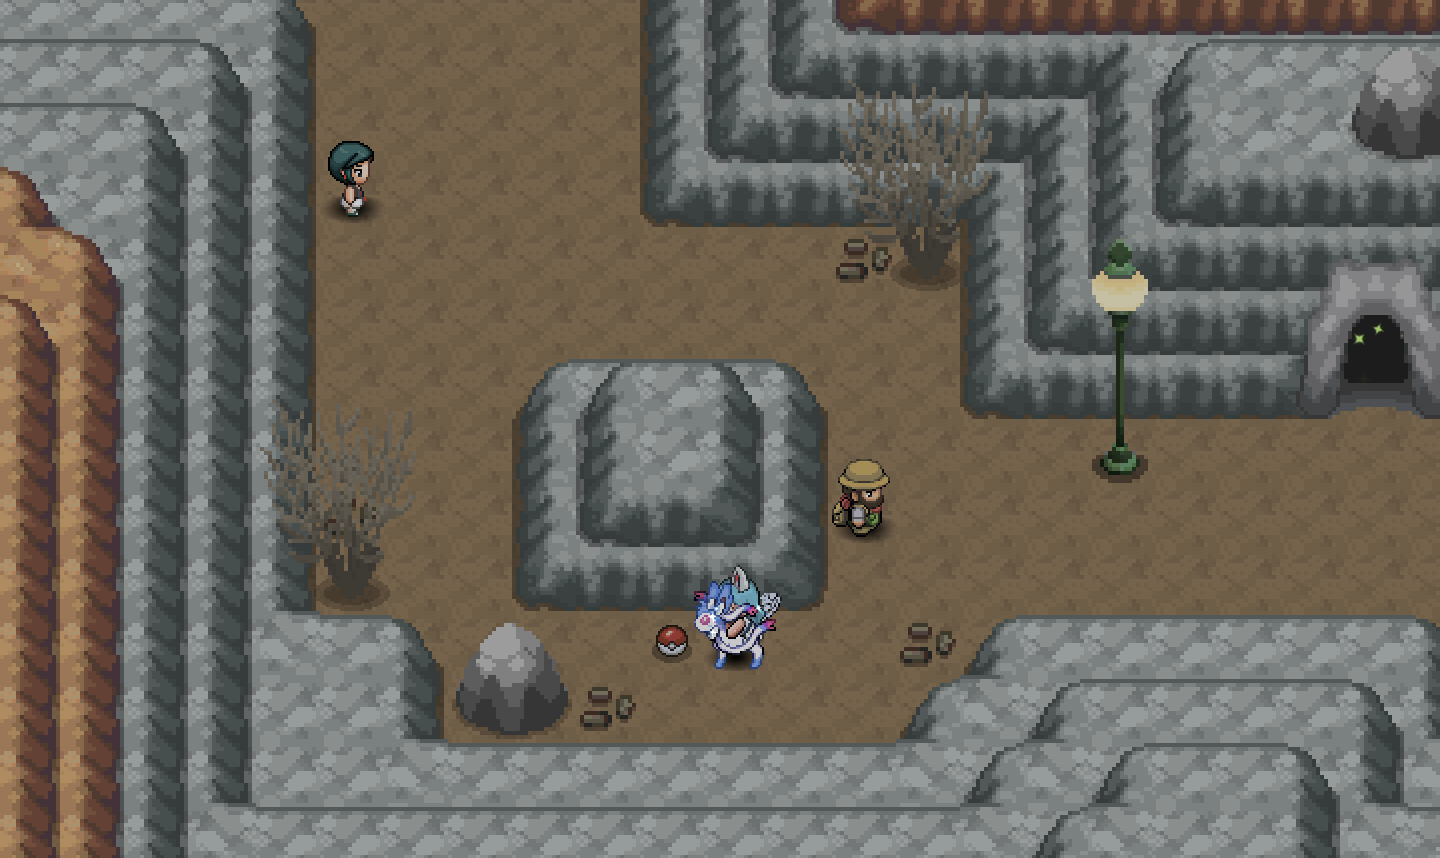
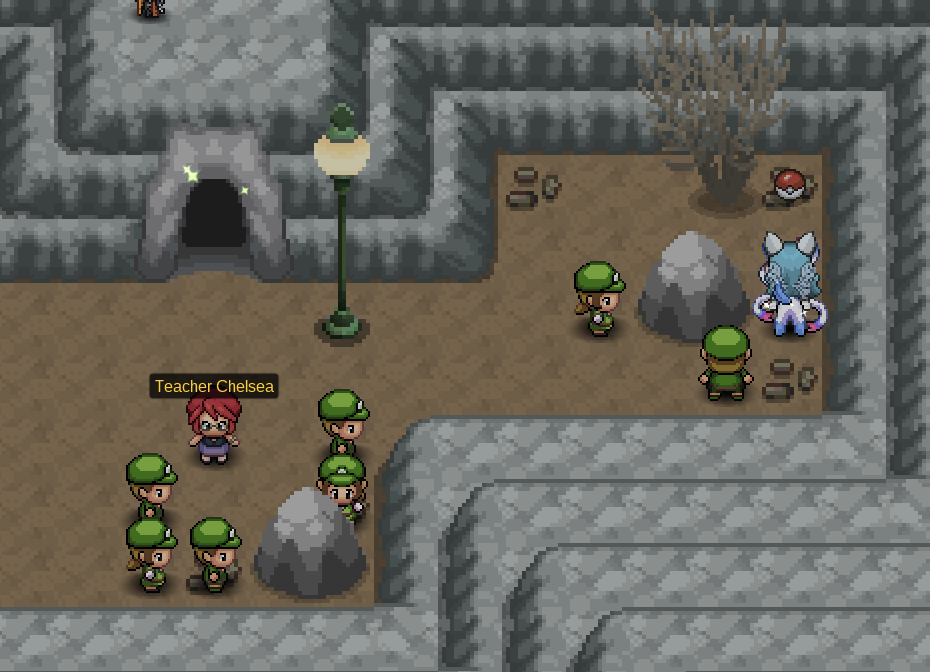
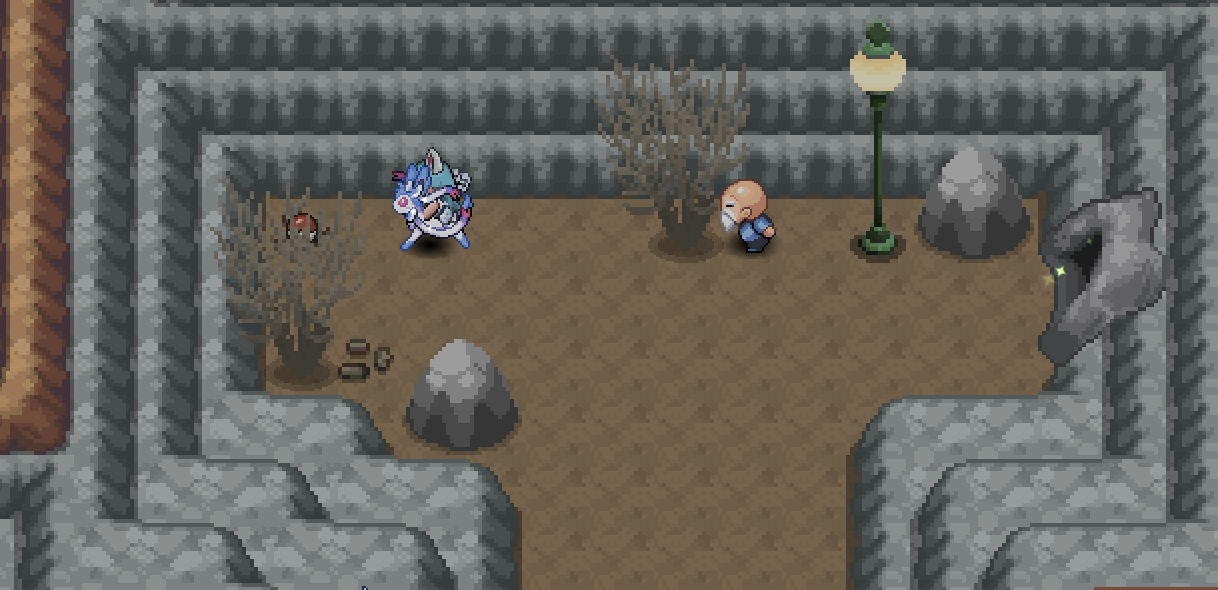
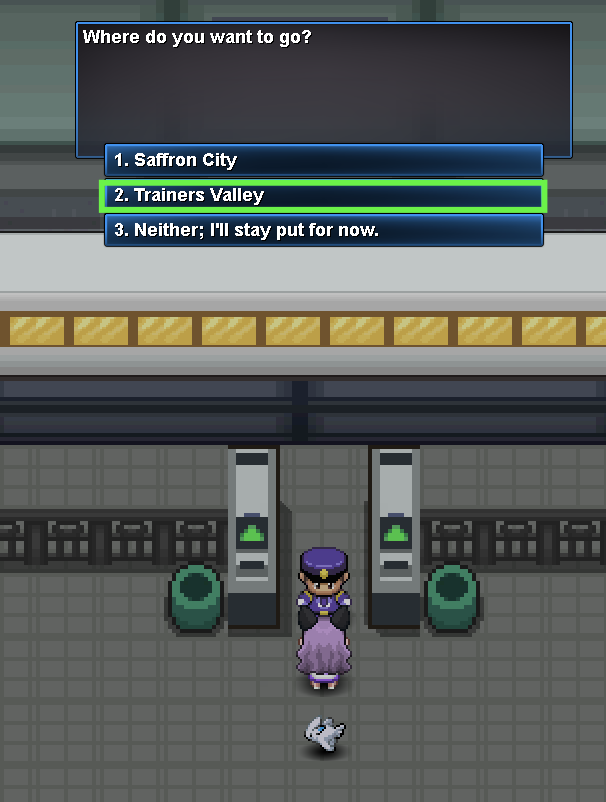
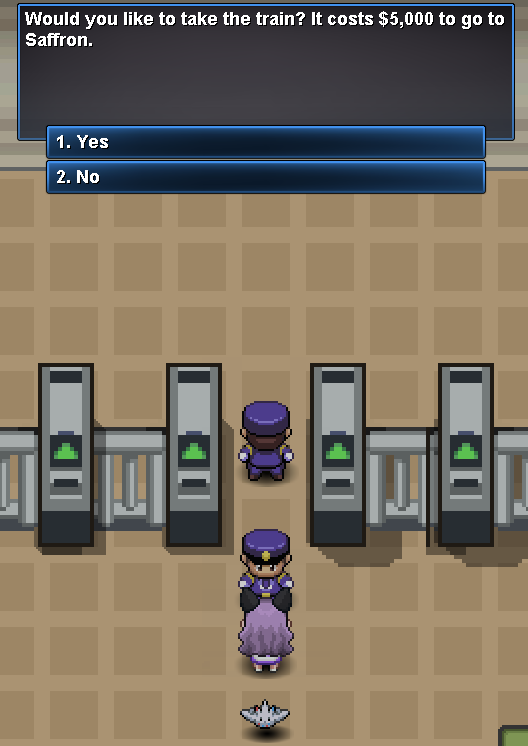
⋯⋯⋯⋯⋯⋯⋯⋯⋯⋯⋯⋯⋯⋯⋯⋯⋯⋯⋯⋯⋯⋯⋯⋯⋯⋯⋯⋯⋯⋯⋯⋯⋯⋯⋯⋯⋯⋯⋯⋯⋯⋯⋯⋯⋯⋯⋯⋯⋯⋯⋯⋯⋯ Hey everyone! This guide is to help players unlock the Subway System, as it is PRO's alternative to quick travelling due to the fact that players are not allowed to use Fly outside of battle. The subway system works for Kanto and Johto only; if you wish to unlock fast travelling for Hoenn and Sinnoh, do the Hoenn Teleport Quest. There aren't any requirements to start the quest, however, you'll need to be Kanto Champion in order to use the subway and train. Keep in mind that to fully complete the quest, you'll need $50,000 Pokedollars, a Nocturnal Feather, and a Bicycle to access Route 16. ⋯⋯⋯⋯⋯⋯⋯⋯⋯⋯⋯⋯⋯⋯⋯⋯⋯⋯⋯⋯⋯⋯⋯⋯ To start the quest, talk to the Subway Manager in Saffron City at the Saffron Railway Station. He'll tell you that the system is not working at the moment because their biggest sponsor, Yorkie, has issues with his farm and needs help on Route 16. Upon learning that Yorkie needs help, head to Route 16 and talk to him. He'll ask you to find his brother to retrieve the parcel. Although Yorkie has no idea where his brother is, he lets you know that he can only be in Kanto. There are five spots that Yorkie's brother can be at, and every player has a chance of Yorkie's brother being in one of these locations, so be sure to check them all! After finding Yorkie's brother, he'll ask you for $50,000 Pokedollars in return for the parcel. After that, head back to Route 16 to talk to Yorkie and give him the parcel back. He'll want to reward you but first, he'll ask you to retrieve a Nocturnal Feather to prove how much you love Pidgeys! To obtain a Nocturnal Feather, you can either buy it from other players in Trade Chat, or you can hunt it yourself by using a Pokemon that knows Covet or Thief and using one of those moves on Pidgeotto in Route 16 during the morning or night. More information about hunting them can be found in the Hunting Nocturnal Feather part of this guide. After retrieving a Nocturnal Feather, talk to Yorkie again and give it to him! As a reward, you'll receive HM Fly, and the subway system will start working again. After talking to the Subway Manager in Saffron Railway Station again, all the guards blocking access to the subway will leave, but keep in mind that you will need to be Kanto Champion in order to use them. Well, that's it! Great job on completing the quest. You can now use the subway system! It'll be $2,500 for traveling within the same region, and $5,000 for traveling between Kanto and Johto. ⋯⋯⋯⋯⋯⋯⋯⋯⋯⋯⋯⋯⋯⋯⋯⋯⋯⋯⋯⋯⋯⋯⋯⋯⋯⋯⋯⋯⋯⋯⋯⋯⋯⋯⋯⋯⋯⋯⋯ The Nocturnal Feather is only dropped by Pidgeotto that inhabit Route 16. As of June 23rd, 2018, the drop rate for the Nocturnal Feather has been buffed to 25%. The following techniques can be used to facilitate the hunt for it. Contribution Leotosi, the original owner and creator of this thread. Shary and Nebulas, for the Nocturnal Feather image.
-

staff guides How to record your screen and upload a video
Shamac posted a topic in Non-content Guides
Hello everyone and welcome to another guide to help you for the Official Legendary Tournament Round Two. In this guide I will teach you how to record your screen and ingame actions (Using OBS and Fraps) and how to upload a video to Youtube. The programs you will meet below have more tools and settings than what I am showing, I just compiled the basic tools for each program since there is no need to overcomplicate. I advise you to try it out in the meanwhile, so when you actually need to record it will be easy and you will find the perfect settings for your taste. Also if you find any error, you didn't understand what I wrote, or you want something to be added here, post a reply quoting me so I can edit the topic. Without further ado, . Using OBS Step 1: Download OBS Step 2: Install it Step 3: Open the program / Add Settings Click on the "+" on the Sources table and add: - Display Capture - Game Capture (This should make you able to record if you use the Client on Window Mode or Full Screen) Once you do this, the display should start showing like your screen multiple times. Small note if you want to change anything... Click on Settings: Click on Video on your left bar, it should appear a menu with the resolution, this can be usefull, since you can use it in a lower resolution so the video file doesn't become big and taking more time to upload. Click on Output on your left bar, it should appear a menu where you can choose where you want the video file to appear and in which format you want for it, as shown in the picture below. After you made that settings changes remember to click on "Apply" then "Ok" to implement them Step 4: Recording Start recording by clicking on the botton "Start Recording" in the client, once you want to stop recording, instead of "Start Recording", there will be a "Stop Recording". After clicking on "Stop Recording", in some moments, the video file will be in the folder you choose to use. Using Fraps Step 1: Download Fraps Step 2: Install it Step 3: Open the Program / Add Settings It should appear a menu like the one shown in the picture below. Click on the "Movies" botton then choose the where you want the video file to appear and which key you want use to start recording. Step 4: Recording With Fraps open in the background, enter in the Client you are going to use, once you are ready to start recording, press the key you choose to start recording and it will start. Once you are done recording press again in the key you used to start and in short moments a video file will appear in the folder you choose to use. How to Upload to Youtube Step 1: Go to Youtube and do an account. If you have a Gmail Account it can be linked and you will have instantly to Youtube. If you already have, skip this step. Step 2: Do a Youtube Channel In the top left corner click on the page and a small tab will appear, once there click on "My Channel". Step 3: Upload a video Once the channel is created, click on "Upload a video", it will show a new page where you can drag the video file to there or click on the image and choose the file location in your device. Once you are uploading you can edit the information about the video. Remember to press Publish at the end of the upload. Once you press Publish a new page should appear and it will show the link of the video you just upload on youtube. I hope this guide will help someone, once gain I advise you to try it out in the meanwhile so you get familiar to the programs and if you find any error or something you would like to add here post a reply quoting me in this topic so I can edit. Best of luck and have fun :) -
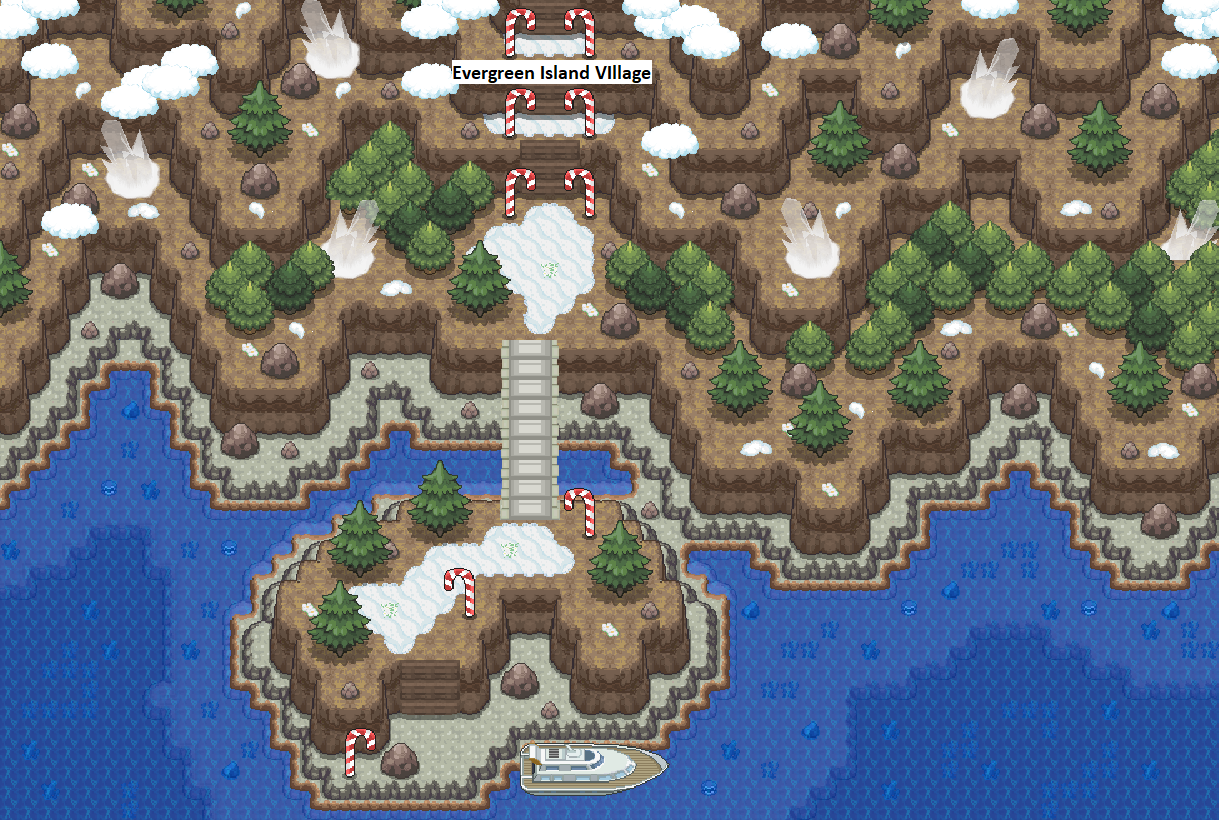
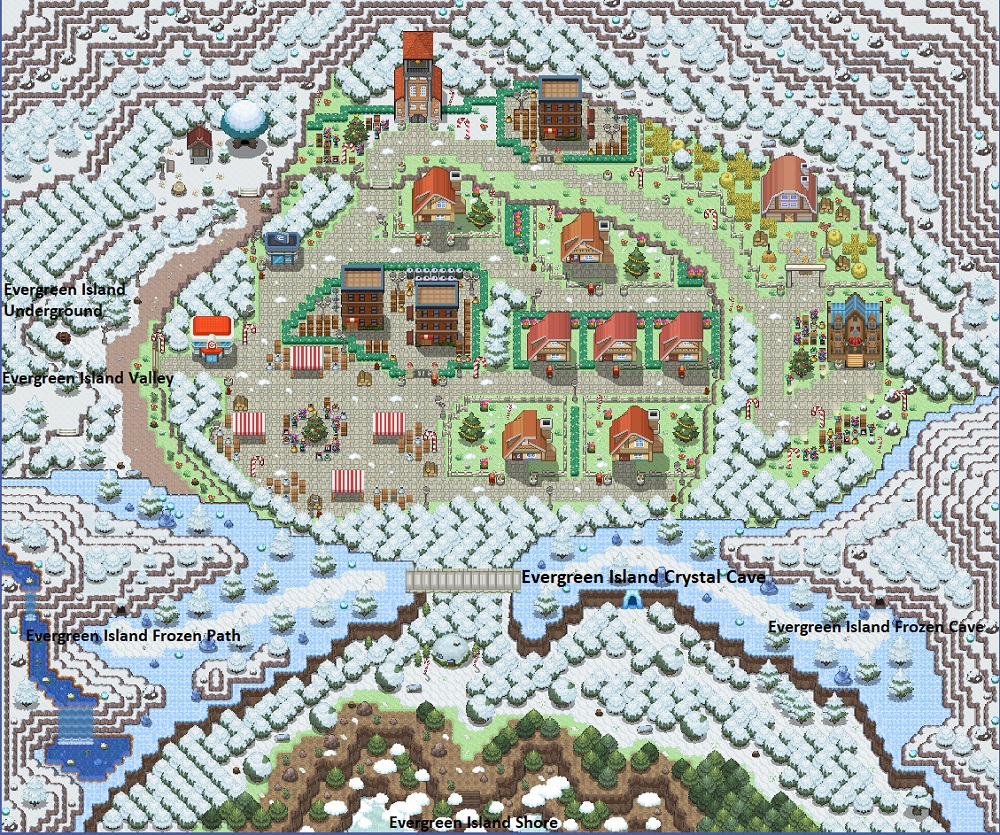
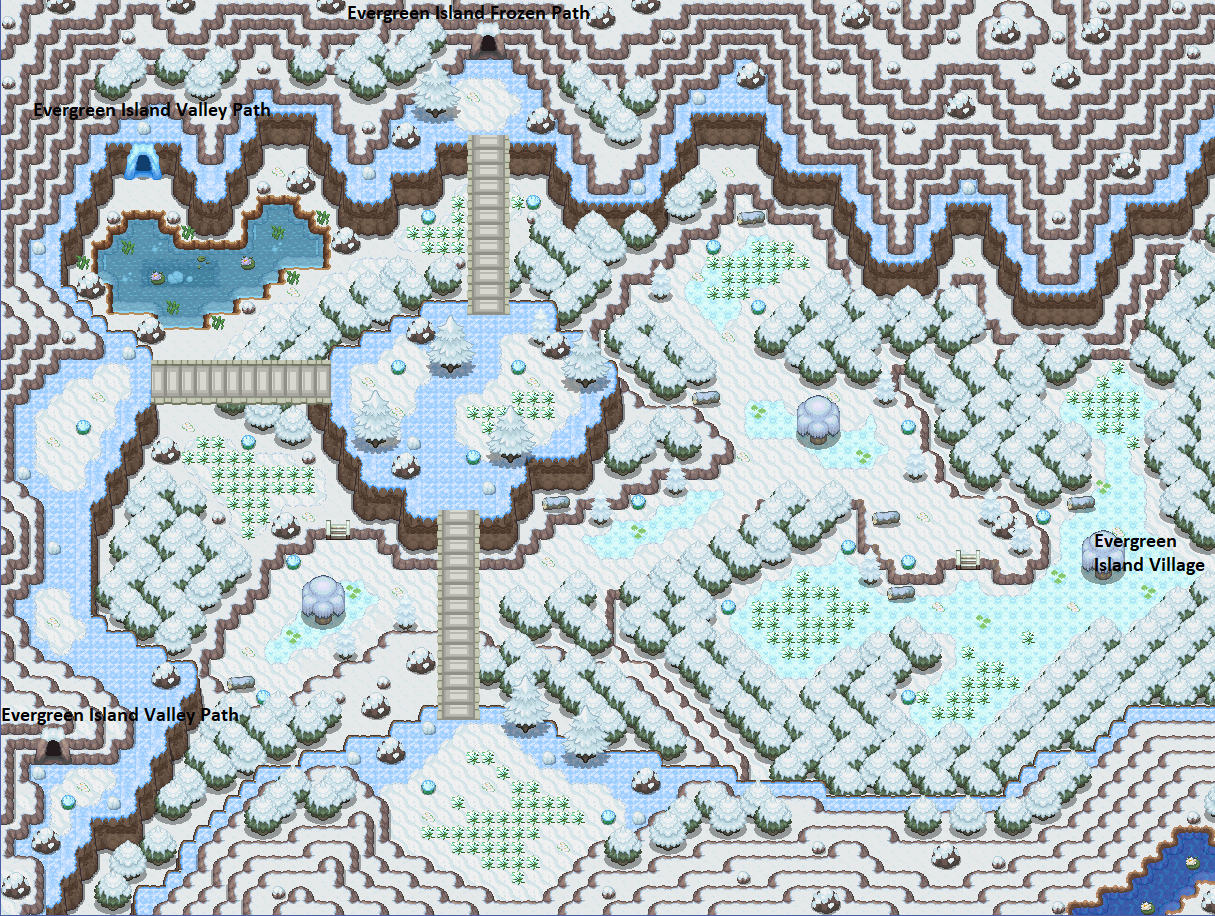
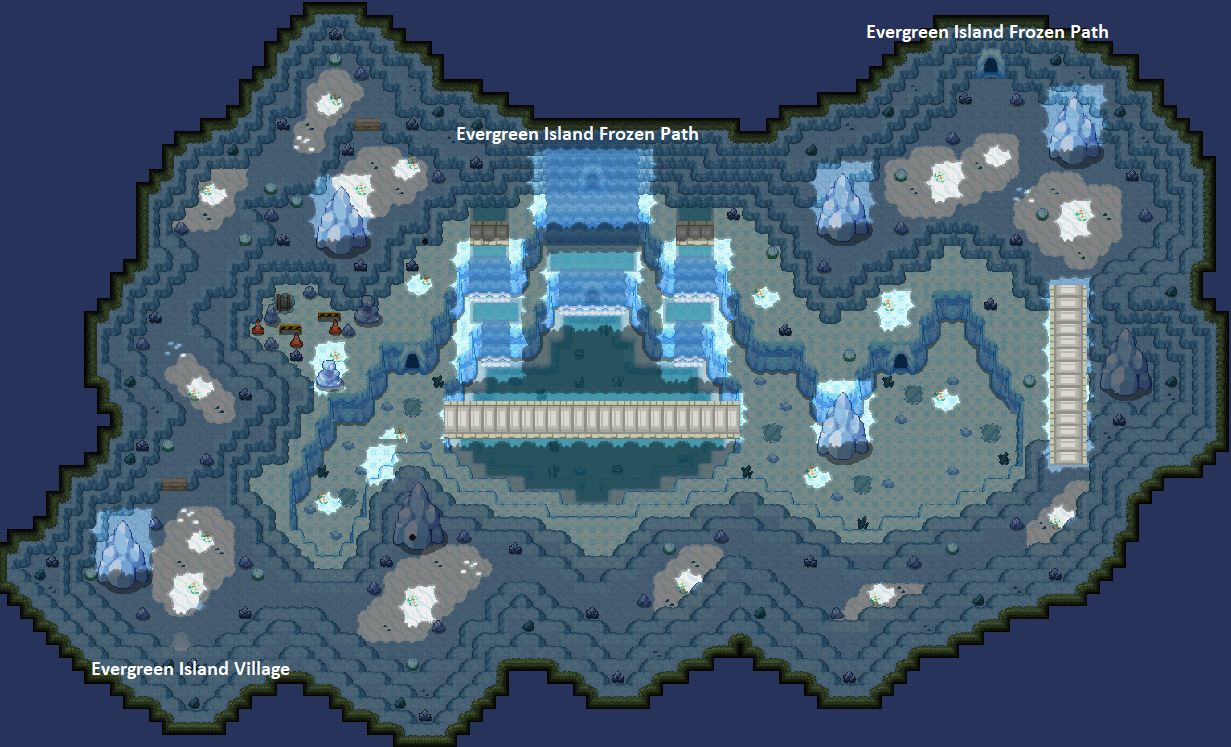
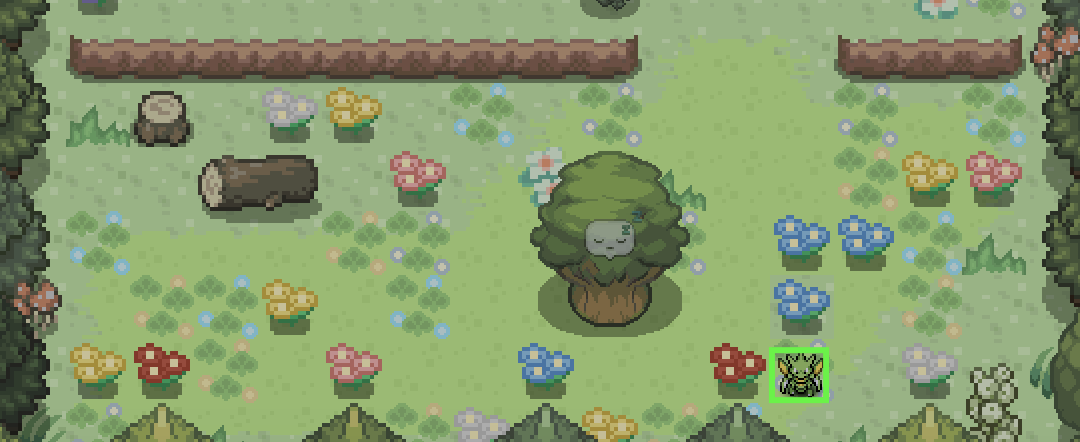
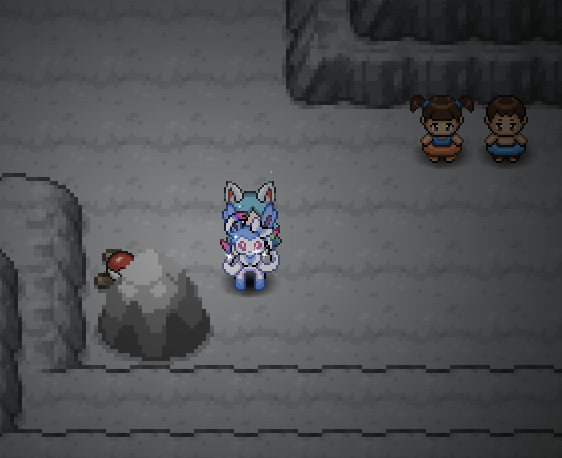
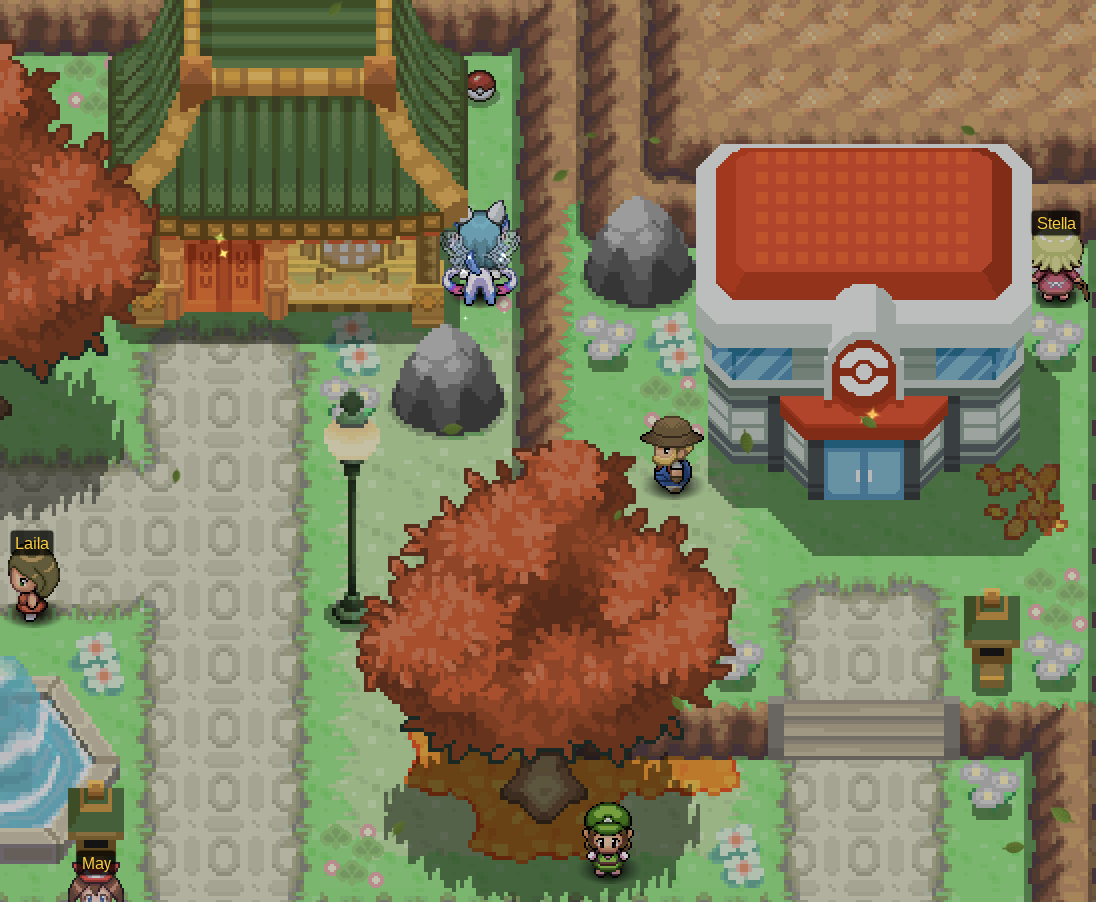
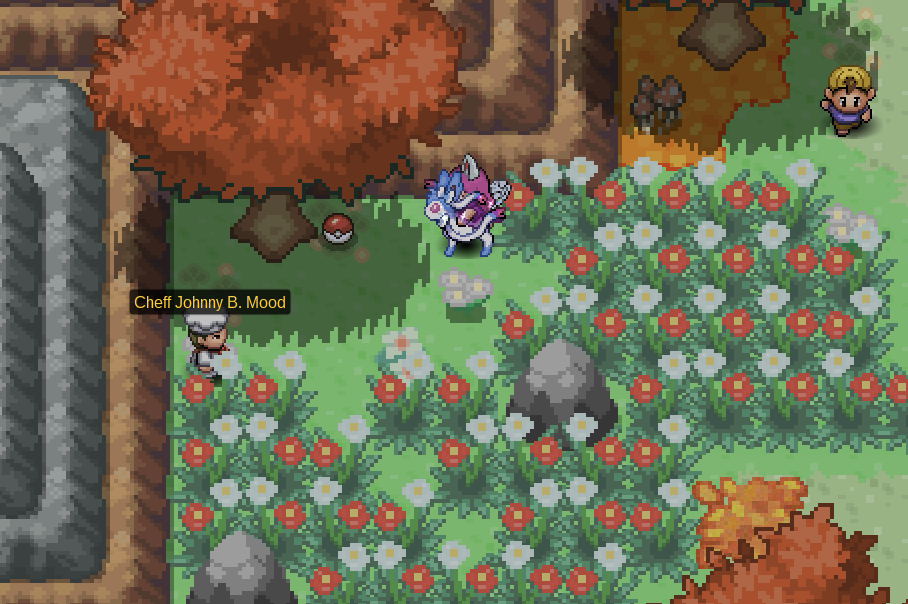
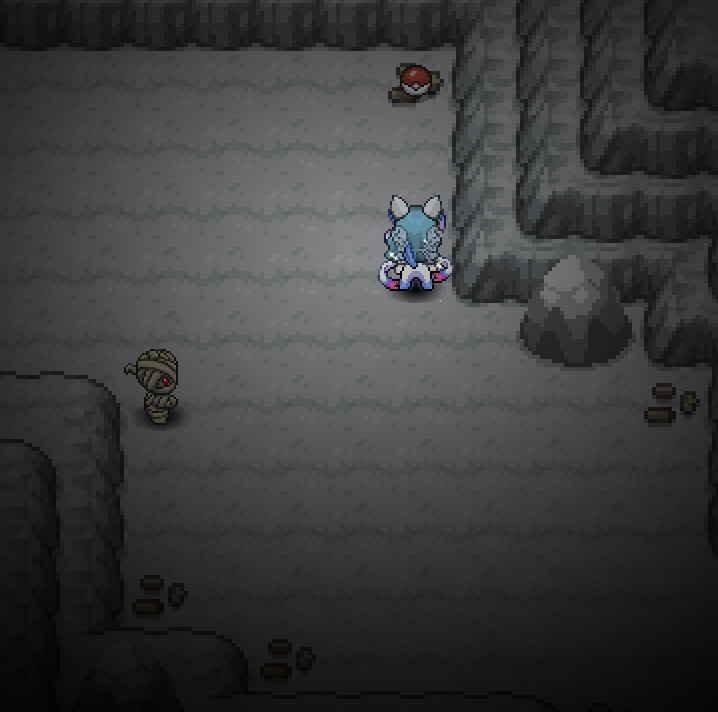
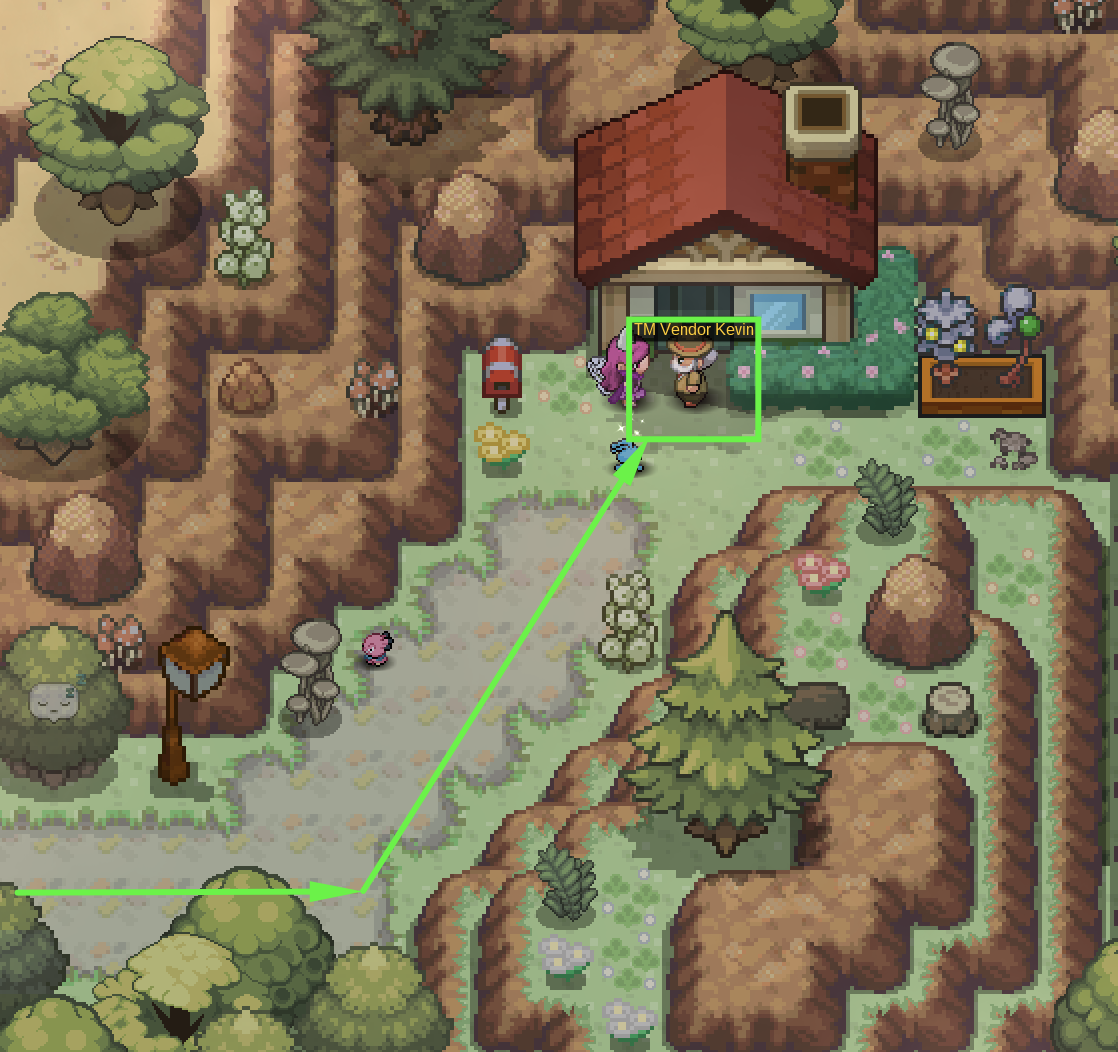
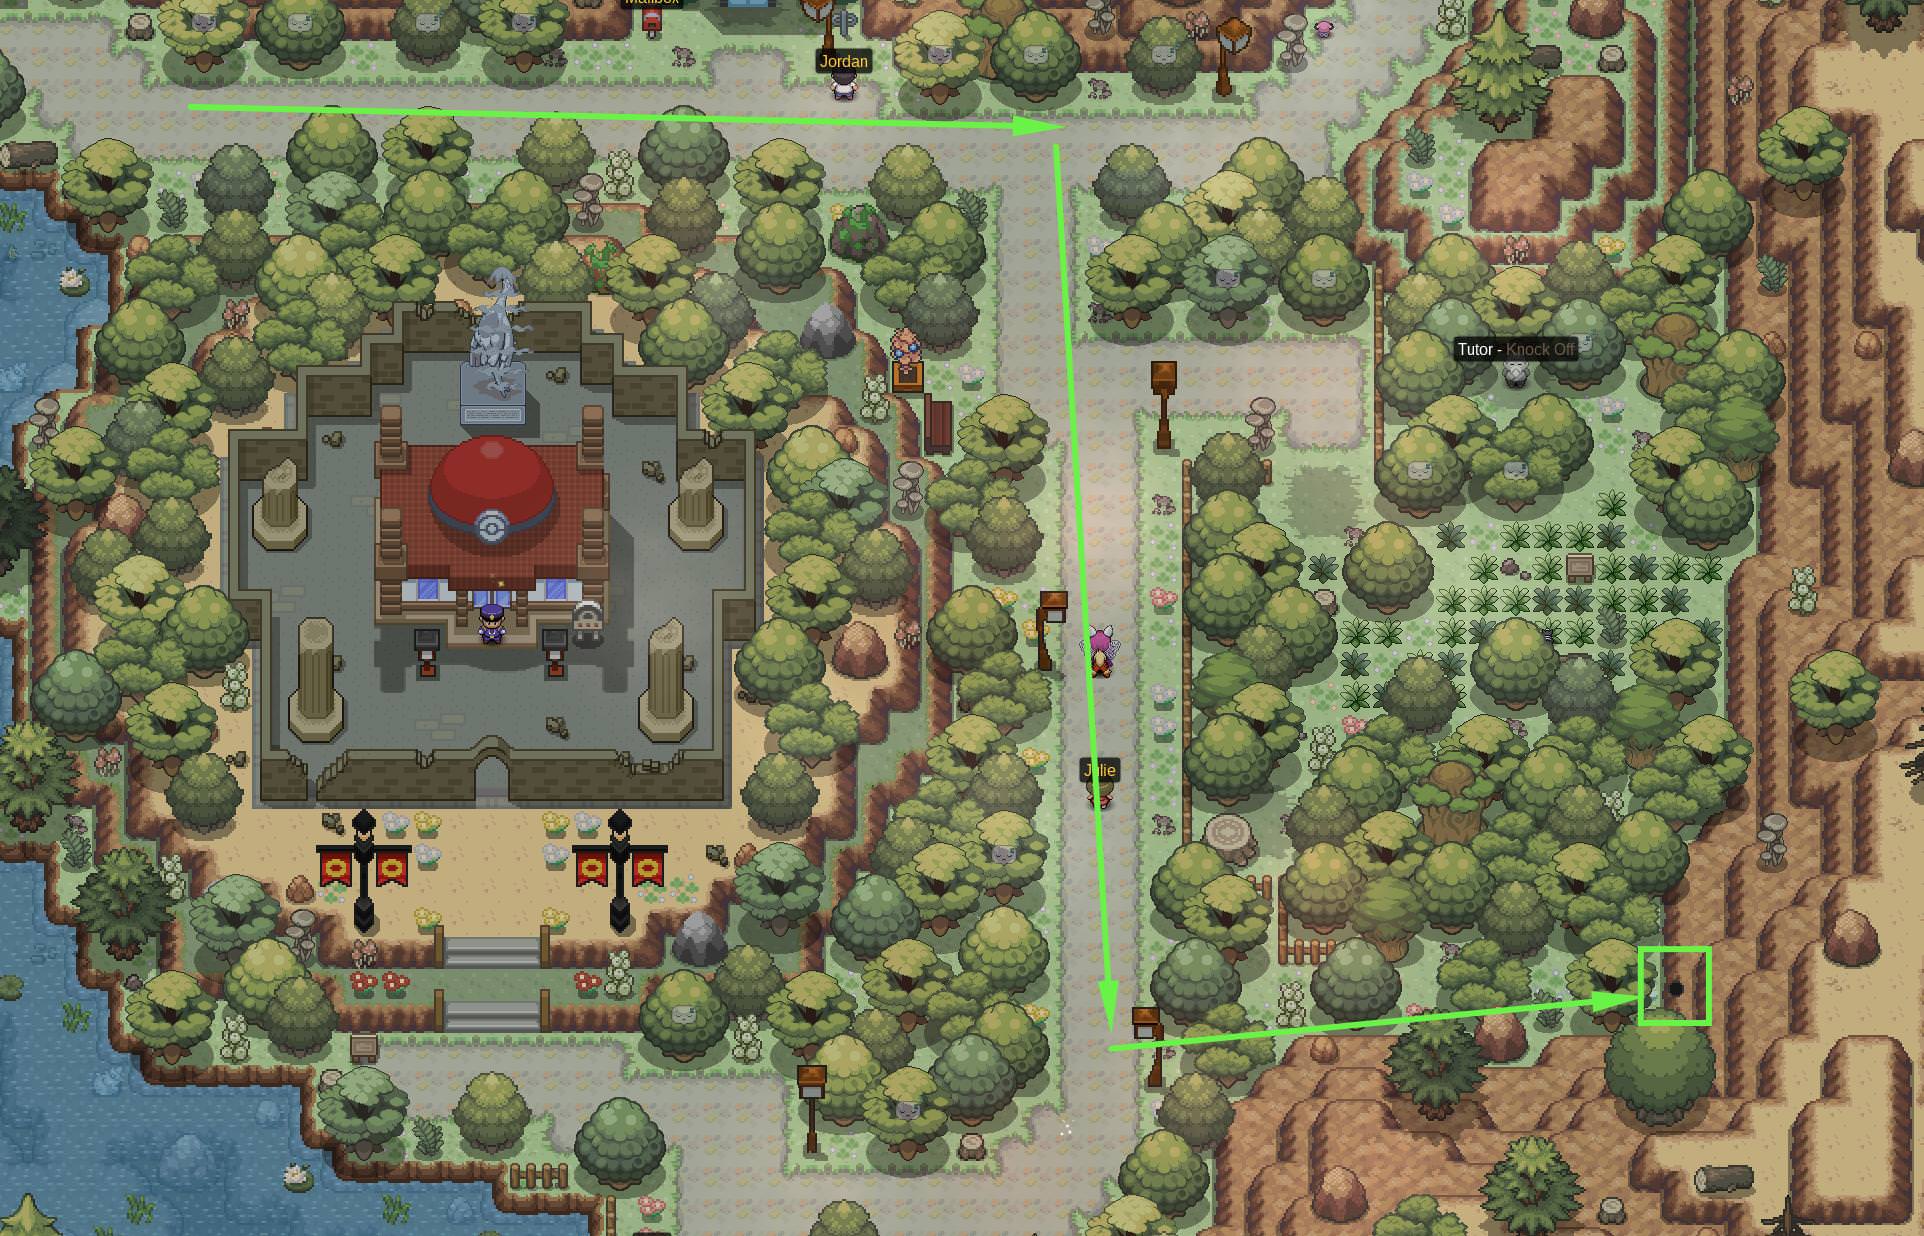
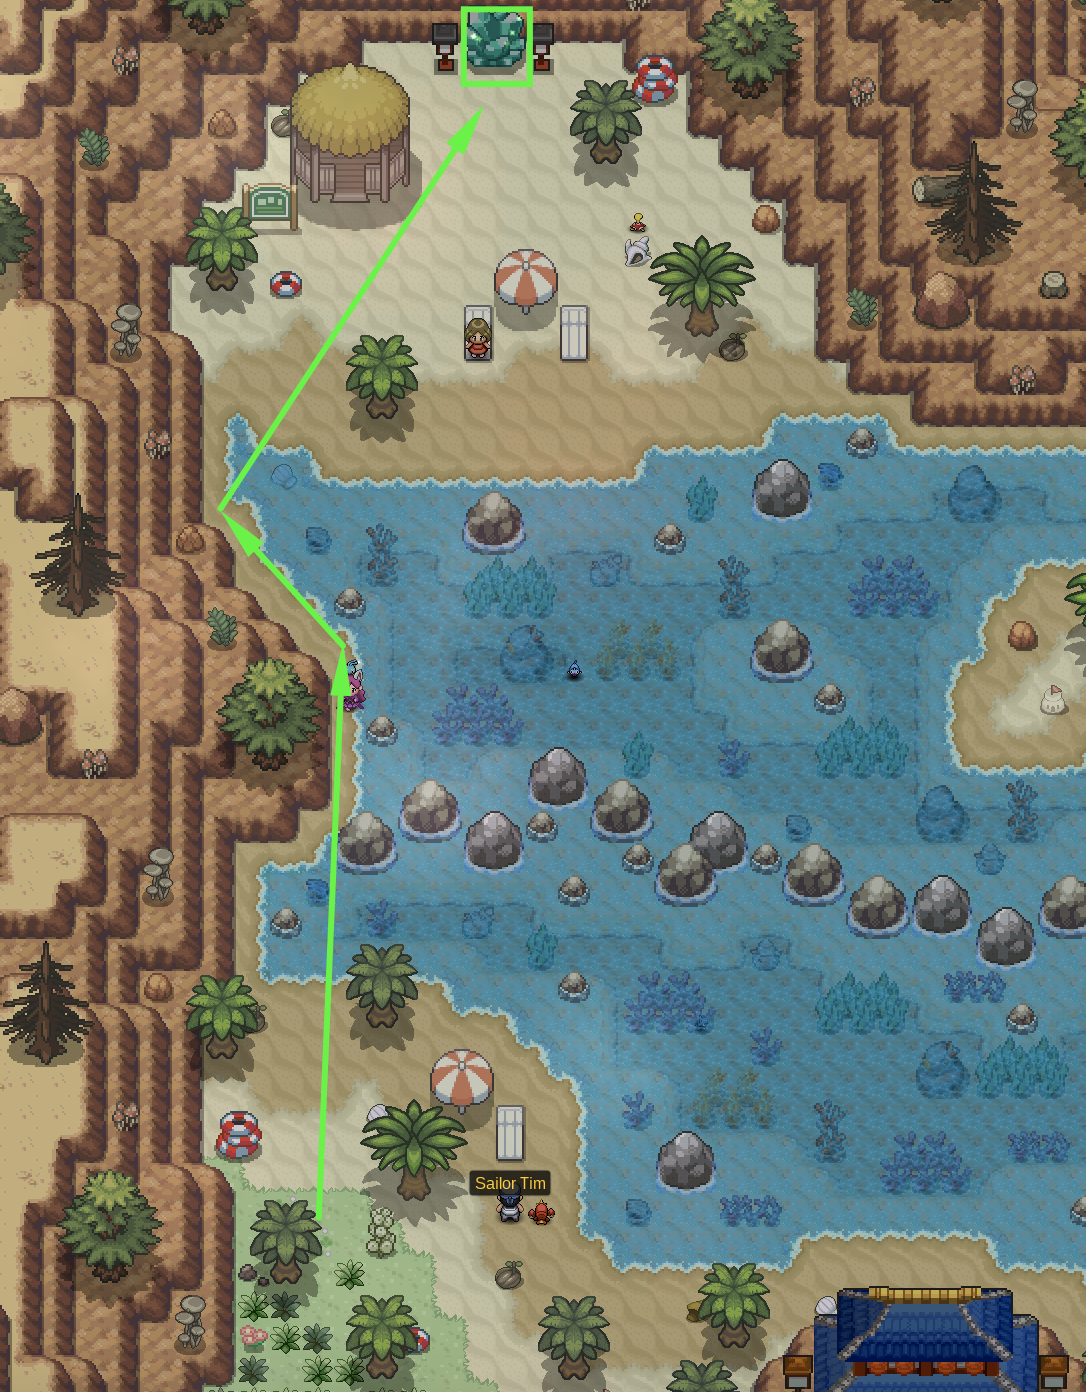
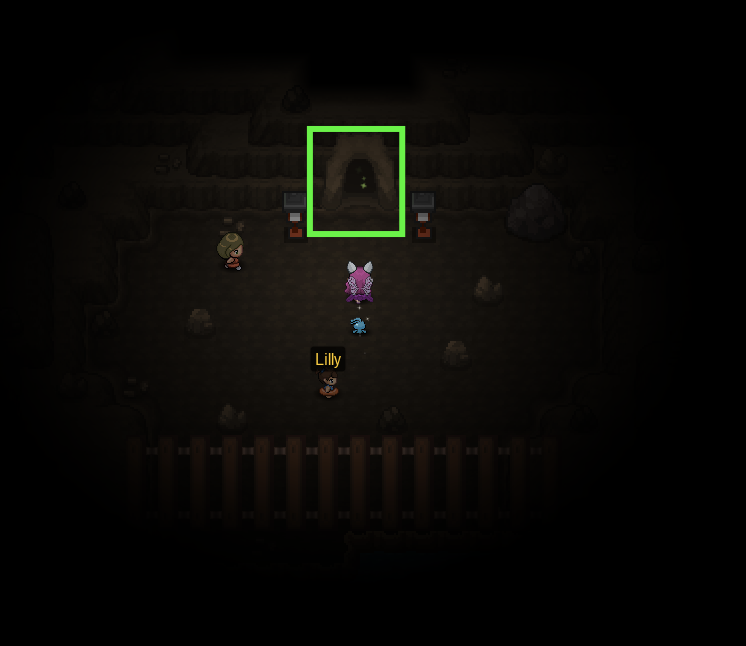
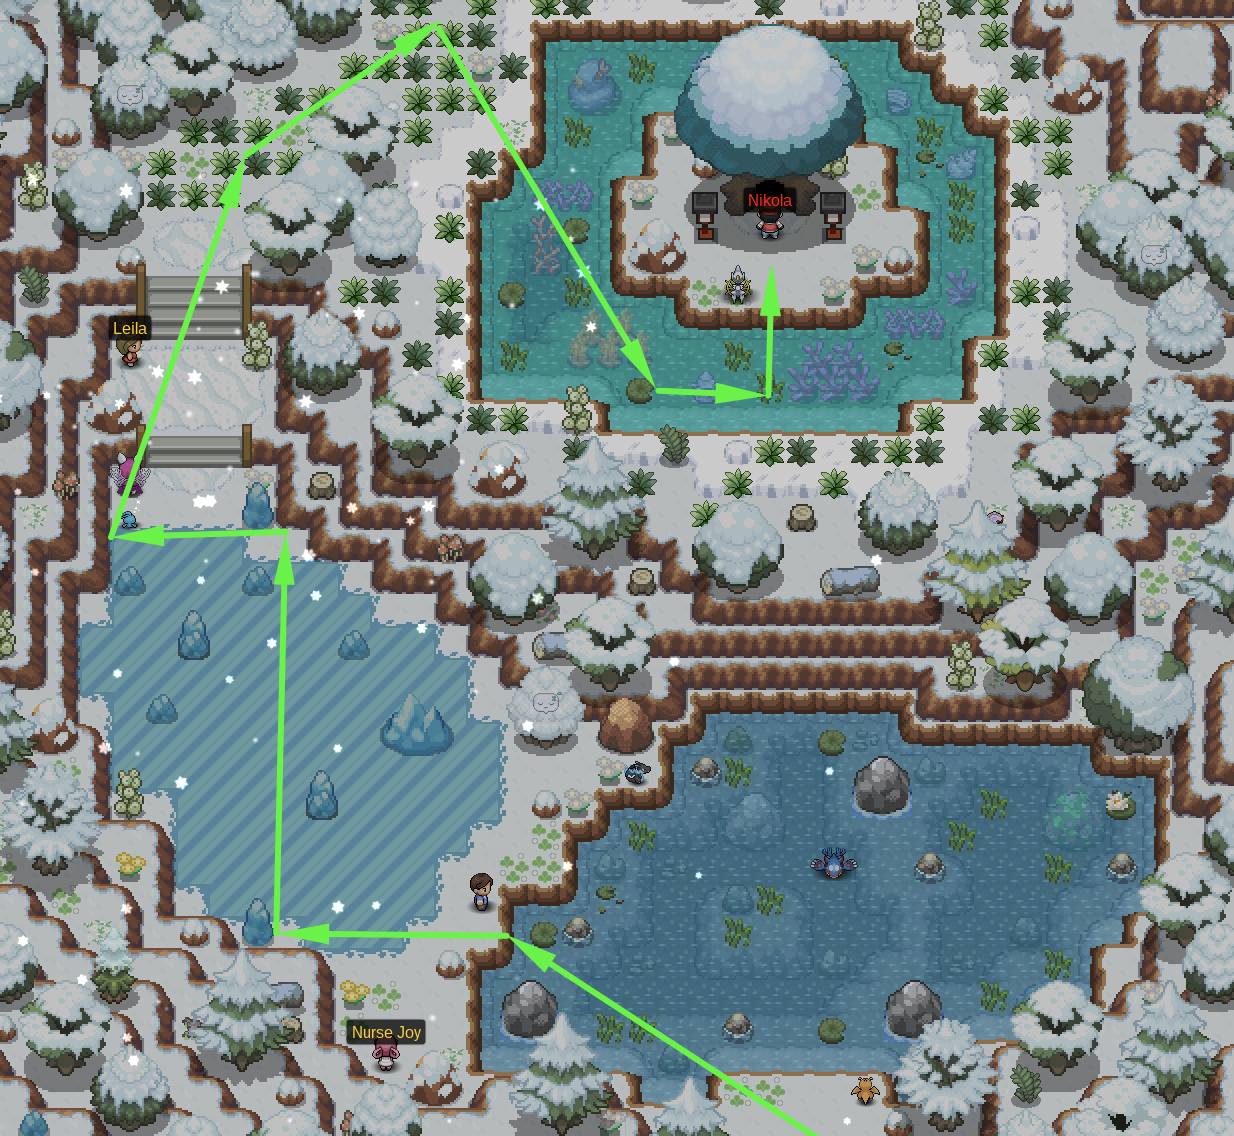
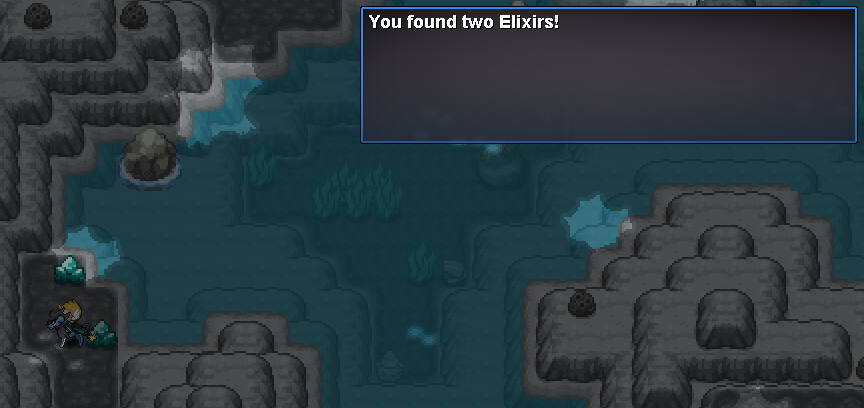
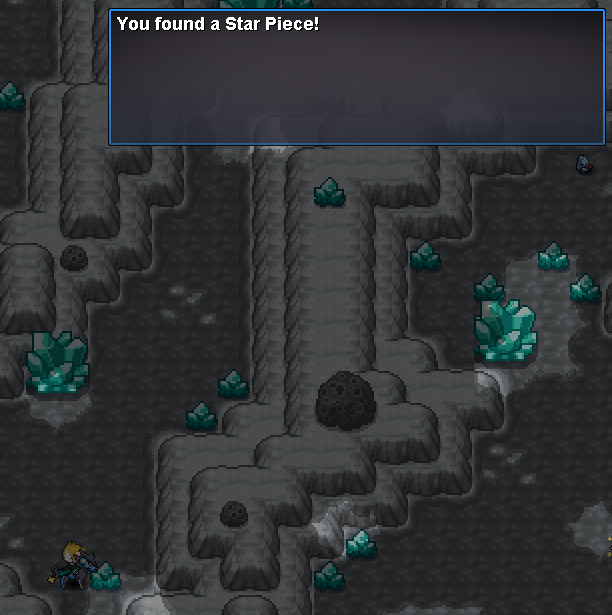
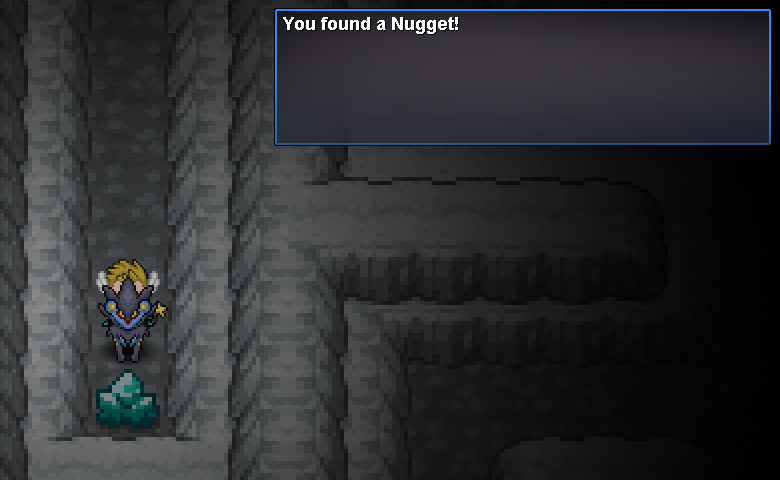
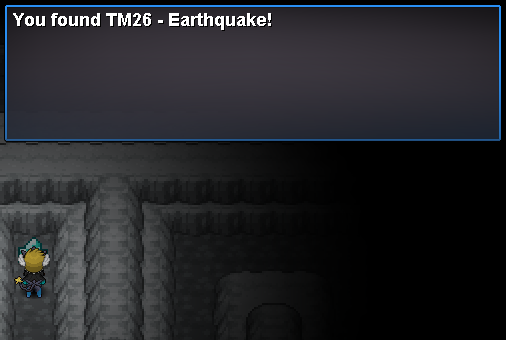
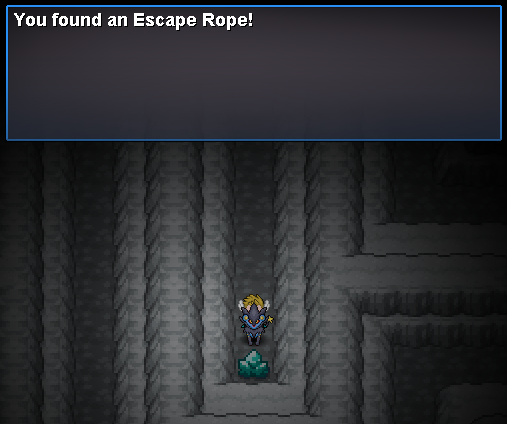
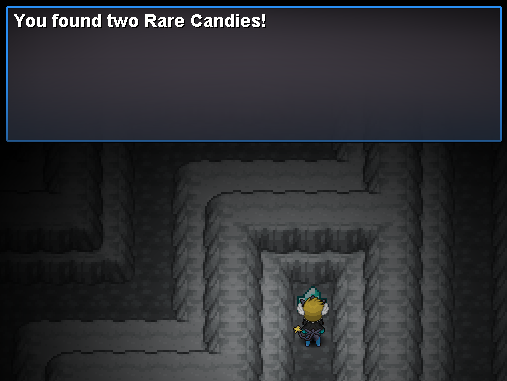
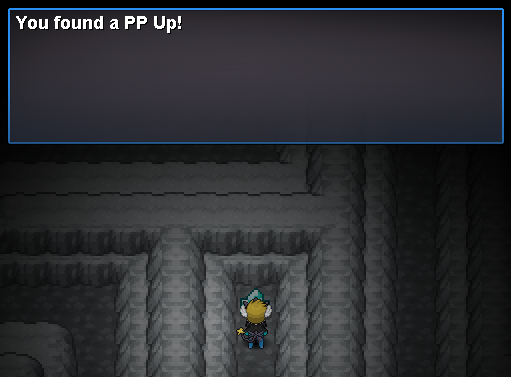
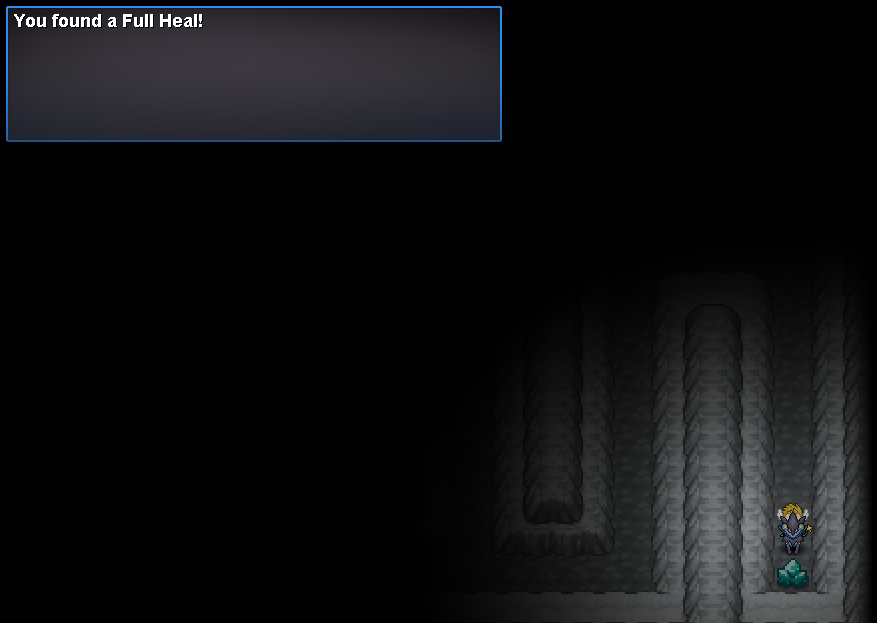
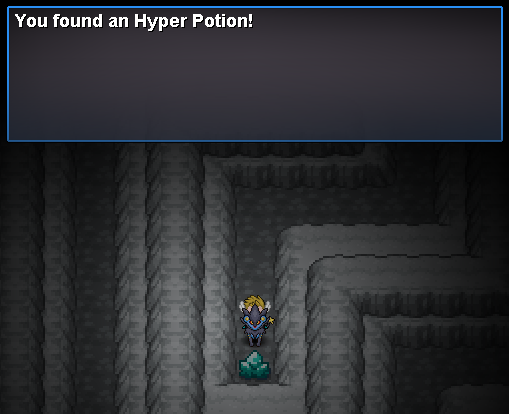
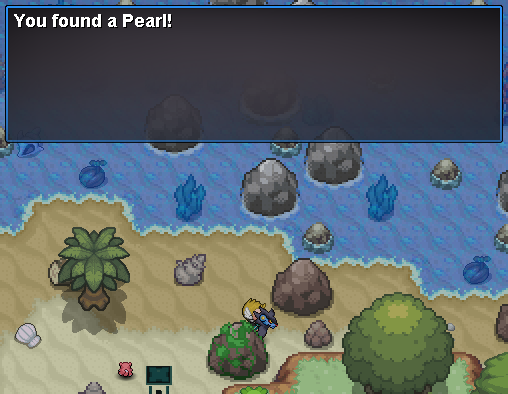
Hello everyone. I hope you are enjoying the Christmas Event so far. As many people have been having trouble navigating the maps so far, I have decided to post an overview of the main maps and where everything leads in hopes of helping everyone out. [spoiler=Evergreen Island Shore] [spoiler=Evergreen Island Village] [spoiler=Evergreen Island Crystal Cave] [spoiler=Evergreen Island Valley] [spoiler=Evergreen Island Valley Path] [spoiler=Evergreen Island Frozen Cave] [spoiler=Evergreen Island Frozen Path] Kind regards Aspheric

-
- 19
-

-
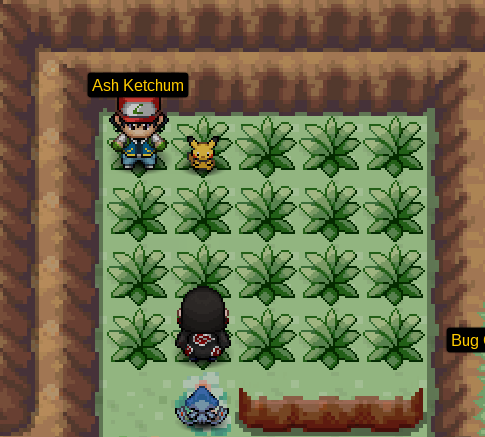
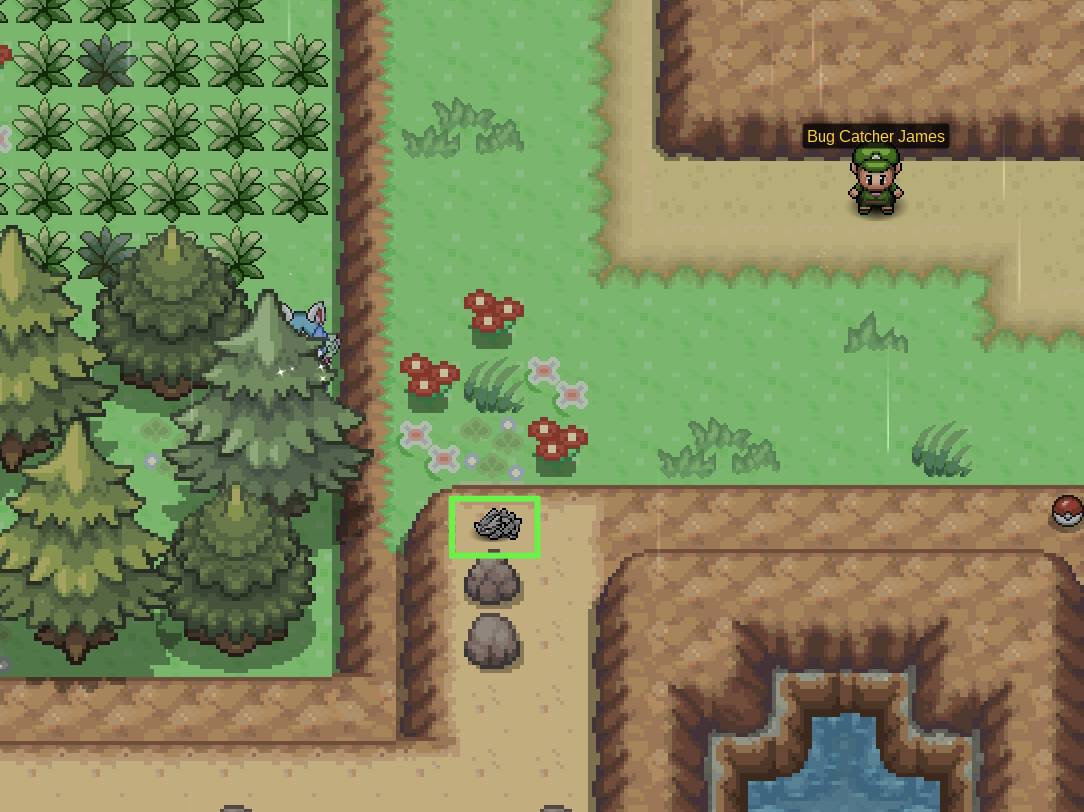
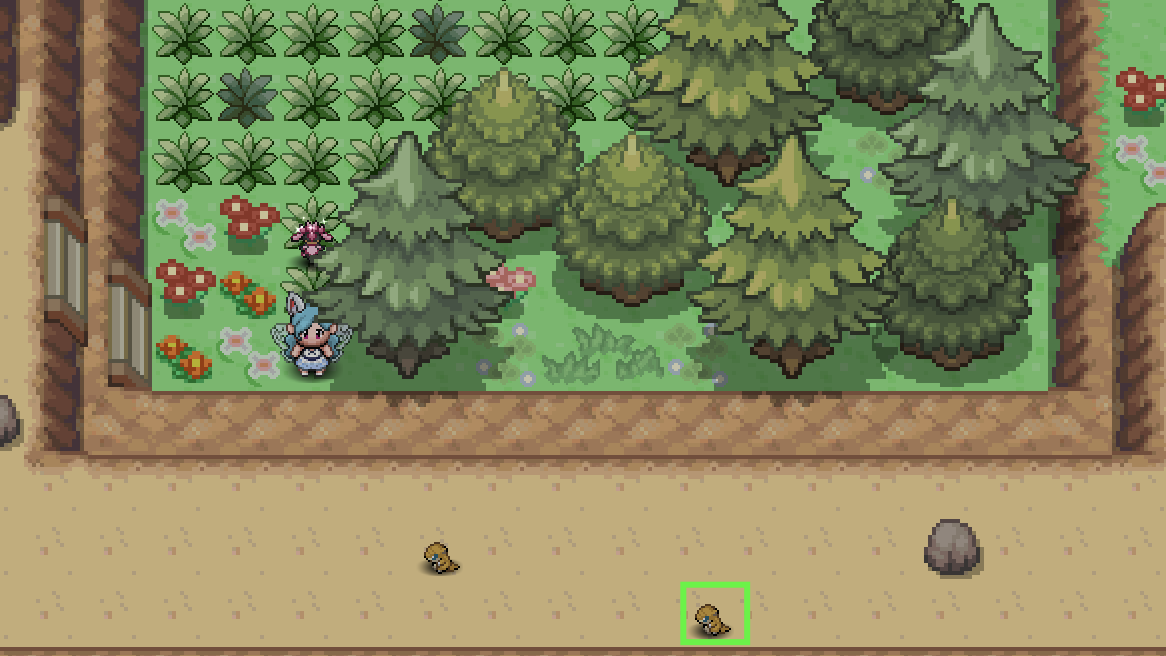
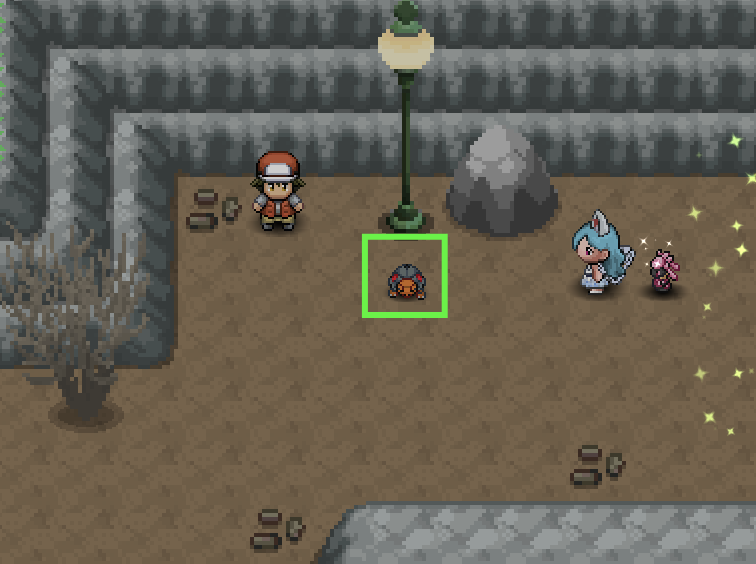
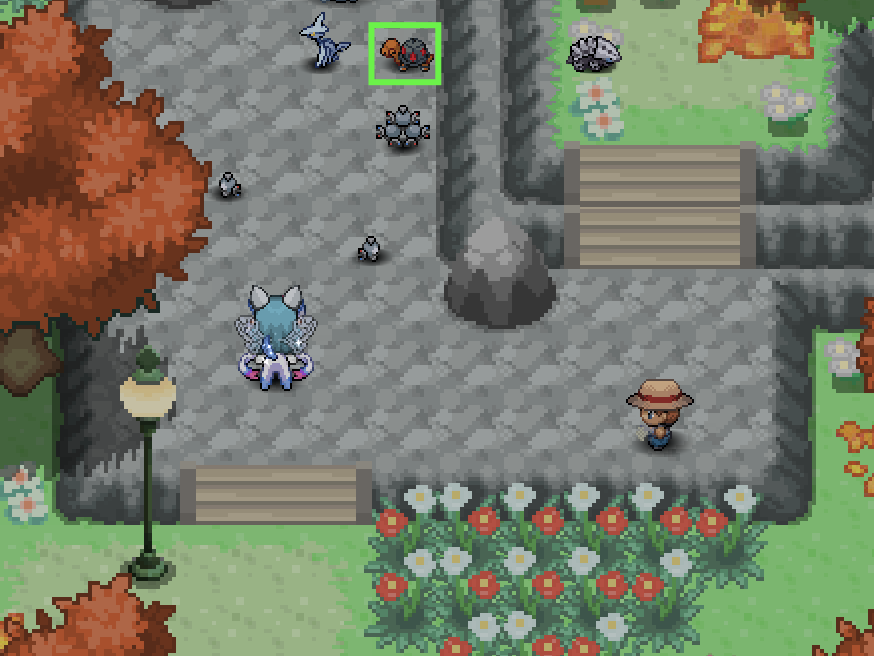
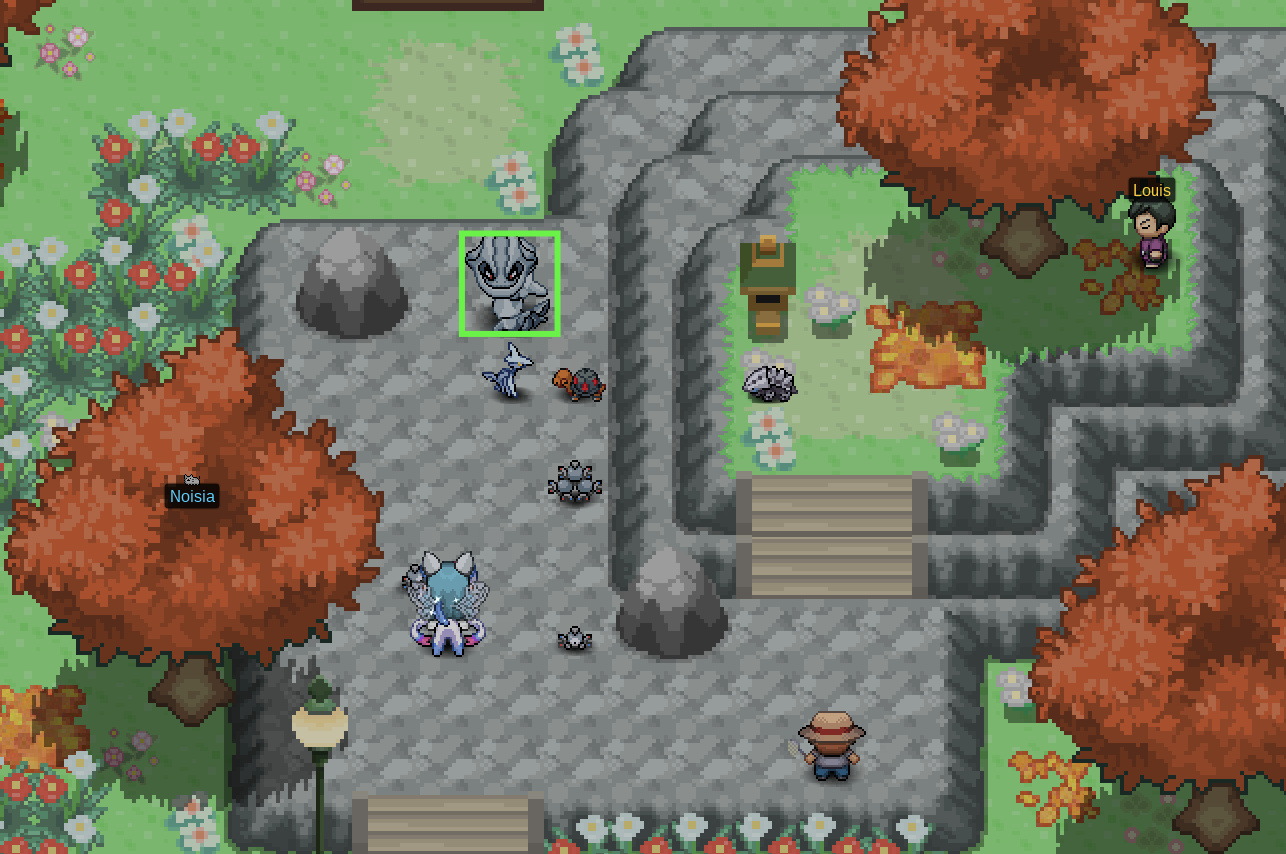
_____________________________________________________________________________________________________________________________________________________________________________________ _____________________________________________________________________________________________________________________________________________________________________________________ Greetings trainers! In this guide I will show you how to get one of the exclusive items of PRO. The Ash Hat! With nothing more to say, let's start the guide! _____________________________________________________________________________________________________________________________________________________________________________________ _____________________________________________________________________________________________________________________________________________________________________________________ This quest has a little requirement that should've been done beforehand, to be more exact when you start the game. Fulfilling this requirement is only possible at the start of the game. The requirement is: - Have chosen Pikachu as your starter. That would be the only requirement for this guide. If you dont know how to get pikachu as starter, here is a short explanation: When Professor Oak gives you the opportunity to choose a pokemon, you can see 3 pokeballs on the table and 1 behind him on the ground. If you just interact with the pokeball on the ground you can't pick it up. To pick it you have to talk to the 3 other pokeballs on the table and don't pick any of those Pokemons as your starter. After that you are able to pick the pokeball with the thunderbolt on it. This is Pikachu. __________________________________________________________________________________________________________________________________________________________________________ __________________________________________________________________________________________________________________________________________________________________________ The procediment to obtain this hat will start in Viridian forest. In Viridian Forest you have to find Ash and battle him: His team is: Pikachu Lvl 11, Pidgeotto Lvl 9 and Butterfree Lvl 10 After you battled him he will dissapear from Viridan Forest. You only need to fight him, if you lose is not a problem. In Route 9 you will meet Ash and his pikachu again, this time he will give you a quest to do. This quest consist of finding the Mankey who stole his cap. To find this specific Mankey we will have to encounter Mankey's and find out which one is holding his cap. The ability Frisk can be a big help as it shows which item the Mankey is currently holding. With Covet and Thief we can steal the item Mankey is holding. Remember; the move Covet or Thief would only work if the pokemon you're using for the move, doesnt have any item equiped To get the move Covet you can do it catching a mankey in the same route. The move Thief is obtainable via one of the quest's of Officer Jenny, if you dont know how to complete them check our guide or click HERE. Regarding the ability Frisk, you can get a Pokémon with the Ability Frist at Route 1. Sentret spawns there at Morning and Day. After you found Ash his cap you need to speak with him. He will notice that he had another cap in his bag. He tells you that you can keep 1 Hat. That would be the end of the quest, enjoy your Ash Hat! Have a great day!
- 1 reply
-
- 1
-
-
Hello PRO Trainers! We, the staff team, have decided to create this breakdown to go in depth on the EV Zones that have been created by Prehax the Spawn Editor This breakdown will describe the what an EV is, The areas created specifically for EV training, The Pokemon you will find in said locations, and a few Tips that will help you in EV training. We hope this helps everyone in need of it! EV Zones are areas in every region that have specifically built spawns to enhance the proficiency of EV training that would other wise be unavailable in any other areas in the game. a Before we move onto how to EV train we must first cover what an EV is, so that you have a complete understanding of the goal you are trying to achieve on your Pokemon. The EV Zones have a specific area in every region which are special. During a different time of the day you may obtain a specific EV whether it's roaming through the grass or surfing and fishing on the near by waters. Down below I will go in-depth for every Regions specific EV Zone. I have also, added an image guide that also has the times and location and how to encounter Pokemon need for every specific EV With that said, this concludes the in-depth breakdown. If there are any questions or concerns about the guide please let me know in the comments and I will answer as soon as possible. Happy Training! Credits: Prehax, Shinohara, Xylos Work Cited: https://Pokemon.fandom.com & https://www.ign.com
- 7 replies
-
- 13
-
-
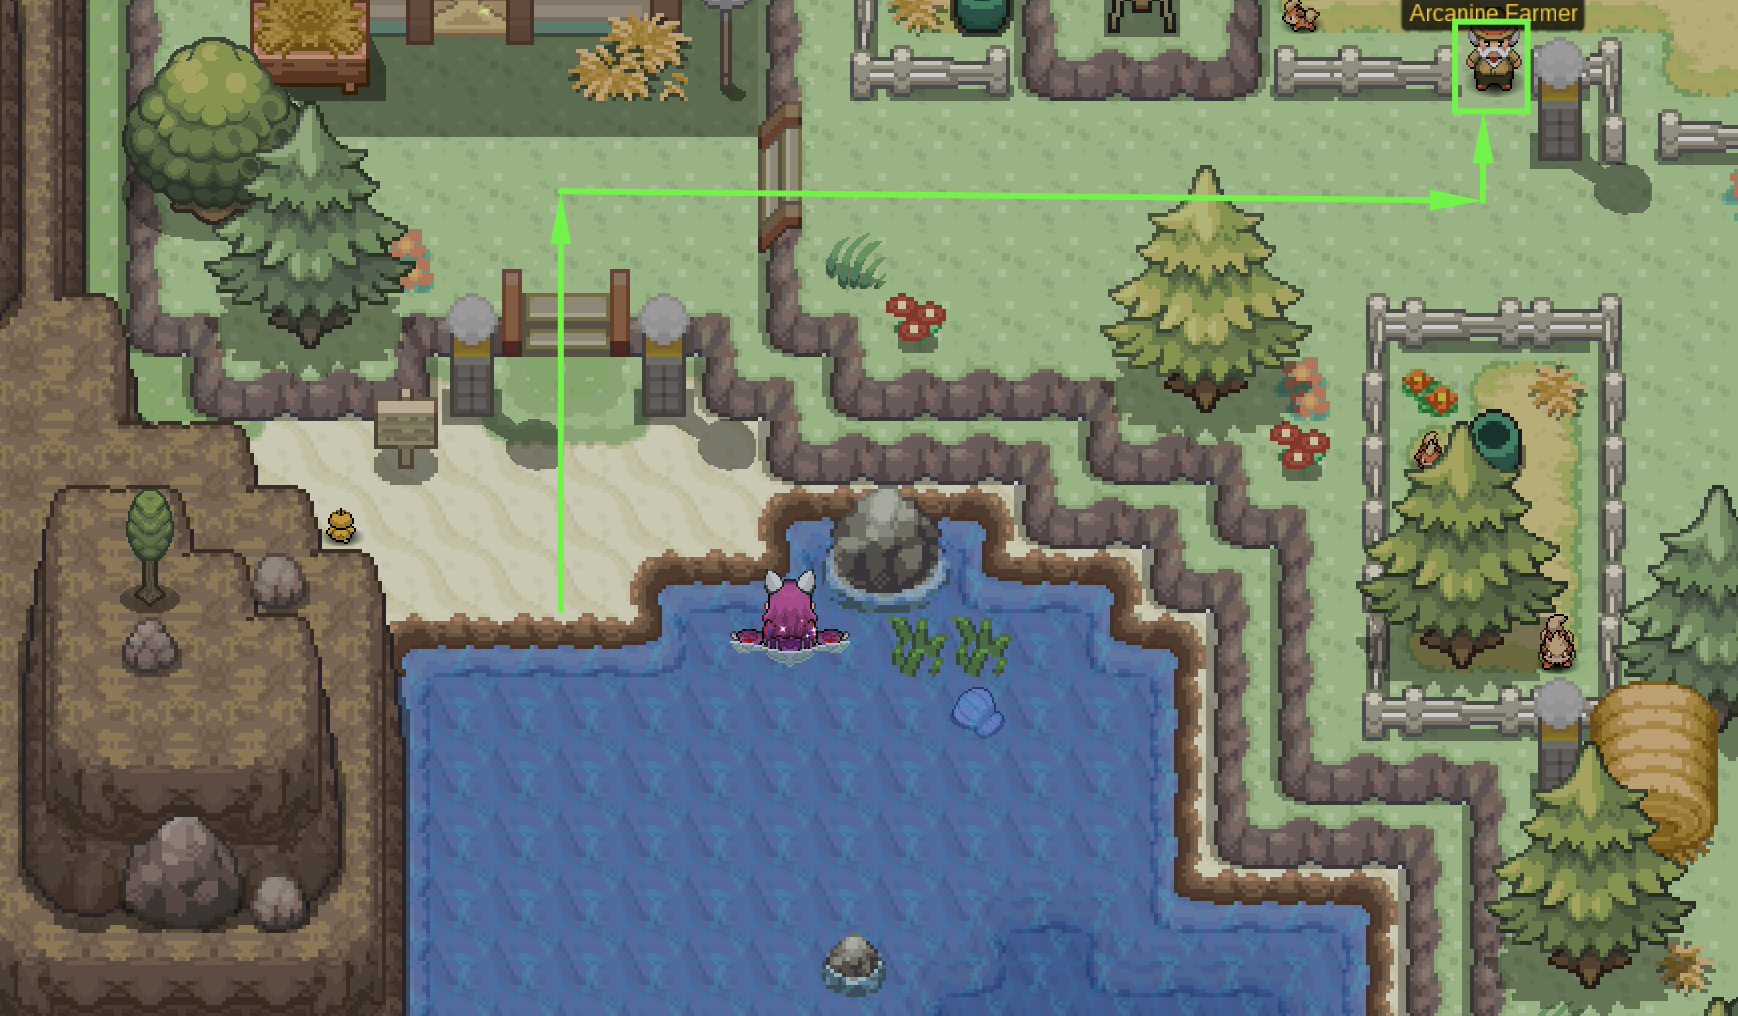
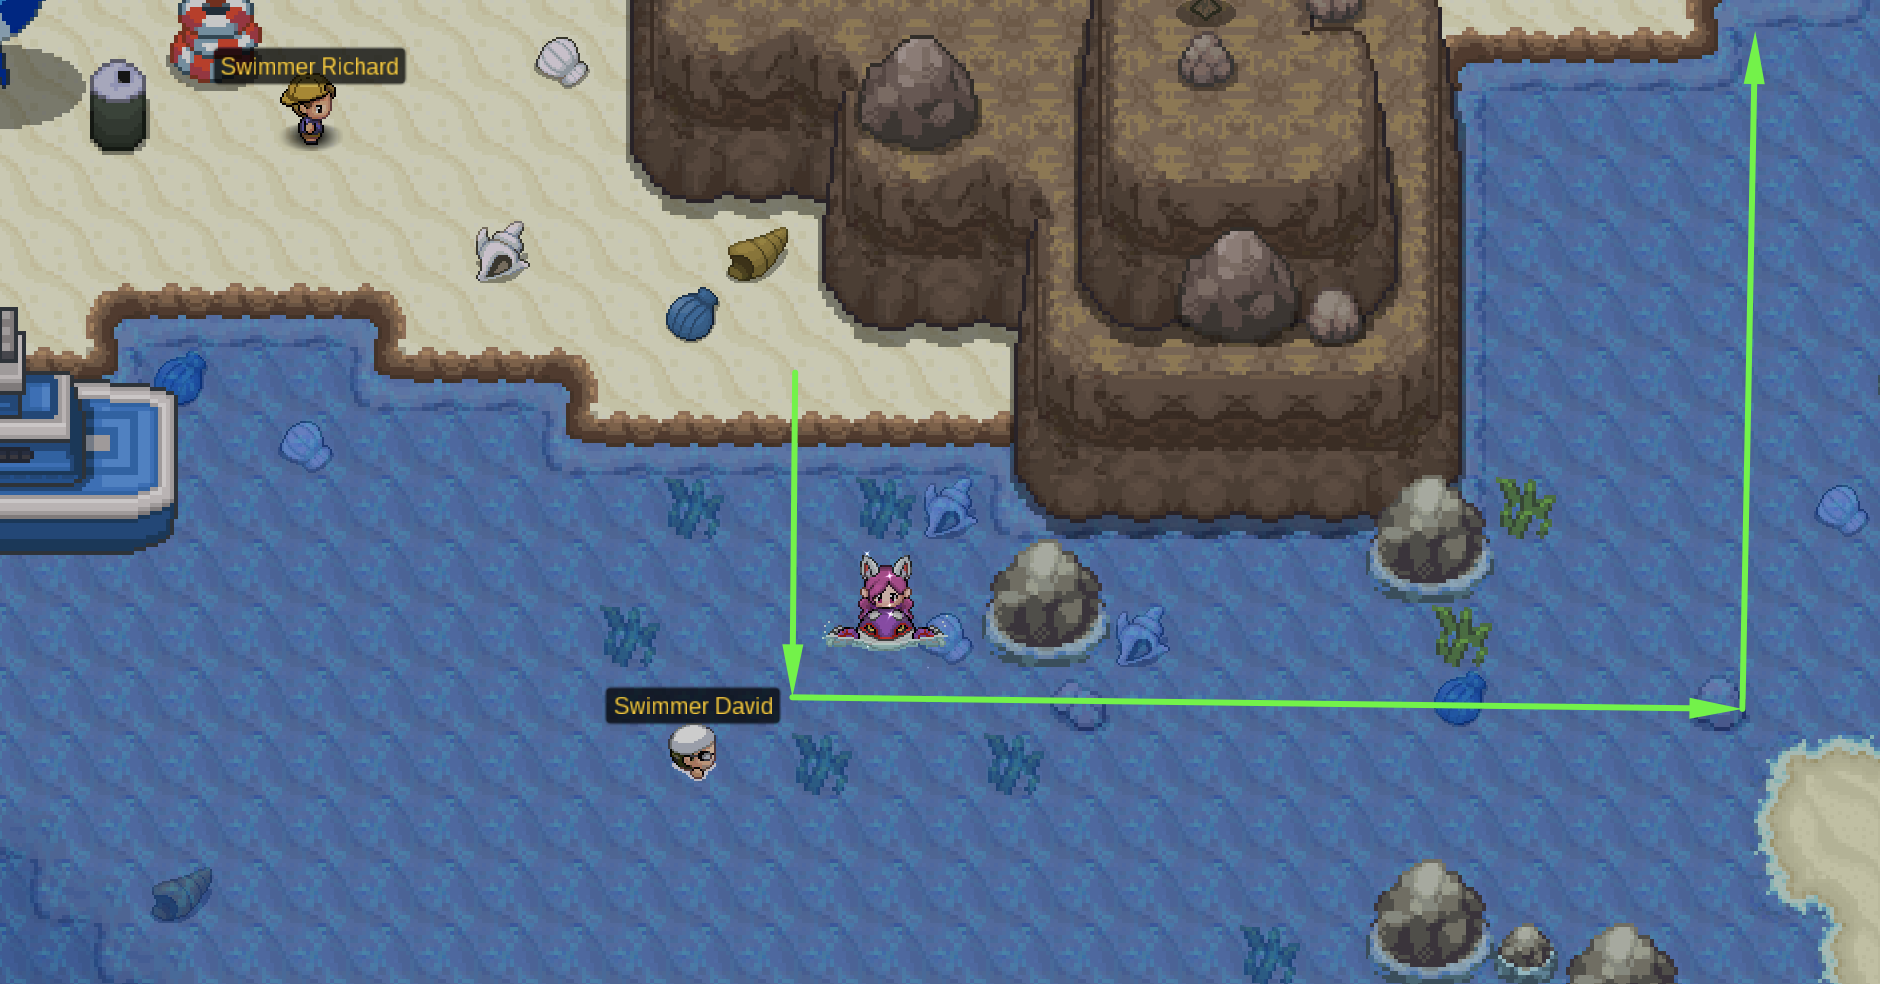
Hey there and welcome to the Arcanine Mount Quest Guide! This guide will teach you how to obtain a free Arcanine Mount. Along with this, it will also teach you where you can get the pokemon needed for this quest. Region: Kanto Route: Route 19, South of Fuchsia. Access Point: Surf East of Route 19. Step 1: Go South of Fuchsia Step 2: Surf East of Route 19 Step 3: Go North to the Arcanine Farm The Arcanine Farmer will ask you to show him a Chansey, Pinsir, and Kangaskhan. Do note that these Pokemon must have your OT. Therefore, they must be caught by you in order for you to turn them in. The Arcanine Farmer will give you an Arcanine Mount in exchange for showing him these Pokemon. The easiest way to find pokemon that spawn in an area is by using the Reborn Bot. You may access the Reborn Bot in the PRO Official Discord or you may invite it to your own server. Nevertheless, here are the locations wherein you can catch the Pokemon required for this quest. Do note that since these pokemon are of high tier, you may not find them immediately. Chansey and Pinsir have a repel spawn. For hunting techniques, feel free to check out our Hunting Guide. Tier: Rare Recommended Areas: Route 13, Route 14, Safari Exclusive (Repel) Do note that the Safari Exclusive requires Membership and you will only have 20 minutes to hunt. Chansey #Map Area Daytime Rarity MS Level Item Breezy Cave Land M/D/N Rare No 17-21 - Cerulean Cave 2F Land M/D/N Rare No 55-62 - Leev Town Port Land M/D/N Rare No 20-24 - Route 13 Land M/D/N Rare No 22-26 - Route 14 Land M/D/N Rare No 27-30 - Route 209 Land M/D/N Rare No 17-21 - Safari Area 2 Land M/D/N Rare No 12-14 - Safari Area 3 Land M/D Rare No 20-22 - Safari Entrance Land M/D/N Rare No 21-26 - Safari Exclusive Land M/D/N Rare Yes 26-31 - Tier: Rare Recommended Areas: Breakers Beach (Repel), Safari Area 1 Safari Area 1 will not require membership. However, you will only have 20 minutes to hunt. Pinsir #Map Area Daytime Rarity MS Level Item Breakers Beach Land M Rare No 40-44 - Bug Catching Area Land M/D/N Rare No 15-19 - Hoenn Safari Zone Area 4 Land M/D Rare No 10-27 - Isolated Forest Land D Rare No 55-60 - Route 229 Land M/D/N Rare No 47-51 - Safari Area 1 Land M/D/N Rare No 29-32 - Safari Exclusive Land M/D/N Rare Yes 21-25 - Azalea Town Headbutt M/D/N No 5-10 - Cherrygrove City Headbutt M/D/N Rare No 5-10 - Route 1 Headbutt M/D/N Uncommon No 2-6 - Route 11 Headbutt M/D/N Rare No 10-20 - Route 117 Headbutt M/D/N Uncommon No 13-16 - Route 14 Headbutt M/D/N Rare No 25-30 - Safari Zone Exclusive Headbutt M/D/N Rare No 21-25 - Amazon Forest Bugsy (Reward) M/D/N - No 15 - Tier: Rare Recommended Areas: Rock Tunnel 1 Do note that Rock Tunnel 1 requires you to have Membership. Safari Area 1 will not require membership. However, you will only have 20 minutes to hunt. Kangaskhan #Map Area Daytime Rarity MS Level Item Breezy Cave Land M/D/N Rare No 17-21 - Breezy Path Land M/D/N Rare No 17-21 - Rock Tunnel 1 Land M/D Rare Yes 20-24 - Safari Area 1 Land M/D/N Rare No 23-28 - Vulcan Cavern Cave Land M/D/N Rare No 35-39 - Cinnabar Lab Room 2 Oak (Reward) M/D/N - No 15 -
- 1 reply
-
- 1
-
-
Hello everyone and welcome to the Fishing Guide ! This guide will introduce you to the fishing mechanics and its system. Fishing is a special mechanic that allows the player to encounter Pokémon that live in water. When a Pokémon can be obtained through fishing, a Fishing Rod icon appears in the spawn list of each map. ] Keep in mind that fishable Pokémon are tagged with "Fish." There are 3 different types of Rods: Old Rod, Good Rod and Super Rod. To fish, choose your the rod from your backpack, or move it in the hotkey toolbar and select from there, while standing near water and wait 4 seconds. To find out where any Pokemon spawn and what rod they require, you can use the commands ^s pokemon or ^s map on our OFFICIAL PRO DISCORD . Using a Rod of an higher tier than the one required to fish the Pokémon will allow the Player to encounter the Pokemon anyway. Old Rod It is obtainable for free by the fishing guru in a Vermilion City house. Good Rod It is purchasable in Fuchsia City House 1 for 15,000 pokedollars. To be able to buy this, you must first have the Old Rod. Super Rod It is purchasable in Olivine City House 1 (from the desk-bound NPC) for 75,000 pokedollars. To be able to buy this, you must first have the Good Rod.
-
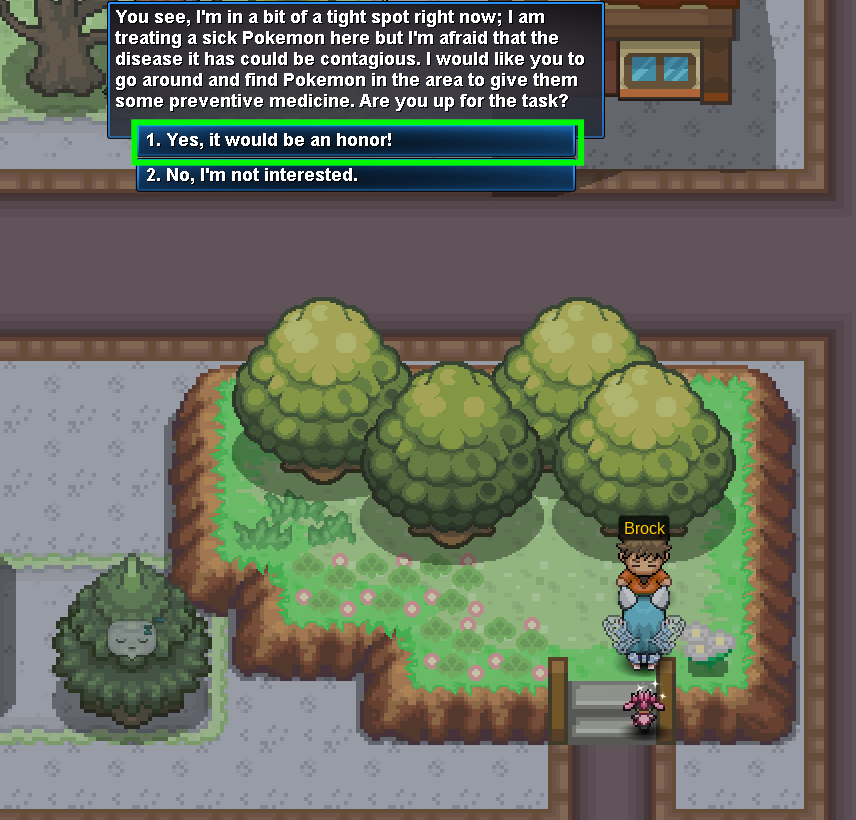
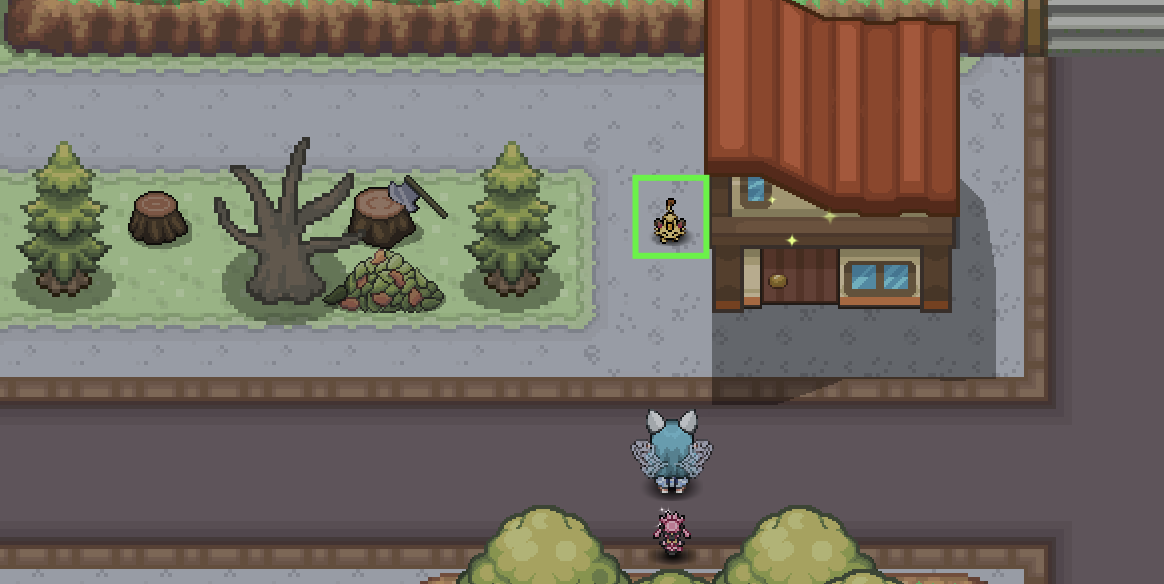
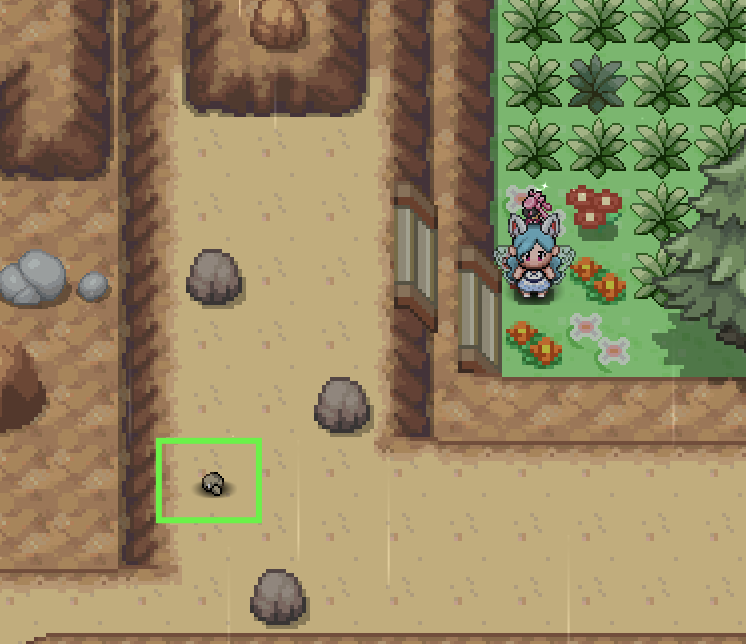
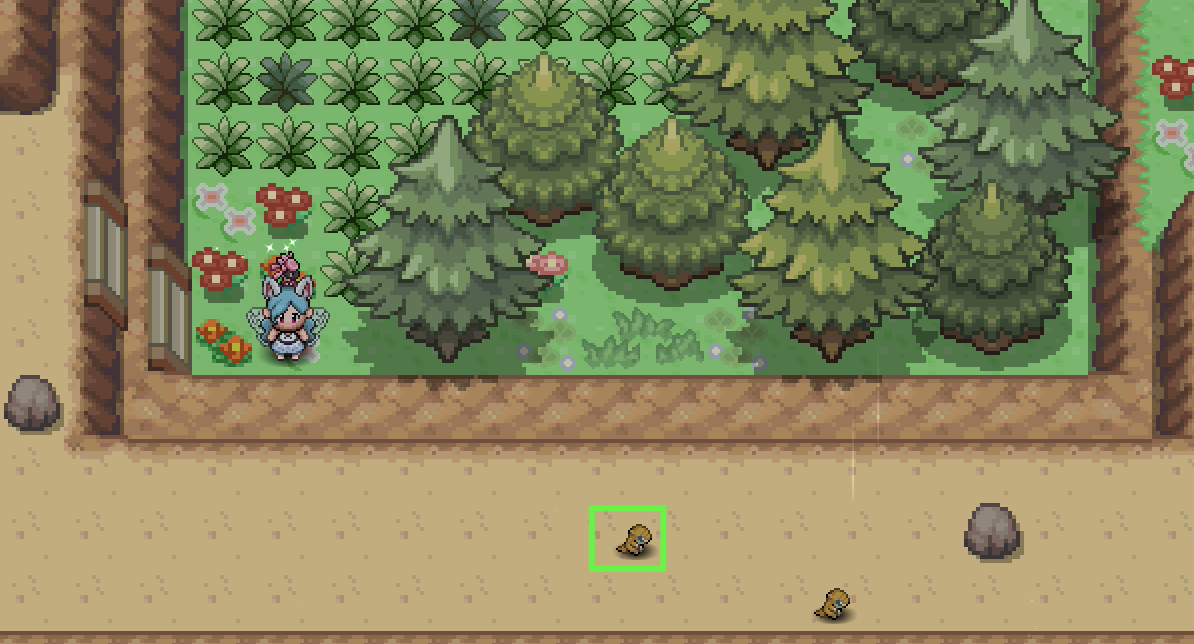
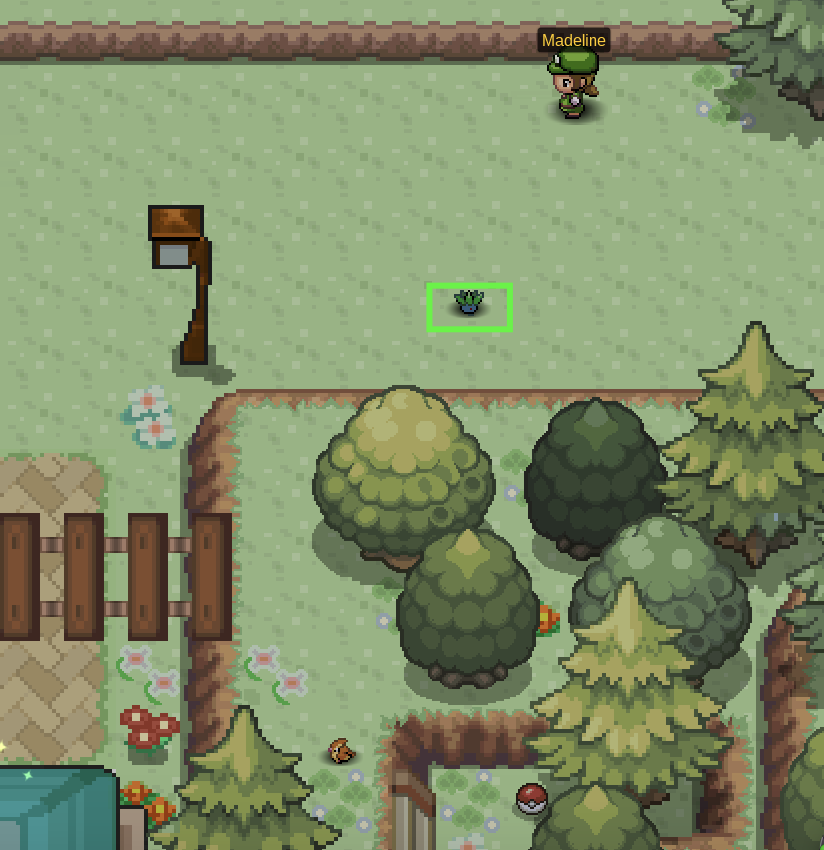
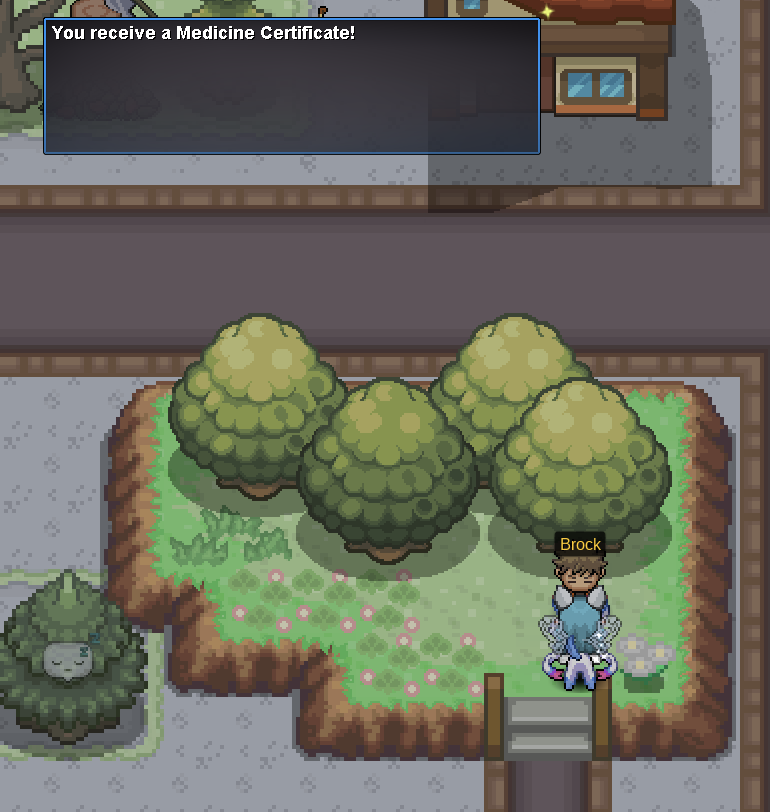
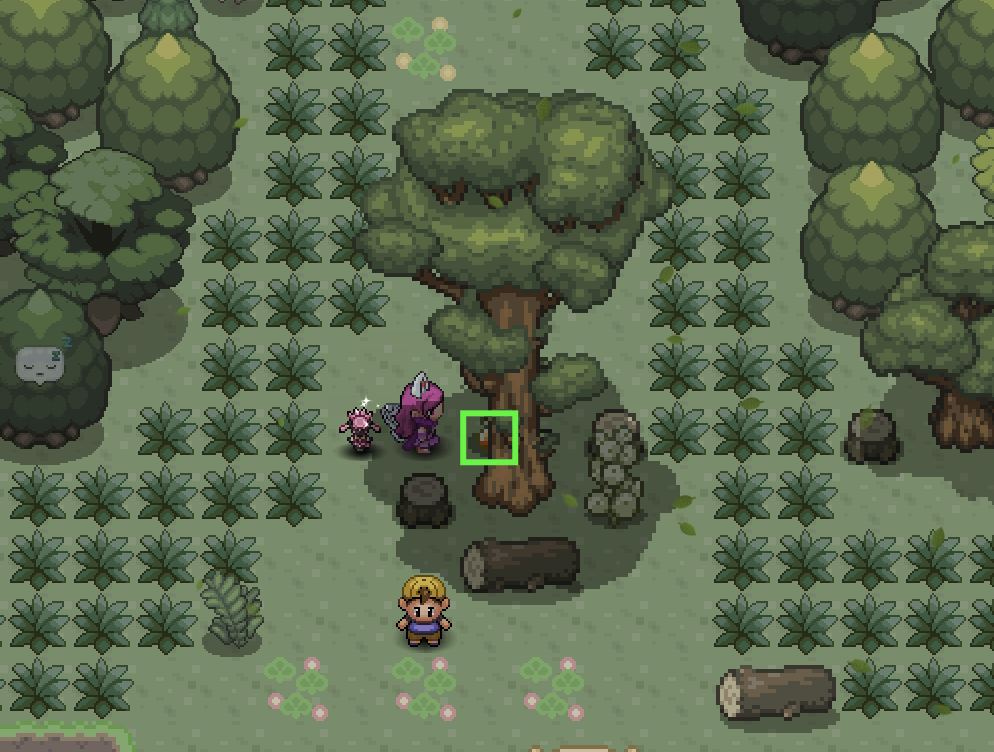
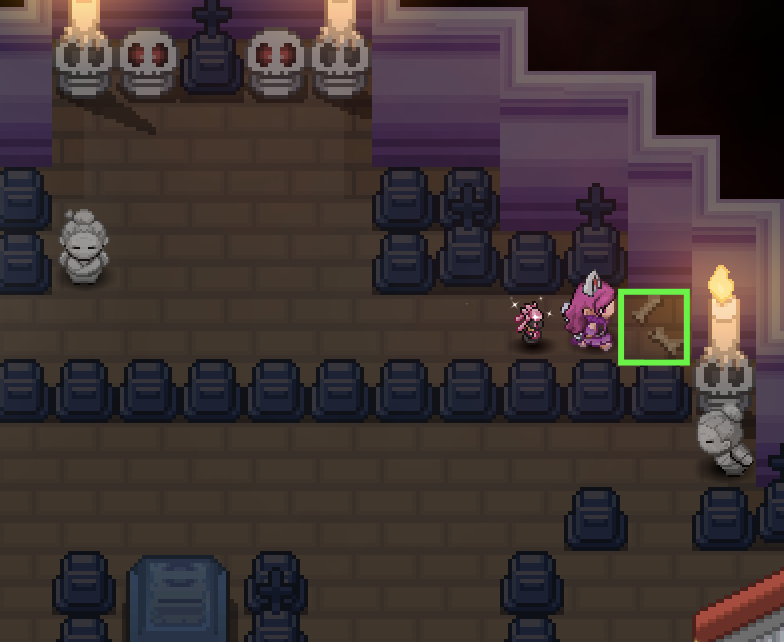
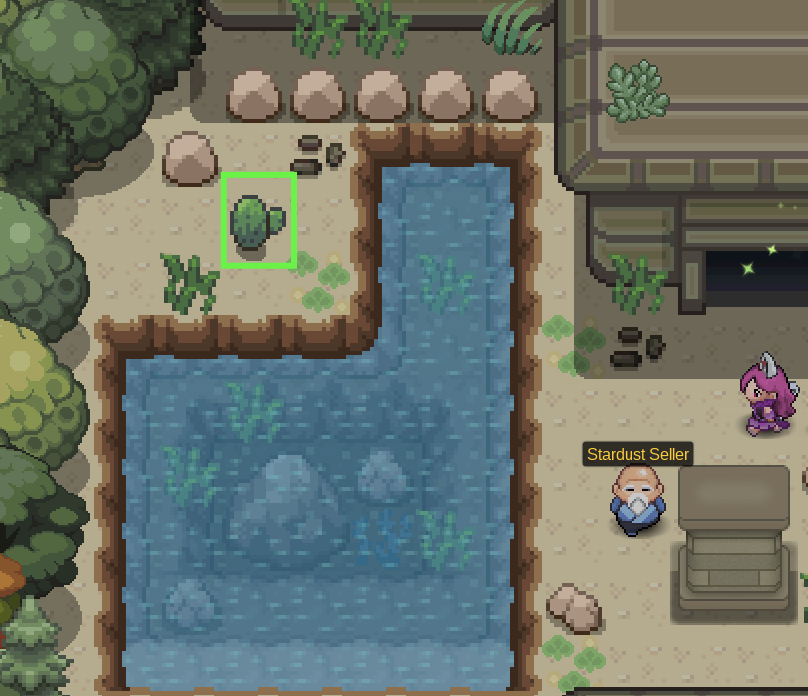
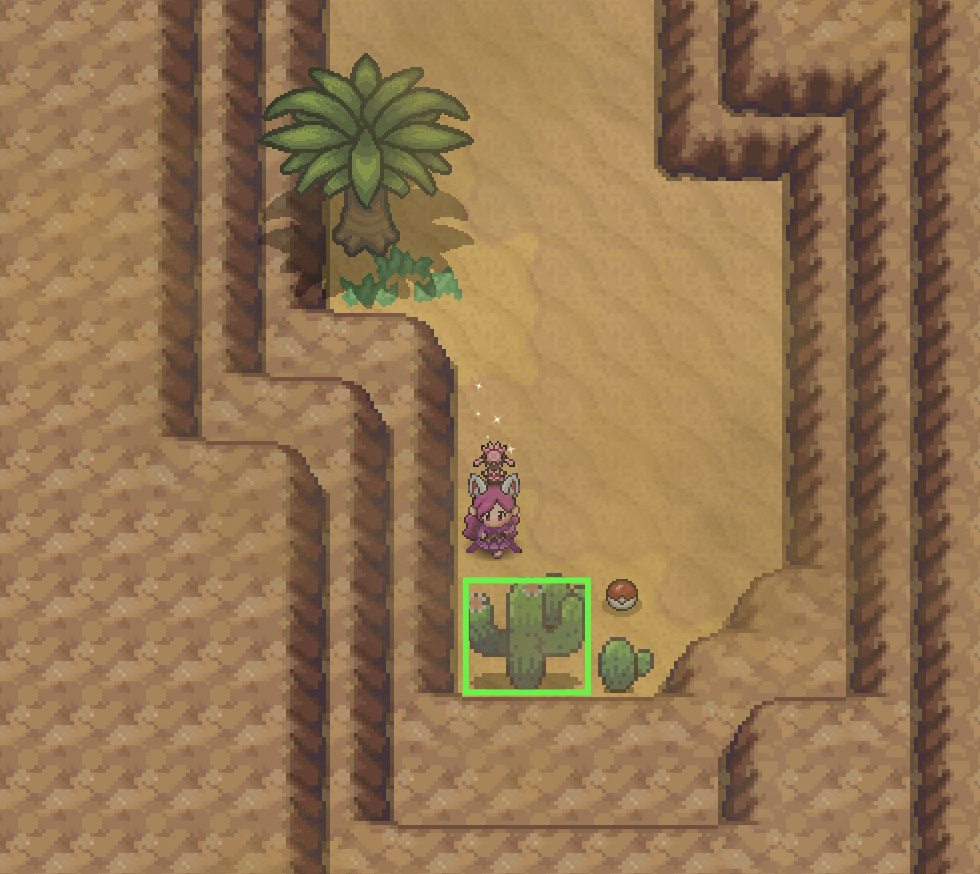
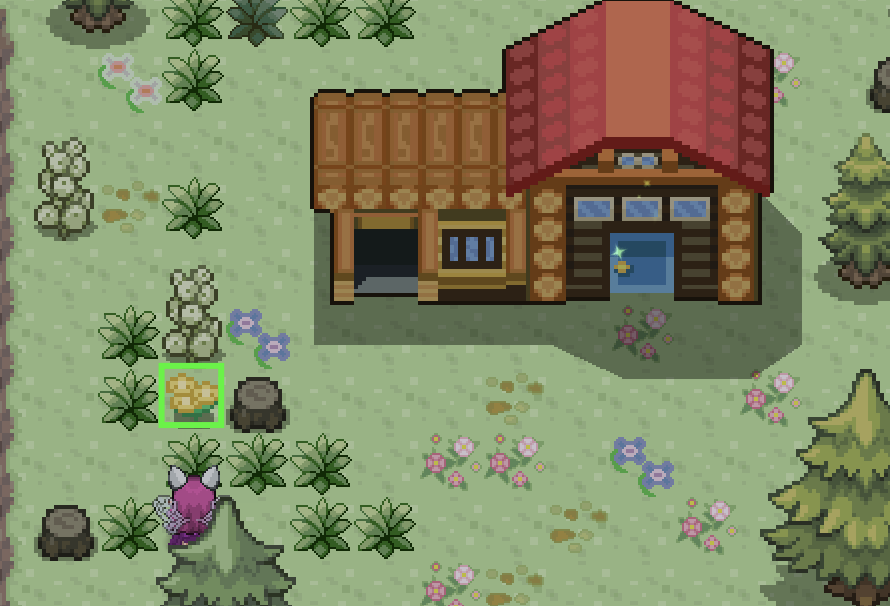
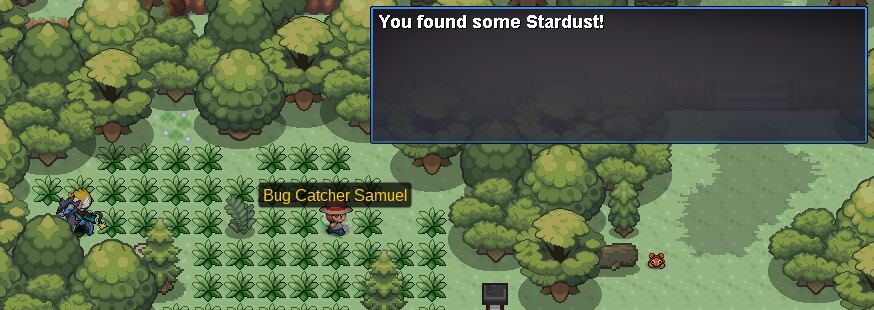
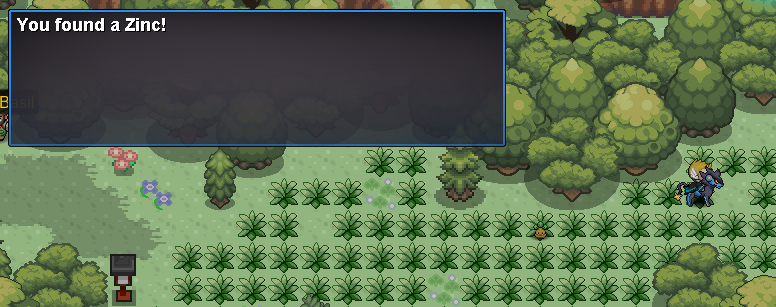
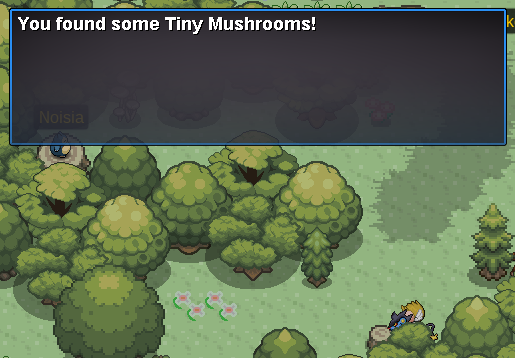
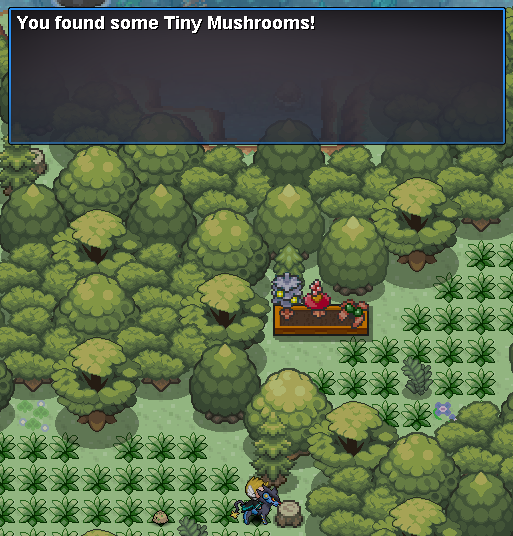
Hi there and welcome to the Doctor Pokemon Quest! This guide will help you understand the mechanics of the Doctor Quest! Furthermore, it'll help you find the materials needed for the quest. ❊ Completed the Egg Moves Quest ❊ Must be Hoenn Champion Kanto Daycare MS: 6 Hours -- Non-MS: 11 Hours Johto, Hoenn, Four Island Daycare MS: 11 Hours -- Non-MS: 20 Hours Kanto: Route 5 Johto: Route 34 Hoenn: Route 117 Sevii Islands: Four Island Sinnoh (Not involved in this quest): Solaceon Town ❊ In order to start curing Pokemon, you'll need a Medical Certificate first. ❊ After, you'll need to present your certificate to the old lady in the Kanto, Johto, Hoenn, and Four Island Daycares. ❊ You will then be asked to help heal a pokemon of a specific tier with different items. ❊ With active membership (MS), you gain double medical experience and gain experience every step of healing. ❊ After healing a pokemon, you'll have a chance to battle it and capture it. These pokemon are syncable. Step 1: Talk to Brock at Pewter City and offer to help him. [spoiler=Med Cert Step 1] Step 2: Use the Medicine to cure the pokemon. Locations are listed below. [spoiler=Med Cert Step 2] Viridian City Pidgey: Next to Ground Gym [spoiler=Pidgey] Oddish: Near the southern stop house [spoiler=Oddish] Route 2 Scyther: Southern Route 2, Right side [spoiler=Scyther] Pewter City Meowth 1: Near Pewter Jail [spoiler=Meowth 1] Meowth 2: Near the Pokecenter [spoiler=Meowth 2] Route 3 Geodude: Upper Route 3 [spoiler=Geodude] Rhyhorn: Upper Route 3 [spoiler=Rhyhorn] Sandshrew 1: Upper Route 3 [spoiler=Sandshrew 1] Sandshrew 2: Upper Route 3 [spoiler=Sandshrew 2] Sandslash: Route 3 Dig Spots [spoiler=Sandslash] Step 3: Report back to Brock and turn in 3 Rare Candies. He will give you the Medical Certificate in return. [spoiler=Med Cert Step 3] ❊ You gain experience by fully curing pokemon. ❊ With active MS, you gain double experience and gain experience from every step in curing a pokemon. ❊ Below is the Tier System for better understanding on the use of Medical Experience. ❊ Unfortunately, there isn't a way to check your Medical Experience as of now. [spoiler=Tier System] Tier 1 Experience Requirement: None Selection Chance: 50% Can only encounter Tier 1 Pokemon Tier 2 Experience Requirement: 20 Medical Experience Selection Chance: 50% Allows you to encounter Tier 2 Pokemon Tier 3 Experience Requirement: 40 Medical Experience Selection Chance: 50% Allows you to encounter Tier 3 Pokemon Tier 4 Experience Requirement: 80 Medical Experience Selection Chance: 40% Allows you to encounter Tier 4 Pokemon Tier 5 Experience Requirement: 160 Medical Experience Selection Chance: 20% Allows you to encounter Tier 5 Pokemon ❊ Each daycare has different Pokemon at different tiers from 1 to 5. ❊ The pokemon chosen for you to cure will be chosen at random. ❊ The higher the tier, the more steps it requires to fully cure. ❊ The higher the tier, the rarer the Pokemon is. ❊ You cannot obtain pokemon of a higher Tier if you do not have the experience for it. [spoiler=Curable Pokemon] [spoiler=Kanto Daycare]Tier 1 Cleffa -- Igglybuff -- Happiny Tier 2 Abra Tier 3 Shellder Tier 4 Munchlax -- Mime Jr. Tier 5 Bulbasaur -- Charmender -- Squirtle [spoiler=Johto Daycare]Tier 1 Snubbull -- Azurill -- Remoraid Tier 2 Pichu Tier 3 Togepi Tier 4 Mantyke -- Bonsly Tier 5 Chikorita -- Cyndaquil -- Totodile [spoiler=Hoenn Daycare] Tier 1 Whismur -- Carvanha -- Seedot Tier 2 Corphish Tier 3 Wynaut Tier 4 Swablu -- Lillipup Tier 5 Treecko -- Torchic -- Mudkip [spoiler=Four Island Daycare] Tier 1 Bidoof -- Cherubi -- Kricketot Tier 2 Shinx Tier 3 Cubchoo Tier 4 Riolu -- Rufflet Tier 5 Bergmite -- Pancham -- Darumaka ❊ In order to cure a Pokemon, you'll have to bring certain items to the old lady. ❊ The items required to cure a pokemon vary per tier and are chosen at random from a list. ❊ For further information on how to obtain each item, feel free to check out our Item Guide, Held Items in the Wild Guide and Berry Guide. Tier 1: Berries Tier 2 and 3: Berries and Vitamins Tier 4 and Tier 5: Berries, Vitamins, and Items [spoiler=Berry, Vitamin, and Item Lists] [spoiler=Berries] ❊ Cheri Berry ❊ Chesto Berry ❊ Pecha Berry ❊ Rawst Berry ❊ Aspear Berry ❊ Leppa Berry ❊ Oran Berry ❊ Persim Berry ❊ Lum Berry ❊ Sitrus Berry ❊ Pomeg Berry ❊ Kelpsy Berry ❊ Qualot Berry ❊ Hondew Berry ❊ Grepa Berry ❊ Tamato Berry ❊ Heal Powder ❊ Energy Powder ❊ Energy Root [spoiler=Vitamins] ❊ Revival Herb ❊ Carbos ❊ Iron ❊ HP Up Protein ❊ Calcium ❊ Zinc ❊ Rare Candy [spoiler=Items] ❊ Charcoal ❊ Hard Stone ❊ Metal Coat ❊ Hard Stone ❊ PP Up ❊ NeverMeltIce ❊ Sharp Beak ❊ Repel ❊ Stardust ❊ Tiny Mushroom ❊ Sometimes, the old lady will ask you to bring a special healing item in order to cure a pokemon. ❊ You can find these items in the locations below. [spoiler=Special Item Locations] [spoiler=Kanto] Bone Moss: Pokemon Tower 3F, East [spoiler=Bone Moss] Cape Coral: Route 25, In front of Bill's house [spoiler=Cape Coral] Deep Clay: Diglett's Cave, Near Dig Spot Allotments [spoiler=Deep Clay] Heart Peach: Viridian Forest, Near Stop House [spoiler=Heart Peach] Sparky Blossom: Kanto Powerplant, Upper Right [spoiler=Sparky Blossom] [spoiler=Johto] Elder Log Coal: Burned Tower Floor 2, Need Rock Smash [spoiler=Elder Log Coal] Golden Olphistle: Lake of Rage, Central Lake [spoiler=Golden Olphistle] Languid Mushroom: Slowpoke Well L1, Left Island [spoiler=Languid Mushroom] Madre Cactus: Ruins of Alph, Left across lake [spoiler=Madre Cactus] Rainbow Tulip: Ilex Forest, Next to Boss Neroli [spoiler=Rainbow Tulip] [spoiler=Hoenn] Cactus Dahlia: Route 111 Desert, South [spoiler=Cactus Dahlia] Chimney Ash: Jagged Pass, Central Area [spoiler=Chimney Ash] Deepblue Shell: Route 129 Underwater, West [spoiler=Deepblue Shell] Moon Bloom: Petalburg Maze *From the entrance, stay next to the left wall. In the last intersection, go right and stay next to the north wall. [spoiler=Moon Bloom] Succulent Leaf: Route 125, West [spoiler=Succulent Leaf] [spoiler=Sevii Islands] Ancient Seed: Six Island, Southeast of Ruin Valley [spoiler=Ancient Seed] Heat Fungus: One Island, Ember Spa [spoiler=Heat Fungus] Lake Knot: Two Island, Cape Brink [spoiler=Lake Knot] Rooster Lily: Five Island Meadow, Next to the House [spoiler=Rooster Lily] Summer Claw: Three Island, Bond Bridge Beach [spoiler=Summer Claw]
- 3 replies
-
- 16
-
-
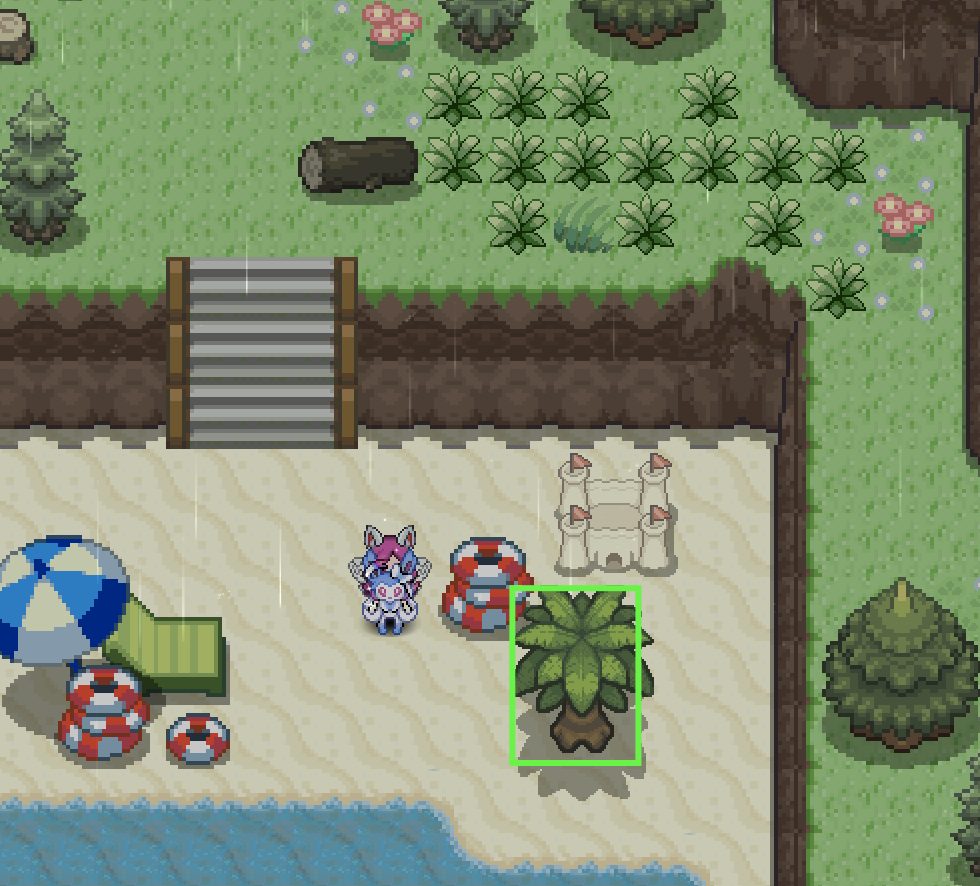
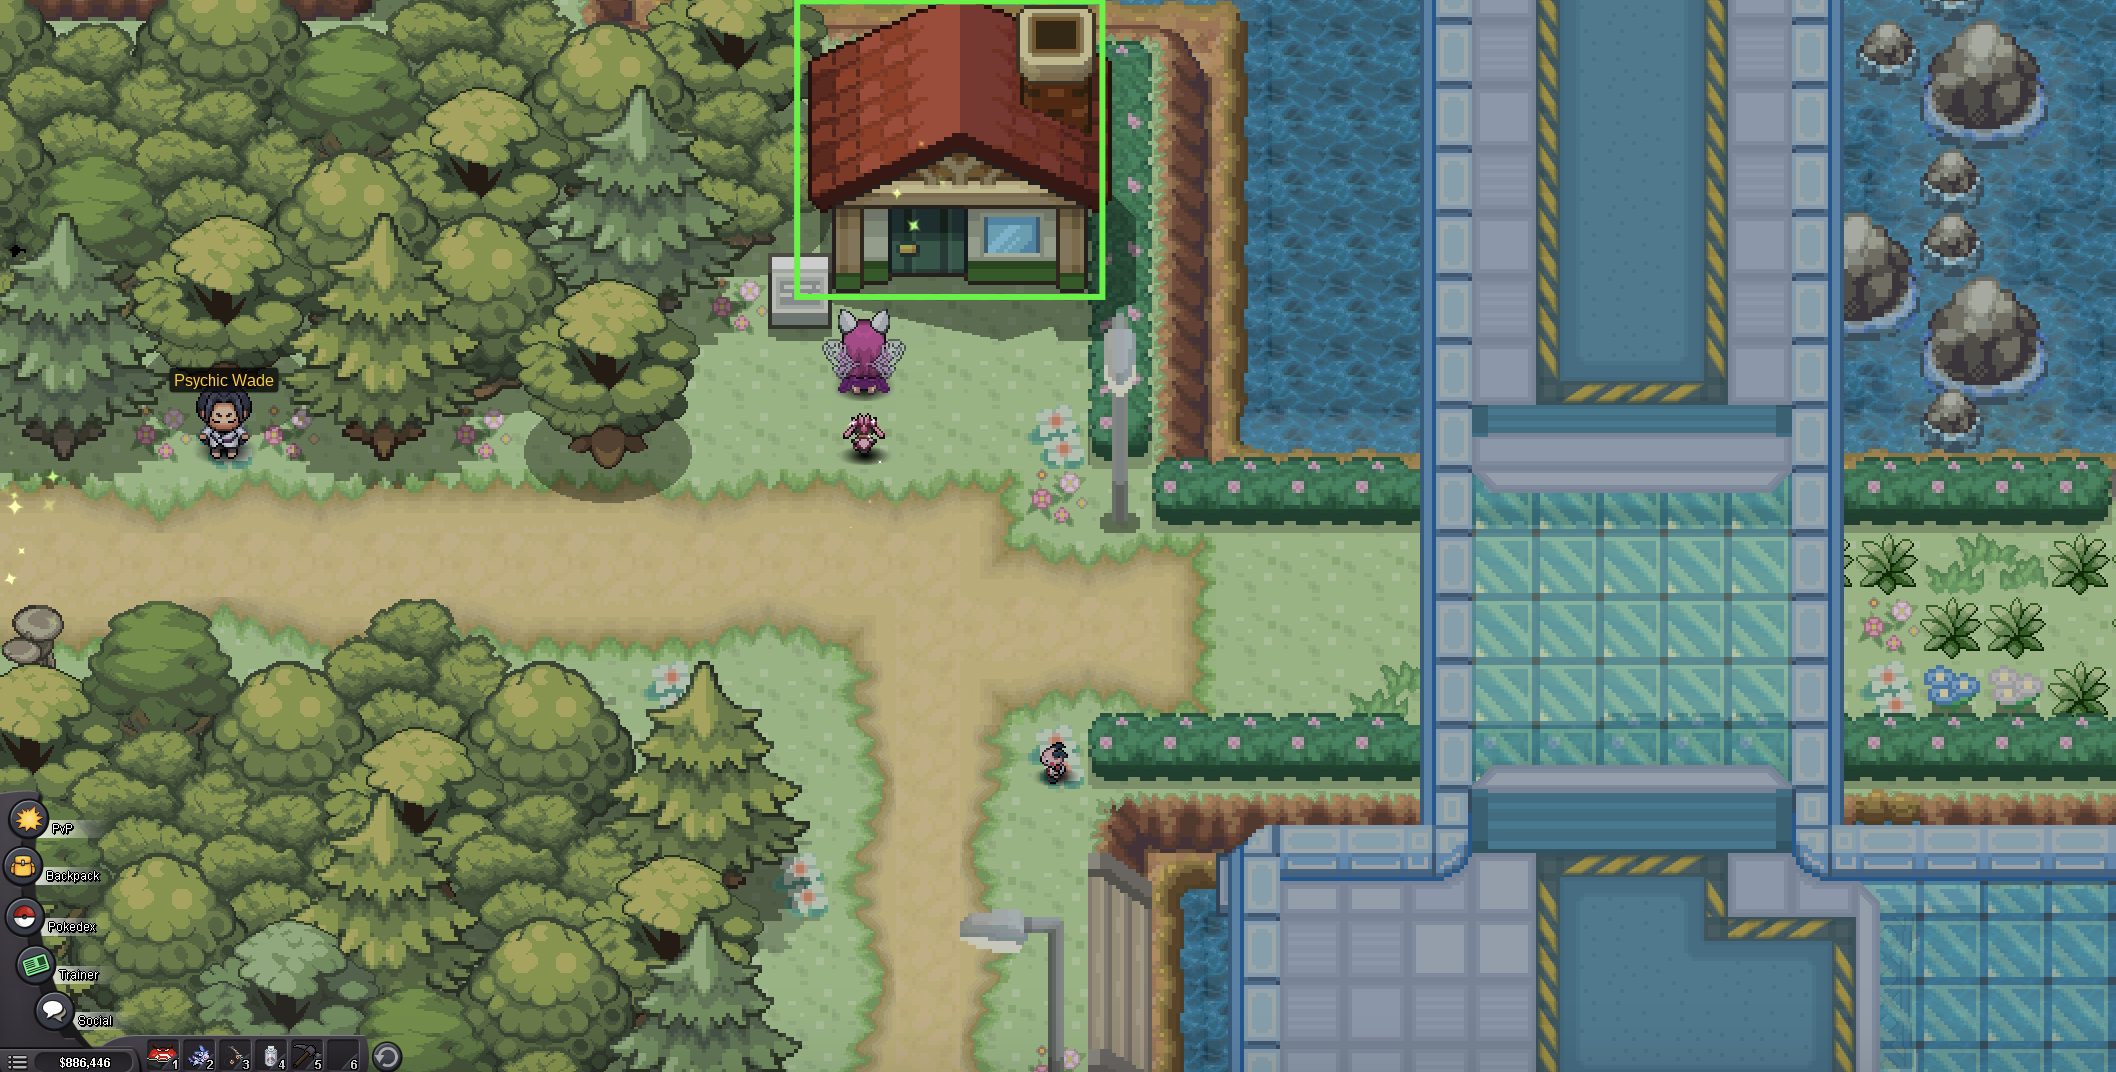
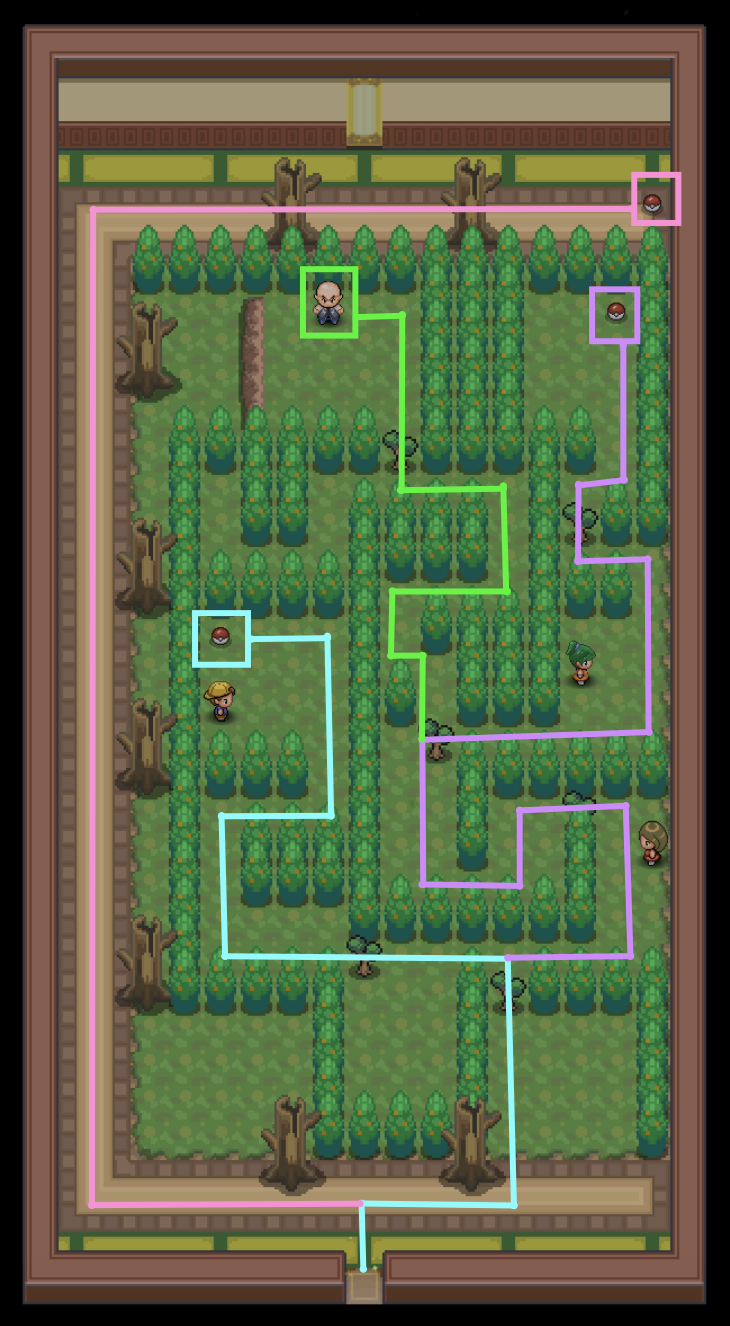
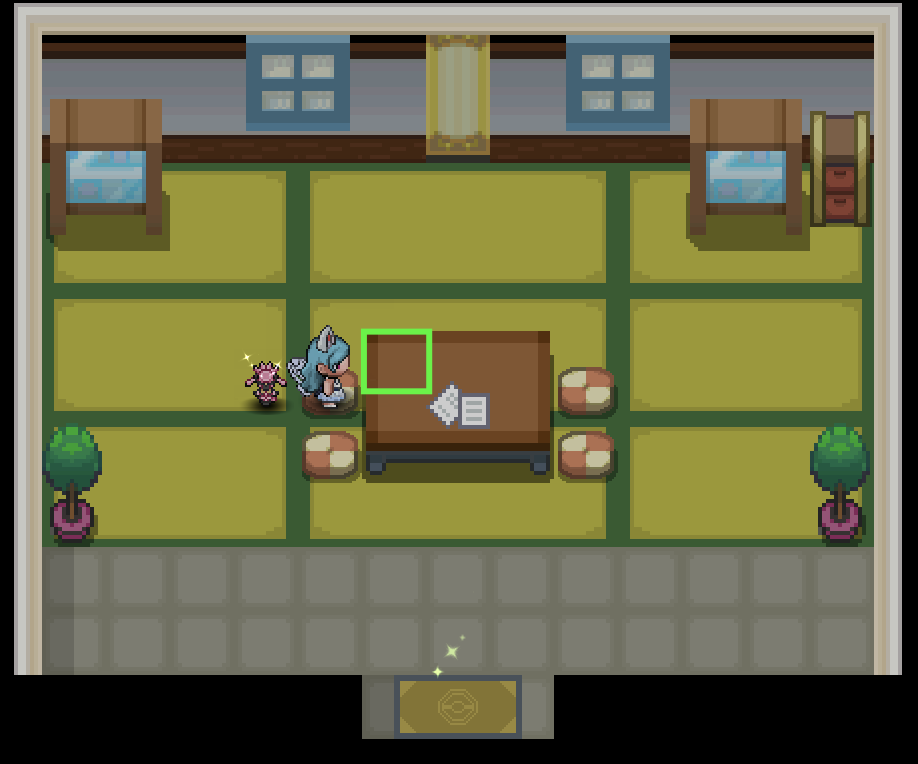
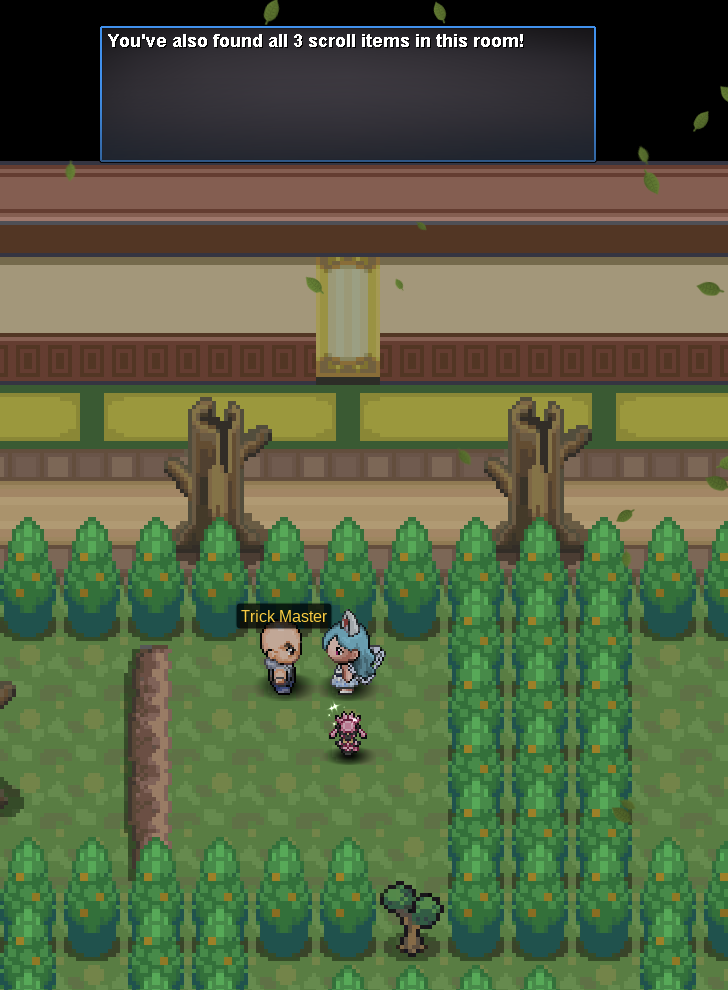
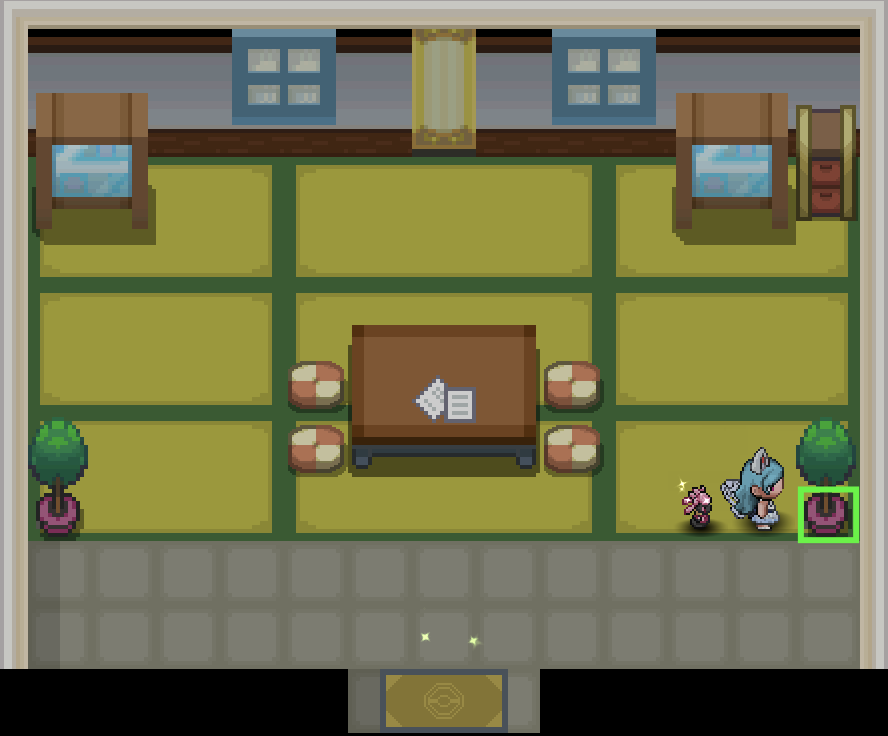
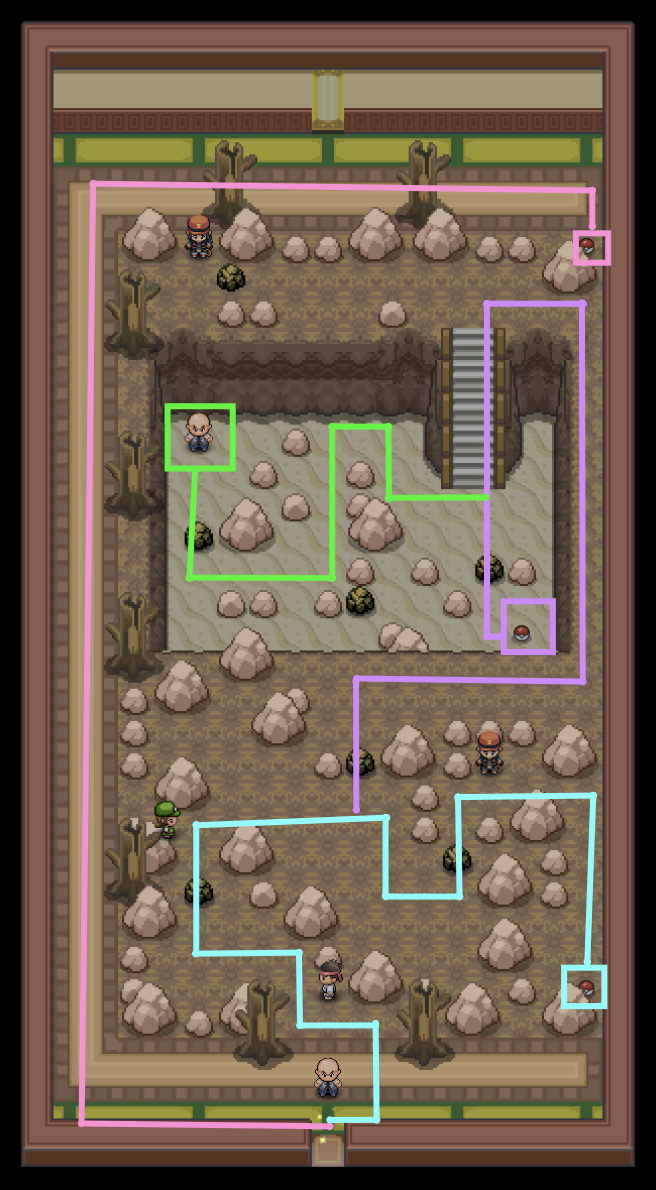
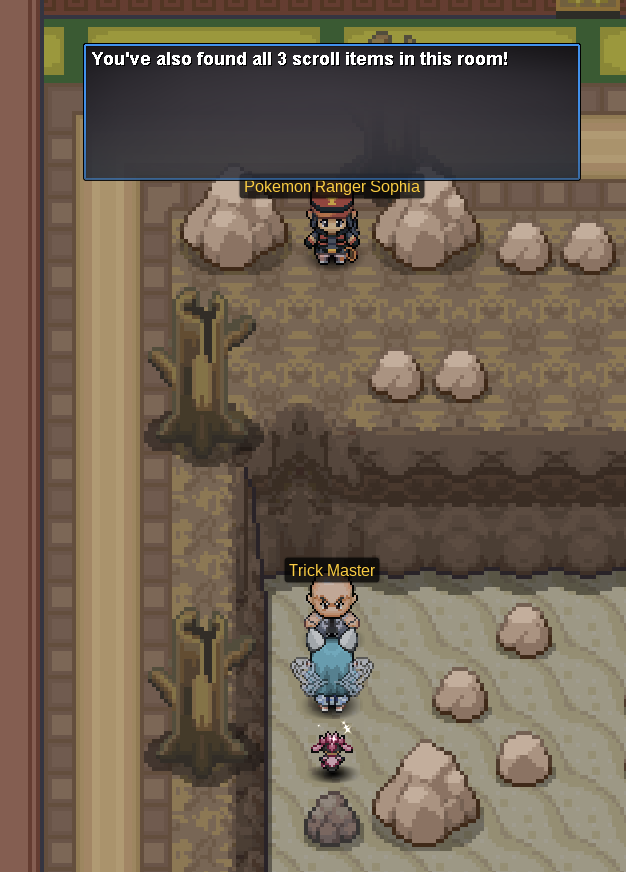
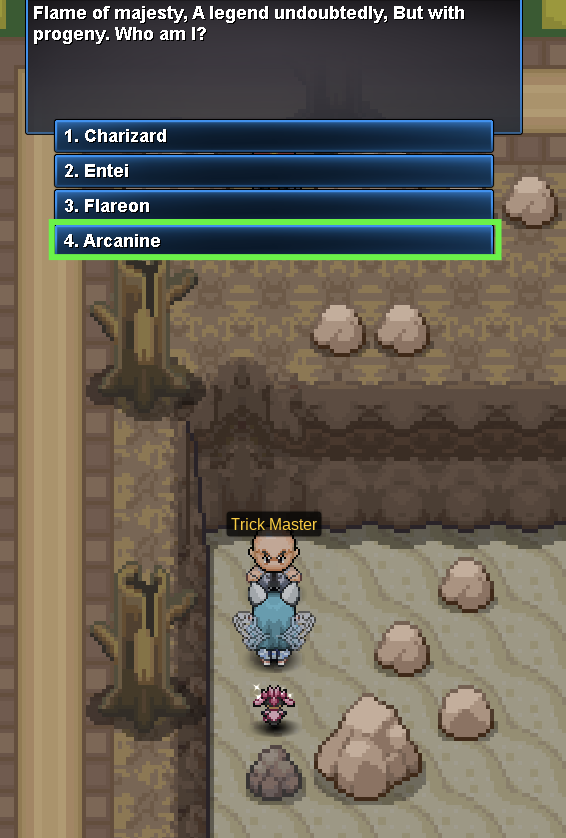
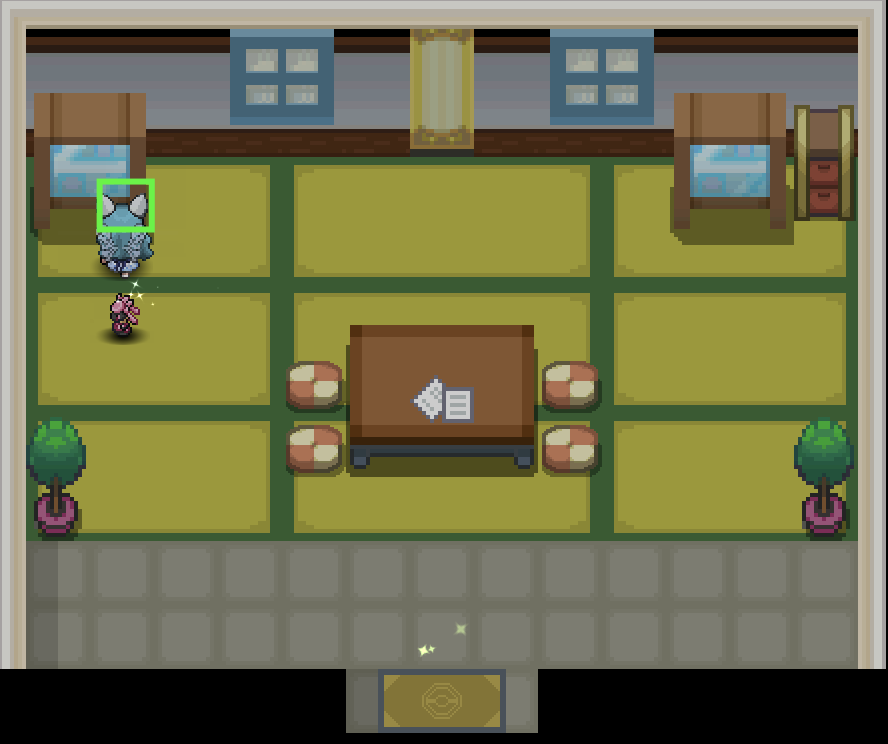
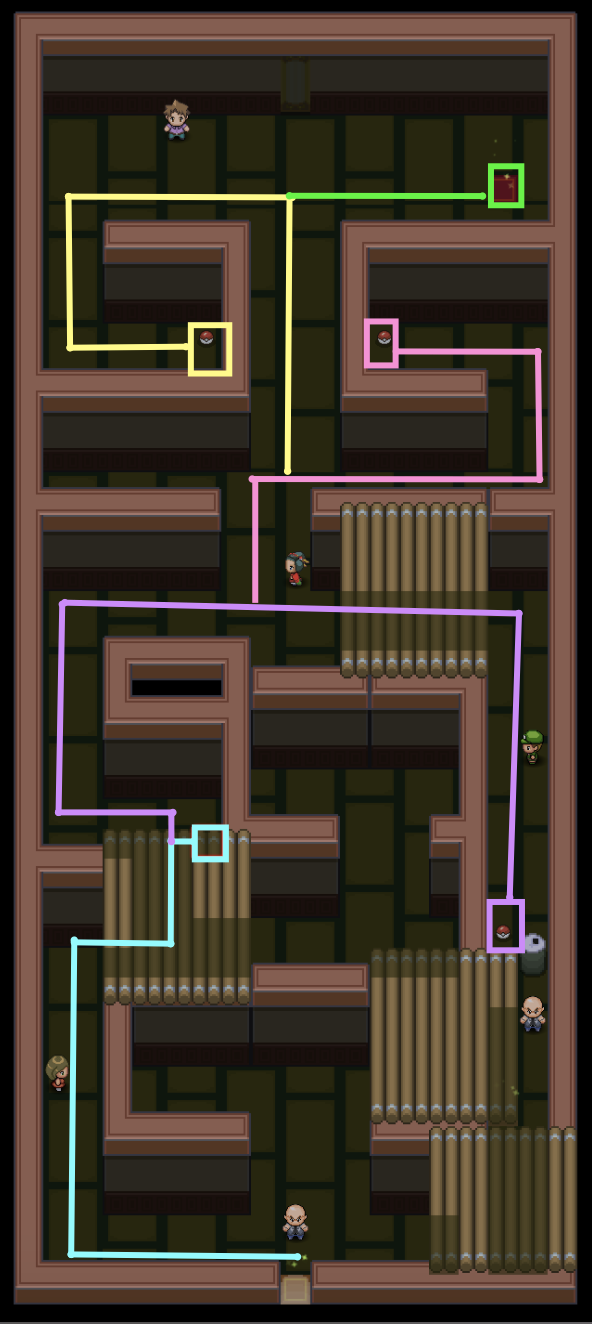
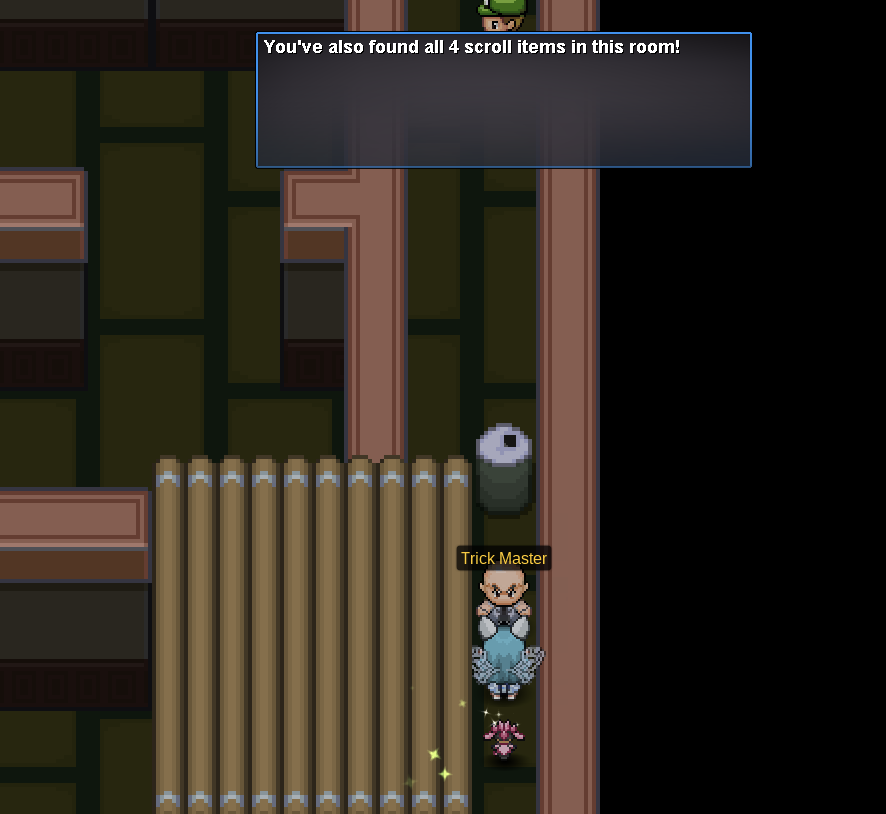
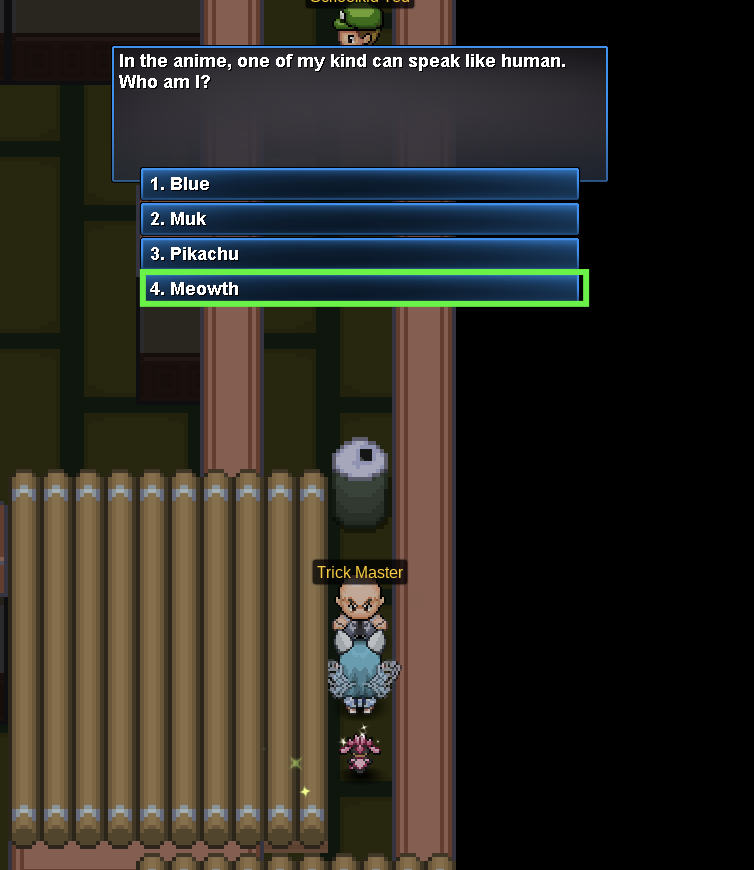
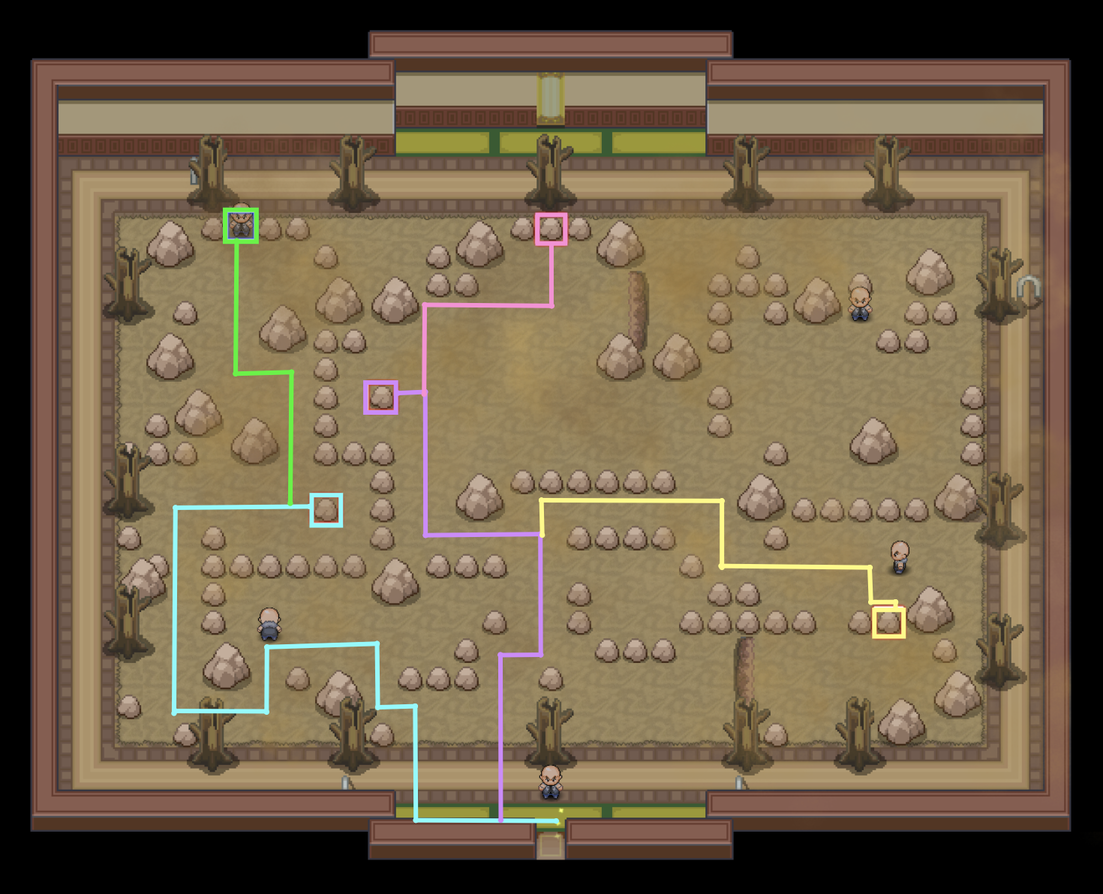
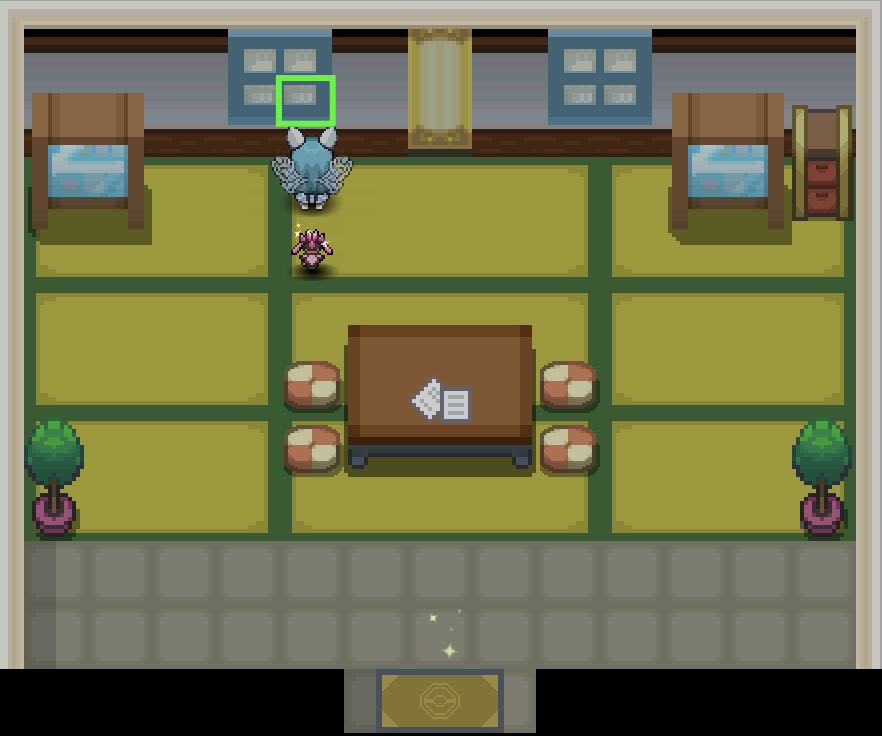
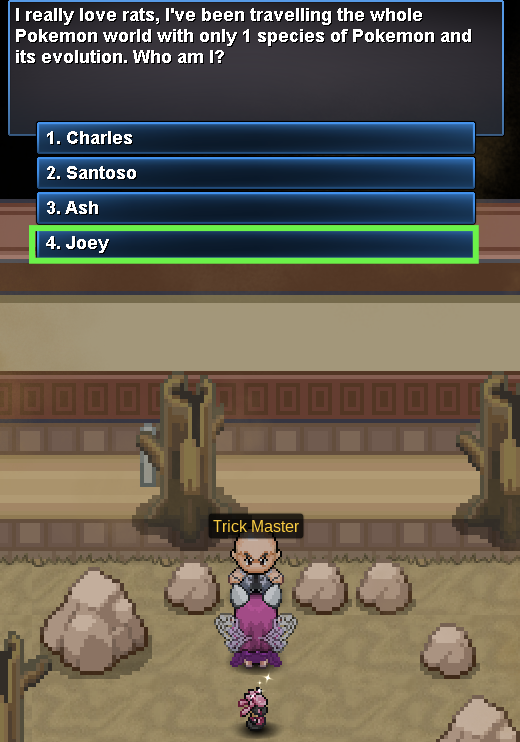
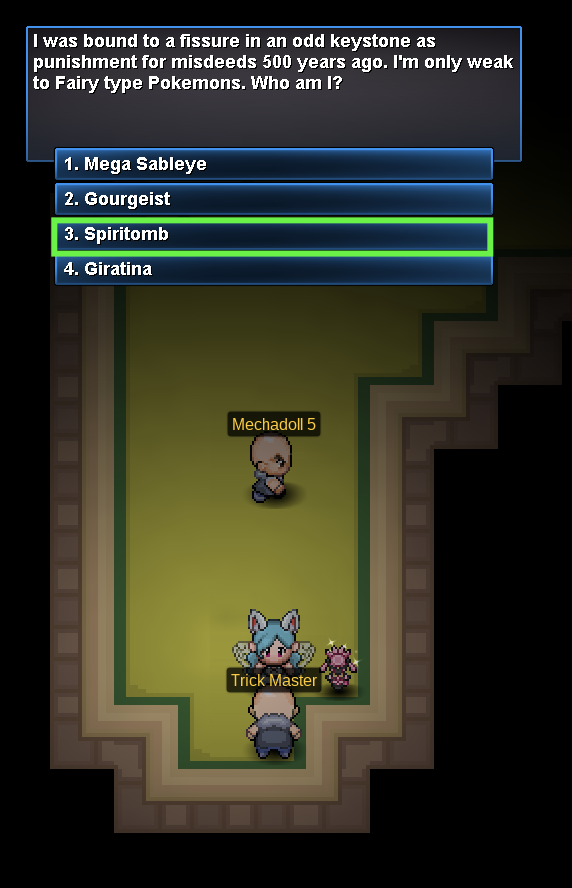
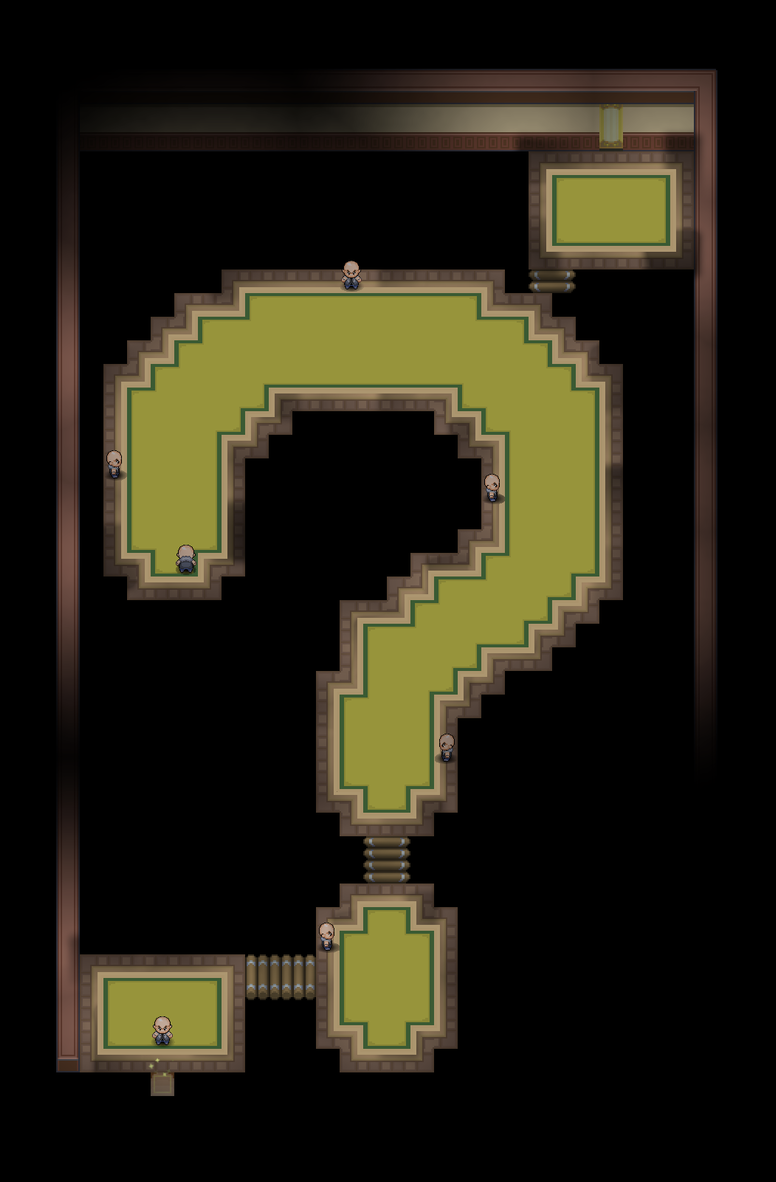
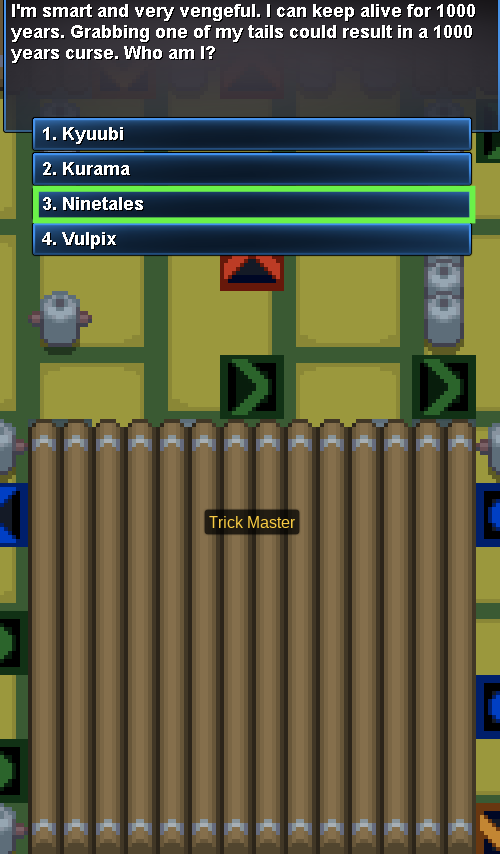
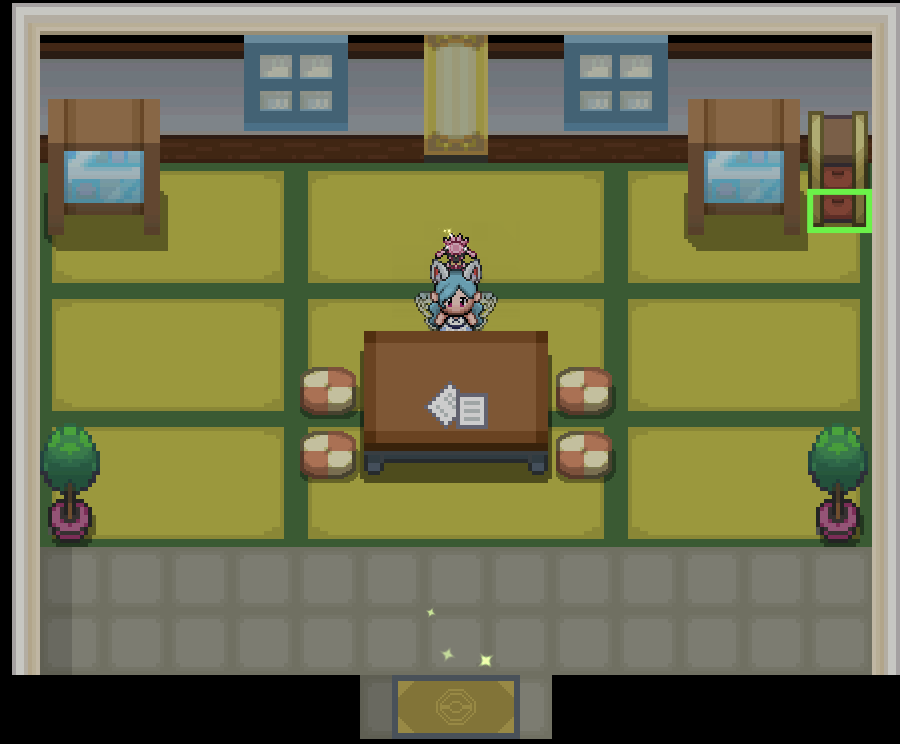
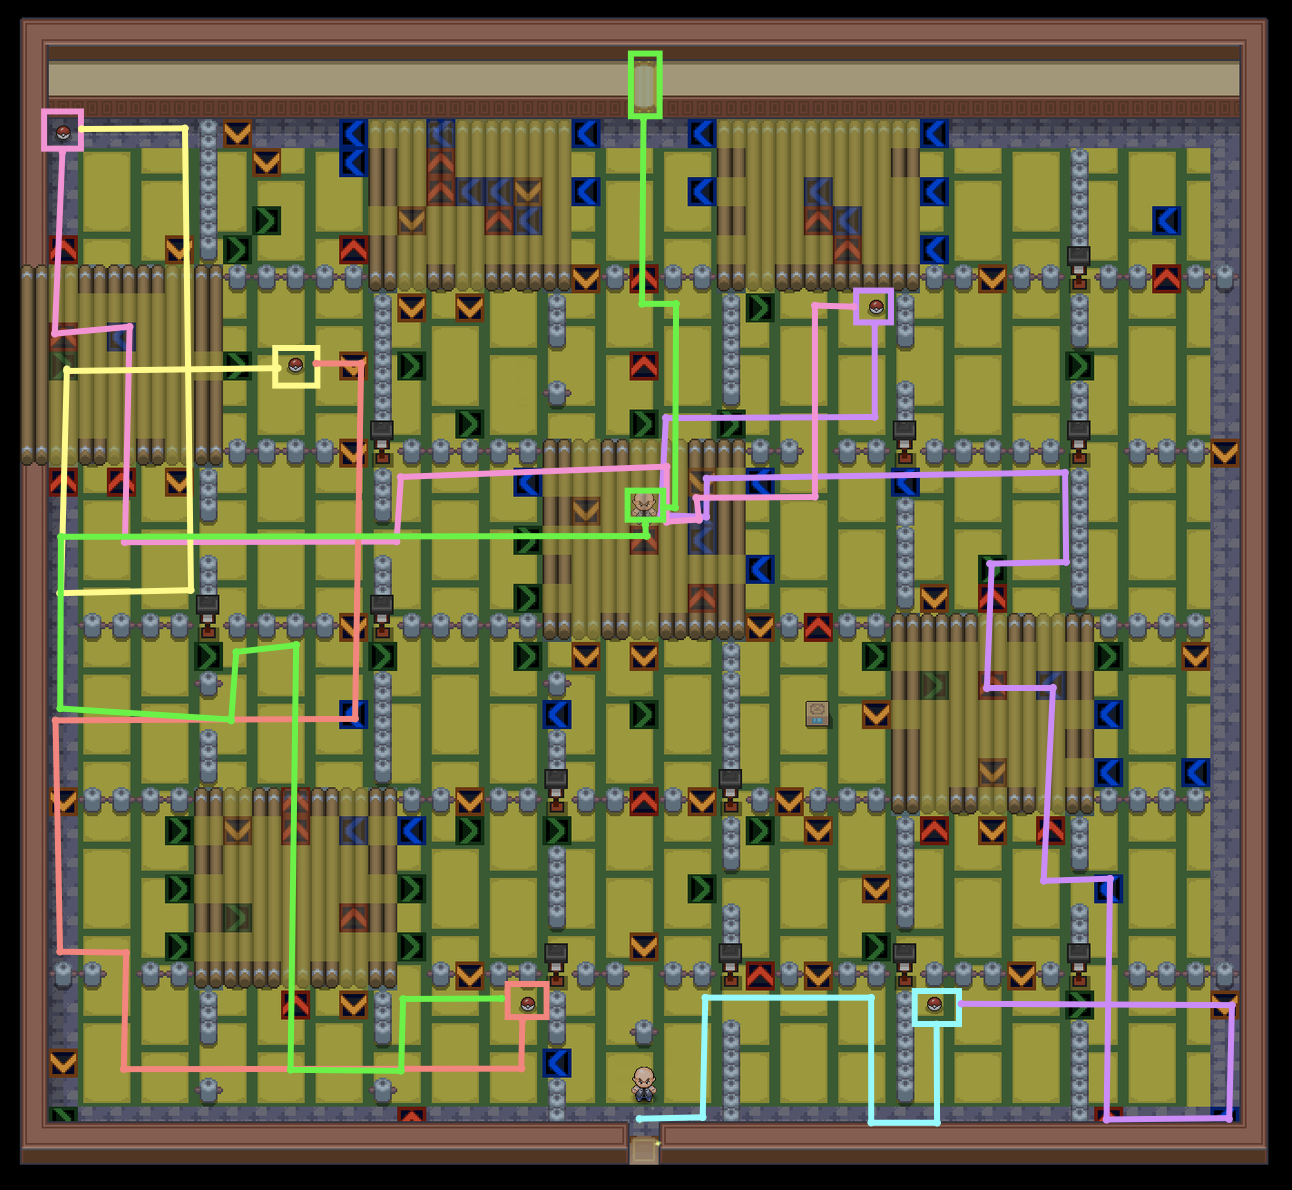
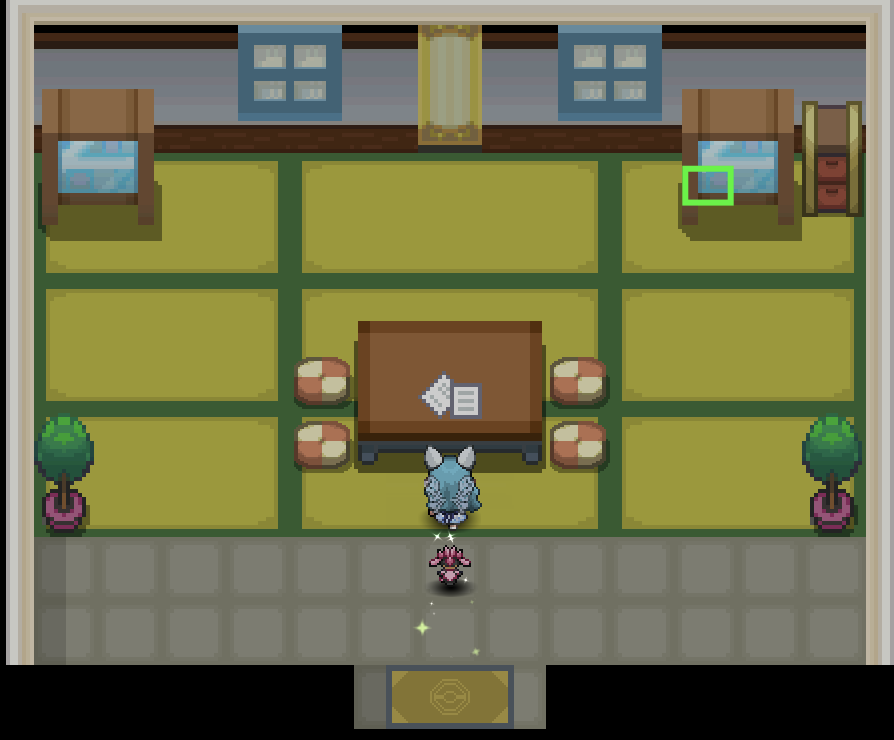
Hi there and welcome to the Trick House Guide! This guide will teach you about the different challenges in the Trick House. It will also inform you on rewards you may obtain. Region: Hoenn Route: Lower Route 110 Access Point: House next to Psychic Wade ✧ Each time you enter, you'll have to find the Trick Master. ✧ Afterwards, you will be tasked to do a challenge. ✧ After completing a challenge, you will be asked to answer a riddle. ✧ Riddles are chosen at random from a list of Riddles which can be found below. ✧ After each challenge, the house goes on its respective cooldowns. ✧ If you leave the house during a challenge, you will have to redo the challenge after the cooldown. ✧ After completing the 6th challenge, future attempts will always lead to the 6th challenge. ✧ If you get the riddle wrong, you can reattempt the challenge for as long as you do not leave the house. Challenge Type: Battle Maze Reward: TM Taunt Cooldown: 1 Day Average Trainer Level: 19 Requirements: Cut/Tree Axe Step 1: Find the Trick Master at the table as shown below. Afterwards, you'll be able to enter the Yellow Banner at the back. Step 2: Obtain each of the 3 scrolls as shown below. Step 3: Turn in the Scrolls to the Trick Master Step 4: Answer the Riddle. Afterwards, interact with the yellow banner at the back and claim your prize. *See Riddle List. Challenge Type: Battle Maze Reward: 5 Great Balls Cooldown: 1 Day Average Trainer Level: 33 Requirements: Rock Smash/Pickaxe Step 1: Find the Trick Master at the plant as shown below. Afterwards, you'll be able to enter the Yellow Banner at the back. Step 2: Obtain each of the 3 scrolls as shown below. Step 3: Turn in the scrolls to the Trick Master Step 4: Answer the Riddle. Afterwards, interact with the yellow banner at the back and claim your prize. *See Riddle List. Challenge Type: Battle Maze Reward: 2 Rare Candies Cooldown: 1 Day Average Trainer Level: 44 Requirements: - Step 1: Find the Trick Master at the left shelf as shown below. Afterwards, you'll be able to enter the Yellow Banner at the back. Step 2: Obtain each of the 4 scrolls as shown below. Step 3: Turn in the scrolls to the Trick Master. Step 4: Answer the Riddle. Afterwards, interact with the yellow banner at the back and claim your prize. *See Riddle List. Challenge Type: Battle Maze Reward: 10 Hyper Potions Cooldown: 1 Day Average Trainer Level: 56 Requirements: - Step 1: Find the Trick Master at the left window as shown below. Afterwards, you'll be able to enter the Yellow Banner at the back. Step 2: Obtain each of the 4 scrolls as shown below. Step 3: Turn in the scrolls to the Trick Master in the upper left corner. Step 4: Answer the Riddle. Afterwards, interact with the yellow banner at the back and claim your prize. *See Riddle List. Challenge Type: Quiz Reward: Magnet Cooldown: 2 Days Requirements: Flash (Recommended) Step 1: Find the Trick Master at the right shelf as shown. Afterwards, you'll be able to enter the Yellow Banner at the back. Step 2: Answer the riddle of each Mechadoll. They will ask a Question from a list of three. The three possible questions for Each Mechadoll is shown below. Step 3: Answer the Riddle. Afterwards, head to the yellow banner in the upper right corner of the room to claim your prize. *See Riddle List. Challenge Type: Tile Maze Reward: First time reward Houndoominite, then randomized from the list below. ✧ 5 Hyper Potions ✧ 5 Max Potions ✧ 5 Ultra Balls ✧ 1 Rare Candy ✧ 1 TM Shadow Ball Cooldown: 3 Days Requirements: - Step 1: Find the Trick Master at the drawers as shown. Afterwards, you'll be able to enter the Yellow Banner at the back. Step 2: Obtain each of the 5 scrolls as shown below. *Blue, Purple, Pink, Yellow, Red, Green Step 3: Turn in the scrolls to the Trick Master Step 4: Answer the Riddle. Afterwards, interact with the yellow banner and claim your prize. *See Riddle List. You will have to answer a riddle each time you complete a challenge. It will taken at random from the list below. The list contains the different questions and their corresponding answers.
-
✖︎ This guide will help you to find a preview of all: ▪︎ Mounts (Land - Surf, sorted via shop: Coin / PvP / PvE) ▪︎ Clothes & Headgear (Sorted via shop: Coin / PvP / PvE) ▪︎ Miscellaneous items and boxes, alongside what they might contain ...findable in-game to customize your character. ✖︎ If you look for a specific item, feel free to ask in the in-game Trade channel or by creating a topic in our Trade Zone sub-forum. ✖︎ All the cosmetic items are listed in this guide. Periodically, new items will be added in the guide, given that they are added in game. ✖︎ You may find Ctrl+F or Ctrl+F useful, if you're seeking a specific item. ✖︎ Due to the consequent amount of items, the page might take time to load. Contributors : 9oomy, Gouseru, Calahan, Neroli, Shinohara [spoiler=Spring Event Mounts 2019] Togekiss Caramel Togekiss Chocolate Togekiss Cotton Candy Togekiss Mint Togekiss Strawberry Togekiss Vanilla [spoiler=Christmas Event Mounts 2018] Xmas Mareep
-
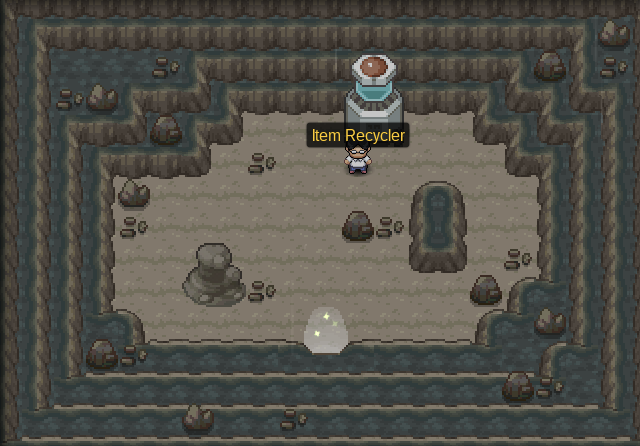
Hi there and welcome to the Item Recycler Guide! This Guide will teach you about the different items you can turn in to the Item Recycler. It also elaborates on the possible outcomes of your item inputs. Function: Turns your held items, evolutionary stones, and evolutionary items into another item. This is based on the number of items you turn in to the Item Recycler. Requirements: Johto Champion Cooldown: None Region: Johto Access Point: Mt. Mortar Directions: Step 1: Take the middle entrance at Route 42 and take the ladder down. Step 2: Make your way to the northern ladder in Mt. Mortar B1F as shown. Step 3: Make your way up to the ladder at the upper left corner of Mt. Mortar Lower Cave as shown. Step 4: Head to the northern exit in Mt. Mortar Upper Cave. Step 5: Leave Mt. Mortar Northern Entrance at the top right exit. Step 6: Make your way towards the center of Forest Pit. Step 7: Head to the exit inside Lake Cave. ❇ Water Stone ❇ Fire Stone ❇ Thunder Stone ❇ Leaf Stone ❇ Moon Stone ❇ Sun Stone ❇ Shiny Stone ❇ Dusk Stone ❇ Dawn Stone ❇ Metal Coat ❇ Reaper Cloth ❇ Prism Scale ❇ Deep Sea Scale ❇ Deep Sea Tooth ❇ King's Rock ❇ Dragon Scale ❇ Razor Claw ❇ Razor Fang ❇ Black Belt ❇ Black Glasses ❇ Charcoal ❇ Dragon Fang ❇ Hard Stone ❇ Magnet ❇ Miracle Seed ❇ Mystic Water ❇ Never-Melt Ice ❇ Poison Barb ❇ Sharp Beak ❇ Silk Scarf ❇ Silver Powder ❇ Soft Sand ❇ Spell Tag ❇ Twisted Spoon ❇ Leftovers All the can be recycled. You can find a list of Gems here! If you give 1 item: ❇ Revive ❇ Ultra Ball ❇ Full Heal ❇ Ether If you give 10 items, you can get items from different tiers below at random. 1 is the most common tier while 4 is the most rare. *If you give evolution stones, you'll have a smaller chance of getting rarer items. Amount: 5-10 Items: ❇ Revive ❇ Ultra Ball ❇ Full Heal ❇ Ether Amount: 2 Items: ❇ Tiny Mushroom ❇ Honey Amount: 1 Items: ❇ Pearl ❇ Nugget Amount: 1 Items: ❇ Choice Band ❇ Choice Scarf ❇ Choice Specs ❇ Masterball
-
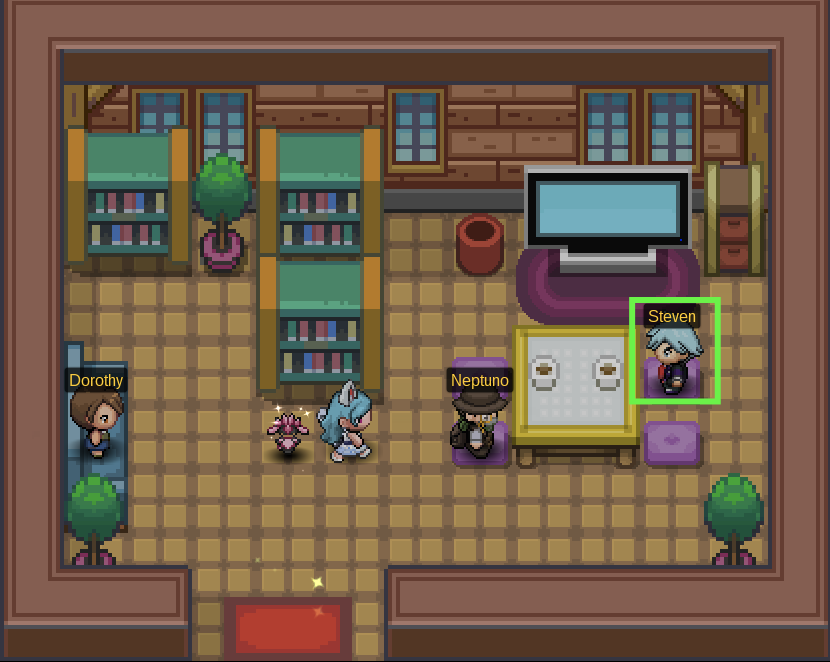
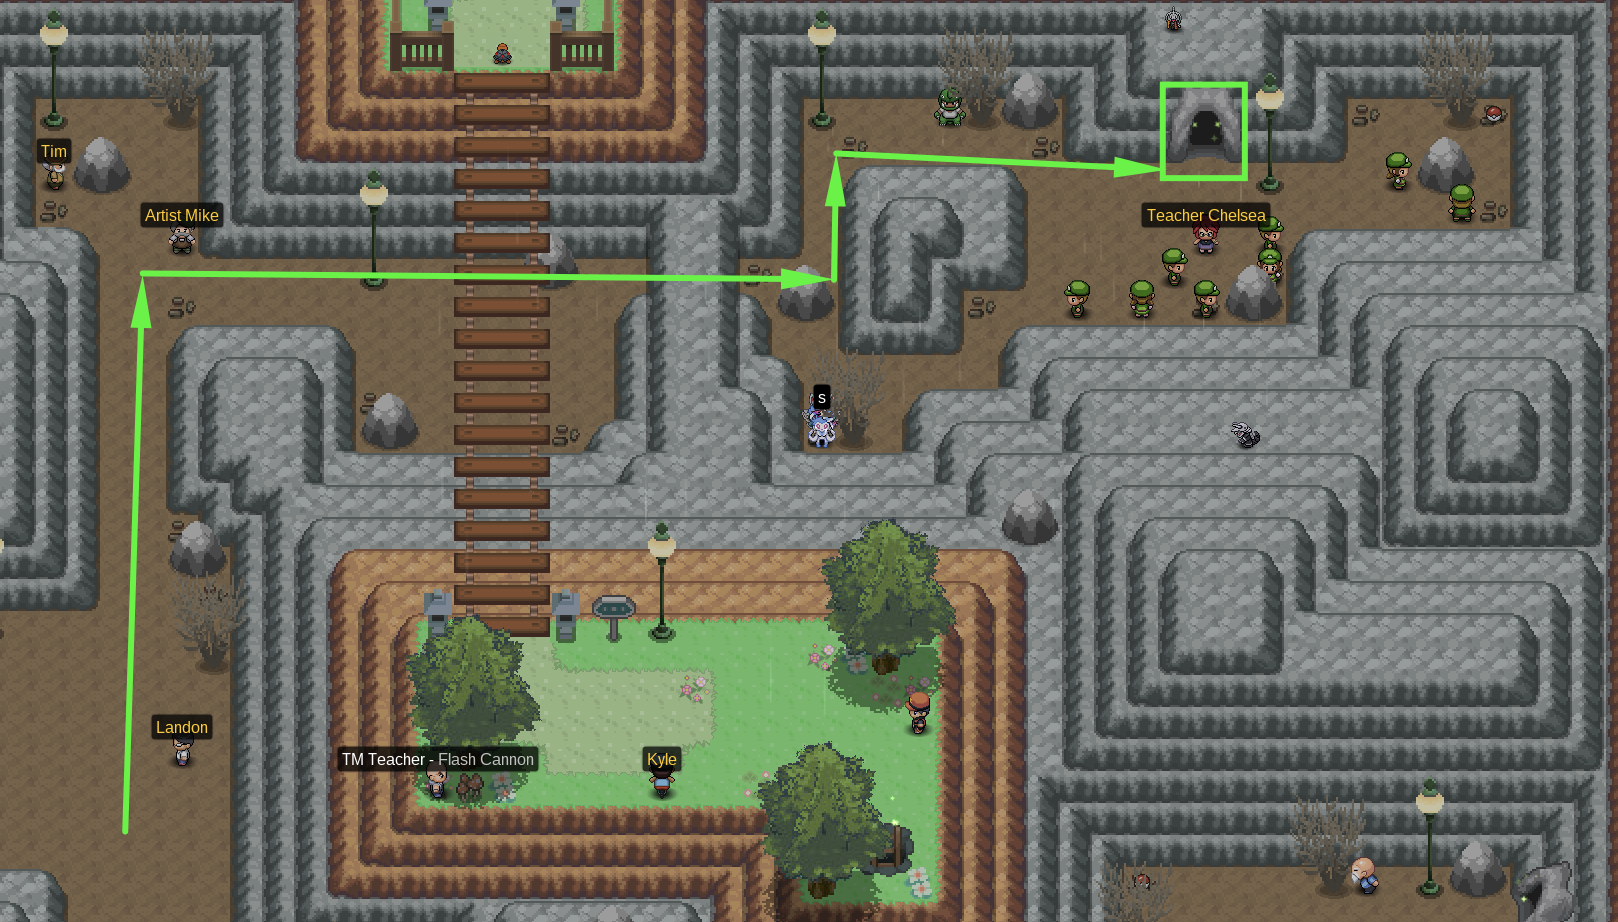
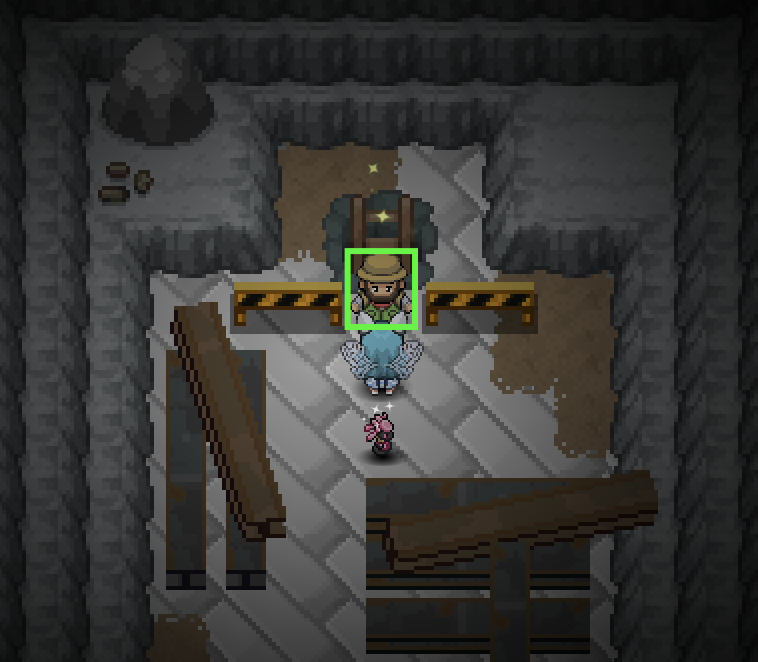
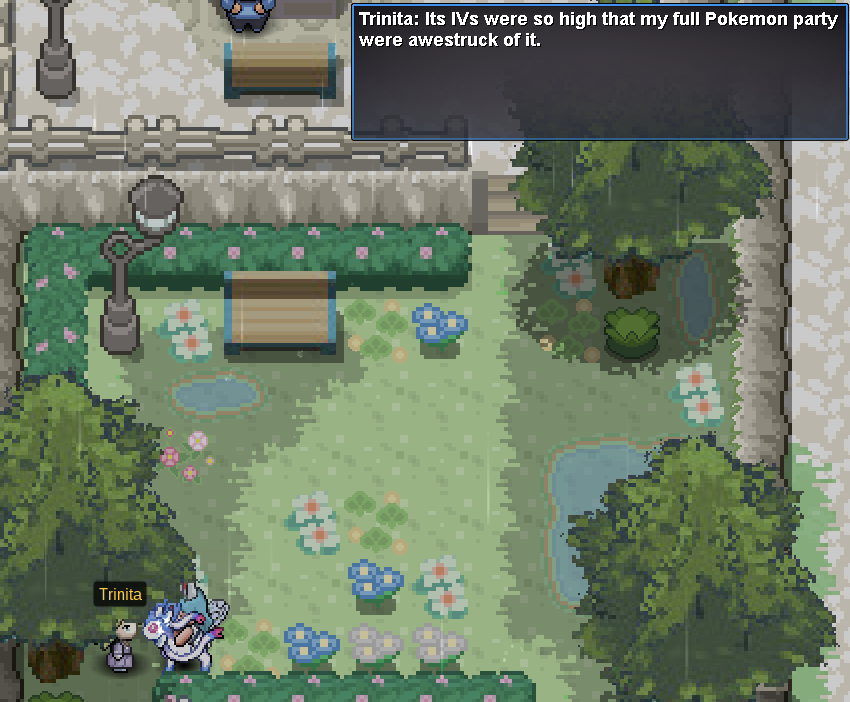
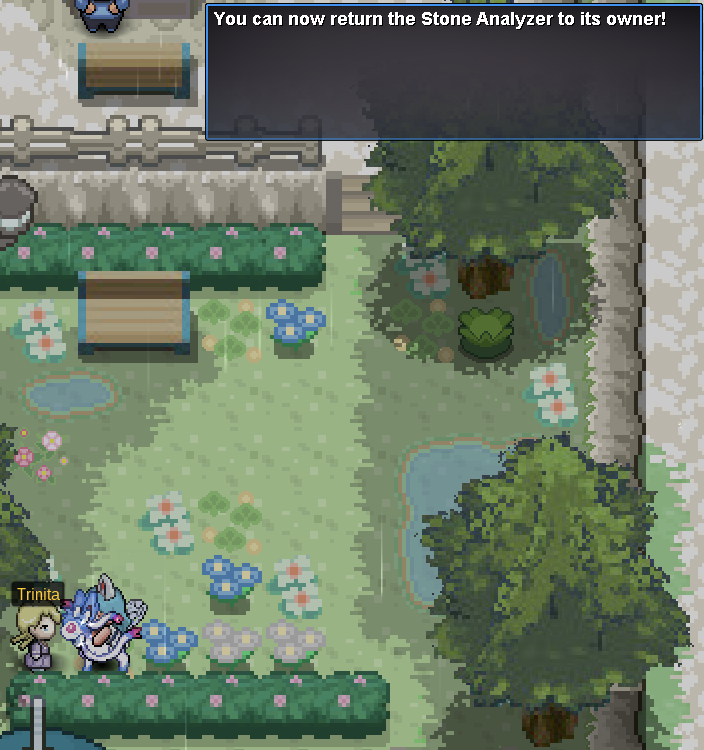
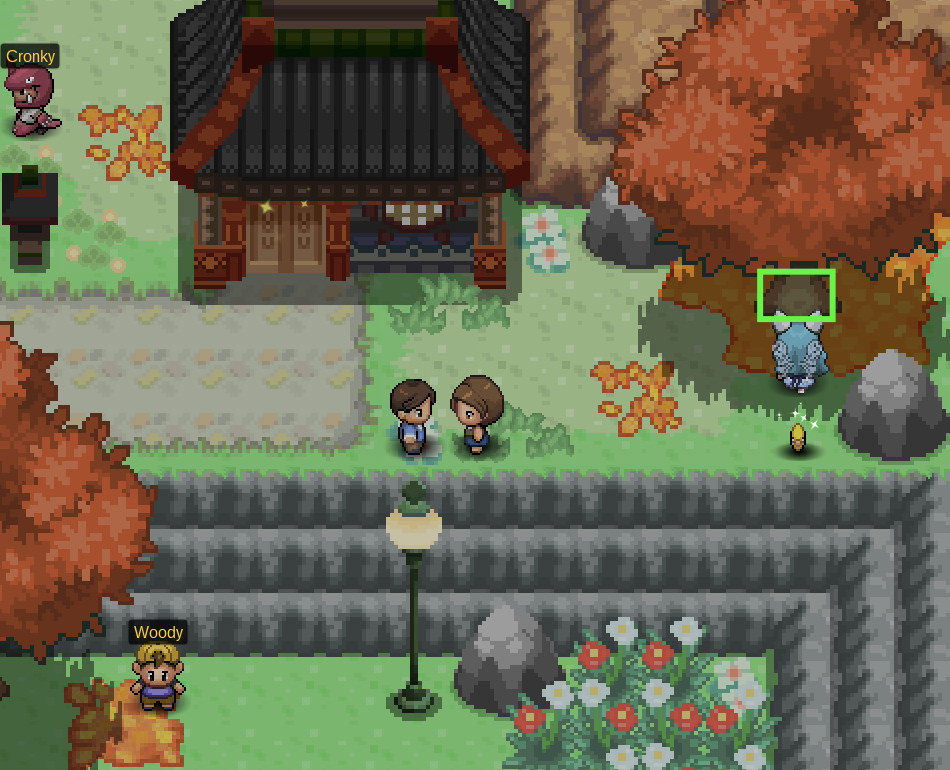
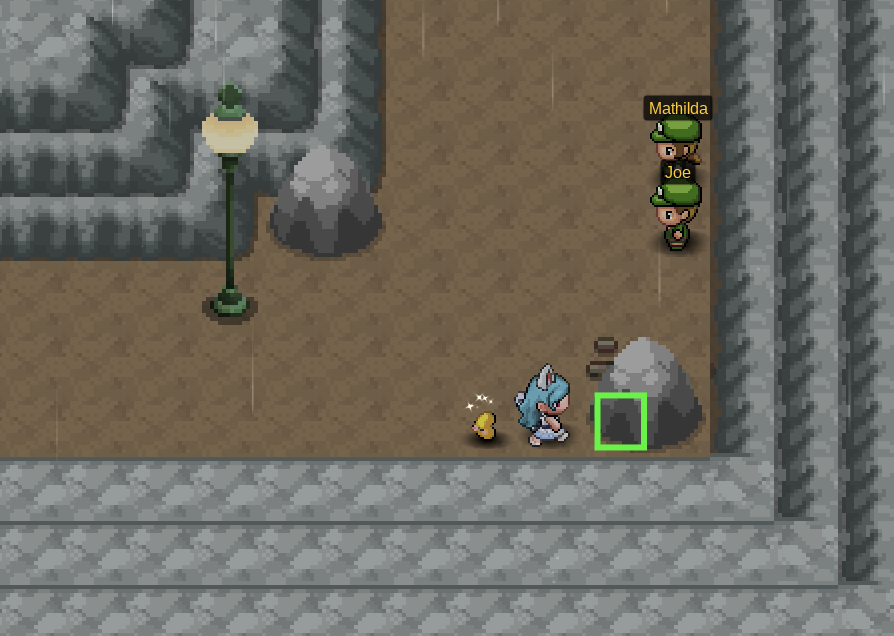
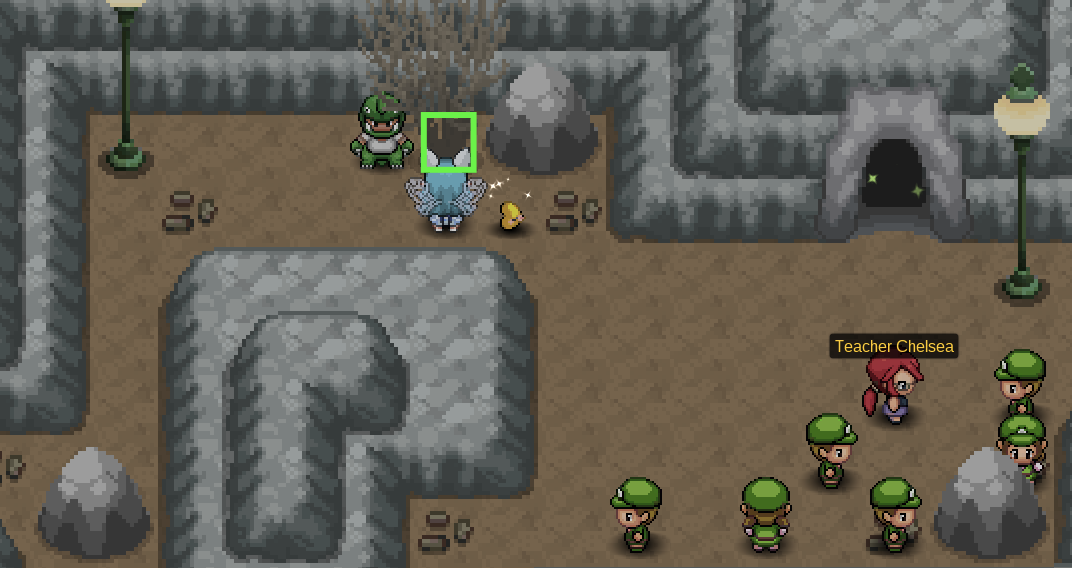
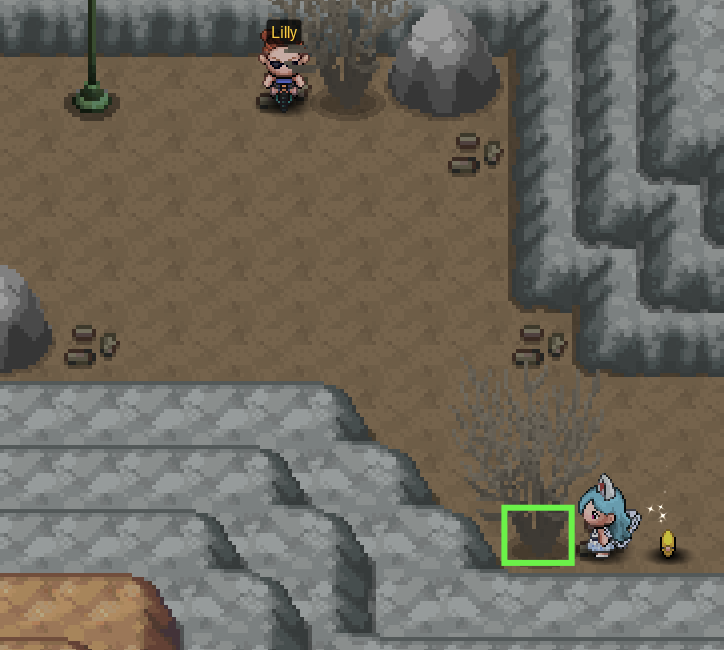
Hi there and welcome to the Valley of Steel Guide! This Guide will help you accomplish the quests in the Valley of Steel. It will also provide you with the locations of the different items in the valley. Requirements: Hoenn Champion Fee: 5,000 Pokedollars per entry Region: Hoenn City: Lavaridge Town Access Point: Guard South of Lavaridge Town [spoiler=Valley of Steel ] Step 1: Talk to the Torkoal upon entering the Valley of Steel. [spoiler=Step 1] Step 2: Talk to the Torkoal upon entering Valley of Steel Western Peak. [spoiler=Step 2] Step 3: Battle the pokemon South of the Town at the Western Peak, across the bridge. The Torkoal will ask to join you after you interact with it. [spoiler=Step 3] Step 4: Go to Steven in Valley of Steel Eastern Peak, House 3. It's the house furthest back. [spoiler=Step 4] Step 5: Go back to the area where you found the Torkoal and battle the Steelix. [spoiler=Step 5] Step 6: Go back to Steven, and he'll go to the Valley of Steel Underground. [spoiler=Step 6] Step 7: Talk to the Hiker in the cave and you now have access to the underground and Boss Steven. [spoiler=Step 7] Boss Requirements: ✦ 1 Steel-Type Pokemon ✦ A Pokemon with Iron Defense ✦ 201 hours playtime Boss Team: Armaldo (X-Scissor, Rock Blast, Crush Claw, Slash) Bisharp (Night Slash, Iron Head, Guillotine, Swords Dance) Mawile (Iron Head, Spit Up, Swallow, Stockpile) Aggron (Automize, Double Edge, Metal Burst, Heavy Slam) Klinklang (Hyper Beam, Zap Cannon, Metal Sound, Lock-On) Mega Metagross (Meteor Mash, Hammer Arm, Thunder Punch, Ice Punch) Step 1: Talk to Tim in the Valley of Steel. [spoiler=Step 1] Step 2: Talk to Groon in Route 103. He'll tell you to go to Sootopolis. [spoiler=Step 2] Step 3: Talk to Trinita in Sootopolis City. She will require an Oddish with 146+ IVs. [spoiler=Step 3] Step 4: Turn in the Oddish with 146+ IVs. [spoiler=Step 4] Step 5: Go back to Tim and you'll get a chance to catch a Pawniard! [spoiler=Step 5] Description: Neptuno will give you a quest each day. This can be either be a Battle Quest or an Item Quest. Take note that if you leave the valley, you can no longer complete the quest. Location: Valley of Steel Eastern Peak, House 3 Cooldown: 1 Day Rewards: You will be rewarded with a certain amount of steel coins after completing each quest. You can turn in and check your steel coin balance with Dorothy. ✦ 5 Heal Powder: 20 Steel Coins ✦ 9 Ultra Balls: 12 Steel Coins ✦ 45 Pokeballs: 12 Steel Coins ✦ 3 Revives: 25 Steel Coins ✦ 1 Electirizer: 110 Steel Coins Battle Quests: ✦ Tufo at Western Peak ✦ Tefe at Eastern Peak ✦ Tofu at Western Peak ✦ Tifa at Cave of Steel 1F ✦ Tafi at Cave of Steel 2F Item Quests: You will have to find a certain number of each an item. Below are the locations for each. [spoiler=Tree Sap Locations]✦ Tree by the entrance of Valley of Steel ✦ Tree next to the Flash Cannon Tutor, Center of Valley of Steel ✦ Tree towards the side; across the bridge, South of Western Peak ✦ Tree next to a Eastern House 2, Valley of Steel Eastern Peak [spoiler=Steel Strand Locations]✦ Rock under the bridge, North of Valley of Steel ✦ Rock next to Joe and Mathilda, East of Valley of Steel [spoiler=Dry Branch Locations]✦ Dead bush next to Underground Cave, North of Valley of Steel ✦ Dead bush near Lilly, South of Valley of Steel ✦ Dead bush near Lilly, South of Valley of Steel Trade: Bisharp for Klefki Location: Valley of Steel Eastern Peak Location: Valley of Steel Cost: 12, 000 Pokedollars CAVE OF STEEL 1F (Towards Eastern Peak) CAVE OF STEEL 2F (On your way down to Valley of Steel) VALLEY OF STEEL WESTERN PEAK VALLEY OF STEEL EASTERN PEAK VALLEY OF STEEL
-
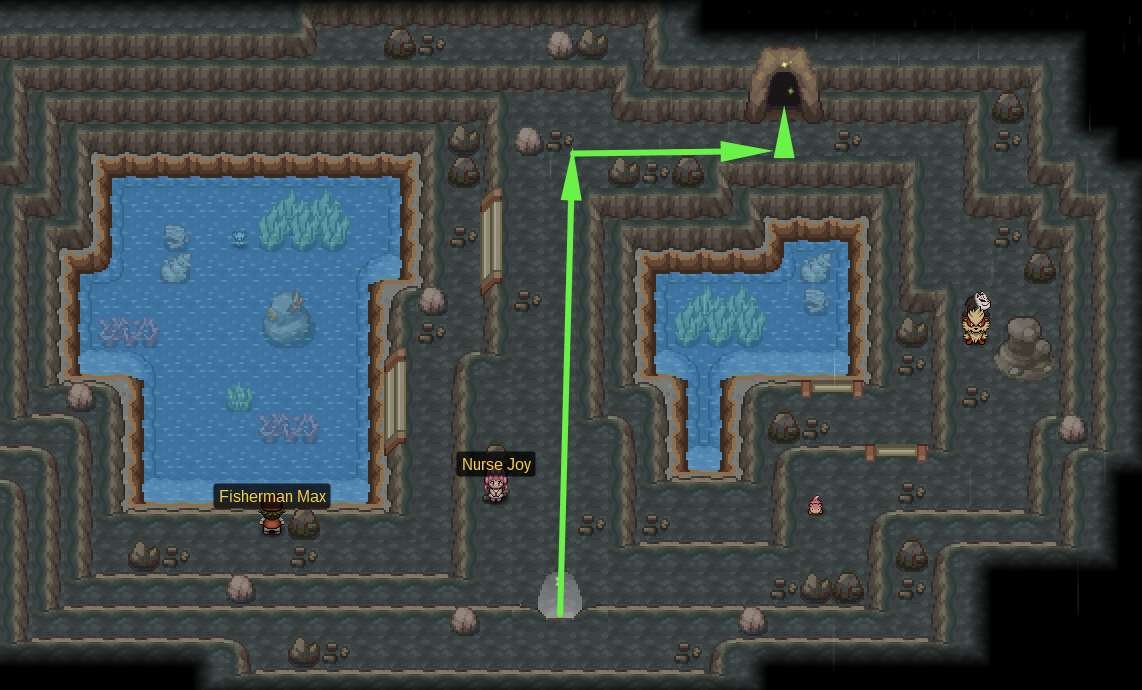
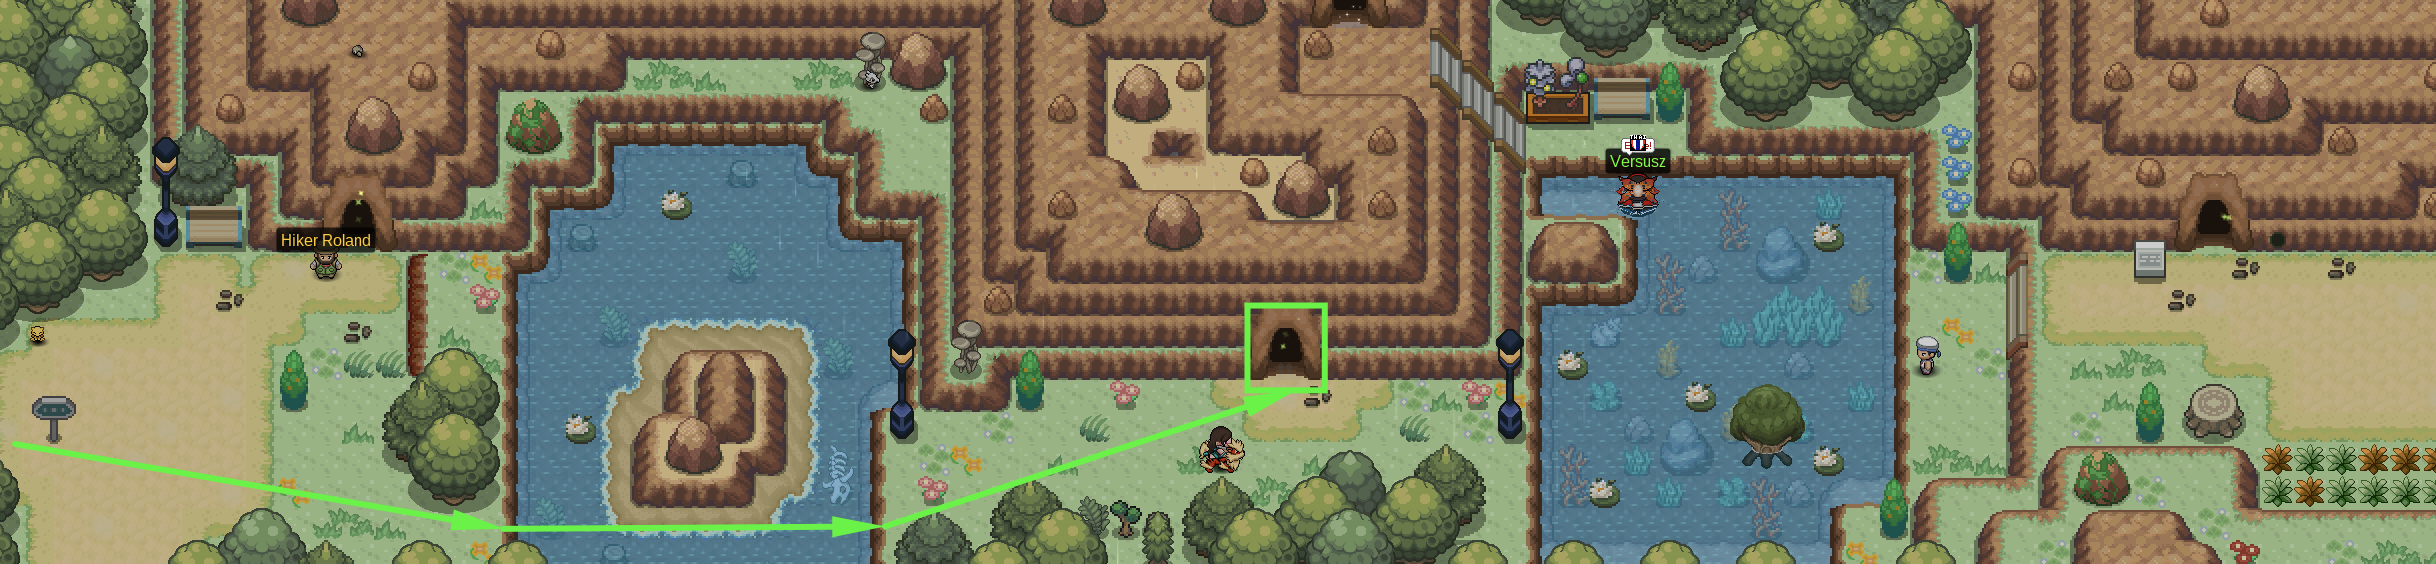
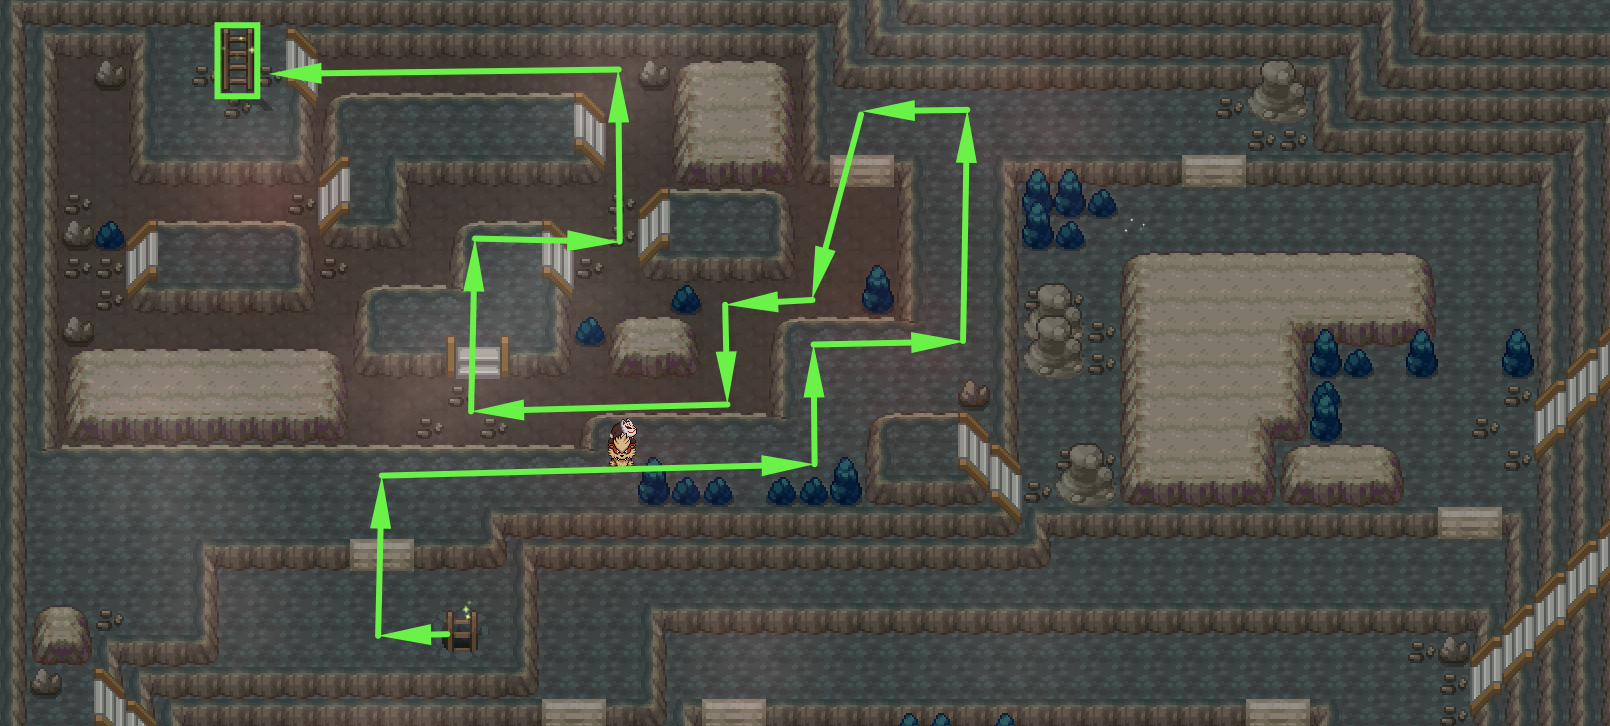
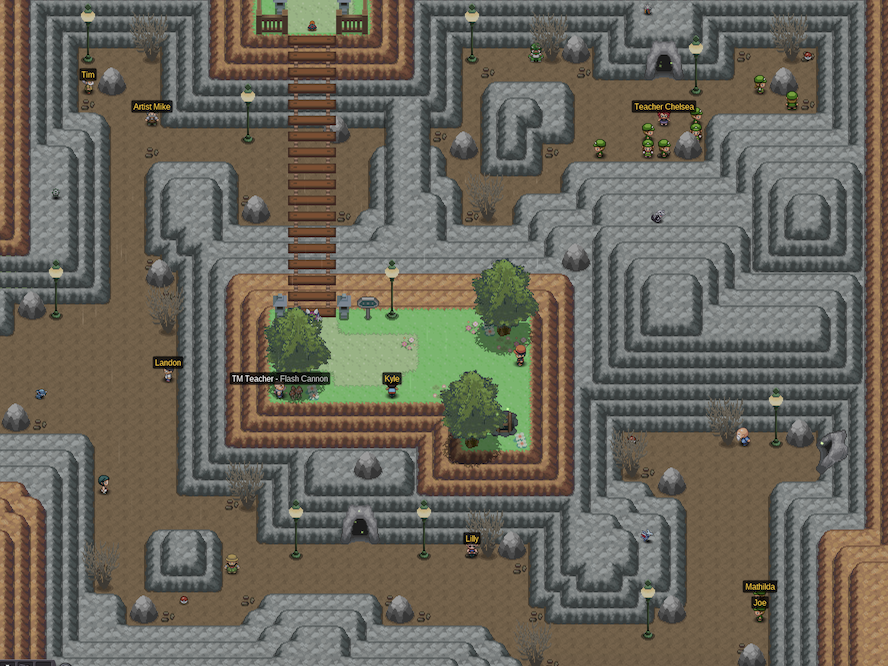
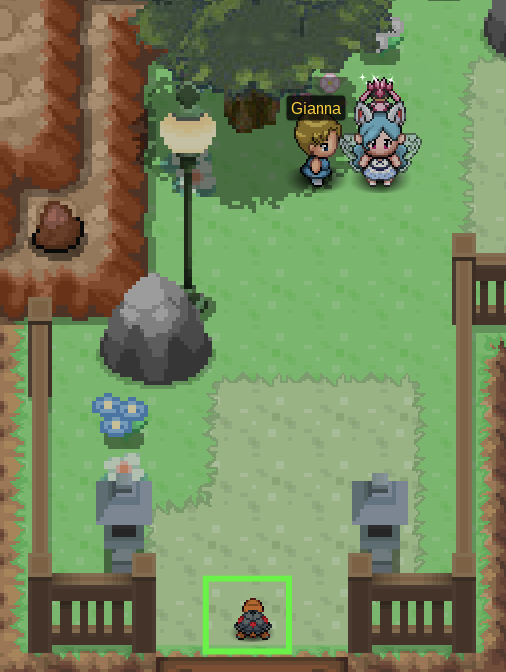
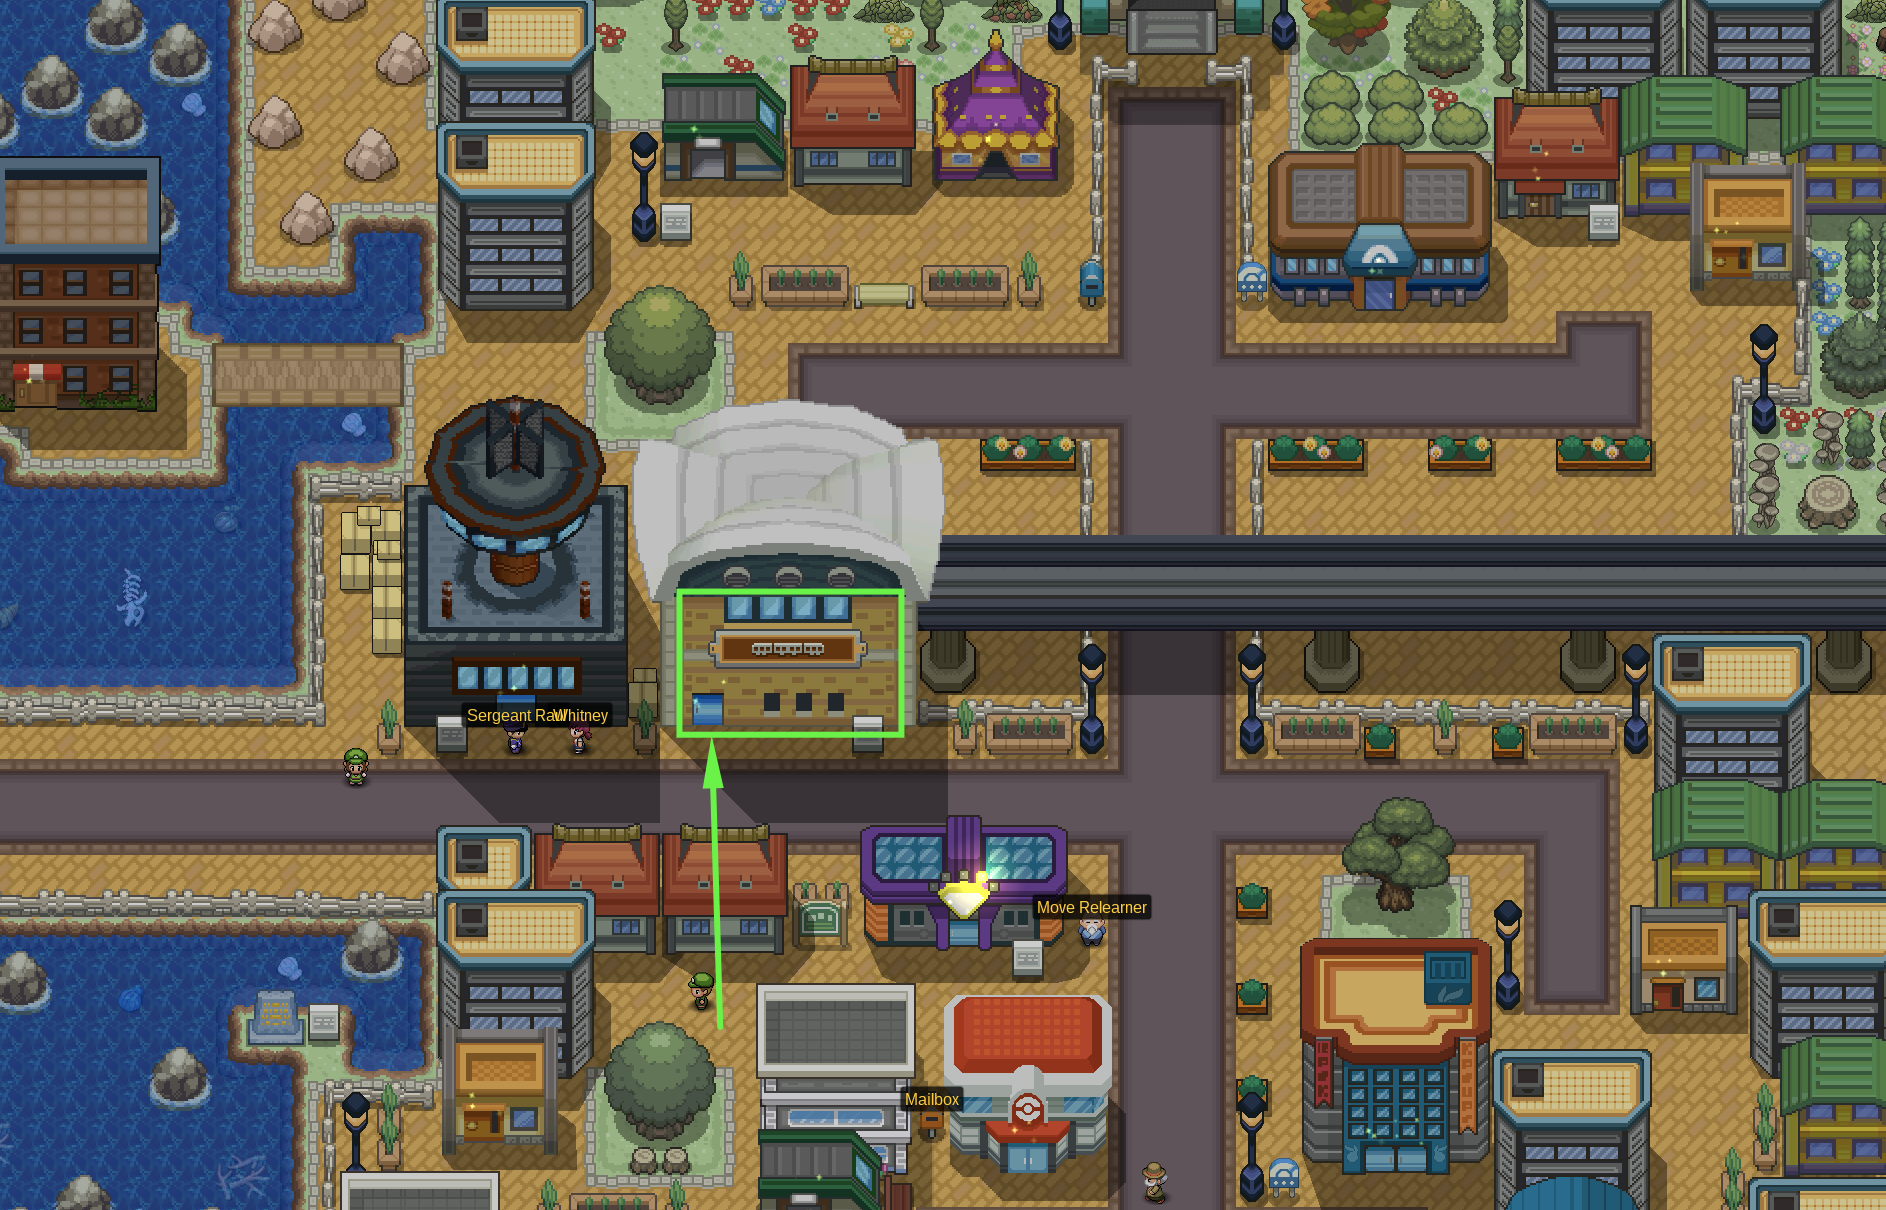
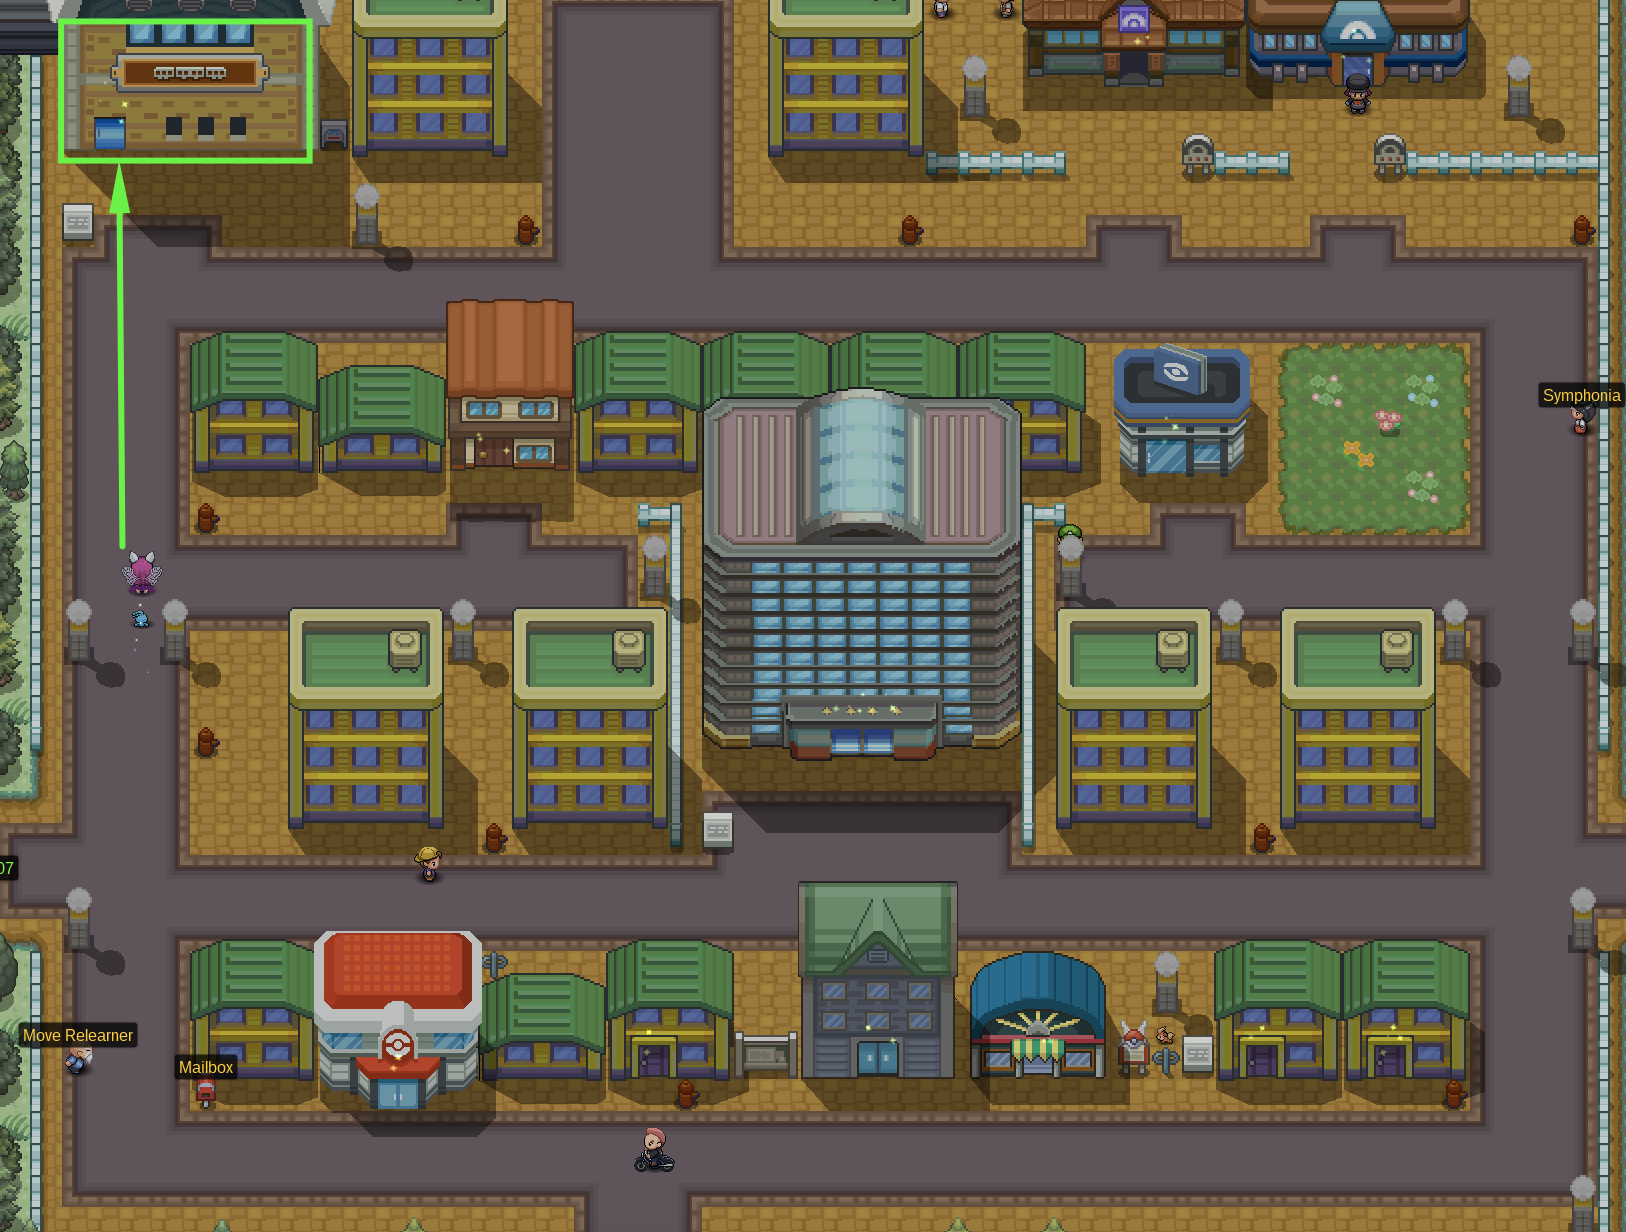
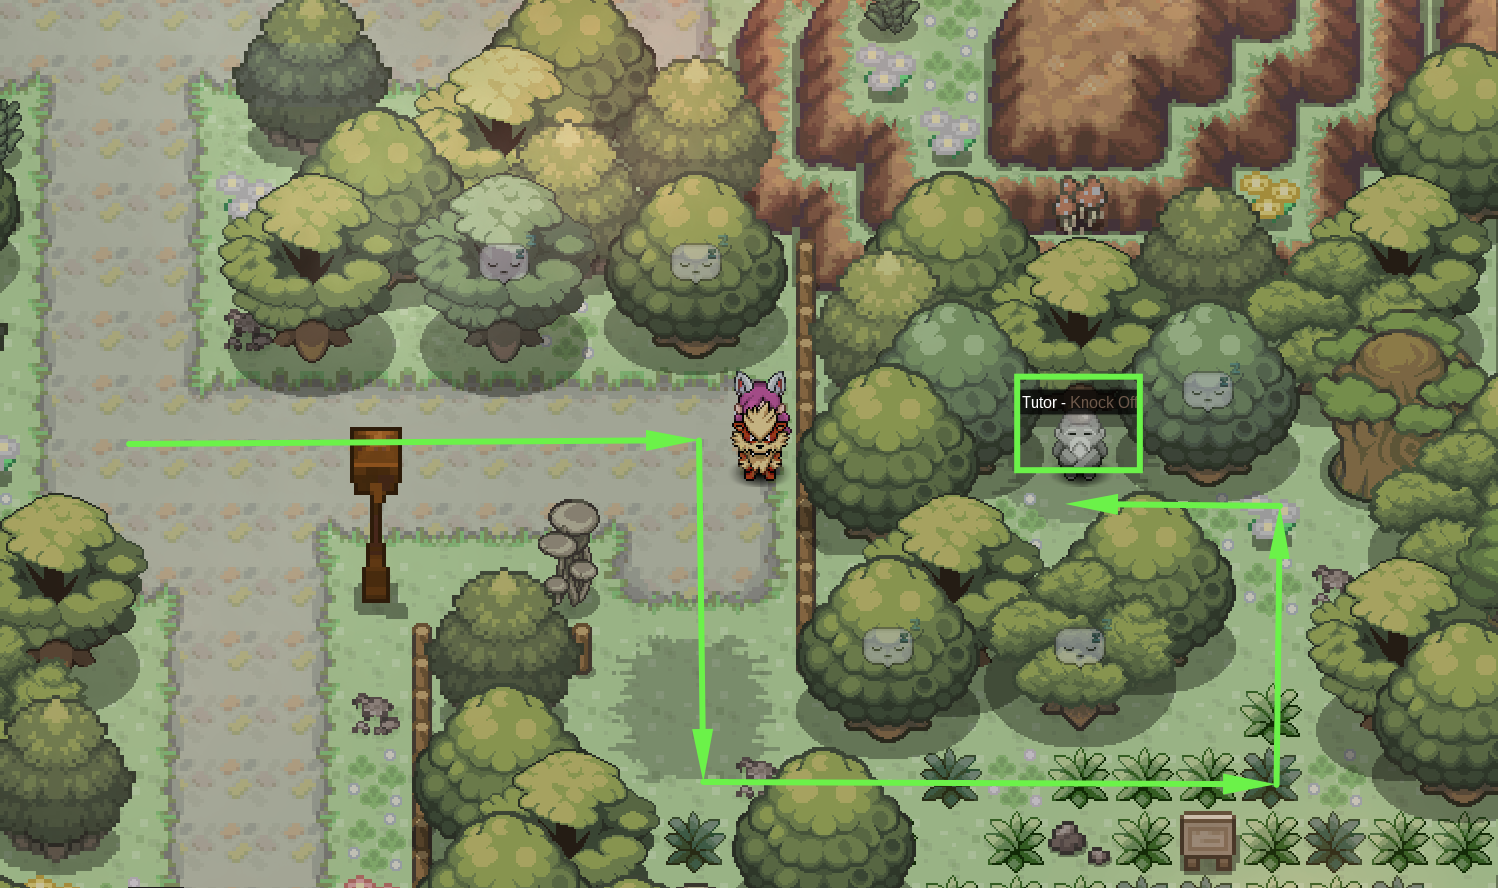
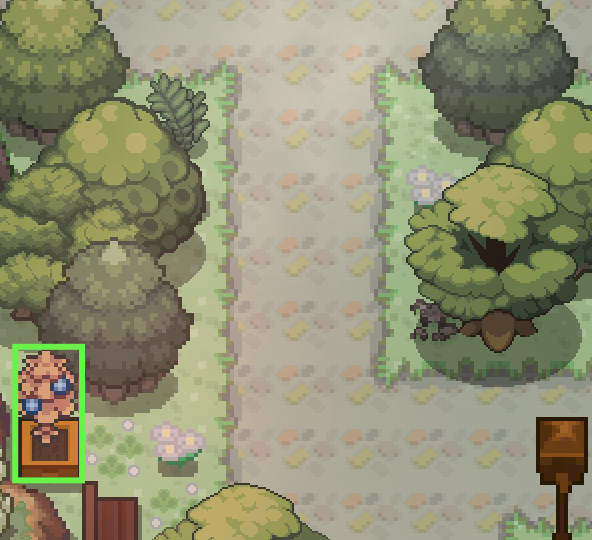
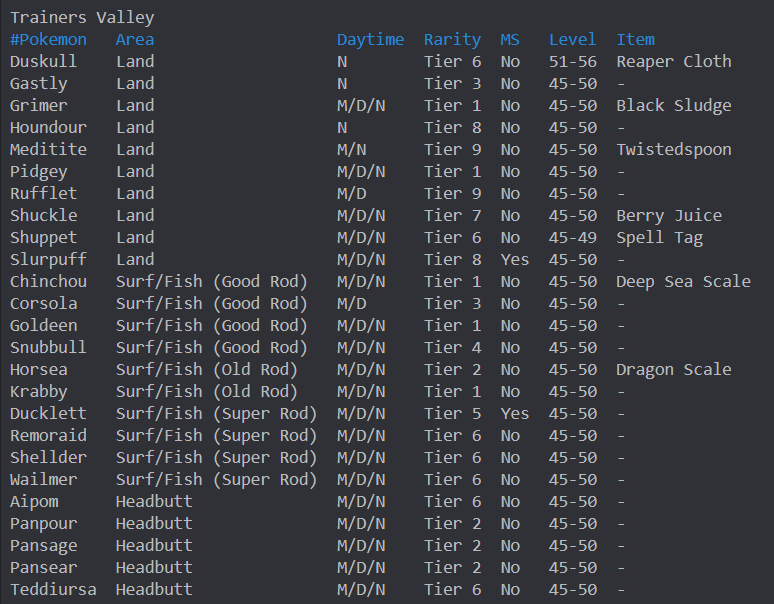
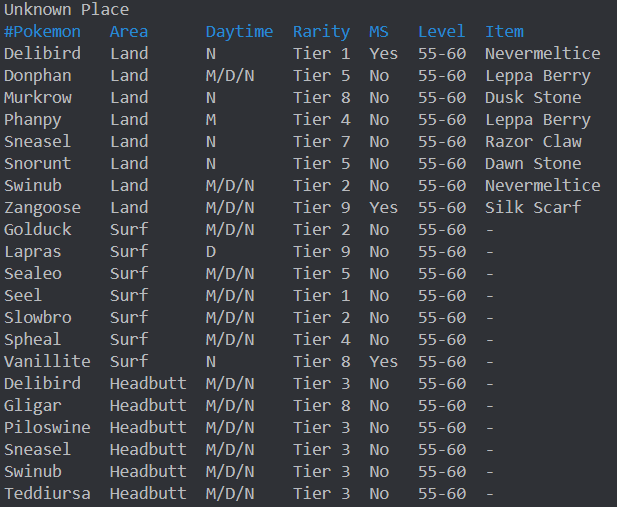
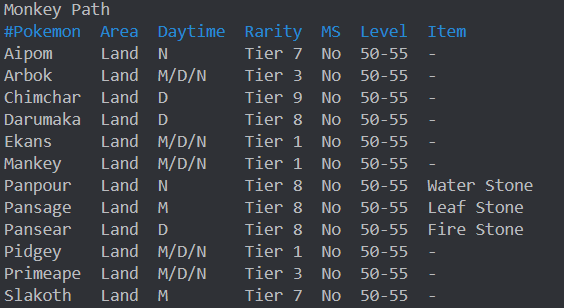
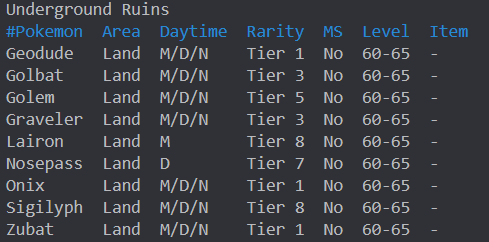
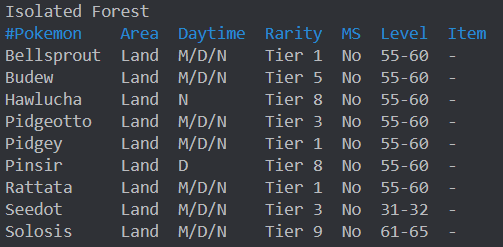
Hi there and welcome to the Trainer's Valley Guide! This guide will teach you about the different areas in Trainer's Valley. It will also inform you on pokemon and the NPCs there. ✻ Fought Red at Mount Silver. ✻ Completed Subway Quest. ✻ Caught data of 120 Kanto Pokemon. ✻ 38 Evolved Pokemon. *Please ensure you have met all requirements. Step 1: Go to the Saffron/Goldenrod Train Station. Step 2: Take the train for 5k. Step 3: Select the Trainer's Valley Option for an extra 10k. Location: East of Pokecenter TMs for Sale: Step 1: Head to the burrow at the wall east of Trainer's Valley. Step 2: Head north from the beach towards the crystal. Step 3: You will enter a cave. Make sure you have Flash. Go north until you find the exit. Step 4: Make your way up to Nikola. Region: Kanto Location: Unknown Place Cooldown: 21 Days Requirements: Failed to catch a legendary from its quest. Rewards: Chance to catch the legendary you failed to catch. Team: Mewtwo Rayquaza Kyogre Deoxys Arceus Groudon Description: Cave to enter Unknown Place Access Point: Crystal on the Beach east of Trainer's Valley Spawns: Description: Cave to enter Monkey Path, apart of Regi Quest. Access Point: Stop house south of Trainer's Valley Spawns: Description: Grassland South of Trainer's Valley, Apart of Regi Quest. Requirements: Show Pansage, Pansear, Panpour (Each 90+ total IVs) to Apo. They need to have your OT. Access Point: South Exit of Trainer's Valley Cave. Spawns: Description: Underground Ruins of Trainer's Valley, Apart of Regi Quest. Requirements: Access to Monkey Path, Hoenn Champion, 250 hours of playtime, and the Regi trio seen data (Regice, Regirock, Registeel). Access Point: Stop house south of Trainer's Valley. Spawns: Description: Forest South of Monkey Path. Requirements: Access to Monkey Path. Access Point: South of Monkey Path. Spawns: Location: East of Trainer's Valley, along the road. Cost: 15,000 Pokedollars Location: East of TM Vendor Berry Yield: Lum Berry, Sitrus Berry Location: Along the main road Berry Yield: Oran Berry Trainer's Valley Number of Headbutt Trees: 16 Trees Cooldown: 12 hours Spawns: -Ariados -Xatu (Morning, Day) -Murkrow (Night) -Jumpluff -Aipom -Bagon (Morning, Day) -Sableye (Night) Unknown Place Number of Headbutt Trees: 9 Trees Cooldown: 12 hours Spawns: -Snover -Sneasel -Jynx -Cubchoo -Cryogonal
-
Location Game corner in Goldenrod City Requirements How to use Rewards Syncable Pokemon Shiny Pokemon Random Prizes
-
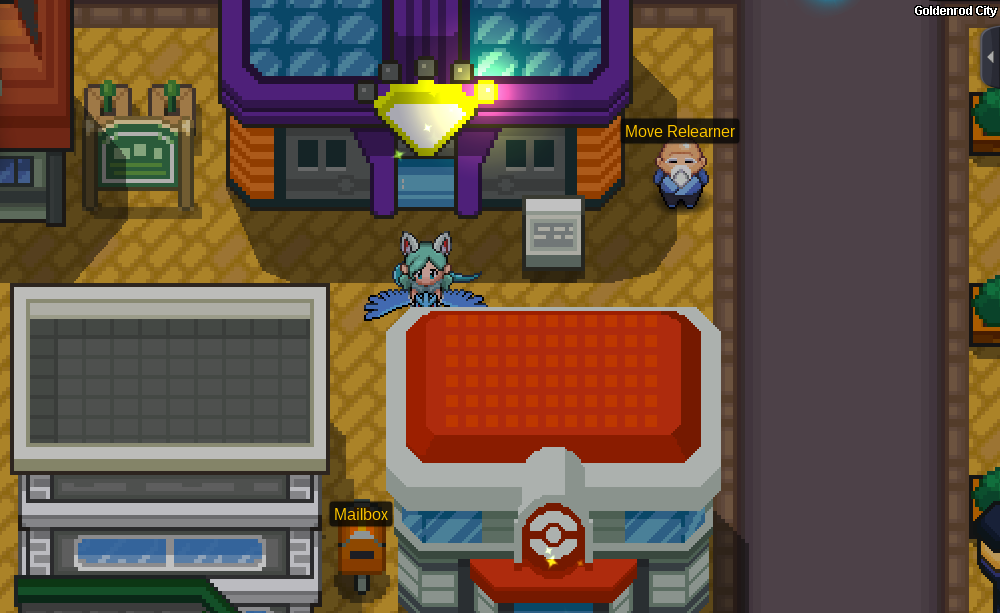
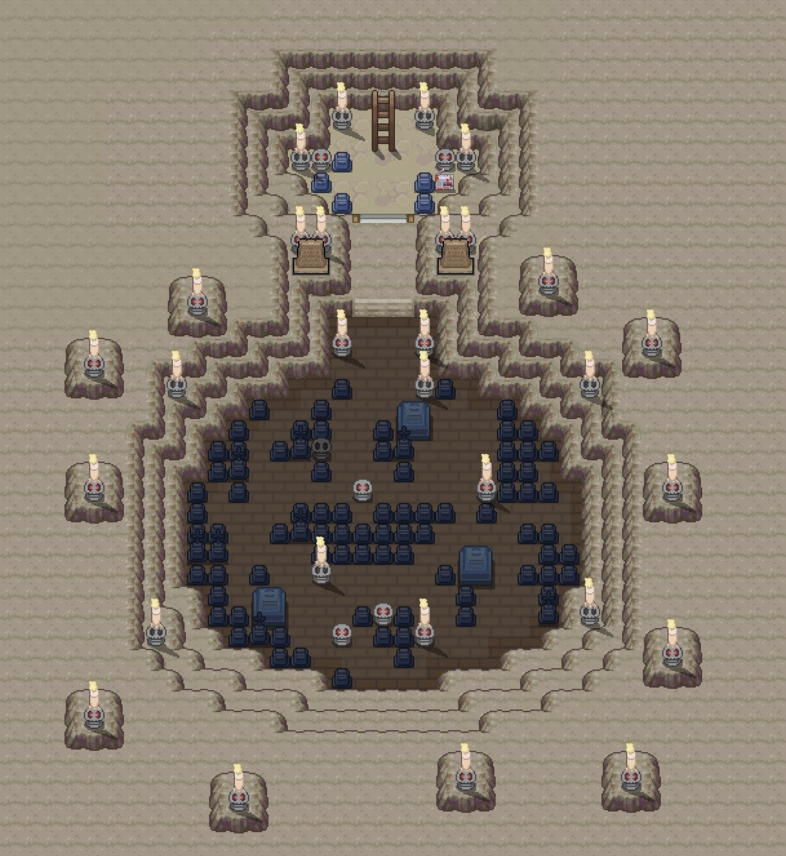
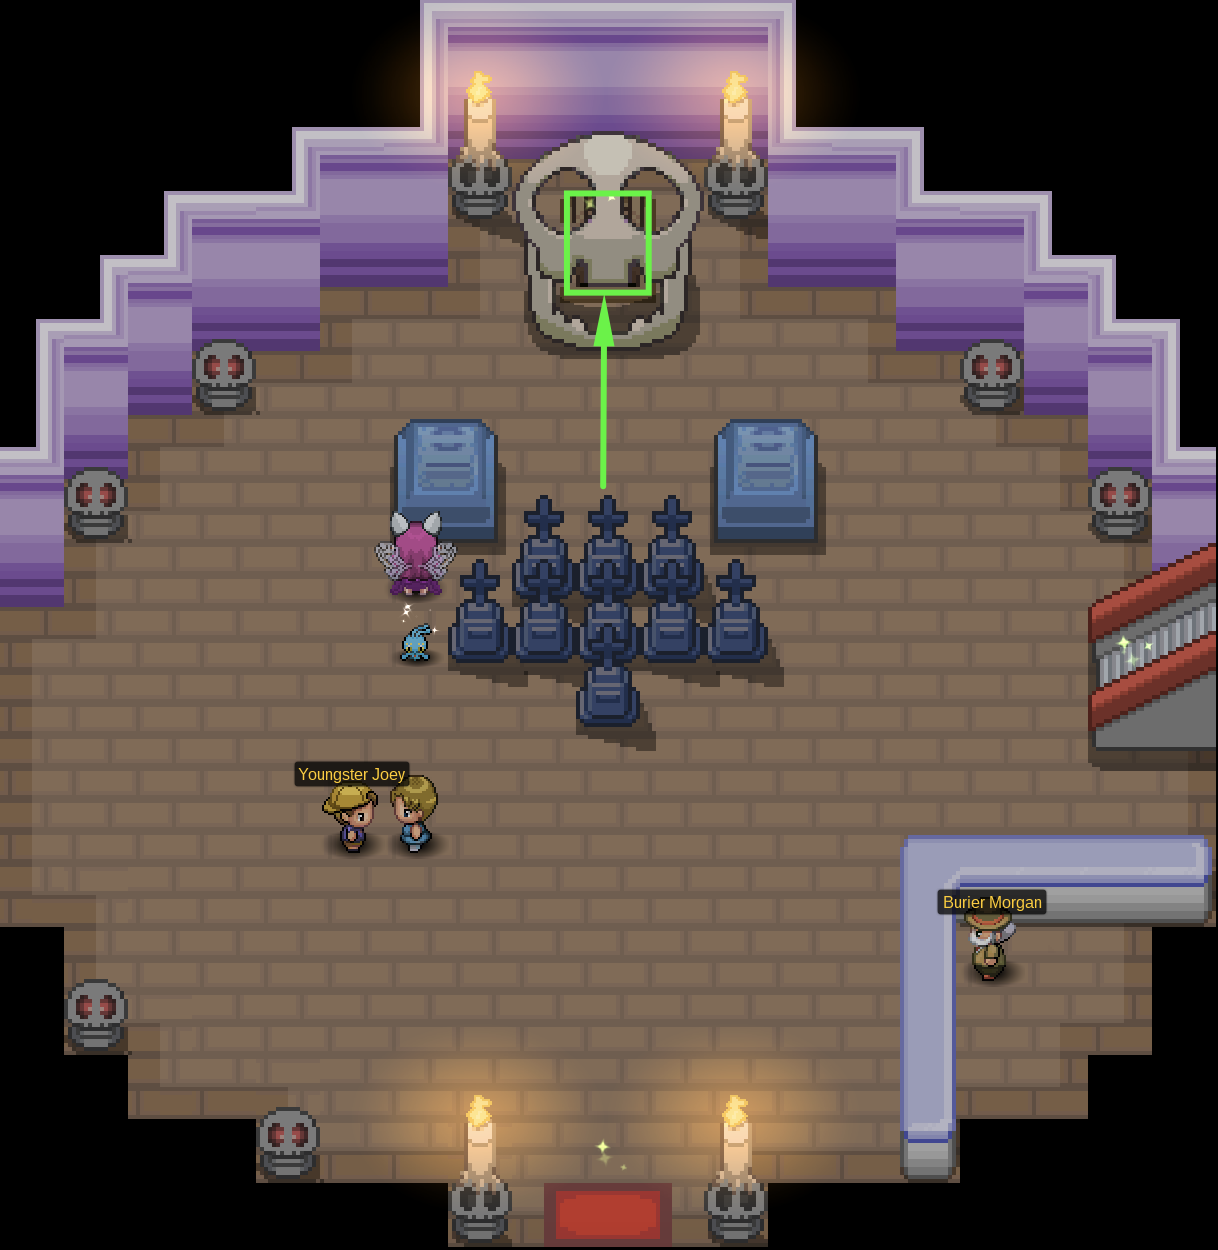
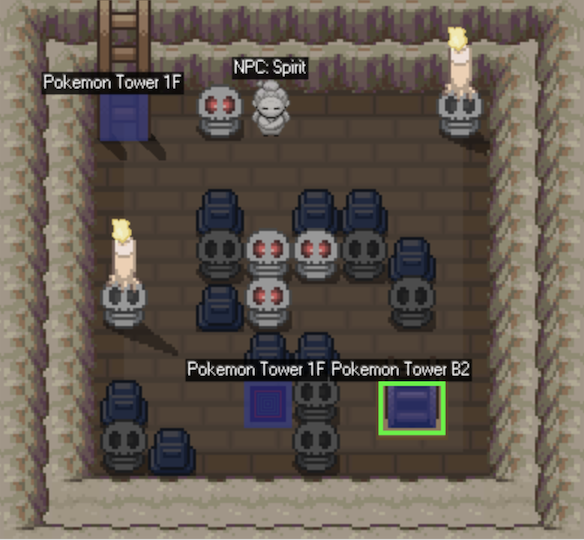
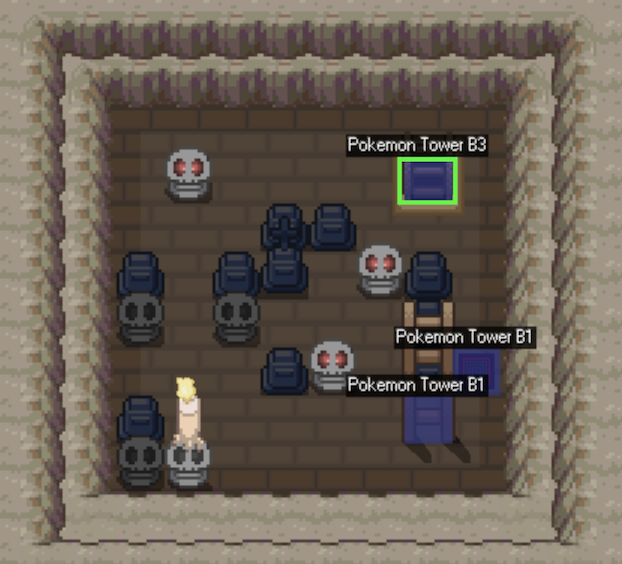
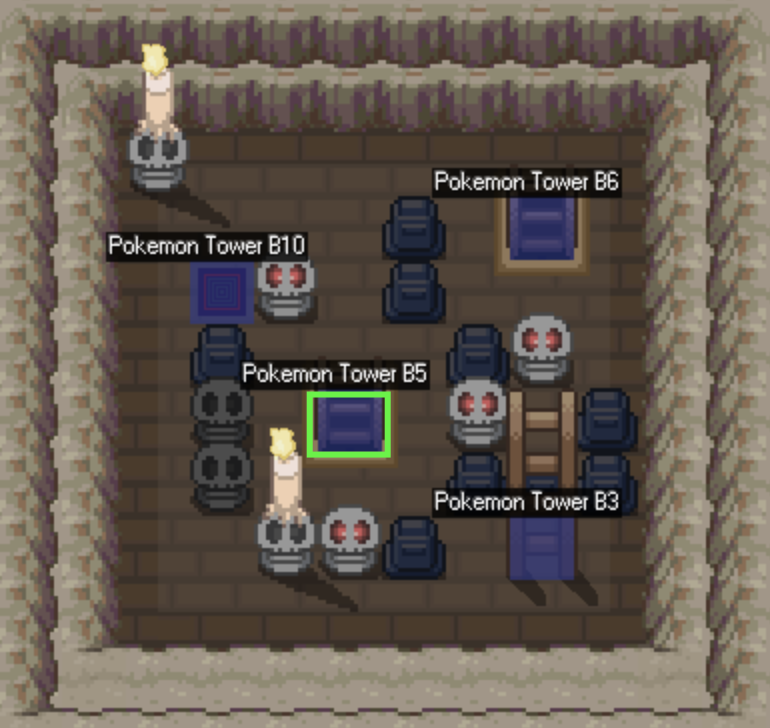
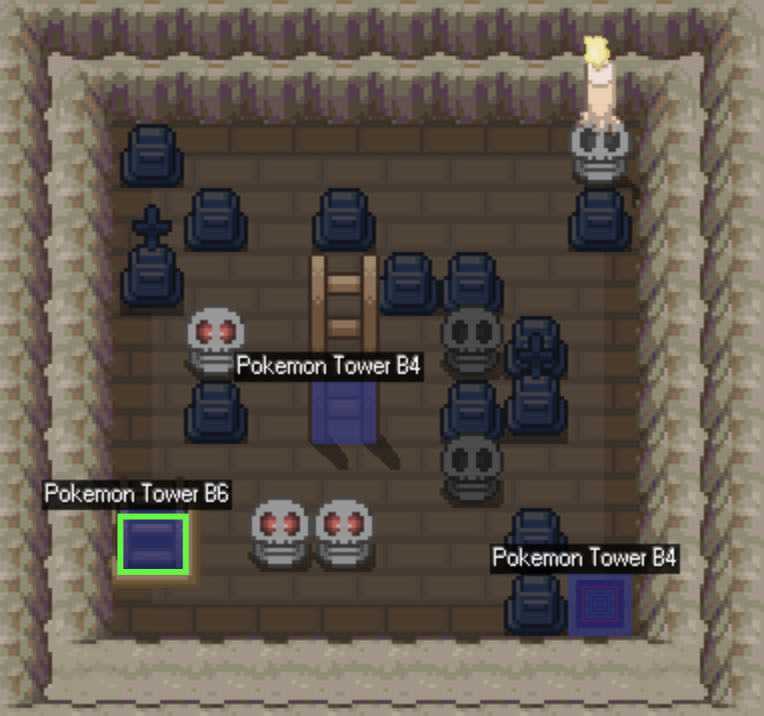
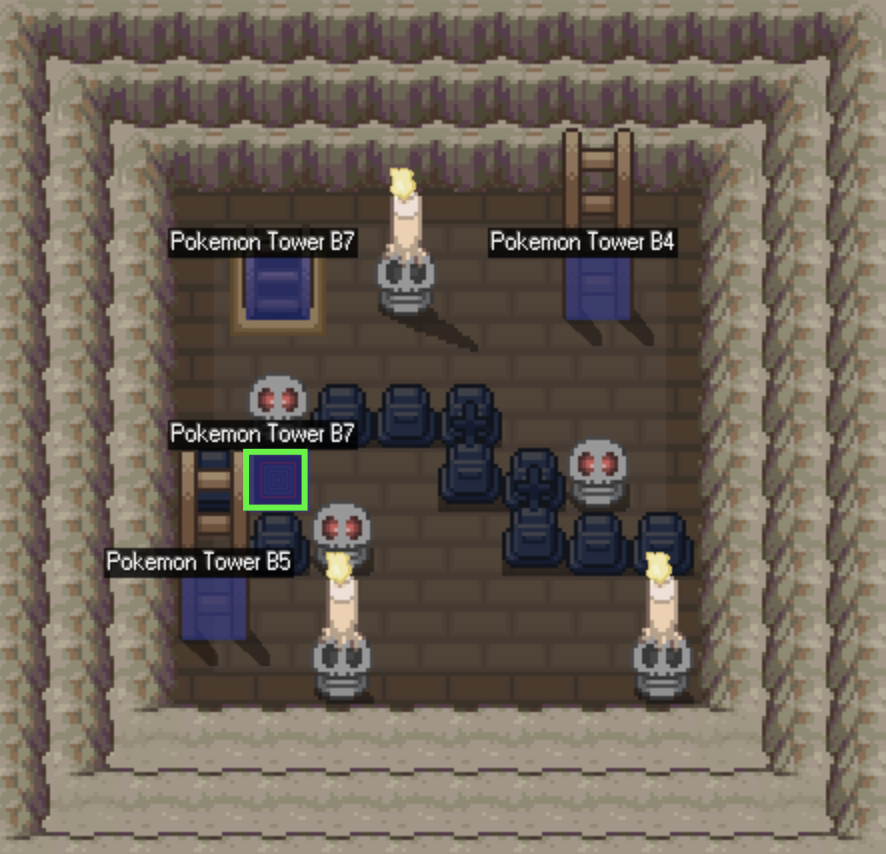
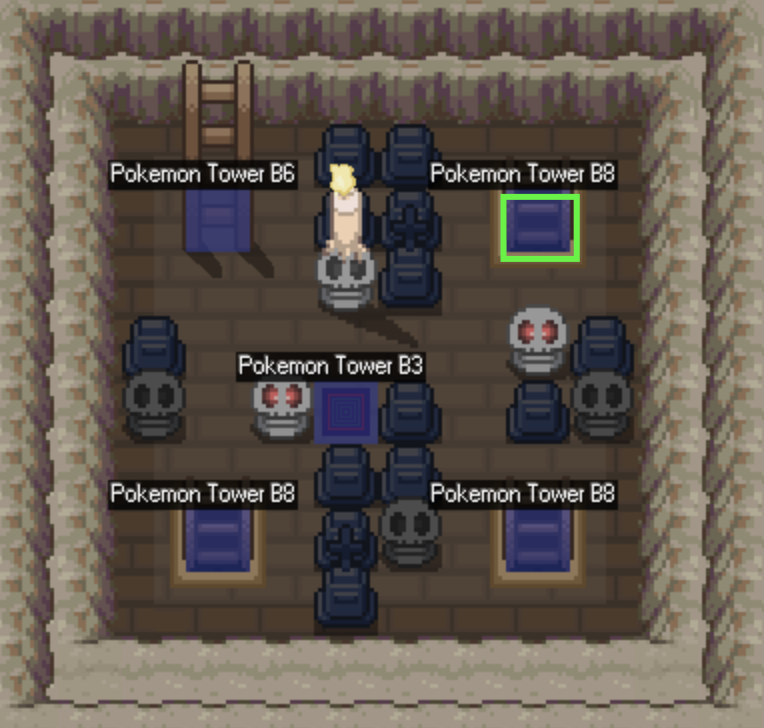
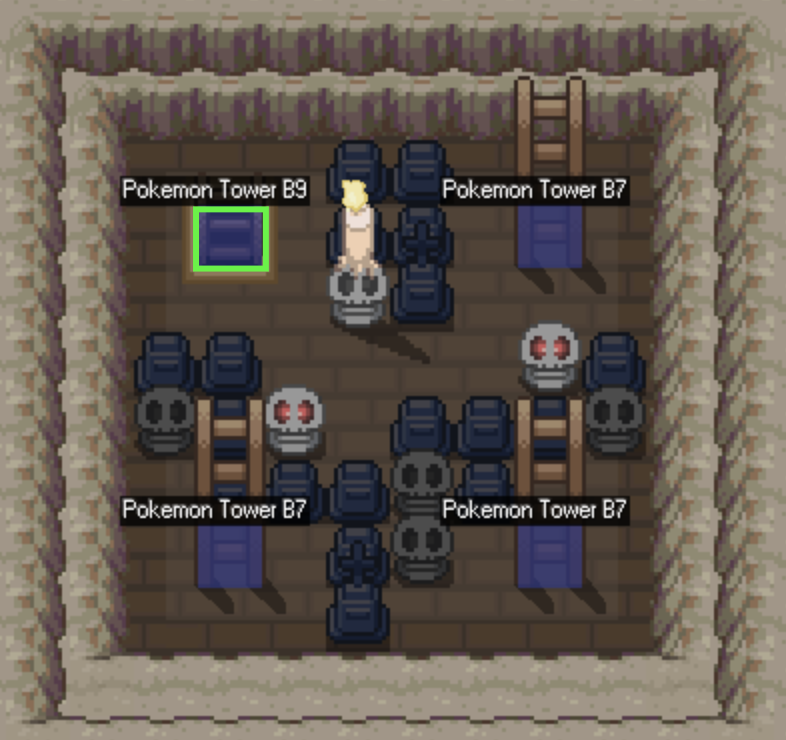
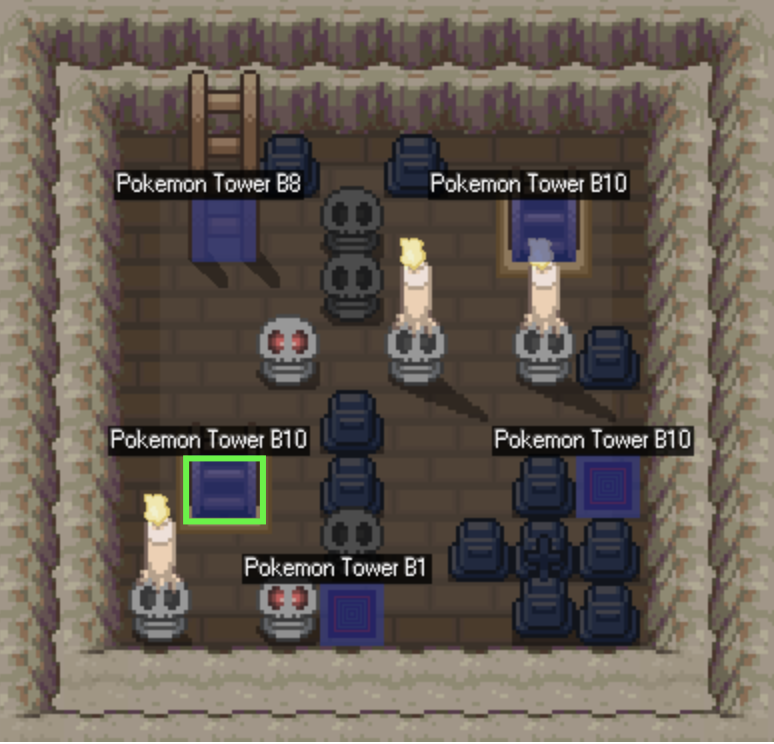
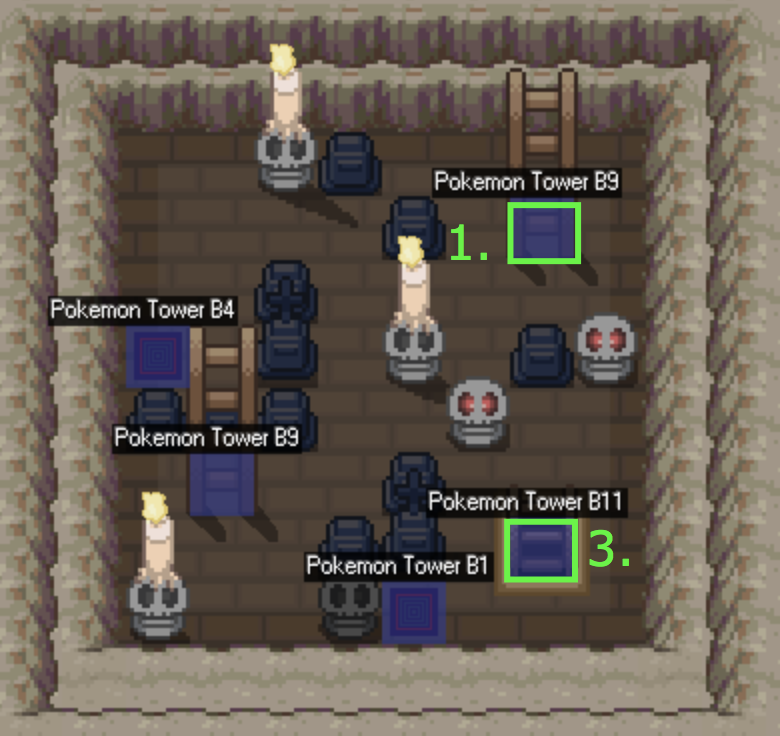
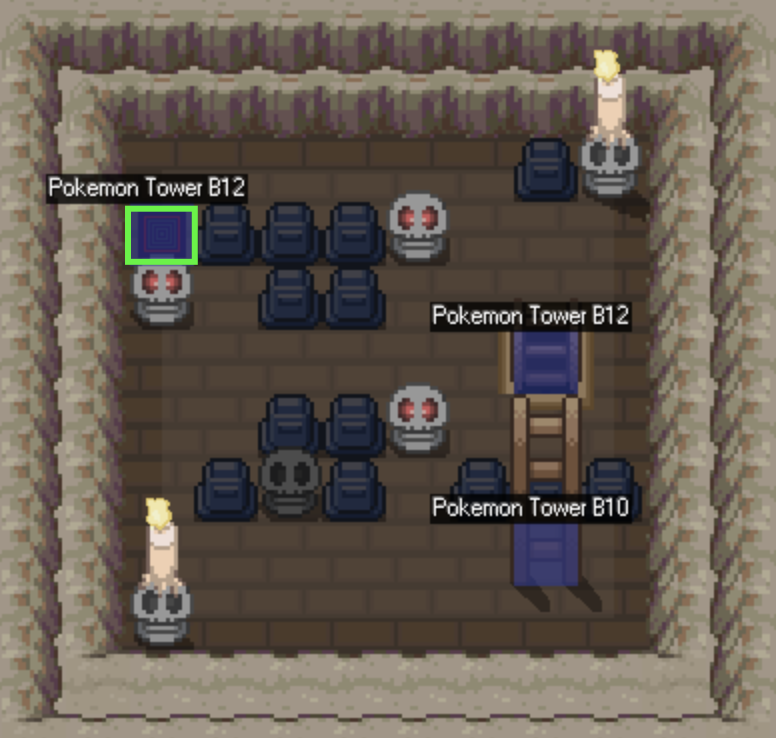
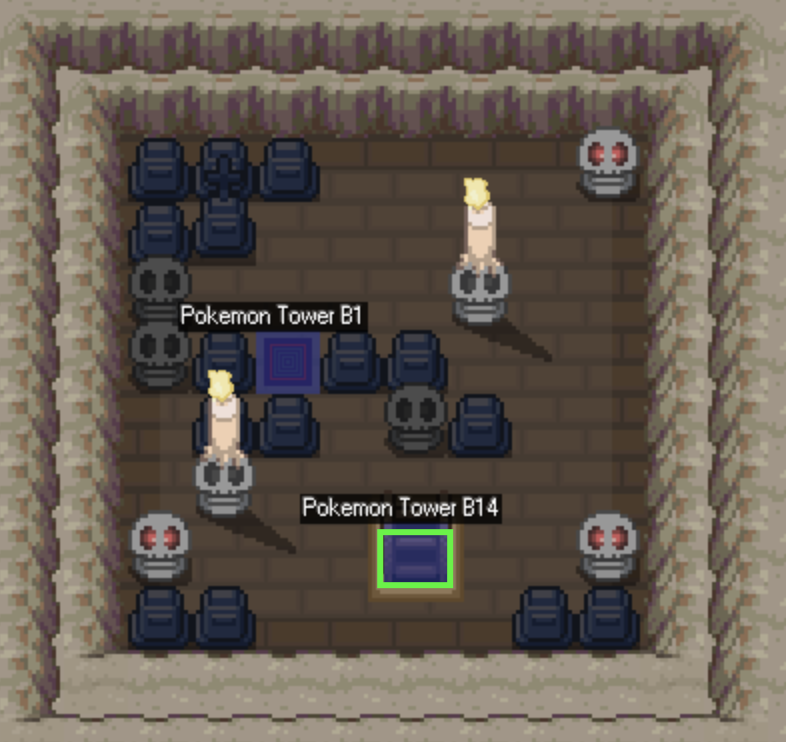
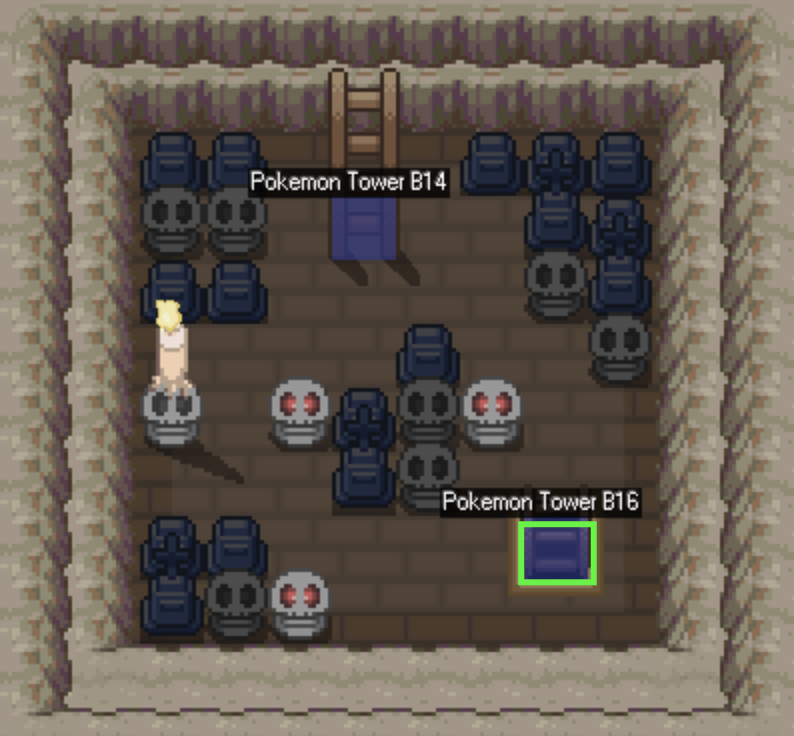
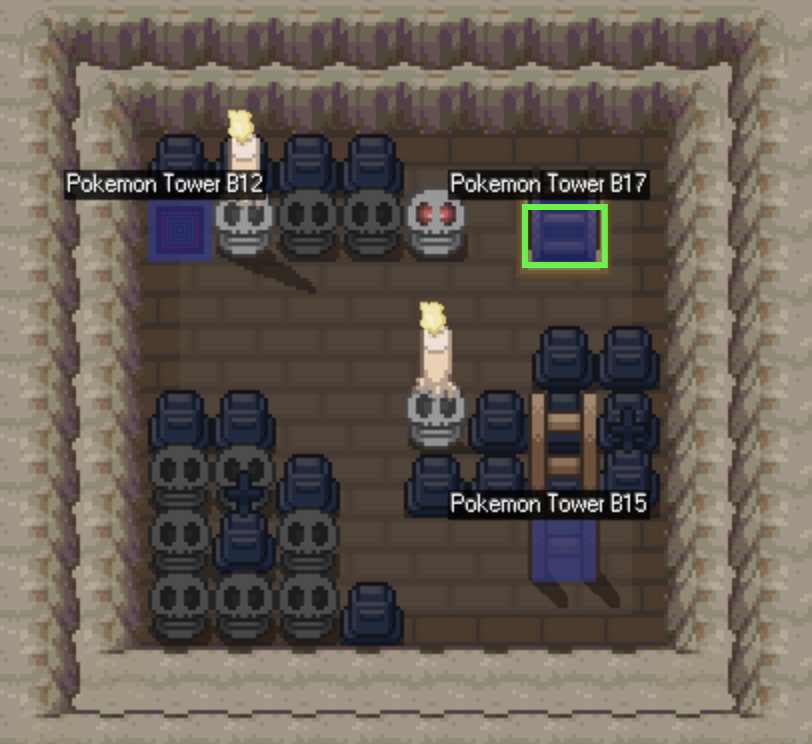
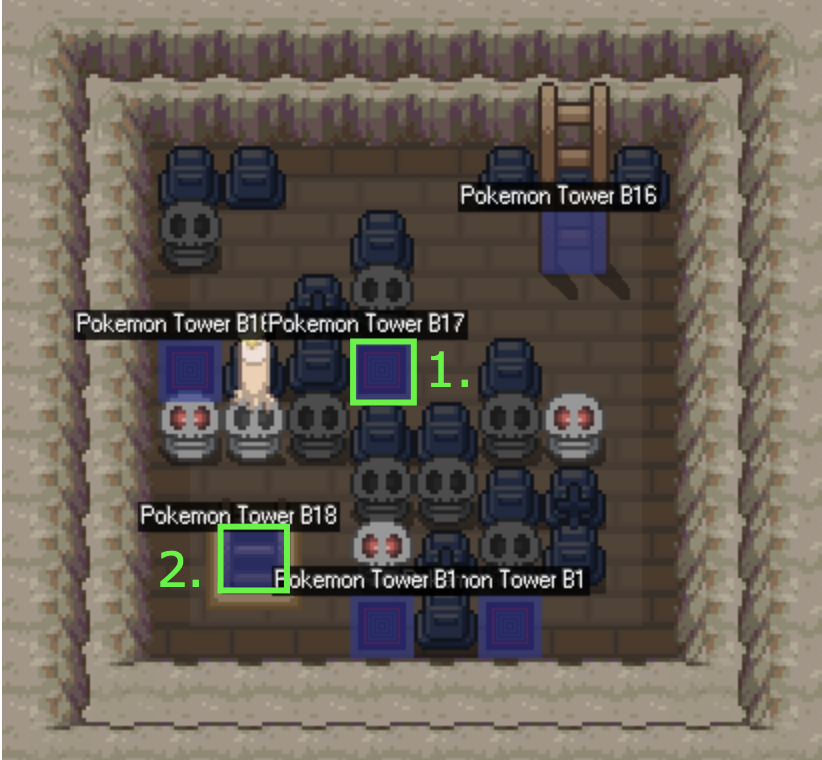
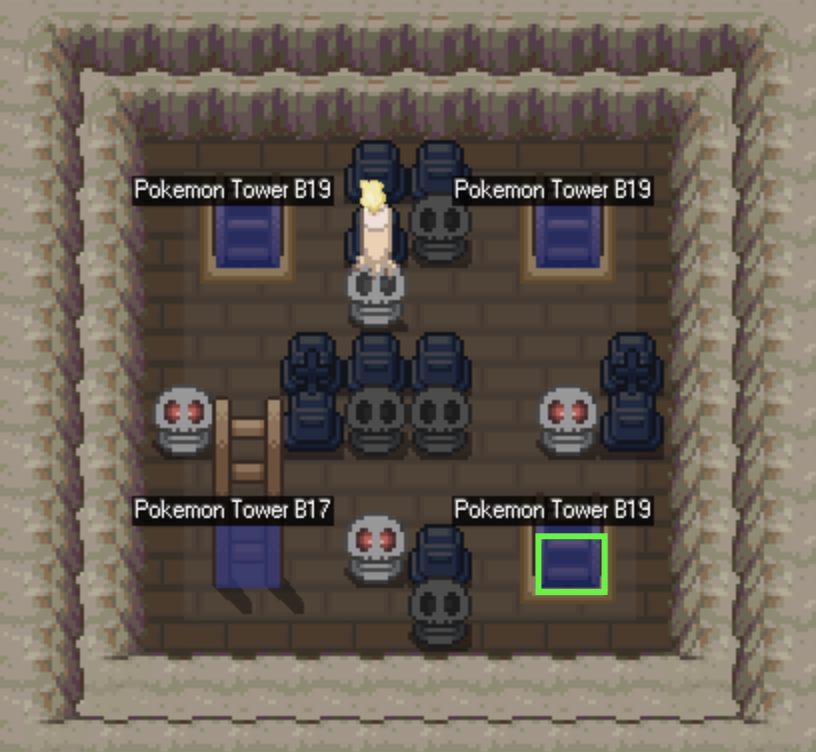
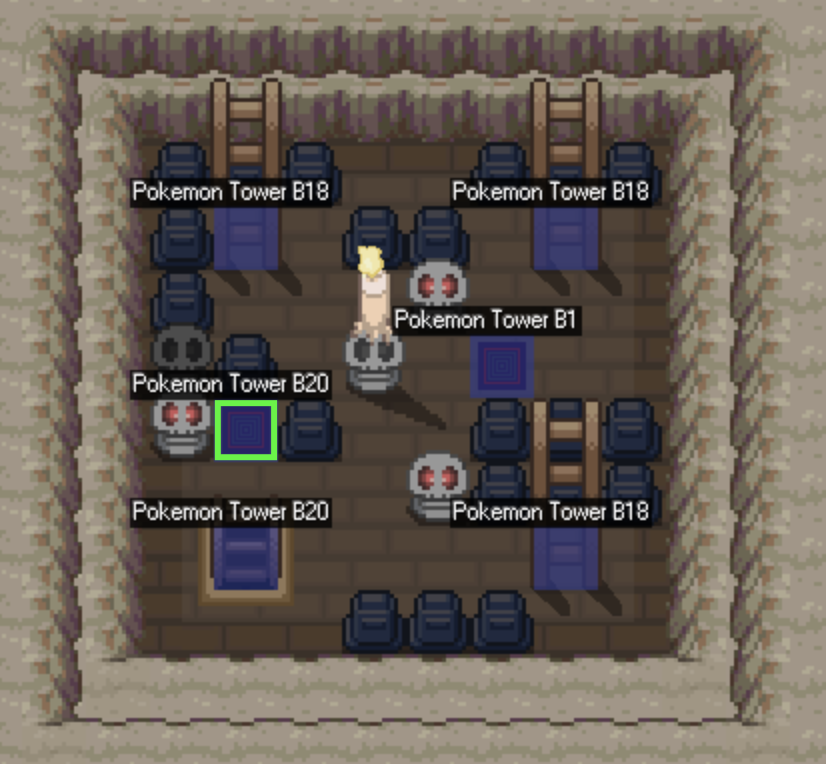
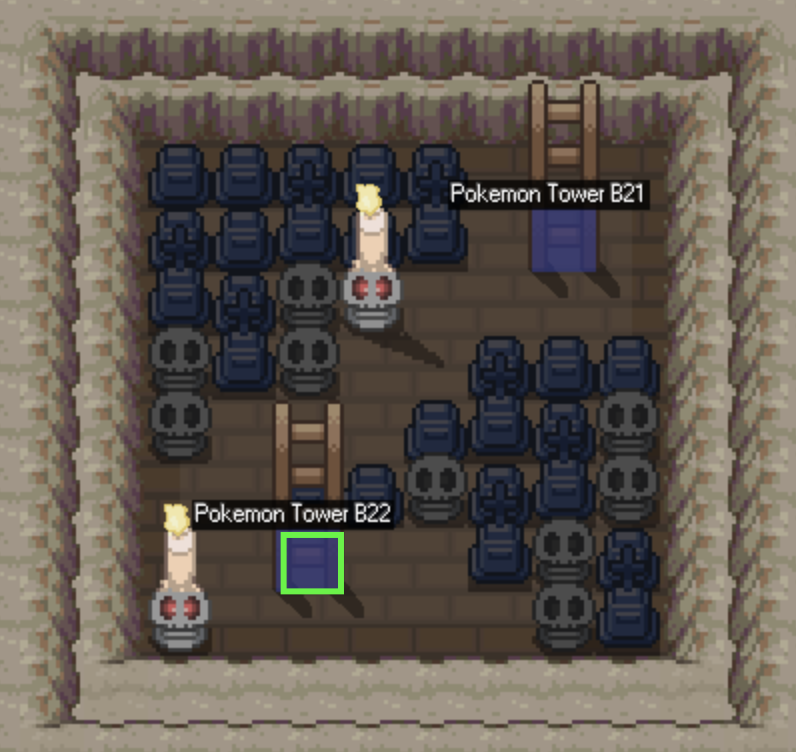
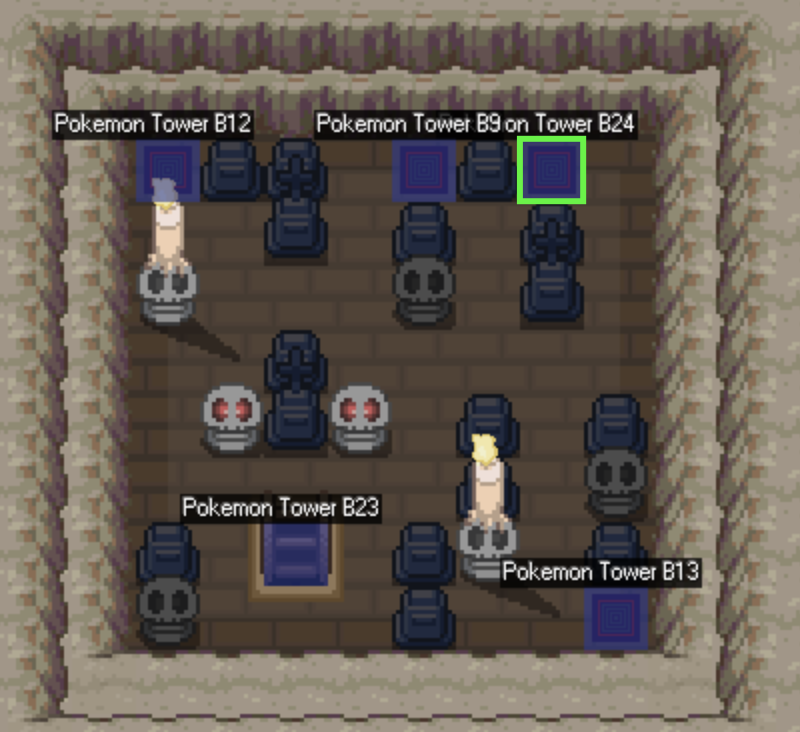
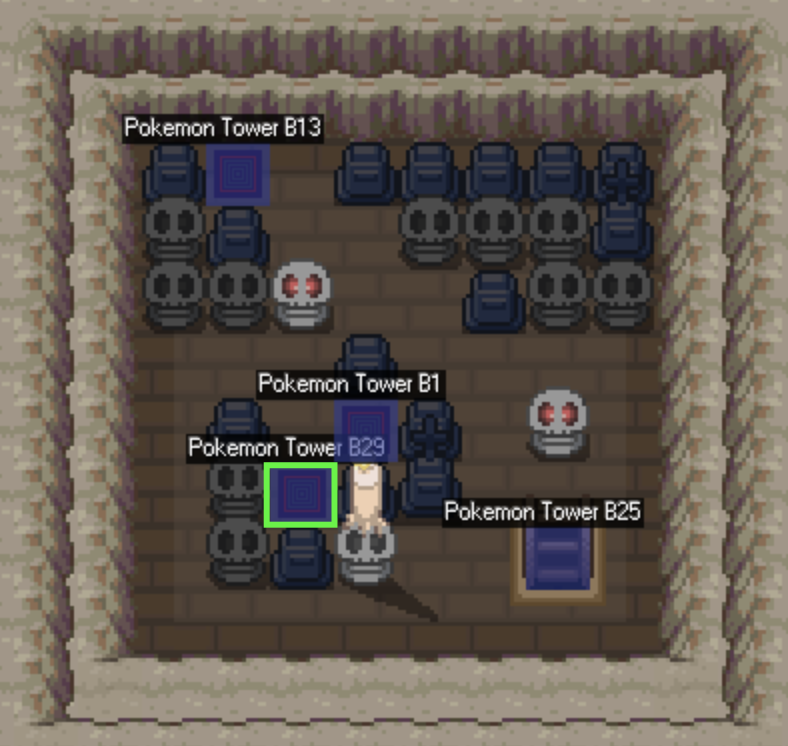
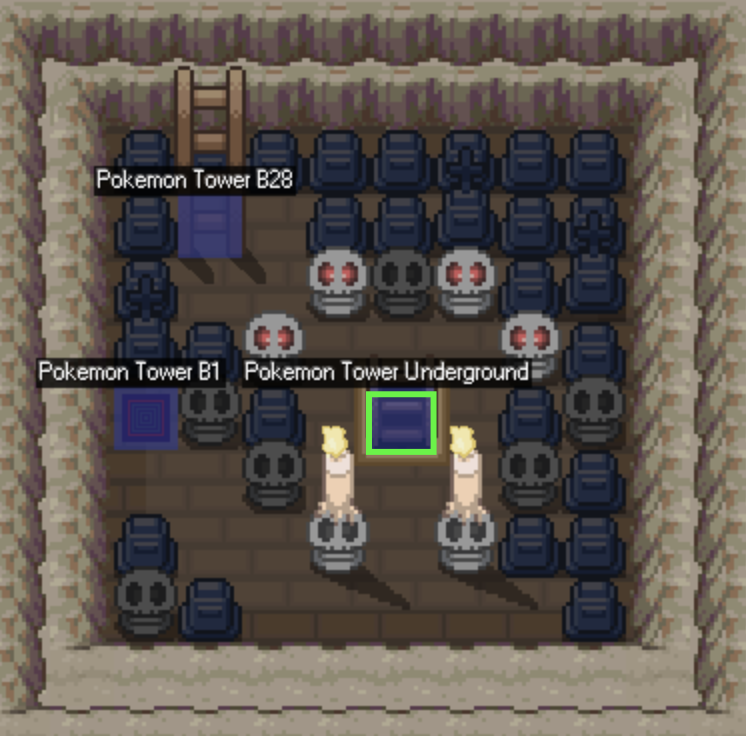
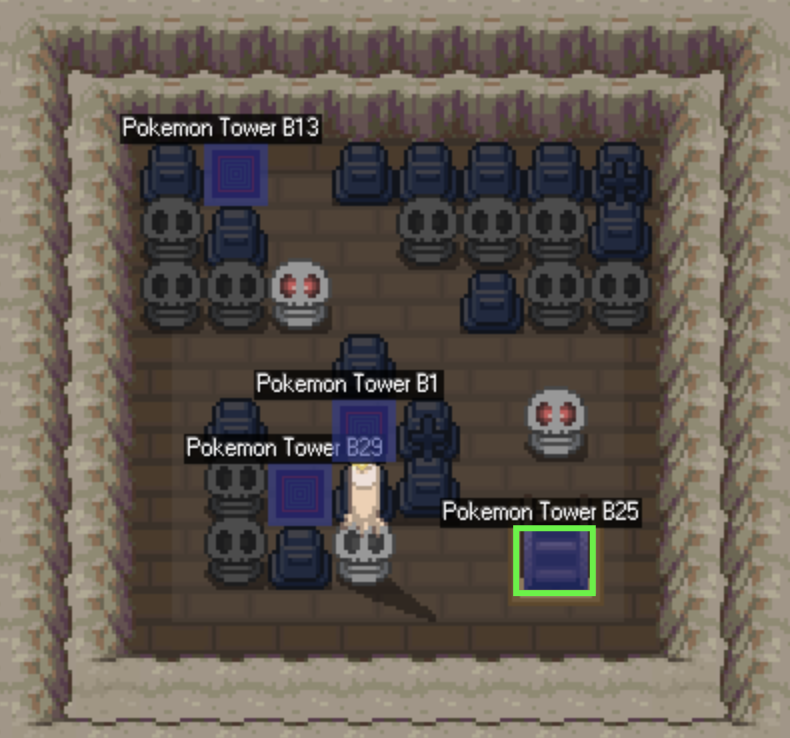
Hi there and welcome to the Pokemon Tower Underground Guide! This guide will help you navigate the underground's maze. Along with that, it'll also inform you on the pokemon you can obtain in the area. Please remember that you require active membership to access the lowest level of the Underground. Region: Kanto City: Lavender Town Access Point: Pokemon Tower 1F [spoiler=Lavender Tower Underground] The Underground can be quite tricky. There are 29 Floors before the Underground. The images below will teach you which teleport pad or ladder to take for each floor. [spoiler=B1-B8] B1: Take the ladder at the lower right corner. [spoiler=B1] B2: Take the ladder at the top right corner. [spoiler=B2] B3: Take the teleporter directly below the ladder. Afterwards, take the teleporter at the lower left corner. Finally, take the ladder at the lower right corner. [spoiler=B3] B4: Take the ladder in the middle. [spoiler=B4] B5: Take the ladder at the lower left corner. [spoiler=B5] B6: Take the teleporter in the middle. [spoiler=B6] B7: Take the ladder at the top right corner. [spoiler=B7] B8: Take the ladder at the top left corner. [spoiler=B8] [spoiler=B9-B16] B9: Take the ladder at the lower left corner. [spoiler=B9] B10: Take the ladder at the top right corner. Once at B9, take the teleporter closer to the right side of the room. Once back at B10, take the ladder at the lower right corner. [spoiler=B10] B11: Take the teleporter at the top left corner. [spoiler=B11] B12: Take the teleporter at the top right corner. [spoiler=B12] B13: Take the only ladder in the room. [spoiler=B13] B14: Take the only descending ladder in the room. [spoiler=B14] B15: Take the ladder at the lower right corner. [spoiler=B15] B16: Take the ladder at the top right corner. [spoiler=B16] [spoiler=B17-B29] B17: Take the teleporter nearest to the ladder. Afterwards, take the ladder at the lower left corner. [spoiler=B17] B18: Take the ladder at the lower right corner. [spoiler=B18] B19: Take the teleporter closer to the left side of the room. [spoiler=B19] B20: Take the teleporter closer to the right side of the room. [spoiler=B20] B21: Take the ladder at the top right corner. [spoiler=B21] B23: Take the ladder at the lower left corner. [spoiler=B23] B22: Take the teleporter at the top right corner. [spoiler=B22] B24: Take the teleporter at the lower left corner. [spoiler=B24] B29: Take the ladder closer to the right of the room. [spoiler=B29] Location: Pokemon Tower B12 Cost: 12,000 Pokedollars [spoiler=Hypnosis Tutor] Item: Dusk Stone Cooldown: Does not respawn Location: Pokemon Tower B25 Directions: [spoiler=Dusk Stone Directions] B24: Take the ladder at the lower right corner. [spoiler=Duskstone B24] B25: Interact with the front of the grave west of the ladder in the center. [spoiler=Dusk Stone B25] The easiest way to find pokemon that spawn in an area is by using the Reborn Bot. You may access the Reborn Bot in the PRO Official Discord or you may invite it to your own server. Nevertheless, here is the list of pokemon that you may obtain in the Pokemon Tower Basement and Underground. The Basement levels does not require active membership, while the Underground does. Updated as of August 16th, 2018 Basement: [spoiler=Pokemon Tower Basement Spawns] Pokemon Tower B1 #Pokemon Area Daytime Rarity MS Level Item Gastly Land M/D/N Tier 5 No 10-14 - Rattata Land M/D/N Tier 1 No 10-14 - Zubat Land M/D/N Tier 1 No 10-14 - Underground: [spoiler=Pokemon Tower Underground Spawns] Pokemon Tower Underground #Pokemon Area Daytime Rarity MS Level Item Duskull Land N Tier 6 Yes 12-16 Reaper Cloth Gastly Land M/D/N Tier 4 Yes 12-16 - Litwick Land M/D/N Tier 8 Yes 17-21 - Misdreavus Land M/D/N Tier 5 Yes 12-16 Spell Tag Rattata Land M/D/N Tier 1 Yes 12-16 - Shuppet Land M/D/N Tier 6 Yes 12-16 Spell Tag Spiritomb Land M/D/N Tier 8 Yes 12-16 - Zubat Land M/D/N Tier 2 Yes 12-16 -
-
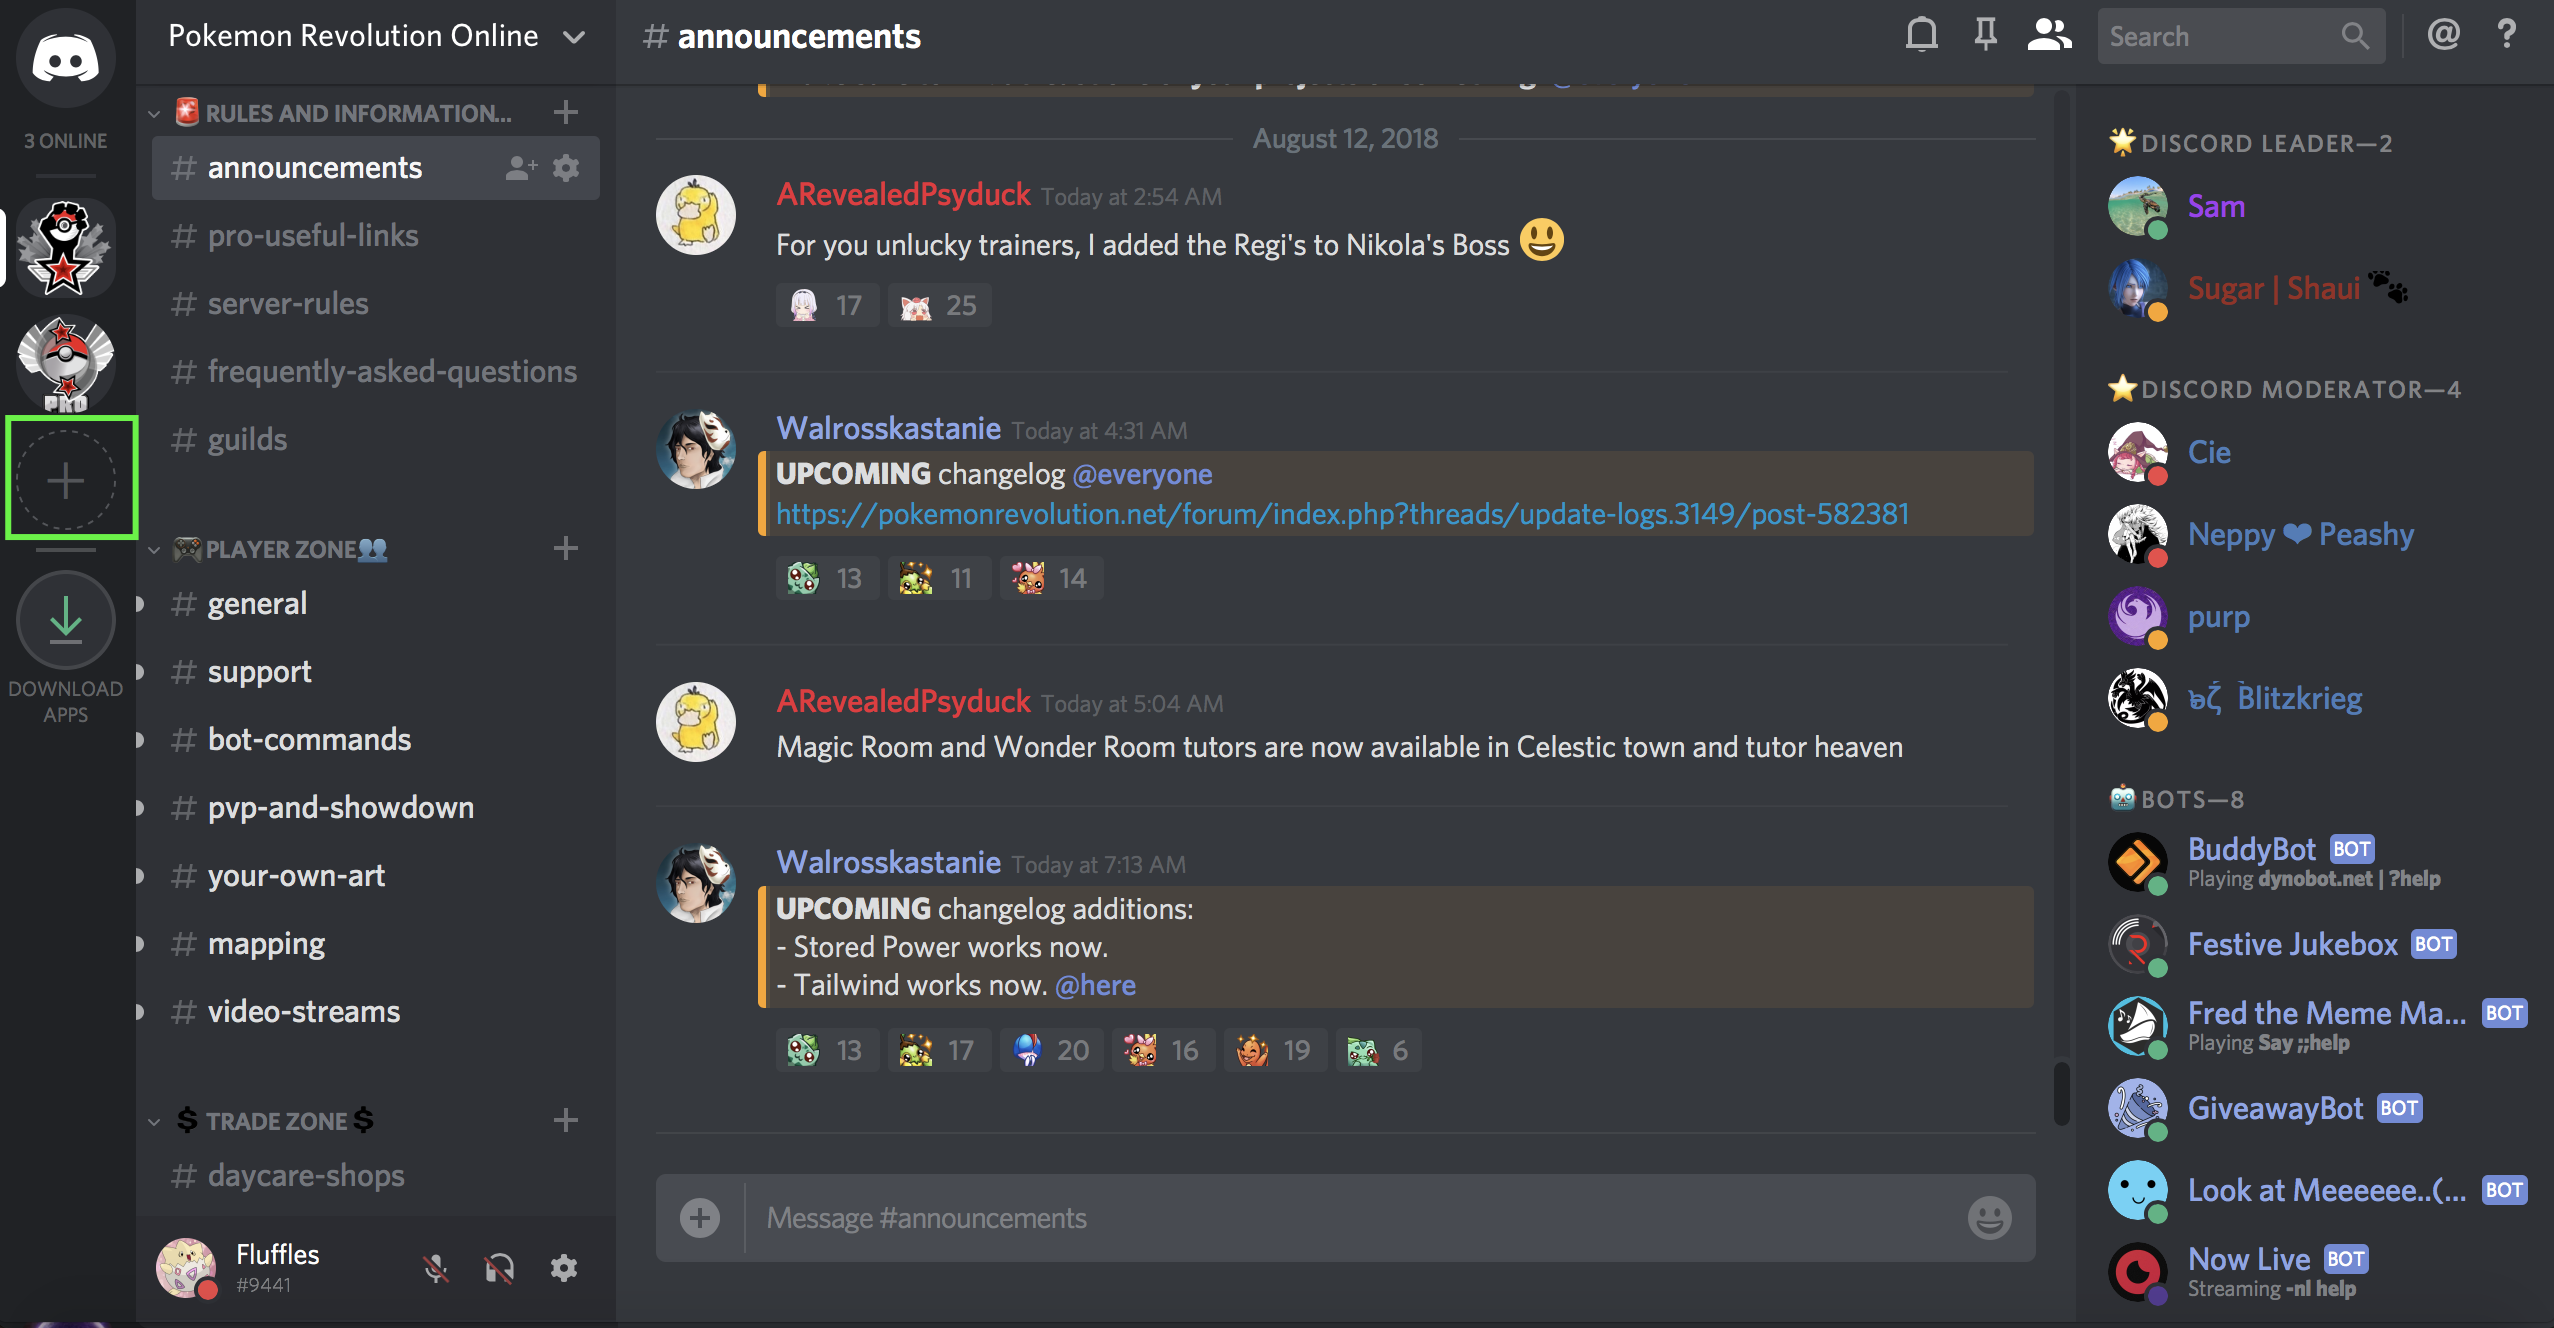
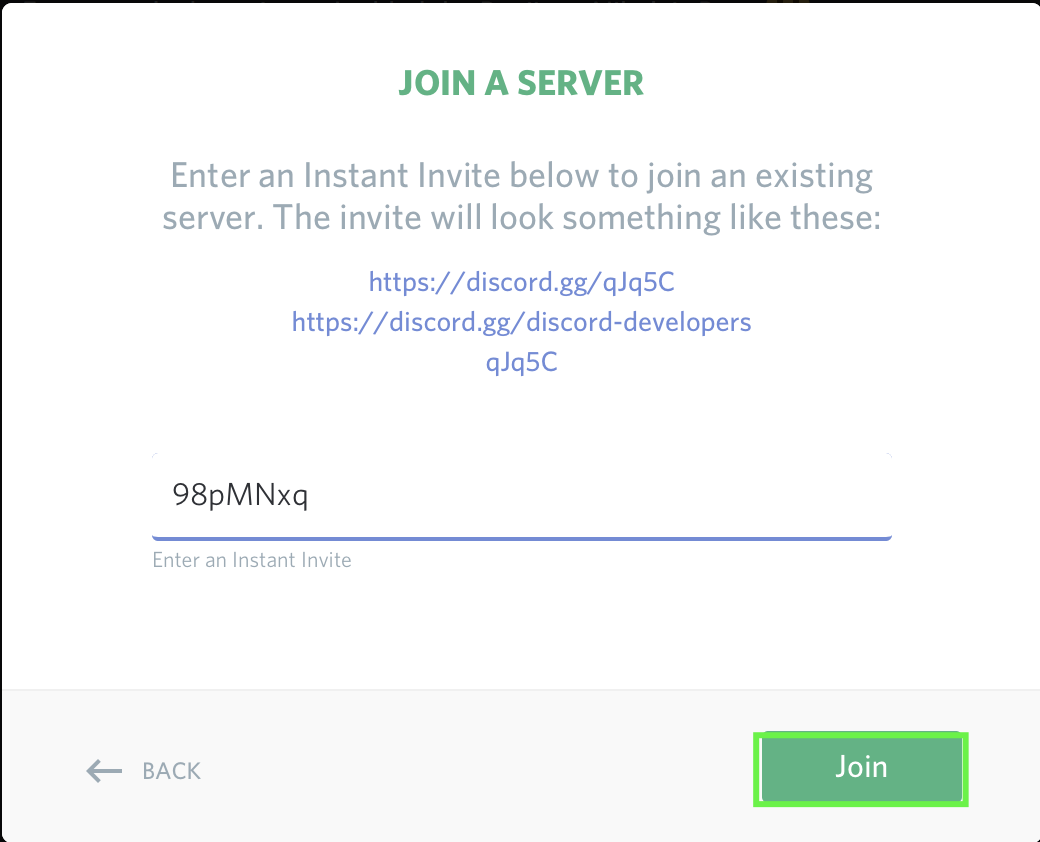
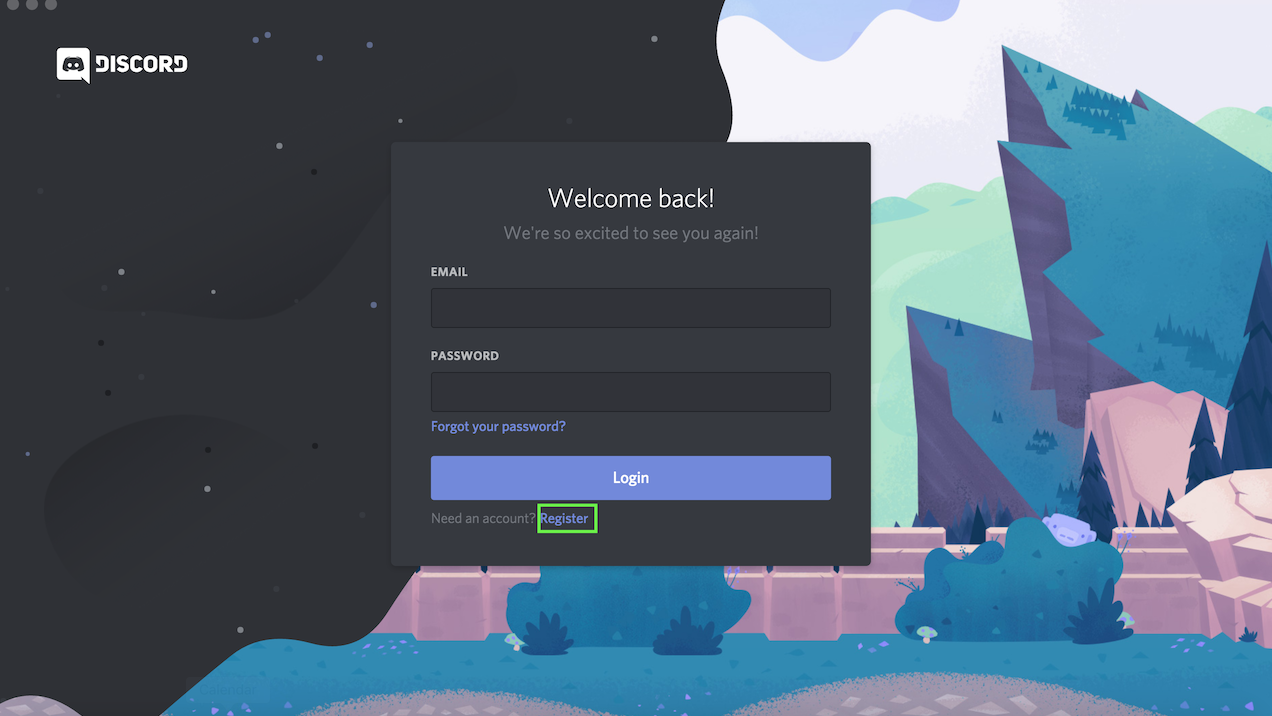
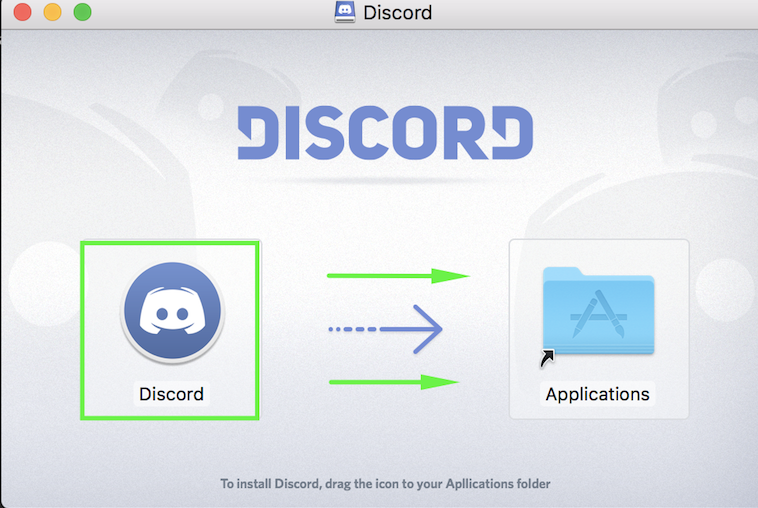
Hi there and welcome to the PRO Discord Guide! This guide will teach you all you need to know about our Official Discord Server. This will also teach you how to install Discord on your computer. Step 1: Go to the Official Discord Website and click Download. *The download provided will change depending on your Operating System. Step 2: Look for Discord Setup and double click it. Wait for the discord app to appear. Macs: Open the .dmg file and drag the Application in your Applications folder. Step 1: Click Register after opening Discord Step 2: Fill in the information and click "Continue". Invite Link: PRO Official Discord Chatting Requirements: You must have been in the server for over 10 minutes. Assigning yourself a Server: Use the command ?rank <Gold/Silver Server> in #bot-commands. REMINDER: Please read the Server Rules before anything else. Step 1: Click on the plus (+) icon and select join a server. Step 2: Select 'Join Server'. Step 3: Input the invite code (98pMNxq) and click join. Alternatively, you can simply click on the hyperlink above to join the Discord. Below are the different channels in the PRO Official Discord. Player Hosted Events: Promotions for events run by players. Discord Events: Information on events run by Discord Staff. Announcements: Important information, Updates, and Maintenance notices on Discord and PRO. Pro Useful Links: Guides created by the community that may be of help. Server Rules: PRO's Official Discord rules. Frequently Asked Questions: Answers to commonly asked questions by the community. Guilds: List of guilds on each server for you to check out and join. General: This is the server's main chat for communicating with others. Support: Assistance with support-related issues may be asked here. Bot Commands: All bot commands excluding Fredboat's are to be done here. PvP and Showdown: Discussion on PvP and Showdown-related topics and strategies. Your Own Art: Show off your art to the community. Mapping: Discussion on maps and how to make them. Video Streams: Advertisements of PRO-related Youtube Videos or Twitch Streams. Daycare Shops: Daycare Services on both servers. Trades and Prices Silver: Trade-Related Discussion and Promotions for Silver. Trades and Prices Gold: Trade-Related Discussion and Promotions for Gold. VC: Fredboat commands, channel for mic-muted players in VC. VC1: Voice channel limited to 50 players. VC2: Voice channel limited to 10 players. Streaming: Voice Channel for players who are streaming. Music Channel: Voice Channel for players listening to music. Prefix: ? Invite Link: Dyno Primary Function: Support Commands: [spoiler=Dyno Commands]?appeal: Provides a link to Discipline Appeals. ?bugcenter: Provides a link to the Bug Resolution Center. ?cloudflare: Provides a link to a small VPN. ?complaint: Provides a link to the General Complaint Area. ?cosmetics: Provides a link to the Clothing and Mounts Showcase. ?crashissues: Provides a link to solutions for crash issues. ?dashboard: Provides a link to the Dashboard. ?downloads: Provides a link the PRO's Downloads. ?evohelp: Provides a link to the Evolution Megathread and Uncoded Evolutions. ?evzones: Provides an image guide on EV Zones. ?forum: Provides a link to the Forums. ?ghostqueue: Provides an explanation for what a ghost queue is. ?gs: Provides a link to General Support. ?images: Provides a link to the Forum Images Guide. ?invite: Provides the invite link for the PRO Official Discord. ?legends: Provides a link for the Legendary Megathread. ?media: Provides links for our official media accounts. ?mee6: Provides information on the discord's leveling system. ?membership: Provides information on the Benefits of Membership. ?merge: Provides information on the server merge. ?moves: Provides a link for the TM and Tutors Guide. ?notcoded: Provides a link for the List of Uncoded Moves. ?register: Provides a link to Registration. ?report: Provides a link to the Report Center. ?restore: Provides a link to the Restore Pokemon Megathread. ?rollback: Provides a link to the Rollback Thread. ?rules: Provides a link to PRO's Rules. ?serverdown: Provides an explanation for the server being down. ?status: Provides a link to Server Status. ?stuck: Provides solutions for if you are stuck. ?suggestions: Provides a link to the Suggestions Sub-forum. ?updatelog: Provides a link to the Update Logs. ?wiki: Provides a link to the Official PRO Wiki. Prefix: ;; Invite Link: Fredboat Primary Function: Music Commands: [spoiler=Fredboat Commands];;play <url/keywords>: Plays music from the given URL or keyword. ;;queue: Displays the queue of the current tracks in the playlist. ;;nowplaying: Displays the currently playing track. ;;skip: Removes the currently playing track from the queue. ;;voteskip: Votes to skip the current track. Must have at least 50% of the votes. ;;pause: Pauses the player. ;;resume: Resumes the player. ;;join: Makes FredBoat join your current voice channel. ;;leave: Makes FredBoat leave the current voice channel. ;;repeat: Changes the repeat mode. Run this command for more info. ;;shuffle: Toggles shuffle mode. ;;reshuffle: Reshuffles the queue. ;;fwd <time>: Forwards the track by the given amount of time. ;;rew <time>: Rewinds the track by the given amount of time. ;;seek <time>: Sets the position of the track to the given time. ;;restart: Restarts the currently playing track. ;;history: Shows history of recently played tracks. Prefix: ^ Invite Link: Reborn Bot Primary Function: In-Game Aid Commands: [spoiler=Reborn Commands]^bguide: Provides a Beginners Guide on Pokemon Technicalities ^boss: Provides information on a boss. ^cooldowns: Provides cooldowns on bosses, excavation, bug catching, and subway tickets for a player. ^dex: Provides pokedex information on a pokemon. ^hp: Provides the hidden power of a pokemon given a screenshot of IVs. ^info: Provides information on an item, move, or ability. ^inspect: Provides information on a Player. ^item: Provides information on pokemon that can hold an item. ^ivs: Provides the IVs of a pokemon. ^memberlist: Provides a list of members of a guild. ^msspawns: Provides a list of member-ship only pokemonn. ^poketime: Provides the current time in-game. ^repel: Provides a list of pokemon available from the repel trick. ^spawn: Provides a list of areas where a pokemon spawns. ^defaultserver: Sets a server as your default server. ^smogon: Provides PvP information on a pokemon from Smogon. ^timeladder: Provides a list of players with the most playtime. ^guildladder: Provides a list of the top 10 Guilds this season. ^guildseasons: Provides a list of the top 10 Guilds in past seasons. ^ladder: Provides a list of the top 25 Players in Ranked PvP this season. ^mostadded: Provides a list of players whom have added the most in opponents-information ^mostpaired: Provides a list of the most paired pokemon in PvP. ^mostused: Provides a list of the most used pokemon in PvP. ^pvpseasons: Provides a list of the top 25 Players in Ranked PvP in past seasons. ^ts: Provides a list of most used teams.
-
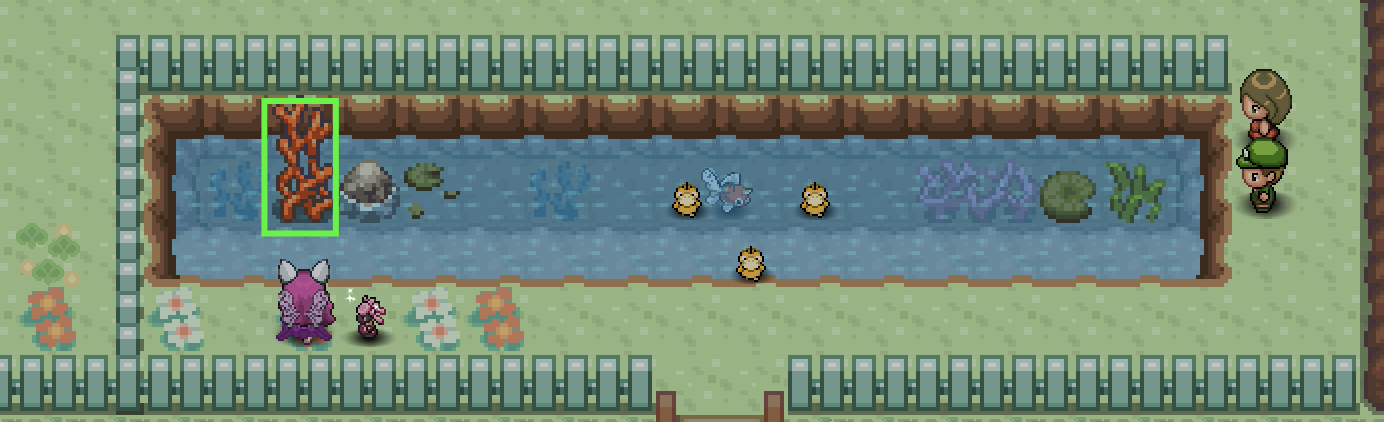
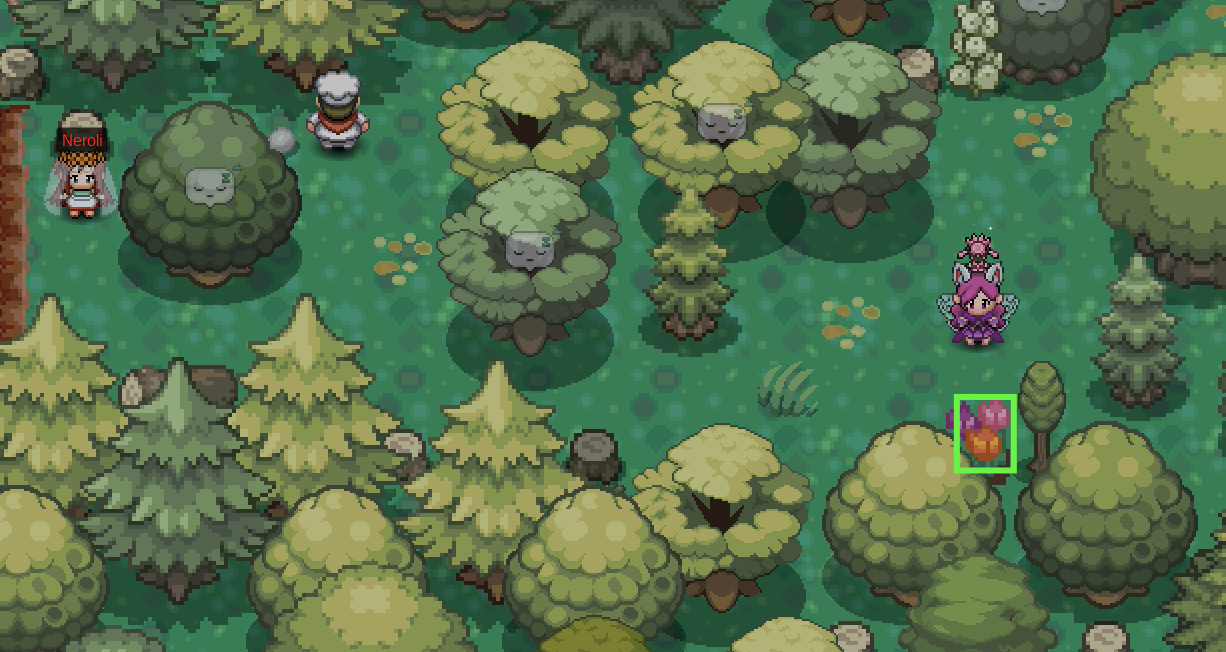
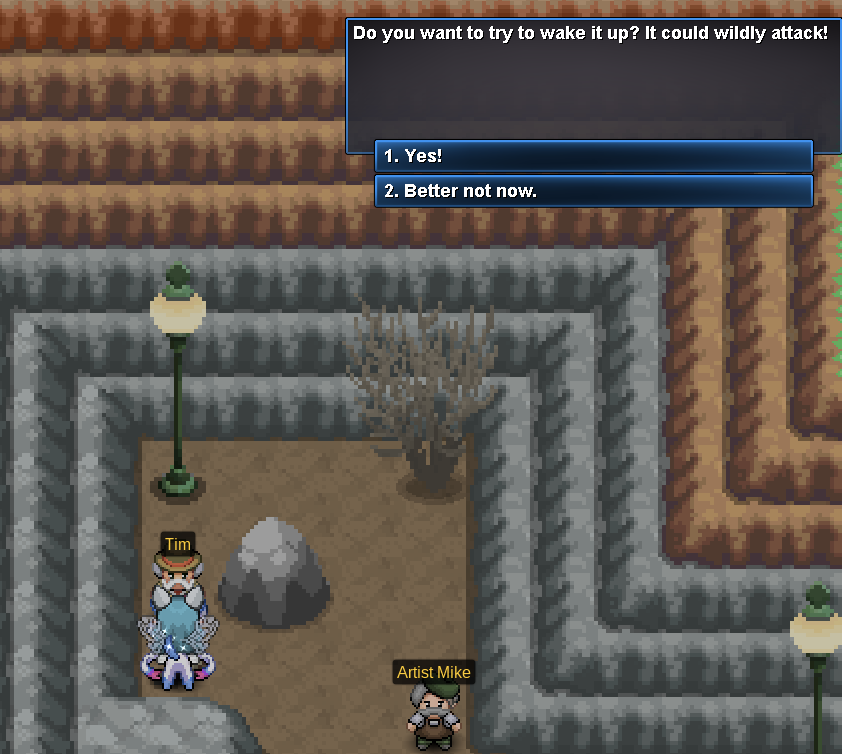
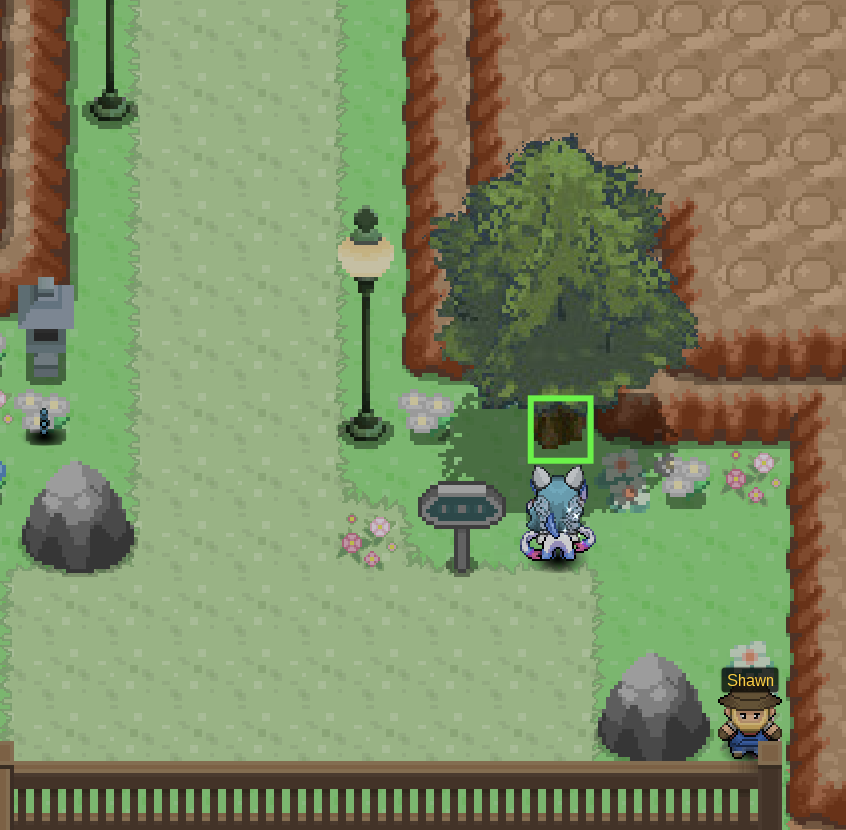
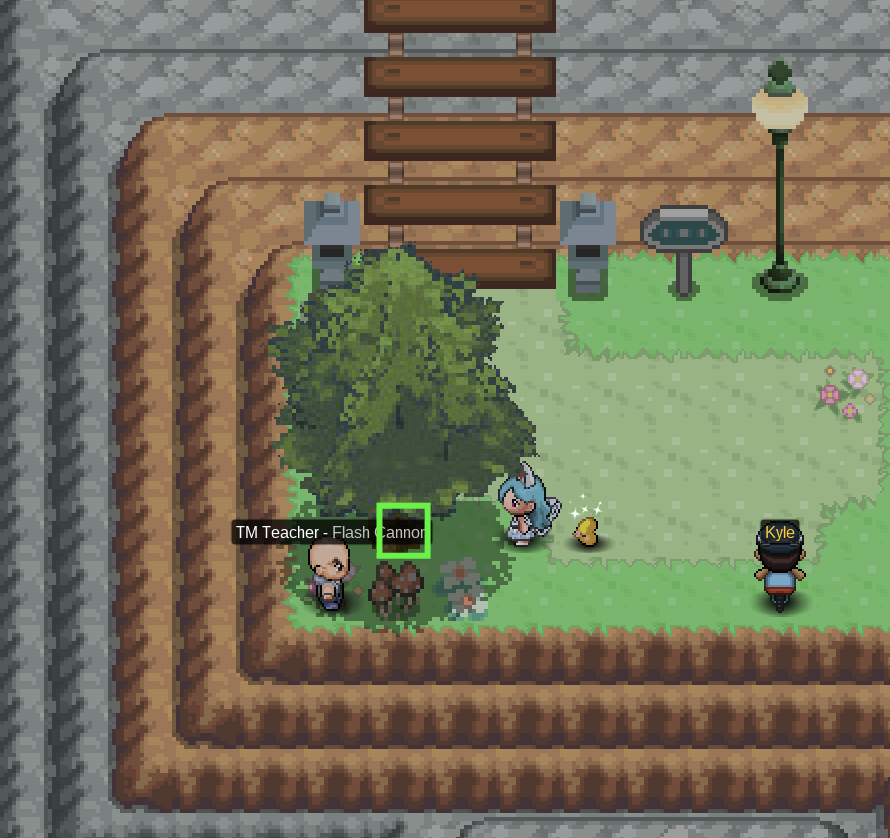
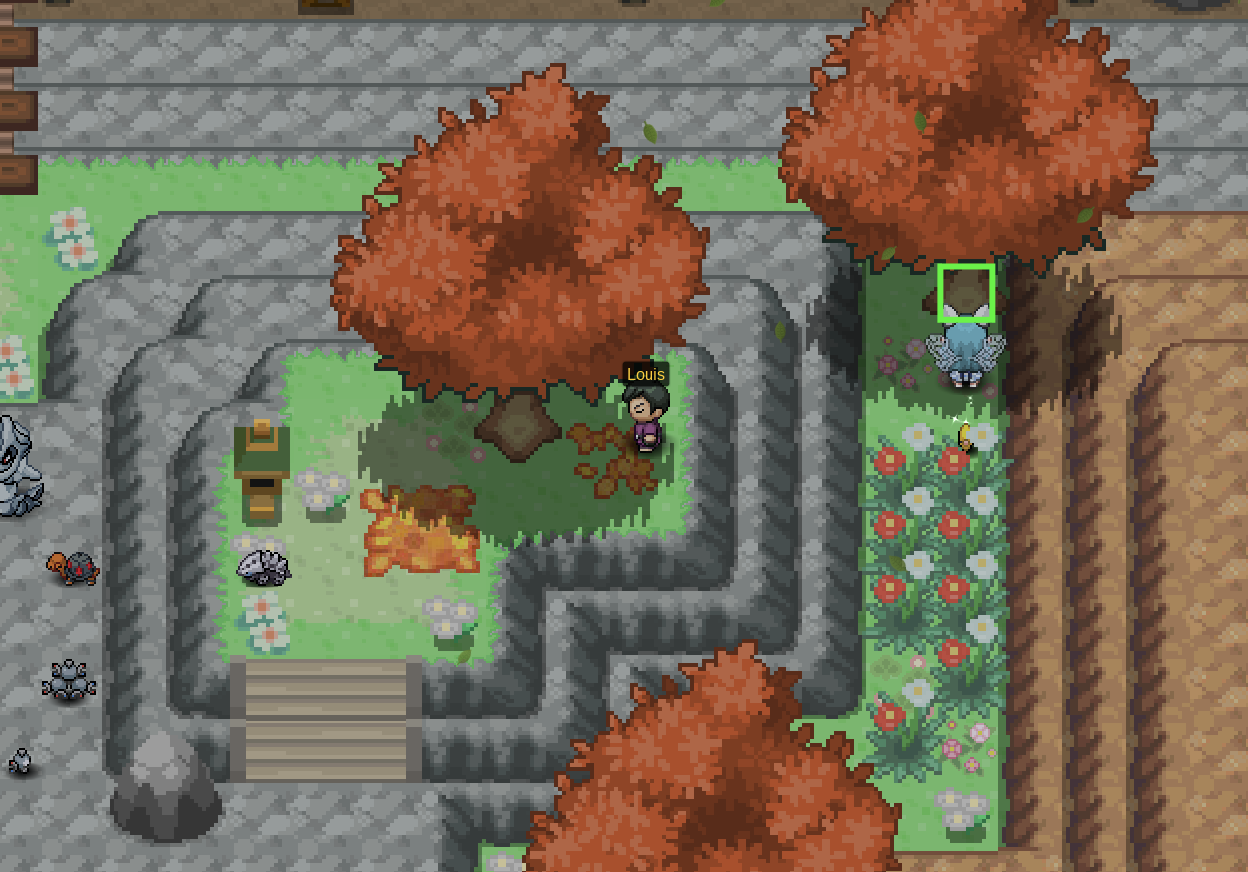
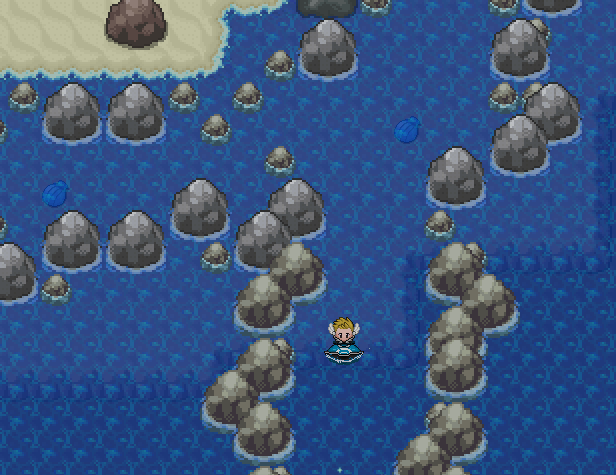
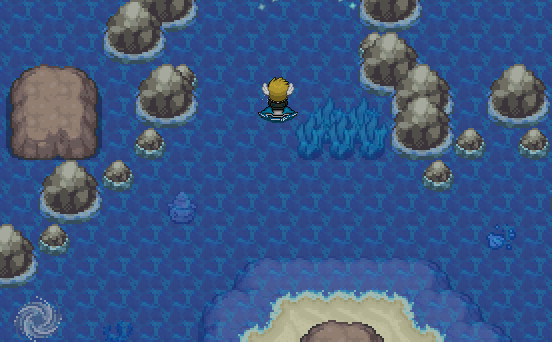
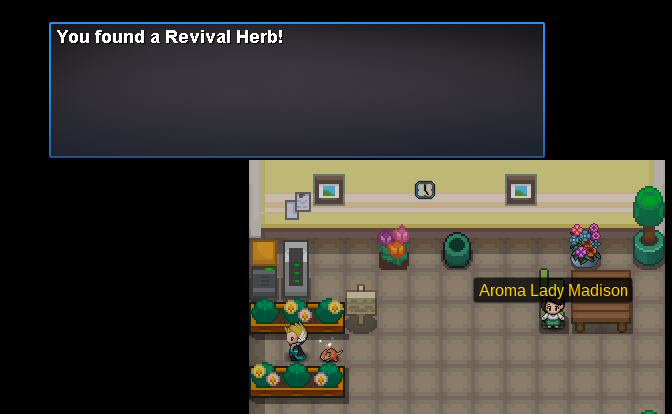
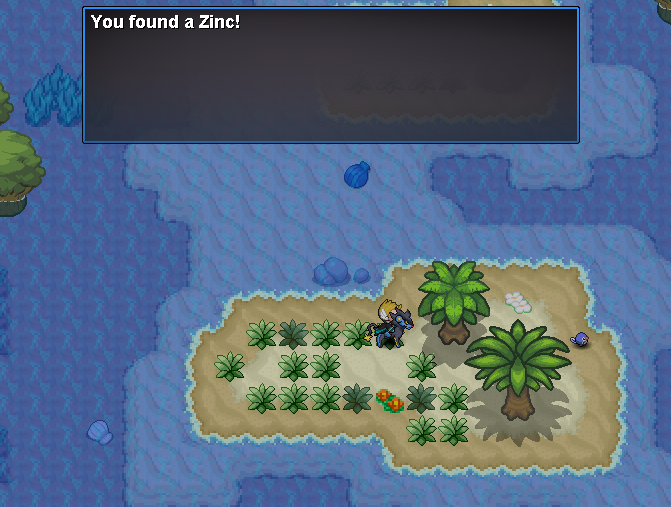
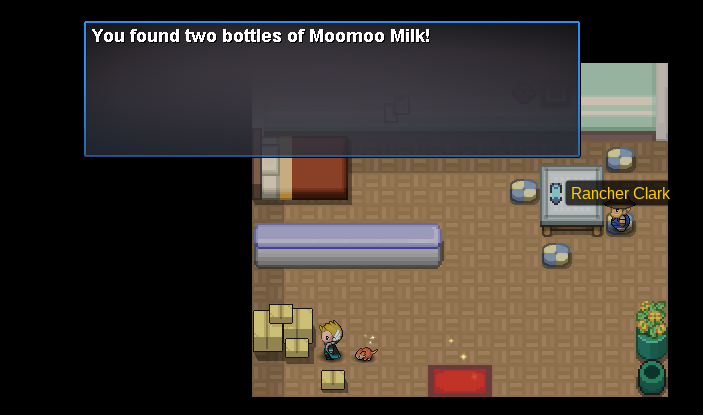
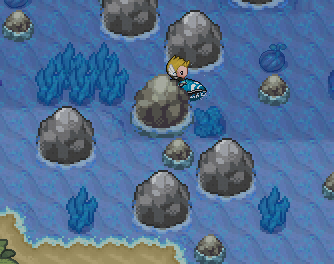
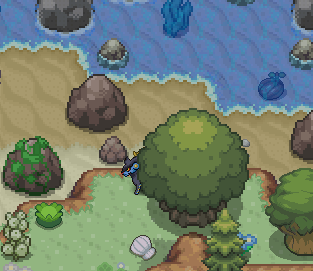
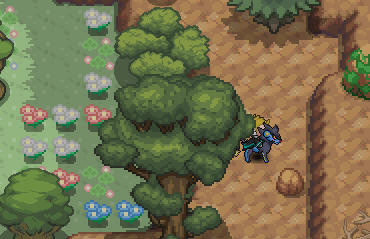
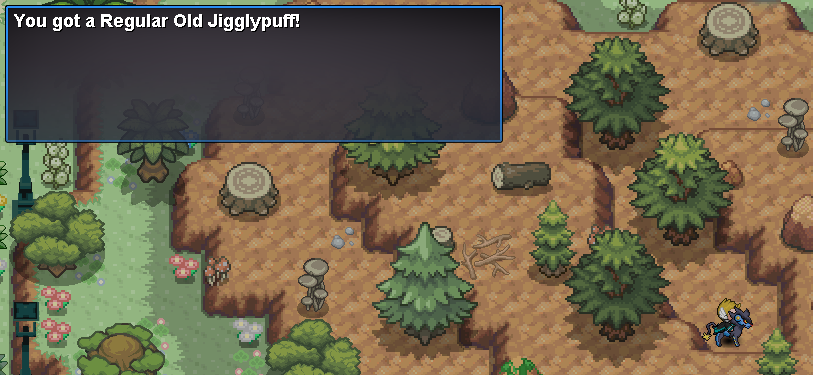
Hey there and welcome to the Nap Island Walkthrough! This guide will cover every quest you will find on this small island. Nap Island will give you the ability to travel between Johto and Hoenn without spending money. Requirement: You will need to be Hoenn Champion to be able to enter the island. How to access: You will have to either go South in Route 41 or North in Route 125. Once you are in Nap Town talk to Claire. She will ask you to help her with something; upon accepting, she will tell you that her cute and adorable Pokémon ran away to bother other people and she will ask you to bring her Pokémon back. Head to the Sleeping Path and you will find a Jigglypuff in front of Nap Cave's entrance. Interact with Jigglypuff and it will start singing; you will then fall asleep giving it the time to run away. Go through Nap Cave to reach the Secret Nap Area where you will spot Jigglypuff. Here you will meet Claire's boyfriend and after talking to him, Jiglypuff will run away again. Talk to Stephan another time and he will battle you. He has a Luxray. After defeating Stephan, you will need to head to Nap Forest where you will meet Jigglypuff in the bottom-right corner of the map. Defeat Jigglypuff to help Stephan catch it and then reach Claire who will thank you for the help. Upon talking to Stephan, he will reward you with a Rocky Helmet. On Nap Shore, you'll find the Elite 4 of Nap Island. It is composed of four kids and the Champion Rin; defeat them all to receive some rewards! Jonathan is the first member of the Nap Island Elite 4. He specializes in Grass type Pokémon. Leavanny, Vicreebel, Shiftry, Exeggutor, Ferrothorn, Whimsicott After defeating him, he will give you a Meadow Plate and you will be allowed to face the second member of the Elite 4. Dylan is the second member of the Nap Island Elite 4. He specializes in Rock type Pokémon. Rhyperior, Crustle, Cradily, Solrock, Tyranitar, Gigalith After defeating him, he will give you a Dawn Stone and you will be allowed to face the third member of the Elite 4. Benjamin is the third member of the Nap Island Elite 4. He specializes in Bug type Pokémon. Scolipede, Armaldo, Heracross, Yanmega, Durant, Galvantula After defeating him, he will give you a Wide Lens and you will be allowed to face the fourth member of the Elite 4. Noam is the fourth member of the Nap Island Elite 4. He specialized in Water type Pokémon. Slowking, Carracosta, Walrein, Whiscash, Crawdaunt, Lanturn After defeating him, he will give you TM 105 - Scald and you will be allowed to face the Champion of the Elite 4. Rin is the Champion of the Nap Island Elite 4. Garchomp, Slaking, Volcarona, Magnezone, Gengar, Gyarados After defeating her, she will give you a Slakoth! Inside the house on the right of Nap Town's Pokecenter, two old people are waiting for someone to help them; talk to the Old Lady Simone to start this quest. She will ask you to bring her the ingredients needed to make a remedy for her sick husband; the only medic on Nap Island. All these ingredients can be easily gathered around the island. Revival Herb Zinc Moomoo Milk Deep Sea Scale If you don't have already a Pokémon that knows the move Aromatherapy, you can catch a Paras in Nap Forest. After bringing her all the ingredients, her husband will feel better and he will reward you giving you the possibility to catch his Munna. Inside the house on Sleeping Path, a young boy who wants to become a rapper is listening to music. His mom hid his dinner because he doesn't want to start his journey. After helping him, he will reward you with $10,000. There are a few items and an abandoned Pokémon that you can pick up during your stay on Nap Island. Route 49 Nap Shore Nap Town Route 135 Sleeping Path Nap Cave Nap Cave B1F Secret Nap Area Nap Forest
- 12 replies
-
- 13
-
-
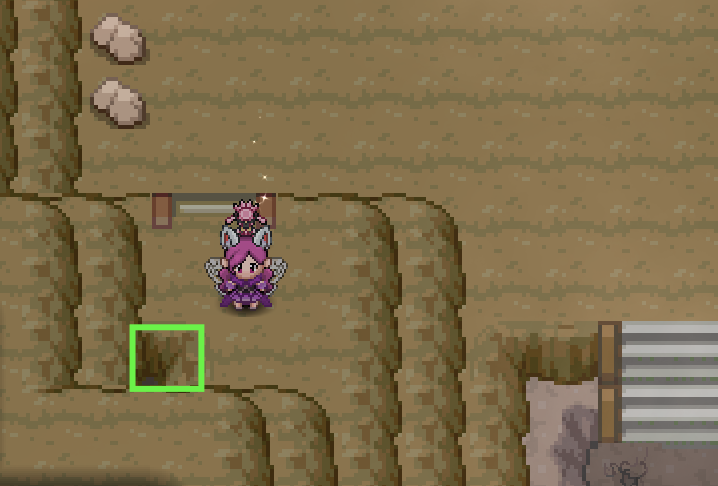
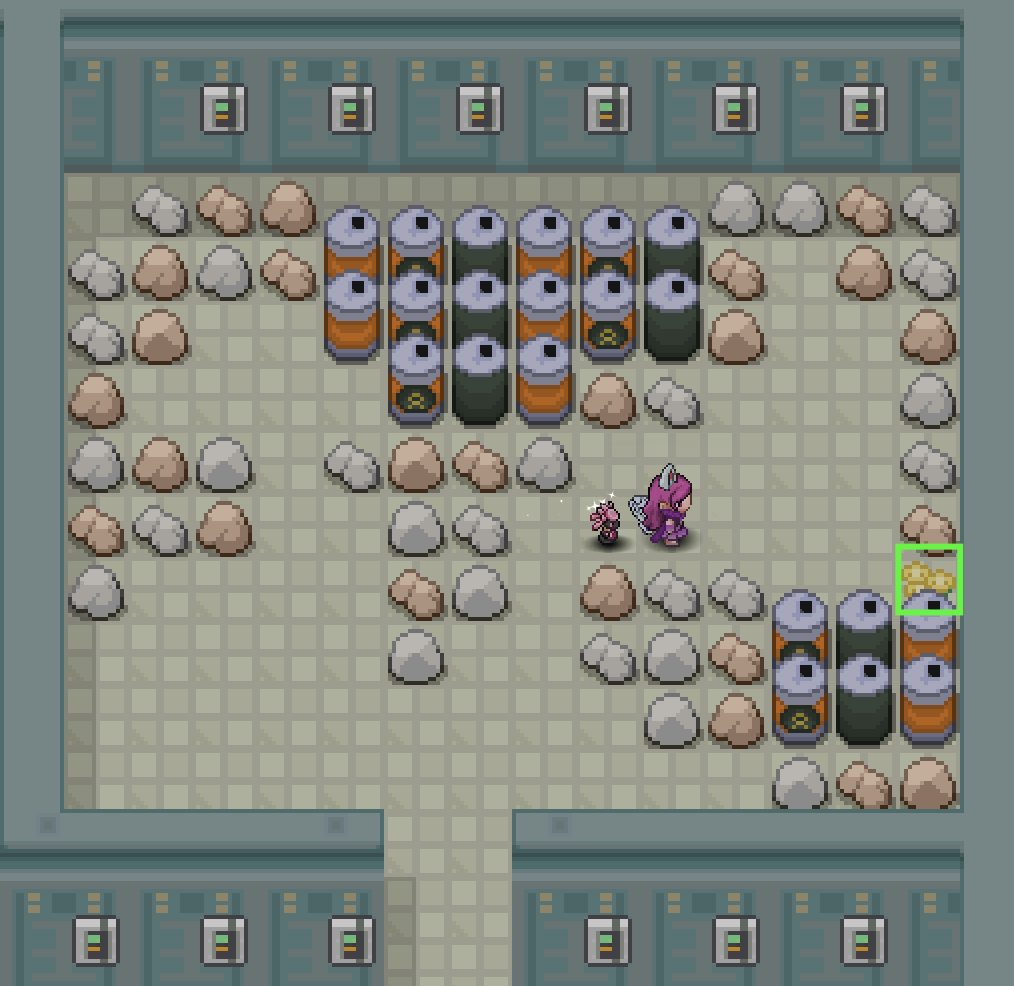
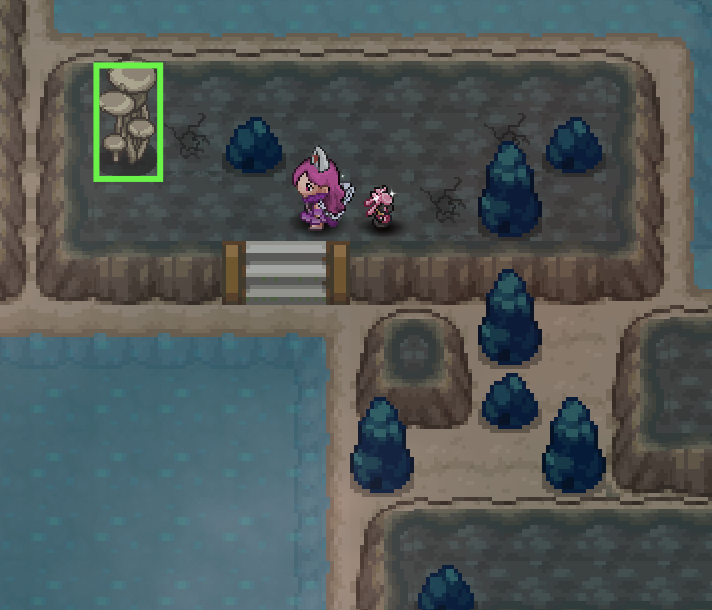
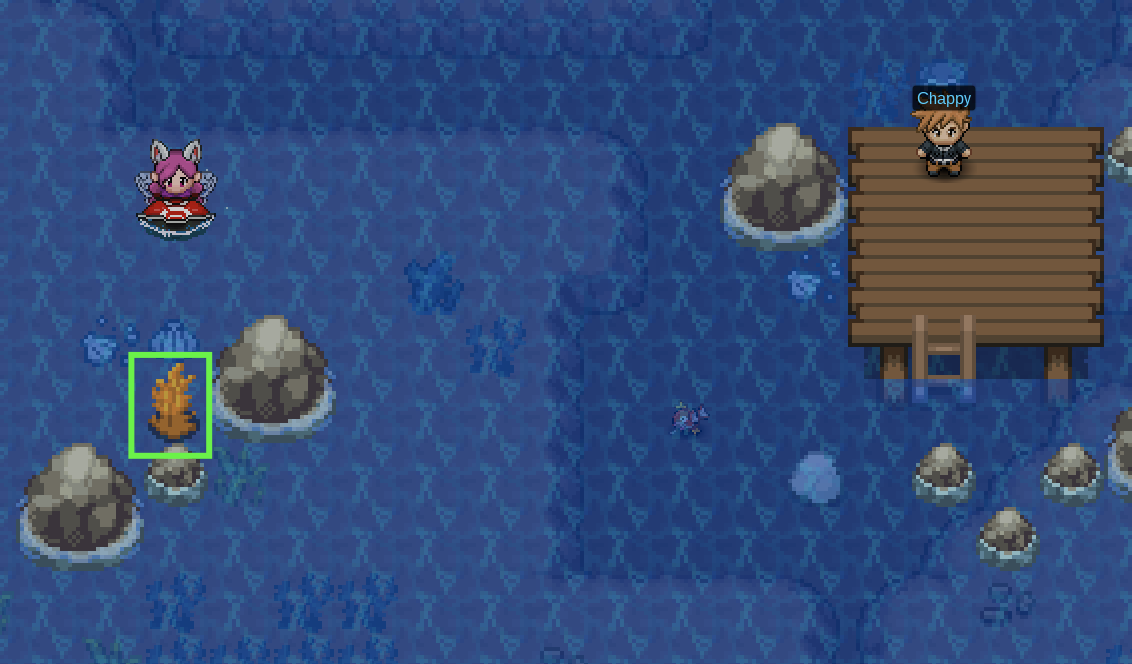
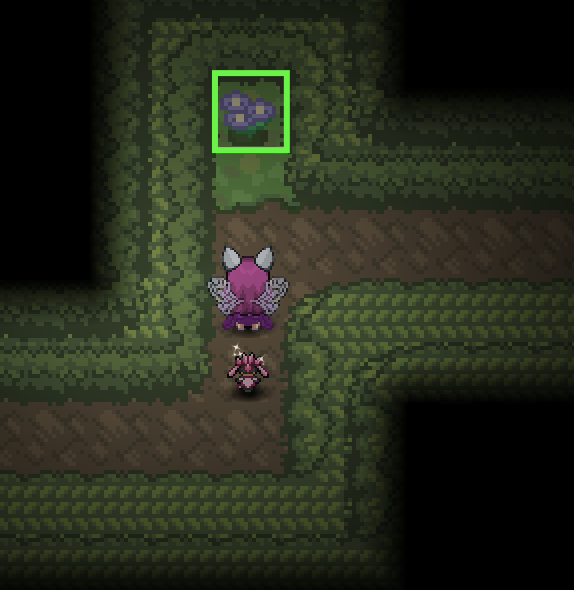
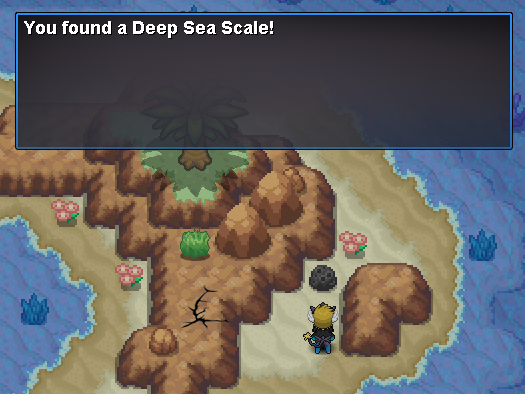
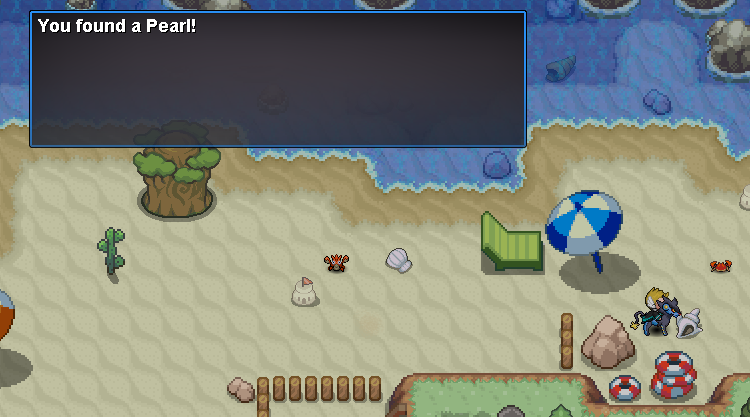
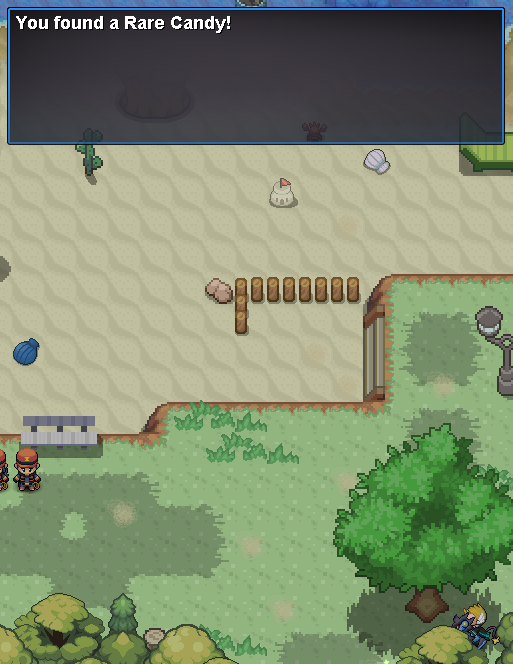
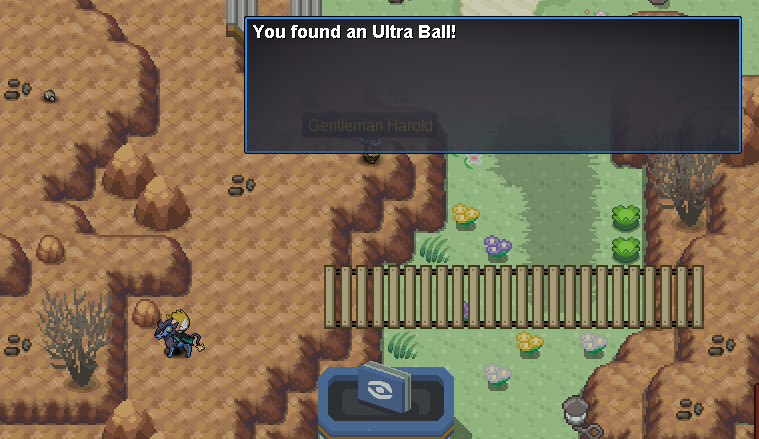
_____________________________________________________________________________________________________________________________________ _____________________________________________________________________________________________________________________________________ ✦ Finding the keys ✦ Scanner & The Storage Unit ✦ Heading to Slateport Museum ✦ Hidden Items ✦ Contributions _____________________________________________________________________________________________________________________________________ To start the quest, you need to head to Route 108 and enter the Abandoned Ship. Upon entering, you'll notice that you're in the Abandoned Ship Exterior. There's nothing too special about this place except that there is an Aqua Tail Move Tutor. However, you notice the room on the top floor is locked and needs six keys in order to be unlocked. Start exploring the ship, battling trainers, and familiarizing yourself with the various rooms to look for the captain office keys. The specific locations for each key is shown below, with their map name included to help you find them: [spoiler=Locations of All Keys][spoiler=Abandoned Ship 1F Room 1] [spoiler=Abandoned Ship 1F Room 2] [spoiler=Abandoned Ship B1F]You need to interact with the stray Wingull in order to pick up this key. [spoiler=Abandoned Ship B1F Room 4] [spoiler=Abandoned Ship B1F Room 3] [spoiler=Abandoned Ship B1F Room 1] After finding all the keys, head up to the Captain's Office. Be ready to battle Captain Bickerstaff! His team is full of Lv40 Pokemon. Upon defeating Captain Bickerstaff, he'll reward you some money, give you the storage unit key and leave you with his Clamperl. _____________________________________________________________________________________________________________________________________ Before you started this quest, you may or may not have talked to Captain Stern in Slateport Museum 1F. Talking to him wasn't necessary to invoke the quest, but Captain Stern mentions that he needs a Scanner, hinting that Wendy has it. So, after completing 'Finding The Keys', we can now head to the Storage Unit in Abandoned Ship B1F. However, it's important to pick up the scanner from Sailor Wendy beforehand, as you cannot pick up the mossy blob otherwise. Yes, this is the Wendy that Captain Stern was talking about. Previously, the door was locked, but since Captain Bickerstaff gave us the key, we can enter it now. Upon entering, you notice a mossy blob on the floor. Weirdly enough, it reacts to the scanner! _____________________________________________________________________________________________________________________________________ Afterward, head back to Slateport Museum and talk to Captain Stern. He'll notice that you have the scanner and will ask for it in return of giving you whatever was in the mossy blob. For all players, it could either be a Deep Sea Tooth or a Deep Sea Scale. Personally, I got a Deep Sea Scale. These are evolutionary items done to evolve Clamperl into either a Huntail or Gorebyss. _____________________________________________________________________________________________________________________________________ Various items are scattered across the ship for the player to loot. After all, what's the point of exploring an abandoned ship without anything to grab? TM 13 - Ice Beam TM 68 - Rain Dance Revives Water Stone Great Ball Escape Rope _____________________________________________________________________________________________________________________________________ I'd like to thank NisseP for his original guide and locations of the keys. I'd also like to thank the Community Coordinators for reviewing this guide. If there's something I'm missing in the guide, such as an item location, feel free to let me know and I'll add it! I couldn't find the artist who drew the beautiful image I used in this guide, but I'd like to credit them as well. Let me know if you can find the artist.
-
- 4
-