Jump to content

Leaderboard

Popular Content

Showing content with the highest reputation on 11/03/25 in Posts

  1. Excavation System Improvement Suggestion Excavations currently go unnoticed by most players and are mainly used only to obtain Therian forms of legendary Pokémon. It would be great to see some updates that make them more engaging and worthwhile. One idea is to rotate the excavation spawns each season to include PvP Pokémon which are most used in the previous season, helping new or aspiring PvP players farm useful Pokémon more easily. Another nice addition could be changing the excavation spawns during events, keeping the content fresh and exciting. Additionally, updating the Artifact Point Store with exclusive items for Pve & PvP or limited-time items would make it more rewarding. Adding a cap system based on excavation points for item exchanges could also help balance rewards while keeping players motivated to participate. What are your opinion on this? Feel free to suggest more.
    4 points
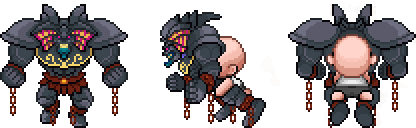
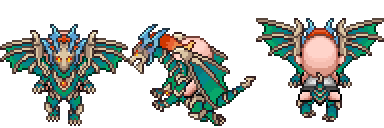
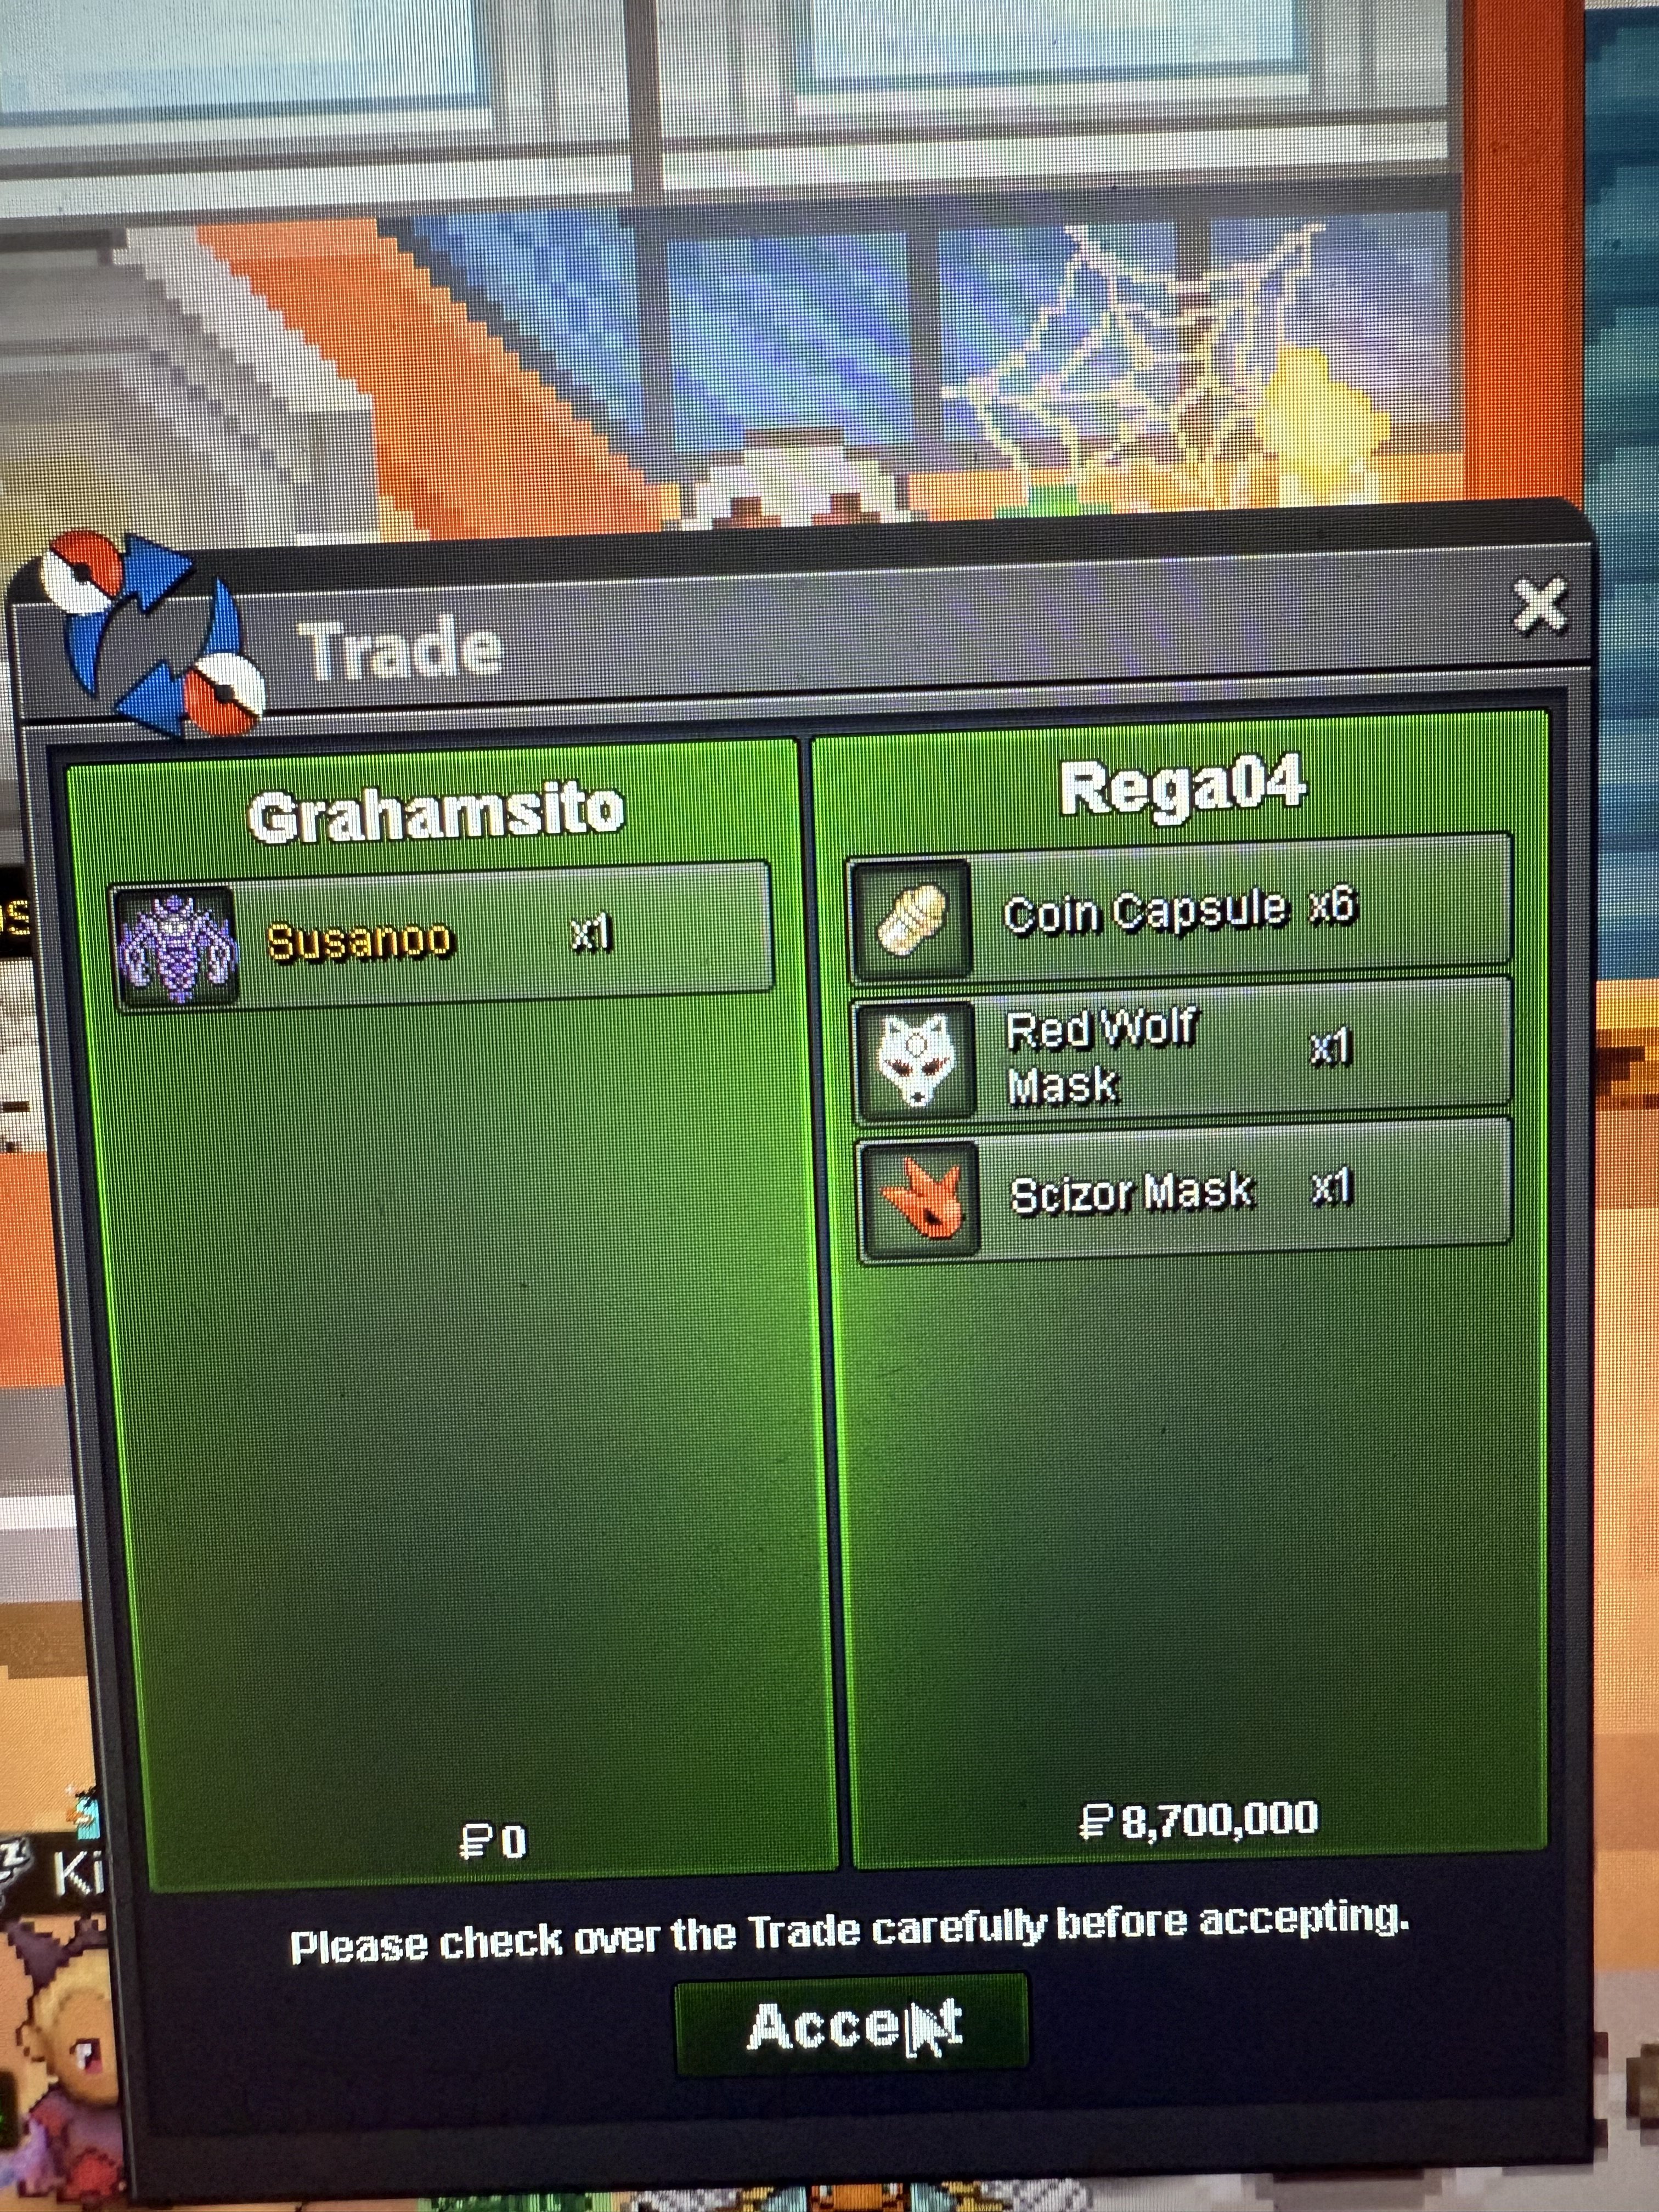
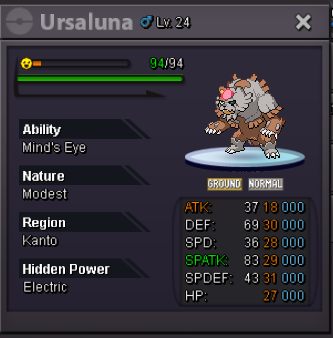
  2. .Keitaimg { margin-left: -5px; } Prepare to elevate your player-versus-player experience with PvP Chests—mysterious chests brimming with rare cosmetics, unique mounts, and handy consumables. Designed exclusively for Ranked PvP, these chests reward both your daily activity and dedicated ladder climbing. First Win of the Day Start strong by claiming 1× PvP Chest with your first win in both Normal Ranked and Random Ranked PvP each day. Additional Wins In Normal Ranked, earn 1× PvP Chest for every two additional wins after your first. In Random Ranked, earn 1× PvP Chest for every four additional wins after your first. Top 25 Ladder Rewards At 12 AM and 12 PM GMT+0 each day, the Top 25 players on the Normal Ranked PvP ladder receive enhanced-chance chests: 1st Place: 5× PvP Chests 2nd–3rd Place: 4× PvP Chests 4th–10th Place: 3× PvP Chests 11th–19th Place: 2× PvP Chests 20th–25th Place: 1× PvP Chests Very Rare Mounts Slifer the Sky Dragon Obelisk the Tormentor The Winged Dragon of Ra Exodia Mount Dark Exodia Mount Blue-Eyes White Dragon Chaos Emperor Dragon Shenlong Mount Hoverpod Kaido Mount Karoo Mount Spyro Mount Kaisel Mount S Kaisel Mount S Walking Wake Mount S Gouging Fire Mount S Raging Bolt Mount S Koraidon Mount S Miraidon Mount S Poipole Mount S Naganadel Mount S Buzzwole Mount S Guzzlord Mount S Nihilego Mount S Celesteela Mount S Flutter Mane Mount Ultra Necrozma Mount S Ultra Necrozma Mount Ursaluna Mount Changes its appearance to Ursaluna Bloodmoon at night. Its form counterparts can be found during the respective events. Accessories Susanno (Blue) Susanoo (Purple) Susanoo (Orange) Susanoo (Green) Kyubi Amidamaru Venom Demon Mode Cosmetic Sets Great Saiyaman (Helmet, Clothes, Cape) Great Saiyagirl (Helmet, Clothes, Cape) Vegeta (Wig, Eyes, Armor, Tail) Boruto (Wig, Scar, Clothes) Baryon Mode (Eyes, Clothes, Tails) KCM 2 Mode (Wig, Clothes) Madara (Wig, Eyes, Armor) Cursed Seal (Wig, Eyes, Clothes, Wings) Zero (Helmet, Clothes, Cape) Captain (Clothes, Daiguren Hyorinmaru) Ulquiorra (Horns, Eyes, Clothes) Goblin Slayer (Helmet, Armor) Solaire of Astora (Helmet, Armor) Dark Magician (Helmet, Armor, Magic Circle) Armarouge Set (Helmet, Armor) Armarouge Set 2 (Helmet, Armor) Ceruledge Set (Helmet, Armor) Ceruledge Set 2 (Helmet, Armor) Astral Knight Set (Armor, Helmet, Cape) Dr. Doom Set (Clothes, Hood, Mask, Cape) Green Goblin Set (Helmet, Suit, Glider) Mordekaiser Set (Helmet, Armor, Cape) Consumables Soul-Bound IV-Locked Reroll Ticket to lock a single IV Soul-Bound IV-Locked Reroll Ticket to lock two IVs Soul-Bound Ticket to swap two IVs of a legendary Pokémon in a targeted way Rare Mounts Walking Wake Mount Gouging Fire Mount Raging Bolt Mount Koraidon Mount Miraidon Mount Poipole Mount Naganadel Mount Buzzwole Mount Guzzlord Mount Nihilego Mount Celesteela Mount Flutter Mane Mount Going Merry Mini Merry II Flying Dutchman Hybrid mount with unique poison gas particle effect. Minecraft Boat Raft Greymon Cosmetic Sets Ogerpon Teal (Mask, Clothes, Veil) Ogerpon Wellspring (Mask, Clothes, Veil) Ogerpon Hearthflame (Mask, Clothes, Veil) Ogerpon Cornerstone (Mask, Clothes, Veil) Tapu Koko (Wig, Eyes, Clothes) Tapu Lele (Hat, Eyes, Clothes) Tapu Bulu (Hat, Eyes, Clothes) Tapu Fini (Hat, Eyes, Clothes) Dragon Knight (Helmet, Clothes, Spear) L (Wig, Eyes, Clothes) Consumables Soul-Bound Reroll Ticket Soul-Bound Ticket to randomly reorder the IVs of a Legendary Pokémon Soul-Bound Ticket to reduce an IV of a Legendary Pokémon by 1 Scarce Heavy-Duty Boots Uncommon Consumables TM097 – Fire Punch TM188 – Draining Kiss TM199 – Ice Spinner TM220 – Knock Off TM230 – Flip Turn TM231 – Dual Wingbeat TM239 – Temper Flare TM254 – Alluring Voice TM280 – Power Whip TM292 – Body Press TM294 – Toxic Spikes TM308 – Encore TM319 – Hurricane Common Consumables TM168 – Charm TM169 – Fake Tears TM170 – Scary Face TM171 – Fire Fang TM172 – Thunder Fang TM173 – Ice Fang TM174 – Acid Spray TM175 – Struggle Bug TM176 – Psybeam TM177 – Confuse Ray TM178 – Disarming Voice TM180 – Pounce TM181 – Chilling Water TM185 – Metal Claw TM192 – Snowscape TM194 – Rock Blast TM196 – Imprison TM198 – Tailwind TM217 – Sand Tomb TM223 – Vacuum Wave TM241 – Supercell Slam TM248 – Skitter Smack TM276 – Superpower TM286 – Stored Power TM303 – Liquidation TM306 – Heat Wave TM309 – Play Rough TM317 – Outrage TM328 – Future Sight Bonus Drops PvP Chest (10% Chance) Gain an extra PvP Chest within your current chest. PvP Tokens (100% Guaranteed) Every PvP Chest includes PvP Tokens, which you can collect and spend on various PvP-focused rewards and cosmetics. Soul-Bound Reroll Ticket for a specific Legendary (3% Chance) Every PvP Chest has chance to drop a Legendary-specific Reroll Ticket (e. g. Heatran Reroll Ticket). Item Details Cosmetic Sets Dropped as one tradable item (e. g. Vegeta Set). Once you opened a cosmetic set to claim the cosmetics, those items become untradeable. Mounts & Accessories Typically tradable unless noted otherwise. Some mounts change forms or have special effects during certain conditions or events.
    3 points
  3. I'd love to see titles introduced to PRO, which players can earn by achieving specific milestones. This would give players extra motivation and a sense of purpose for many in-game activities. For example, titles could be earned from: Completing all regions Pokedex Reaching certain PvP ratings (Like 400, 500, or 600) in both random and normal ranked. Achieving PvP win streaks (such as 10, 25, or 50 consecutive wins) PvP Ladder streaks (3, 5, or 10 consecutive ladder seasons) Farming Excavation points. Winning Pve events (like Multiplayer Bcc or Fcc). Earning Money Collecting shinies or rare form. Hunting Rare forms or shinies. Exclusive Titles for Streamers or Staff Dungeons Playtime Players could equip one title at a time, which would be displayed next to their name in chat. Additionally, they could pin up to four titles on their profile for others to see. This feature would make many existing things of the game like dungeons, excavations, Pokedex, Playtime, Shiny hunting and PvP more rewarding and meaningful. With good visual designs and creativity, titles would add a strong sense of accomplishment and individuality to Pro. What are your thoughts on this? Feel free to drop your opinions!
    2 points
  4. 2 points
  5. Alt account: Sumocal (Silver Server) Auction Details: Start Price: 5.5m End Point: 48 hours (after start price is met) Insta Price: 9m Minimum Raise: 100k Accepted Payments: Pokedollars, Coin Capsules (x1 Coin Capsule = 500k), IV Reroll Tickets (x1 IV Reroll Ticket = 750k) Important Reminders: This is a Cross Server auction. You may bid from any server, and I will transfer to your preferred server upon winning. If you intend to purchase with an alt account, specify the account alongside your bid. If a bid is received in the final 15 minutes of the auction, the end point will be delayed by 15 minutes from that bid, and will be delayed by 15 minutes for each new bid thereafter, until the current offer has been held for a full 15 minutes. Happy Bidding!
    1 point
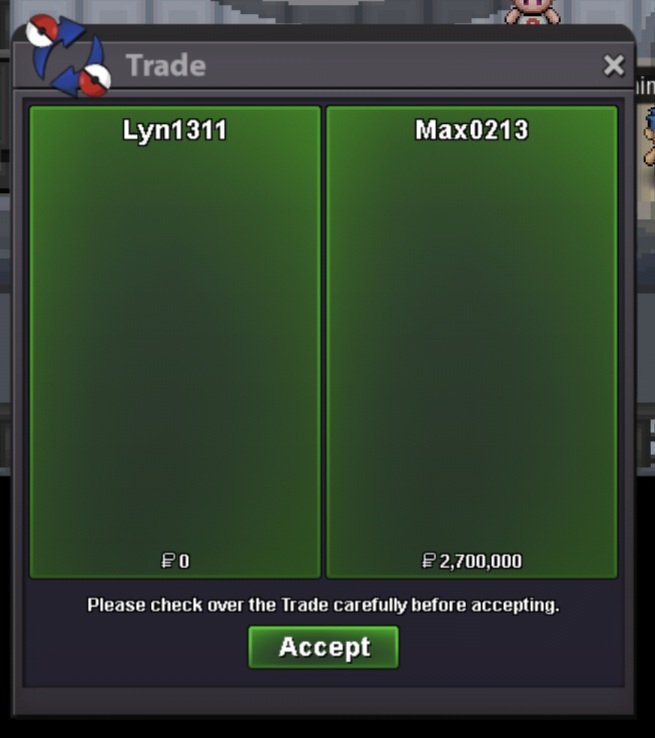
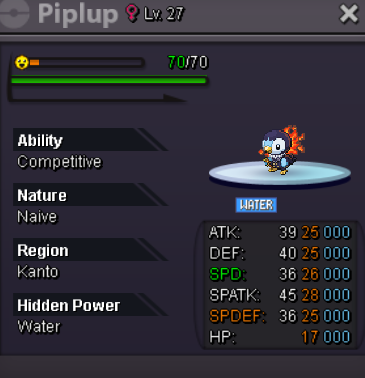
  6. Auction Details: Start Price: 2m End Point: 48 hours (after start bid) Insta Price: N/A Minimum Raise: 200k Accepted Payments: Pokedollars Other Infos: 15 min rule is apply You can bid here or in game GOOD LUCK GUYS! Piplup (Halloween Form) Level: 27 Naive Nature Ability: Competitive(H.A) IVs: 17 HP / 25 Atk / 25 Def / 28 SpA / 25 SpD / 26 Spe
    1 point
  7. start offer 3.5m min bid 500k ends 48 hours after first bid has met accept cc 480k
    1 point
  8. Current Offer : 6M Start Price : 3M Insta Price : N/A Min Raise : 200K Accepted Payments : Pokedollars / Coin Capsule (500k each) IGN : Lor3hC End Point: 72h after first bid (with timer) This is a Gold auction but bids are accepted from Silver server, just mention it in ur bid Enjoy
    1 point
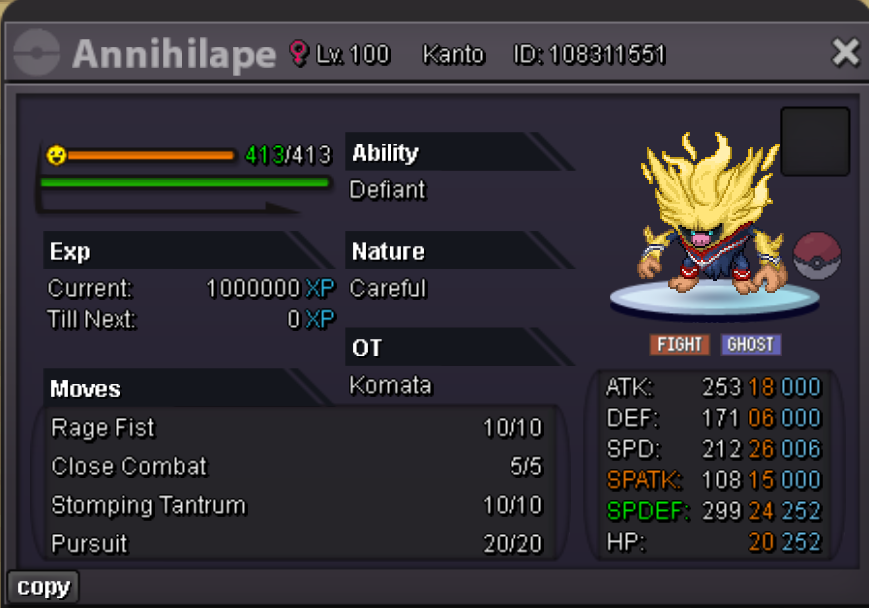
  9. Hey there! Time to sell my HLLW Annihilape Careful! Start Offer: 10K Min offer: 10K End time: 24 Hours after the first bid! Happy bidding!
    1 point
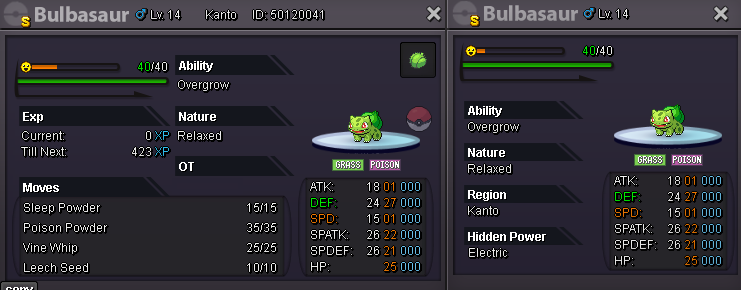
  10. Shiny Bulbasaur Start bid: 40m Min. raise bid: 1m Insta Price: 80m Time: 2 days after first bid. Accepted: Coin Capsule: 500k Reroll Ticket: 700k Nature Reroll Ticket: 350k
    1 point
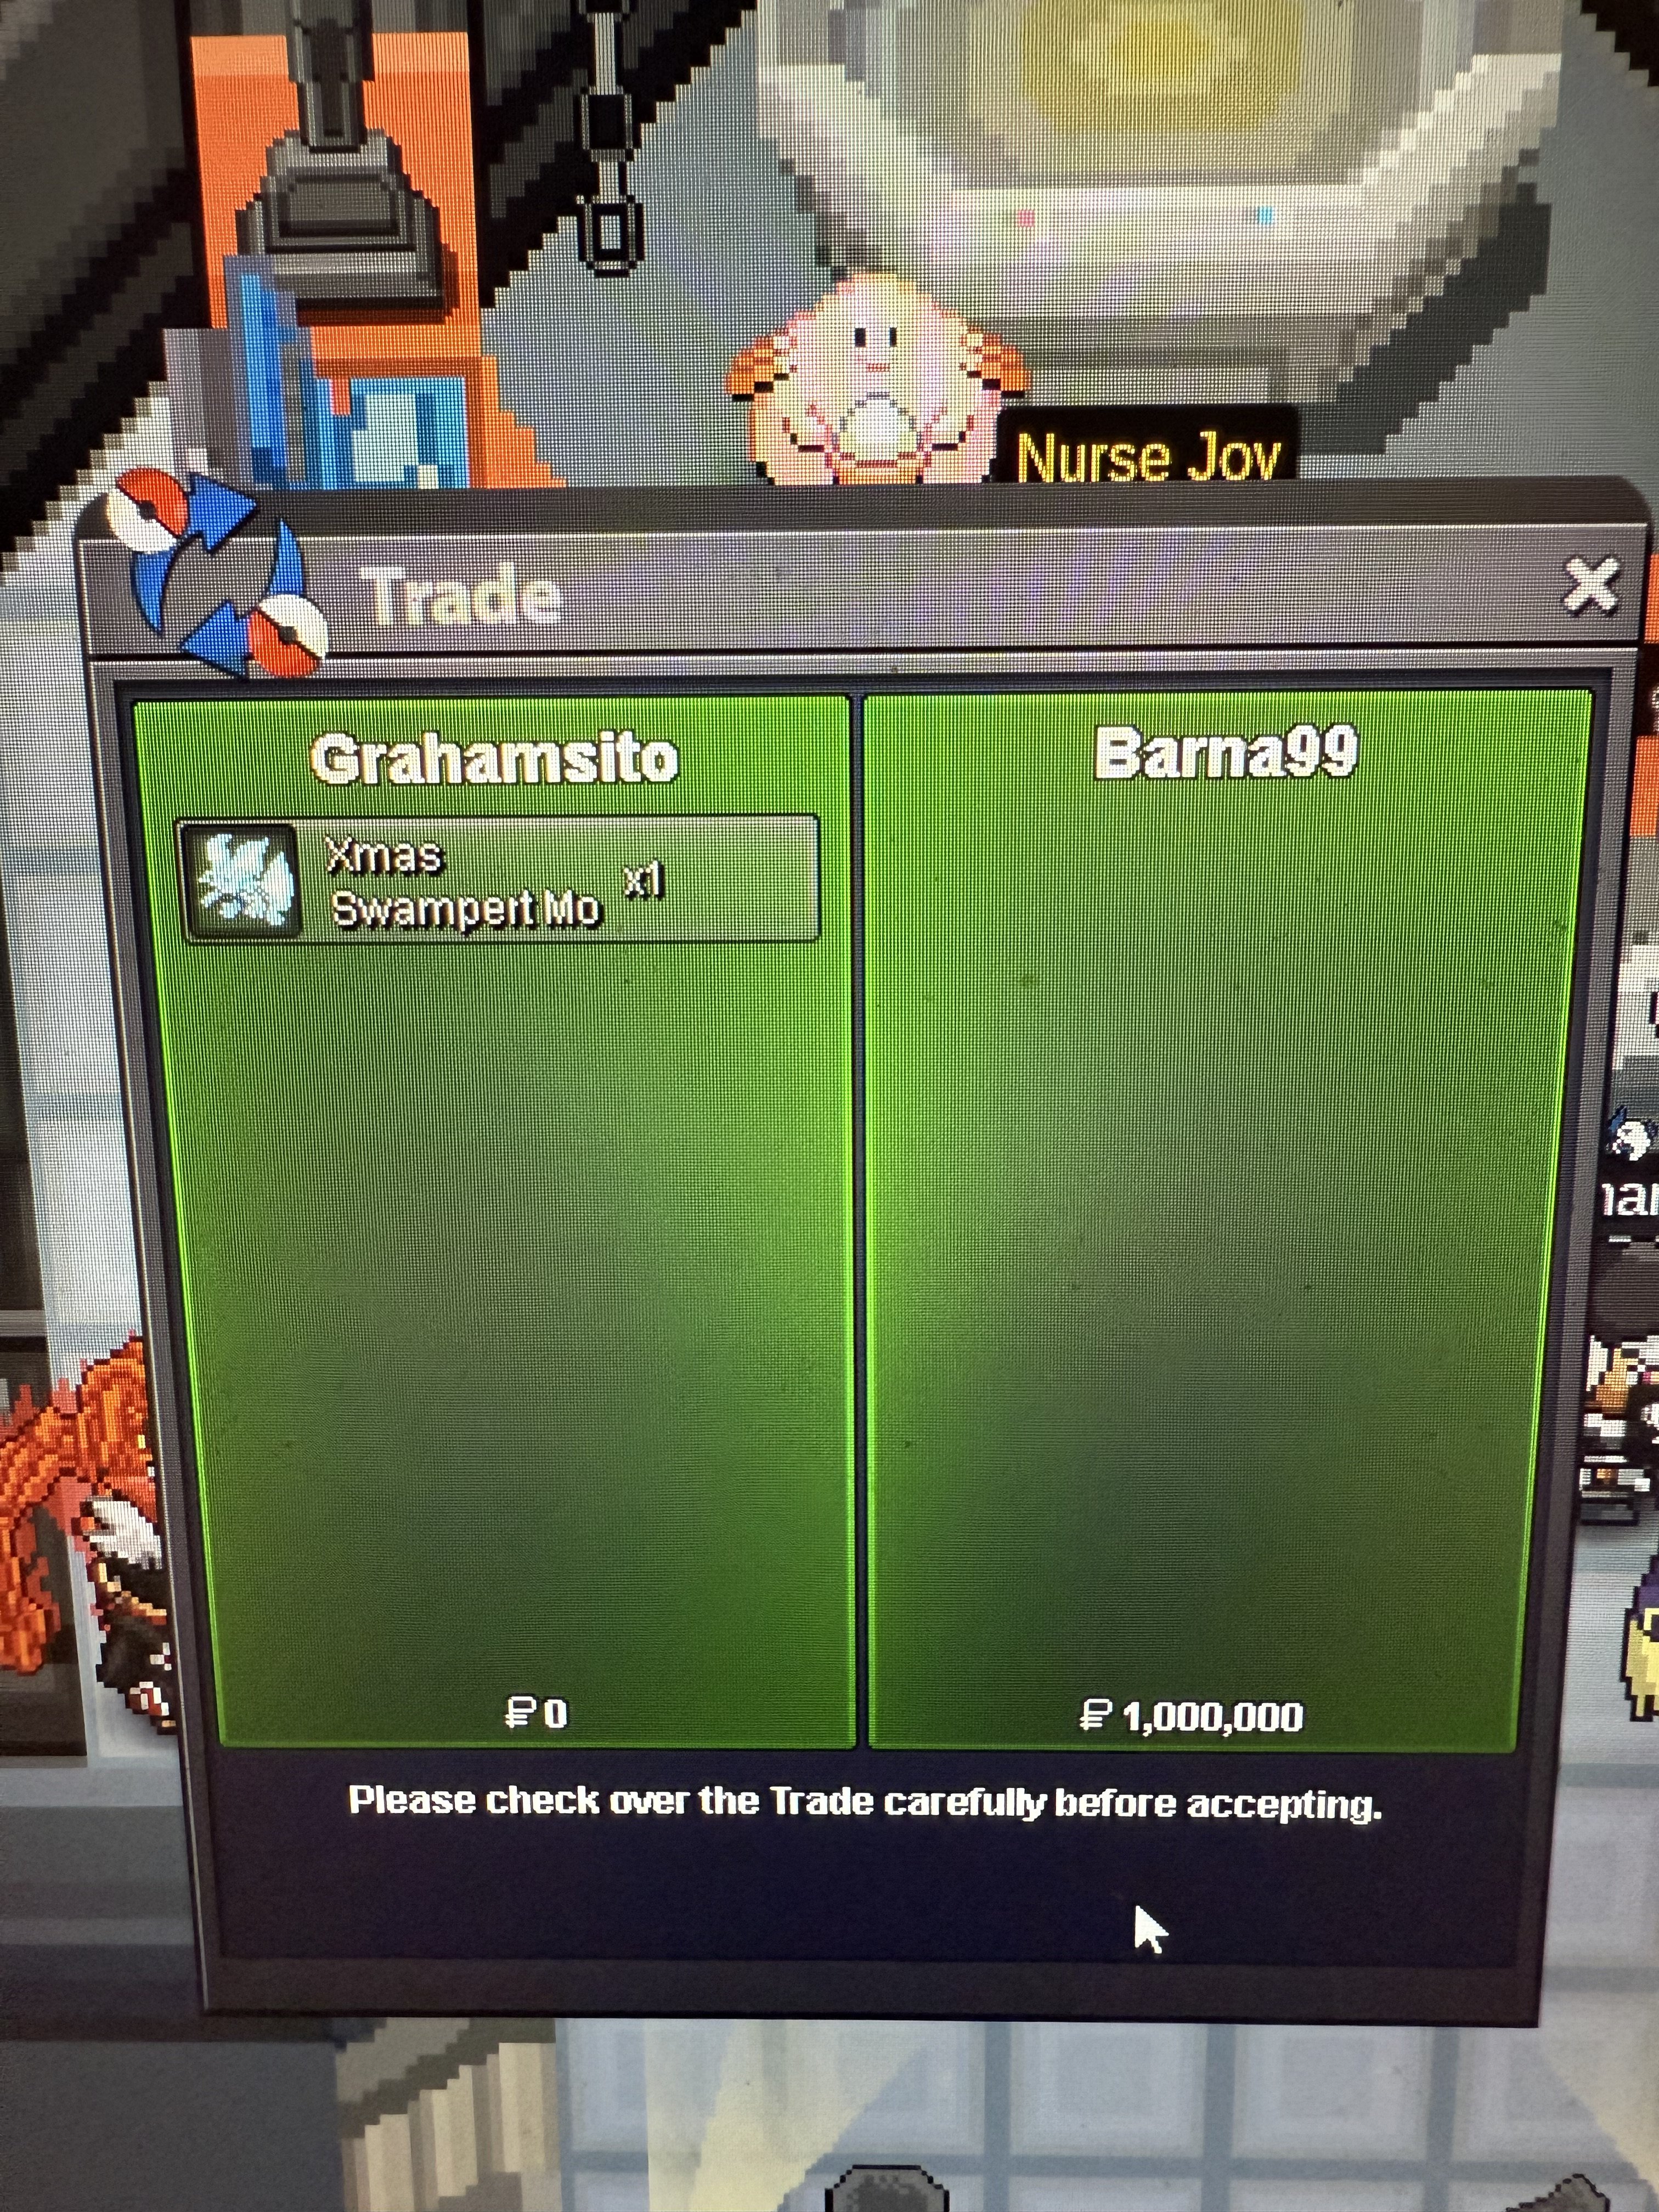
  11. Hello all, The insta was never reached so there was no damage, however the insta price was set since the beginning. Kindly, K-Mew
    1 point
  12. Start Price: 2m End Point: 72 hours (after start price is met) Minimum Raise: 500k This is a Cross Server auction. You may bid from any server, and I will transfer to your preferred server upon winning. If you intend to purchase with an alt account, specify the account alongside your bid. If a bid is received in the final 15 minutes of the auction, the end point will be delayed by 15 minutes from that bid, and will be delayed by 15 minutes for each new bid thereafter, until the current offer has been held for a full 15 minutes.
    1 point
  13. 1 point
  14. 1m for cloudsire water absorb
    1 point
  15. 1 point
  16. + 1, rotation suggestion is good and more stuff could be added for artifact exchange.
    1 point
  17. Another quest done! Kamitrio, keldeo and kyurem (gold server). Thnx much, Glhf! Another quest done! Darkrai quest (gold server). Thnx much, Glhf! Another quest done! Mega lopunny. Thnx much, Glhf! Another quest done! Gengar chess lv 2 and 3, kyurem, keldeo and babyxd. Thnx much, Glhf! Another quest done! Hoopa+6ring, arche quest valley. Thnx much, glhf!
    1 point
  18. Trainer Tower Guide Welcome to the basic guide on how to make the most out of the Trainer Tower! The Trainer Tower is a new feature added to PRO after the Experience Rework. The Tower solves the current issues with experience training. Wild Battles are no longer really good for lategame players to level up their pokemon as the experience is low compared to fighting Trainer Battles. Gym Rematches, Copycats and Trainer Battles can help you level up 1 to 2 pokemon at a time. However, the Trainer Tower helps you level up an entire party at once! You can find the Trainer Tower in Route 13 in Kanto. Regardless of whether your pokemon participated in the fight or not, they will all gain experience as long as they’re not fainted! Since the rework, you can now evolve pokemon without penalisations. Pokemon now level up according to the original games’ experience curve. The Trainer Tower is filled with trainers, a Nurse Joy and a PC so you can train any pokemon in the game! The more pokemon you carry in your party, the less experience you will receive but it will be easier to climb the tower. The less pokemon, the more experience but riskier it will be! You can surrender against any of the trainers without a penalisation, being teleported or losing money. You only pay a small fee for entering the tower. You do not pay additional fees for climbing up floors in the tower! Just pay once and climb up several floors in a single journey! Prices go from 1.500 (from the first floor) to 9.000 (from entering from the 80+ level floor). To begin with, the Trainer Tower has multiple floors. Each floor’s trainer pokemon will have a maximum range of 10 levels. For example, floor 2 will have pokemon from level 20 to 29. Floor 5 will have pokemon from 50 to 59. This applies to all floors. All floors except floor 9 have 10 trainers in them. Floor 9 has 5 trainers whose pokemon range from 90 to 100. Each trainer will have more pokemon as you go up. For example, in floor 2 you might only find trainers with 2 pokemon that are not evolved. In floor 4, you might find trainers with 3 or 4 pokemon that might be evolved but can still evolve. In floor 6 and above, you should find trainers with 5 to 6 pokemon that are almost fully evolved. In floor 8 and above, trainers will have 6 pokemon that are fully evolved except very weird and rare occasions (such as finding Zweilous and Hydreigon in the same trainer). Each trainer will have a common theme: all of their pokemon will share one type. This leads to good and bad results: each trainer will for example have 6 ice types, but these might also have dual types (ice-flying, ice-grass, for example). Each trainer’s sprite also represents them. For example: The young girl is always the normal type trainer. The fire clown is always a fire type trainer. The sailor is always a water type trainer. The cute woman is always a grass type trainer. The trainer with orange clothes is always an electric type trainer, flying type trainer or normal type trainer. The woman with a ponytail and a backpack is always the rock type trainer. The skier is always an ice type trainer. The hiker is always a ground type trainer in higher floors (30+) or a steel type trainer in lower floors. (10-29) The scientist npc is either a steel type trainer or an electric type trainer. The kimono girl is always a fairy type trainer. The ace trainer is always a dragon type trainer. The rocket grunt is always a dark type trainer. The biker is always a poison type trainer. The male medium is always a psychic type trainer. The female medium is always a ghost type trainer. The karate trainer is always the fighting type trainer. The bug catcher is always the bug type trainer. To enter the tower, there are multiple floors a single pokemon is allowed to access specific floors directly. A level 1-9 pokemon can access floor 10-19. A level 10-19 pokemon can access floors 10-19, 20-29. A level 20-29 pokemon can access floors 10-19, 20-29, 30-39. A level 30-39 pokemon can access floors 20-29, 30-39, 40-49. A level 40-49 pokemon can access floors 30-39, 40-49, 50-59. A level 50-59 pokemon can access floors 40-49, 50-59, 60-69. A level 60-69 pokemon can access floors 50-59, 60-69, 70-79. A level 70-79 pokemon can access floors 60-69, 70-79, 80-89. A level 80-89 and above pokemon can access 70-79, 80-89, 90-100. A level 90-100 pokemon can access 80-89, 90-100. To enter the tower as a pokemon party, there are more restrictions. If your pokemon party has 10 to 19 levels of difference, these are the restrictions. A level 1-19 pokemon party can access floor 10-19. A level 10-29 pokemon party can access floors 10-19, 20-29. A level 20-39 pokemon party can access floors 20-29, 30-39. A level 30-49 pokemon party can access floors 30-39, 40-49. A level 40-59 pokemon party can access floors 40-49, 50-59. A level 50-69 pokemon party can access floors 50-59, 60-69. A level 60-79 pokemon party can access floors 60-69, 70-79. A level 70-89 pokemon party can access floors 70-79, 80-89. A level 80-100 pokemon party can access 80-89, 90-100 If your pokemon party has 10 to 29 levels of difference, these are the restrictions. A level 1-29 pokemon party can access floor 10-19. A level 10-39 pokemon party can access floor 20-29. A level 20-49 pokemon party can access floor 30-39. A level 30-59 pokemon party can access floor 40-49. A level 40-69 pokemon party can access floor 50-59. A level 50-79 pokemon party can access floor 60-69. A level 70-89 pokemon party can access floor 70-79. A level 80-100 and above pokemon party can access floors 80-89, 90-100 It is not possible to enter the tower with a higher level difference party than 29 levels. If the difference between levels in your party becomes higher than what I indicated above, you will NOT be able to climb more floors and you will have to leave the tower challenge, rearrange a new party that fulfills the conditions and reenter. For example, if I start the tower challenge with a 1-29 party but the pokemon at level 29 levels up to 30 and my lowest level pokemon is below 10, I will not be able to access floor 20-29. If I start the tower challenge with a 40-59 party but the level 59 pokemon goes up to 60, I will not be able to access floor 60-69. Check your level differences with what I wrote above. When you have paid the fee, you can choose which floor you want to access through the elevator. For example: I enter the tower with a level 60 pokemon and go directly to floor 60-69. I then talk to the elevator and go down to the 50-59 floor to fight a few trainers, then I take the elevator to go up to the 70-79 floor and then I go back to the 60-69 floor. If your pokemon is within the level range of any of the specified floors above, and you fulfill the conditions of these levels, you CAN switch freely between floors. If I enter the tower’s floor 60-69 with a level 69 pokemon and level up to 70 BEFORE I want to visit floor 50-59 for a bit extra experience before I continue climbing, I will NOT be able to do so anymore. The option in the elevator will disappear. The elevator calculates the levels of your party WHEN YOU TALK TO IT INSIDE THE TOWER. Thus, it takes your levels into account IN REAL TIME! When you level up inside of the tower, even if you get over the maximum level difference, you will NOT be kicked out! ^note: this might need some testing General Advice. Use the Nurse Joy NPC to heal often, 1 to 2 times per floor if needed. It only costs 1.5k and fully heals your party! Carry a LOT of Leppa Berry and Sitrus Berry. These items are insane in the tower: being able to heal 10 PP and 25% of your maximum HP is incredible inside. Carry a LOT of healing items THAT YOU OBTAIN THROUGH THE ITEM RECYCLER NPC IN JOHTO. Do a lot of Dig Spots periodically, recycle the gems and items you find in them. Revives, Revival Herbs, Ethers, Max Ethers, Elixirs and Max Elixirs are often never used and just sit in your PC. DON’T BE AFRAID TO USE HEALING ITEMS! It is worth it. Defeat ALL THE TRAINERS IN THE FLOOR BEFORE MOVING ON! If the difference of levels in your party is too large, you might not be able to continue climbing up and might need to rearrange an entire party. Have 1 to 2 maximum pokemon that can oneshot almost everything in the tower. Remember that the LESS pokemon you carry, the MORE experience is gained. The experience that the extra pokemon would gain goes into your pokemon! Use OFFENSIVE pokemon to get through the tower trainers. DON’T use tanks. It is simply too time consuming and not worth it. Trainer’s pokemon are COMPLETELY RANDOMISED and just follow a specific type pattern per trainer. A trainer can have multiple of the same pokemon at different levels. Trainer’s pokemon have no items AND their moves are the last 4 moves they learn by level up. OPEN UP YOUR POKEDEX AND CHECK THEIR LAST 4 MOVES! For example, a level 40 Bulbasaur will have Seed Bomb, Synthesis, Worry Seed and Double-Edge. Check the sprite of each trainer before you fight them. THEY LITERALLY TELL YOU WHAT TYPE OF POKEMON THEY WILL USE! Use very strong offensive pokemon for it. These pokemon MUST HAVE GOOD MOVESETS. DO NOT USE STRONG OFFENSIVE POKEMON WITH BAD MOVESETS. For example, Moxie Gyarados is better than Sheer Force Kingler because Moxie gets access to Earthquake (beats Electric, Rock, Fire), Iron Head (beats Ice, Rock, Fairy), Waterfall (beats Fire, Ground, Rock), Crunch (beats Psychic, Ghost), but Kingler barely learns reliable moves aside from Earthquake and Water Type moves. If you insist however, just use pokemon with really high ATK or SPATK stats. Abuse your pokemon’s abilities: Some enemies have Sturdy, Cursed Body and other BS abilities that are really annoying. Pokemon with Moxie, Adaptability, Mold Breaker are amazing sweepers for the tower (Gyarados, Crawdaunt, Pinsir). If possible, the offensive pokemon you use should be EV trained, have a good nature and IVs and moveset. It should also be fast. If the pokemon you intend to use is NOT level 100, You can choose to use the LEND function from a separate account and lend yourself the pokemon. Once you have finished training your party, you can send back the sweeper to its original level and reuse it in the future. Using setup moves is risky but worth it. However, you will be constantly taking hits all the time and have to heal up additional times. Teach good moves to the pokemon you are leveling up via T M moves or level up moves AND equip them with good items! They can use Choice items to help you against specific trainers in the tower you might have difficulties against. Pokemon I personally recommend after 25 to 30 hours of testing Adamant Gyarados equipped with Gyaradosite, Moxie ability. You can use an Expert Belt if you don’t have the Megastone. < by far the best. Iron Head, Earthquake, Crunch, Waterfall. Adamant Beedrill equipped with Beedrillite, which will become Adaptability < very easy pokemon to hunt as a newbie and very easy megastone to obtain as a newbie. Poison Jab, X-Scissor, Drill Run, Throat Chop. Adamant Haxorus equipped with Expert Belt, Mold Breaker ability < a more expensive option. Earthquake, Dragon Claw, Poison Jab, Throat Chop. Other Mold Breaker, Adaptability and Moxie users such as Pinsir, Crawdaunt or Salamance are viable too. Credits to Leeluckya and other players for coming up with the Gyarados + Lend trade strat! Credits to myself for the rest lmao
    1 point
×
×
  • Create New...