Search the Community
Showing results for tags 'finished'.
-
 Welcome to my guide;; This guide is basically for those who doesn't have discord OR those who have discord but doesn't have access. for some time. ____________________________________ REQUIREMENTS 1. Have completed at-least 2 regions ( Kanto & Johto ) ___________________________ I am also adding Alternative Place for those whose best location is not in kanto and johto. These alternative locations will have GREEN colour. __________________________________ For those pokes who can be caught by repel I will add one more section but pokes who can't be repeled I will only add best spawn area. ________________________________________ NOTE - This Guide doesn't Contain any event map / Area. ____________________________________ For Repelable Pokes the details will be written with yellow colour whereas for non repels details will be written in orange colour. ____________________________________ As this guide may contain minor mistakes , feel free to contact me if you found any. You can contact in forum DMs or in discord ( Superb#3564). _________________________ GEN - 2 ________________________ CHIKORITA Best Area - Route 226 Alt. Area - Safari Johto Grass Area ________________________ CYNDAQUIL Best Area - Safari Johto Mountain Zone ______________________________ TOTODILE Best Area - Safari Johto wet zone ____________________________ SENTRET / FURRET Best Area - Route 1 ( Both ) ____________________________ HOOTHOOT / NOCTOWL Best Area - Route 119 A/Route 210 North Best alt. - Route 37(M/N) / Route 8 (N) ______________________________ LEDYBA / LEDIAN Best Area - Forest Pit / BCC ______________________________ SPINARAK / ARIADOS Best Area - Route 1 / BCC ______________________________ CROBAT Best Area - Dragons Den ______________________________ CHINCHOU / LANTURN Best Area - Pallet Town / Route 40 ______________________________ PICHU Best Area - Love island ______________________________ CLEFFA Best Area - Mt. coronet Alt. Area - Secret Nap Area ______________________________ IGGLYBUFF Best Area - Moon 1F Alt. Area - Love Island ______________________________ TOGEPI / TOGETIC Best Area - Route 5 / Sendoff Spring Repel Area - Route 210 ( 22-26 ) Alt. Repel area - Route 5 (18-23) ( M/D) ______________________________ NATU Best Area - Route 28 ______________________________ MAREEP / FLAAFY / AMPHAROS Best Area - Route 43/Route 43 / Route 120 ______________________________ BELLOSSOM Best Area - Love Island ______________________________ MARILL/AZUMARILL Best Area - Route 104 / Route 114 Alt. Area - Lake Cave / Route 31 ______________________________ SUDOWOODO Best Area - Route 26 ______________________________ POLITOAD Best Area - Fuchsia City Repel Area - Route 120 ( 27-30 )(M) ______________________________ HOPPIP / SKIPLOOM Best Area - Route 33 / Route 14 ______________________________ AIPOM Best Area - Route 44 Repel Area - Route 33 (12-17 level ) ______________________________ SUNKERN Best Area - Forest Pit ______________________________ YANMA Best Area - Route 35 ______________________________ WOOPER / QUAGSIRE Best Area - Violet City / Route 10 ______________________________ UMBREON Best Area - Safari Exclusive ______________________________ MURKROW Best Area - Lost Cave Repel Area - Route 18 (M/N)(27-32) ______________________________ SLOWKING Best Area - Dragon Shrine ______________________________ MISDREAVUS Best Area - Mt. Silver 3F ______________________________ UNOWN Best Area - Ruins Of Alph Puzzle - 1 ______________________________ WOBBUFFET Best Area - Lave Valor ______________________________ GIRAFARIG Best Area - Route 43 ______________________________ PINECO Best Area - Route 48 Repel Area - Route 43 ( 21-25 ) ______________________________ DUNSPARCE Best Area - Forest Pit ______________________________ GLIGAR Best Area - Route 45 Repel Area - Route 45 ( 37-42 ) ______________________________ STEELIX Best Area - Mt. silver 2F Repel Area - Mt. Mortar northern (23-30) ______________________________ SNUBBULL Best Area - Leev town Port Alt. Area - Route 2 (N) ______________________________ QWILFISH Best Area - Route 12 ______________________________ SHUCKLE Best Area - Cianwood city ______________________________ HERACROSS Best Area - Route 47 Repel Area - Route 33 (12-17) _________________________________________ SNEASEL Best Area - Mt. Silver exterior _________________________________________ TEDDIURSA / URSARING Best Area - Rock tunnel 2 / Acuity Lakefront Alt. Area Ursaring - Mt. Silver expert Belt _________________________________________ SLUGMA / MAGCARGO Best Area - Route 18 / Route 113 _________________________________________ SWINUB Best Area - Ice Path 1F _________________________________________ CORSOLA Best Area - Route 14 _________________________________________ REMORAID / OCTILLERY Best Area - Route 44 / Route 222 _________________________________________ DELIBIRD Best Area - Ice Path 1F _________________________________________ MANTINE Best Area - Route 40 _________________________________________ SKARMORY Best Area - Route 45 Repel Area - Route 113 ( 19-24 ) _________________________________________ HOUNDOUR Best Area - Route 7 Repel Area - Route 7 ( 21-26 ) _________________________________________ KINGDRA Best Area - Dragons Den _________________________________________ PHANPY / DONPHAN Best Area - Route 45 / Mt. Silver lower mountainside Repel Area - Route 46 (M) (7-9) _________________________________________ STANTLER Best Area - Hoenn Safari Zone area 5 Alt. Area - Route 36 (N) _________________________________________ SMEARGLE Best Area - Route 212 North Alt. Area - Amazon Forest Repel Area - Ruins Of Alph ( 26-33 ) _________________________________________ TYROGUE Best Area - Route 112 Alt. Area - Mt. Mortar B1F _________________________________________ SMOOCHUM Best Area - Seafoam Island B2F _________________________________________ MAGBY Best Area - Fiery Path _________________________________________ MILTANK Best Area - Route 39 _________________________________________ LARVITAR / PUPITAR Best Area - Forest Pit / Mt. Silver Expert Belt Repel Area - Mt. Silver expert belt ( 55-59 ) ( For both ) _________________________________________ If you want to hunt in pair of two pokes with Same sync and can be used in PvP You may check This guide. Hope this Guide will help you; Thanks for taking a look here.
 -
 Welcome to the Mini-Guide on optimising your Dig Spots, Pokestops and Monetary Items route! This guide will aim to provide newbies, advanced and expert players a way to route their Dig Spots, Pokestops and some of the respawnable monetary items that you can pick up each week or every two weeks. This guide will also showcase the fastest (in theory) route to do this. I have done dig spots hundreds of times over the last years (four accounts, two times a week, you can start doing the maths) and while I believe starting from Viridian instead of Cerulean feels awkward, it’s still the best place to do so. The topic was covered in my money guide, but I guess it’s better to make a separate guide about it. This guide was requested due to popular request (not really, just Gore asked me to do it because he was too lazy to find it out himself and I could just pump this quick and add it to my Guide list, basically) as newbies throughout Kanto can use this to quickly do their dig spots and pokestops round, grab their hidden items and get their bike, old rod, thief tm to get smoke ball, etc etc. You get the point. This guide is just aimed to help you out and do these tasks twice a week while not taking too long and just doing it as fast as possible. It should only take you from 30 minutes to 1 hour to do all of them, once every 3 days per account. It takes me up to 4 hours as I do it in four accounts while I answer questions in Help Chat. It should take you just an hour as a max. I will try to also provide calculations at the end of how much money can you theoretically make at a minimum from these dig spots. However, I’ve estimated that the minimum amount of money you can get can be as little as 10k, but have a LOT of value in recyclable items or sellable items in help chat, or you get something as absurd as 200k but no recyclable items at all. Thus, the money gain from dig spots is very unstable and RNG base. However, as long as you know how to economise (haha rare candy selling go brrrr), you’ll be fine. Stock up on recyclable items, sell monetary items and then sell everything you got from it to get a few hundred thousand pokedollars a week if done properly. Only keep what is really needed! This guide will NOT cover all monetary items, just a few we can pick up (such as the Nugget in route 210, for which we have to detour). These items are already covered in two other forum guides (which, coincidentally, I made too). I’ll link them below. This guide also does not cover Tanoby Key and Water Path because you are forced to use a Membership and an entire Quest to get there, They’re not worth it at all. Shall we now begin? Let’s go! Minimum requirements for Kanto: Move Dig on a Pokemon with 150+ Happiness or a Shovel. Cut on any Pokemon or the tool to Cut trees. Flash or a Flashlight. Surf or a Surf mount. Remember that you also require the minimum badges for each HM. Also, you should have a HM Slave that can do most of these (Nidoking can Surf, Dig, Cut and Rock Smash for later regions, if needed, Parasect can use Cut, Flash, Dig, False Swipe, Spore, etc. He can be used if you go to Hoenn’s Petalburg Forest and grab the Shrooms there.) Minimum badge to do all of Kanto things: 5th badge (As you need Surf to access one Pokestop and the Hidden Items in Seafoam). 8th (to access Sevii Islands dig spots if you have a membership active for Tanoby Key and Water Path) or Cerulean Cave unlocked (there’s a weekly rare candy there and a biweekly nugget). Minimum requirements for Johto: Apply the same HM usages as before. However, we have to add in Rock Smash, as if we don’t have a Rock Smash pokemon we would have to travel around Blackthorn three times (Which is just beyond stupid). Dark Cave is REALLY annoying to go through. Minimum badge: We need the 8th badge as we cannot talk to Pokestops for items until the 8th badge. Minimum requirements for Sinnoh: Same HM usages as before. ROCK SMASH IS OBLIGATORY. We can’t access Oreburgh Gate dig spots without it. We DO NOT NEED ROCK CLIMB, we will use a route to totally avoid it. It’s boring, long and unnecessary. Minimum badge: We need the 7th badge to access the top of Mt Coronet. Optional tools we can use for our Dig Spots, Pokestops and Items: Smoke Ball (please, PLEASE bring one, because if you find a Diglett in a dig spot and it has Arena Trap and you have no moves to damage it, you’ll be stuck and forced to relog and will lose a LOT of time). Synch (equip Smoke Ball to it). I heavily suggest you change the synch sometimes from region to region, that you use the discord bot to check what synch can help with each individual dig spots section, as there are really, REALLY rare pokemon in some of them. With your Membership active, you can find Aegislash’s preevo and Larvitar in Mt Moon, and more rare pokemon elsewhere. I heavily recommend Adamant, Jolly, Brave, Careful, Impish, Relaxed and Sassy synchs. Bring them whenever you do dig spots. Always check spawns before you begin! Super Repels and Repels: Buy 100 Super Repels (in every account you will do dig spots) and 50 Repels. They will last for atleast 10 dig runs. 100 super repels = 50k. In 1 dig round you’ve already made up that cost easily, so do not worry. We will use them properly timed to avoid having to fight battles continuously. For example, we need two for Mt Moon, one for Rock Tunnel, one for Diglett Cave (this can be a normal repel), one for Dark Cave, one for Slowpoke Well, one for Mt Mortar (this can be a normal repel), one for Oreburgh Gate (normal repel if we relog to Jubilife, or super repel if you want to walk back), one for Ravaged Path (we can normal repel but going back to the exit might be annoying), and one for Mt Coronet (if you don’t have the dig spot unlocked in the top of the mountain, you’ll need 1 super repel to enter from below and get to the top to unlock it for future usage, or 1 normal repel that will barely let you go through the 4th floor, and another normal repel to go back from it). Thus, 10 super repels (or 8 supers and 2-3 normals). As mentioned above, you can bring any extra tools to avoid carrying too many HM slaves. I will link below the location of all hidden items and their respawn time in all regions in case you want to visit Hoenn to get shrooms and do excavations (don’t really recommend this personally, takes up daily time and it doesn’t always provide good rewards, it’s also a high investment if you don’t earn good stuff). I made a guide that you can use with pictures to check any of the places mentioned. Bring a Bike for Rare Candy in Route 16, or a mount to go fast, and a surf mount to avoid surfing slowly. https://pokemonrevolution.net/forum/topic/132722-url Let’s begin! From Viridian City, we want to pick up the Rare Candy at the southern bridge. This respawns every 7 days. We will also talk to the pokestop. Now, we will head to Viridian Forest, there’s a hidden Rare Candy next to the big tree to Viridian Maze (for some reason, this might respawn every 14 days and not 7, but I personally don’t know why). We will also talk to the Pokestop right to the east. We will leave from the south and use cut to skip the Forest through the Route 2 quick way. We will enter Pewter City’s pokecenter and we will go and talk to the pokestop in the Museum. Then, we’ll head back to Route 2, talk to the hole outside, enter Diglett Cave and use a Super/Normal Repel. We’ll get the 8 dig spots and talk to the Pokestop on the other side. When we leave, we’ll talk to the hole to leave it unlocked for future uses, and we’ll head east to Route 11 and south through Route 12. We’ll grab the Rare Candy here, which respawns every 7 days. We will continue south until Route 14, where we’ll dig the four spots, and we’ll then head west to dig a few more Route 15 spots. We’ll talk to any NPC to enter a fight, log out and be teleported back. Optionally here, you can travel and grab the Rare Candy in Route 16 (every week, requires a Bike), and the one time monetary items in Seafoam Island (make sure you find a map before you travel there!). We will now head to Route 3 and pick up the Stardust in one of the rocks and the dig spots just below the entrance. Then, we will reach the pokecenter and excavate the dig spots just below it. We will enter the pokecenter, and enter Mt Moon. Use your first super repel here. To the bottom left there’s 4 dig spots. We’ll then get the ones in the ladder in the middle (they’re at the end). If you see any pokeballs pick them up, the first one is a Star Piece (the second is just TM Water Gun). Go until the end down the ladder, pick up the dig spots, use your second super repel and go back to the main floor. Then, head northeast to the old man, excavate the dig spots, then go to the west until you see the next ladder. Go down, take all the dig spots, find an encounter and relog. We will now use the dig spot outside to teleport to the other side of Mt Moon (just talk to it from both sides to unlock it). We will surf northeast from Route 4, talk to the Pokestop in front of Cerulean Cave, go back, go to Route 5 below Cerulean to talk to the pokestop. Now, we’ll go east to Route 9 and then surf so we can quickly reach the Power Plant pokestop. There’s no need to repel here because until we enter Route 10, there are no water spawns. (No idea why this is like this). Surf back to Route 9, and go down to the pokecenter to heal up. Talk to the Pokestop outside, enter the cave, use your super repel, use flash and dig the 6 dig spots you’ll immediately see. Instead of going down the ladder, exit the cave and use the dig spot to teleport to the other side. (Pokecenter side) Immediately enter, go to the leftmost ladder, then go and pick the dig spots there. Find an encounter when your repel ends, relog, and teleport again (this is faster than trying to leave from the same exit). We’ll now head to Vermillion harbor and talk to the last Kanto pokestop there (aside from the Route 25 one, which we pick up at the end of the route), and jump on the boat to Olivine City! Enter the pokecenter and heal up. We will pick up the Pearl and Rare Candy hidden in Olivine and the Pokestop next to the lighthouse. We’ll now travel to Ecruteak and talk to the Pokestop. We’ll head east and in Route 42 we’ll enter Mt Mortar and use a normal repel. We will grab the dig spots, enter the next hole, then leave through the next one (they’re adjacent, don’t go up any stairs) and get the dig spots next to the hiker. When we leave the cave, surf left, enter the next cave there, grab the 4 dig spots and if you want to, you can go deep inside to get two Rare Candies, one in a pokeball and one hidden in Forest Pit (after you beat the Johto Elite Four). Another choice is to just enter a hole, grab the dig spots, leave and surf to the next one. I'll show the three entrances below. We will now head to Lake of Fury, talk to the Pokestop there, and head back and east until we reach Blackthorn. Teleport through Ice Path, and talk to the Pokestop in Dark Cave. Teleport to the other side (route 31), use a super repel inside, and use Flash, break the rocks, and go counter clockwise (left, down, east, north, then left again) to pick up all dig spots and try to head back to the route 31 exit. DON’T EXIT THROUGH THE SOUTH EXIT OF THE SMASHABLE ROCKS. Head to Violet City. Talk to the Pokestop and grab the Rare Candy behind the Gym Sign (you need surf). Head west to Route 36, then west and up to National Park. Talk to the Pokestop and then head south to Route 35. Pick up the Nugget, then head south to Ilex Forest and use a repel (if you want, not worth it much though). Talk to the Pokestop, head east to Slowpoke Well through Azalea Town and talk to the Pokestop. Don’t enter it though. First, go east to Union Cave and teleport through the dig tunnel. Talk to the Pokestop and go back. Now you can enter Slowpoke well. Use a super repel when you’re next to the first dig spot. You’ll be able to go through the entire two floors with a single one of them. Grab the first three, then go north and west continuously digging everything up. Then, head southwest for the last three and surf east to go down the ladder. Pick the two that are next to the ladder and then finally surf once west for three digspots and east for four of them. Find an encounter and log out. We’ll be in Olivine City! We will now grab the boat to Canalave. Surf south and find the big tree at the end, talk to it to find a Big Pearl. Enter the pokecenter in Canalave and heal up. We’ll now head to Jubilife and enter the pokecenter. From here, we’ll go east to Oreburgh Gate, and we’ll be using a Repel (not a Super) and trying to get all the dig spots in the depths. We’ll talk to the old man for a fight or find a wild pokemon and relog to Jubilife. We’ll then head north to Ravaged Path, the way to Floaroma town. We’ll use a super repel (or repel if you want, but on the returning way you might eat some encounters) and exit it. We’ll head to Floaroma and then to Eterna. The path splits here: if you’ve previously unlocked Mt Coronet’s dig teleport hole, we will simply excavate the dig spots in Route 211 and use the teleport hole, one repel and get the holes in the summit and teleport back. If you’ve not, I recommend you head south through the bike tunnel, then go east and when you see Mt Coronet’s entrance (to the other side you would reach Hearthorne), enter, use a super repel, surf, go upstairs, go around the area until you reach the northwestern door, then climb up until you get to the summit. Then, you just need to talk to the dig hole to unlock it. After you do all of that, head east to Celestic town and to Route 210. There’s a hidden nugget in one of the rocks. Continue east to excavate the five dig spots. Head south to the restaurant and go east until you reach Veilstone. Go south and in the route below enter the tunnel to the left. Dig the few spots and continue going left digging everything you see. Exit in Solaceon, head to the southern route (208), check the last dig spots and congratulations! You just finished the money route! From this point onwards, once you’ve practised this a bit, you can repeat this nonstop. Every week, keep getting the Kanto items I’ve indicated as they’re weekly (including the Rare Candy in Cerulean Cave’s entrance). I also heavily suggest you take a trip every two weeks to get the shrooms in Petalburg Forest. However, that’s already covered in my previous guides. Focus solely on Dig Spots and Pokestops for now! I hope you have enjoyed this guide and found a good use to it! Please, use the Monetary and Money guides I made to check out on all possible optional money items you can check out on if you take optional paths while you follow this guide. Remember some respawn and some others don't! You can also check their locations there if you can't find them in this guide.
- 12 replies
-
- 10
-

-
Welcome to my guide This Guide will help you out to find Best place to hunt Pokemon. Also if you are free , then which poke you should hunt? __________________________________ Good Luck for Hunting ;; As this guide may contain minor mistakes , feel free to contact me if you found any. You can contact in forum DMs or in discord ( Superb#3564). __________________________________ NOTE - 1. - Red named poke means it require MS. 2. M/D/N means Morning/Day/Night it's mentioned for all pokes. If not mentioned it means All day. 3.T means tier of the poke. __________________________________ Route - 13 1. Chansey ( T8)- All day + Ditto(T6) Recommended Sync - Bold __________________________________ Route 28 Heracross ( T9) + Sneasel ( T7)(N) Sync - Jolly __________________________________ Route 33 Shinx (T9)+ Heracross(T9) + Aipom(T6) Sync - Ada / Jolly __________________________________ Route 34 Pineco (T8)(N) + Togepi ( T8) Sync - Bold __________________________________ Route 39 Shinx ( T9) + Tauras ( T6) Sync - Ada / jolly __________________________________ Route 42 Aipom(T6) + Heracross ( T9) (M/D) Sync-Ada / jolly __________________________________ Route 45 Skarmory ( T9) + Gligar (T6) Sync - Impish , Careful __________________________________ Caves , Tunnel and Mt. Silver ______________________________ Cerulean cave 1. 1F Wobbuffet + Yamask (T8 both) Sync - Bold , Calm , Sassy , Relaxed 2. 2F Marowak + Skorupi (T8 both) Sync - Ada __________________________________ Victory Road 2F Drilbur + Marowak ( T8 both) Sync - Ada __________________________________ Rock Tunnel 1. Rock tunnel 1F Kangaskhan(T8) + Cubone(T6) Sync - Ada __________________________________ Mt. Silver 1. Mt. Silver lower mountainside Larvitar (M)(T8) + Aipom(T6) Sync - Ada / Jolly 2.Mt. Silver expert belt Larvitar + Pupitar ( T8 both) Sync - jolly / ada / Impish / Sassy / Relaxed / Careful 3.Mt. Silver 3F Absol (T9) + Larvitar (T8)(D) Sync - Ada/jolly 4.Mt. Silver exterior Zangoose (T7) + Sneasel (T6) Sync - Jolly 5. Donphan(T5) + Skarmory (M/D)(T9) Sync - Impish/Careful __________________________________ Trainers Valley 1. Unknown Place Zangoose ( T9) + Sneasel ( N)(T7) Sync - Jolly __________________________________ Sinnoh Region _________________________________ __________________________________ Route 207 Gligar(T8)(N) + Phanphy(T6) Recommended Nature - Impish / Careful __________________________________ Route - 209 Gastly(T1) + Ralts(T9) Recommended Nature - Timid __________________________________ Route 211 Swablu(T9)(D) + Meditate(T8) Recommended Nature - Ada / Jolly __________________________________ Route 213 Shellos(T7) + Pelliper(T3) Recommended Nature - Bold / Calm __________________________________ Route 214 Gliagar(T7) + Hippopotas(T8) Recommended Nature - Impish / Careful __________________________________ Route - 215 Helioptile(T9) + Houndour(T6)+Kadabra(T8)+Abra(T5) Recommended Nature - Timid/Modest __________________________________ Route 216 Cubchoo + Sneasel (T8 both) Recommended Nature - Jolly __________________________________ Route 223 Mantyke (T6) + Wingull(T2) Recommended Nature - Bold/Calm __________________________________ Route 224 Buizel(T6) + Hawluchaa (T8) Recommended Nature - Ada / Jolly __________________________________ Route 227 Skarmory(T9) + Gligar (T8) Recommended Nature - Impish/Careful _________________________________ Route - 228 Beldum(T9) + Rhydon(T6) Recommended Nature - Ada __________________________________ Route-229 Scyther(T8) + Pinsir(T8) Recommended Nature - Ada/Jolly __________________________________ Route - 230 Togepi(D)(T9) + Shellos(M/N)(T9) Recommended Nature - Bold/Calm __________________________________ Route 210 North Bagon(T8) + Scyther(T8)+Swablu(D)(T9) + Meditate(T8) Recommended Nature - Ada/Jolly __________________________________ Acuity lakefront Meditate(T8) + Sneasel(T6)(D) Recommended nature - Jolly __________________________________ Amity square Buneary(T6) + Shroomish(T7) Recommended Nature - Ada/jolly __________________________________ Cave of justice Absol (T8) + Growlithe(T4) Recommended Nature - Ada/Jolly __________________________________ Etherna forest Buneary(M/D)(T7) + Whirlipede(T8) Recommended Nature - Ada/Jolly __________________________________ Fuego ironworks Luxio(T8) + Shinx(T7) Recommended Nature - Ada / Jolly __________________________________ Victory Road - Sinnoh 1. 1F Medichamp(T8) + gabite (T9) Recommended Nature - jolly / ada 2. B1F Medichamp(T8) + Mienfoo(T8) Recommended Nature - Ada/Jolly __________________________________ Pal park Riolu(T8)(M) + Croagunk(T8 Recommended Nature - Ada/Jolly __________________________________ @ Hoenn Region @ __________________________________ Route - 105 Wailmer ( T6 ) + Pelliper (T6) Recommended Sync - Calm/Bold/Modest ___________________________________ Route 106 Clauncher ( T8 ) + Wailmer (T6) Recommended Sync - Modest For Clauncher Timid also works. ___________________________________ Route 109 1. Clauncher (T8) + Wailmer(T6) Recommended Sync - Modest 2. Magikarp/Gyaradose(T5) + Shellder(T6) Recommended Sync - Ada/Jolly ___________________________________ Route 110 Plusle(T8) + Minun(T8) + Electrike(T6) Recommended Sync - Timid/Modest ___________________________________ Route 114 Skorupi (T8) + Swablu(T9) + Zangoose (T9) Recommended Sync - Ada / Jolly ___________________________________ Route 116 Abra(T6) + Joltik(T9) Recommended Sync - Timid/Modest ___________________________________ Route 117 Tympole (T8) + Togepi(T8) Recommended sync - Modest/Bold ___________________________________ Route 118 Absol (T9) + Aipom(T6) Recommended sync - Ada/Jolly ========= Manetric(T8) + Electrike(T6) Recommended Sync - Timid ___________________________________ Route 119 ( A ) Carvanha(T5) + Sharpedo(T8) Recommended Sync - Ada( Jolly for boss) ___________________________________ Route 119 ( B ) Feebas(T7) + Pelliper(T5) Recommended Sync - Calm / Bold/Modest ___________________________________ Route - 126 Shellder(T5) + Magikarp(T2) + Clamperl(T6) Recommended Sync - Ada/Jolly ___________________________________ Route - 134 Alomomola (T6) + Wailmer (T6) Recommended Sync - Bold / Calm __________________________________ Victory Road ( Hoenn ) 1) 1F Aron(T8) + Lairon(T9) Recommended Sync - Ada , Brave , Impish , careful , relaxed , sassy 2. B1F Aron (N)(T9) + Mauwile (T8) Recommended Sync - Ada ___________________________________ Granite cave 1. B1F Aron(D) + Axew (M/N) (T8 Both) Recommended Sync - Ada ___________________________________ Moon Clefairy(T3) + Clefable(T8) + Togepi(T9) Recommended Sync - Calm/Bold _________________________________________ Thanks for visiting _________________________________________ Special THANKS of this guide to BHIMOSO
-
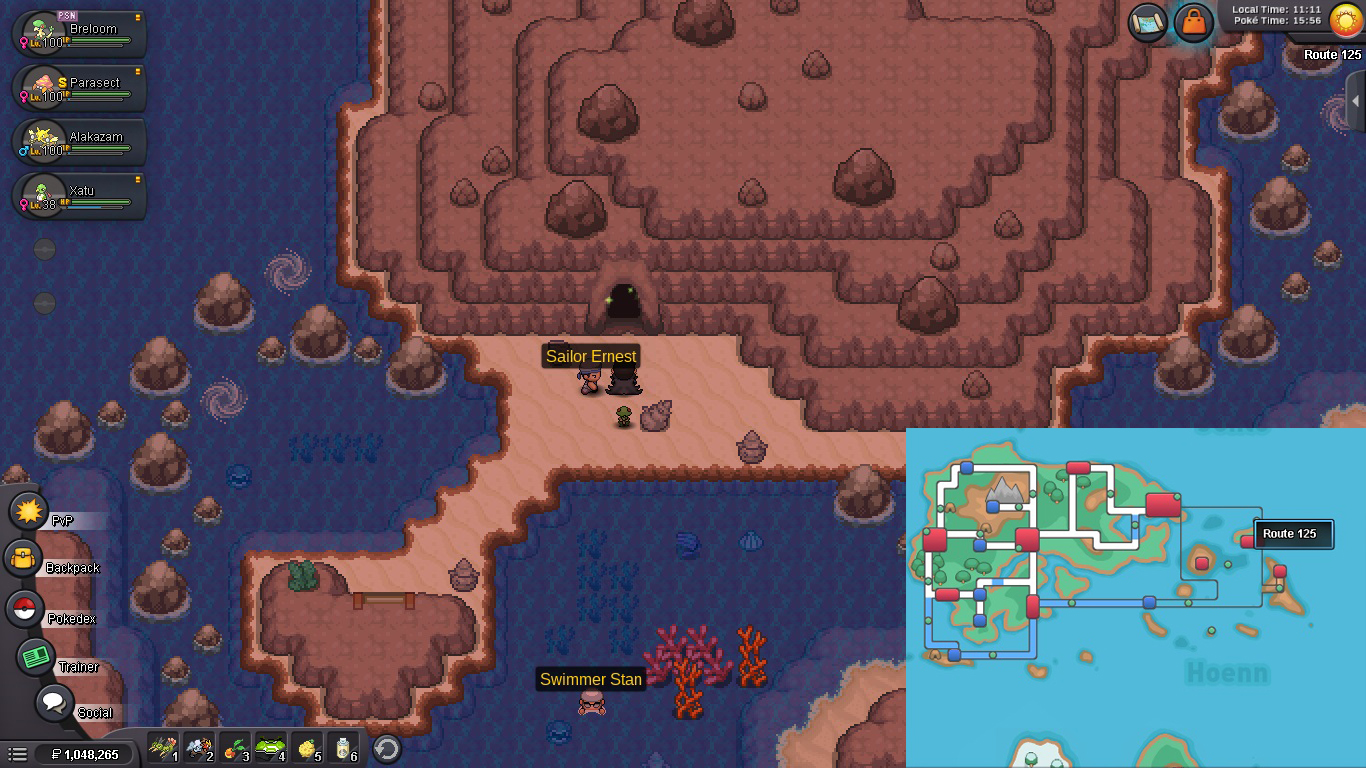
Welcome to my guide;; This guide is basically for those who doesn't have discord OR those who have discord but doesn't have access. for some time. ____________________________________ REQUIREMENTS 1. Have completed at-least 3 regions ( Kanto Johto & Hoenn) ___________________________ I am also adding Alternative Place for those whose best location is not in kanto and johto. These alternative locations will have GREEN colour. __________________________________ For those pokes who can be caught by repel I will add one more section but pokes who can't be repeled I will only add best spawn area. ________________________________________ NOTE - This Guide doesn't Contain any event map / Area. ____________________________________ For Repelable Pokes the details will be written with yellow colour whereas for non repels details will be written in orange colour. ____________________________________ As this guide may contain minor mistakes , feel free to contact me if you found any. You can contact in forum DMs or in discord ( Superb#3564). _________________________ GEN - 3 ________________________ TREECKO Best Area - Petalburg Woods _______________________ TORCHIC Best Area - Hoenn Safari Zone Area 6 ________________________ MUDKIP Best Area - Hoenn Safari Zone Area 5 ________________________ POOCHYENA / MIGHTYENA Best Area - Eumi Island Town / Route 121 ________________________ ZIGZAGOON / LINOONE Best Area - Route 101 / Route 119A ________________________ WURMPLE / SILCOON / BEAUTIFLY Best Area - Petalburg Woods / Petalburg Woods / Route 229 ________________________ CASCOON / DUSTOX Best Area - Petalburg Woods / Eterna Forest ________________________ LOTAD / LOMBRE Best Area - Route 204 ( For both ) Alt. Area - Route 102 / Route 31 ________________________ SEEDOT / NUZLEAF Best Area - Route 101 / Route 114 ________________________ TAILOW / SWELLOW Best Area - Route 101 ( Heatbutt ) / Route 115 ________________________ WINGULL / PELIPPER Best Area - Route 104. ( Both ) ________________________ RALTS / KIRLIA Best Area - Route 102 / Route 212 North Repel Area - Route 102 (5-7) ________________________ SURSKIT Best Area - Route 102 ________________________ SHROOMISH Best Area - Petalburg Woods Repel Area - Amity Square ( 21-24 ) ________________________ SLAKOTH Best Area - Pal Park Alt. Area - Petalburg Woods ________________________ NINCADA Best Area - Route 116 ________________________ WHISMUR / LOUDRED Best Area - Rusturf Tunnel / Victory Road Hoenn B2F ________________________ MAKUHITA / HARIYAMA Best Area - Oreburg Gate 1F Alt. Area - Granite Cave 1F / Victory Road Hoenn B2F ________________________ AZURILL Best Area - Jura Cave ________________________ NOSEPASS Best Area - Granite Cave B2F ________________________ SKITTY Best Area - Eumi Island Theme Park 1 ________________________ SABLEYE Best Area - Sky Piller 1F Repel Area - Jura Cave (M/D) (25-29) ________________________ MAWILE Best Area - Iron Island B2F L Alt. Area / Repel Area - Hoenn Victory Road B1F (49-54) ________________________ ARON / LAIRON Best Area - Victory Road Hoenn 1F ( Før Both ) Repel Area - Victory Road Hoenn 1F (49-55) ________________________ MEDITITE / MEDICHAMP Best Area - Mt. pyre exterior / Iron Island B1F L Alt. Area - Victory Road Hoenn B1F ( Only medichamp ) ________________________ ELECTRIKE / MANECTRIC Best Area - Route 110 / Route 118 Repel Area - Route 110 (16-19) ________________________ PLUSLE / MINUN Best Area - Route 15 (Both) Repel Area - Route 29 (5-7) Note - For Minun Repel trick is only works on Morning and for plusle it works only on Day and Night. ________________________ VOLBEAT / ILLUMISE Best Area - Route 229 (Both) Alt. Area - Route 117 (Both) ________________________ ROSELIA Best Area - Route 221 Alt. Area - Route 117 ________________________ GULPIN Best Area - Route 3 ________________________ CARVANHA / SHARPEDO Best Area - Jura Cave / Mossdeep City Repel Area - Love Island (D) (18-22) ________________________ WAILMER / WAILORD Best Area - Route 123 / Route 223 Alt. Area - Route 129 ( For Wailord Only ) ________________________ NUMEL / CAMERUPT Best Area - Fiery Path / Eumi island burner tower ________________________ TORKOAL Best Area - Fiery Path ________________________ SPOINK Best Area - Jagged Pass ________________________ SPINDA Best Area - Route 113 ________________________ TRAPINCH / VIBRAVA Best Area - Route 111 Desert / Route 228 Repel Area - Route 111 Desert (25-29) / Route 228 (57-65) (M/N) ________________________ CACNEA / CACTURNE Best Area - Route 111 Desert / Route 228 ________________________ SWABLU Best Area - Nap Shore Repel Area - Route 115 (27-42) _________________________ ZANGOOSE Best Area - Mt. Silver Exterior _________________________ SEVIPER Best Area - Route 114 _________________________ LUNATONE Best Area - Moon _________________________ SOLROCK Best Area - Moon _________________________ BARBOACH / WHISCASH Best Area - Mt. Coronet South / Etherna City Alt. Area - Route 114 / Victory Road Hoenn B2F _________________________ CORPISH / CRAWDANT Best Area - Dragons Den / Route 123 Repel Trick - Route 40 (22-24) / Route 123 (34-39) ___________________________ BALTOY / CLAYDOL Best Area - Route 111 Desert / Sky Piller 3F ___________________________ FEEBAS Best Area - Route 119B Repel Area - Jura Cave (25-29) ___________________________ CASTFORM Repel Area - Route 111 Desert ___________________________ KECLEON Best Area - Route 123 Repel Area - Route 119B (23-28) ___________________________ SHUPPET / BANETTE Best Area - Mt. Pyre Summit / Route 226 Alt. Area - (for banette) Sky Piller 1F ___________________________ DUSKULL / DUSCLOPS Best Area - Mt. Pyre Summit / Sky Piller 5F Repel Area - Trainers Valley (N)(51-56) ___________________________ TROPIUS Best Area - Route 119A Repel Area - Route 119A (23-28) ___________________________ CHIMECHO Best Area - Mt. Pyre Summit ___________________________ ABSOL Best Area - Cave Of Justice Repel Area - Route 213 (N)(29-33) Alt. Area - Route 118 ___________________________ WYNAUT Best Area - Love Island Repel Area - Lake Verity (6-9) ___________________________ SNORUNT Best Area - Low Tide Enterence Room Repel Area - Acuity Lakefront (M)(36-39) ___________________________ SPHEAL / SEALEO Repel Area - Route 125 / Route 226 Alt. Area ( for sealeo ) - High Tide Enterence Room ___________________________ CLAMPERL Best Area - Amity Square ___________________________ RELICANT Best Area - Route 126 ___________________________ LUVDISC Best Area - Ever Grande City ___________________________ BAGON / METANG Best Area - Route 228 / Hoenn Safari Zone Area 2 Repel Area ( Only For Metang ) - Hoenn Safari Zone Area 2 (33-36) ___________________________ If you want to hunt in pair of two pokes with Same sync and can be used in PvP You may check This guide. Hope this Guide will help you; Thanks for taking a look here;
-
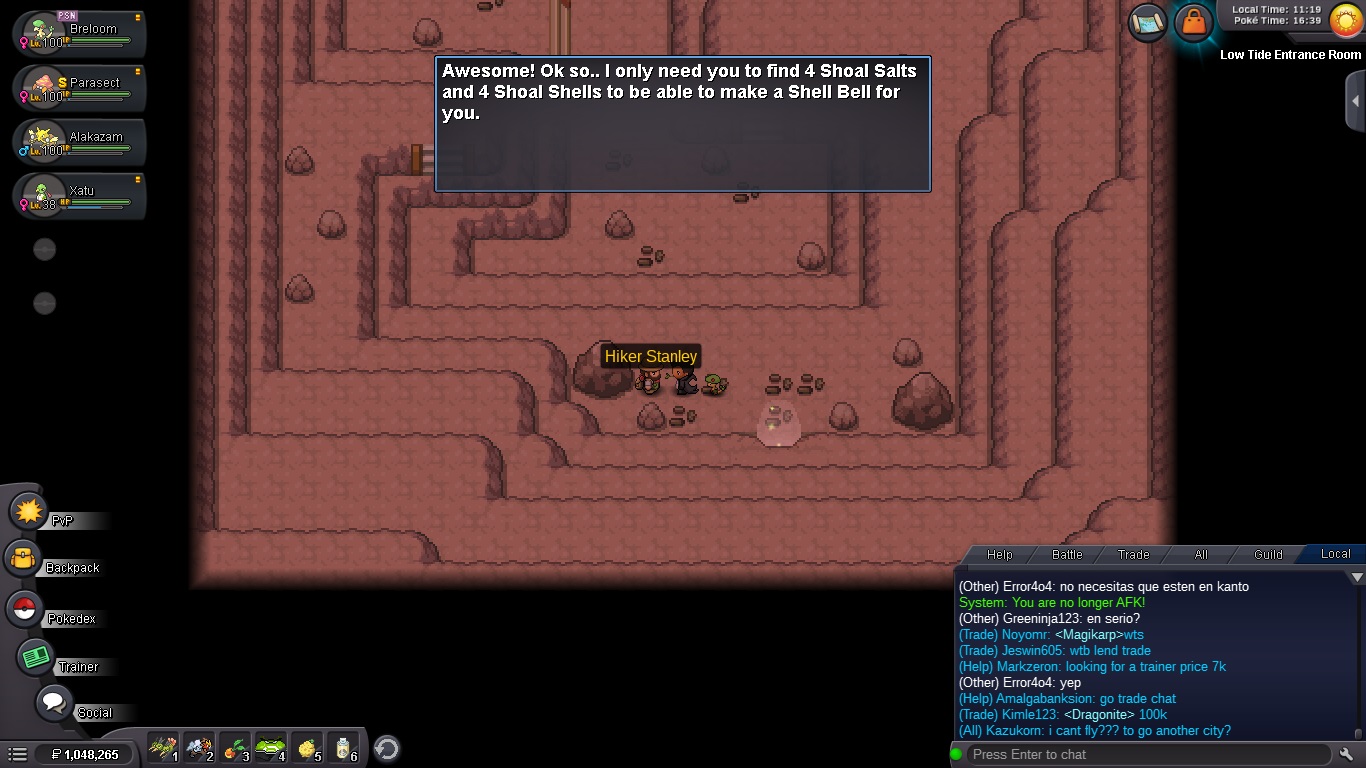
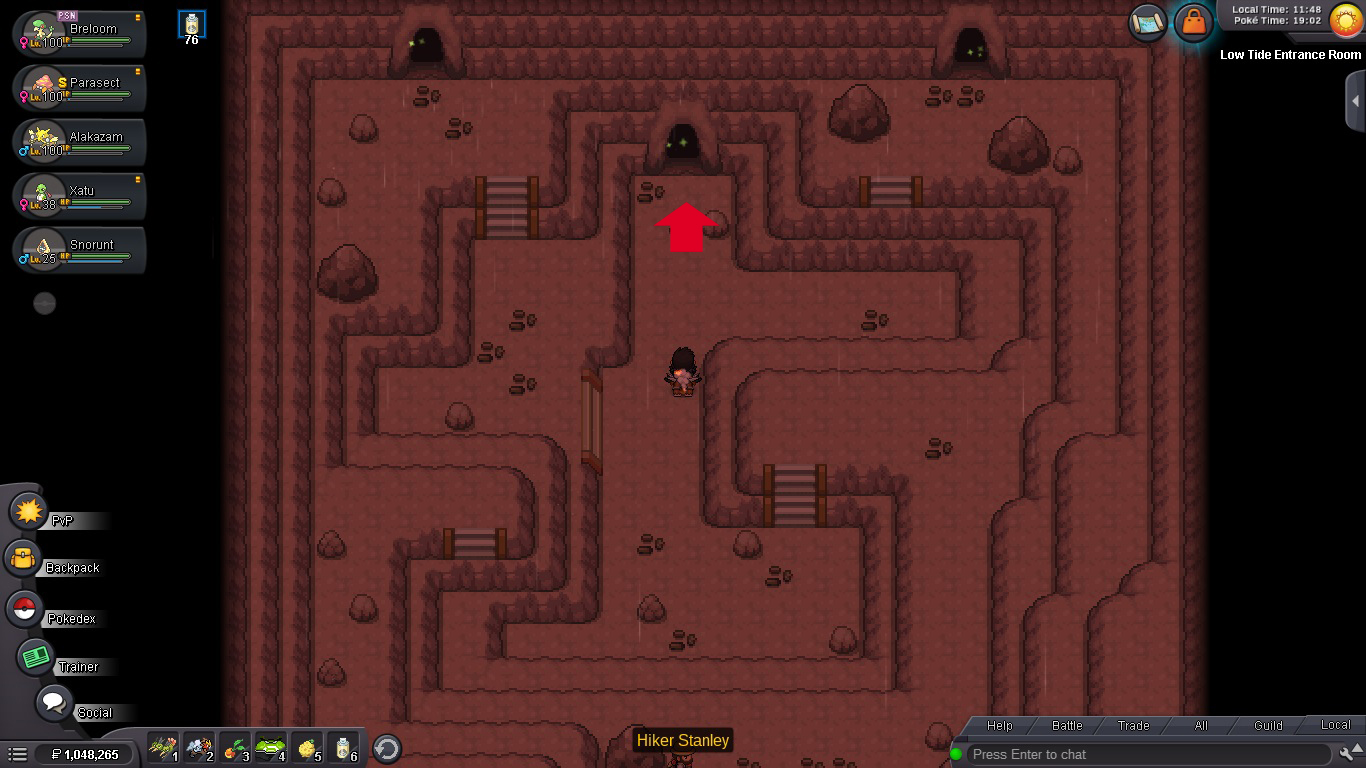
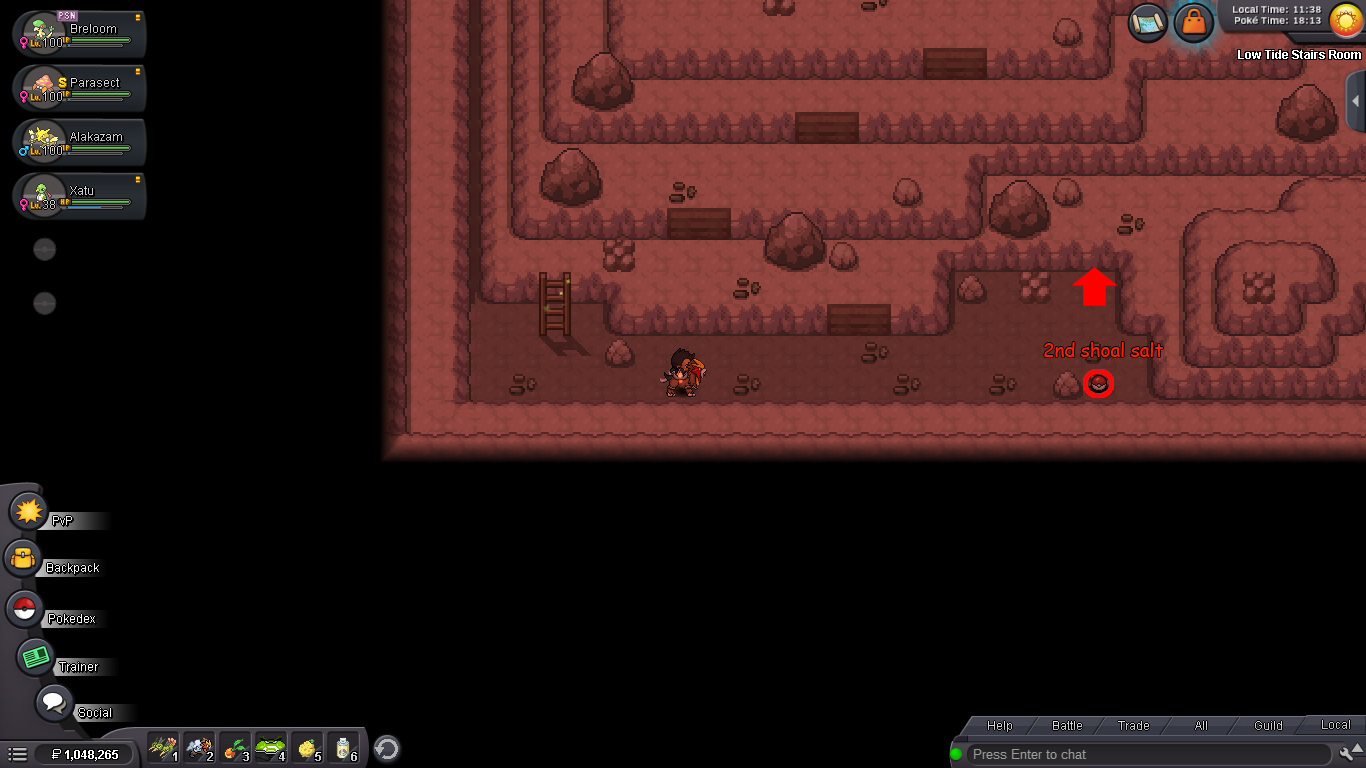
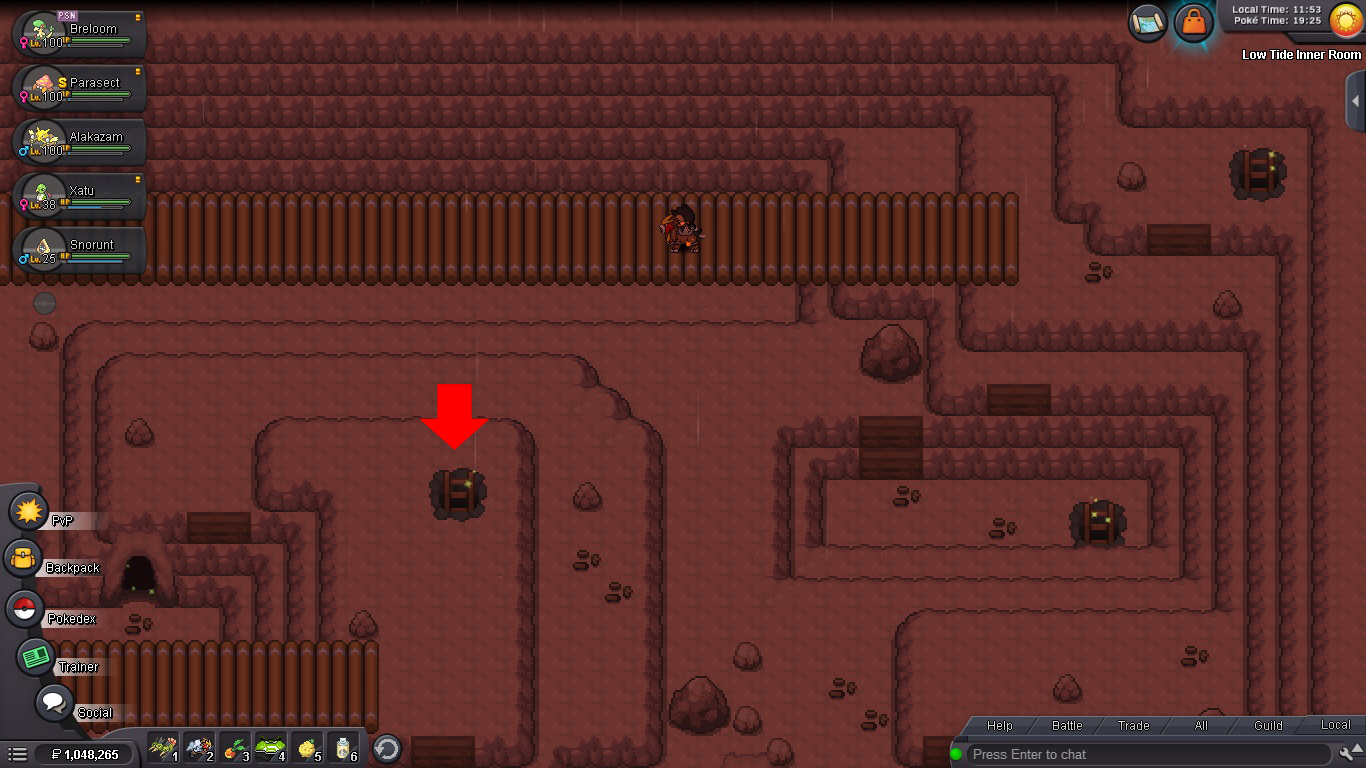
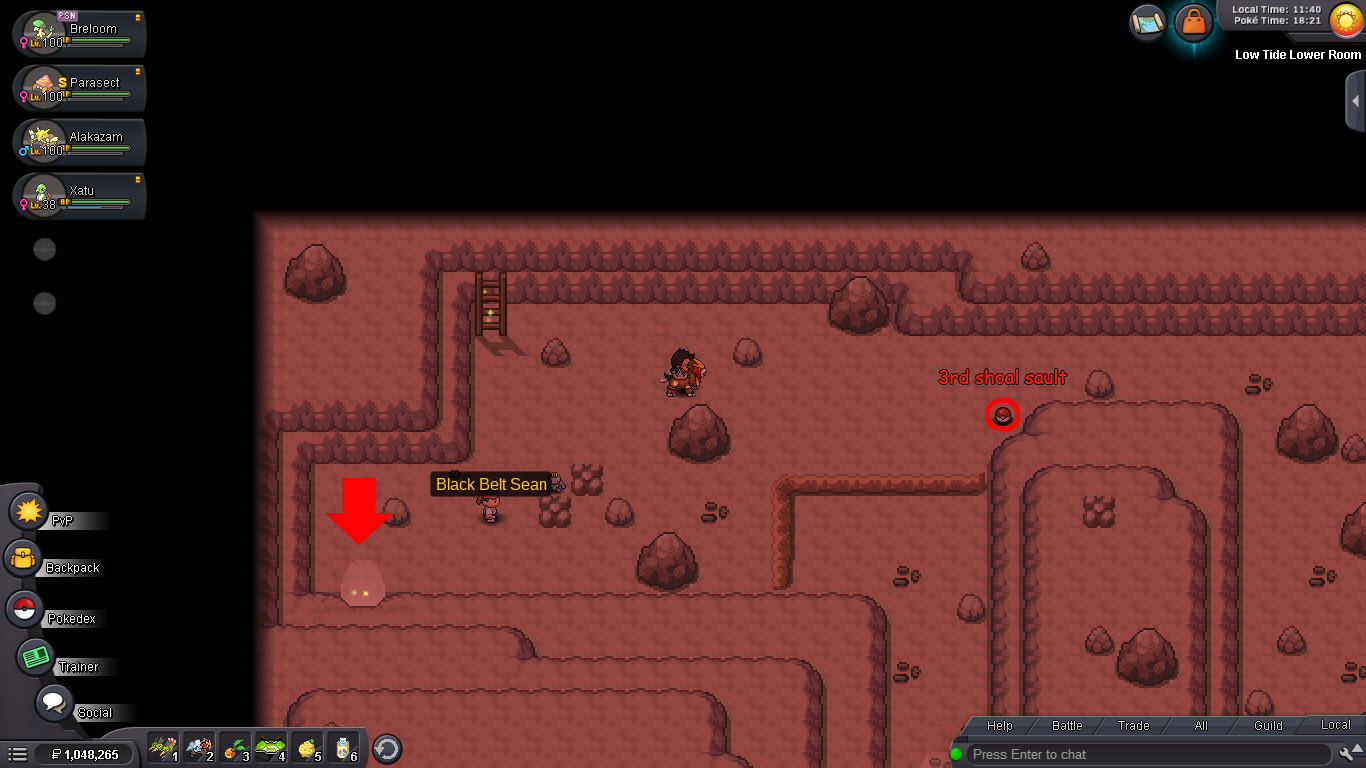
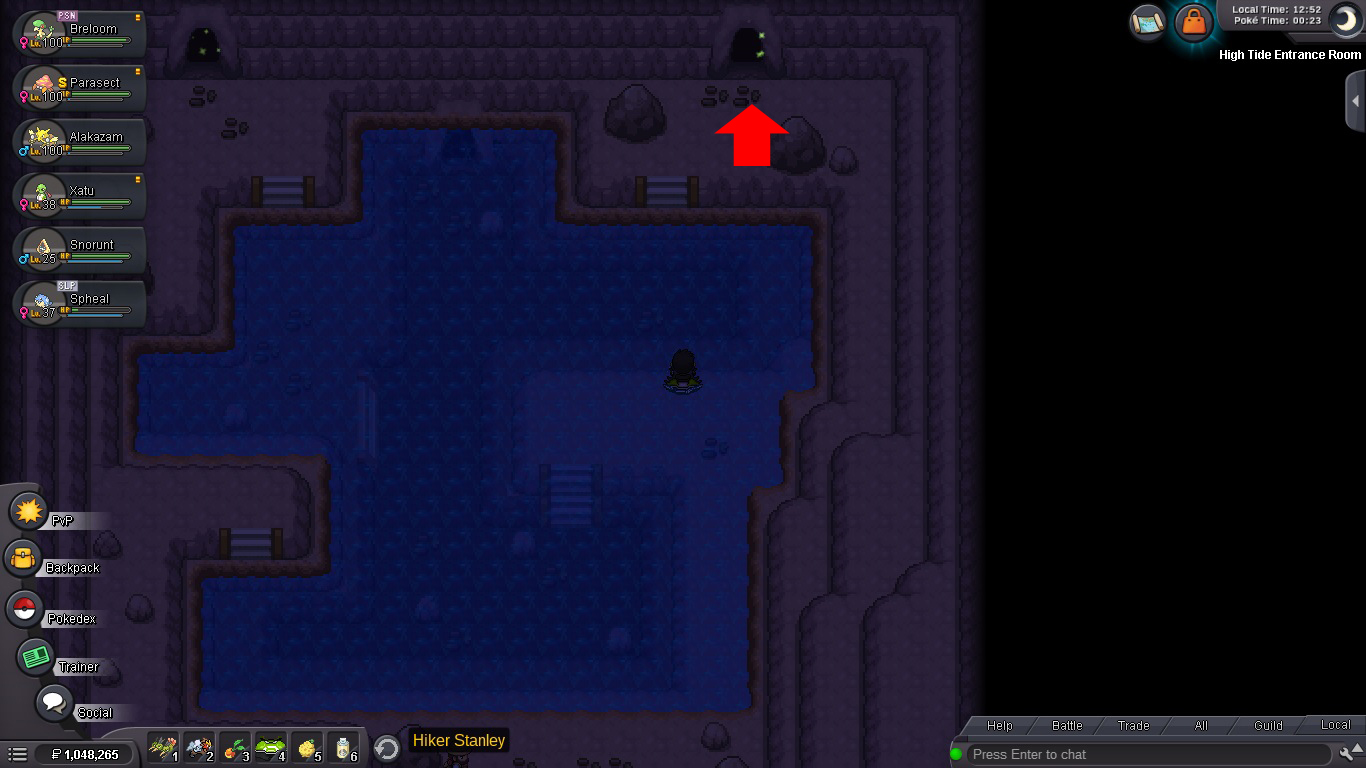
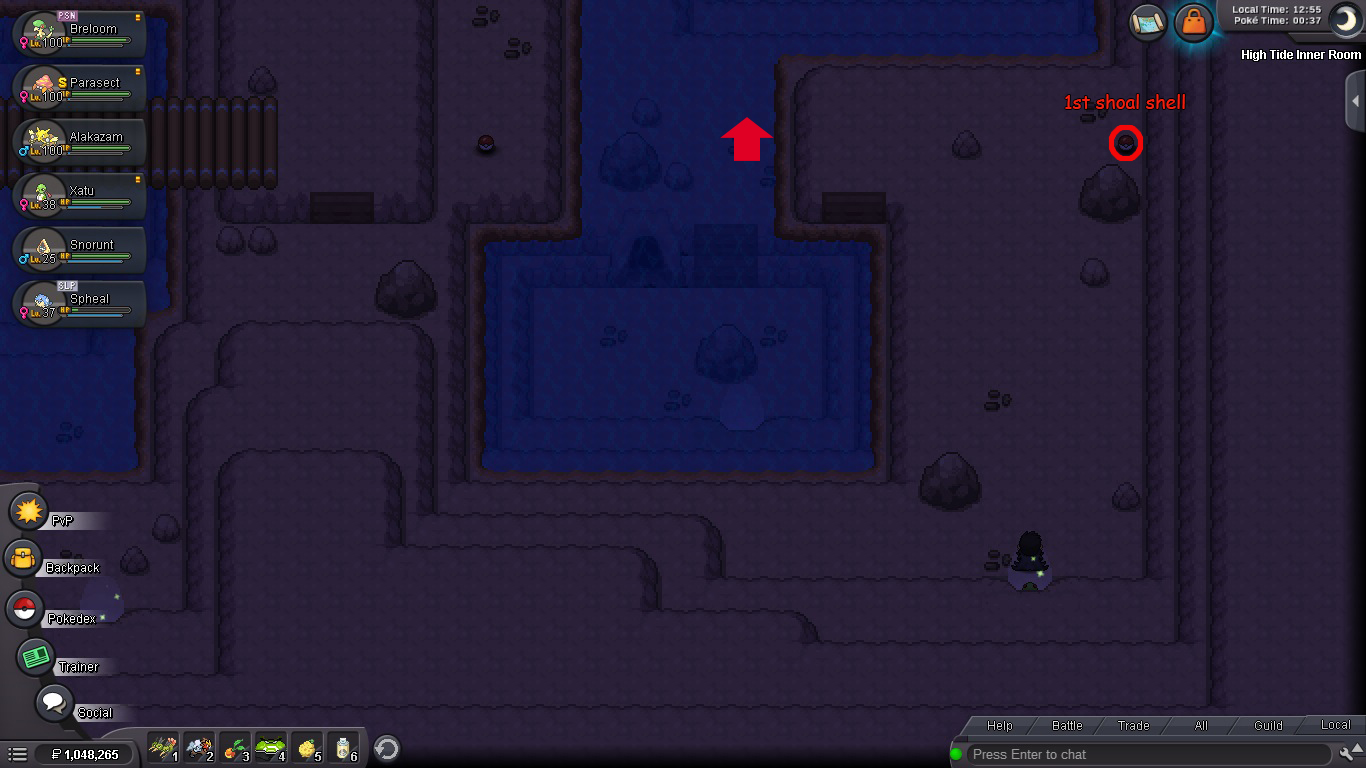
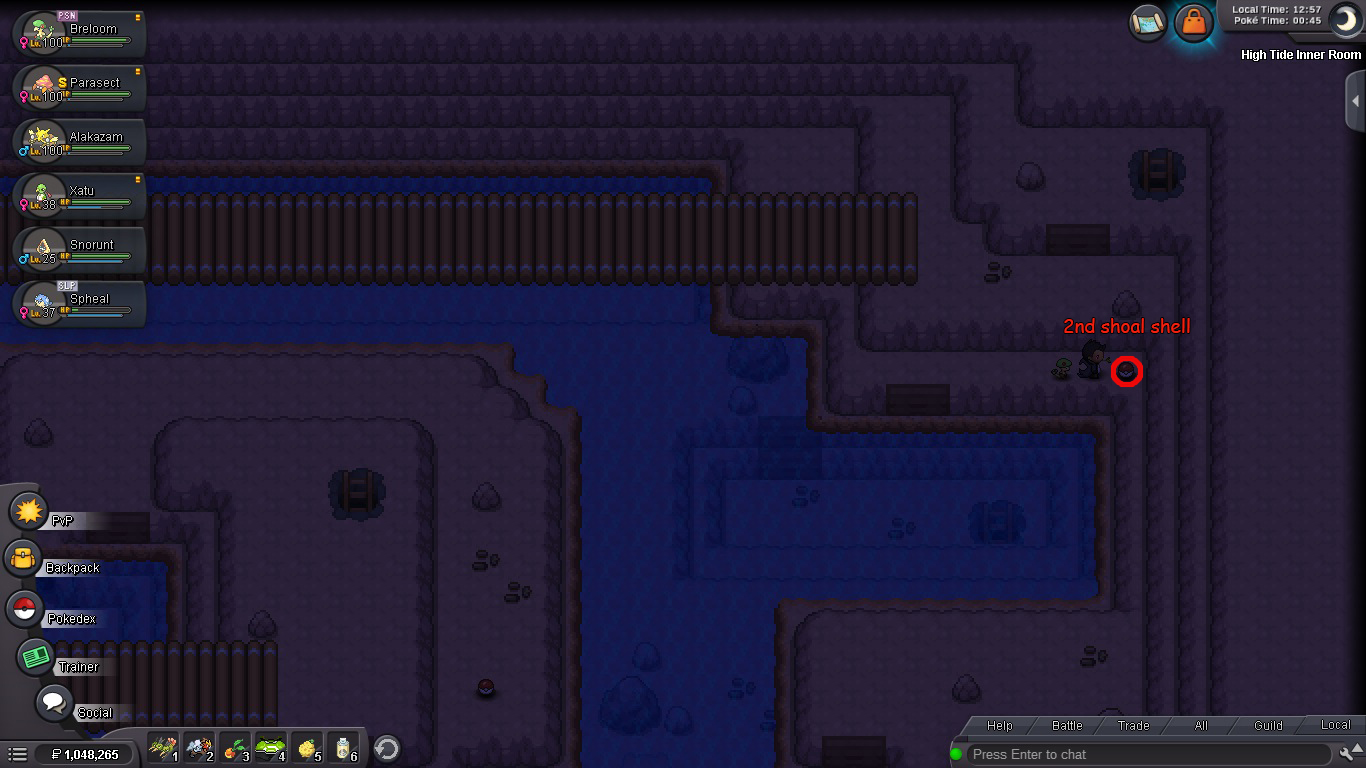
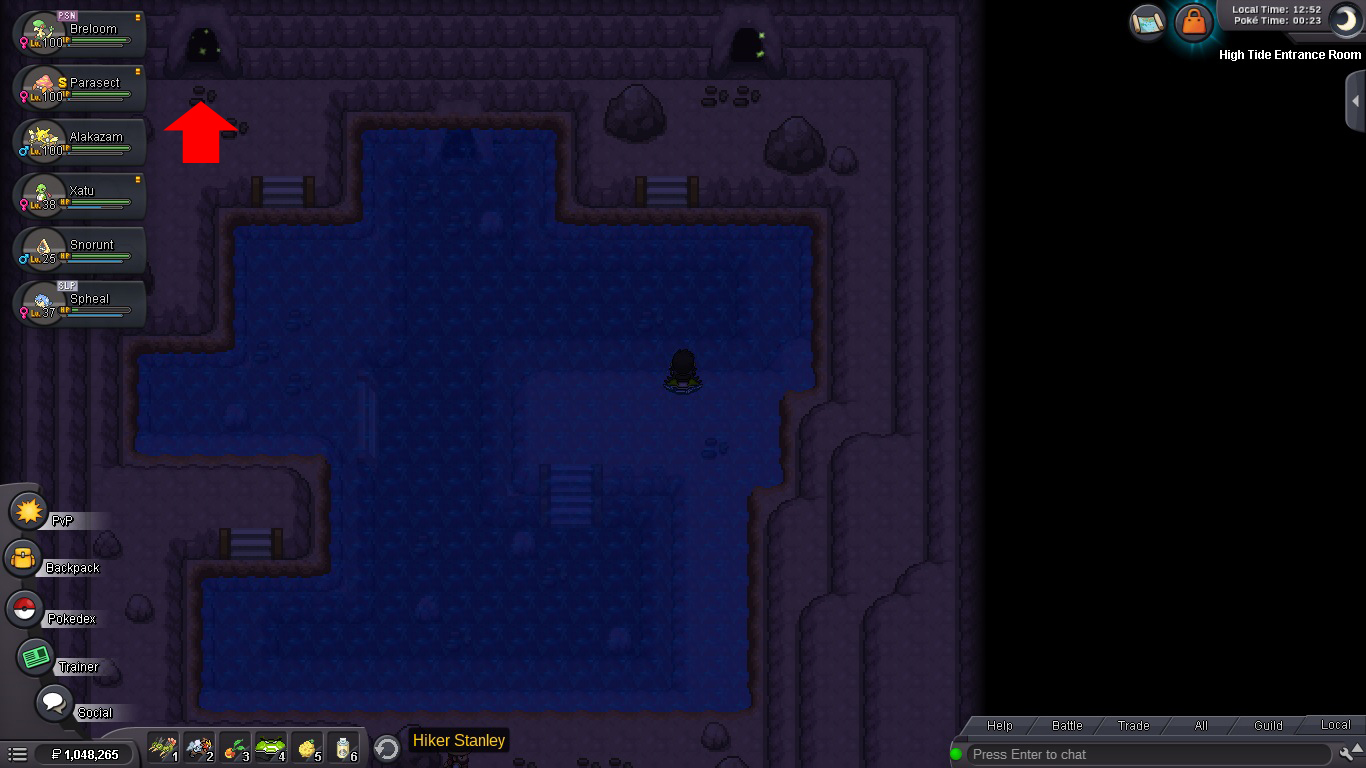
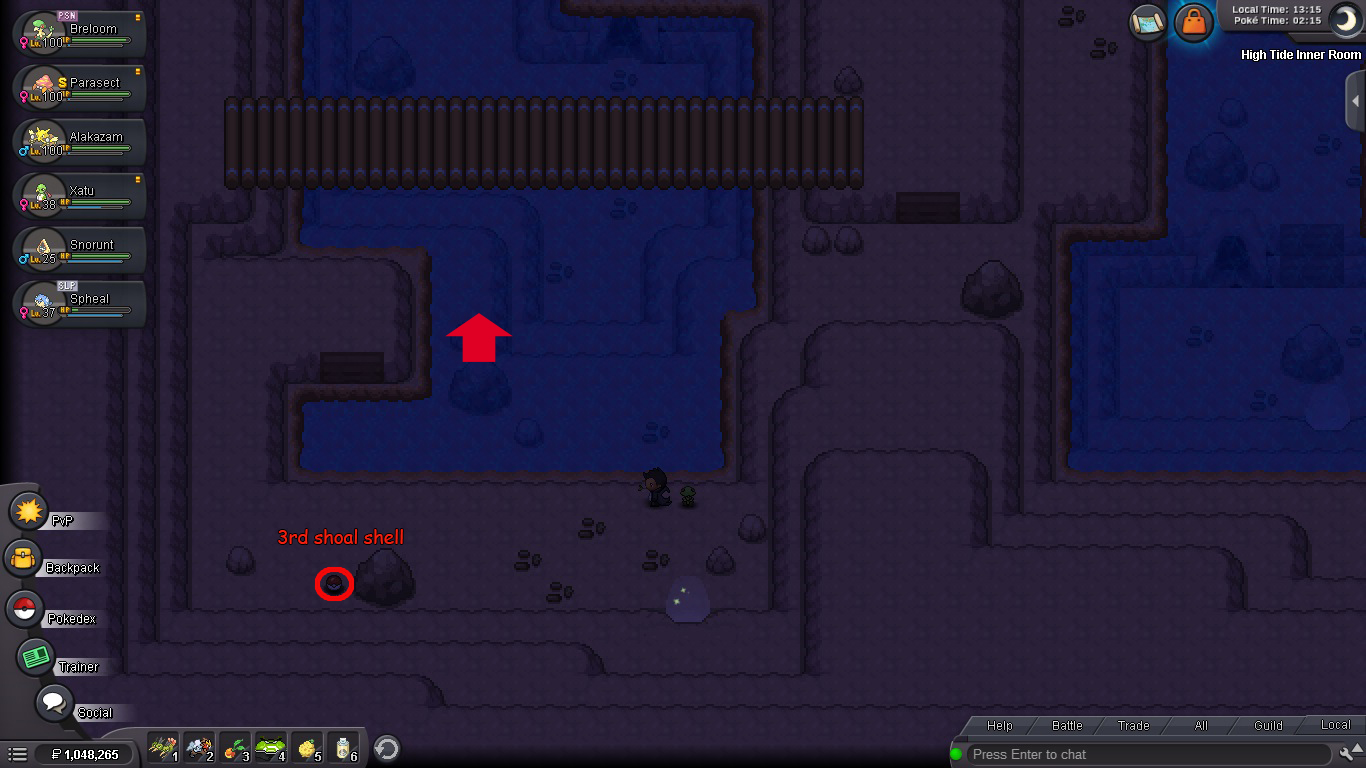
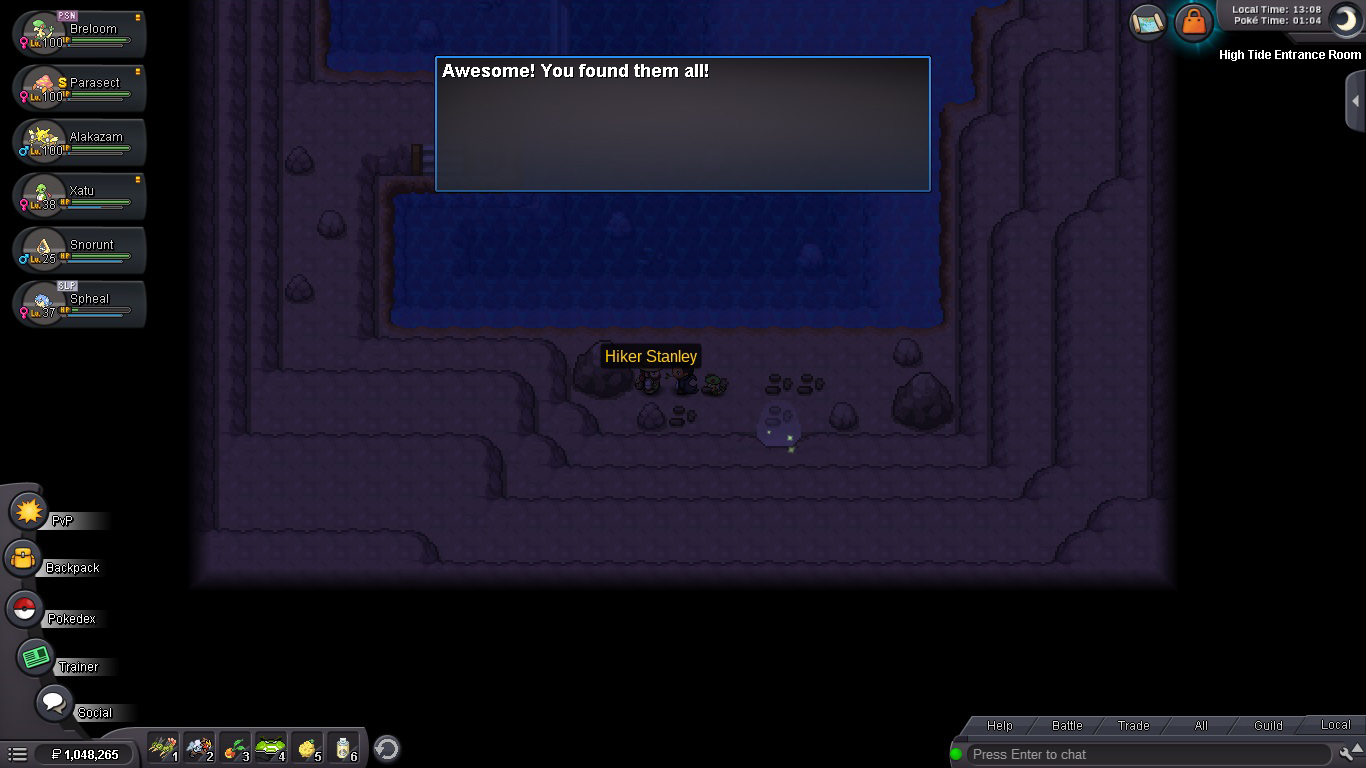
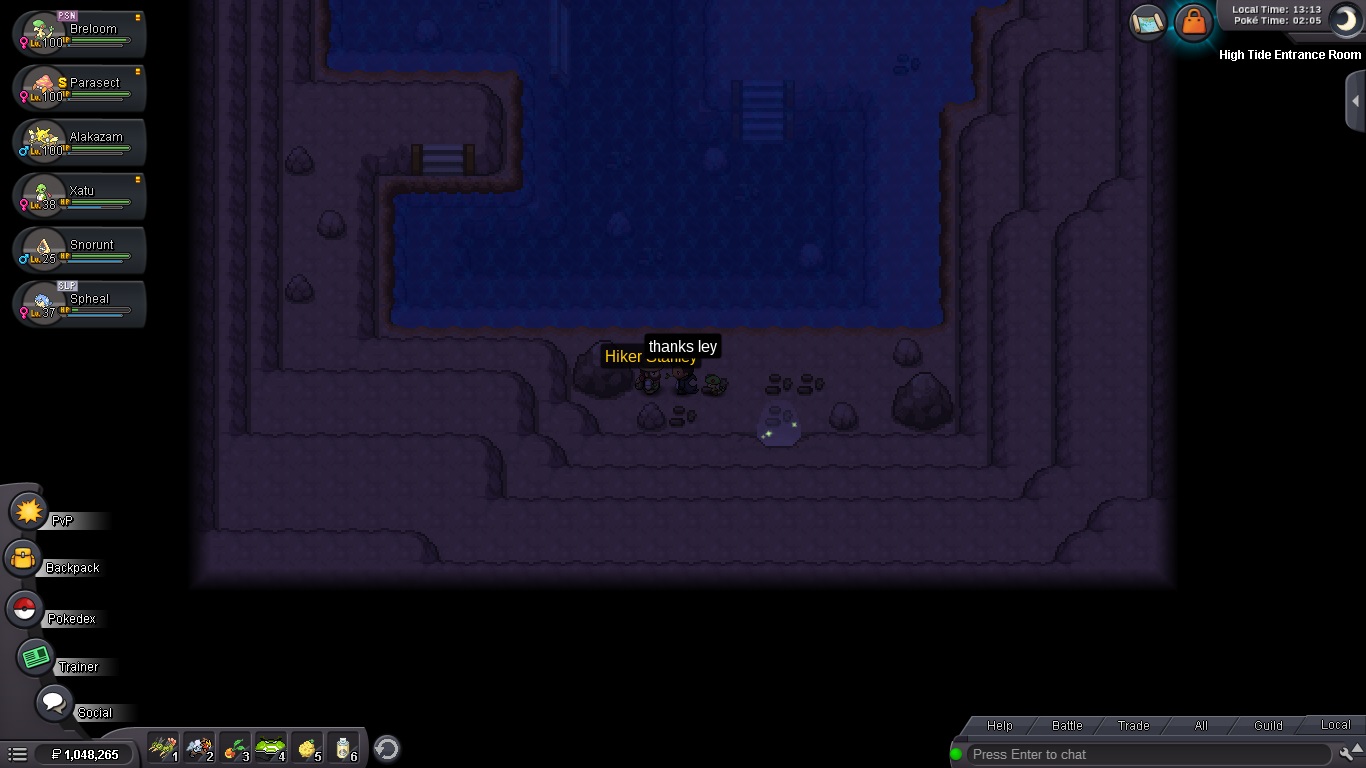
We have listed ALL of the locations of monetary items in PRO. We've calculated the money gain and taken screenshots and written down the location of all these items: Pearl, Big Pearl, Nugget, Stardust, Star Piece, Big Nugget, Big Mushroom, Small Mushroom. As an extra, I am also listing Rare Candy, since they seem to be of everyone's interest and they're insta sellable on the PROMarket. I've gone through the entire PRO Wiki and made an entire list of the places where the monetary items are. However, there's still a lot of items missing, missing info, and screenshots, and the previous guides for monetary items and hidden items are outdated and the pictures do not even work anymore. I've listed the places I've already been to and taken a screenshot of, but there's still a LOT to find out. I'd ask you all if you want to collaborate to come and help out to find the missing spots and the remaining screenshots for all the info we've gathered. I'm going to copy paste the list here and link the zip file with all my work for now. We are also missing the time frame in which these items respawn, as we are not 100% sure the Wiki info is correct since it's mostly outdated (some of these spots even changed). The guide is 99% done and can thus be considered complete, but it will be edited if any new findings appear or if anyone takes better screenshots of some areas. For now, pictures will be uploaded as attachments in the bottom of this post, and will be fixed and uploaded properly in the post itself. There are way too many pictures to be posted, so it would completely break the post order. We're constantly going to use the Hidden and Monetary Item Location Guide throughout this process: https://pokemonrevolution.net/forum/topic/132722-url ! Approximate Money Gain if you pick em all up. Big Nugget : 20k (x2 in total) = 40k Nugget: 5k (x10 in total) = 50k Pearl: 3k (x15 in total)= 45k Big Pearl: 9k (x6 in total) = 54k Stardust: 1.5k (x5 in total) = 7.5k Star Piece: 6k (x4 in total) = 24k Tiny Shroom: 1.5k (x1 in total) = 1.5k Total FIXED possible gain from grabbing everything: 369k Kanto Items Viridian City Rare Candy: Bottom side after the bridge. - 7 days. Viridian Forest Rare Candy; Behind the tree next to the maze. - 14 days. Mt Moon B1F Star Piece: South from the team rocket guy down the first ladder. - 14 days. Route 3 Stardust: In the first dig spots at the beggining of the route, it's in the northwestern rock. - doesn't respawn. Route 12 Rare Candy: South from the Camper Justin pokeball, 2 tiles down from it. - 14 days. Route 16 Rare Candy (Bicycle needed): Pokeball. - 14 days. Route 17 Rare Candy: East of Cue Ball Corey, between the rightmost pillars. - doesn't respawn. Seafoam B1F Pearl: Southeast from westmost B2F Ladder, tall stalagmite. Credits to Waleed1301 for the picture! - doesn't respawn. Seafoam B3F Pearl: East of the westmost tall stalagmite from the B2F ladder. - doesn't respawn. Seafoam B4F Nugget: Centermost stalagmite of the island reachable from the second eastmost B3F ladder. - doesn't respawn. Note: the location is different for each player. Route 27 Rare Candy: Left of the tree with an axe on it, near Johto Falls. - doesn't respawn. Kanto Extra Items Cerulean Cave 1F Nugget: Pokeball. - respawns, 14 days Cerulean Cave B1F Nugget: Rock smash some rocks and you will find it. Credit to Ashes55! Doesn't respawn. Ceru Cave 1F Rare Candy: Just when you enter, between the water and the rocks above the staircase in the entrance. - 7 days Love Island Diamond Domain Cave Rare Candy: Pokeball. - Doesn't respawn (for some reason) Island One Treasure Beach Starpiece: Next to the old man, under umbrella. - Doesn't respawn. Island One Kindle Road: In the thin line to the left of the saunas, hidden Nugget at the bottom of the sand - Doesn't respawn. Island Five Stardust: Rock to the left of the bridge, on the beach. - Doesn't respawn. Island Five Meadow Pearl: In the beach, the leftmost shell. Doesn't respawn. Island Five Chrono Chross Nugget: Behind a tree. - Doesn't respawn. Water Path Pearl: In the middle of the route, in the sand castle, - Doesn't respawn. Island Six Big Nugget: It's in the cave you have to go through while doing the Meowth Quest. Pokeball. - Doesn't respawn. Vulcan Island Shore Rare Candy: Enter the Vulcan Path, go to the bottom left, climb up the stairs, exit to the south. Next to the boss. - Can't check if it respawns. Vulcan Forest Rare Candies: Next to the northern exit. - Same as above. Johto Items Violet City Rare Candy: Behind the gym sign. - doesn't respawn Route 35 Nugget: Surfing to the left, below the berry tree patch. - doesn't respawn Burned Tower Floor 2 Nugget: In the top left center rocks. - doesn't respawn Bell Towe Rare Candy: In the last floor before Ho-Oh, behind the pillar. - doesn't respawn. Mt Mortar B1F Rare Candy: North East Corner Pokeball. - doesn't respawn. Forest Pit Rare Candy: small rock west and north from Halley. - doesn't respawn. Route 39 Nugget: To the lampost next of Sentret. - doesn't respawn. Olivine City Rare Candy: In a rock in front of the Lighthouse. - doesn't respawn Olivine City Pearl: In the rightmost tile in the horizontal fence to the southeast of the gym. - doesn't respawn Johto Extra Items Route 49 Rare Candy: In the Southmost Island. - doesn't respawn. Mt Silver 2F Rare Candy: In the central rock in the northern exit. - doesn't respawn. Ruins of Alph Rare Candy: In the interior south west corner. - doesn't respawn. Ruins of Alph Rare Candy: In the northwest one. - doesn't respawn. Hoenn Items Oldale Town Rare Candy: Under the pokecenter. respawns every 7 days Meteor Falls B1FR Stardust: Below tess. doesn't respawn New Mauville Rare Candy: South of the stairs. respawns every 7 days Fortree City Tiny Mushroom: Below the bridge on the bottom right.- Doesn't respawn Shoal Cave High Tide Entrance Room Star Piece: To the left of the entrance, on a rock. Doesn't respawn Sootopolis City Rare Candy: Next to the Poke Mart. Requires Rock Smash. - Doesn't respawn Granite Cave B2F Rare Candy: Pokeball in the middle of the way - Respawns every 7 days. Route 105 Pearl and Big Pearl: Check the shells in the islands. - Doesn't respawn. Route 106 Stardust: Near the Granite Cave eastern wall. - Respawns every 7 days. Route 108 Pearls: Next to the first isolated rock in the center of the route from the west. Respawns every 7 days. Route 108 Rare Candy. Behind the palm tree in the north-westmost island. Respawns every 7 days. Route 109 Big Pearl: In the middle of water west of Peeko Sailor's boat Respawns every 7 days. Extra: Route 109 PP UP from the Route 108 exit. Respawns every 7 days. Route 110 Rare Candy: At the north end of the cycling road, just before going up the platform. Respawns every 7 days Route 116 Pearl: North of the tree maze part. Requires Cut. Doesn't respawn. Route 121 Nugget: Beyond the northmost fence in the eastern part of the route. Requires Cut. Doesn't respawn. Route 124 Pearl: In the south-eastmost divespot. doesn't respawn. Route 128 Pearl: In the south-east dead-end of the main area, accessible from Route 127 Underwater. Doesn't respawn. Route 127 Rare Candy: Top Left left of bird keeper Byron behind one of the trees. - doesn't respawn. Route 132 Rare Candy: On the westmost palm tree in the islands on the southwest part of the route. Doesn't respawn. Route 135 Pearl: On top of the mountain on the east side of the bridge connecting middle islands. Doesn't respawn. Hoenn Extra Items Nap Cave B1F Nugget: On a small crystal near the south-west corner of B1F. Doesn't respawn. Nap Cave B1F Rare Candy: On a small crystal in the center east of B1F. Doesn't respawn. Secret Nap Area Pearl: In the far east of the beach. Doesn't respawn. Nap Shore Pearl: In the shell from the exit to Route 49. Doesn't respawn. Valley Of Steel Eastern Peak Rare Candy: It's behind a tree. Doesn't respawn. Valley Of Steel Western Peak Rare Candy: It's behind a tree. Doesn't respawn. Sinnoh Items + Extra Items Canalave City Big Pearl: Invisible under the big different tree, reach it by surfing south from the boat. Respawns every 7 days. Mt Coronet South 2F Star Piece: In the east-most room accessible from the eastmost ladder of 3F. - Doesn't respawn. Mt Coronet 6F Rare Candy: On the north-eastmost rock. - Doesn't respawn. Pokemon Mansion Big Nugget: In the second western room from the entrance. - Doesn't respawn. Pokemon Mansion Rare Candy: After defeating Liam in the furthest western room from the entrance. - Doesn't respwn. Twinleaf Town Rare Candy: In the south-west of the town. Requires Surf. - Respawns every 7 days. Victory Road 2F Rare Candy: On the rock one tile north of the northmost rock smash rock in the south-east path.. Requires Rock Smash. Victory Road B1F Deep Big Pearl: After entering the maze part from the south, follow the path north, west, north, east, then go south one tile, on the rock to the east. Victory Road B1F Pearl:. From the south-westmost ladder, on the westmost accessible small rock before going down the stairs. Route 206 Rare Candy: In the north-west corner of the ground level, west of the Warward Cave - Respawns every 7 days. Route 208 Star Piece: Directly north of the Mt Coronet entrance, which requires to do a detour. - Doesn't respawn. Route 210 Nugget: On the large rock in the north-west part of the route, reachable by following the horizontal north bridge to the west. - Doesn't respawn. Route 212 South Stardust: In the south-east corner of the swamp part, south of Ranger Taylor. - Respawns every 7 days. Route 213 Big Pearl: On the south-eastmost small rock on the island in the south-east corner of the route. Requires Surf. - Respawns every 14 days. Route 215 Rare Candy: In the center north of the route, near Black Belt Nathaniel. Requires Cut. - Doesn't respawn. Route 217 Ice Stone: Behind a tree. (Credits to Waleed1301) Route 218 Rare Candy: In the north-east corner of the route. Requires Surf. Doesn't respawn. Route 220 Pearl: On the large rock two tiles right from SwimmerTrollrah, the southmost swimmer. - Respawns every 14 days. Route 222 Pearl: On the westmost large rock on the beach. - Respawns every 14 days. Extra: Route 222 2 PP UP next to Tuber Conner Fence - Respawns every 7 days. Route 224 Big Pearl: On the small rock next to Jingoss - Respawns every 14 days Route 225 Rare Candy: In the north-west of the route, directly west from Miner Elikike123. - Doesn't respawn. Route 228 Nugget: In the north-east corner, next to the north end of the long bridge. - Doesn't respawn. Pictures and Locations of each Hidden Item (all regions and side areas)
- 27 replies
-
- 14
-
-
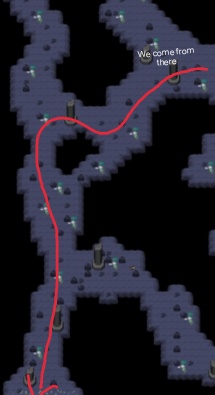
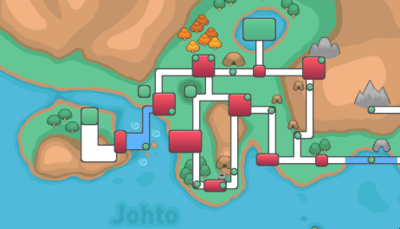
If you do not have the Gracidea Flower and Micle Berry yet, please go to the following threads in order to obtain the prerequisite items: https://pokemonrevolution.net/forum/topic/125633-url https://pokemonrevolution.net/forum/topic/126044-url Once you have obtained these items, Talk to the NPC by the Micle Berry who will tell you the following Riddle: Grace and frustration, a legend denied; Rest without wings, o agile one; Full heal without effort, with well-honed defense: From light bring energy, and sap those you loathe. After speaking to him, head over to Sunyshore City in Sinnoh and head north to the Sinnoh Victory Road, don't forget a waterfall Pokemon! Outside of the Victory Road, there is a Pokemon Center, you can get the required Pokemon from there. You must have Pokemon with the following requirements: - Max Speed IVs - 252 Defence EVs - Natural Cure - Chlorophyll - Serene Grace - Leech Seed - Arcanine - Roost (Note: 2 or more conditions can be met by a single Pokemon, i.e. Serene Grace Chansey with 252 Def EVs or Chloro Cottonee with Leech Seed) After you have your team set up, head inside Victory Road. The following image shows you how to get to Route 224 which is where the Shaymin Shrine is located. After getting through Victory Road, you will find yourself on Route 224, head north and click on the shrine. If you have all of the requirements, then you will teleport to the Flower Paradise. Head north and you'll come across Shaymin! Shaymin Sky Form Head back to the shrine and interact with it and you will get the option to change Shaymin's Form
-
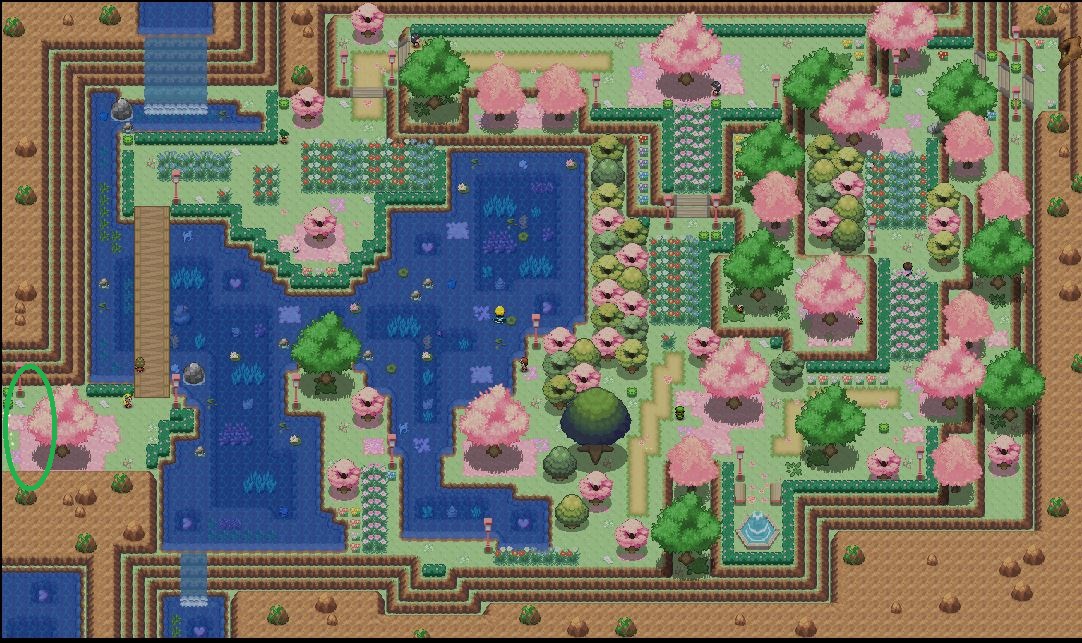
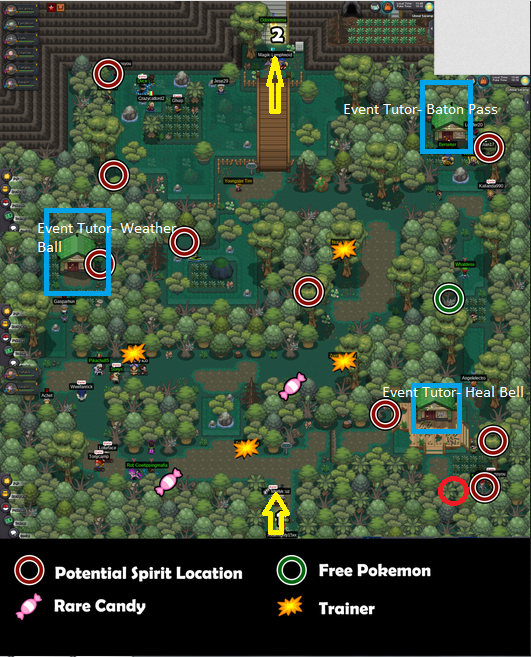
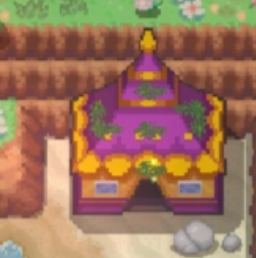
Alright the newest part of the Shaymin quest has been released So I am going to show you pictures with the correct order of the sounds to show you were to go . Thanks Terraxyz for giving me the order!!!! This was essential to making this guide happen!!! Ok first off you need to have gotten the Gredecia flower in the first half of the quest! Then you need to interact with those cries Now to find them here are some helpful pictures For Cactnea it is north of the NPC Shelly!! THANKS ZOIS13 For showing me where it was!!! Interact with it for cry. Next for the seedot It is in the southwest corner of the map by Anna NPC!! C0libry thanks for your help as well!!! Talk to the seed for the cry. now the next one is Belossom That is on your way to the rock with red flowers near a stump. You stand on the flowers for the cry Next is paras this one you only have to step on to get your cry as well. You stand on the mushrooms! Last one you interact with is a lotad sound you step on a lily pad you have to surf under a bridge to get to it by a Hiker NPC on the west side of the map!!! THANK YOU BOOM For finding it!!!! Once you step on them in the correct order a message pops up!! Now go back to the rock you first interacted with for gradecia flower!!! it will be gone!!! =0 dun dun dun. In its place you will find A berry tree interact with it!!! This message pops up!!!! Congrats!!!!! You have your berry that you need for the Shaymin quest!!!! Thanks everyone in all chat who was helping us all out to find this!!!! Hopefully this helps everyone else wanting to do this part of the quest!!!
-
 **Don't forget to leave a like** Here is a guide to finds all 2019 Easter Eggs in Kanto. Bring 2 Escape Rope (or use Escape Trick) Need Flash, Cut, Surf (Dig would help you too) Talk to this guy to start the quest (in breezy town, house 2) : I place them to find them all in one easy travel from Vermillion [spoiler=Rewards] In the egg basket : 25 or 50 Easter Tokens per basket 1 Egg : 1 x PP UP 4 Eggs : 5 x great ball 7 Eggs : 5 x hyper potions 10 Eggs : 5 x Revive 14 Eggs : 10 x friend ball 17 Eggs : 10 x Focus Sash 20 Eggs : 5 x revival herb 24 Eggs : 3 x Big Mushroom 27 Eggs : 5 x rare candy 30 Eggs : 5 x PP max 34 Eggs : 10 x level ball 37 Eggs : 10 x fast ball 40 Eggs : 1 x Master ball [spoiler=Locations] [spoiler=Vermillion] [spoiler=Route 11] [spoiler=Route 12 (Raika Famous Hiding Spot)] [spoiler=Route 13] [spoiler=Route 14] [spoiler=Route 15] [spoiler=Fuschia] [spoiler=Route 19 (Arcanine Farm)] [spoiler=Seafoam Island B1F (Use Fuschia Entrance)] [spoiler=Route 20] [spoiler=Cinnabar] [spoiler=Route 21] [spoiler=Pallet Town] [spoiler=Route 1 (Behind Tree)] [spoiler=Viridian (Enter Poke Center)] [spoiler=Route 22] [spoiler=Indigo Plateau (Use Escape Rope After)] [spoiler=Route 2] [spoiler=Viridian Forest] [spoiler=Pewter] [spoiler=Route 3] [spoiler=Mt Moon B1F (First Ladder)] [spoiler=Route 4] [spoiler=Cerulean] [spoiler=Route 24] [spoiler=Route 25]Here you can see the fabulous Haneroze !!! [spoiler=Route 5] [spoiler=Route 9] [spoiler=Route 10] [spoiler=Rock Tunnel (Use Lavender Entrance)] [spoiler=Lavender] [spoiler=Pokemon Tower B5] [spoiler=Route 8] [spoiler=Saffron (Enter Poke Center)] [spoiler=Route 7] [spoiler=Celadon] [spoiler=Route 16] [spoiler=Route 17] [spoiler=Route 18 (Use Escape Rope After)] [spoiler=Route 6 (Back to Vermi)] Special thanks to Blaze, Madtrainer, Norg83, CrosbieL for helping me to gather all the spots. This guide would not have been possible without them. Long life to Phoenix Guild (Silver Server)! Also thanks to waleed1301, I learned 8 pictures came from him! Sorbet #0883
- 33 replies
-
- 45
-
-
Here is the location of all the 40 eggs that can be found through this event, thanks to all the people that helped me with finding the eggs and to the tips that you guys gave me to improve this post since it was the first complex post I ever did here Hope this will help you guys and good luck with your hunt! Cities: Routes: Other Places:
-
how i can get uxie back after beat nikola ?
-
https://www.youtube.com/watch?v=HSin83eeab0 [spoiler=Read After Watching The Video!]So in the video shown above, I hope to convey to you all how broken disable is. Pokemon will continue to use the disabled move despite it being....well disabled. I understand that the rules specify that "6. Abusing glitches, and not reporting them as soon as possible, will result in sanctions. " but I would like to note that I could have easily beat that final gym anyway by using recover and calm mind. Additionally, it should be noted that Gengar's ability, Cursed Body, has a chance to inflict the "disabled" effect on the enemy pokemon. Keep this in mind if you plan to place restrictions on the use of disable. As far as I am aware, the glitch only works in PvE. I have not tested it in PvP but I assume it works as intended since my pokemon has experienced disable from opposing Gengar Sorry for the poor video quality. Anyway, that's all from me.
-
WELCOME TO MY GUIDE HOW TO WIN EASY SUPERBOSS IN DOCK ISLAND. FIRST OF ALL YOU WILL NEED ONLY 4 POKES FOR THIS STRATEGY. POKES IS: FROM THIS POKES YOU ONLY NEED A GOOD DUSCLOPS AND A JOLLY GYARADOS DONT NEED TO BE MOXIE ALSO FOR WOBBUFFET AND KLEFKI YOU CAN USE TRASH ONES BUT WOBBUFFET NEED TO BE DEF AND HP EVS TRAINED AND KLEFKI HAVE HP EV TRAINED AND ABILITY PRANKSTER. STRATEGY IS SIMPLE 1) lead with klefki use REFLECT if you dont die 1 hit use SPIKES 2)Afrer klefki dies go with dusclops and do as many FLASH as you can. 3)After that go with wobbuffet and do x3 CHARM. 4)Now is safe to switch in gyarados with Gyarados do x6 DRAGON DANCE 5)Swipe with gyarados -)CRUNCH MEWTO X -)WATERFALL GROUDON -)ICE FANG XD001 -)CRUNCH LATIOS -)CRUNCH KYOGRE -)ICE FANG RAYQUAZA IF ALL HAVE GO WELL YOU MUST HAVE THIS RESULT. HERE I WAS TESTING IT THATS WHY I HAVE LOST TWO POKES NORMALY THE ONLY POKE DIES IS KLEFKI. I HAVE TEST THIS IN MORE THAN 4 ACC SO I CAN TELL YOU THIS STRATEGY WORKS PERFECT AND ITS PRETY EASY. HERE SOME INFO FOR THE BOSS. Boss Location: CURRENTLY LOCATED IN DOCK ISLAND LEFT HOUSE Cooldown: 15 days Requirement/s: 6 level 100 pokemon, 200 hours playtime, active membership. Team: Mega Mewtwo X (Psycho Cut, Close Combat, Recover, Psych Up) Primal Groundon (Earthquake, Flamethrower, Swords Dance, Thunder Punch) XD001 (Cosmic Power, Aeroblast, Psyshock, Roar) Primal Kyogre (Surf, Thunder, Ice Beam, Calm Mind) Mega Latios (Calm Mind, Stored Power, Recover, Dragon Pulse) Mega Rayquaza (Dragon Dance, Outrage, Roost, Extreme Speed) Possible reward/s: $60000-125000, 10x Rare Candy, 10x PP Up, 10x Focus Sash, 50x Ultra Ball, Assault Vest, 1x Weakness Policy, Eviolite, Master Ball, Dratini, Larvitar, Bagon, Beldum, Goomy, Gible, 25 % chance for Phione Third time reward? Yes ✭✭✭ Dratini, Larvitar, Bagon, Beldum, Goomy, Gible, Small MS Medalion(15days) Good Luck! :D
- 1 reply
-
- 3
-
-
This is one of the ways to defeat lance. My method only needs two [Level.100] Pokemon: Gengar、Gyarados Gyarados Set: Move: Dragon Dance、Ice Fang、Surf Equipment: Never-Melt Ice //just make sure one shot, It will be need more [Dragon Dance] if you don't have Team Leader is Gengar and also a pioneer of death. Script: 1. Face to Dragonite, let Gengar trigger the Cursed Body. //It have 30% Chance. If not triggered, log out and again 2. Switch to Gyarados and use [Dragon Dance] 2-3 times If triggered. 3.Use [ice Fang] until battle end. //You can use [Dragon Dance] once if the opposite side gets Frozen
-
Welcome to: How to make money, the guide! Before we start with the guide, I'd like to clarify certain things: This guide is mainly aimed to those newbies, semi advanced and somewhat experienced players that are in desperate need of money to survive on PRO's economy. This guide is not really aimed at expert multimillionaire players. However, some of these players might appreciate some of the advice and make use of some of the guide I'll be writing down here. I'll be mentioning a LOT of options and brainstorming a lot of ideas for any player to use. (Also, I'll add a lot of humour into it :v) These are also REALISTIC things you can do, not impossible or overcomplicated stuff. They're basic and easy. Are you stuck in Kanto trying to get a bike but these pokeballs keep making you poor? Are you hardstuck on Sabrina and have completely lost faith on moving on? Are you trying to defeat Mewtwo but he keeps oneshotting your team and you have no idea how to farm money to buy potions because you didn't bother to spend 5 minutes to google that the ability Sturdy would've helped you? If so, this is your guide! Welcome to how to make money in PRO 101! or "how did Bhimoso lose his sanity to this level to make guides instead of playing the game"! This guide will first be aimed at you newbies who are still in Kanto trying to buy a bike, a good rod, a parcel, and a house on route 19 (Spoilers: you can't, sadly). Then, we'll go over your monetary options in Johto, in Hoenn (spoiler alert: Hoenn sucks when it comes to making money. Seriously. IT SUCKS.) and finally, Sinnoh. I will try to condense as much info and options as I can for you all. I will also read comments on this guide and link other guides that may help you out or have relevant info. You can bring in suggestions too, although I have a big selection of stuff to post. Choose the region you've reached to or the ones you're interested in the most. As an extra and very useful decision: Remember you can have up to 4 accounds and play in all of them, complete the story 4 times, trade with yourself and help yourself a bit. If you have 4 accounts, you can do all of these methods four times and gain four times the normal amount of money. That will make you rich beyond absurd levels and will skyrocket your money gain. You can gain millions in a day just by doing all of this stuff in your accounts. I repeat: MILLIONS. Keep in mind it is no longer allowed to do Dig Spots and Bosses in both servers as it's against PRO's Rules because of economy reasons (according to developers). Remember to do Dig Spots every three days, Pokestops every day and a half, Mushrooms every 2 weeks, Bosses every 2 weeks, daily excavations and fight trainers every week for maximized money gains. You'll earn absurd amounts of money this way. Let's get into it! Kanto If you're a newbie, I will be assuming you are just starting, have reached the middle point of Kanto and noticed you REALLY need money for that bike or you're ultra desperate in the Elite Four. If not, you can still do all of these, and include Bosses, Love Island extras and more stuff! Missions Let's start with the simplest and first option, before we move onto the others: Missions. If you remember from your visits in Viridian City, you'll have noticed the officer there has missions for you. These missions can be done in almost all Kanto cities which have gyms: Viridian, Pewter, Cerulean, Celadon and Cinnabar. All these cities have 2+ missions each, some of which are easy and appropriate for the current situation you're in, but some are a bit too hard to do them economically. I'll list all of these which are easily manageable for newbies and the ones not so manageable. Remember you can only do missions once! Viridian City: Take the Rattata Hair quest. Teach TM Thief to a pokemon that is a physical attacker and is a good hm slave (Sentret/Nidoran when they evolve will be), ensure he has no items equipped and spam Thief against Rattatas in route 1. Once he steals a Rattata hair, be sure to remove it from him and get 2 more Rattata hair (3 in total). Go and get the reward for the quest, this is an easy money making one. You will also be able to steal items from other pokemon if you feel so. (This is of great use later on!) Beat Bug Catcher Gerald in Viridian Forest. This is just free money, just beat him lol. Same goes with catching a sentret. However, they only appear at morning and day time in route 1 (if you do not know when does a pokemon spawn, use the Reborn Bot in the official PRO discord. -> https://discord.gg/98pMNxq ). Do all quests in Viridian, basically. Total gain: 15.5k pokedollars. (that's a LOT at the beggining of PRO) Pewter City: Beat Brock (yes, it's a quest reward lol). Then talk to Jenny to get a bit of money. Afterwards, catch a Pikachu in Viridian Forest. They're not very common but they're easy to find. For the Headbutt quest: teach Headbutt in the entrance of Viridian Maze (the tree in Viridian Forest which has a hole, north from the entrance from the south) to a HM Slave. Show it to Jenny and she'll give you a lot of money (it will pay more than the 2k you need to teach headbutt to a pokemon.) Try to headbutt trees in the first routes and cities and get a Silcoon. Show it to her and you'll get extra money. You'll get 7750 pokedollars if you did not give the Silcoon, you'll get an extra 9k if you do. Cerulean City: Here, one of the quests is not really manageable, which sucks a bit. Do the teaching dig to a pokemon quest: either train a Sandshrew or Diglett until they learn dig via level-up and then show it to Jenny, or teach the TM to a Pokemon that can learn it (preferably a HM slave). When you've done this, you'll get a Soft Sand (increases ground type moves power). If you then go to route 3 and Mt Moon and dig up dig spots (or in other places) and bring atleast two different gems to Jenny, you'll get a Big Pearl. Sell it to the item maniac in route 25 for 9k pokedollars! Afterwards, you can try your luck with the Clefairy one: to know if it has Cute Charm, poison it. If it loses HP, it either has Cute Charm or its hidden ability. If it doesn't, it has Magic Guard. However, be ready for the pain, because he's not common and he only appears in night time in MT Moon. Then, bring it to Jenny for a reward. Then, give it to the girl in the library in Vermillion to get two rare candies. Afterwards, go back to Jenny and get a lot of money for it. The other quest is to EV train a pokemon partially. I'll explain: You need to EV train a pokemon so that one of its stats has more than 50 EVS in comparison to another stat. These are the blue numbers in your pokemon's description. You can google what EVs (or Effort Values) mean and how they work. I'll do a guide on it soon! -> https://bulbapedia.bulbagarden.net/wiki/Effort_values The pokemon you train must have 50 or more EVS over another stat's EVS. For example, its attack EVs have to be 51 if its HP EVs are 0. As long as this condition applies to two stats, you can show the pokemon to Jenny and she'll reward you. In total, you will get 29k pokedollars. Celadon City: There are two bounties here for two missions. However, the Fight Michael one should be avoided for now: it requires you to get the bike (thus, you'd need to spend 60k money for it). However, if you managed to get the bike, go and fight Michael in route 17 and beat him. Talk to Jenny and you'll get some nice 10k! Afterwards, do the HP up one, this gives a LOT of money: 14k! Here's the catch though: you need to either buy an HP up for around 8k in the department store and give it to Jenny, so you'll receive 6k in benefits. However, you can also obtain it via digging or in pokeballs in certain routes! If you manage to find one, bring it to her, or simply but it for the 6k. Your choice.! You'll gain 16k, 24k if you dug up the HP UP or obtained it somewhere else. Cinnabar Island: There are three quests you can do here. The easiest and most rewarding one is to fightArticuno and get its seen data. To get it, you only need to fight it, the result of the fight does not matter. He's in the depths of Seafoam Islands, in B4F. You can look up the map in the PRO Wiki (https://prowiki.info/index.php?title=Seafoam_Islands) and try to get to him. He's around level 60-70. You can choose to destroy him with rock, steel, electric or fire moves or just relog while fighting him and be teleported back to Cinnabar with its seen data. You'll get 12k for this. Revive a Fossil in the Cinnabar Island (any fossil you dug up or the one obtained in Mt Moon). Show it to Jenny and you'll get 6k and a Hard stone. You'll have earned 18k in total. Ignore the Corsola quest completely: it only rewards 10 Lure Balls. Pokestops Our next resource is: Pokestops! Have you seen these clowns around Kanto, which walk around certain areas? If you talk to them after having beaten 4 Kanto Badges, you will be able to obtain items from them! These items may vary from simple Potions or Repels to PP Ups and Rare Candies. We are looking for these 2, which are the rarest items to get from them (it's around a 10% chance to get them each time you talk to a clown). These are INCREDIBLE items for the lategame, and so, you can sell PP Ups for around 3k and Rare Candies for 7k in Trade Chat. If you get lucky and get a few Rare Candies in Kanto, you'll be able to get a lot of money pretty quickly if you sell them. The full list of locations are: Viridian City: Under the gym. Viridian Forest: In front of the Viridian Maze Tree, go to the east. Pewter City: East from the museum, top right of Pewter. Route 3 Pokecenter: In front of the Mt Moon entrance, outside of the Pokecenter, to its left, in front of the tunnel entrance. Route 4: In front of the Cerulean Cave Entrance (requires surf). Route 25: In front of Bill's House. Route 5: In front of the Daycare. Vermillion City (Harbor): Just walking around there. Diglett Cave: Entrance from Vermillion, just go inside. Route 10: There's one next to the Pokecenter and another one in the Power Plant Entrance. As an extra: some of the pokestops VERY rarely give useful TMs you can use while in Kanto Story. The powerplant one can give you TM Thunderbolt and the one in Viridian gives you TM Earthquake. You can also buy them in Gym 3 and Gym 8 in Kanto, respectively. Pokestops have a cooldown of only 36 hours. After a day and a half of having talked to them all, go and talk to them again, and pray to the RNGesus gods to bless some Rare Candies upon you. You'll normally always get atleast 15k+ worth of items every time you do it. Dig Spots Here comes the real money maker of our guide: Dig spots will basically either skyrocket your savings or troll you extremely hard and give you a lot of basic stuff such as pokeballs and evolution stones that might help a bit, but not as much as getting rich, which is our aim right now. Dig spots require you to either own a Shovel or a Pokemon in your team who knows the move Dig (can be taught with the TM number 28 which can be bought in Celadon Department store and other places, can also be learned upon level up by Diglett and Sandshrew). The pokemon must also have more than 150 happiness. Dig spots are spread across the world and you can look for them and their locations in the wiki (http://prowiki.info/index.php?title=Diggable_Patches). Digging these spots will either spawn a wild pokemon (some of which are really rare and useful for Kanto Story!) or a lot of rare and useful items you will make use of by selling or using them a lot. We will go over the route you should follow, what places you should really visit and which dig spots you can skip if you don't want to waste too much time while running on four accounts. Along this route we will also grab some hidden items and overworld items we can sell later on. The locations for dig spots in kanto are: Route 3, Mt Moon, Rock Tunnel, Route 14, Route 15, Diglett Cave, and if you have access to Sevii Islands (which requires having beaten Kanto E4 and having a Membership active (donate to the game, it helps improve it!) there are also in Water Path and Tanoby Ruins. Hidden and Overworld items. All along PRO there are hidden items spread everywhere which are very hard to find: some block your road and you'll accidentally bump into them, and you'll interact with them and grab them by accident thinking: "owo watz diz? *touches interact button and grabs item* basically. Other useful items are overworld ones which you'll see in the form of pokeballs in the overworld. There's way too many items in the game to name them all, but since I wanted to make this guide and allow anyone to become rich as soon as Kanto goes, I listed ALL of the monetary items findable in pro in a guide. In this guide, we'll make routes so that you can pick up as many of these as you can along your adventure, routing along certain specific spots and grabbing and picking up certain items. It will be a long process, but the amount of money you'll earn is insane. I will also detail what tools you will need to get to all required places. For now, look up all the places available in Kanto, since it's what matters for now, and it's (right now) directed towards newbies. Services and Trading This is basically the least profitable method in the early game. You don't have a macho brace (diggable if you have absurd luck, obtainable in an easy trade in Goldenrod) to give EV services (however, you can always buy it from someone else!), it would cost money and EV Safari wald costs 10k per visit, no access to mega high level areas to level up such as Cerulean Cave (however, you do have access to Smoke Balls in wild Weezings and Koffings in Cinnabar Mansion and False swipers in Cubone, since it learns it at level 27 in Rock Tunnel), no access to reliable Sync hunting methods (you'd have to hunt Abras forever... you'd be required to have a Diglett with Arena trap, which is not hard to get, but they're tier 6 and they take forever to hunt in the early game), basically nothing that is profitable right now. What you have to do is to trade. Sell the Rare Candies you obtained along the way during pokestops, dig spots and hidden items for around 7k each in trade chat. Never go for a lower place. Try to buy Kanto synchs (natus obtained in route 28 by more advanced players) that can be useful for your story and that you can invest in hunting pvpable pokemon that are immediately sellable untrained such as Gastly, which requires no black medallion, is tier 1 in Vermillion Graveyard (as early as pre 3rd badge) and is extremely easy to hunt and sell. However, I heavily do not suggest you to do this now. I suggest that you invest from 5 to 10k per natu synch nature to hunt useful pokemon with good natures for your story. The Kanto later gyms are pretty hard, and the E4 is a mindless grind without using decent pokemon. Bosses For now, your option to do Bosses is near impossible and almost non-existant. You can't obtain a macho brace unless you trade, can't obtain most boss pokemon unless you trade, you would only be able to make a team with insane synchronise luck and only kanto obtainable pokemon (Slowbro, Gyarados, Steelix, etc). You would be extremely restricted when it comes to options, have next to no resources unless you save up with 4 accounts doing all what this guide recommends you and someone helps you out A LOT. Aside from that, you'd have to buy exp services since you don't have access to Cerulean Cave, you don't meet almost any requirements for any boss... yeah, you get the point. Bosses should be skipped ATLEAST until you beat Johto E4. However, if someone lends you an entire Kanto Only Boss Team, then try out your luck! They require a lot of strategy, but if you believe you can do it with these teams, then try it out! Here you can have more info about it. https://prowiki.info/index.php?title=Bosses Trainer/Wild battles If you have a Membership active, one of your options is to fight wild battles as it will double the money gain you earn (and this is basically the last resort once you've done everything else). My recommendation is that you fight every single trainer you find after earning the 4th badge, and that you grind money in Kanto (if you've not beaten the E4 yet) fighting wild pokemon and leveling up at the same time (it will pay off, trust me) in Seafoam Islands B4F, Cinnabar Mansion and Victory Road B3F. It is incredibly worth it to train your pokemon nonstop. Avoid trainer battles before the 4th badge that you believe you don't really need. Trainer battles reset after 7 days, so refight them if you're desperate for money! Reroll Ticket Quest If you donate five Fossils to the Pewter City Museum (Dome Fossil, Helix Fossil, Old Amber, Claw Fossil and Root Fossil), you'll be able to claim a Reroll Ticket. This can be once per account, up to four accounts (as you're allowed to).. This IV Reroll Ticket can be sold in Trade Chat for over 650 or 700k per ticket and will give you alarming amounts of money while in Kanto. However, there is an issue: To donate these fossils, you need the Caught data in your Pokedex of Kabuto, Omanyte, Aerodactyl, Anorith and Lileep. To revive Anorith and Lileep, you need to first find the fossils in dig spots, revive Dome and Helix fossil, level Omanyte and Kabuto to obtain Omastar and Kabutops evolved data, and THEN go to Ruins of Alph and revive Claw and Root fossil after having dug them up to obtain their seen data. If you want to skip all of this trouble (aside from just reviving Aerodactyl, Omanyte, Kabutops in Cinnabar and the other two fossils in Johto), simply do Dig Spots a few times until you have dug these 5 fossils. Then, ask a friend to trade you the 5 revived pokemon so you can get the Dex Caught data from them and you do not waste your fossils reviving them. Donate them in the museum, obtain the Reroll Ticket and sell it in Trade Chat for 650k or even more. Enjoy your free money! It can be done once per account. Route to Farm: Explanation We will now make a route that is easy to go around, requires just a bit of time and is plausible to do for any newbie. We will choose the two options and explain both of them: with and without hidden items. The difference between grabbing hidden items or not is the time difference, HM slave requirements and the fact that the hidden items do not have the same cooldowns as overworld items, and some items have different cooldowns (for some strange reason). Thus, I'll try to highlight which items do respawn and how often you should do every route. You should do the Pokestop route every 36 hours, the Dig Spots every 72 hours and the Item route every 14 days (yes, I can't multiply 14 x 24 because I failed maths in highschool, don't bully me okay?) Remember: You need to have beaten the 4th badge (and preferably, the 5th and have access to HM Surf) to do all of this. This is very early in the game, and the route is planned to help you as much as it can to fight Sabrina and the next leaders and E4. Missions can be done as early as having no badges, but you need to have beaten the 4th badge to be able to reach ALL Kanto dig spots and that Pokestops will give you items. If you talk to them before you earn the 4th badge, they won't give you anything and disappear for 36 hours! If you want to do Pokestops and Dig Spots, I've designed a route that works for both things at the same time so you do not need to learn different routes. If you also want to take overworld items and hidden items into account, you'll have to do small detours at the beginning of Kanto, and at the end, there will be a bit of exploring Seafoam Islands. I will try to explain the combined route and add the hidden items you can find as extras. Remember I put the link with all the locations above, it's super detailed, check it out! We will start in Viridian City. Here, go to the bottom left part, cross the bridge and grab the pokeball to get a Rare Candy. It respawns every 7 days. Go in front of the gym and talk to the pokestop. Go north until you reach Viridian Forest, reach the Viridian Maze Tree, then grab the hidden rare candy on the left behind the tree (use the link above for hidden items). Talk to the pokestop on the right of that tree. Head to Pewter City and talk to the Pokestop on the top east corner of the city, east from the Museum. Head to route 3 and immediately go down. Check out all stones (there's a Stardust hidden in one of them), grab all dig spots, continue through route 3 and grab the next dig spots. Reach the Mt Moon pokecenter, talk to the pokestop and enter the Pokecenter to have a reset relog point. (This is just to come back after you grab all dig spots in Mt Moon). In Mt Moon, immediately go to the left and south to grab 4 dig spots next to the fat mountain guy. Go to the top right of the same floor and grab these 4 dig spots, go back to almost the entrance and go down the ladder. Grab the pokeballs along the way, since one of these has a Star Piece (the one when you just went down the ladder). Go deep in that ladder path and you'll find a few dig spots. Leave the ladder, go to the top right as you did before to grab those 4 dig spots, but now go to the left, go down that ladder, grab the next dig spots and relog in any wild fight. Afterwards, use the dig shortcut to skip Mt Moon, then head to Cerulean Cave entrance, surf and talk to the Pokestop after having crossed Route 4 (if you do not have surf yet and are doing this at 4 badges, ignore this one, go to Cerulean and continue). Go up to route 24, head to route 25 and talk to the next Pokestop there. Go south to Cerulean, then south to route 5 and talk to the next pokestop. Go to the right of Cerulean and get to Route 9. Reach Route 10, enter the pokecenter, talk to the pokestop, then go north to route 9, surf to the Power Plant, talk to the pokestop and enter a wild battle and relog to teleport to the pokecenter. Enter Rock Tunnel, grab the 6 dig spots, leave in the same exit you entered, use the dig hole skip to reach Lavender's side, enter Rock Tunnel again, head to the left ladder and grab the dig spots by going down and up the multiple stairs (spoilers: there's a lot) Now leave south for Lavender and enter the pokecenter, leave it and head south to route 12. Go south and grab the Rare Candy mentioned in the guide above, then head south nonstop until you reach routes 13 and 14. In route 14, grab the dig spots in the southeastern corner, head west to grab the dig spots in route 15. Now you can choose to take a detour: If you have surf, go to Fuchsia, head south to route 19, then go to the west and enter Seafoam Islands. Use the guide above to get around 20k in value in worth of items, then enter a wild battle, and relog. If you do not have it, relog after grabbing route 15's dig spots. Go to Vermillion, grab the Pokestop in the Harbor, enter Diglett Cave to grab the last missing Kanto pokestop and go through it to grab the remaining 8 dig spots. Congratulations, you just earned an absurd amount of money! If you have surf, beat Kanto e4 and have a membership active: grab the dig spots in Tanoby Ruins and Water Path (Sevii Islands, deep into the quest, it's pretty fast and they're worth it!. The route 27 rare candy, the love island one (if you have access to it, you need 120 Kanto native pokes caught data in dex and 38 evolved. Talk to Oak in Pallet Town to know how much progress you've made!) There's a LOT of hidden items worth a lot in the Sevii Islands. Visit them! Remember: You can do Pokestops every 36 hours, Dig Spots every 72 hours and Items every 2 weeks. Enjoy the money! I hope this helps newbies a lot Johto Here we have the second region of the game which encompasses the second generation, the Johto Region! Similar to Kanto, it has a lot of resources to search from! Pokestops Following Kanto's same procedure, there are nine Pokestops spread across Johto's map. They give the same approximate rewards and they're still profitable too as you can get PP UP or Rare Candies with some luck. However, there's a catch. You can only access Pokestops after you obtain the 8th badge! Thus, I do not recommend you do any route for Johto until you reach the 8th badge (as you can't dig early in the game, either). The pokestops are in: Violet City Union Cave Slowpoke Well Ilex Forest National Park Burned Tower Olivine Lighthouse Lake of Rage Dark Cave (Blackthorn Side) Dig Spots As there were Dig Spots in Kanto, there are also Dig Spots in Johto! Sadly, there's only 3 different locations instead of the massive amounts of locations where dig spots would be located in Kanto. However, there's a LOT of Dig Spots in all Johto locations, specially in Slowpoke Well, where RNG Gods normally bless you with absurd amounts of good monetary items. As mentioned before with the info in the Kanto Dig Spots, you can find them in Dark Cave starting from Violet's side, with some help using Surf and Rock Smash (and Flash, since I am incredibly blind, I cannot get through caves without it), Slowpoke Well (where there are dig spots literally EVERYWHERE, in both the entrance floor and the one below using surf) and Mt Mortar, in which depths resides the Item Recycler, which we might use later. The ones in Mt Mortar are in the 3 entrances available from the route east from Ecruteak. Thus, just go inside one room in all of them, dig the 4 spots in each room, leave and enter from the next entrance (one at the west, one at the east and one at the center while surfing). Hidden and Overworld Items As present in Kanto too, there are some Overworld and Hidden items really useful and thankfully, these are pretty easy to obtain! (Unlike Hoenn, which will be an incredible pain lol.) There's not many obtainable items in Johto, but there's a lot of Nuggets and they are all easy to obtain. Aside from that, only two require some extra stuff (such as the Forest Pit one), unlike Kanto's, a lot of these before required to have beaten Kanto's E4 or have done sidequests or fulfilled a lot of requirements. We will be picking up some nice juicy Rare Candies too while on the way to our routing! Bug Catching Contest The Bug Catching Contest is... unreliable at its best. However, it's still a somewhat good way to make money. I'll go straight to the point: If you get first place, you gain a lot of money. However, that's not even 2 nuggets worth of prizes and it's only every 24 hours. We are not focusing on the Contest itself for that. (Check out more info:) https://prowiki.info/index.php?title=Bug_Catching_Area What we are focusing on is the incredibly rare wild pokemon that exclusively appear here. You have 20 minutes to hunt very rare pokémon and try to sell them later once the contest is done. There's a long list of sellable pokemon here. I don't recommend doing any of this, to be fair, as selling will be complicated unless you get a really good pokemon (Larvesta, for example). Nonetheless, I'll leave you all of this info linked, so that you can give it a try! Services and Trading After having reached Johto, a lot of possibilities open up! You gain access to the Macho Brace in Goldenrod, thus allowing you to give EV Services. You also unlock Dragon's Den and, with a lot of hard work, you can unlock Cerulean Cave. You also gain access to Mt Silver after the E4, and thus, you can start giving EXP and EV Services. You also now are able to trade more stuff from the two regions that you find around and you can try your luck in the Bug Catching Contest and capture really rare pokemon and sell them. Johto Spawns also give you the chance to find a lot more rare pokemon and if you're lucky, sell them for some nice money! You can also sell Synchs you find in Ruins of Alph and Route 28! Get them, they're easy money! Bosses In Johto, you can't really do many bosses as you've just gotten into the second region and you might not yet have a boss team. However, you can actually build one easily: get a macho brace in goldenrod, a smoke ball from wild koffings and weezings, natu synchs from ruins of alph (or route 28) and get a few boss pokemon! To give you an example, you can get two Memento Weezings, a Sturdy Hazard Forretress, a Screen setter Bronzong, a Paralyser Chansey and a sweeper Volcarona. They're all perfectly obtainable in the first two regions and are a near perfect team to fight all bosses in PRO. Good luck! Trainer and Wild Battles So we have some good news here: You can now farm money while fighting pokemon in Dragon's Den! You can get up to 550 pokedollars per fight with ms active, which is quite a lot (20 pokemon = 10k! That's not bad!) and if you unlock Cerulean Cave, the number goes up to 620! Aside from this, you can also do the same process as you did after Kanto: just defeat all trainers after the 4th badge. I heavily suggest grinding in Dragon's Den while surfing to get some easy money. Route to Farming We'll do the same as we did in Kanto: We first need to explain that to obtain the Pokestop prizes from them, you actually need the 8th badge in Johto, in contrast with the 4th badge of Kanto (I have no idea why). Thus, it is more recommendable that you simply skip dig spots until you've beaten 8th badge so you can farm dig spots, pokestops, hidden items, trainers and dragon's den in that order. I will also design a route that takes pokestops and dig spots into account while grabbing hidden items. I will also add the optional hidden ones you can grab or the ones that are harder to obtain but might be worth it (the deep sea tooth one for example). I suggest you bring a lot of hm slaves because you'll really need them. We will begin in Violet City, by grabbing the hidden rare candy behind the gym sign, and talking to the pokestop next to Bellsprout Tower. Afterwards, we will head east to Route 31, dig to the other side and talk to the pokestop. Dig to route 31 again and enter the cave, go into its depths using rock smash and dig the 5 spots inside. Relog in a battle to appear in Violet. We will head south until we reach the Union Cave, talk to the Pokestop and use the dig shortcut. We will talk to the Pokestop in Slowpoke Well and instead of heading inside, we will go to Ilex Forest and talk to the next pokestop. Now go inside of Slowpoke Well and pray to the RNG Gods while you dig all of the first floor and second floor, which will (if you have a bit of luck) make you rich like Jeff Bezos. Relog in a wild battle after you've dug up everything. We will now head west from Violet to the National Park, grab the pokestop there and go south to route 35. Surf and grab the hidden Nugget under the Berry Tree and relog in a wild battle. Head to Ecruteak and enter the Pokecenter, we will use it to teleport two or three times. Talk to the Pokestop in the Burned Tower and grab the Nugget in the second floor inside, relog in a wild battle. We will ignore the Bell Tower Rare Candy since it's a bit hard to obtain. Take it if you want, but it takes ages to grab it. Now, we will assume you have not reached Hoenn yet, and thus, we will not take the route to Olivine yet. We will now go to the east route from Ecruteak, enter Mt Mortar from the left entrance, grab the dig spots, use the dig shortcut outside, enter from there and grab the dig spots, leave, surf to the left and enter Mt Mortar again. dig the spots, go down the ladder and grab the Rare Candy in the north. If you've beaten Johto E4, go deep into Mt Mortar and grab the other hidden item in Forest Pit (check the guide I linked before). Relog in a wild battle, and if you're willing to, travel to Lake of Fury, grab the pokestop there and relog. It's positioned in a really awkward place to reach, so there's basically no other choice than just going there and relogging in a fight. We will then go to Olivine City, but before reaching it, grab the Nugget in the Lampost in the northern exit (check the guide), grab the Pearl in Olivine City near the gym in the small fence, grab the Rare Candy in front of the Lighthouse and talk to the Pokestop. Everything in Johto is done now, but if you want an extra: Surf south from Route 41, grab the hidden items along the way, Pearls and Deep Sea items, and reach Hoenn (if you completed the requirements!) Hoenn Here we access PRO's third region, based on the third generation (wow, who wondered). Spoiler alert: Hoenn SUCKS at making money. The main issue with the region is the absence of dig spots, pokestops and other resources we had in previous regions. Furthermore, the distance between hidden items is absurd, to absurd extents. Yea, it sucks. Hidden and Overworld Money Items We'll start with a few good news: Hoenn is FILLED WITH AN ABSURD AMOUNT OF VALUABLES. By absurd, and by writing it in caps, I mean there's a LOT of GOOD money to gain in Hoenn. There's items practically everywhere in the map. You'll become a multimillonaire quicker than I can pronounce potato. See? You already own a company. You're rich! They're mainly placed in water zones so you'll need surf, and you'll also be able to obtain the Deep Sea items after the Hoenn E4 to get to Sinnoh. Services and Trading In Hoenn, you'll be able to find highly valuable pokemon such as Timburr, Ferroseed, and other really, REALLY good PVP/Bossable pokemon that can easily be sold for absurdly high amounts of money (also one of my favs like Deino). I really recommend you take the time and visit Valley of Steel, a zone where you can catch really rare stuff, and that you travel around Hoenn and find incredibly rare pokemon. Do it, boy, DO IT! You also gain access to Hoenn pokemon, so I guess that's good lol. You'll be able to sell and buy more stuff. Also, hunt Gibles on the Moon! Excavations While I do not generally recommend excavations to make money, it's still worth it in the VERY long run, or in the very lategame of PRO. You need 100k pokedollars to unlock them. You also need to pay 2.5k pokedollars to enter an excavation (guess why I didn't recommend them to make money in the first place lol). You can farm certain rare pokemons there by bringing your sync pokemon with you and capturing rare pokemon with correct natures to resell them. You can also farm artifact pieces to purchase rare items and fossils to resell whatever stuff you obtain. If you also happen to find rare bones, you'll be able to sell them to an item maniac. I don't recommend it, but well, it's really fun to try it daily. Mushrooms If you go to Petalburg Forest, you'll find a lot of shrooms there. If you talk to them, you can harvest shrooms to later sell them in the pokemon maniac. If you bring a Paras/Parasect with you, the next time you gather the shrooms, they'll have multiplied. I really recommend doing this since it grants a lot of extra money. Do this every 2 weeks, with Paras and Parasect in your team. It's free real shrooms! Bosses Hoenn has a nice amount of extra bosses to fight against, and I recommend doing the optional fights vs the overworld pokemon minibosses too. Farm them every 2 weeks fo some nice money, if you get lucky, you might get PVP items to resell! Trainer and Wild Battles My suggestion here is to fight EVERY TRAINER that is placed after the 5th badge in Petalburg. Thus, after surfing from Mauville (or surfing southwest from Petalburg or south from Slateport), fight ALL THE TRAINERS YOU FIND. They give a decent amount and there's a massive amount of trainers in Hoenn. (That's why it's really painful, mainly). Also, be aware that almost all of them will be swimmers, so bring a surfer with you. Route to Farming The route in Hoenn is easier to follow than before. if you start in Lilycove, we'll start a clockwise route by defeating everything in our way, picking up hidden items and reaching Slateport. From there, we'll go south until we get to Dewford, destroying everything and picking up hidden items, We'll go north to Rustboro, grab the pokecenter there, grab everything in Oldale and Route 103 and Route 110 and teleport back. We'll go north to Meteor Falls to pick some hidden stuff (Stardust) and we'll go south afterwards and reach Mauville, from there, it's just going back to Lilycove. I suggest starting in Lilycove. We'll go east to route 124, beat everything and pick whatever items we find. Reach Mossdeep, go to the north and defeat everything, enter route 135 if you have beaten the E4 and pick the Deep Sea Items. Go south again, and from Mossdeep head south. Continue picking up items as you visit all water routes and keep defeating everything for money. Continue south and then reach the water town to the west. Continue your journey until Slateport and grab the pokecenter there. Go north to route 110, pick up the stuff there (including New Mauville), pick up the stuff in route 103 too and the Rare Candy in the town, get an encounter and log out to teleport back. We'll now go South from Slateport, go through the water routes fighting everything and grabbing multiple items until we reach Dewford. Repeat the same process north and reach Rustboro. Grab the pokecenter here because we'll visit Meteor Falls just to grab the stardust and teleport back. Grab the shrooms in the forest and then we'll proceed to go to Mauville through the route 116 tunnel, and then go east. We'll go north until we reach Fortree while fighting everything and then go down fighting all trainers until we reach Lilycove. Sinnoh We will now dwelve into PRO's fourth and (currently) final region. Sinnoh has (Thankfully) some stuff to do and grind, such as Dig Spots, the Battle Tower (although I won't cover it here because it doesn't grant you an important gain), and the aforementioned activities you can do. However, the issue with Sinnoh is its weird structure, as trying to grind trainers who are spread out throughout the region is way harder than in previous regions. In Kanto, you could do them in a circle, same as in Johto. In hoenn, you had to take two routes to defeat them. Here it's just a spread fest of trainers, but we'll eventually get there. There are no pokestops here, sadly. Dig spots Sinnoh brings back the Dig Spots mechanic for good: there are spread dig spots throughout the region and there are a lot of them. The best thing is that they usually carry some good monetary items you'll be able to sell and, if you get lucky, you'll dig up some rare pokemon that are otherwise extremely hard to find (yey). There are Dig Spots spread around: The first ones are in the cave above Jubilife city, then to the east of Eterna City, before and after the dig spot shortcut, and if we head east from Celestic Town, we'll find more. We'll then go to the Southeast to Veilstone and head southwest through the tunnel to find more dig spots and end up in Solaceon. We'll finally head south to Hearthorne while grabbing the dig spots on the way and climb Mt Coronet to find a few dig spots on the summit (Although I don't really recommend grabbing these, they barely ever grant anything useful and they're just hard to find and get to). We'll return to Jubilife and make a small trip to the east, enter Oreburgh Gate and surf in the floor below to grab the last dig spots. Hidden and Overworld Items The Hidden and Overworld items in Sinnoh suffer from the exact same problem as Hoenn did: While there's a lot of interesting and good hidden items we can sell, they're really spread out. Some are super far away (one is near Snowpoint, the Ice Stone to evolve Alolan Vulpix), and some are near other hidden items, in good grinding areas versus high level trainers (Victory Road), but still far from other places. However, I highly suggest grabbing them all, even though they're all spread in weird places (such as the south of Sandgem Town). Services and Trading Fun and weird fact: Sinnoh actually doesn't have all that many interesting pokemon to hunt that are not found in other regions. It mainly has some niche stuff that you can use in PVP and hunt down, but not that much. However, what we can make use of it is the fact that we'll now have unlocked ALL region accessible pokemon in the world and thus, we'll be able to trade anything in the game we're interested in and we'll resell it. Heliolisk is a nice pokemon to hunt, such as Metang! Bosses Such as with previous regions, Sinnoh has MANY really difficult bosses (it's normal, considering by this point in the game you should've become an advanced player and close to an expert in PRO), as you have progressed into the game. It has really high rewards for each of them and I highly suggest you fight them all. You can gain really interesting items and a LOT of money if you get lucky enough. Trainer and Wild Battles Fighting trainers in Sinnoh is... weird. You should fight all trainers after the 4th gym, but they're all over the place. You would have to fight these around Canalave, Pastoria, the route to Snowpoint and the mountain and the ending part of Sinnoh in the southeast of the world, and the Victory Road trainers. It's a bit complicated to get to all zones, and to also fight the trainers in MT Coronet. The route is just uncomfortable because it demands that you go to all places in Sinnoh, practically, instead of just being able to cross certain routes. If you're still in, however, get ready to travel and fight A LOT. Solaceon Daily Quest In Solaceon, you can find the News Reporter Building. There, you can show them the pokemon they will ask you every day. If you do this seven consecutive days, the last day reward can be a Reroll Ticket or other super big prizes. You will also obtain Master Balls and other extremely useful stuff for players that can be traded and sold in Trade Chat. These pokemons will range from the Starters in Sinnoh to the last Sinnoh Pokemon. The list is entirely comprised of SINNOH DEX POKEMON. The other requirement is that YOU MUST CATCH THESE POKEMONS YOURSELF. THEY CANNOT BE FROM ANOTHER PLAYER. Route to Farming The route in Sinnoh can be a bit weird, considering it's mainly a square we can more or less navigate through, but it has weird extensions (Canalave, Snowpoint, the eastern part) where you will basically get a bit lost to be able to farm money if you want to obtain extra stuff. If you're not into losing too much time to gather money, just do Dig Spots and Bosses in Sinnoh. It's not a big deal, you can make up the small money you would earn from trainers via grinding pokemon instead. We will try to start in Canalave, taking the southern Big Pearl and moving east onto route 218, grabbing the Rare Candy. We will enter the pokecenter in Jubilife, travel to the starting town to get the rare candy, then going to Sandgem Town (as we crossed earlier) and going down to the water routes, fighting everything in our way and picking up the hidden items. Relog while in battle and we'll head north from Jubilife, do the Dig Spots in the cave and continue and exit to the north to the next town. We'll continue north to Eterna to enter the pokecenter, go south to the route under the bike lane to pick up another item, relog in a fight and head east from Eterna. We'll pick up the dig spots in both sides of the mountain, enter the pokecenter in Celestic, and optionally, we will take the time to enter Mt Coronet, fight all galaxy members, then pick up the Mt Coronet dig spots, relog in a fight, travel through Mt Coronet and leave through the northern exit. We will fight all trainers in the snowy route until Snowpoint and pick up the Ice Stone in route 217. This part is optional, but really worth it! After this, we'll head east from Celestic, pick up the Nugget, dig spots and then head southeast until we reach Veilstone. If you want, enter the pokecenter here, then head south and decide: If you want to do the optional route, fight all trainers going south, then going east to the last gym badge city while picking up the hidden items on the route. You can also try and go to Pastoria and find the hidden items around the city, but this is pretty time consuming. Once you reach the last gym badge city, go north, fight everything, grab all hidden items in Victory Road and fight the trainers there. Find a wild encounter and teleport back. Now you can continue the normal route, do the dig spots in the tunnel and reach Solaceon, go south and dig the other last dig spots. Reach Hearthorne, enter the pokecenter and optionally, pick up the Mt Coronet dig spots if you didn't pick them up before. Go through the mountain to reach Oreburgh, to enter Oreburgh Gate and pick up the last dig spots in the region and thus, congratulations! You've done everything in this guide Enjoy your money now!
- 29 replies
-
- 13
-
-
Hello everyone! After search a bit about all bosses, compare their teams, trying to find counters etc.. i ended up making this team that can defeat any boss in the game. Might take a bit getting all this pokes but 100% worth to do it. HOW TO USE IT If the first pokemon used by the boss is a physical attacker you should put Gyarados, Intimidate will cute his attack, now you keep switching between Slowbro and Gyarados until you cut all enemy pokemon attack. After that you are going to put Umbreon and spam Flash. Now you can use Snorlax and stack amnesia and curse, if snorlax dies you repeat the process and stack clefable or Slowbro depending on the boss team. If the first pokemon is a Special Attacker use Umbreon and spam Flash, then use Snorlax/Clefable/Slowbro to stack! Chansey will be your cover when needed. Click here -> https://pokepast.es/0f667c474a81e8ef Enjoy and if possible Like/Bump the post!
- 13 replies
-
- 11
-
-
Its the best im going to do. Let us begin the incomprehensible guide to the halloween event! Things you will need: Your standard boss killing team(aka level 100's) A pokemon with the foresight move and a pokemon with miracle eyes move(these will be important later on). Head to vermillion(or any port city with a ship to a different region) and then towards the gym, just south of the gym you will find a cosplayer wearing toilet paper, talk to him and head to murkytown. Once you are in murky town you want to talk to vice mayor butch and select dreadtown (you will need to go back there for dakrai later on so unlock it early) before leaving for dread town speak to all the npc's in murky and get yourself some candy. Once you have obtained said candy you are ready to move forward. Head north and talk to the spirits at the end of the path in the picture provided. You will then need to find all 3 spirits and the free honedge to progress to the next area. After you find all 3 + the free pokemon you are ready to talk to the spirits and move on, you need to head north until you see the pokecenter. Once you find the pokecenter head to down the path on the far right side and through unison cave. Continue heading east until you find the npc selling focus sashes, its a scam and gives you 5 expert belts. then you need to go towards the south east to talk to an npc who wants 5 candies to enter dreadtown. Once you go into dreadtown you will need to head north to mayor vlad, you will need to beat the mummy in front of the castle then you will need to beat mayor vlad. After you beat vlad you will notice a hole in the wall just right of him, this is for later, ignore it for now because its the entrance to necropolis. Go back to the pokecenter you were at before dreadtown, then head north and beat mayor gorge who has giratina. Once you beat him head on back to murky town to claim your reward of a houndoom mount or vamp clothing, both come with a pumpkin hat. Once done you are ready for darkrai! <<<<Darkrai Part>>>> The two pokemon with the moves listed at the start will now be needed. make your way back to mayor vlad in dreadtown, to the right you will see a statue with a hole behind it, squeeze on through and make your way to necropolis. We shall start the darkrai quest here. Heal your pokemon and grab your foresight pokemon. Go slightly north to alucard castle, talk to girl up the stairs on the left side. She wants you to hunt down 3 ghosts, search every god damn tile for those invisible pokes. Once you have beaten all 3 go up the stairs to the left, and search every tile as you go there are more hidden pokemon(i believe there are 4 for the left side) Once you talk to the old man at the end he will want you to help is brother on the right side(this side has 10) search every tile along the way again. Once you have unlocked both staircases, head back to the pokecenter and grab the miracle eyes pokemon. You will need to search for the hidden alucard(mine was on the left side) he will most likely be next to the visible alucard, so just search every tile again.(most likely right next to the visible boss) Once you lose to him and head on to the edge of darkness. If you don't die more than 5 times before beating nightingale, you will get a clone starter when you grab the starter. Dont worry if you die in here, just make sure you never wake up. This area is a one time only area. Here you will be tasked with beating the real alucard without your own team. search all the sparkly bits to go to the dark realm. Grab your munna at the start and then have fun looking around, find the growlithe on the left side of the map who is surrounded by gastly. Grab the repel located in a ball nearby and use it to only fight 2 level 20 gastly, Once done growlithe will join your team! He will be the main one you need to level. Head to the north and enter the castle.On the right side of the room you will see a door to walk through, search all the cans and find the rats to get alolan rattata. To unlock the first healing station, just talk to the pc to the right of the cell containing the audino. You will have to beat a pokemon that is rather easy with growlithe. Then head through the passage at the top right of the map, to grab the fire stone located behind the electric fence. To unlock the fence talk to both pylons to fight a rotom. Make sure you do NOT do the ritual to obtain a firestone. In the cave where cubone is find the mudkip/talk to the lamps/talk to the murkrow for cubones bone to get cubone. Once you have the fire stone, level up your growlithe to my suggested level of 45 and evolve him. Once he is level 45 and evolved head on up to nightingale located up the stairs of the main room just before the first healing station. After you beat her, grab all 3 of the balls in the room. You WILL need the moon stone for later! Head back into the cave, and the doorway located in the southwest you will have to fight a battle against all 3 kanto starters and their evolution's at level 25. If you had less than 5 times you will obtain a clone starter of your choice. If you died more than 5 times or selected your starter before fighting nightingale they will just be a normal kanto starter. After this fight the amount of deaths does not matter so go wild. There are many pokemon around who will drop valuable items such as carbos, rare candy and other healing items. Once completed head on back to the first room of that building and talk to the clefairy, then talk to the bookshelfs to get a clue on the statues. Talk to the entei statue first, select volcanic eruptions. talk to the dragonite statue and select jealousy then dodge left. Talk to ho-oh to get the final clue, then talk to the cases with flowers to fight roselia to get clefairy(level this up and evolve it with the moon stone from nightingale to fight umbra as it can NOT be switched out). Level the clefairy to 35, evolve it and teach it soft boiled. After the clefable is leveled, you can go fight umbra which is located to the north in the cave for cubone. You will need clefable in the first slot and it can not be switched out. Now you are ready to head to the south of the main starting area, where the final boss waits in the 3rd floor of the castle. You can keep fighting his guards for easier leveling up, just after you fight his spiritomb and shiny spiritomb go heal at the audino and then his guards will be reset. You can also go around the map and fight the solo pokes for rare candies, ev items and healing items/revives. Once you hit roughly 65 on arcanine just keep attempting the final boss fight until you have a favorable fight against torterra and lucario. Once you beat the darkrai you will be teleported back to the real world, go pick up your false swiper, your timid sync, and anything else you need to catch him. Once you are ready head on back to alucard castle and back to alucards room where darkrai waits at level 50. Good luck There is a free reroll outside Alucard castle, you only get to keep one stat. Final edit: Special thanks go to Lilythana, Papfuglen, and Xurion for being my test dummies to allow for me to be able to put together a somewhat useful guide.
-
[spoiler=Halloween Candies Locations In Murky Town] Sandy [House 1]- 1x Halloween Candy [Free] Uno [House 1]-1x Halloween Candy, 1x Red Halloween Candy [Have to battle] Baswedan [House 2]- 1x Halloween Candy [Free] Annies [House 2]- 1x Halloween Candy, 1x Orange Halloween Candy [Have to battle] Officer Agus [Outside PC]- 1x Orange Halloween Candy, 1x Halloween Candy [Have to battle] Witch Neroli [PokeCenter]- 1x Halloween Candy [Free] Plumber Carl [PokeCenter] - 1x Halloween Candy, 1x Red Halloween Candy [Have to battle] Mummy Setnov [PokeCenter]- 1x Orange Halloween Candy, 1x Halloween Candy [Have to battle] Ghost Rafael [PokeCenter]- 1x Red Halloween Candy, 1x Halloween Candy [Have to battle] Ghost Ronnie- 1x Halloween Candy [Free] Now since we have collected these sweet candies, let's start the quest. To do so, we'll have to talk to Vice Mayor Butch. He'll tell us that recently, an explorer had discovered that many gems and minerals could be found on the Unison Mountain. As a result, the Mayors of two other towns (Mayor Vlad of Dreadtown and mayor Camelia of Serenia Village) of the Phantasm Land started fighting for that mountain which caused destruction everywhere. The only one who could stop them, Mayor Gorge of Murky Town had also disappeared. So he sees us as a trainer with great potential. Thus, we have to save Phantasm Land! He'll ask us to either stop the mayor of Dreadtown or Serenia Village. You can choose either of them. (Although choosing Dreadtown will save you 5 Halloween Candies and some time too!) [/Quote] [Anchor=GS][/anchor][Anchor=GS] [/Anchor] [spoiler=Hilda's Team] Florges Delphox Sylveon Excadrill Clefable Aromatisse After you've defeated her, follow the ladders inside and get to Camelia's House 3F. Here, Camelia promises us that she'll stop fighting with Dreadtown if we defeat her. It is pretty easy to defeat her. [spoiler=Camelia's Team] [spoiler=Camilea's Team] Gardevoir Krookodile Gastrodon Chandelure Sylveon Altaria Since you chose Serenia Village, skip the next part and jump to Mayor Gorge. [/Quote] [Anchor=Mayor Gorge][/anchor][Anchor=Mayor Gorge] [/Anchor] Dark Valley is to the North of Necropolis. It has got two or three trainers. There are some nice spawns there as well! [spoiler=Credits] Allsmell Omgupta3 Two to three of my images got deleted due to some reason. So I needed some help with the images. Waleed1301 Belzebel The banner was made by Robo-Shark (Deviantart)
-

finished ⚪ Johto Walktrough Videos/Johto Vídeo Tutorial ⚪
Navochan17 posted a topic in Quest Walkthroughs
Hi little boys! Today I give you the second full season of the Johto Region, I hope it helps new people, and without further ado I send you the links of the Video Walktrough: ¡Hola muchachitos! Hoy les entrego la segunda temporada completa de la Región de Johto, espero que ayude a las personas nuevas, y sin más rodeos les envío los enlaces de los vídeo tutoriales: Part 1: Part 2: Part 3: Part 4: Part 5: Part 6: Part 7: Part 8: Part 9: Part 10: See you in the third season the Region of Hoenn, goodbye~ Nos vemos en la tercera temporada, la Región de Hoenn, adiós~ Courtesy of Navochan17 Cortesía de Navochan17
-
Hi there, this guide will talk a bit what is a World quest and what you can win with it, so let's start. Next quest will be: 0.5% chance hour Discord Announcements included Content: -What is a World quest? -What do you need to participate in a World quest? -How world quest works? -Delivery -Reward -Birth island -List(know pokémons/possibilities) -Credits What is a World quest? -World Quest or "WQ", is a Event that appear with a chance of 0.5% each hour and the main objective is to caught many pokémons as possible to fill, IV requirement 80000-120000 cult's request with a time limit of 1 day (24H). To check if a world quest is active, it will appear at the top, near your party, this icon: The pokémons asked in a World Quest, are normally encounter in wild, with a tier 7, 8 and 9 with a message in game chat of the required Pokémon. Once a Player just logon without the information needed of the Pokémon required to fulfill, the only way to know it is by talking the ,Mysterious Cultist . Also, is not possible to return no-Original Trainer Pokémons and Pokémons that a player already had before world quest begun. All NPC Related with World Quest have Purple name on it. By complete a WQ , the top Icon will Disappear. What do you need to participate in a World Quest? There is no requirements needed to participate a World Quest, but is recommended to: -Complete All Regions -Complete Side-Quests -Unlock Islands and Side-Areas -Unlock Pokecenter - Train/Teleport -Complete MS Areas A player that wants to complete the World Quest Task , don´t need to talk with any NPC to start it, only to complete by deliver the Pokémon required . How world quest works? World quest, have a time limit of 24 hours in real life, but that does´t mean is the real time limit! Time to complete a WQ is variant, it will depend on all players Luck, remember, is possible to complete a world event by complete the cults IV request (IV requirement 80000-120000 ). A great advice deliver every time you can, you are always against the time! Is possible to check out how much Ivs a player have and the IVS remain to deliver by talking with a Mysterious Cultist. Delivery To deliver a Pokémon, talk a mysterious cultist , normally at any Region dock. Those are: Vermilion-Kanto, Olivine-Johto, Lilycove-Hoen,Canalave-Sinnoh. Reward To receive a reward you need to fulfill the requirement by 0.3.7% of it (400 - 600ivs), is equivalent of 4-5 pokémons "Trash" or 3/4 decent, with a possibility to receive at 0.6% a double reward. (Pokémons given to a cultist will be forever removed at Players Account and is impossible to take them back). The reward is always a Mystery Ticket that can be exchanged at Vermilion dock, to go Birth Island . BIRTH ISLAND Birth island is a area only accessible by using the Mystery Ticket at Vermilion port by talking with Mysterious Captain. New players need to Complete Sinnoh Region to access it. Players that once use a ticket to enter at the island, can leave and enter Birth Island till caught the Pokemon. Once caught a pokémon and player left the island, a ticket is required once more. Birth island have a chance of 50% to appear a player not caught legendary Pokémon. Those are: Second and third members of legendary trios, Lake Guardians, as well as the other Lati twin. Spawn lvl 80. (Legendary only appear with the required quest done). [TABLE] [TR] [TD] Second Members of legendary trio: [/TD] [TD] [/TD] [TD] [/TD] [TD] [/TD] [/TR] [TR] [TD] Third Members of legendary trio: [/TD] [TD] [/TD] [TD] [/TD] [TD] [/TD] [/TR] [TR] [TD] Lake Guardians: [/TD] [TD] [/TD] [TD] [/TD] [TD] [/TD] [/TR] [TR] [TD] Lati Twins: [/TD] [TD] [/TD] [TD] [/TD] [TD] [/TD] [/TR] [/TABLE] The others 50% will appear Pseudo legendary or very rare pokémons but with addition that those will appear with the Hidden ability if they have one. 100% to appear Pseudo Legendary or Very rare pokémons, to a player that already have all legendary listed above or legendary Pokémon quests not done. [TABLE] [TR] [TH][/TH] [TH][/TH] [TH][/TH] [TH][/TH] [TH][/TH] [TH][/TH] [TH][/TH] [/TR] [TR] [TD] [/TD] [TD] [/TD] [TD] [/TD] [TD] [/TD] [TD] [/TD] [TD] [/TD] [TD] [/TD] [/TR] [TR] [TD] Hydreigon [/TD] [TD] Lucario [/TD] [TD] Zoruark [/TD] [TD] Godra [/TD] [TD] Tyranitar [/TD] [TD] Rotom [/TD] [TD] Volcarona [/TD] [/TR] [TR] [TD] Levitate [/TD] [TD] Justified [/TD] [TD] Illusion [/TD] [TD] Gooey [/TD] [TD] Unnerve [/TD] [TD] Levitate [/TD] [TD] Swarm [/TD] [/TR] [/TABLE] Hope this helps. List of know Pokémons that can be at the requests: [TABLE] [TR] [TD] Name [/TD] [TD] Time [/TD] [TD] Dificulty [/TD] [TD] Image Pokémon [/TD] [TD] Kanto? [/TD] [TD] Johto? [/TD] [TD] Hoen? [/TD] [TD] Sinnoh? [/TD] [/TR] [TR] [TD] Pichu (Discovered by Bug at silver server) [/TD] [TD] Normal/Long [/TD] [TD] Hard [/TD] [TD] [/TD] [TD] Yes [/TD] [TD] Yes [/TD] [TD] No [/TD] [TD] No [/TD] [/TR] [TR] [TD] Magby(Discovered by Bug at silver server) [/TD] [TD] Normal/Long [/TD] [TD] Medium/Hard [/TD] [TD] [/TD] [TD] Yes [/TD] [TD] No [/TD] [TD] Yes [/TD] [TD] Yes [/TD] [/TR] [TR] [TD] Croagunk (Pokémon sinnoh only) 1st Official Task at Silver Server. [/TD] [TD] Long [/TD] [TD] Hard [/TD] [TD] [/TD] [TD] No [/TD] [TD] No [/TD] [TD] No [/TD] [TD] Yes [/TD] [/TR] [TR] [TD] Mienfoo 1st Official Task at Gold Server. [/TD] [TD] Long [/TD] [TD] Hard [/TD] [TD] [/TD] [TD] Yes (Reward Only) [/TD] [TD] Yes [/TD] [TD] No [/TD] [TD] Yes [/TD] [/TR] [TR] [TD] Emolga (Discovered by a bug at gold server) [/TD] [TD] Long [/TD] [TD] Hard [/TD] [TD] [/TD] [TD] No [/TD] [TD] No [/TD] [TD] Yes [/TD] [TD] Yes(ms only) [/TD] [/TR] [TR] [TD] Chatot (Discovered by a bug at gold server) [/TD] [TD] Long [/TD] [TD] Hard [/TD] [TD] [/TD] [TD] Yes(Headbutt) [/TD] [TD] Yes [/TD] [TD] Yes [/TD] [TD] Yes [/TD] [/TR] [TR] [TD] Klink (Discovered by a bug at gold server) [/TD] [TD] Long [/TD] [TD] Hard [/TD] [TD] [/TD] [TD] No [/TD] [TD] No [/TD] [TD] Yes [/TD] [TD] Yes [/TD] [/TR] [TR] [TD] Bergmite(Discovered by a bug at gold server) [/TD] [TD] Long [/TD] [TD] Hard [/TD] [TD] [/TD] [TD] Yes(Reward) [/TD] [TD] No [/TD] [TD] Yes(Reward) [/TD] [TD] Yes [/TD] [/TR] [TR] [TD] Inkay [/TD] [TD] Medium/Long [/TD] [TD] Hard [/TD] [TD] [/TD] [TD] Yes(Reward) [/TD] [TD] No [/TD] [TD] Yes [/TD] [TD] Yes [/TD] [/TR] [TR] [TD] Fletchling [/TD] [TD] Medium [/TD] [TD] Medium/Hard [/TD] [TD] [/TD] [TD] Yes(Reward) [/TD] [TD] No [/TD] [TD] No [/TD] [TD] Yes [/TD] [/TR] [TR] [TD]Helioptile[/TD] [TD] Long [/TD] [TD] Hard [/TD] [TD][/TD] [TD][/TD] [TD][/TD] [TD][/TD] [TD][/TD] [/TR] [TR] [TD]Togepi[/TD] [TD] Medium [/TD] [TD] Medium [/TD] [TD][/TD] [TD][/TD] [TD][/TD] [TD][/TD] [TD][/TD] [/TR] [TR] [TD]Gollet[/TD] [TD] Very Long [/TD] [TD] Very Hard [/TD] [TD][/TD] [TD][/TD] [TD][/TD] [TD][/TD] [TD][/TD] [/TR] [TR] [TD]Kangaskhan[/TD] [TD] Long [/TD] [TD] Hard [/TD] [TD][/TD] [TD][/TD] [TD][/TD] [TD][/TD] [TD][/TD] [/TR] [TR] [TD][/TD] [TD][/TD] [TD][/TD] [TD][/TD] [TD][/TD] [TD][/TD] [TD][/TD] [TD][/TD] [/TR] [/TABLE] -Credits: @Kaminokage - Confirmation of Lake Guardians spawn at Birth Island. Thank you! @PreHax - Confirmation of : Dwebble , Politoed, Durant - Removed. Thank you! Trivia: -The First and the Second World quest was been "Forced" to appear. -At the first world event at Silver server , show a long list and canceled the task "dweble" by a message at all silver server saying:"that's is a ms only Pokemon" and was been canceled, right away a new task appeared,Croagunk task. -Some false alarm appeared on Chat, same happen to Gold server at the first task by showing long list of false alarms. -Birth island at Pokémon Revolution , is inspired at Gen 3 Birth Island Mystery egg that appears Deoxys to caught at normal games. -It removed the Cultist that checks IVS percentage and made in one only. -All WQ Npcs changed to purple Text.
-
HELLo Trainers!! This is my second Guide and in this Guide i will teach you that how to battle with other Trainers and How to choose a good team for you. HERE IS SOME TIPS TO MAKE A GOOD TEAM FOR YOU --- - First You need some Good Tank pokes like Ferrothorn, Skarmory, Tangrowth, Rotom wash etc. - You can make following Types of Team - - Balanced Team - Offensive Team - Hyper Offensive Team - Stall - Weather - You can Choose any from the following team above. I am Choosing Offensive Team in This Post. - Offensive team - In these type of teams you need 1 poke to remove rocks and that poke must be Tanky and other 5 offensive poke. You can use 2 good Attackers and 3 Special Attackers. Now lets Build a Offensive team - 1. First you need a defogger so You can choose skarmory Or rotom wash. 2. 2nd poke you need attacker so you can choose Dragonite (with band). Dragonite banded is a Good Sweeper. 3. You need 1 more attacker so you can choose weavile, lucario or conkeldurr for 3rd slot. 4. Now you can choose a mew because mew can kill many pokes and can use many Type of element attacks like flamethrower, ice beam etc. 5. For 5th Slot you can choose a Goodra or manaphy. Goodra with assault vest is a Good Pokemon and Manaphy with tail glow. 6. Now you need last poke. You can choose Togekiss or Magnezone (with scarf) because magnezone can trap steel type pokes like Skarmory and Ferrothorn and Togekiss can flinch many pokes with air slash. MOVESET ---- 1. Skarmory (Rocky Helmet) - Defog ( to defog Rocks and Spikes) Whirlwind ( to Make damage with Spikes) Spikes ( to Damage your oppenent poke) Roost ( to Recover skarmory HP) Rotom Wash (Leftovers) - Defog Volt Switch Hydro Pump Pain Split ( to recover HP) 2. Dragonite ( Choice Band ) - Outrage -Extreme Speed ( Priority Move - Always Goes First ) -Earthquake -Fire Punch 3. Lucario ( Life Orb ) - Sword Dance ( Increases Attack 2x ) Extreme Speed ( Priority Move - Always Goes First ) -Close Combat -Ice Punch Weavile ( Life Orb ) - Knock Off - Ice Shard ( Priority Move ) - Low KicK - Ice Punch Conkeldurr ( Flame Orb ) - Facade - Knock Off/Ice Punch - Mach Punch ( Priority ) - Drain Punch 4. Mew ( Life Orb ) - Nastly Plot ( Increases Special Attack 2x ) - Flamethrower - Psychic - Vaccum Wave ( Priority Move ) 5. Goodra ( Assault Vest ) - Sludge Bomb - Flamethrower - Draco Meteor - Ice Beam Manaphy ( Life Orb ) - Tail Glow ( Increases Special Attack 3x ) - Scald - Ice Beam - Energy Ball 6. Magnezone ( Choice Scarf ) - Volt Switch - Thunderbolt - Flash Canon - Hidden Power (Fire) Togekiss ( Choice Scarf ) - Air Slash - Flamethrower - Dazzling Gleam - Aura Sphere Nature Of Pokemons - MANY PLAYERS ALREADY KNOW ABOUT THE NATURES AND ABILITY BUT NEW PLAYERS DONT KNOW ABOUT IT. SO, HERE IS THE NATURES AND ABILITY OF THESE POKEMONS - 1. SKARMORY ( NATURE : RELAXED/BOLD, ABILITY : STURDY ) ROTOM WASH ( NATURE : BOLD, ABILITY : LEVITATE ) 2. DRAGONITE ( NATURE : ADAMENT, ABILITY : MULTISCALE ) 3. LUCARIO ( NATURE : ADAMENT/JOLLY, ABILITY : JUSTIFIED ) WEAVILE ( NATURE : JOLLY, ABILITY : PRESSURE ) CONKELDURR ( NATURE : ADAMENT, ABILITY : GUTS ) 4. MEW ( NATURE : MODEST/TIMID, ABILITY : SYNCHRONIZE ) 5. GOODRA ( NATURE : MODEST/SASSY, ABILITY : SAP SIPPER ) MANAPHY ( NATURE : TIMID, ABILITY : HYDRATION ) 6. TOGEKISS ( NATURE : TIMID, ABILITY : SERENE GRACE ) MAGNEZONE ( NATURE : TIMID, ABILITY : MAGNET PULL) STRATERGYY - YOU JUST HAVE TO START WITH TOGEKISS AND IF OPPONENT IS USING ICE/POISON/ROCK/STEEL TYPE POKEMON THEN JUST SWITCH OUT TO SKARMORY SIMPLY. - NOW YOUR OPPONENT WILL SWITCH TO A POKE TO KILL YOUR SKARMORY, NOW YOU CAN USE SPIKES. - NEXT YOU CAN SWITCH TO SWEEPER TO BEAT HIM - YOU HAVE TO KEEP YOUR EACH POKEMON. TIPS- - YOU HAVE TO LEARN THAT HOW TO PREDICT, THAT IS SO IMPORTANT FOR PVP BATTLES. - YOU CAN DO PRACTICE WITH YOUR FRIENDS TO LEARN MORE ABOUT PVP. - YOU CAN CHECK ABILITY AND NATURE OF ANY POKE IN PRO OFFICIAL DISCORD SERVER. ( TYPE ^SMOGON POKEMONNAME ). IF YOU NEED HELP TO MAKE A TEAM THEN YOU CAN DM ( DIRECT MESSAGE ) ME ON DISCORD OR LEAVE A REPLY HERE. ^_^ [spoiler=MY DISCORD ]Mega Lucario#0202
-
HELLO TRAINERS WELCOME IN MY NEW GUIDE ABOUT HOW CAN WE TRAIN OUR POKES EASILY I DIVIDED ALL TRICKS IN TIPS SO READ BRIEFLY AND YOU ALSO CAN ASK ANY QUESTION HERE... HERE ARE SOME STEPS WHICH I USE PERSONALLY WHEN I TRAIN MY POKEMONS. TIP - 1 --USE FALSE SWIPER AND FOCUS SASHES-- FALSE SWIPE ( TM 54 ) - False Swipe inflicts damage, but will leave the target with 1 HP. FOCUS SASH - If the holder has full HP and is hit by an attack that would otherwise cause fainting, it survives with 1 HP. SO BASICALLY YOU JUST NEED AN FALSE SWIPER WHICH YOU CAN EASILY BUY IN 20-40K EASILY. NOW YOU NEED 3-4 FOCUS SASHES WHICH YOU CAN BUY IN 4-8K EACH OR 1 PVP COIN EACH. FIRST YOU NEED A BETTER PLACE TO TRAIN YOUR POKES. HERE ARE SOME PLACES WHERE YOU CAN TRAIN YOUR POKES EASILY. - VICTORY ROAD ( FOR KANTO CHAMPION ) - DRAGON DEN ( FOR JHOTO CHAMPION ) - CERULEAN CAVE ( WHICH YOU CAN UNLOCK IN 200K AND 240 CAUGHT DATA ) - DRAGON SHRINE ( YOU CAN UNLOCK BY GETTING 150 EVO DATA AND NEED A 100LVL DRAGON POKE IN YOUR TEAM ) NOW PUT YOUR SWIPER ON 1ST SLOT AND HOLD FOCUS SASH TO A POKE WHICH YOU WANT TO TRAIN. NOW BATTLE WITH A WILD POKE AND USE FALSE SWIPE EACH TURN UNTIL WILD POKEMON KILL YOUR FALSE SWIPER. NOW SEND YOUR POKE WHICH YOU WANT TO TRAIN NOW USE ANY DAMAGING MOVE. TIP - 2 -- USE FALSE SWIPER AND PRIORITY MOVES -- PRIORITY MOVES - ALWAYS GOES FIRST IN BATTLE. NOW YOU JUST HAVE TO DO SAME LIKE TIP-1. JUST DONT HOLD FOCUS SASH TO YOUR POKE NOW LET YOUR FALSE SWIPER FEINT NOW USE THE POKE WHICH YOU WANT TO TRAIN AND HAVE PRIORITY MOVES LIKE QUICK ATTACK, ICE SHARD, SUCKER PUNCH ETC. USE THAT PRIORITY MOVE TO KILL WILD POKE. THIS IS THE EASIEST WAY TO TRAIN POKE BECAUSE YOU CAN USE 3-4 FALSE SWIPER. TIP - 3 -- USE BRELOOM AND PRIORITY -- THIS IS THE VERY EASIEST WAY TO TRAIN YOUR ANY POKE. FIRST OF ALL YOU NEED 4 BRELOOMS 95 LVL+ WITH FALSE SWIPE AND A POKE WITH FALSE SWIPE. YOU CAN USE TRASH BRELOOMS TOO NOW PUT BRELOOM IN SLOT 1 AND GO CERULEAN CAVE NOW FIND ARBOK OR GOLBAT THERE WHICH YOU CAN FIND EASILY NOW BATTLE WITH THAT GOLBAT OR ARBOK AND USE FALSE SWIPE YOUR BRELOOM WILL DIE AFTER 2-3 HITS OF AIR SLASH OR GUNK SHOT/BELCH NOW USE YOUR POKE WHICH YOU WANT TO TRAIN AND USE PRIORITY MOVE NOW REPEAT THIS SAME TRICK WITH OTHER BRELOOMS YOU CAN TRAIN POKES EASILY BY THIS TRICK THANK YOU FOR READING MY GUIDE IF YOU NEED ANYTYPE OF HELP THEN FEEL FREE TO ASK HERE OR YOU CAN DM ME ON DISCORD TOO [spoiler=MY DISCORD]Mega Lucario#0202 [spoiler=MY DISCORD]
-
 Updated 20/12/2021 for toxic behaviour It might be best if somebody adds this to their leveling guide to avoid clutter, so I'm putting this in WIP for now. I've been using this method for over a year, but even after so long it doesn't seem as though the method is well-publicized. So, I decided to make a short guide myself. Video: https://www.youtube.com/watch?v=BuijK_ZA1mw tl;dr: Leech Seed, Leech Seed, Leech Seed, Toxic, Toxic, Memento, swap to your low-level pokemon. Memento method All you need: Jumpluff or Whimsicott. You can probably also use Lilligant and Cherrim if you teach them Healing Wish rather than Memento. - Toxic - Leech Seed - Memento/Healing Wish Execution is simple, just note that you can't use any damaging skills if you want the HP to be accurate, so spam Leech Seed or a non-damaging move (e.g. synthesis) until turn 4; Turn 1: Leech Seed deals 2/16 HP. (14/16 remaining) Turn 2: Leech Seed deals 2/16 HP. (12/16 remaining) Turn 3: Leech Seed deals 2/16 HP. (10/16 remaining) Turn 4: Toxic deals 1/16 HP. (9/16 remaining) Leech Seed deals 2/16 HP. (7/16 remaining) Turn 5: Toxic deals 2/16 HP. (5/16 remaining) Leech Seed deals 2/16 HP. (3/16 remaining) Turn 6: Memento faints your Jumpluff. Toxic deals 3/16 HP. (0/16 remaining) At this point, the enemy pokemon will usually have <15 HP remaining because most pokemon won't have HP divisible by 16. Switch in your low-level pokemon. Leech Seed will immediately take the remaining HP, fainting the enemy pokemon before it has a chance to attack. This works because the game currently recognizes the switch following Memento as part of the 'same turn' that Memento was used, instead of starting a new turn. Advantages: - Doesn't involve focus sash, false swipe, or sturdy. - Importantly, doesn't rely on priority moves, making it much easier to train many low-level pokemon. Depending on your EXP buffs and your luck with encounters, it takes less than an hour to get Magikarp from 5 to 95. Disadvantages: - Doesn't work against poison or grass-types, since they'll be immune to Toxic/Leech Seed. - Jumpluff has poor defensive typing/defensive stats and takes a lot of damage from rock/flying/poison, making Cerulean Cave land difficult when compared to water. Lilligant/Cherrim/Whimsicott won't have problems with rock, but Jumpluff is way more accessible to most players. - Your Jumpluff are going to hate you.
 -
HELLO TRAINERS WELCOME IN MY NEW GUIDE MY NEW GUIDE IS ABOUT HOW TO FARM MONEY EASILY ON PRO HERE IS SOME STEPS WHICH CAN HELP YOU TO EARN MONEY FAST AND EASILY STEP - 1 (DO BOSSES AND DIG SPOTS) 1ST OF ALL IF YOU WANT TO EARN MONEY THEN YOU SHOULD START DOING SOME BOSSES BOSSES GIVES A GOOD AMOUNT OF MONEY SOME BOSSES GIVES 10-20K AND SOME GIVES OVER 60K + SOME ITEMS TOO LIKE LIFE ORB AND OTHER GOOD ITEMS YOU CAN CHECK BOSSES COOLDOWN ON PRO OFFICIAL DISCORD SERVER DIG SPOTS - DIG SPOTS IS THE 2ND WAY TO EARN BUT IT ONLY GIVES RARE ITEMS SOMETIMES RARE ITEMS LIKE RARE CANDY, FOSSILS ETC. YOU CAN COLLECT A BUNCH OF RARE CANDY AND CAN SELL IN A BIG AMOUNT. STEP - 2 (HUNT GOOD AND META POKES) THIS IS THE BEST WAY TO EARN MONEY FAST AND EASILY YOU CAN HUNT META POKES LIKE GIBLE, TYRANITAR, DRAGONITE, DEINO'S ETC IF YOU WANT TO CHECK THE RARITY OF POKE THEN YOU CAN CHECK ON PRO'S OFFICIAL DISCORD YOU CAN GET THE ALL INFORMATION OF THAT POKE WHICH YOU WANT TO HUNT I HAVE 1 MORE TIP FOR YOU YOU CAN HUNT POKE AND AFTER HUNTING 3-4 POKES YOU CAN TRAIN THEM AND CAN SELL ON FORUMS EASILY STEP - 4 DO EV TRANING AND LEVEL UP SERVICES (DAYCARE) YOU CAN EARN A GOOD AMOUNT OF MONEY BY DAYCARE TOO YOU JUST HAVE TO SPEND SOME MORE TIME IN COMPARISION OF HUNTING BUT THIS IS EASY TO IF YOU NEED ANYTYPE OF HELP THEN FEEL FREE TO ASK ME YOU CAN ASK HERE OR YOU CAN DM ME ON DISCORD TOO [spoiler=My Discord]Mega Lucario#0202
-
Eumi Island Theme Park 1 [spoiler=Nugget] [spoiler=Rainbow Candycane] [spoiler=Red Candycane] [spoiler=2 Green Candycanes] Eumi Island Theme Park 2 [spoiler=Nugget] [spoiler=Red Candycane] [spoiler=2 Green Candycanes] Eumi Island Theme Park 3 [spoiler=Dusk Stone] [spoiler=Red Candycane] [spoiler=Green Candycane] [spoiler=4 Red Candycanes] Eumi Island Temple Entrance [spoiler=Nugget] [spoiler=2 Green Candycanes] [spoiler=Stick] [spoiler=2 Red Candycanes] [spoiler=Rainbow Candycane] Eumi Island House 3 [spoiler=Red Candycane] [spoiler=Green Candycane] Eumi Island Park Shop [spoiler=Rainbow Candycane] [spoiler=3 Red Candycanes] [spoiler=4 Green Candycanes] Eumi Island Theme Park Casino [spoiler=3 Red Candycanes] [spoiler=2 Green Candycanes]
-
Shell Bell is an item to be held by a pokemon. The holder regains a little HP every time it inflicts damage on others, the HP regained is equal to 1/8 of the damaged dealt. REQUIREMENTS: Pokemon that can surf or surf mount PROCEDURES: [spoiler=Route]Route 125 [spoiler=Talk to the Shell Bell maker]Hiker Stanley [spoiler=The 1st Shoal Salt]From the entrance Go directly to the entrance at the middle (and oh BTW you can only obtain shoal salts during low tide and that is from 03:00-8:59 and 15:00-20:59 poke time) [spoiler= The 1st shoal salt2]upon entering you will see a pokeball lying on the ground, that is the 1st shoal salt now go down to the ladder where the arrow is pointing for the 2nd salt. [spoiler=2nd Shoal Salt]Right after getting down from the ladder you will see the 2nd salt on your right side. The red arrow is pointing your way to the 3rd salt [spoiler=3rd Shoal Salt]Go up through the ladder go down to the ladder where the arrow is pointing to get the 3rd salt [spoiler=3rd shoal salt and finally your way to the last salt]to your right side is the 3rd salt [spoiler=4th Shoal Salt]now to get to the last remaining salt just enter the opening next to Sean We got all the salt but we cannot start cooking yet XD, we still need 4 more ingredients the 4 shoal shells take note we are only able to gather the shells during high tide and that is 09:00-14:59 and 21:00-02:59 poketime. now for the Shoal Shell [spoiler=1st shoal shell]from the entrance enter the right side opening the pokeball on your right side is the 1st shoal shell [spoiler=2nd shoal shell]just above the 1st shell is the 2nd shell [spoiler=way to 3rd and 4th shoal shell]go back to the entrance and enter the left side opening [spoiler=3rd and 4th shoal shell]the 3rd shoal shell is located on your leftand just right above it where the arrow is pointing is the 4th shell Now that you got all the necessary ingredients go back to Hiker Stanley and talk to him oh and one more thing
-
- 3
-

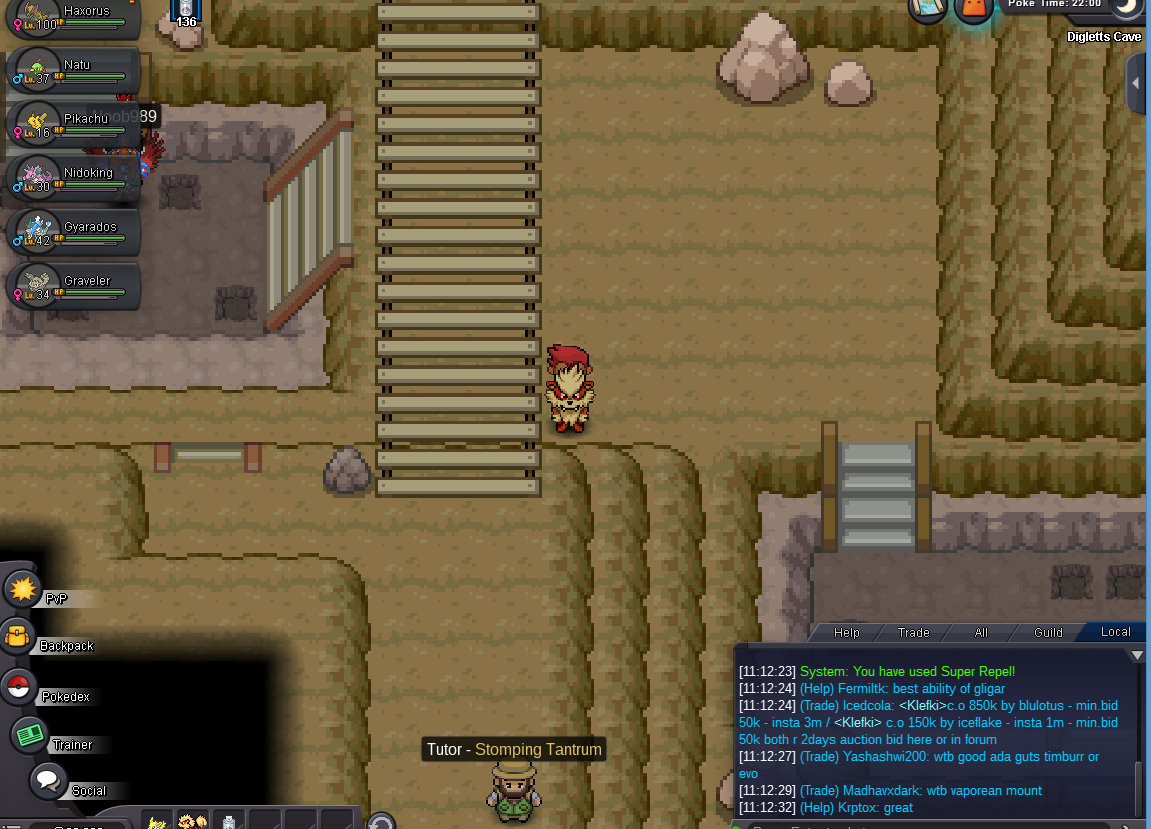
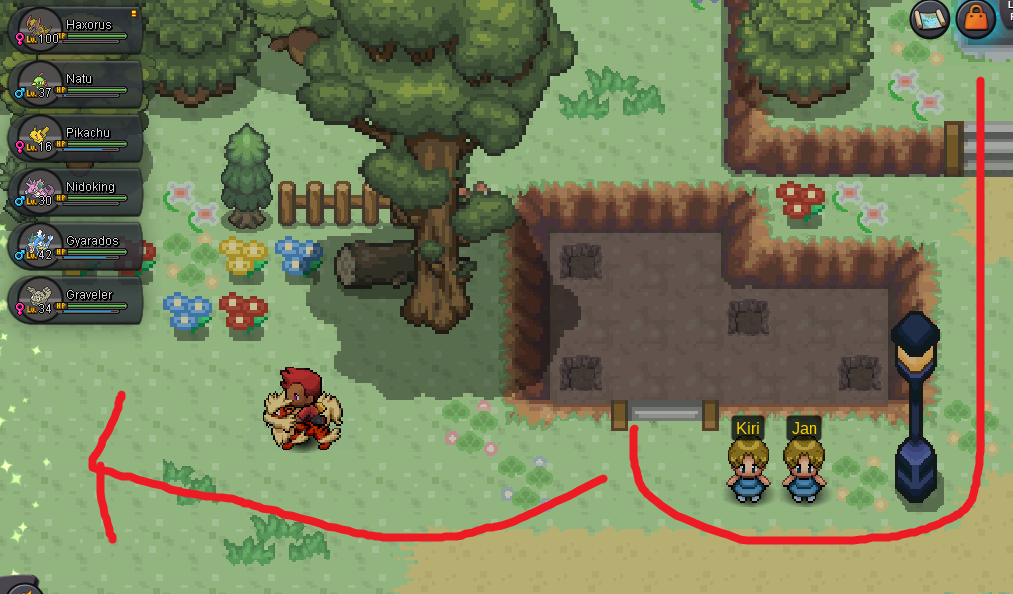
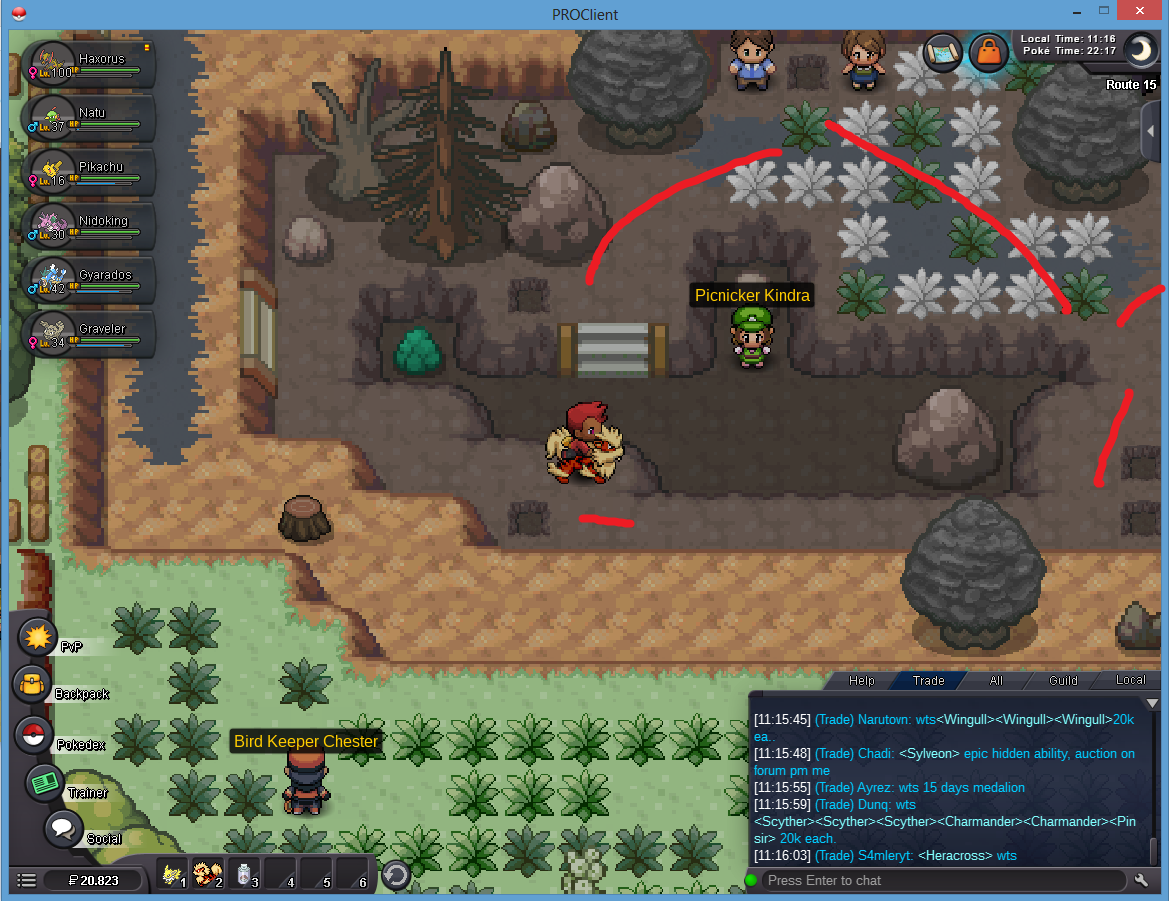
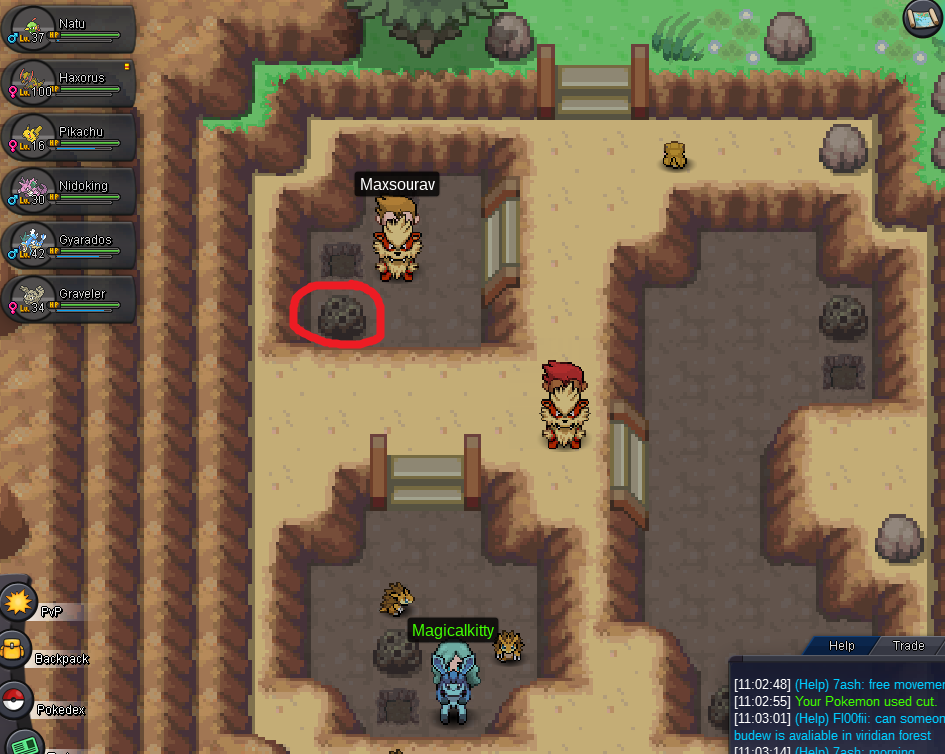
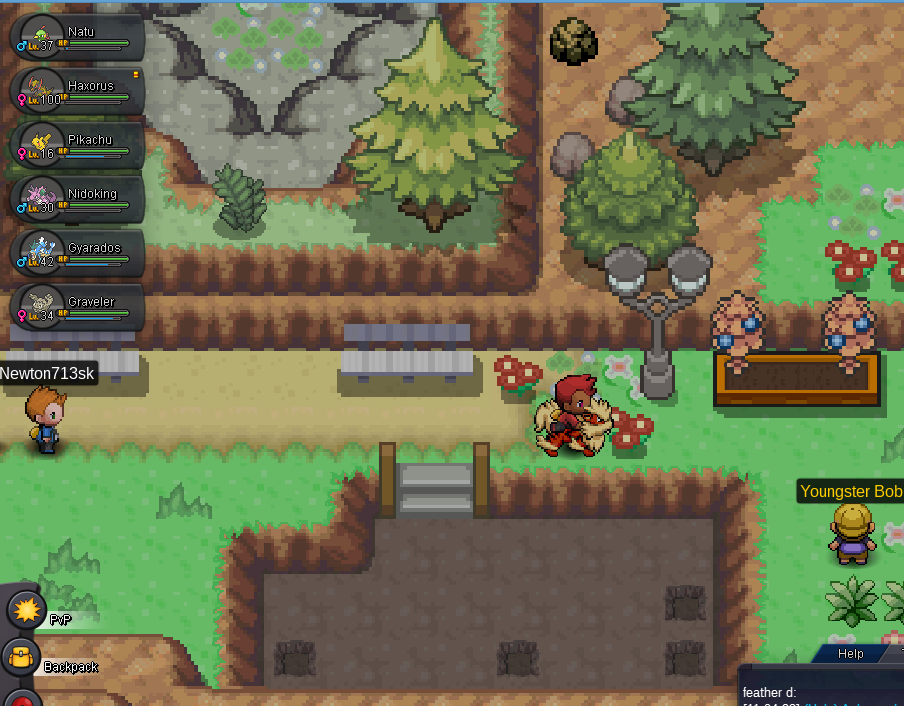
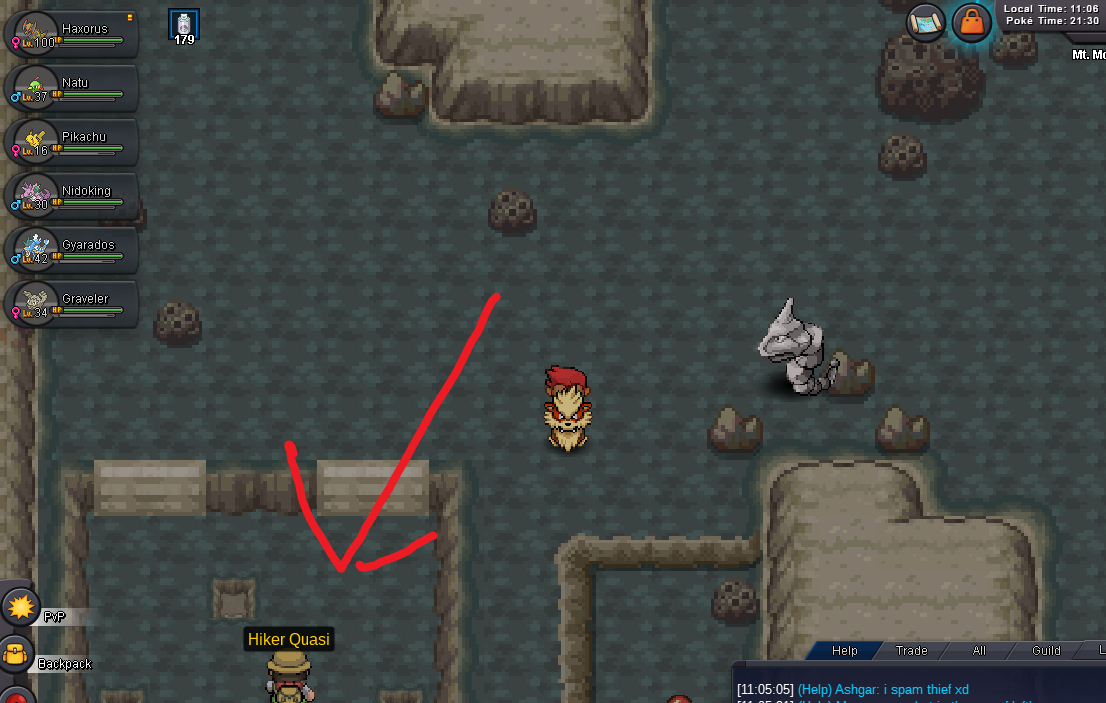
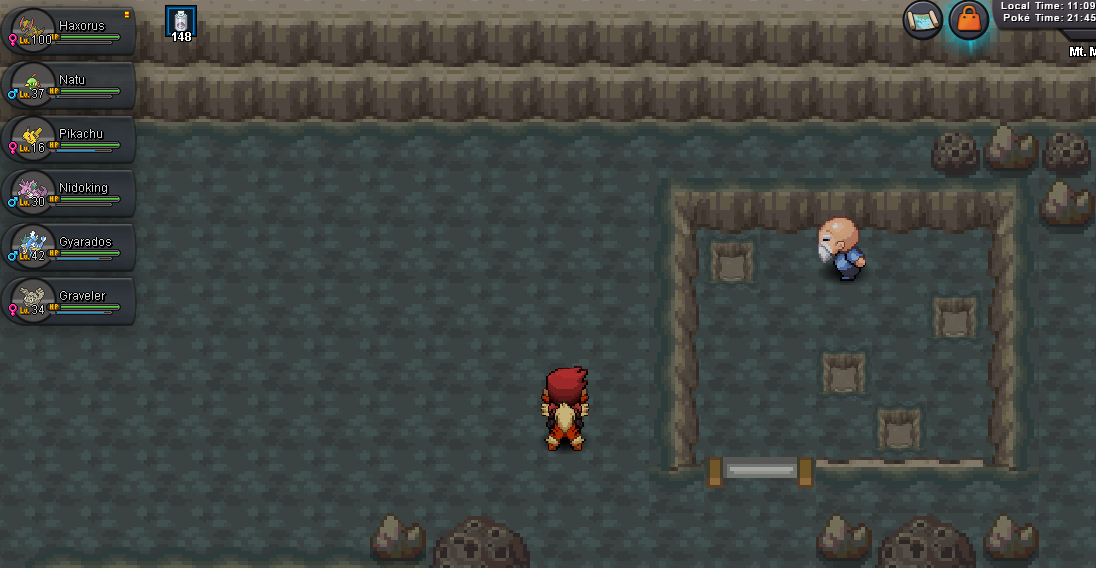
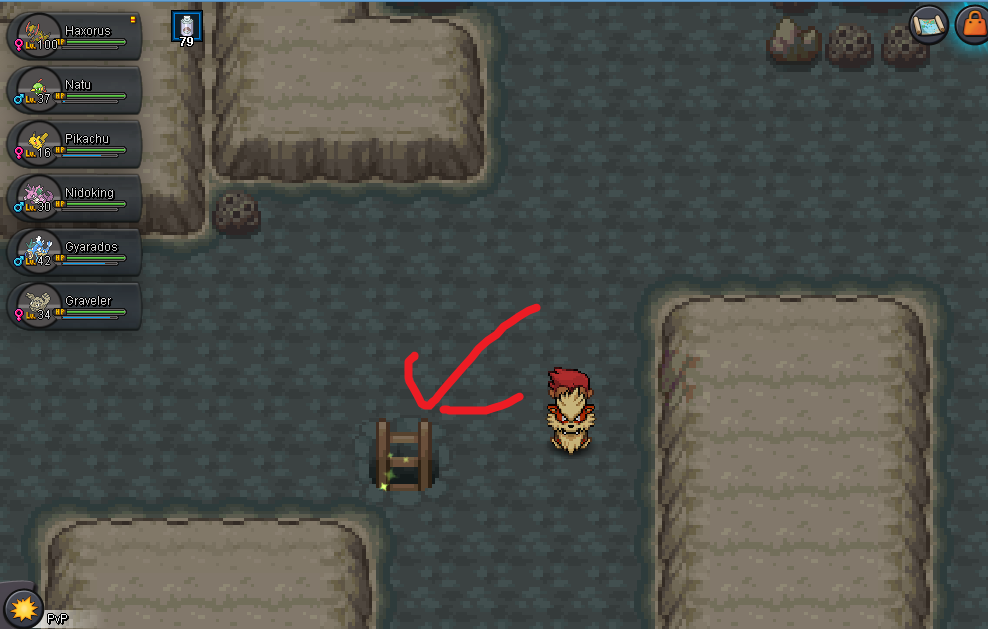
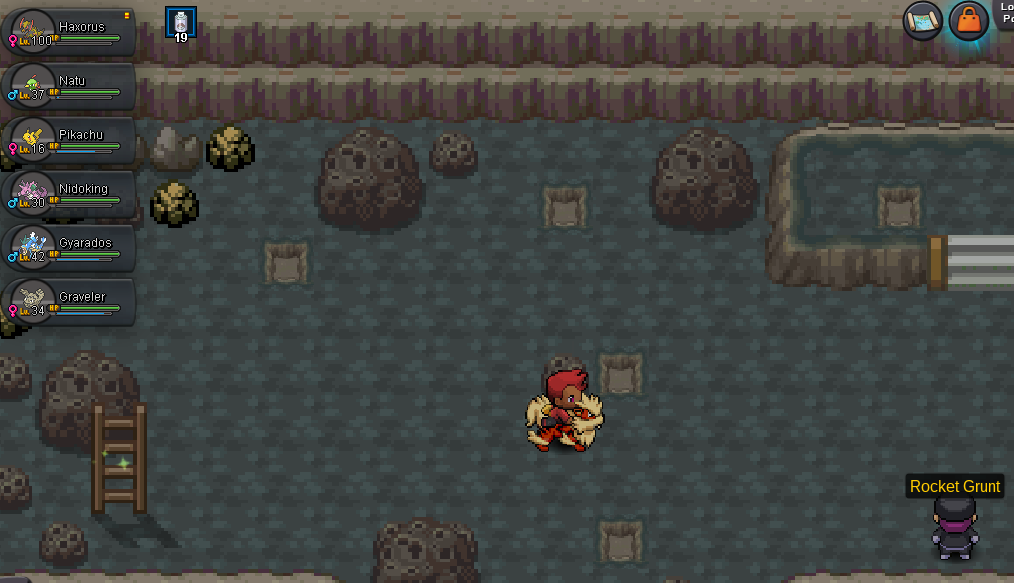
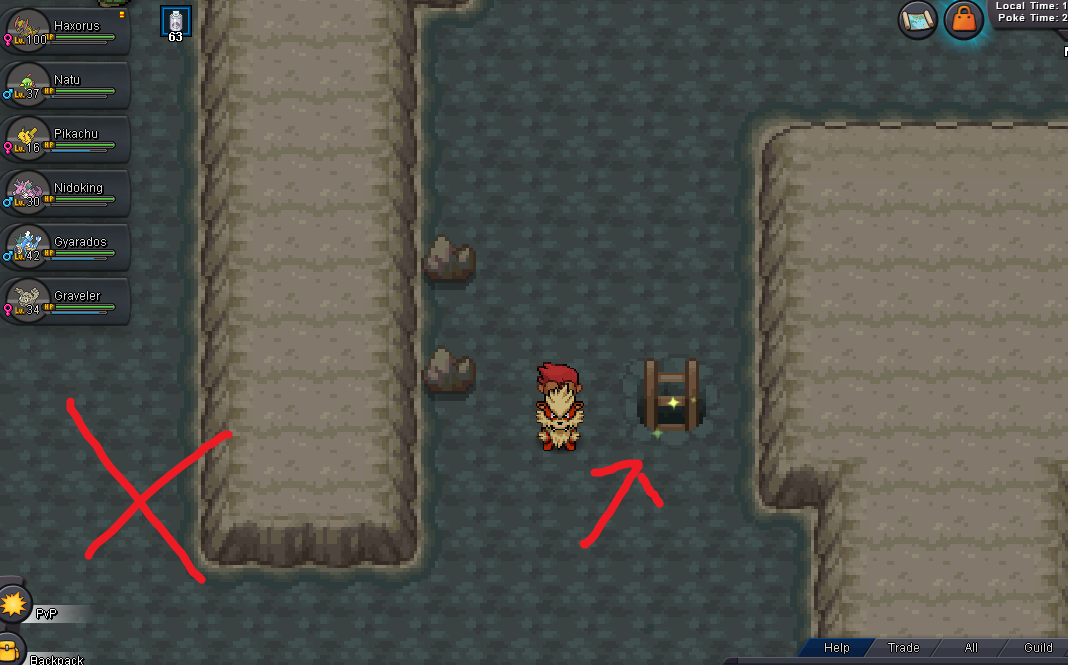
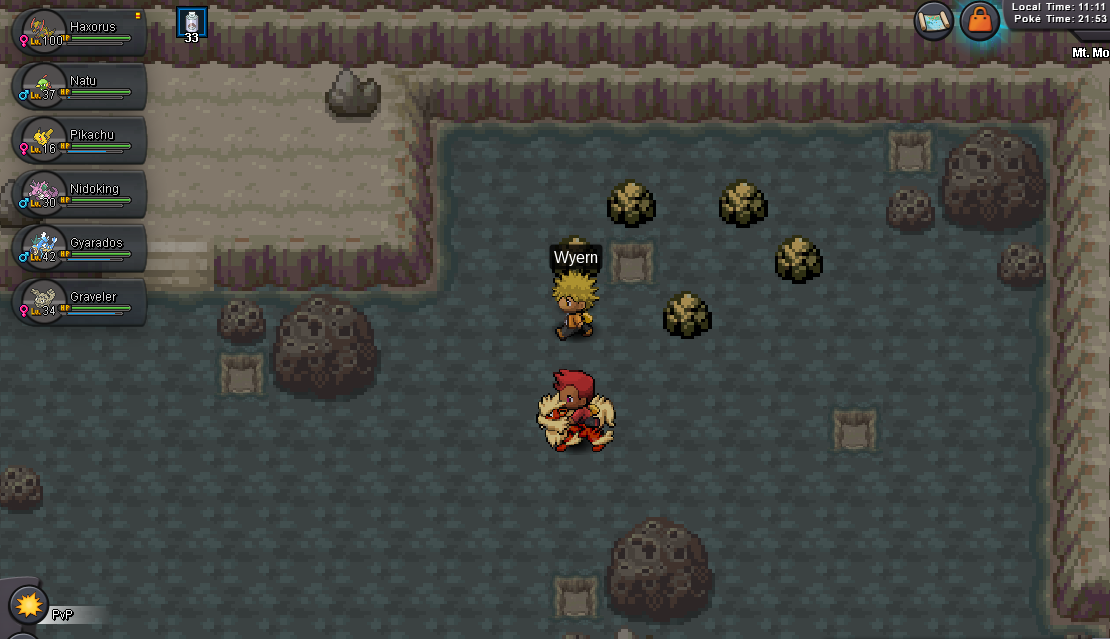
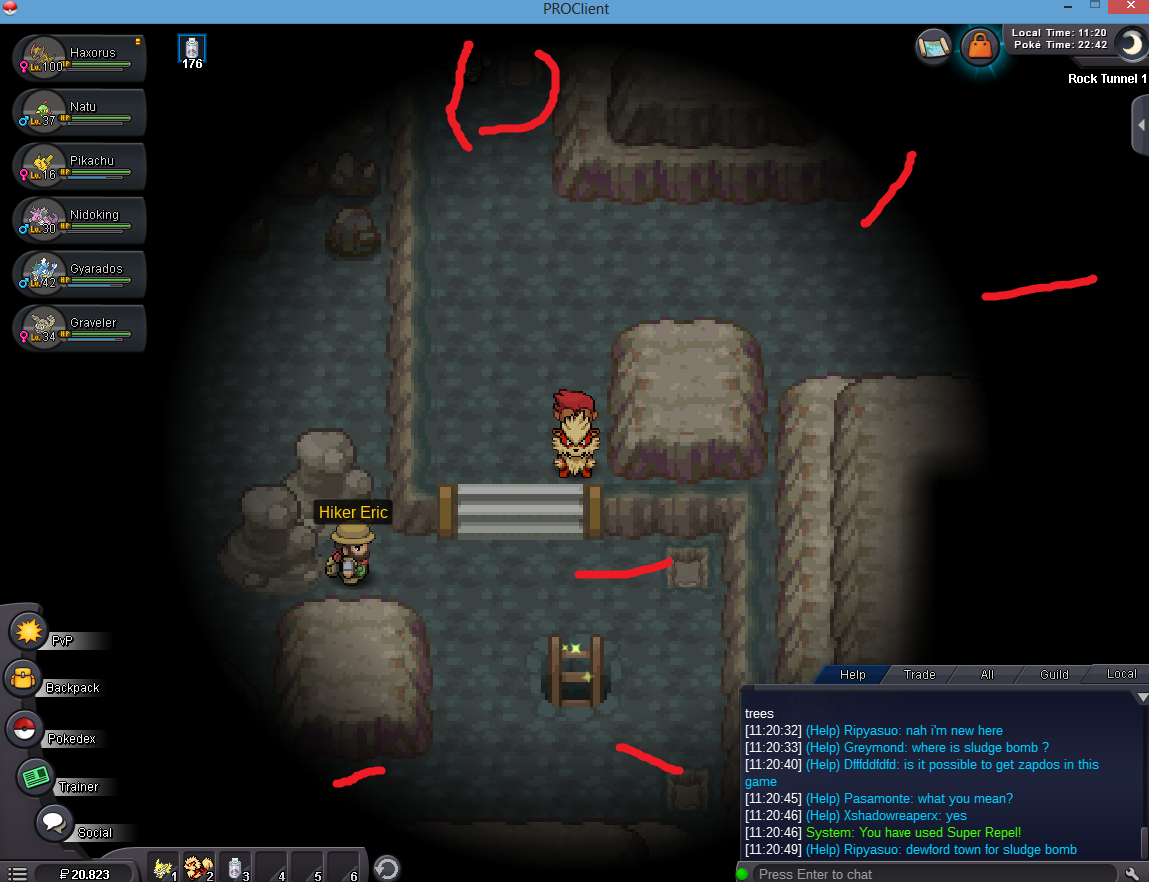
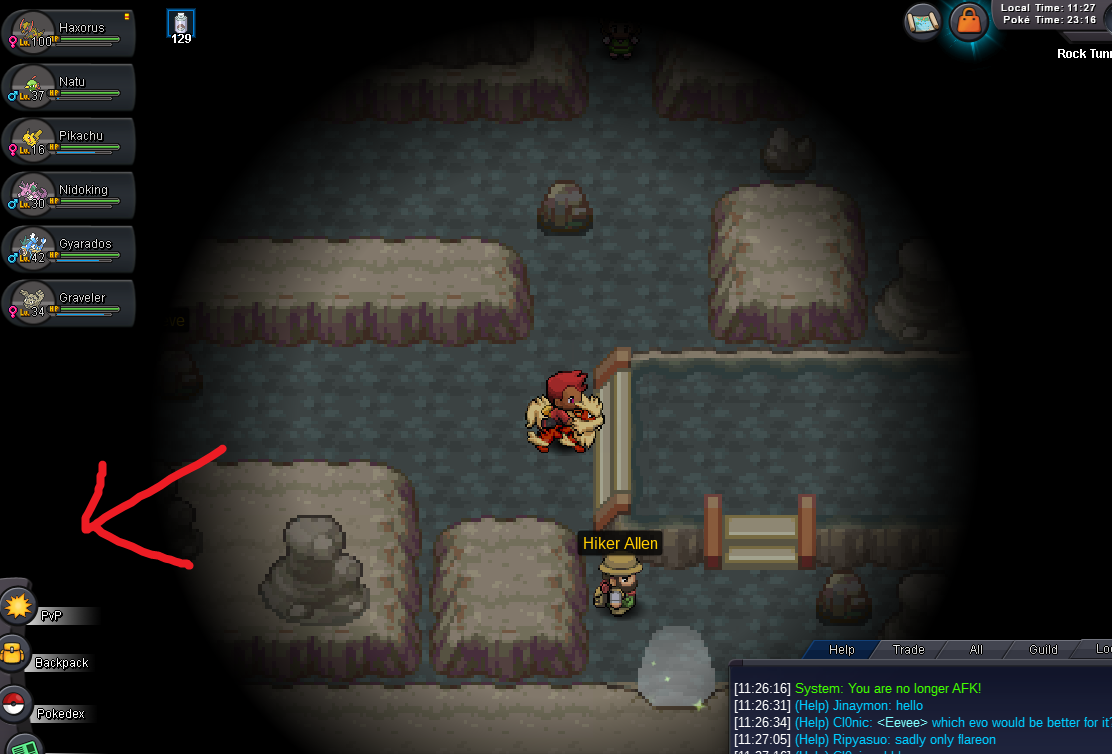
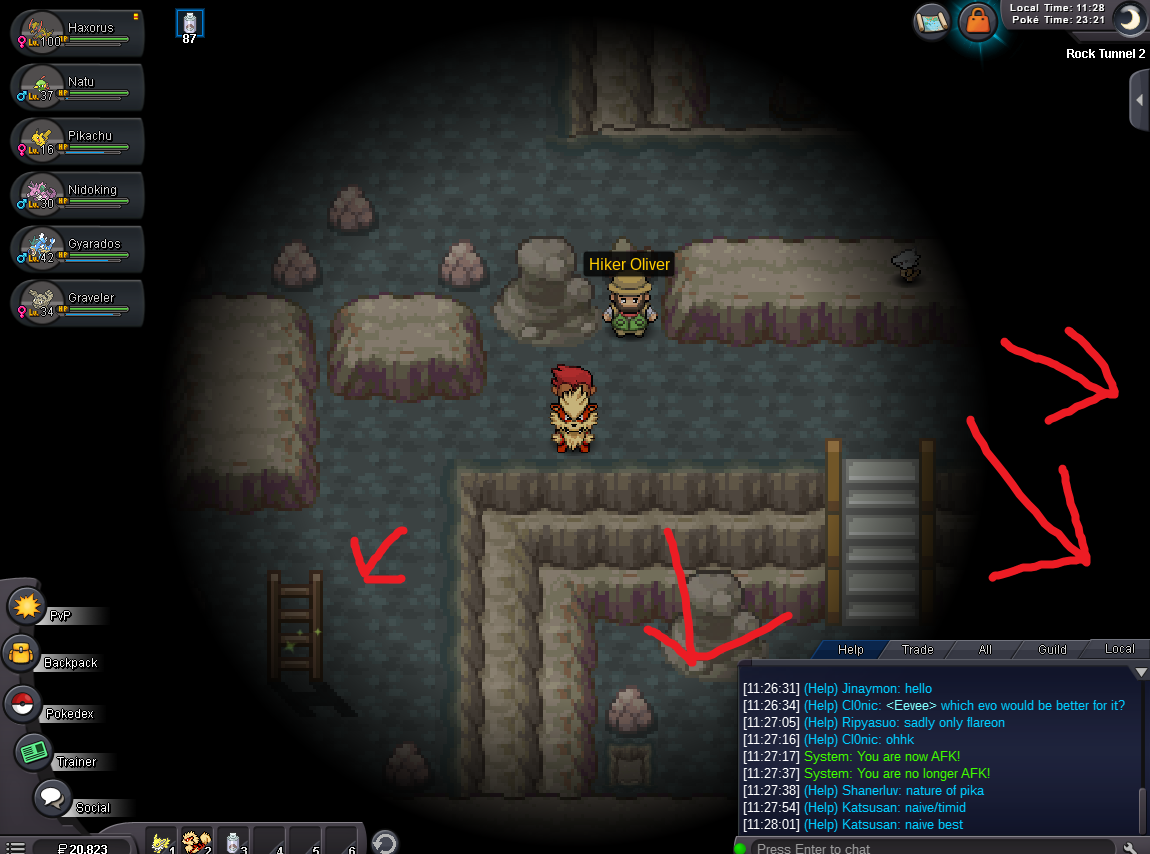
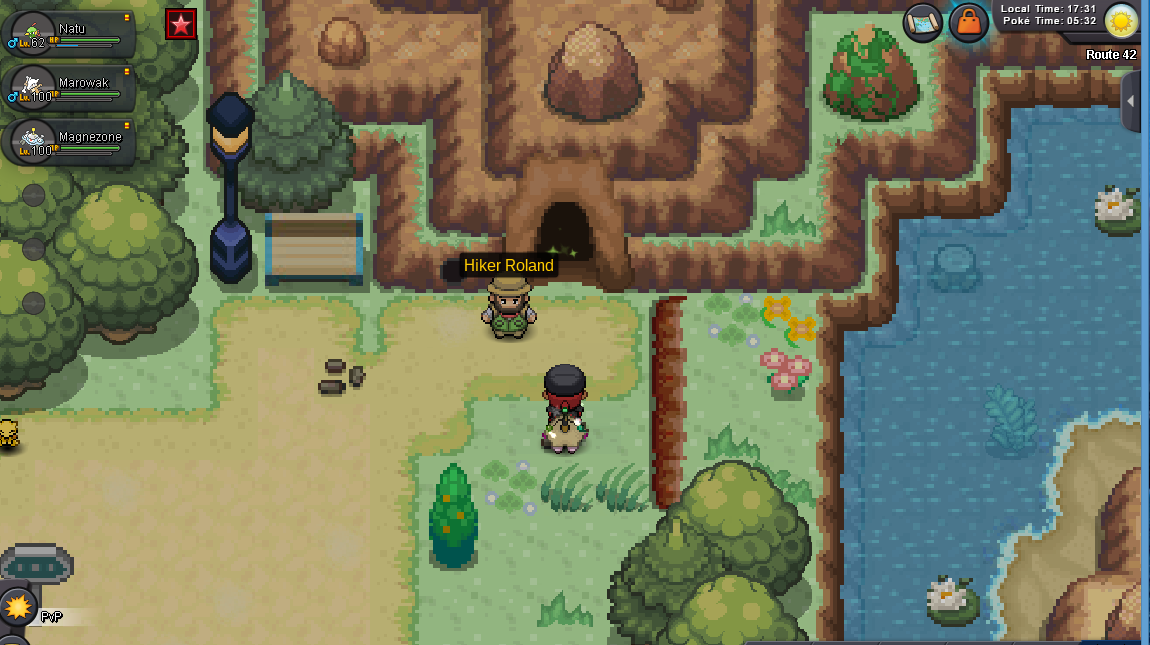
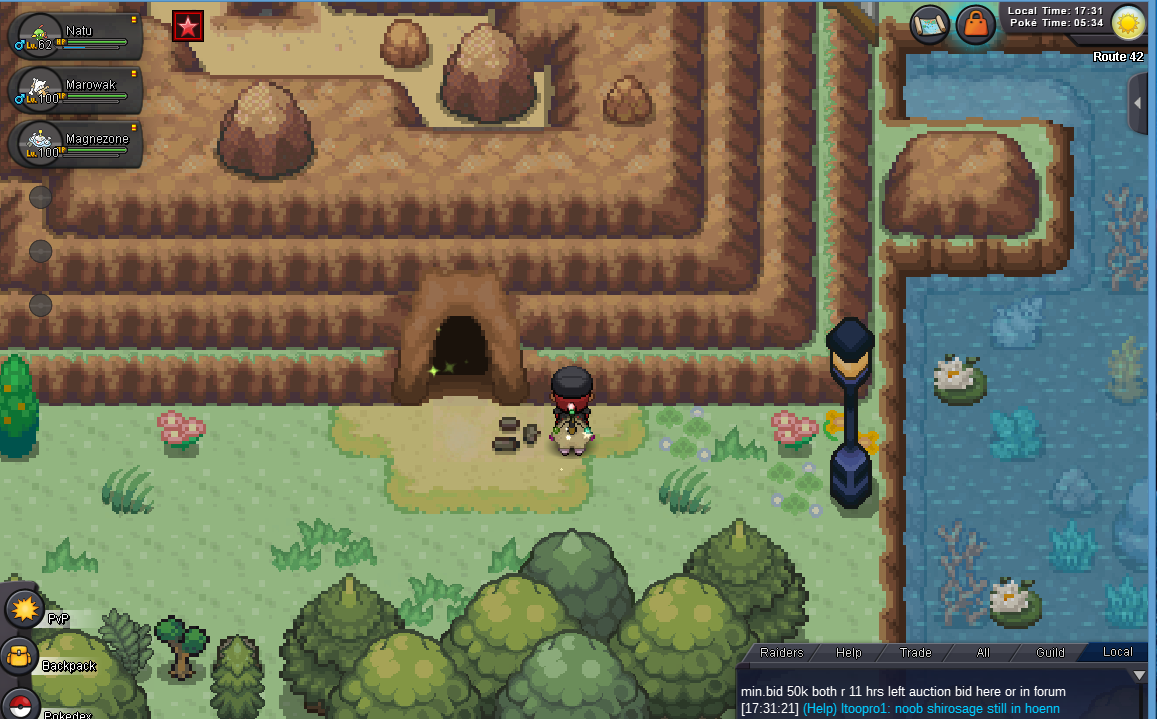
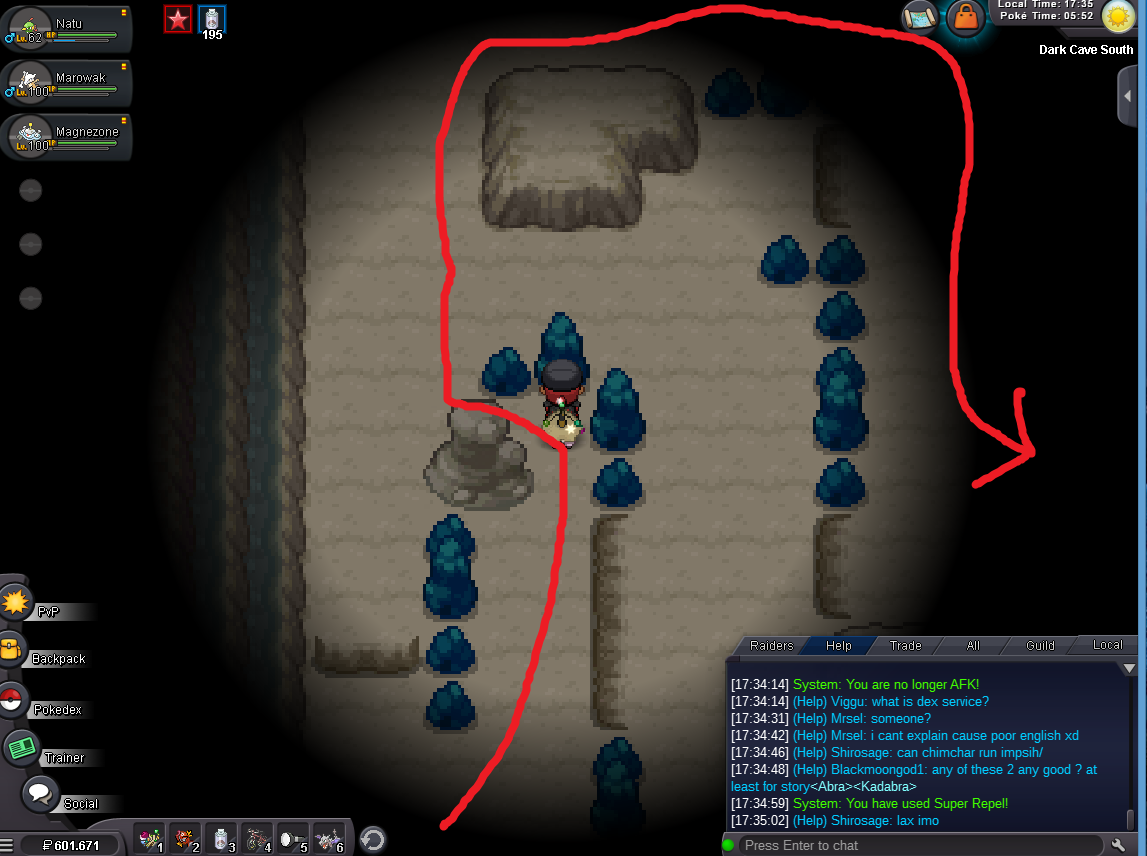
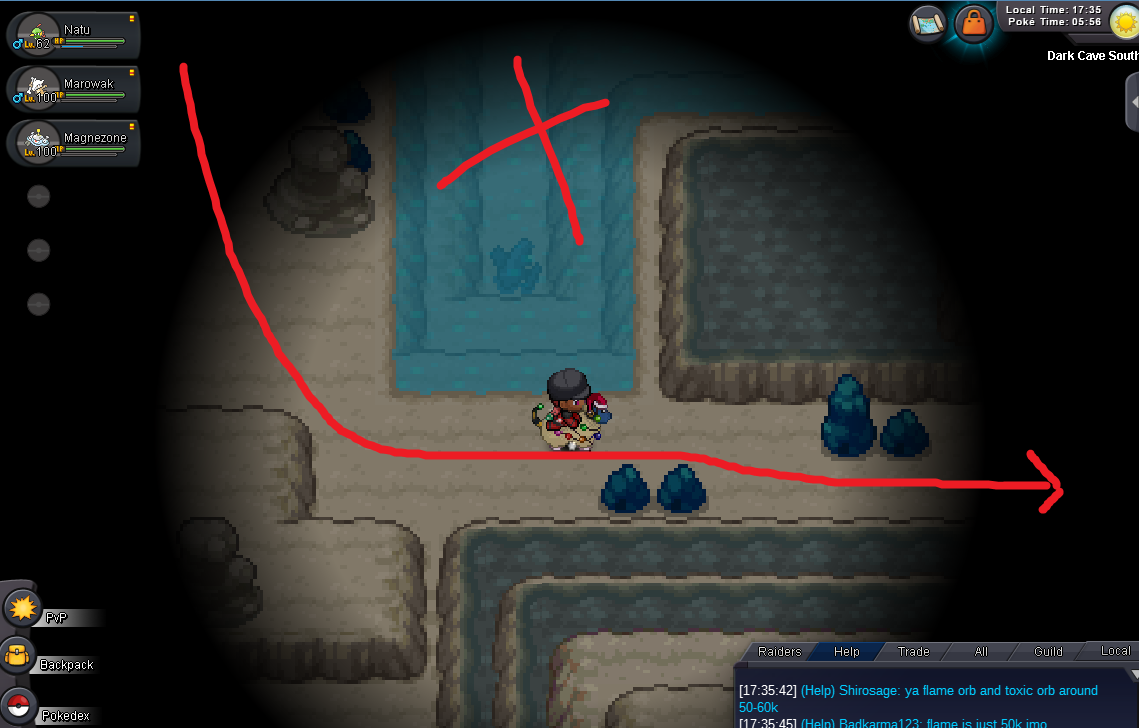
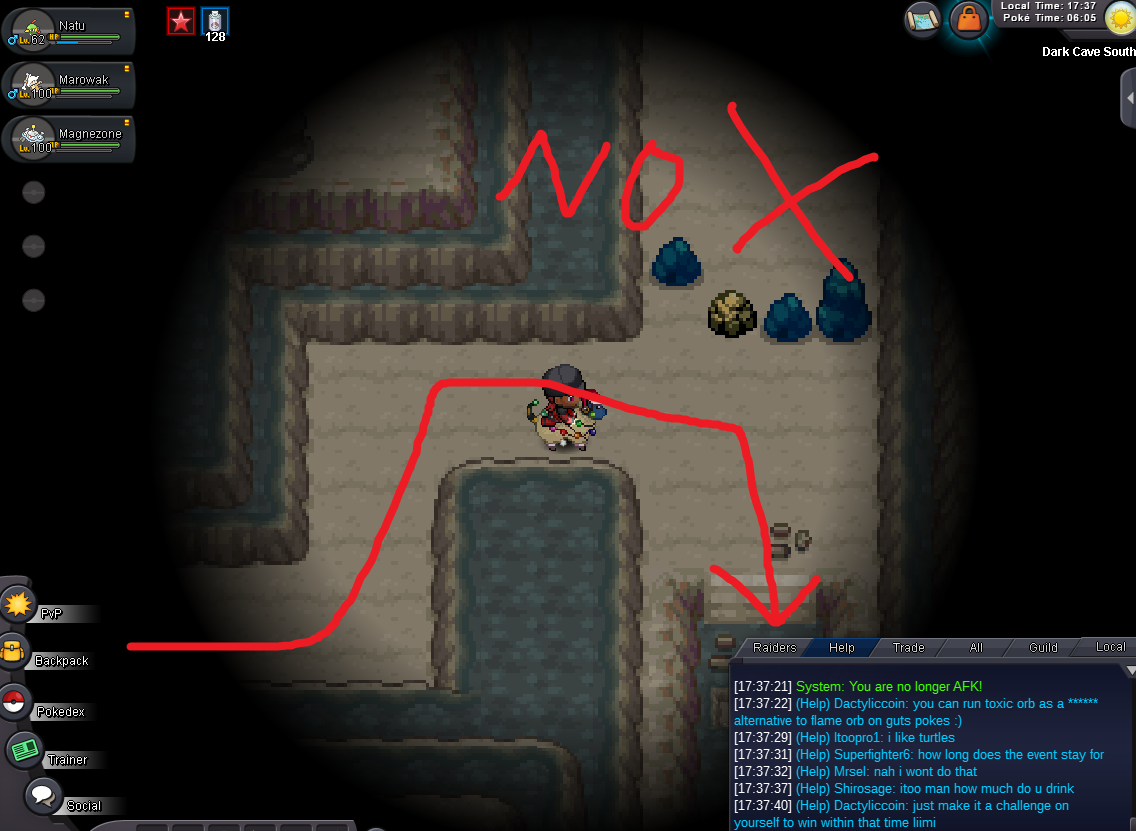
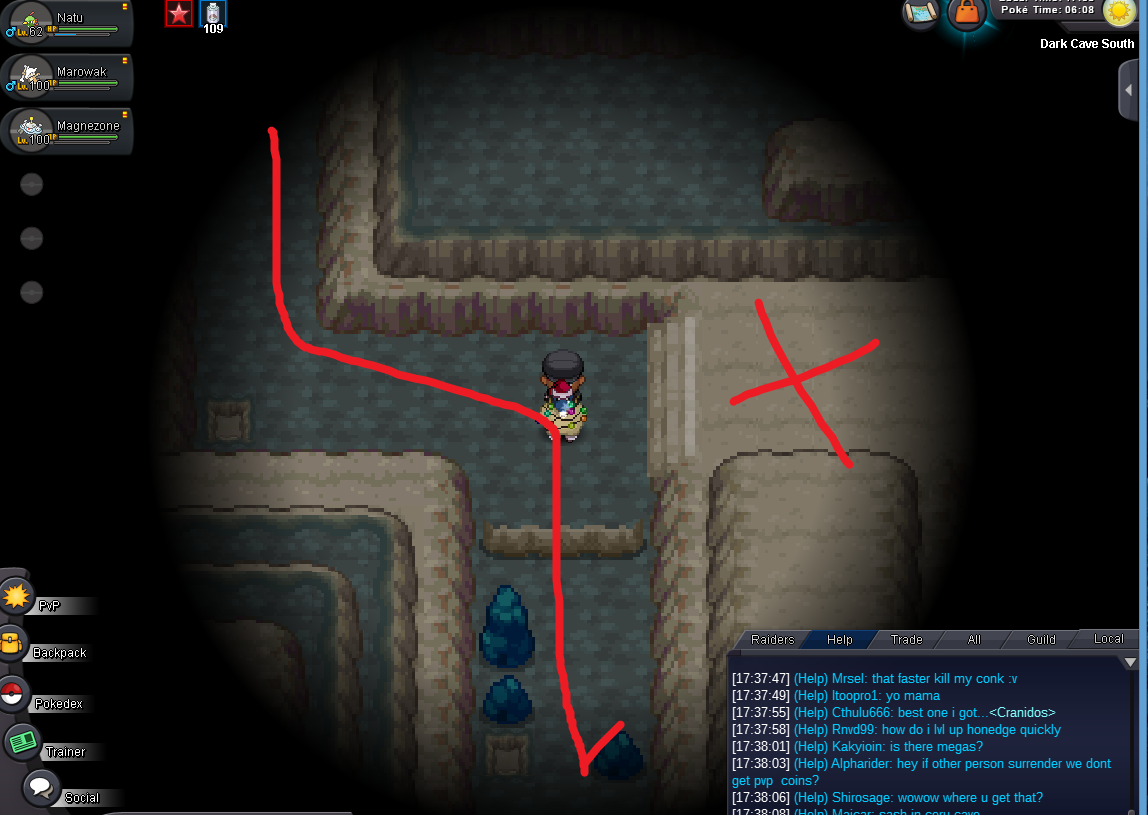
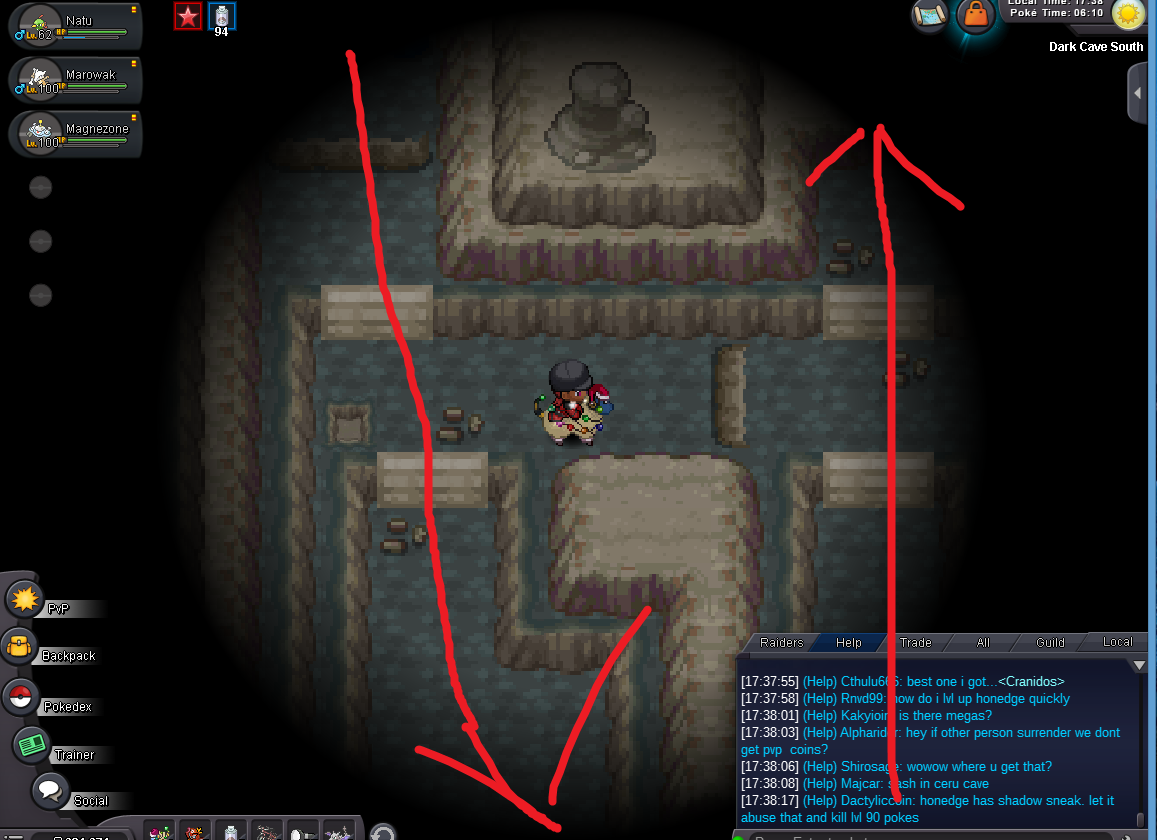
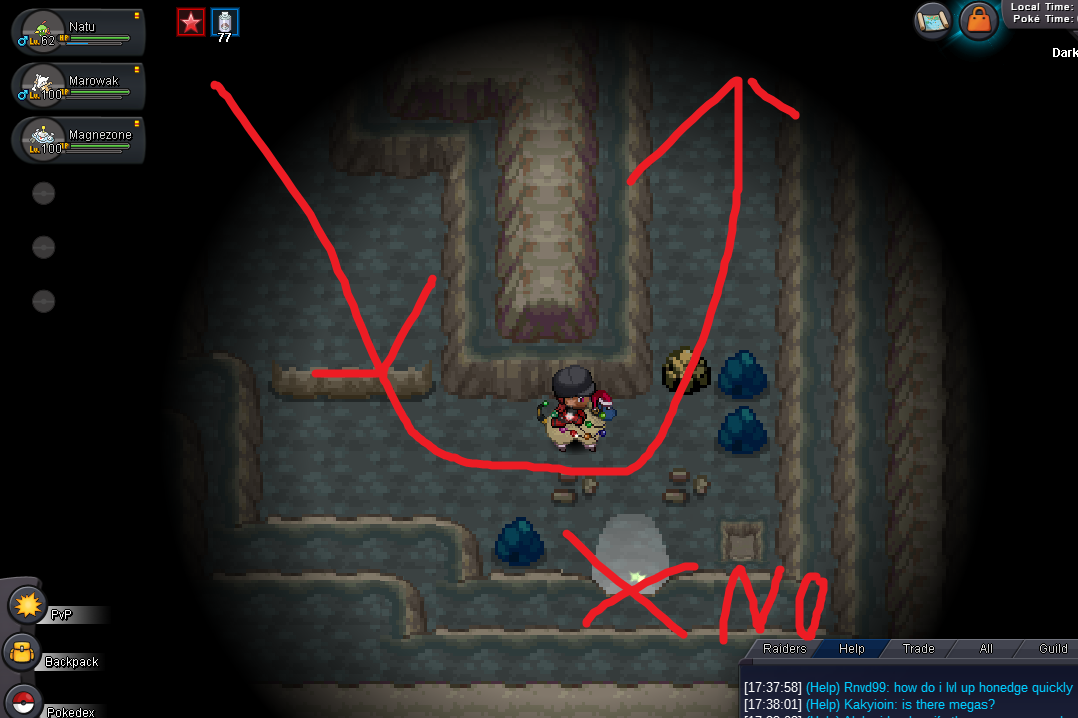
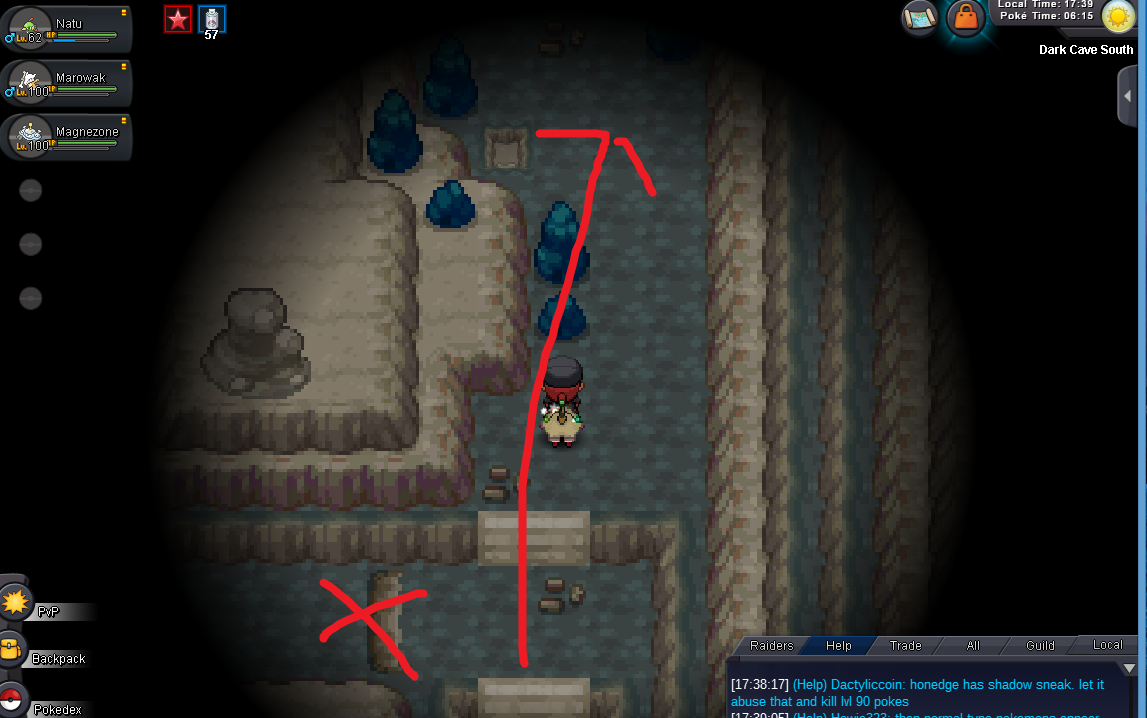
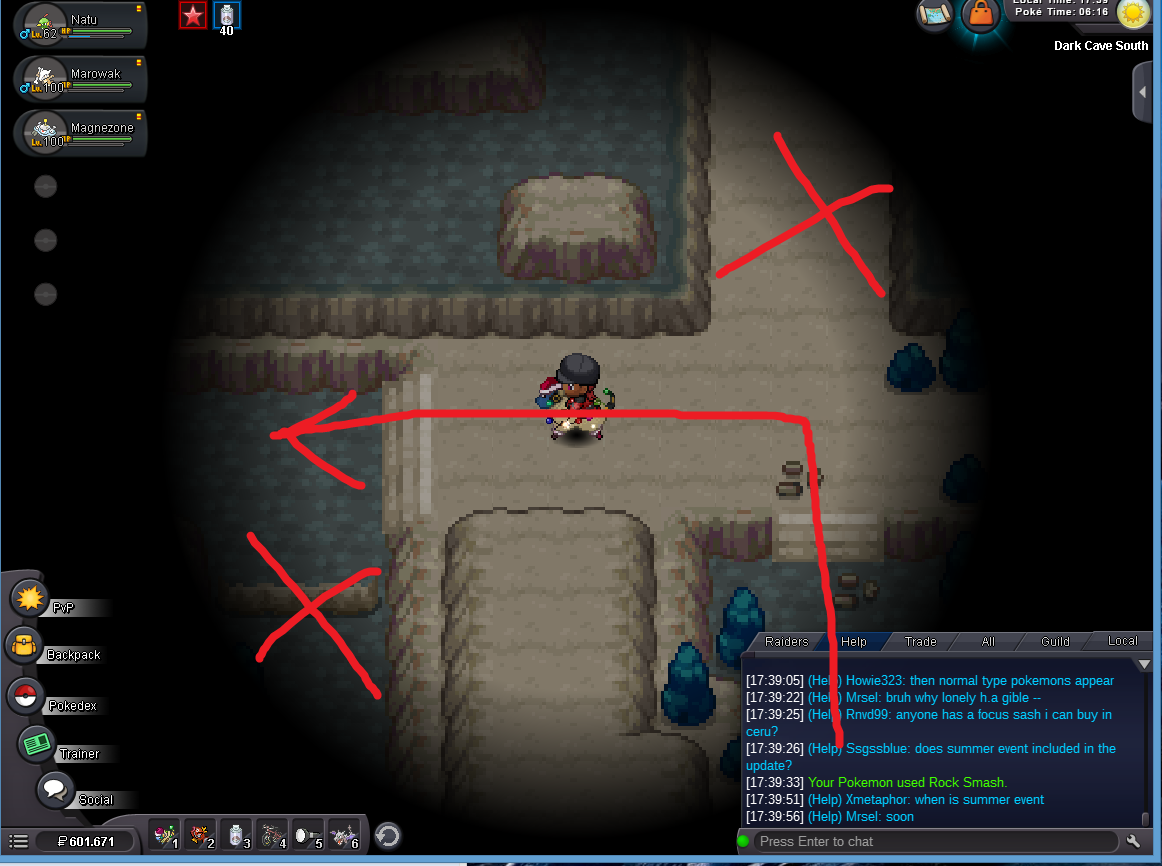
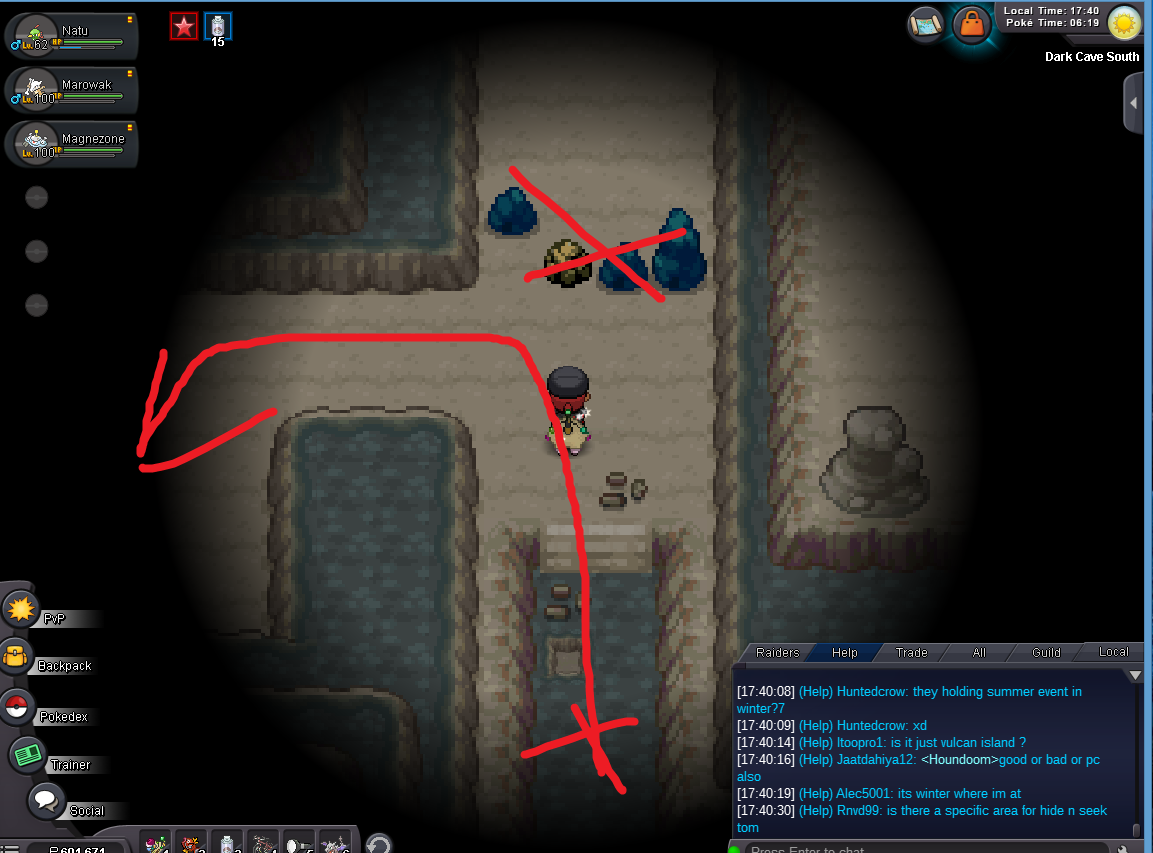
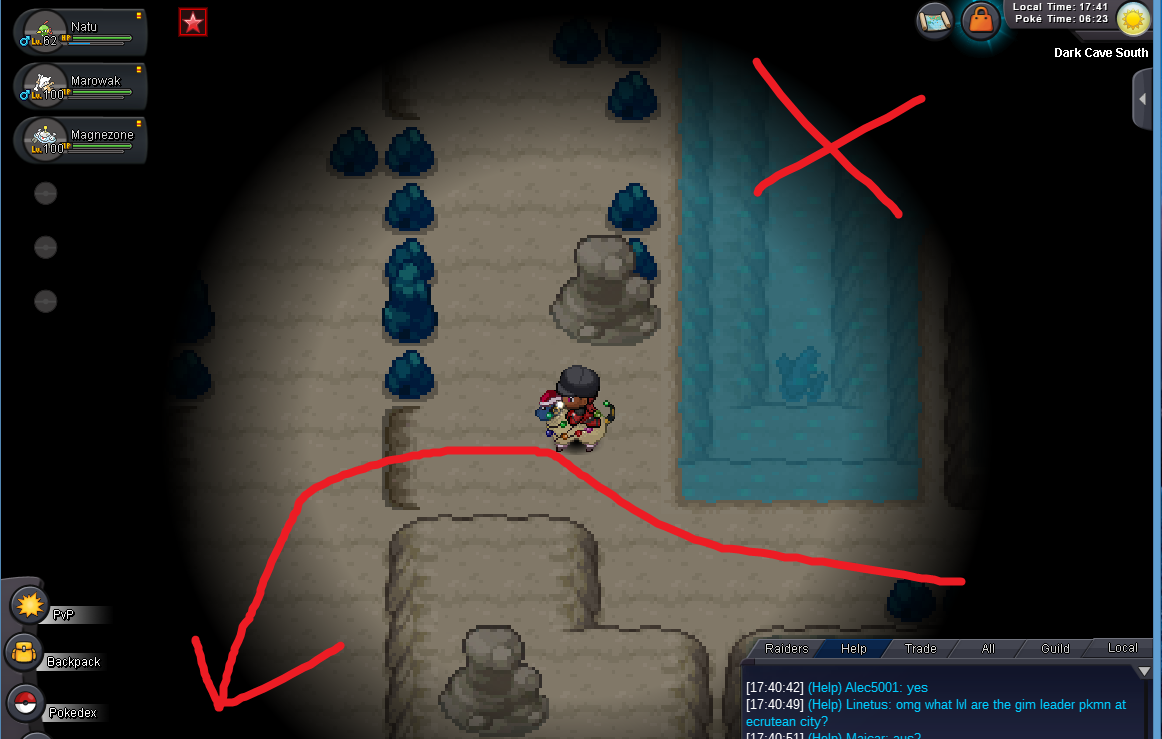
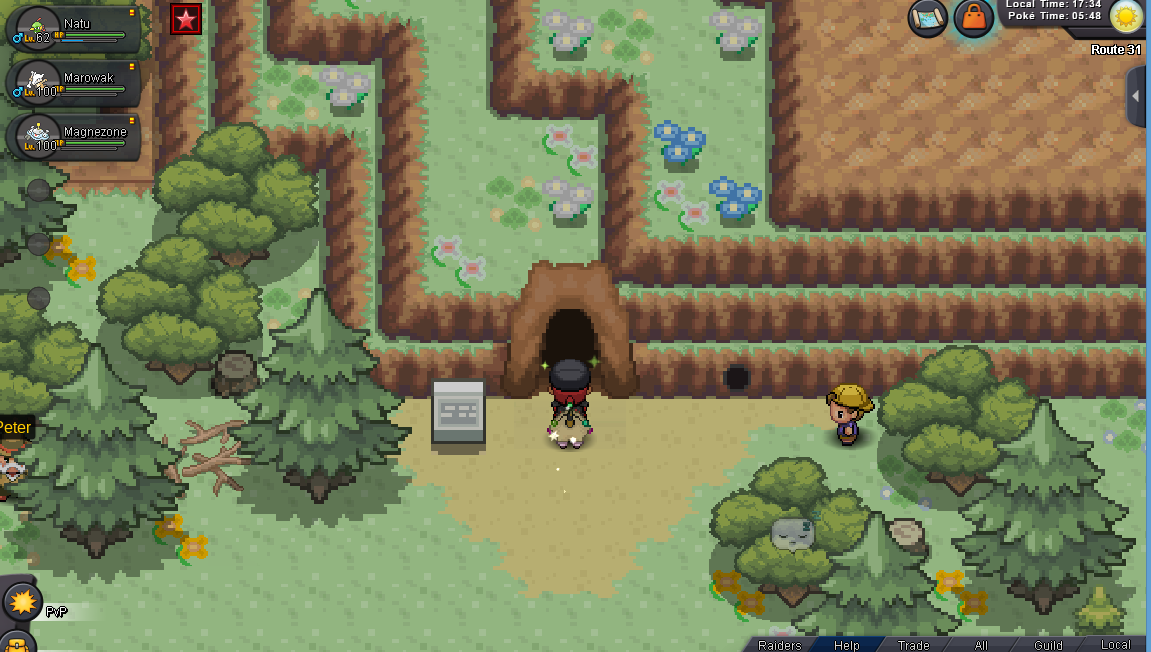
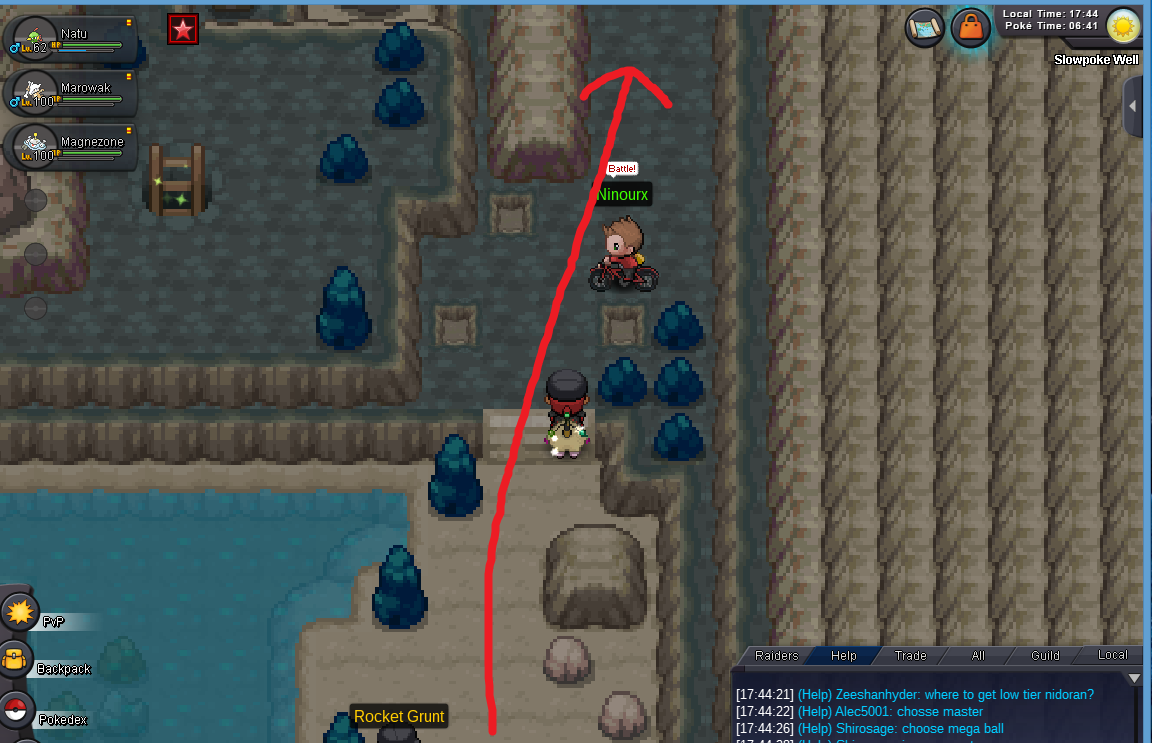
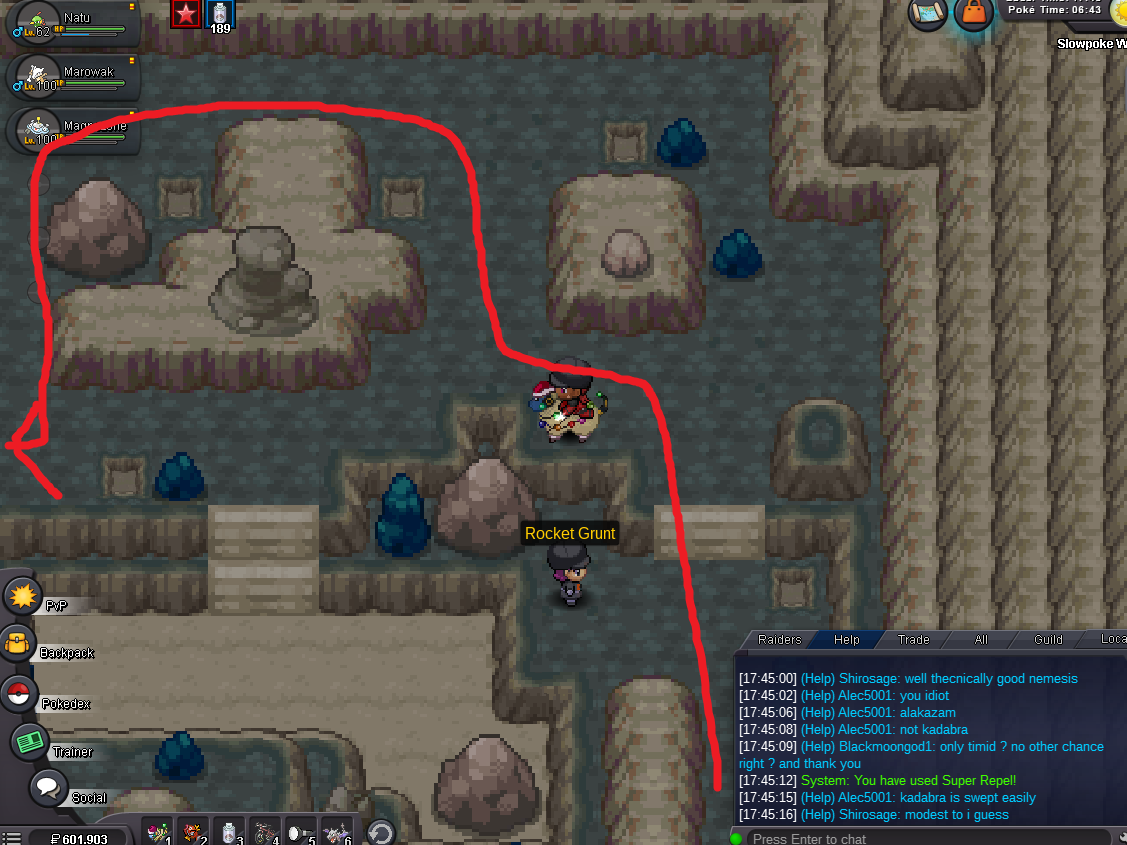
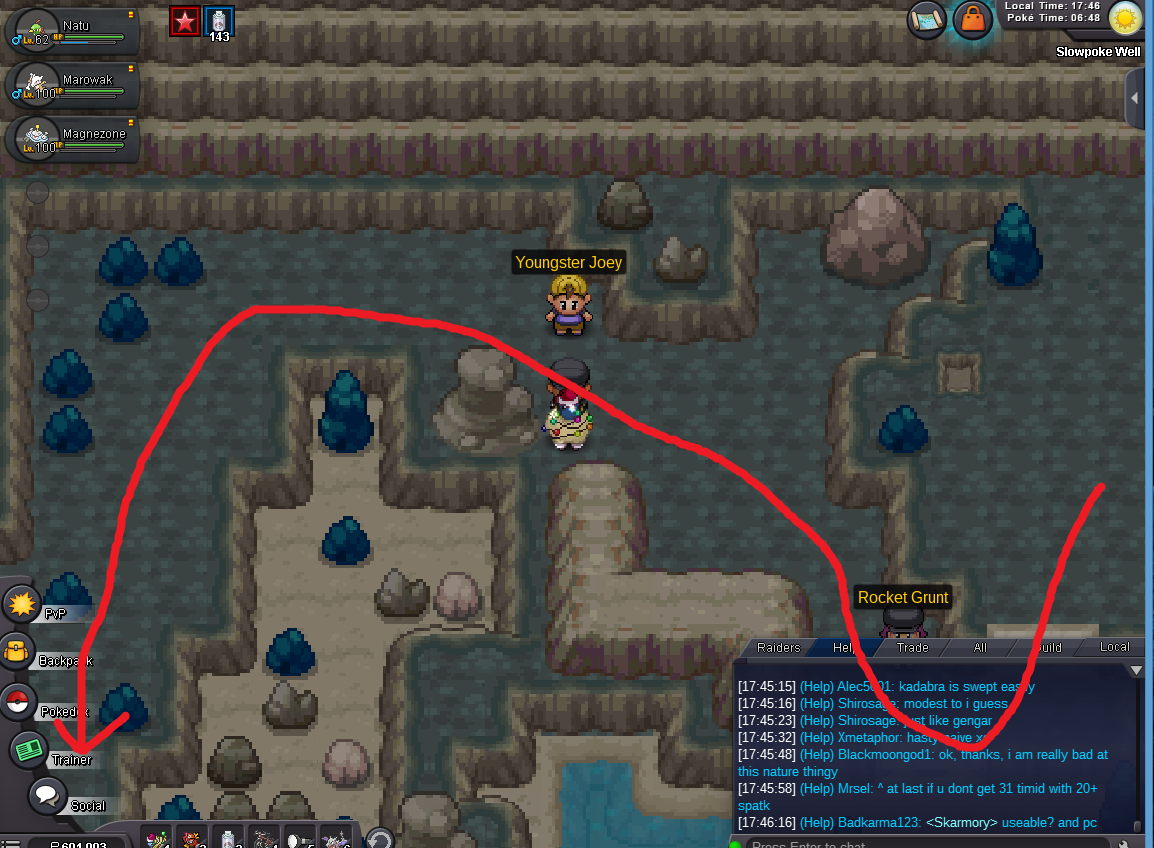
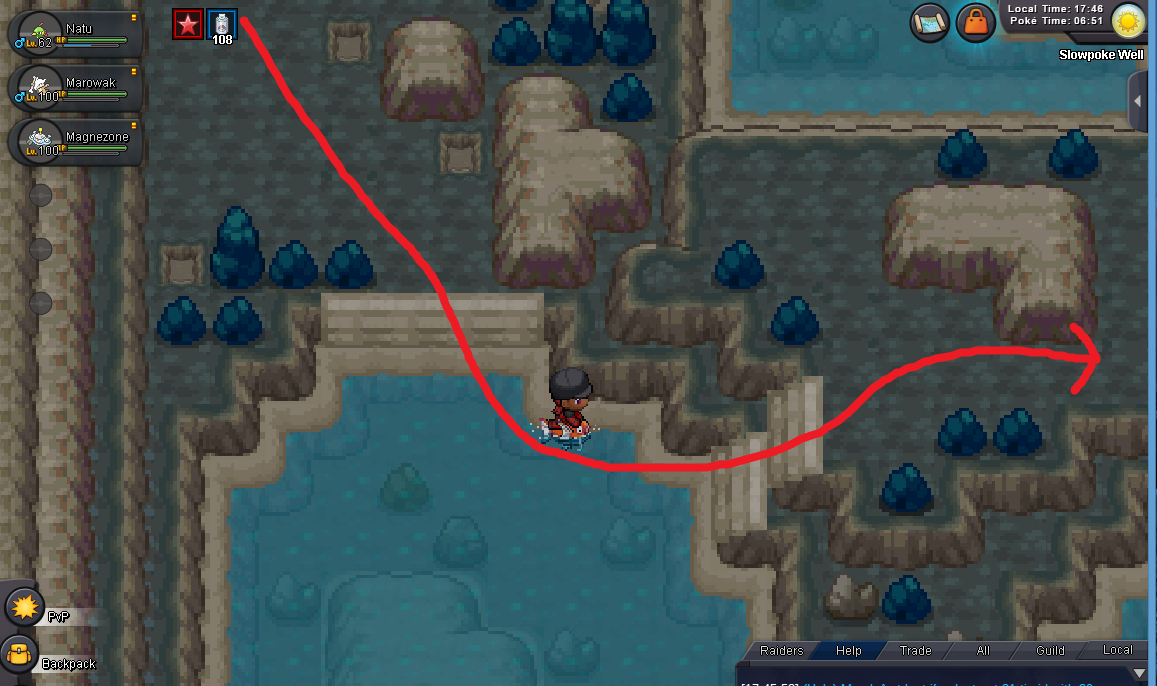
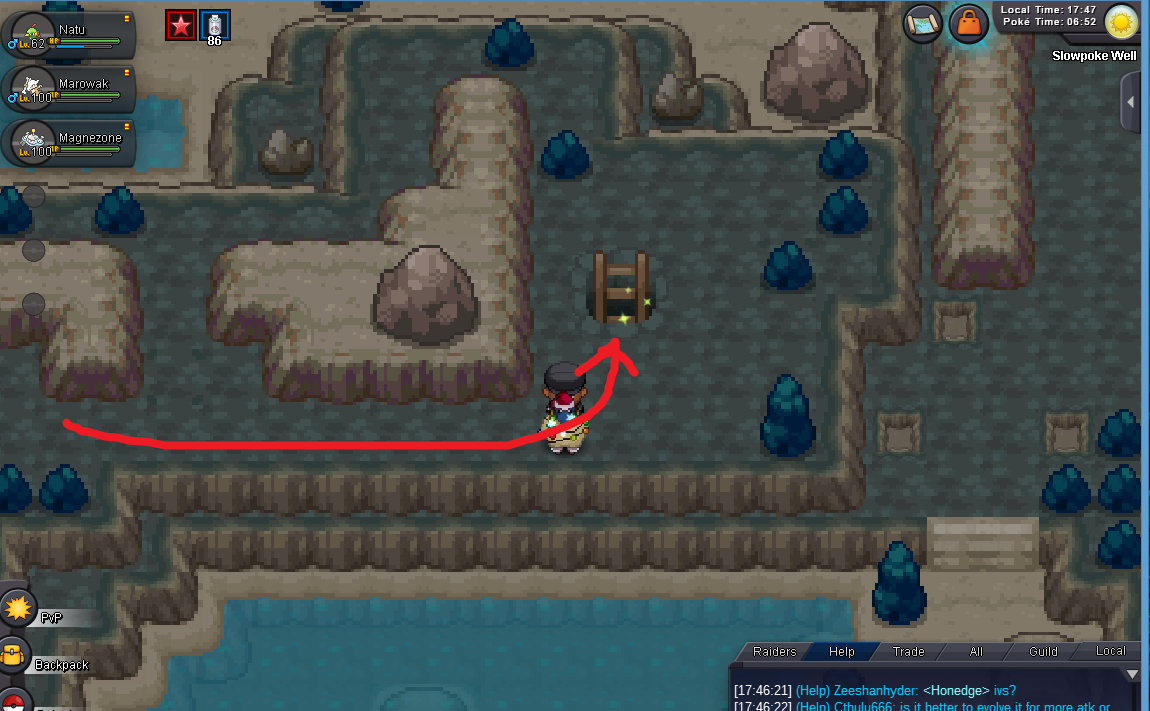
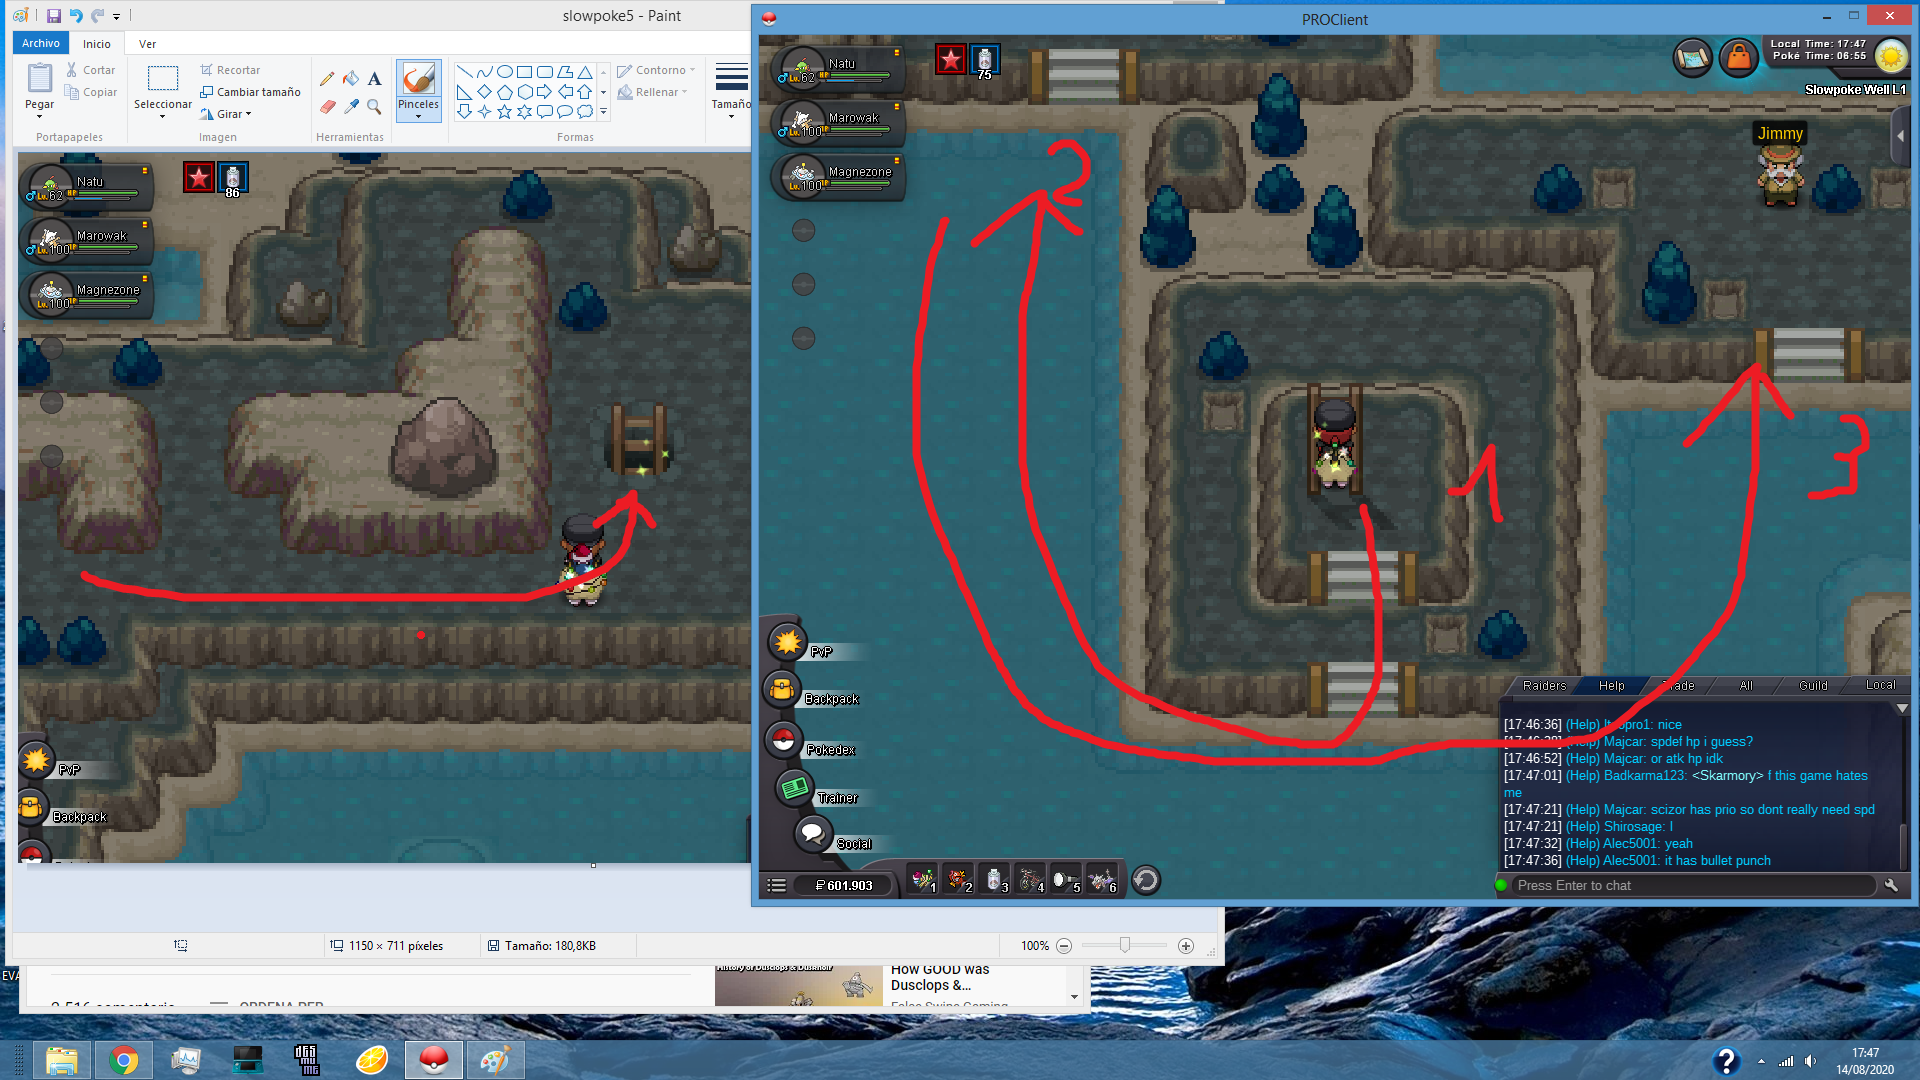
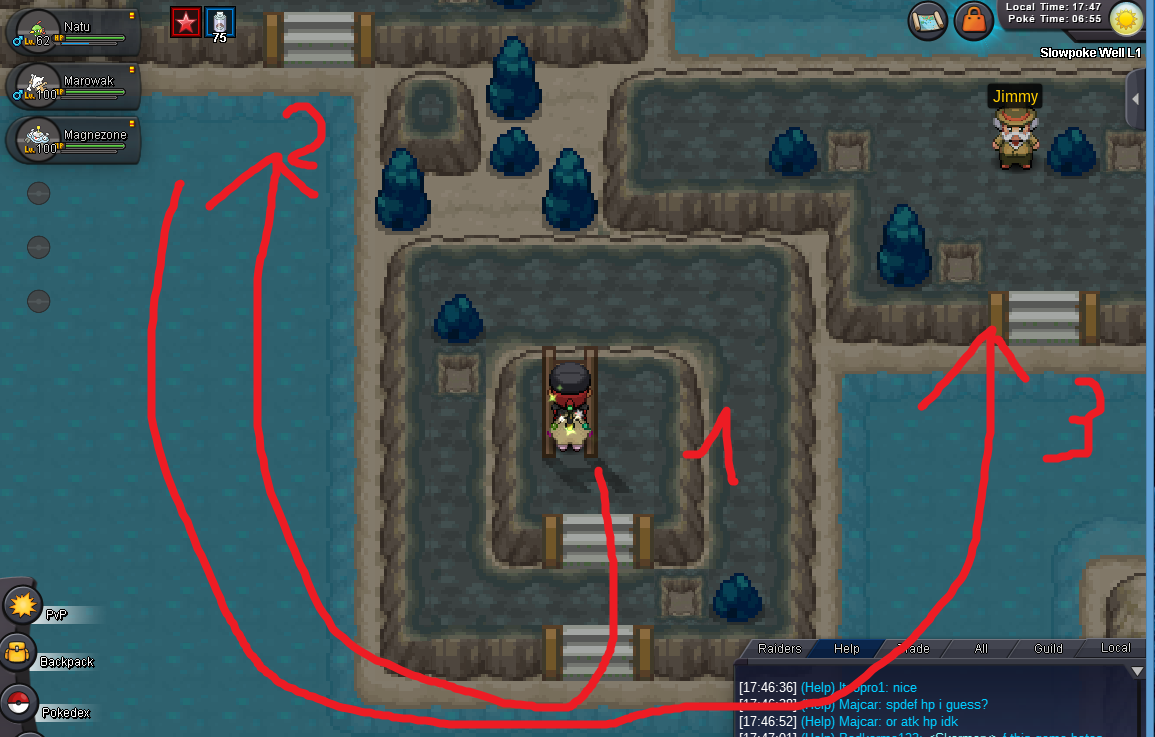
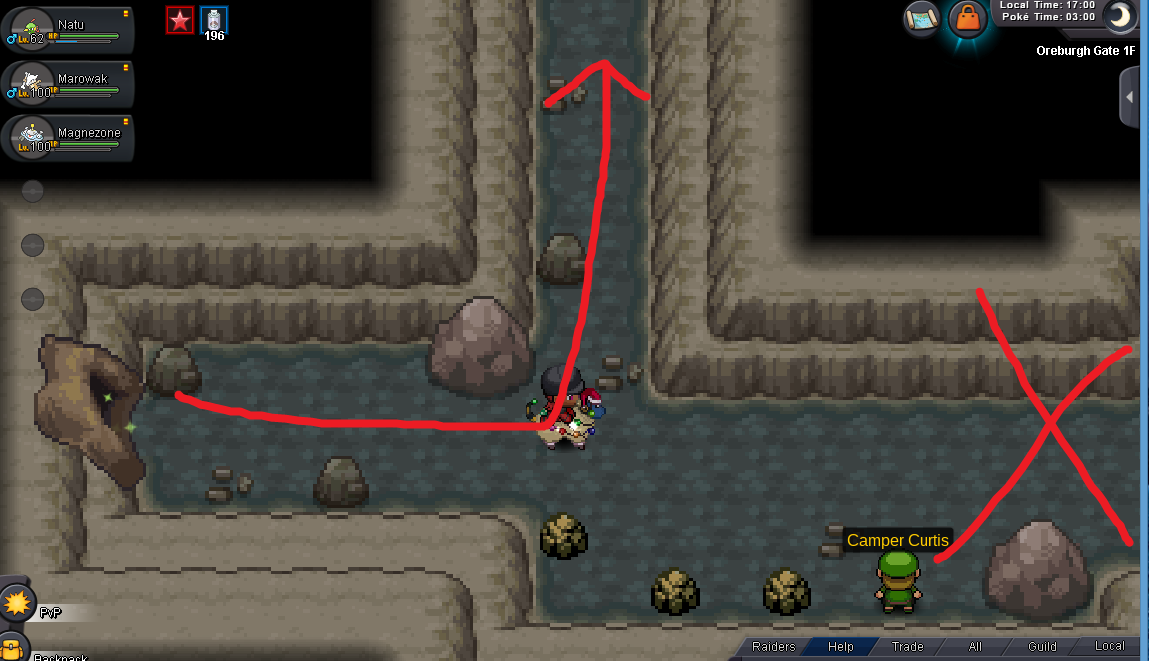
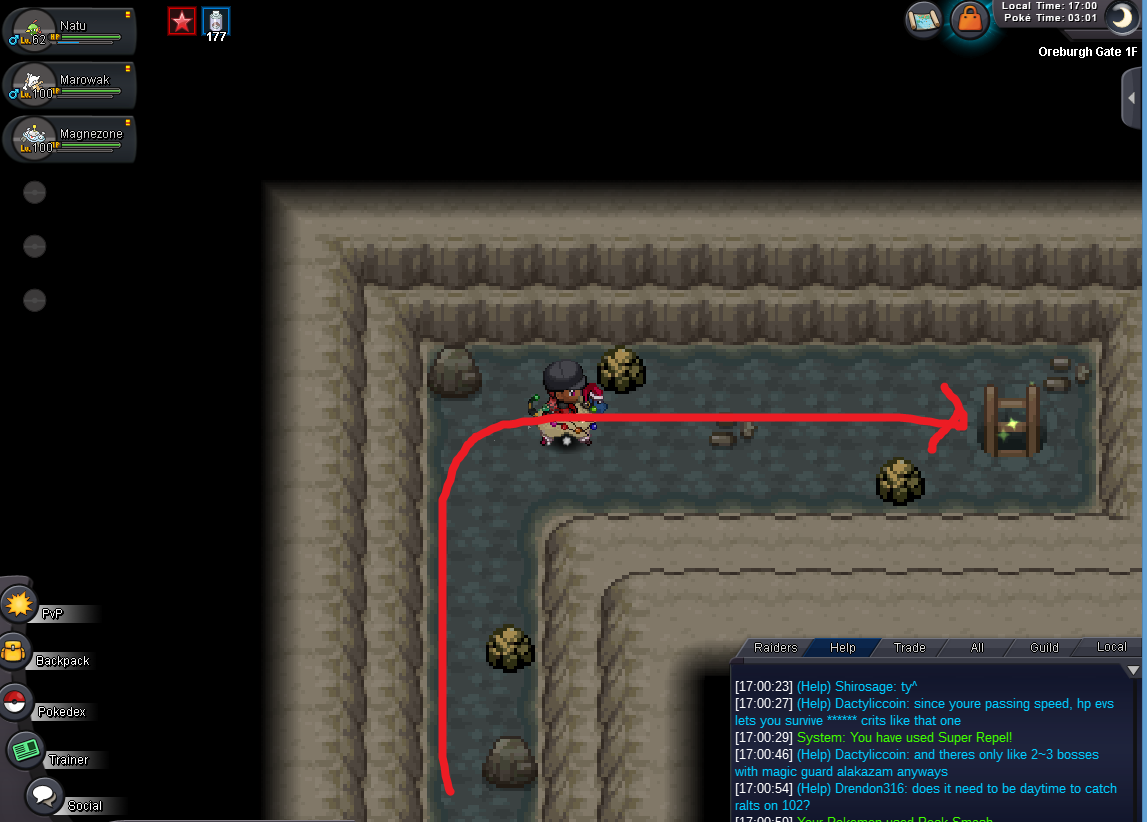
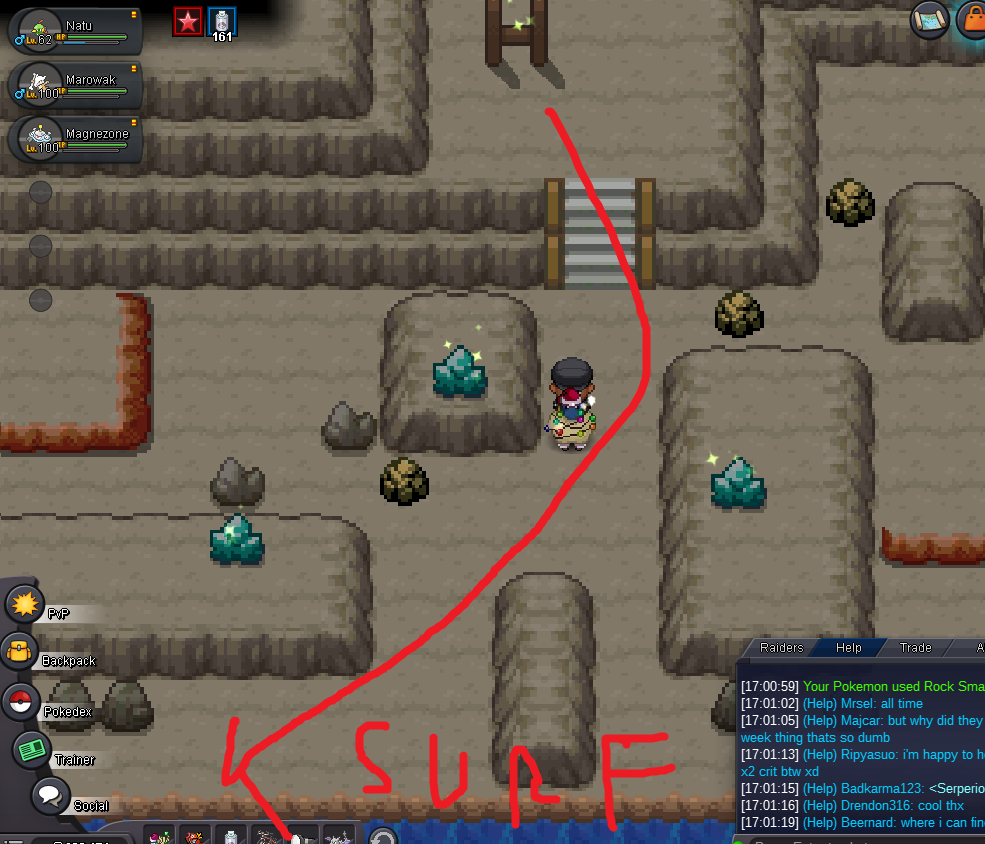
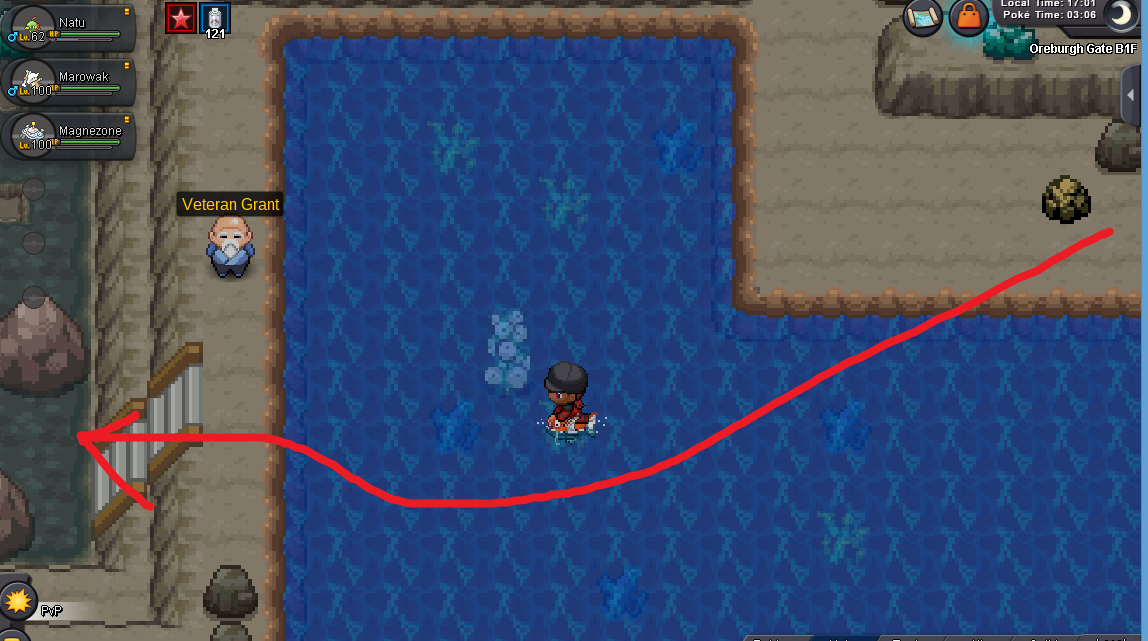
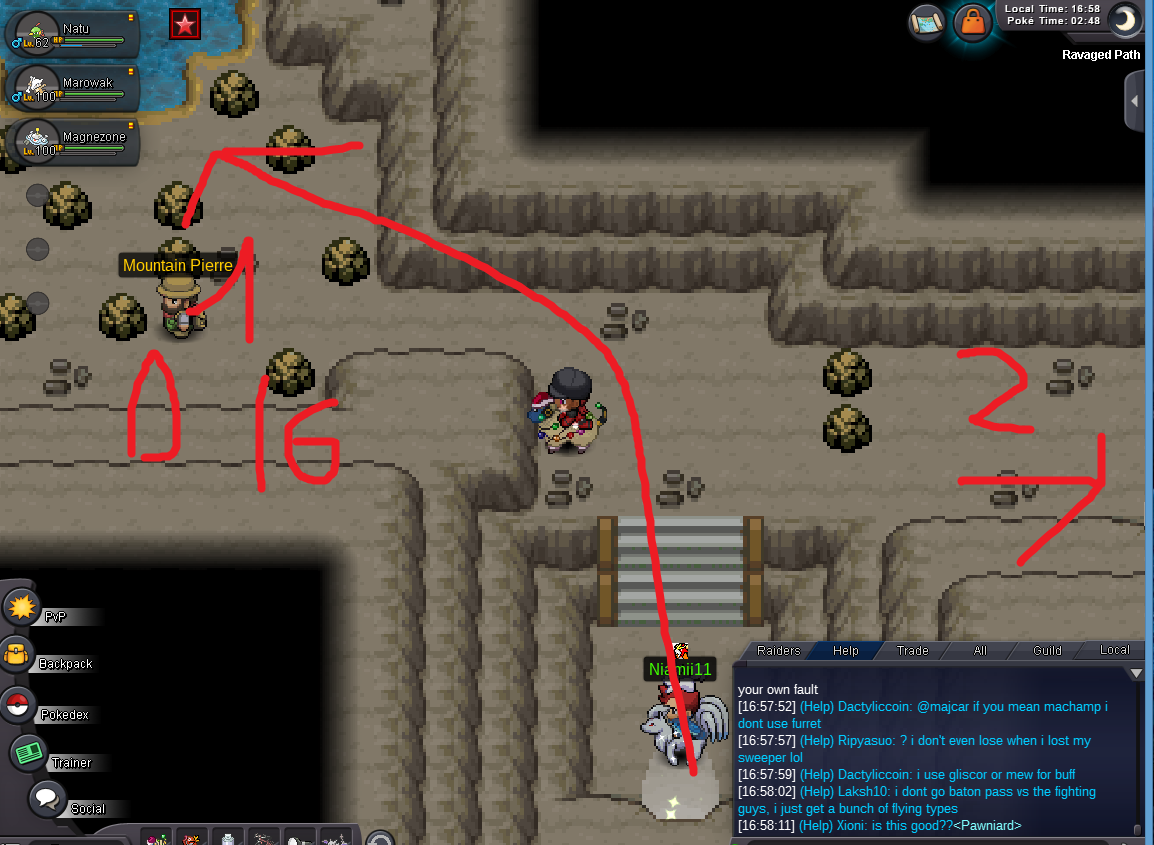
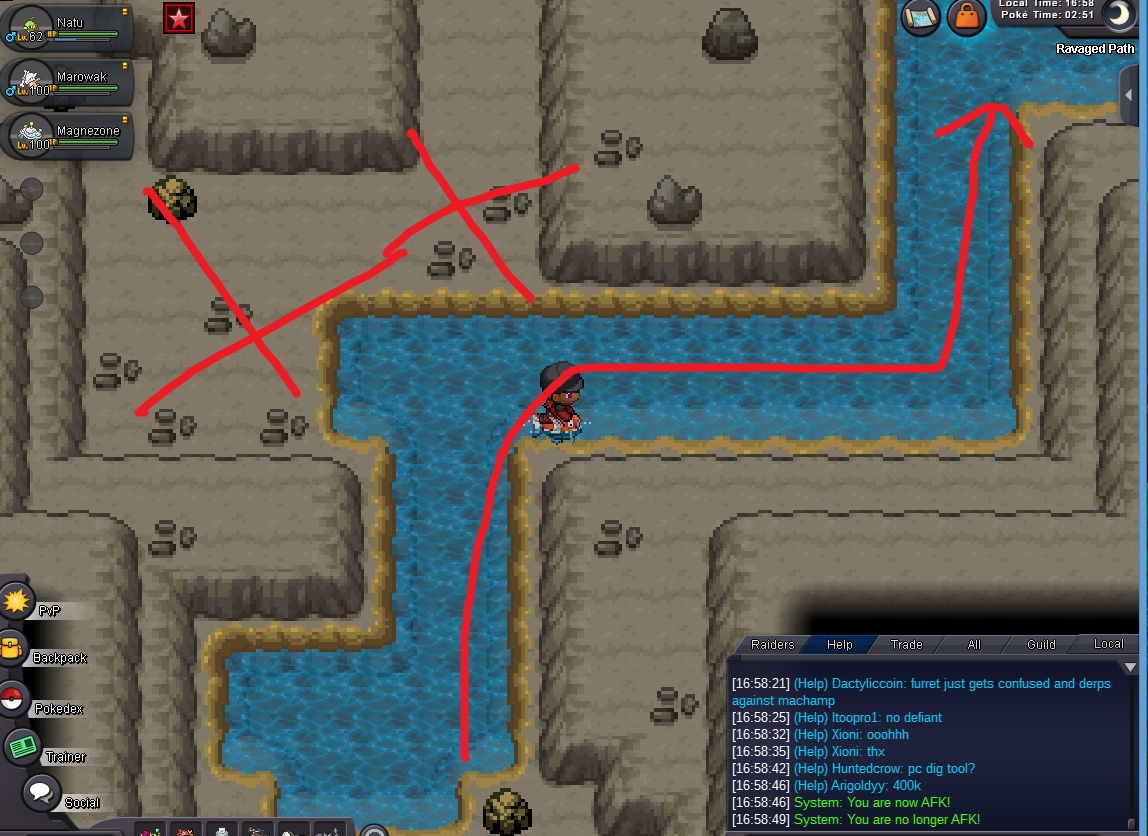
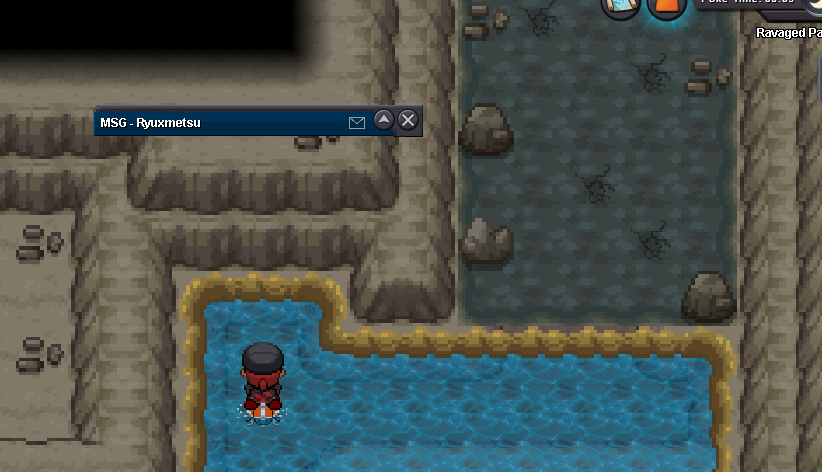
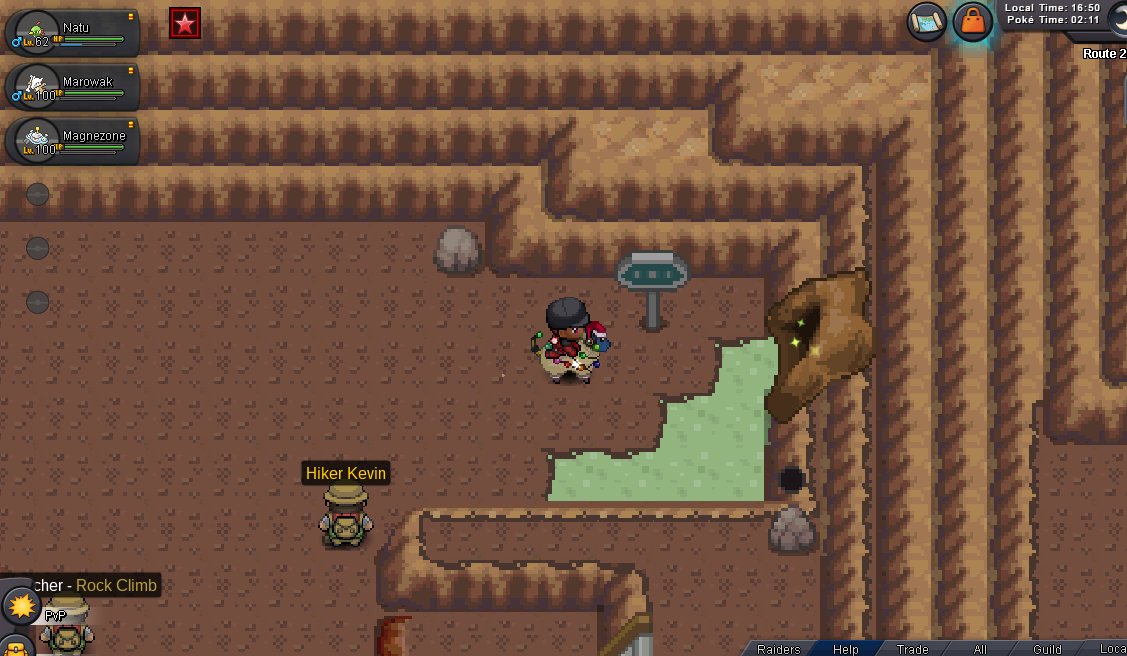
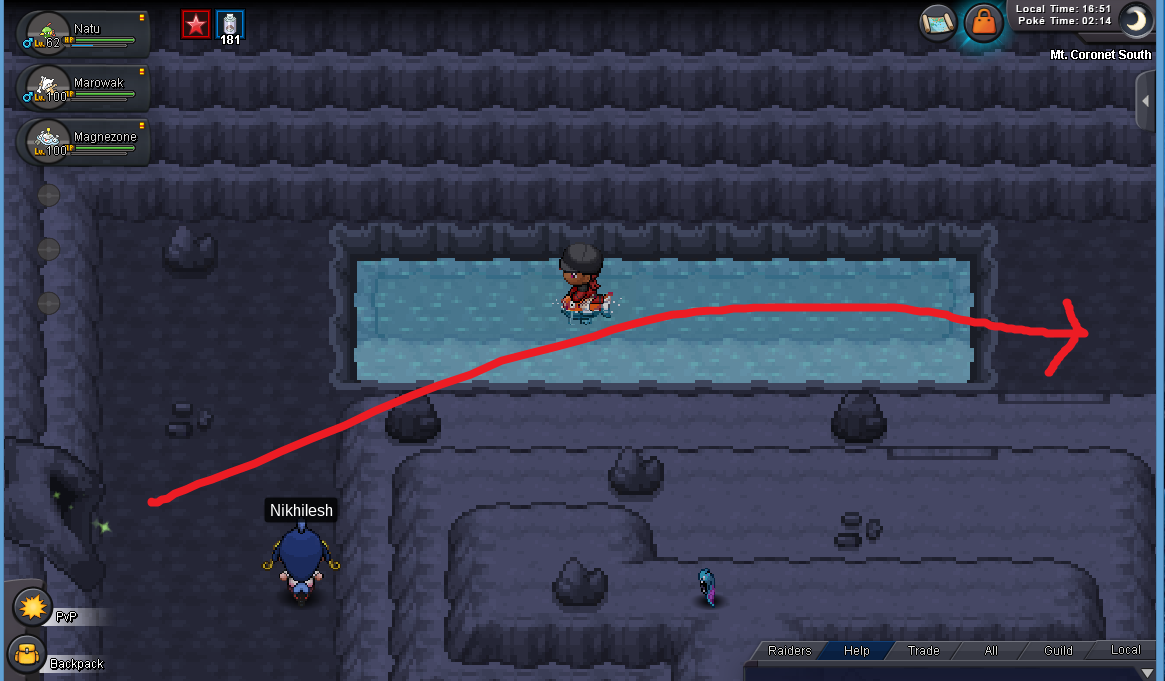
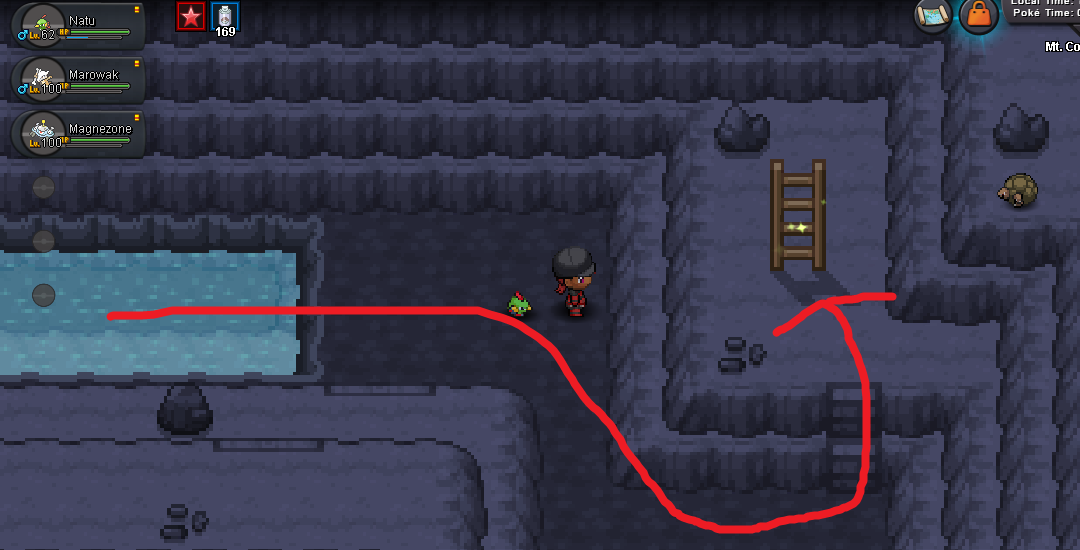
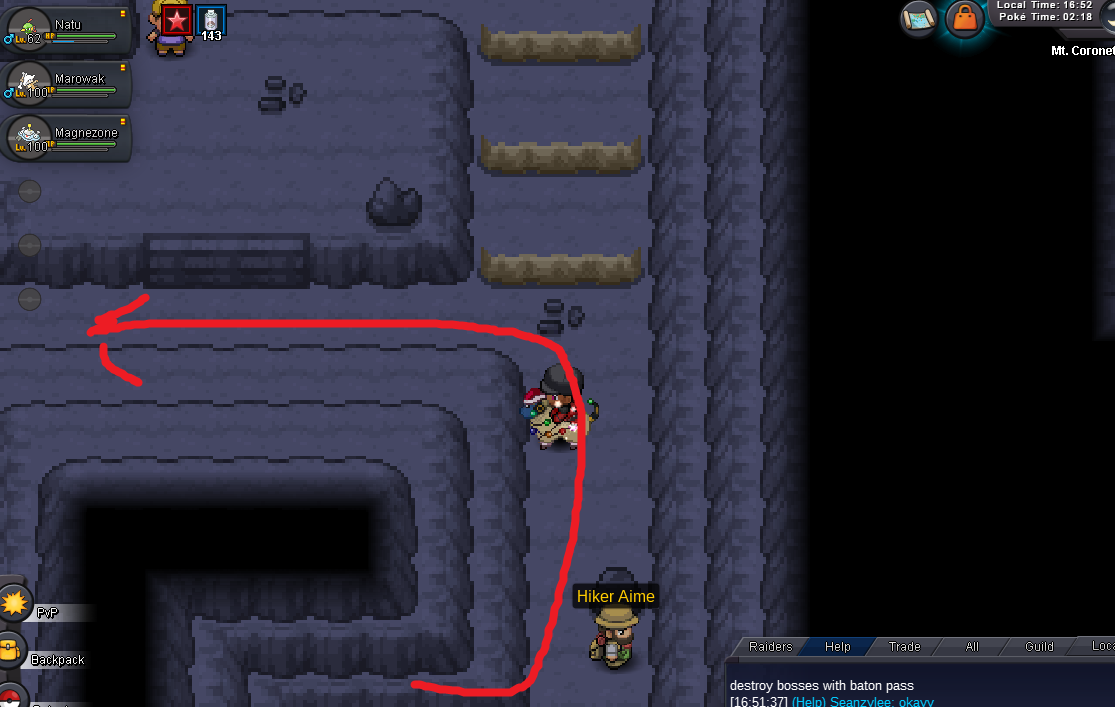
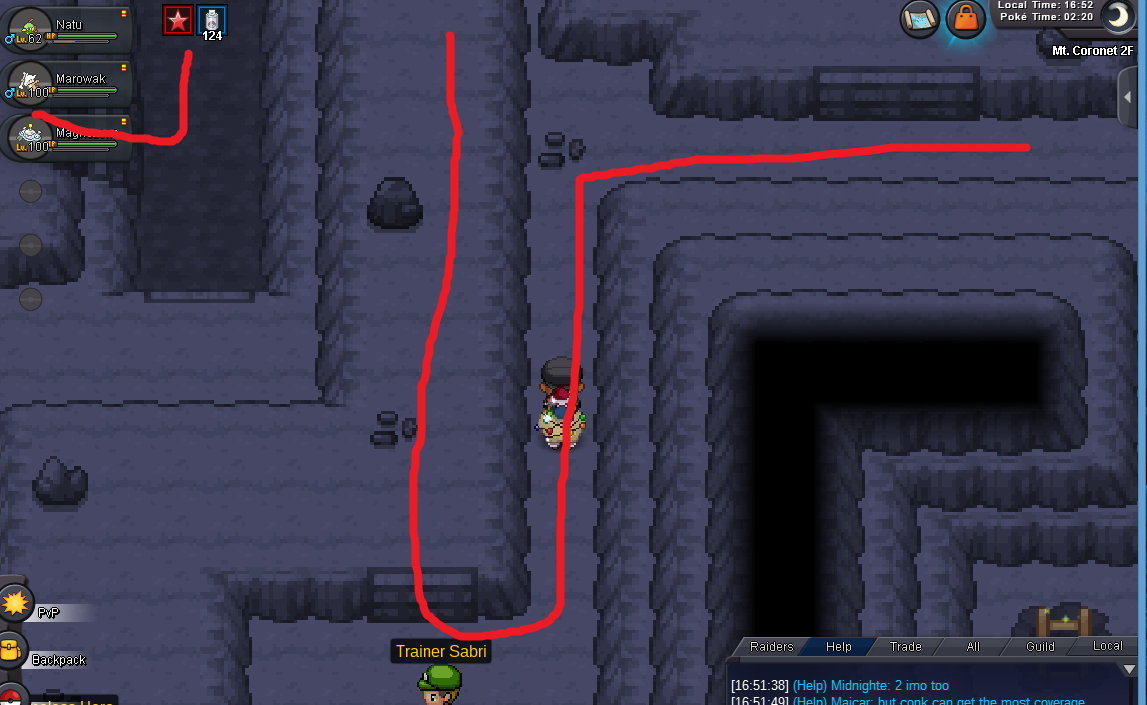
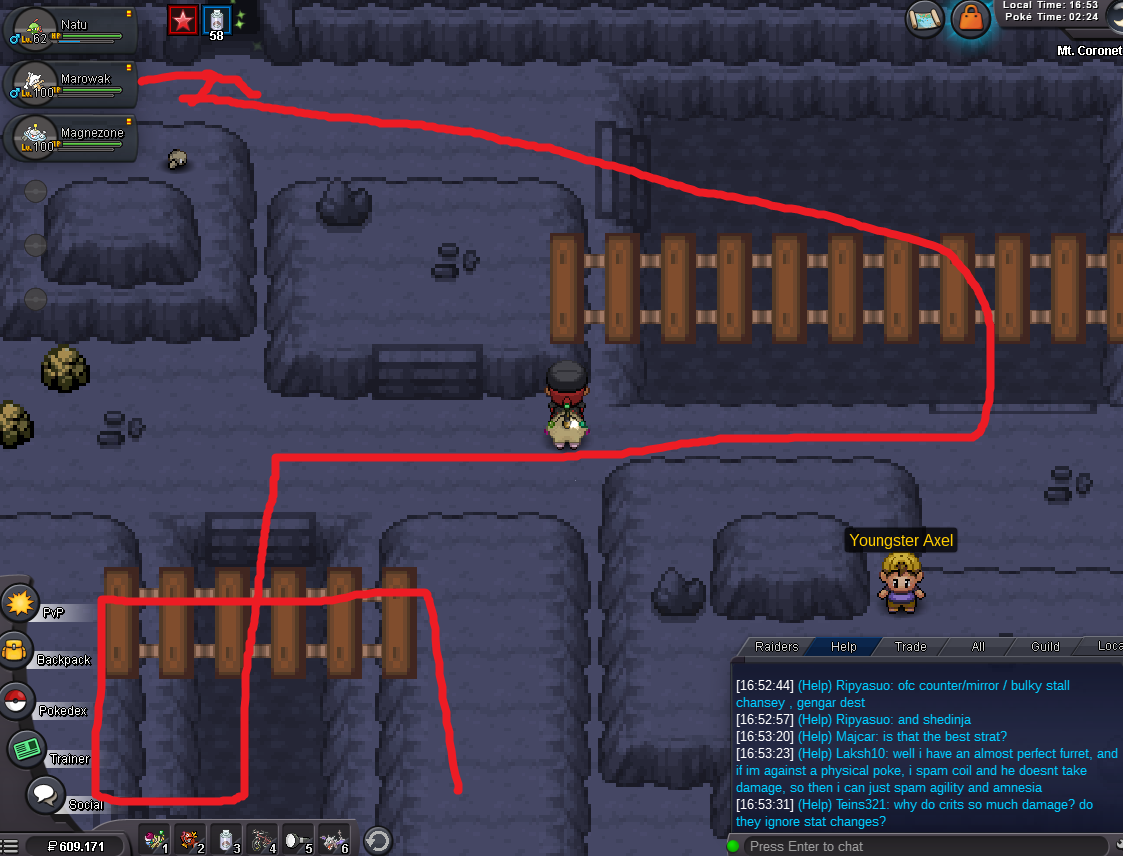
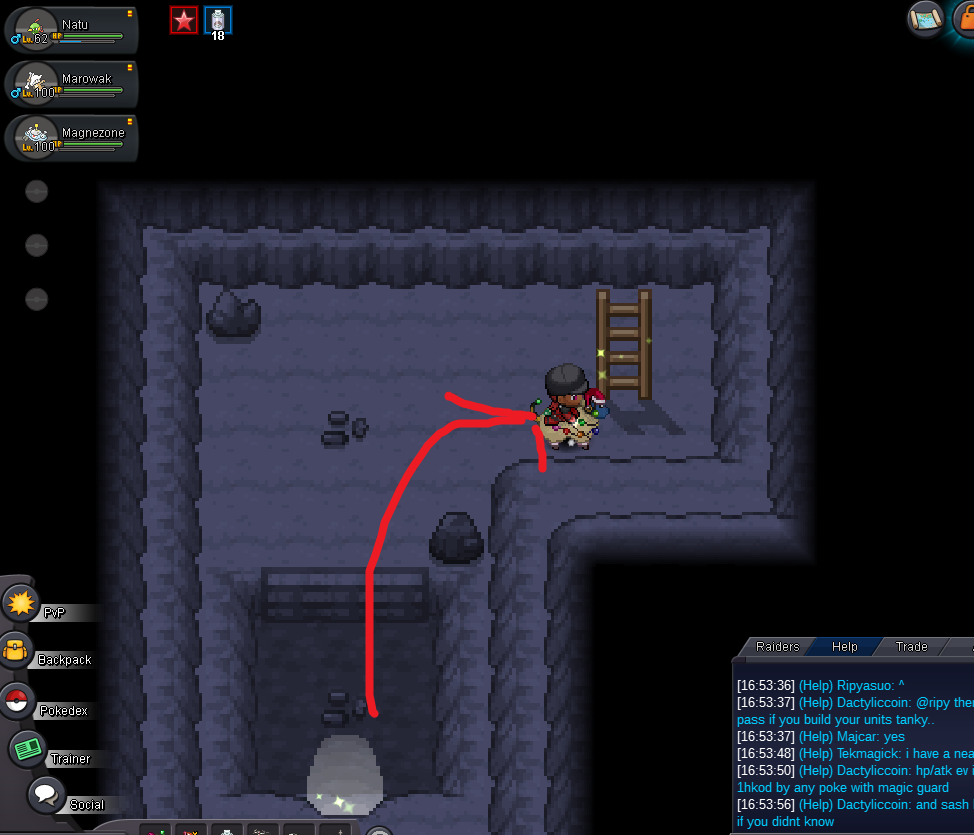
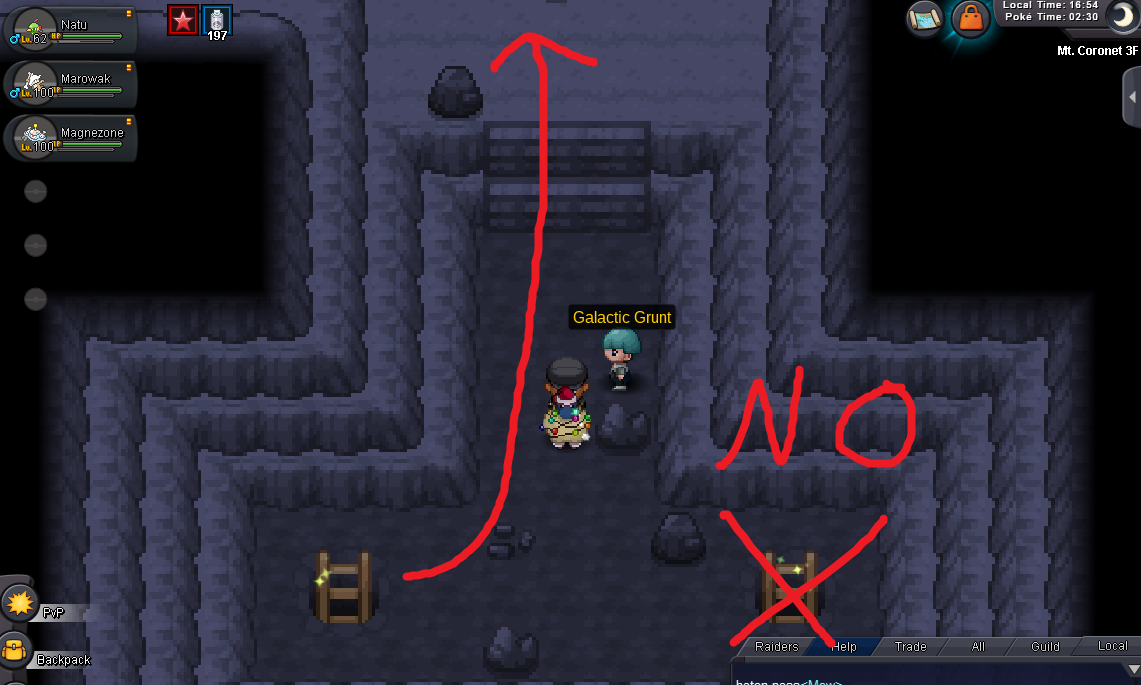
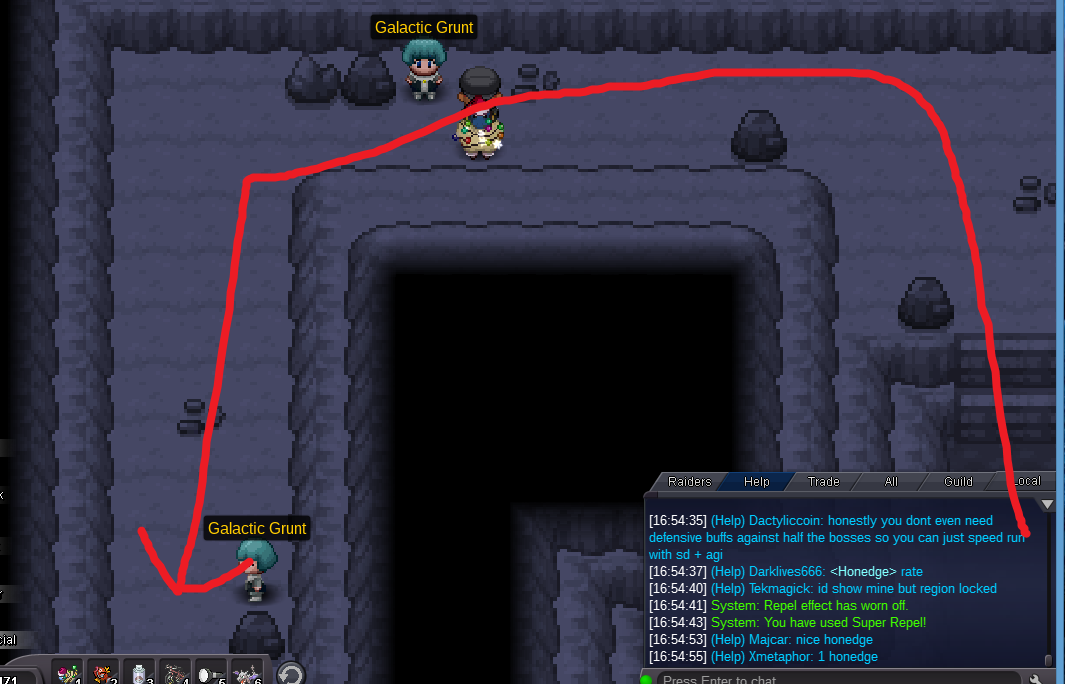
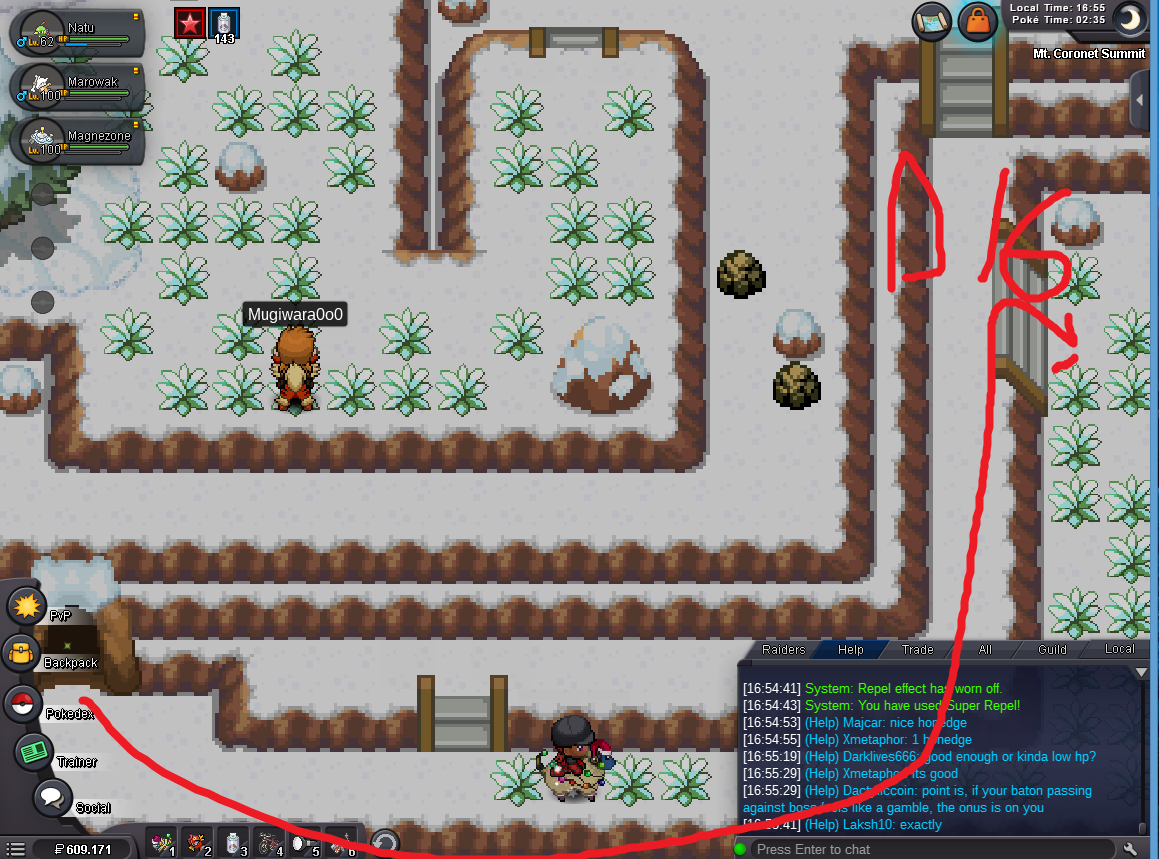
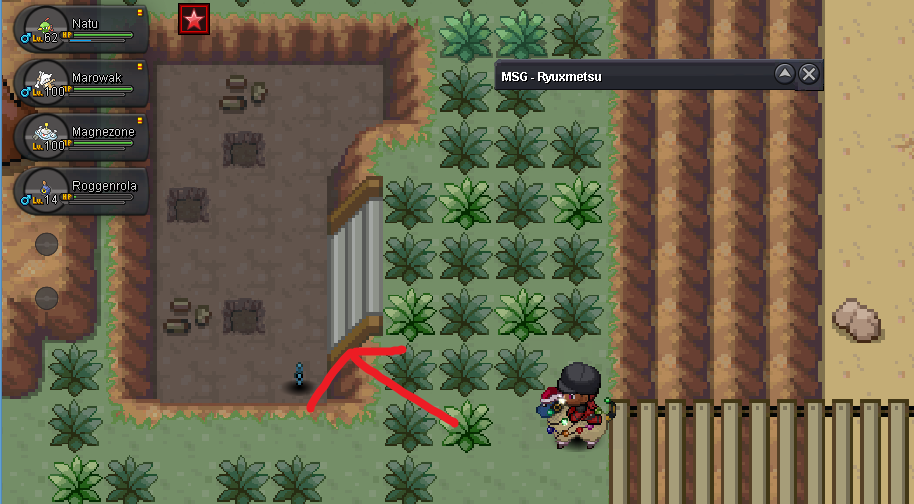
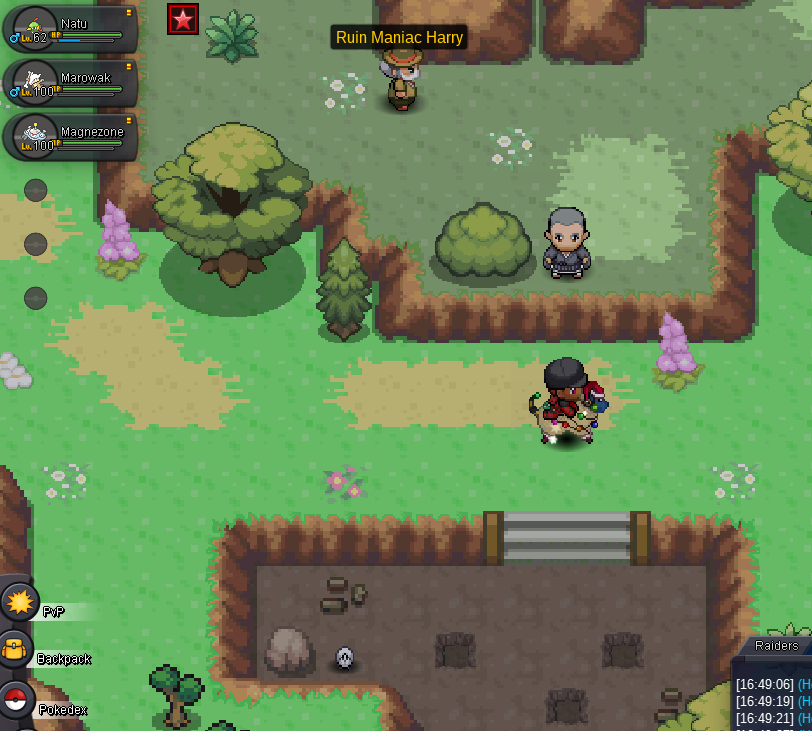
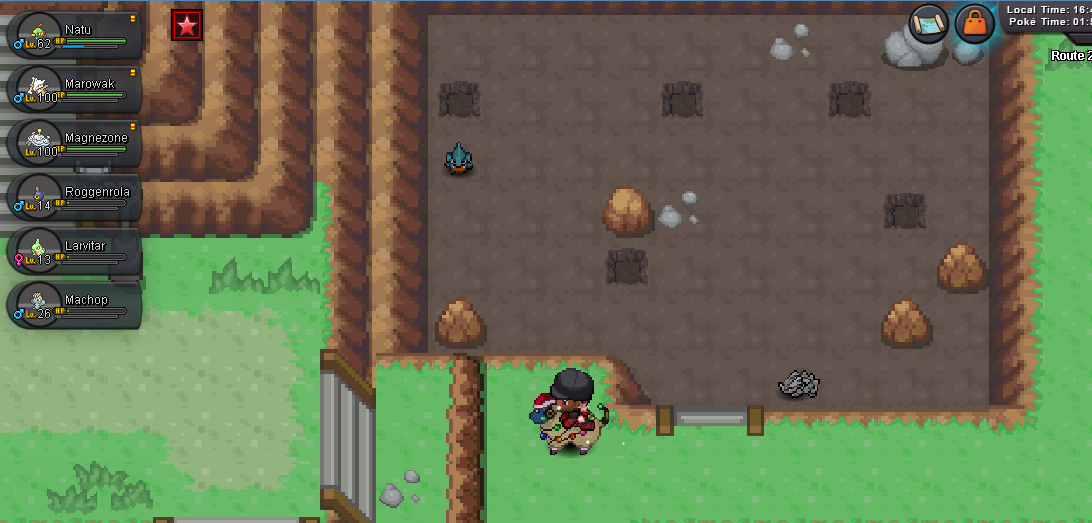
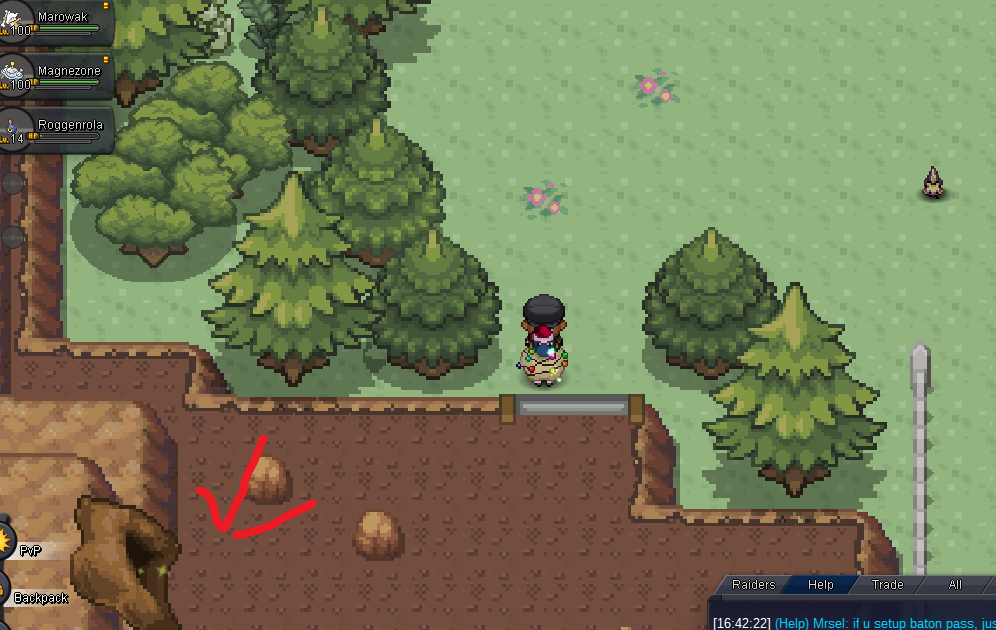
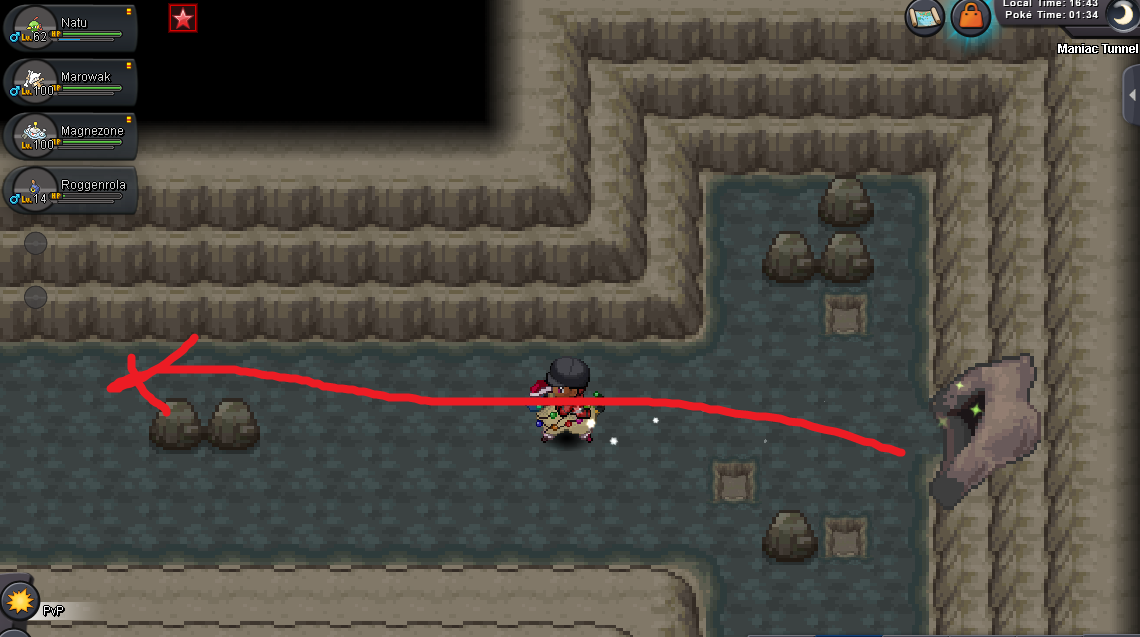
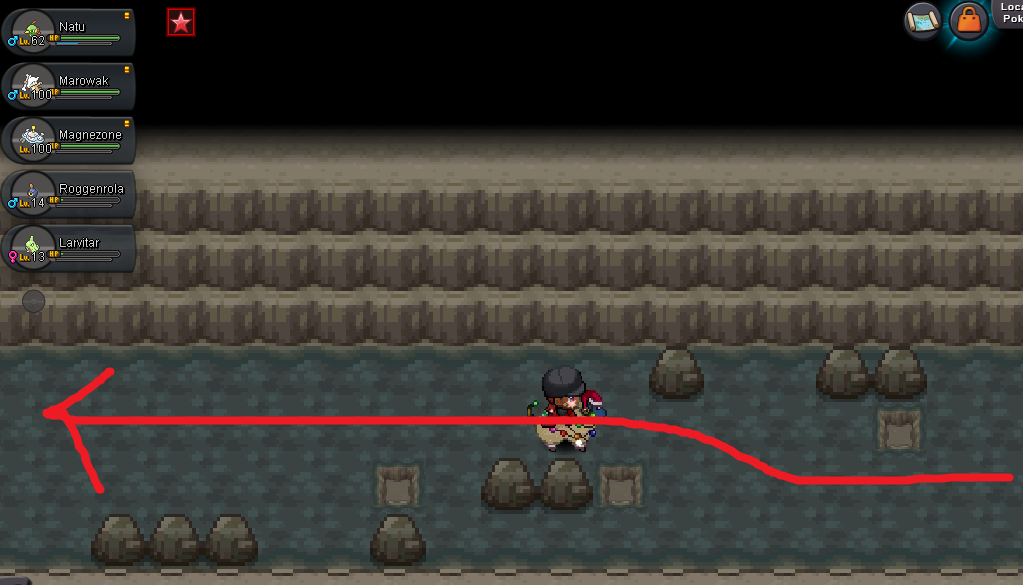
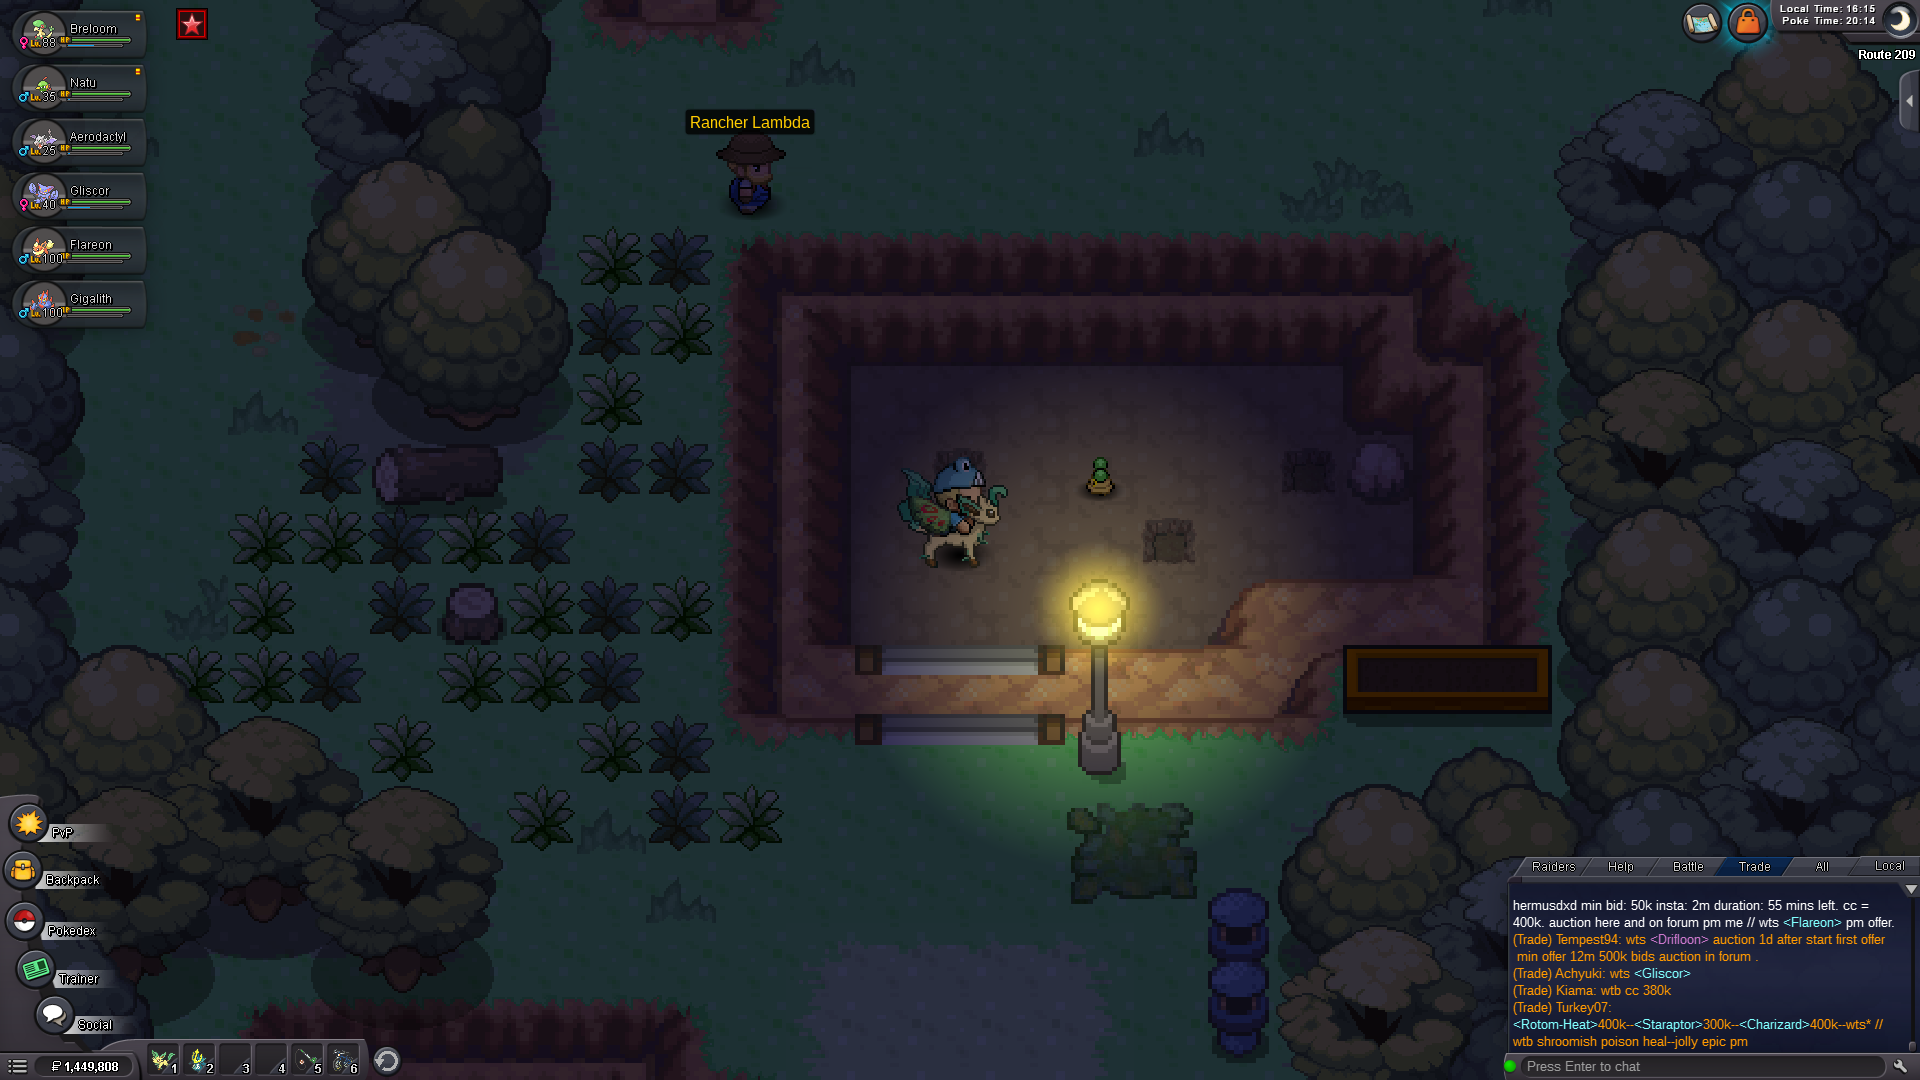
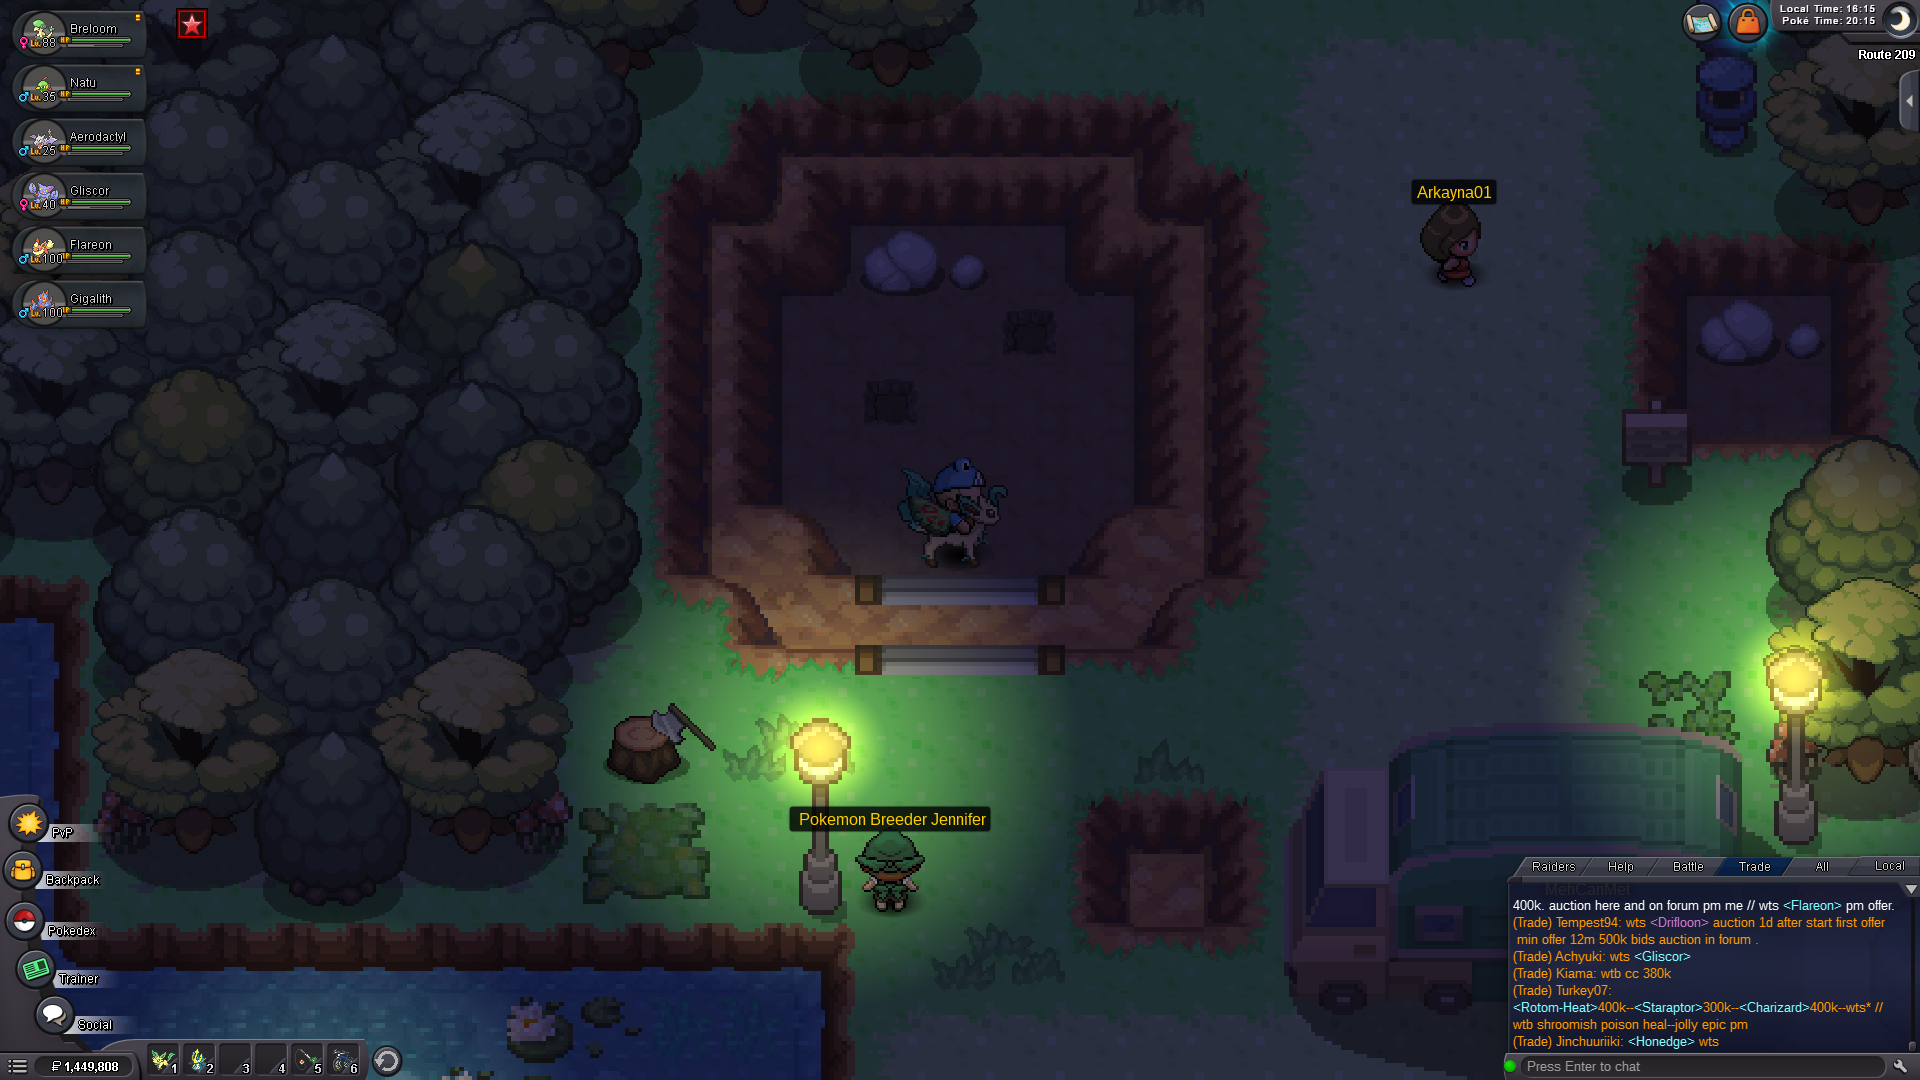
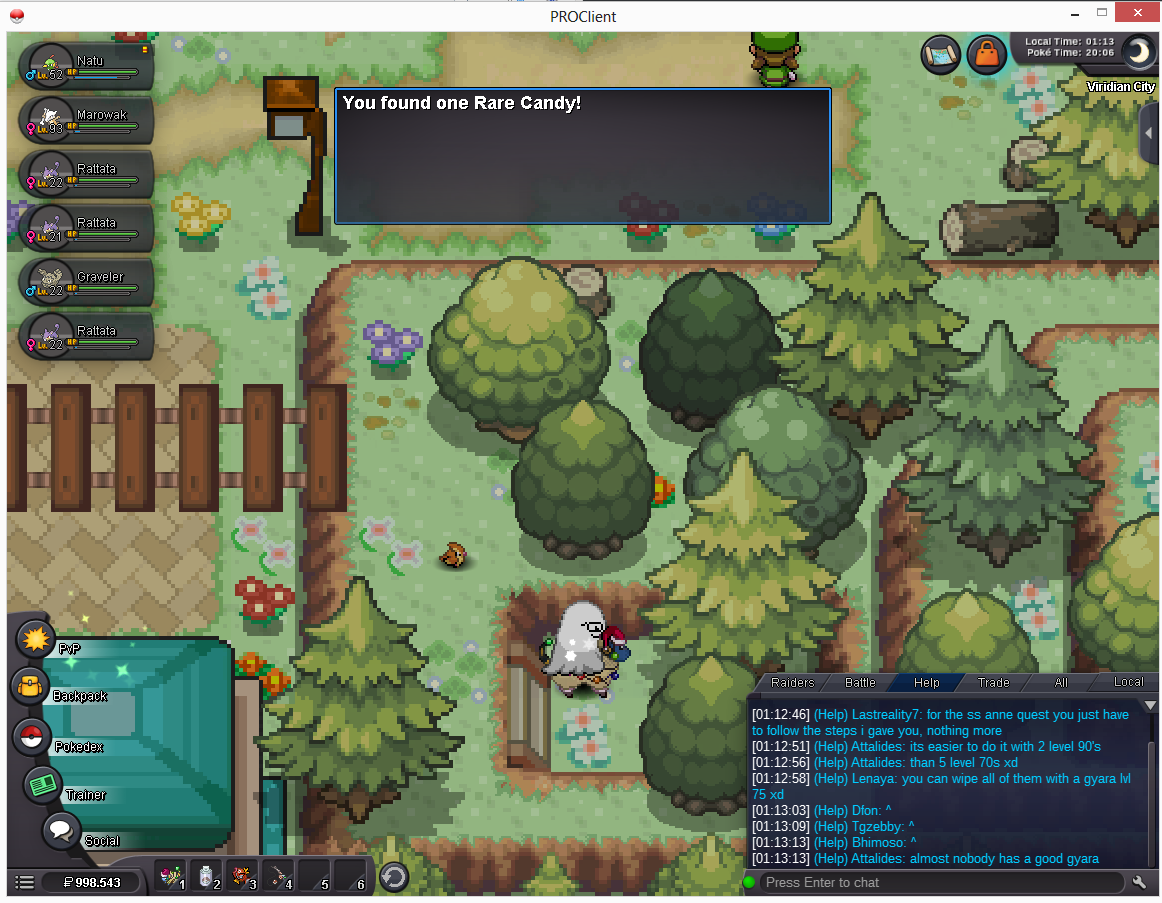
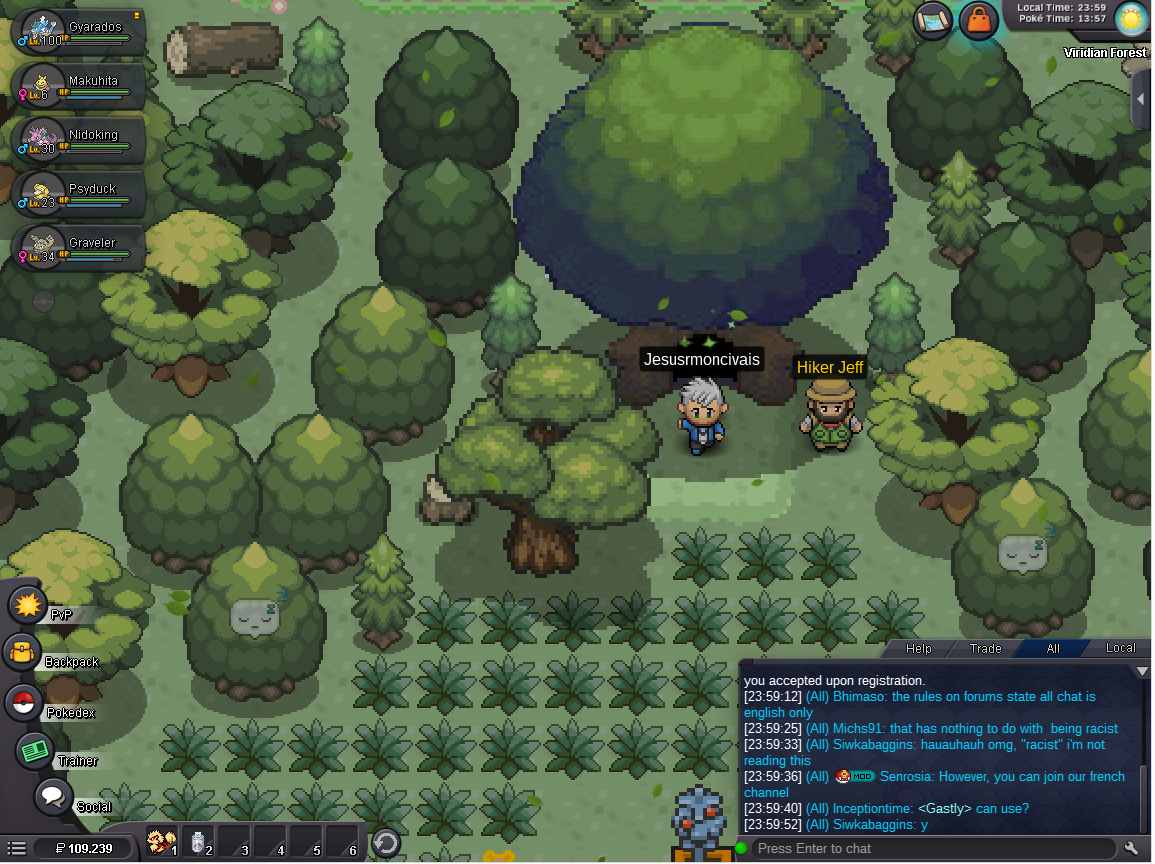
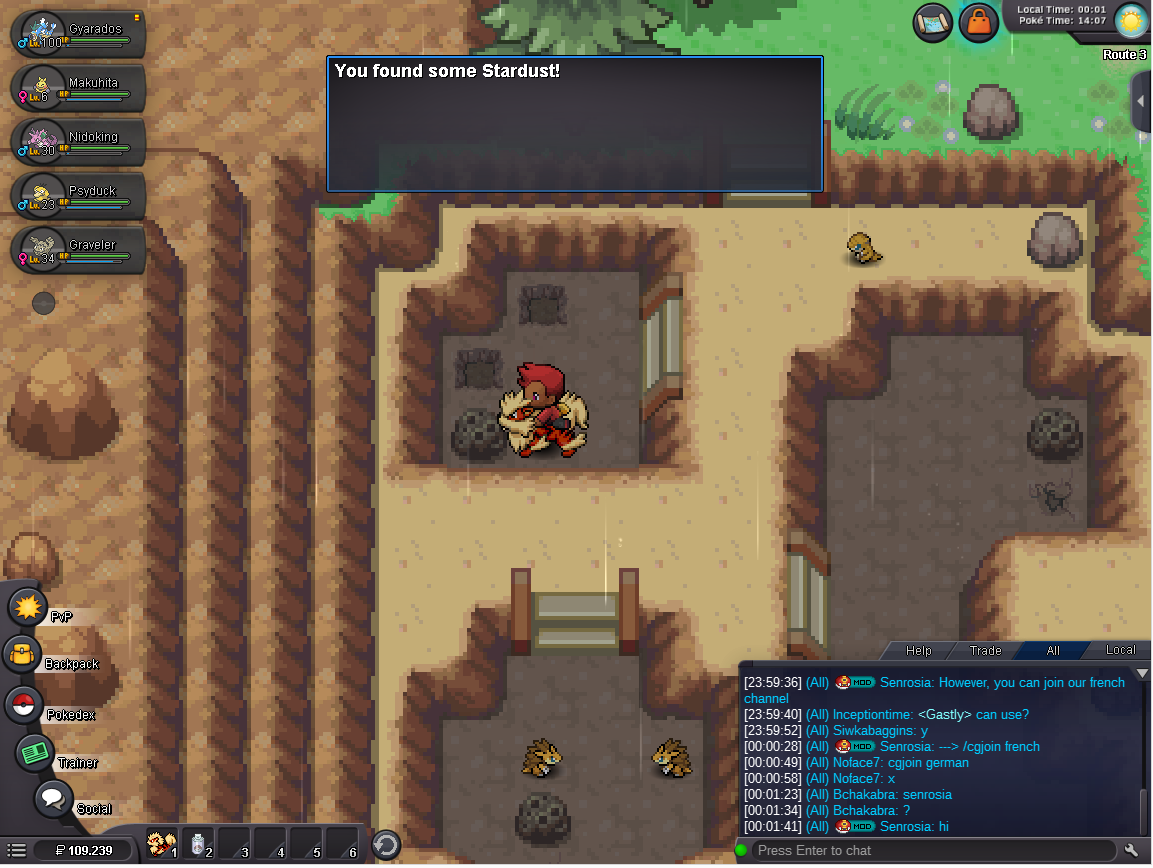
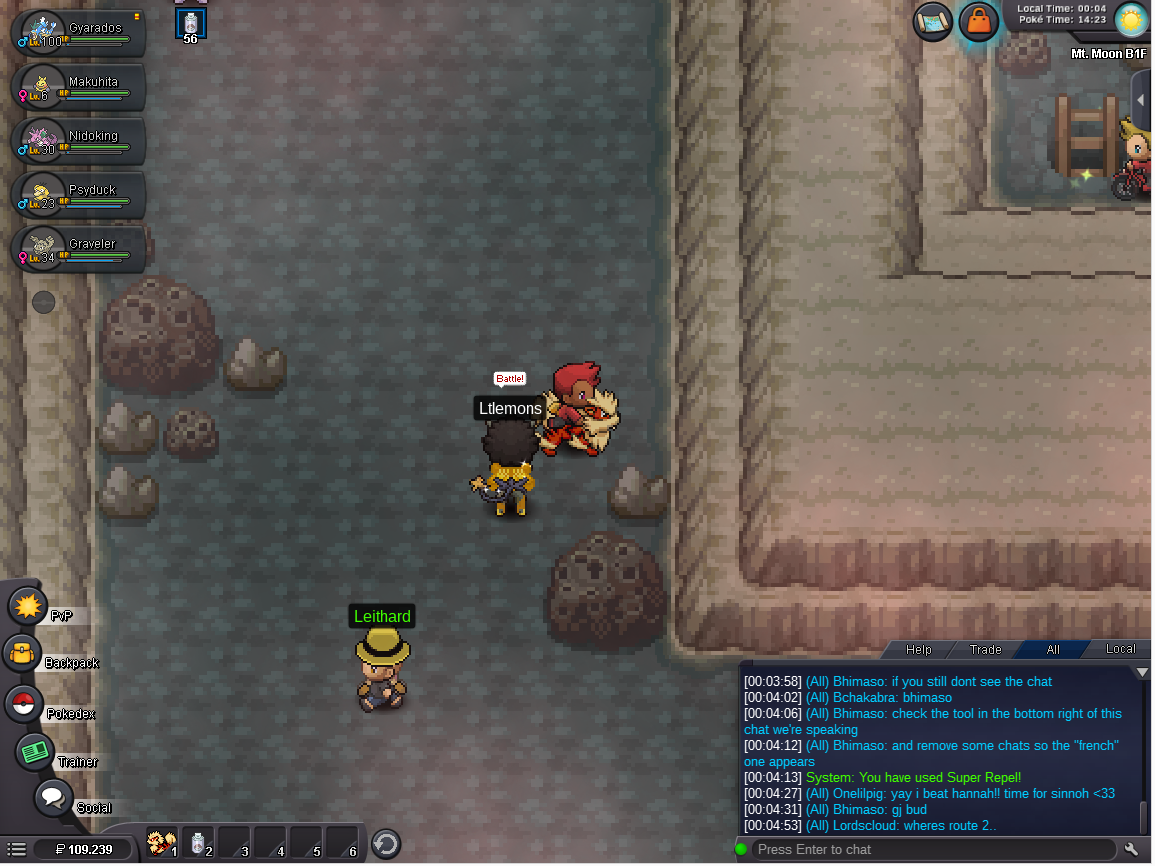
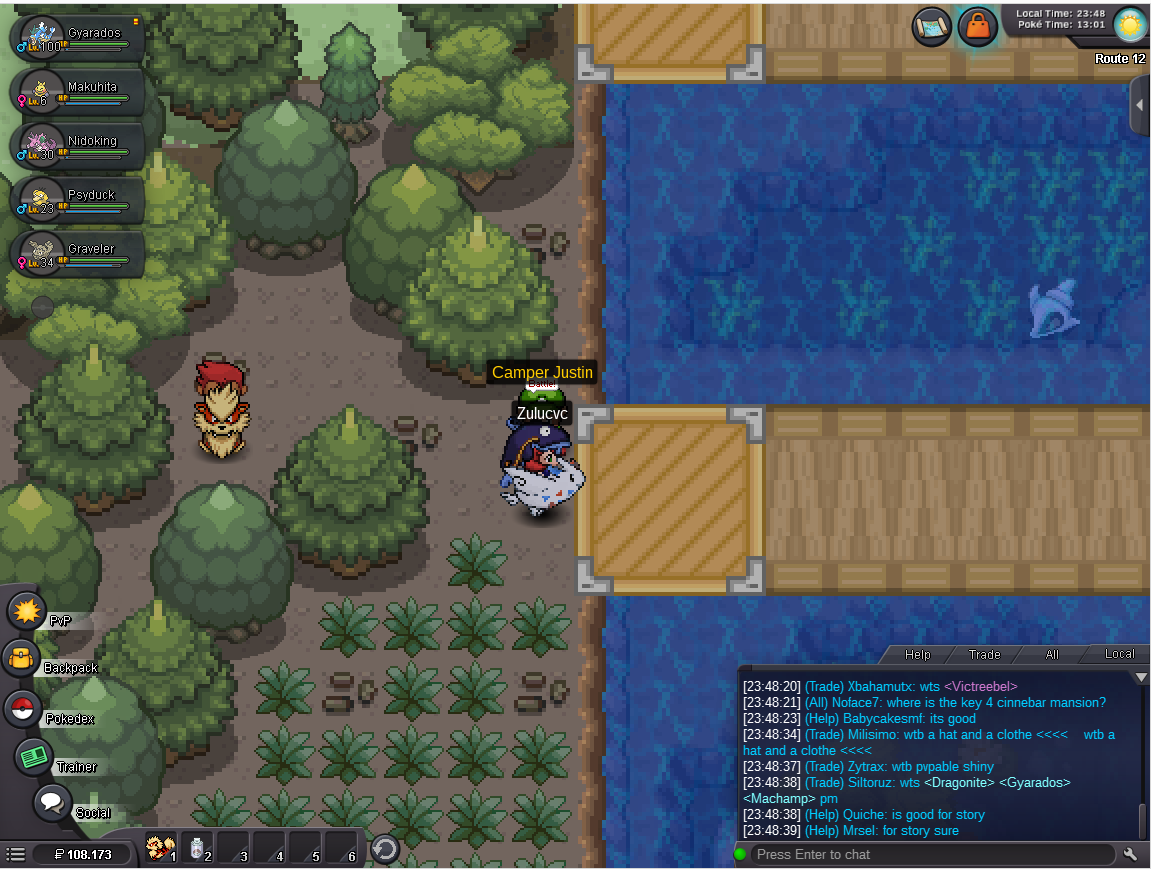
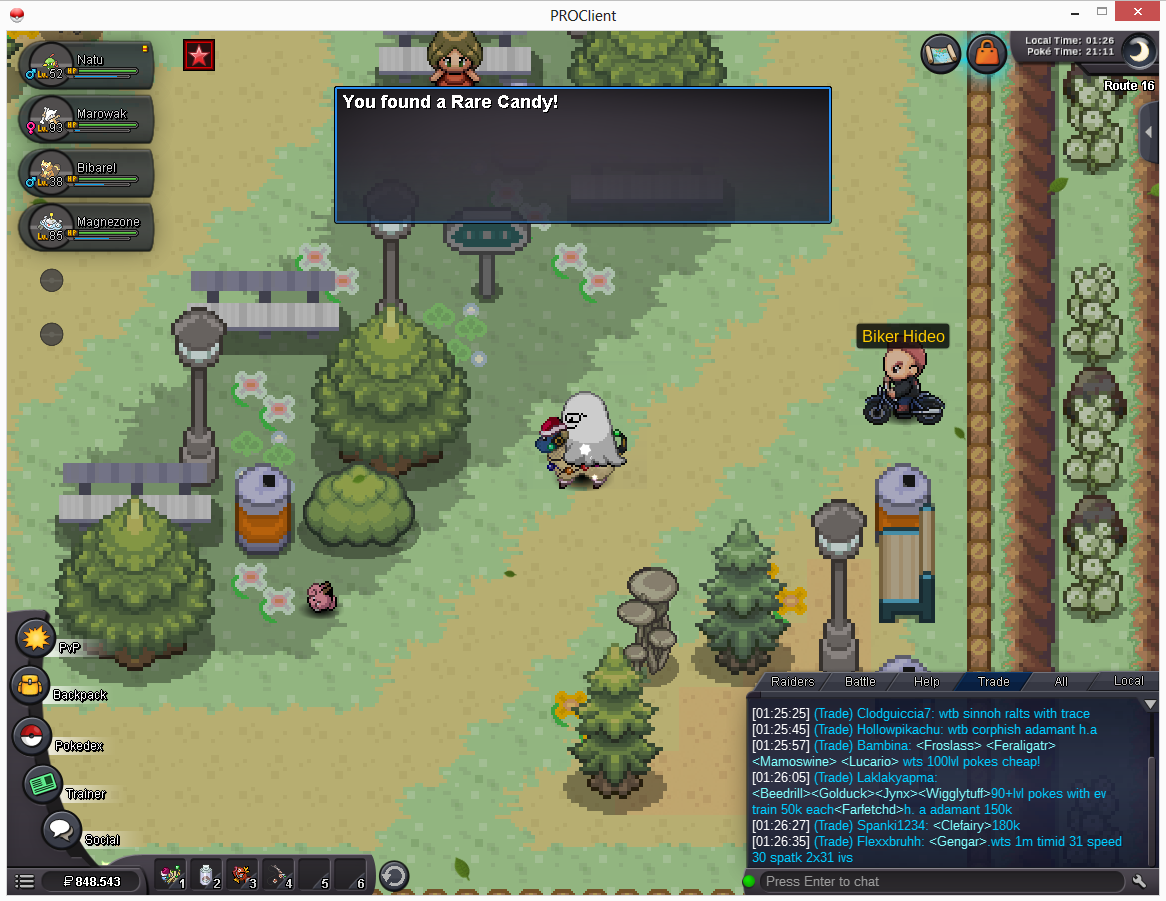
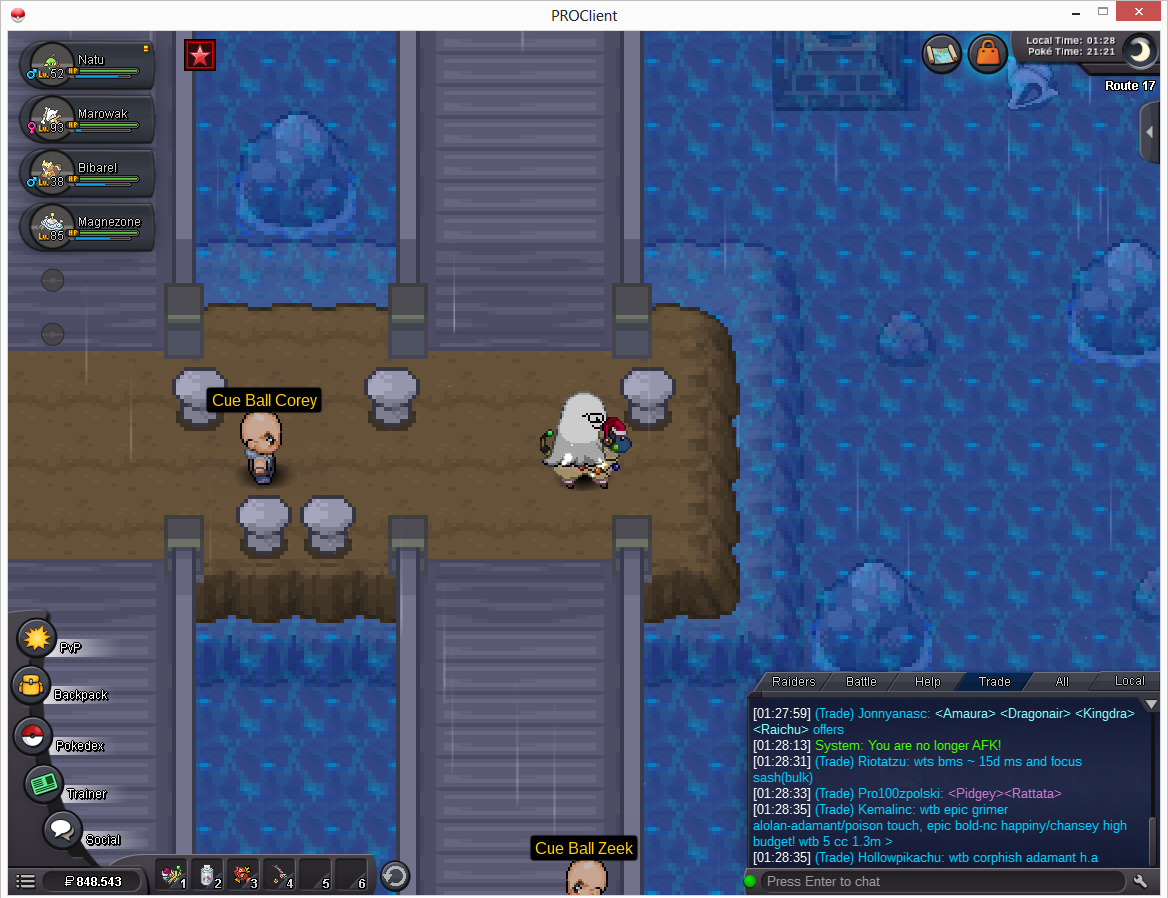
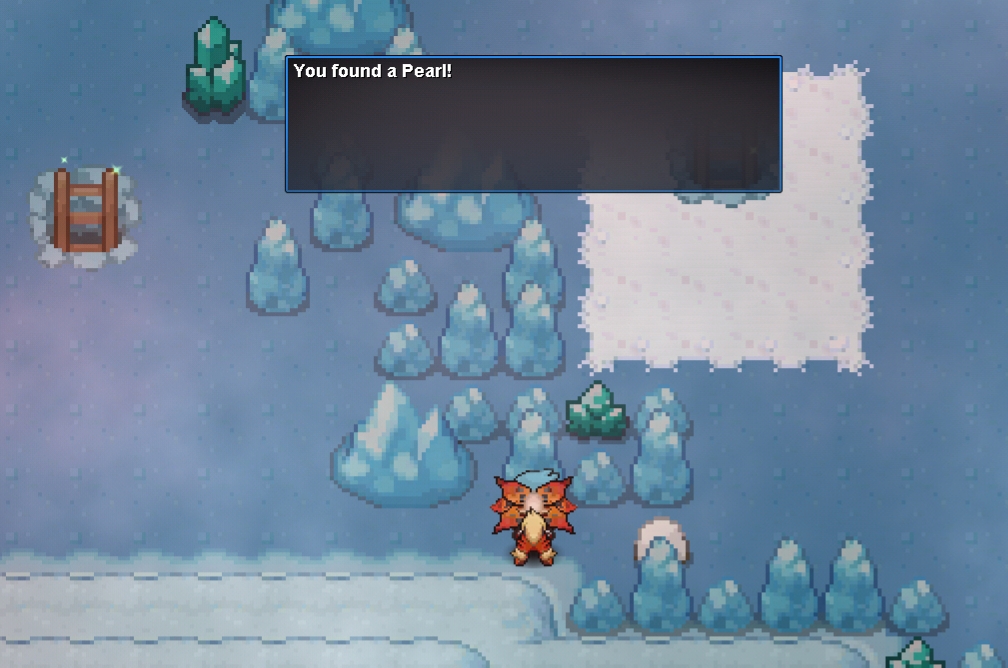
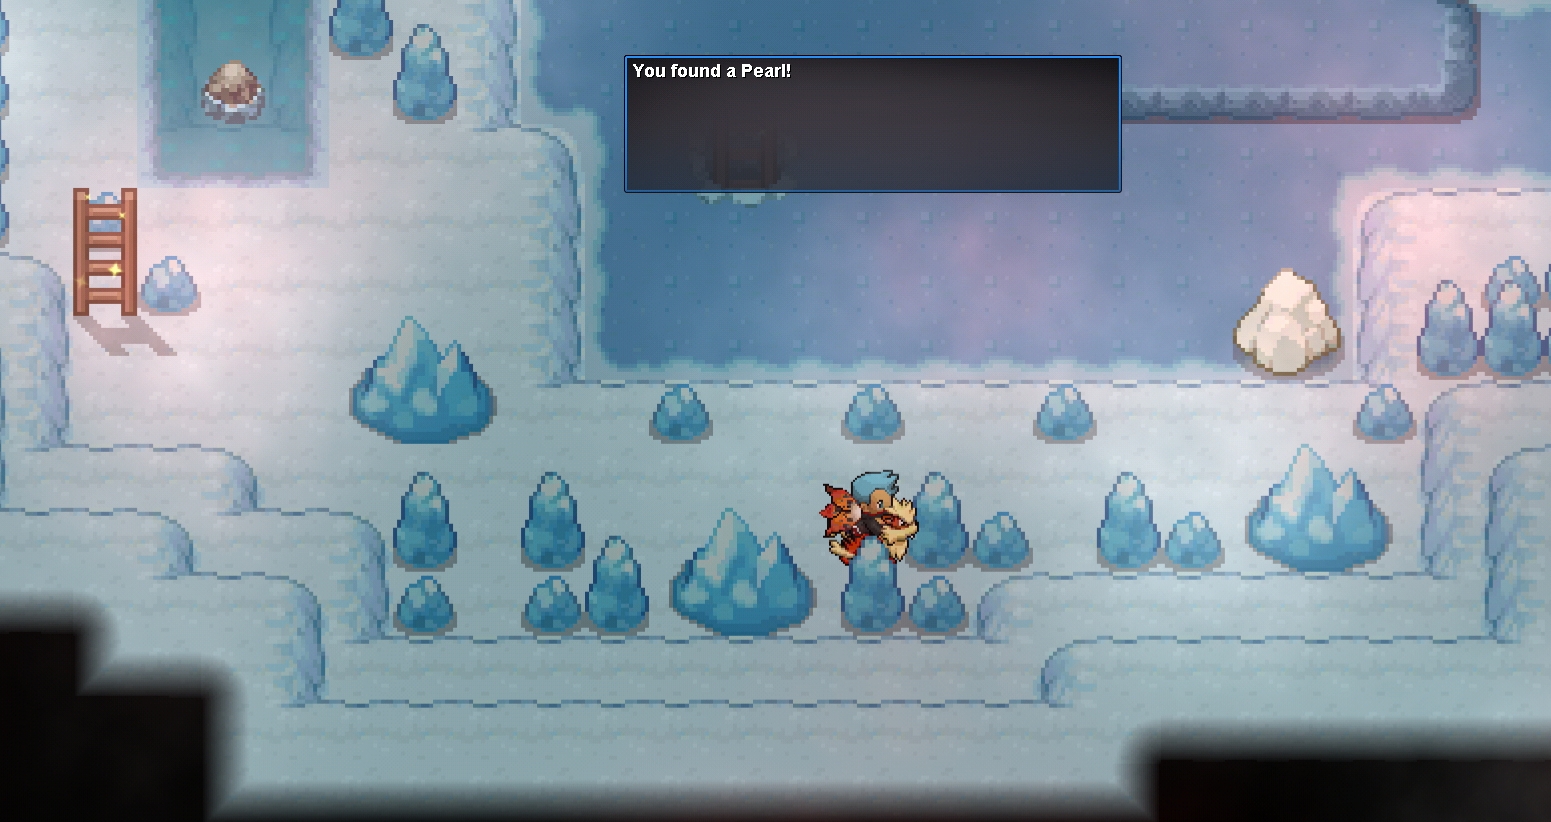
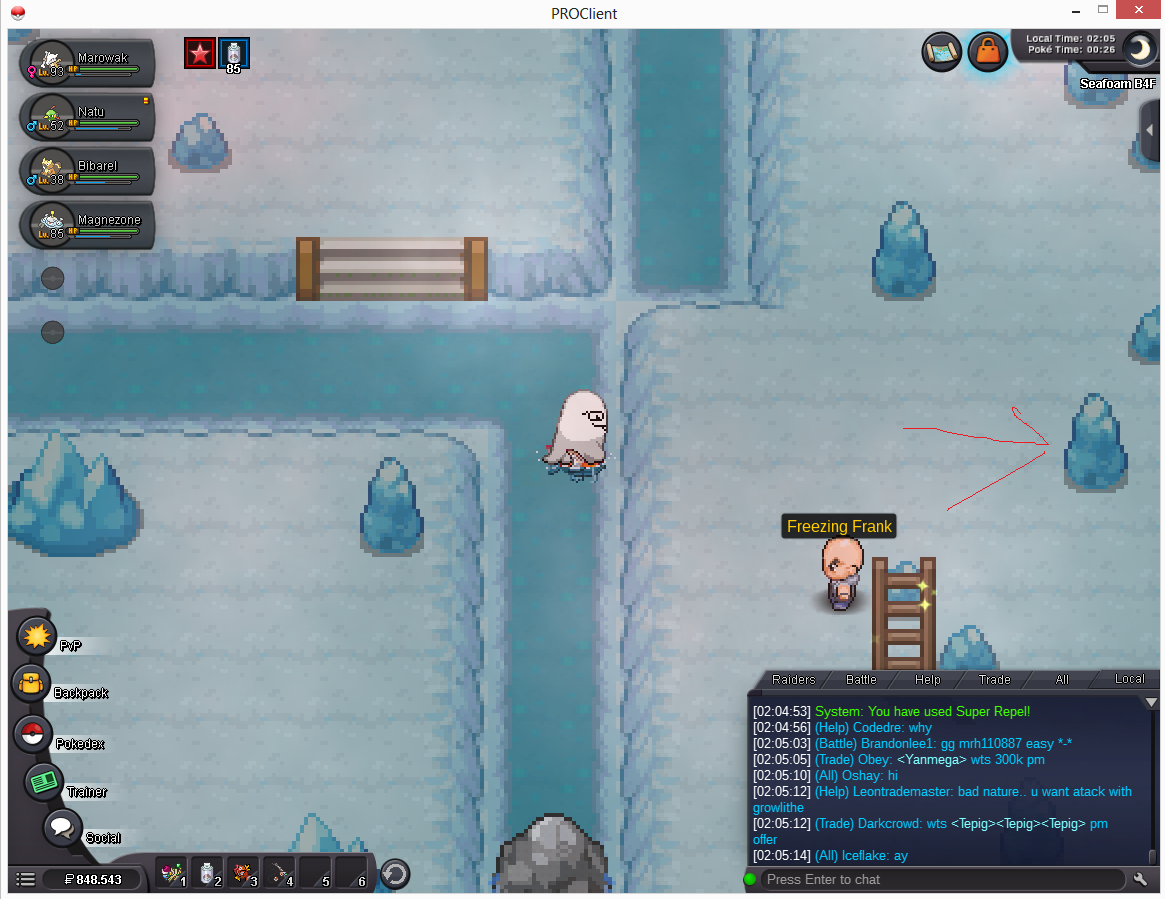


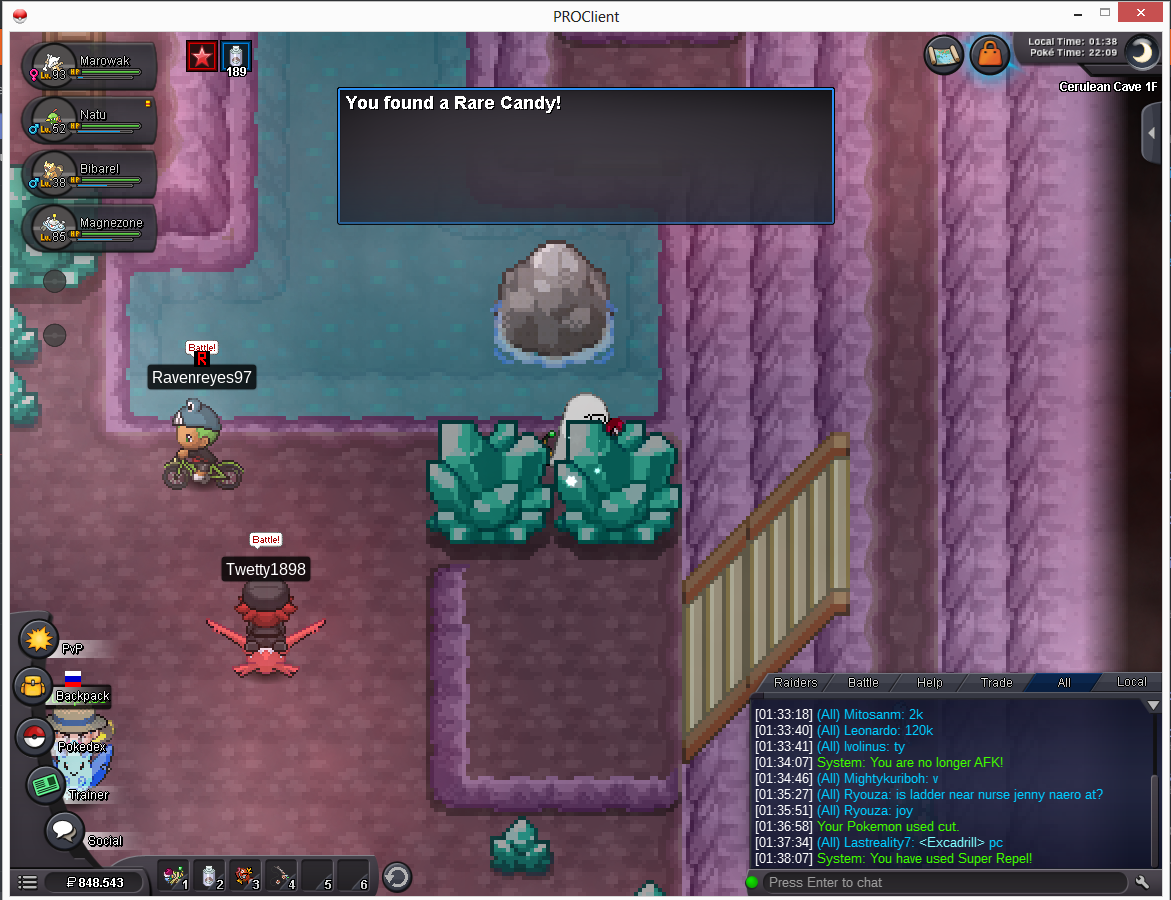

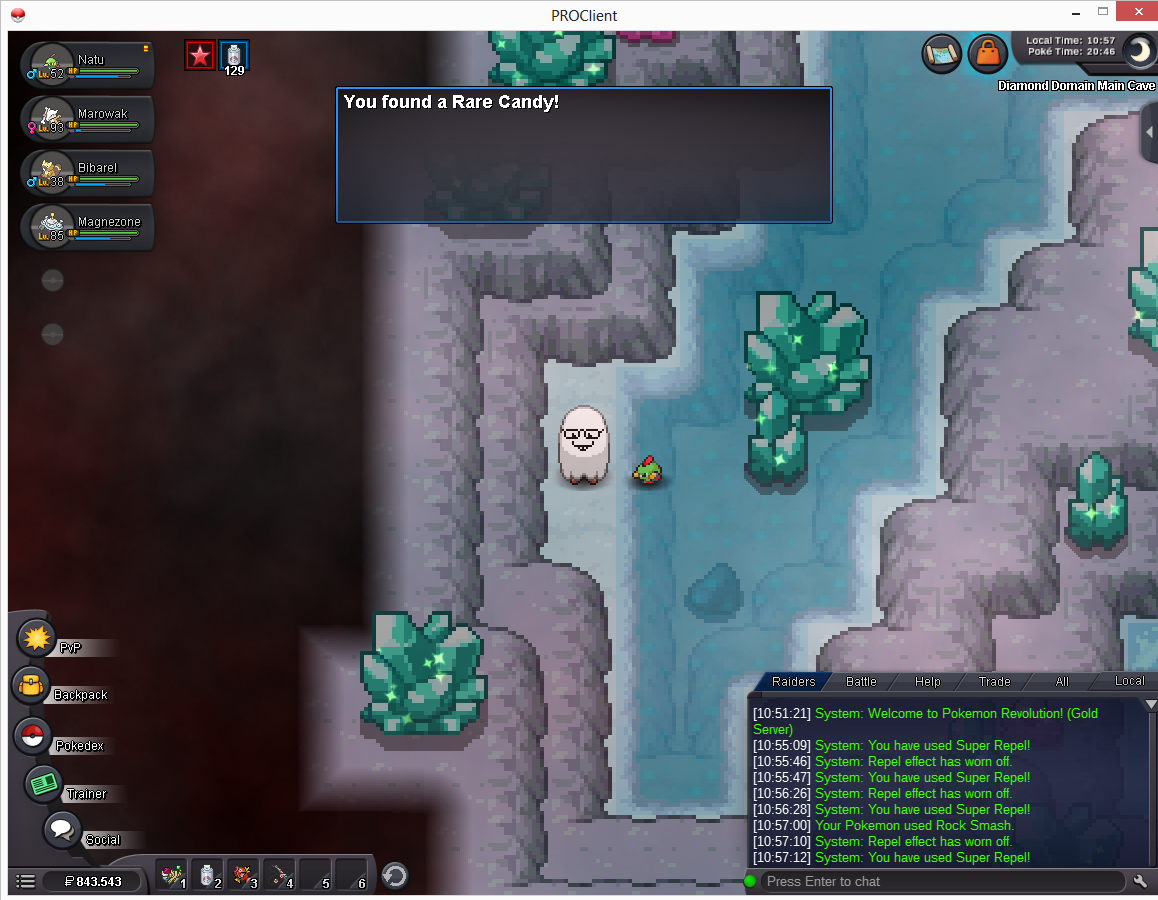
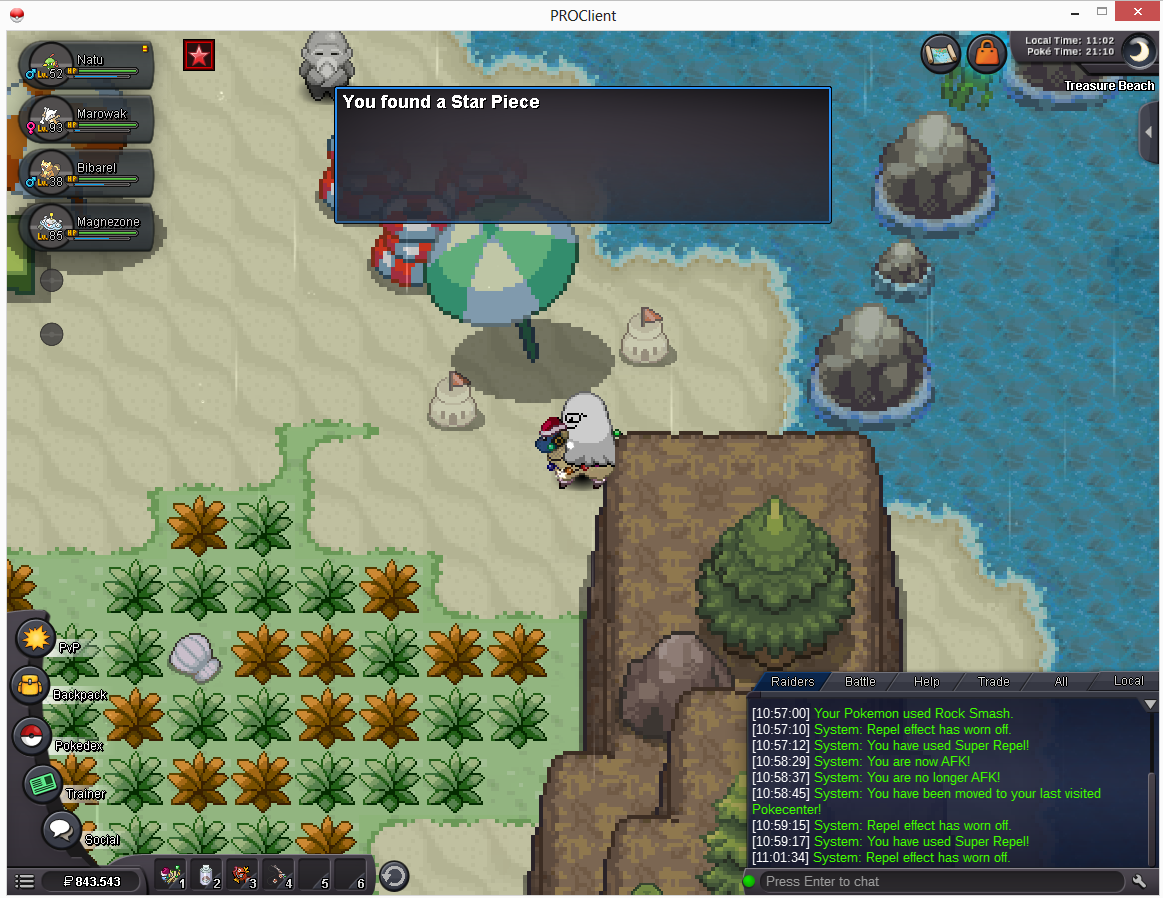
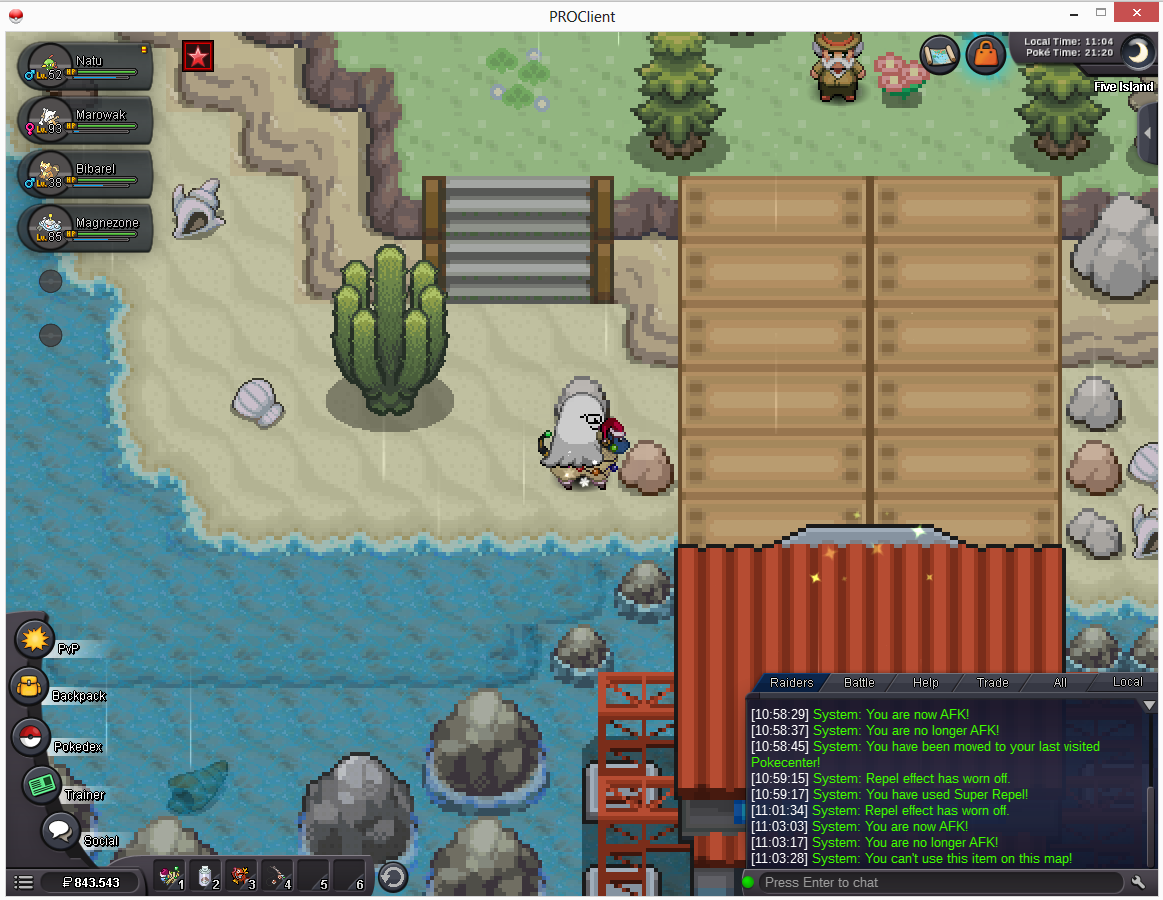
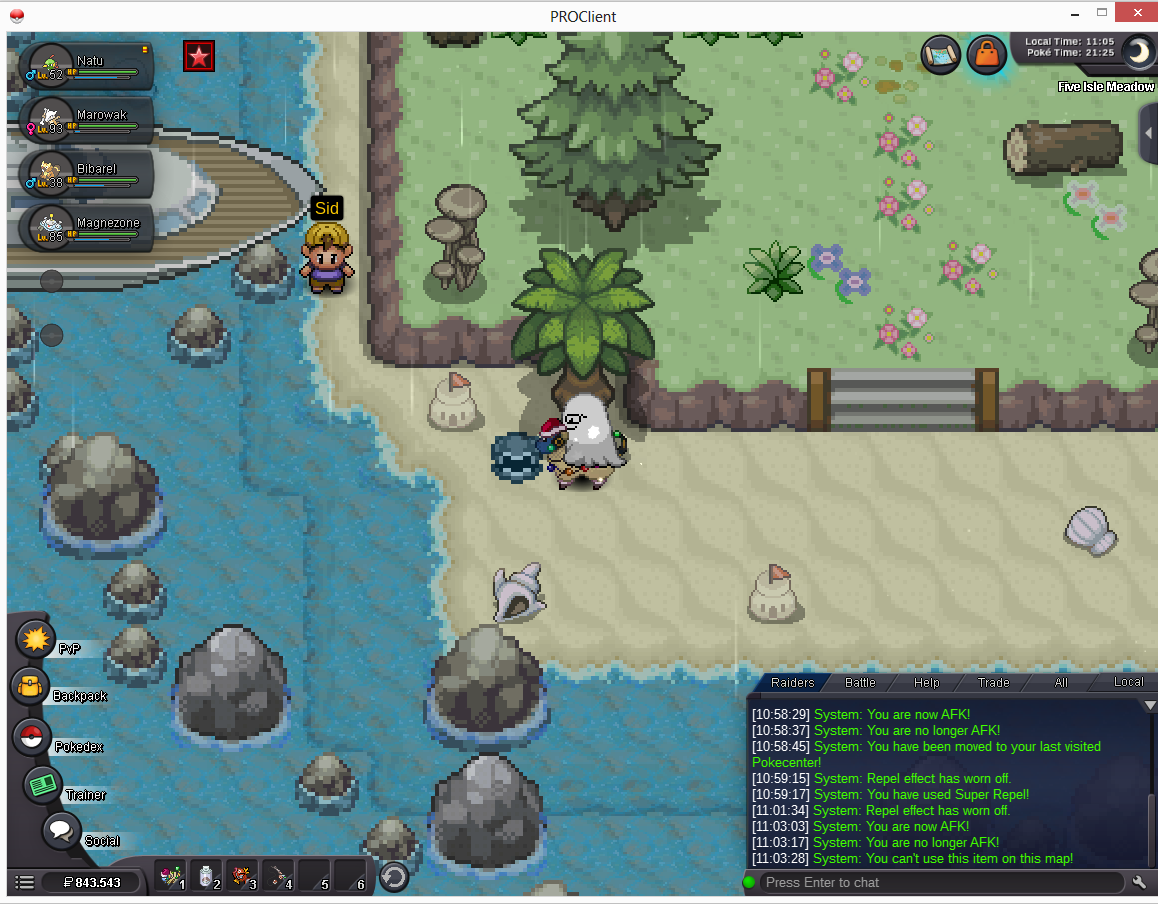
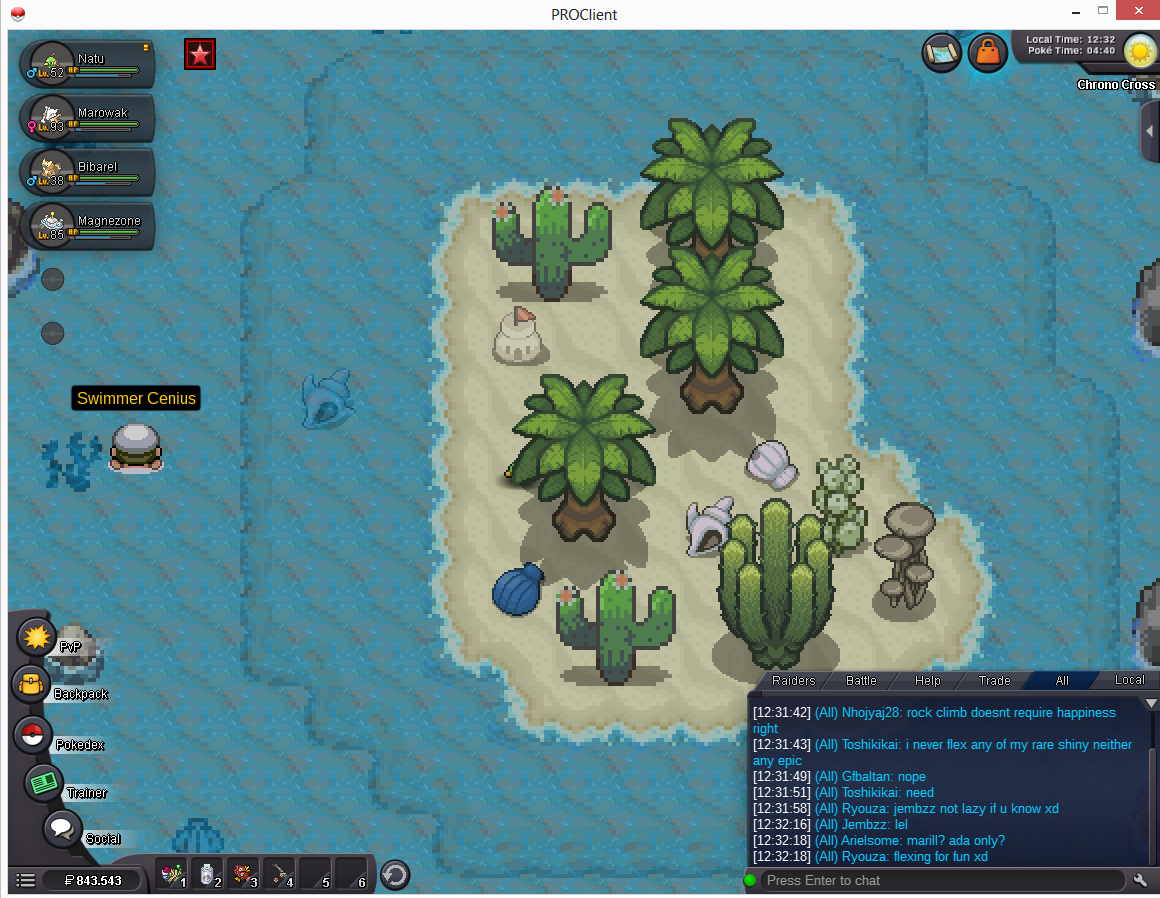
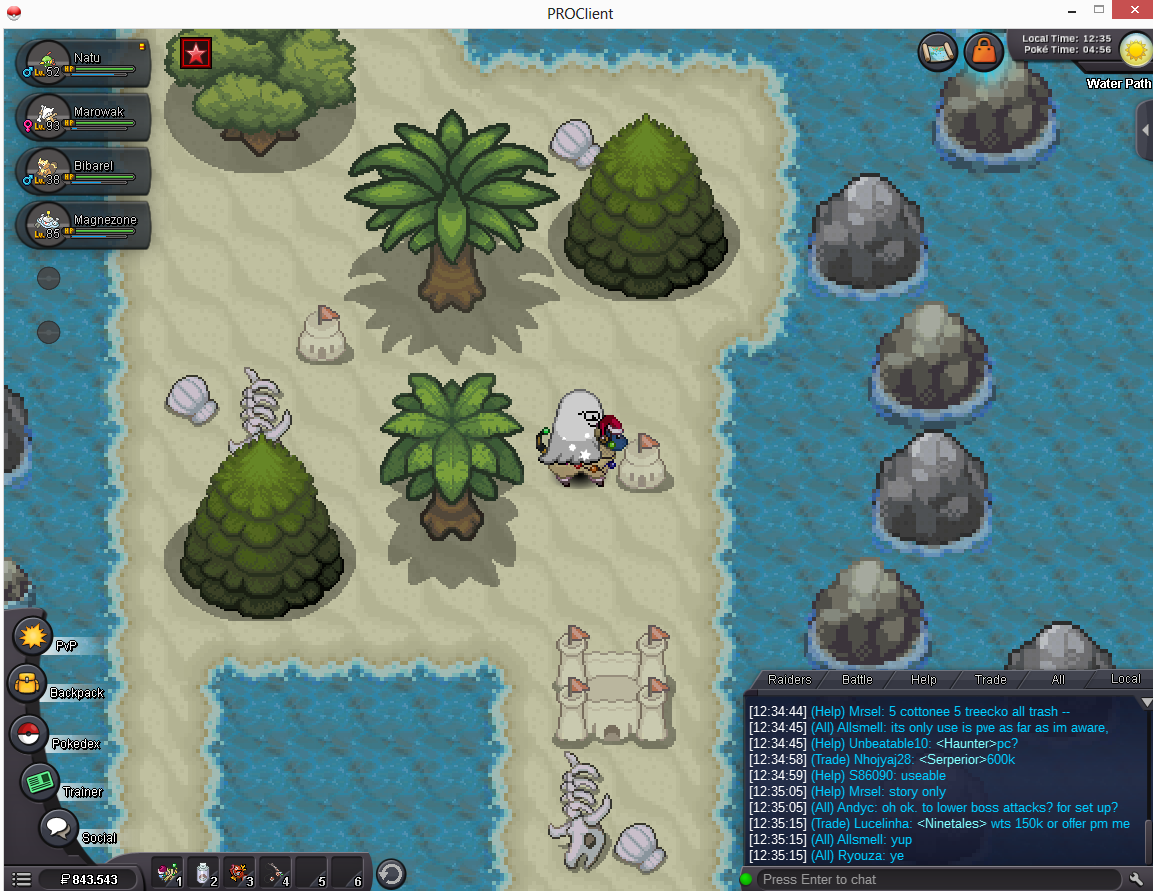
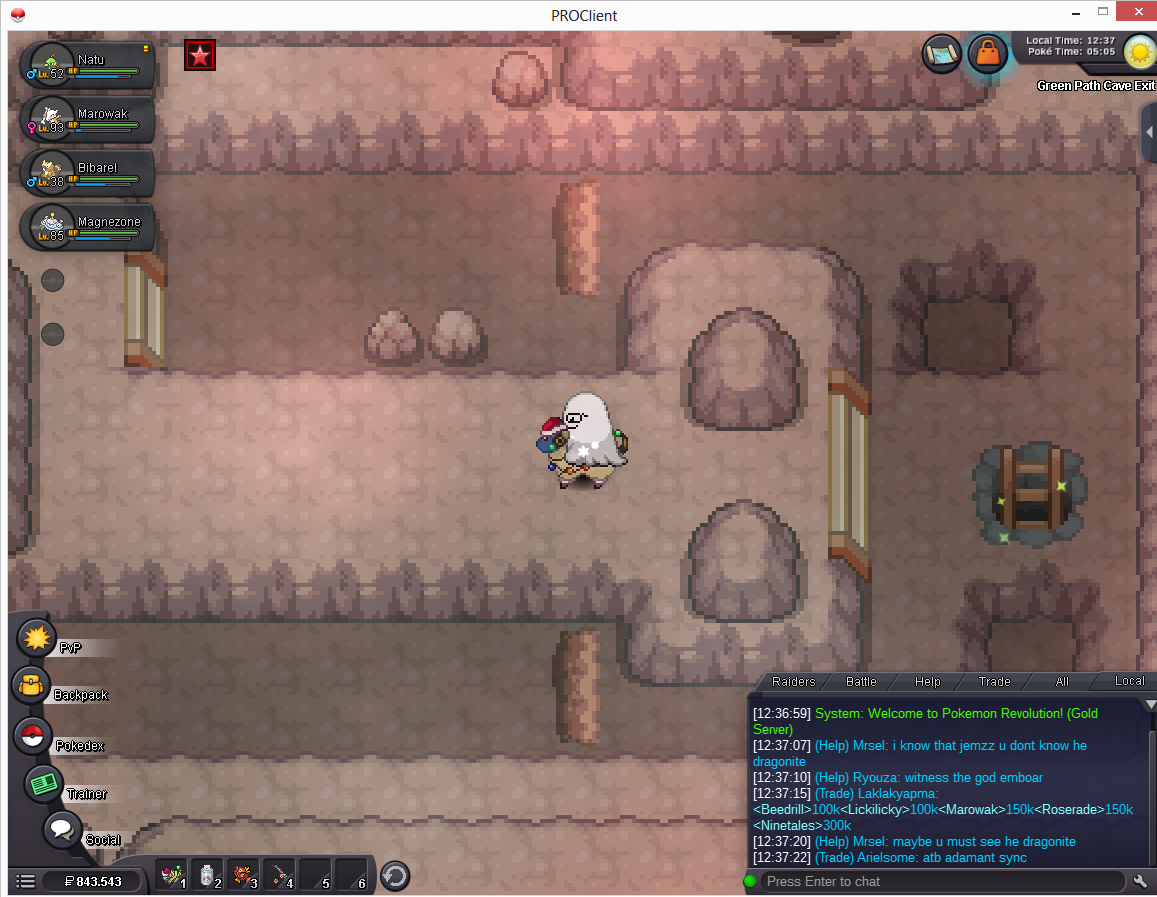
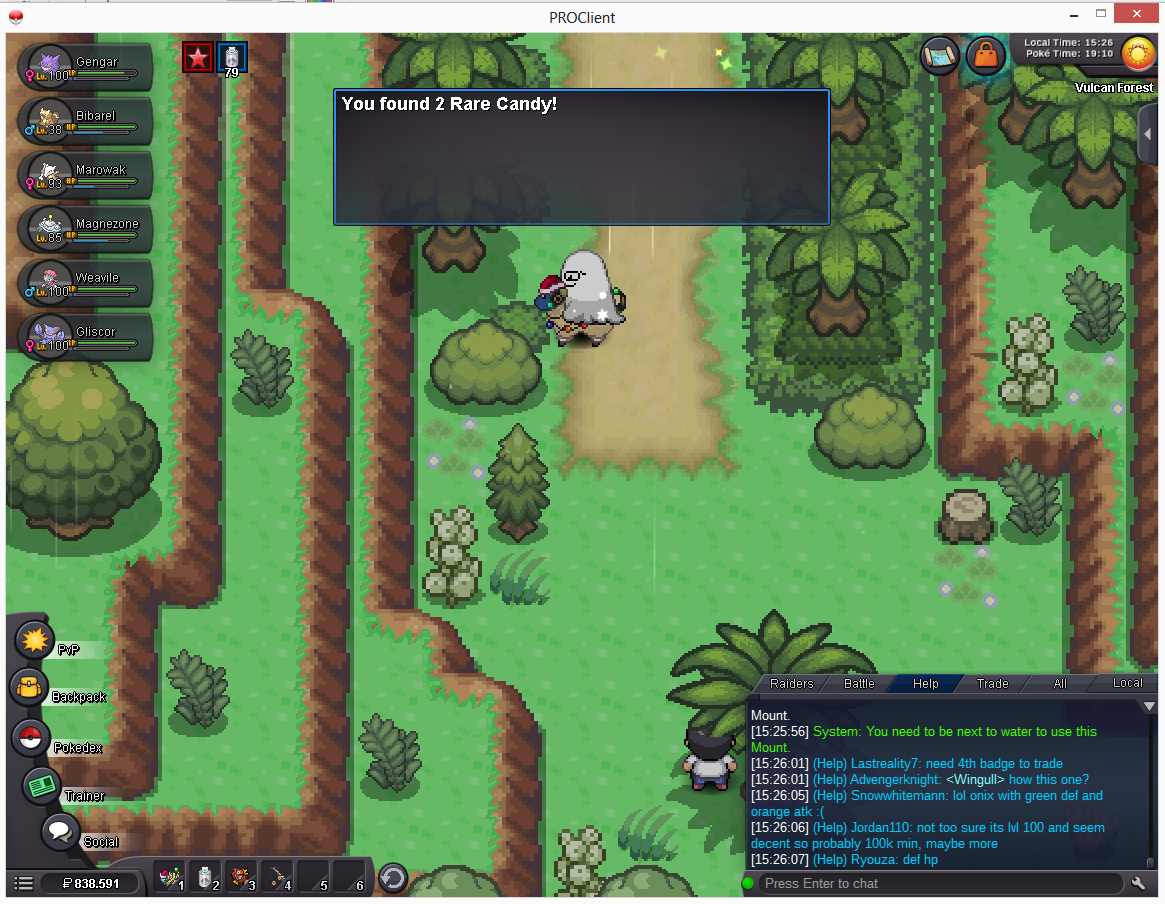
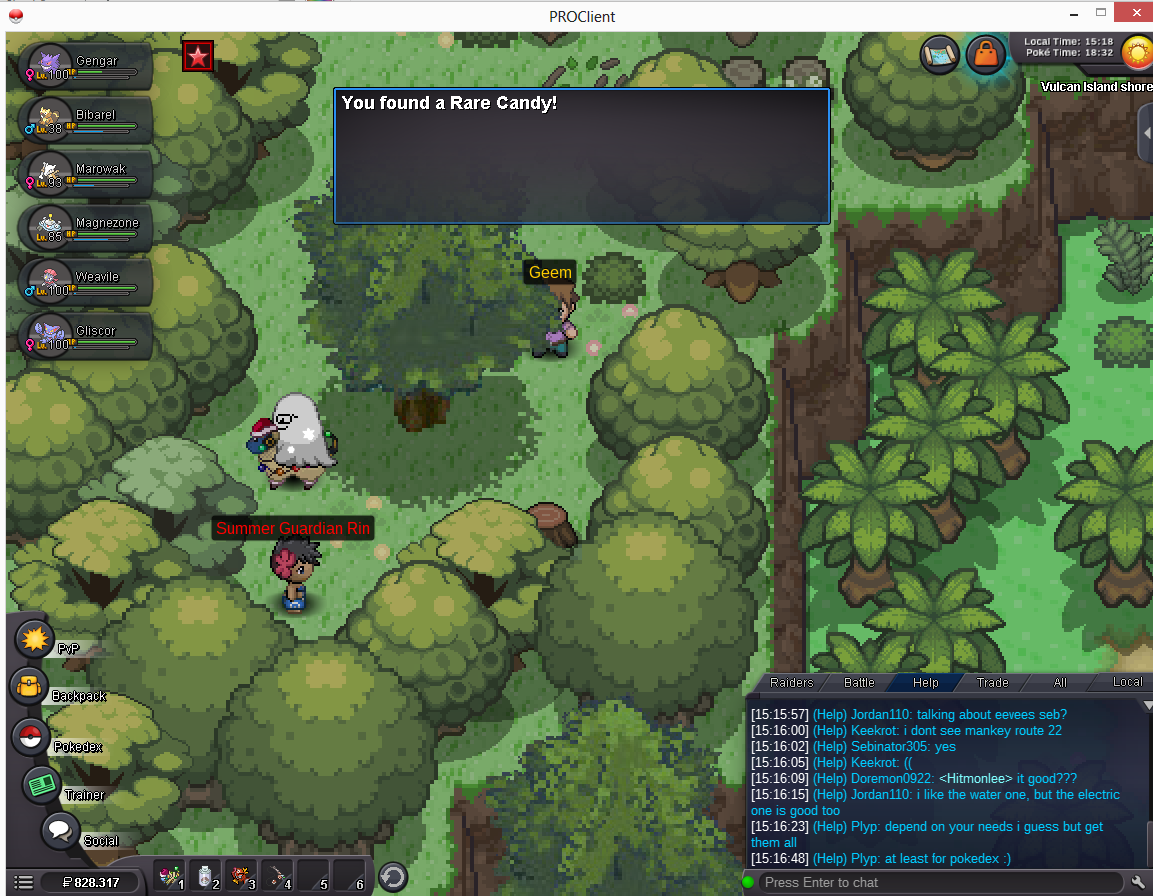

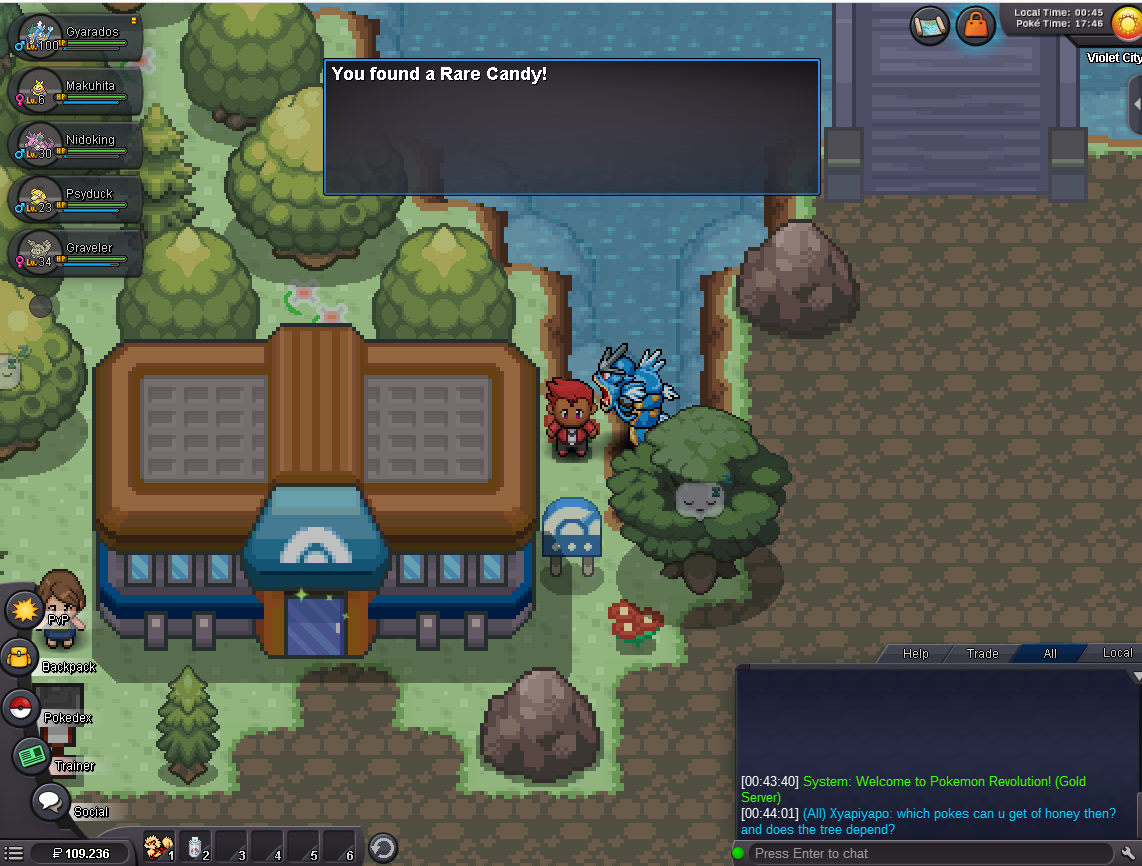
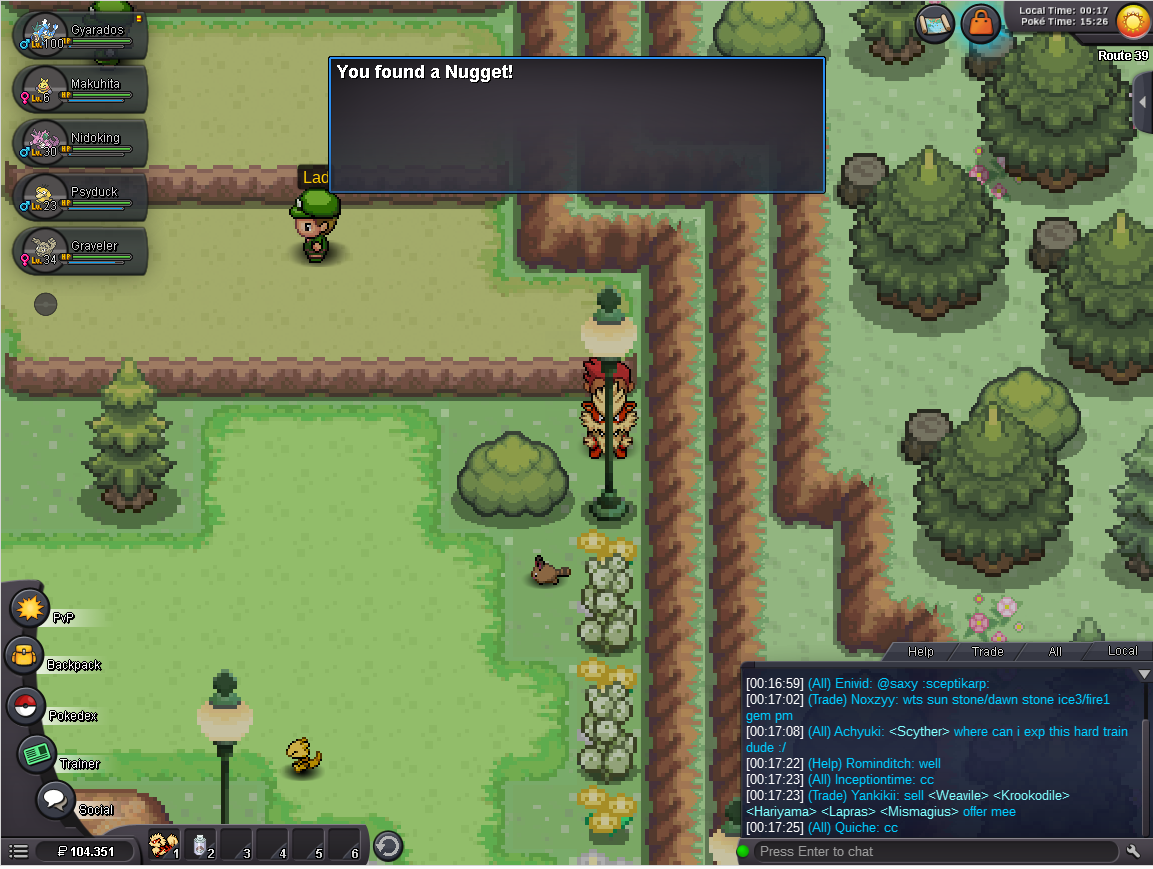
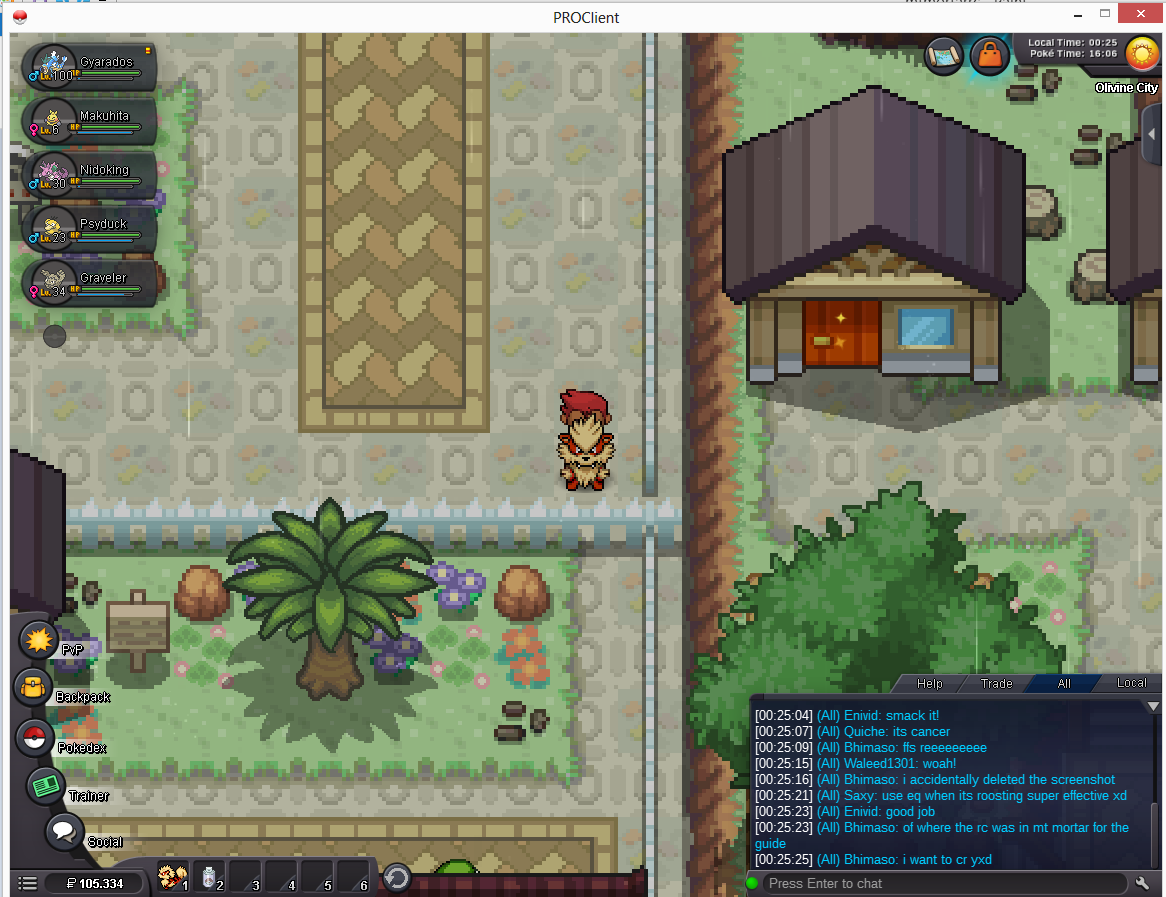
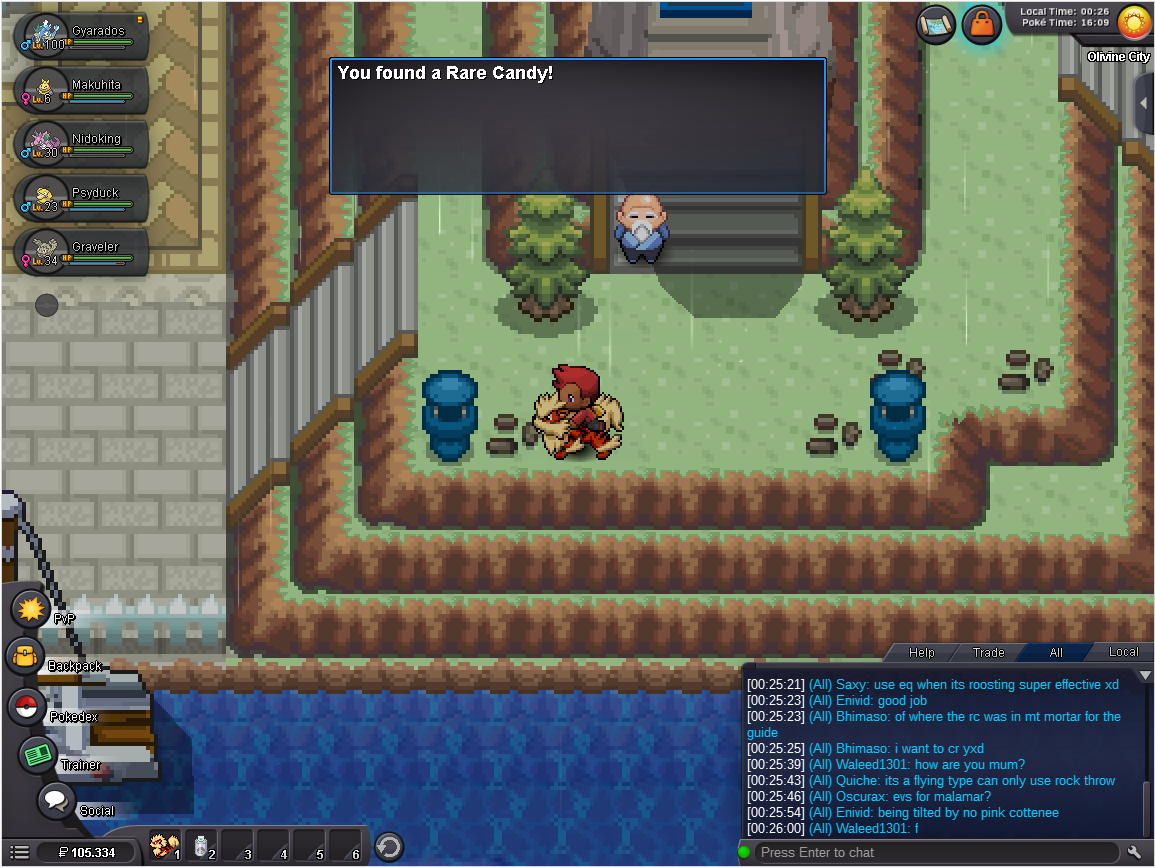
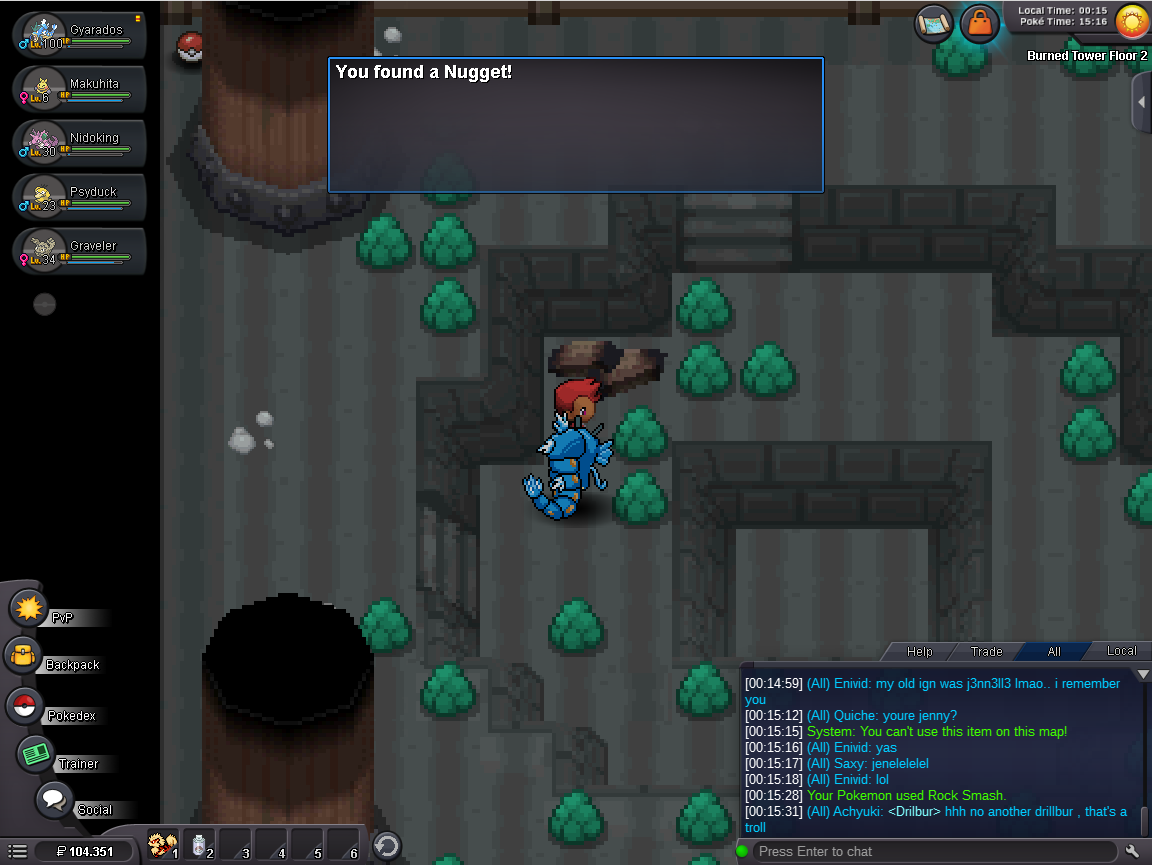

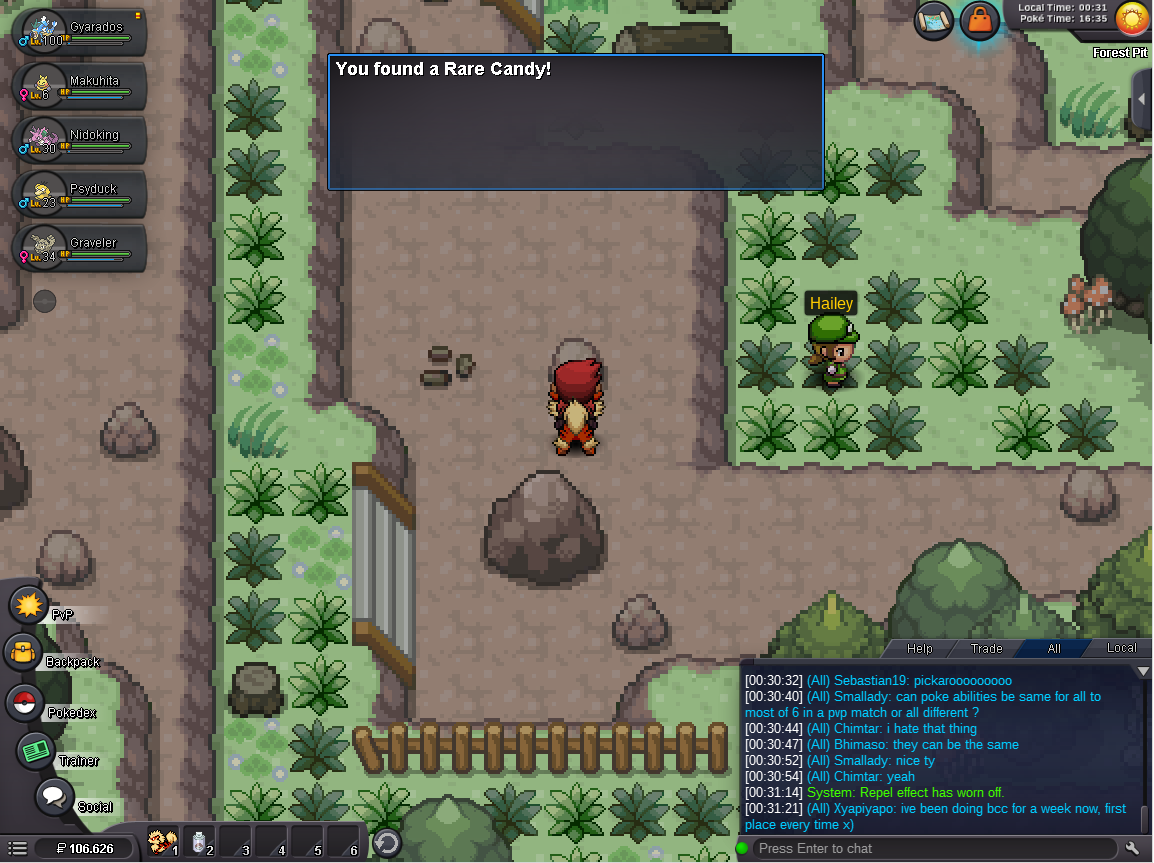


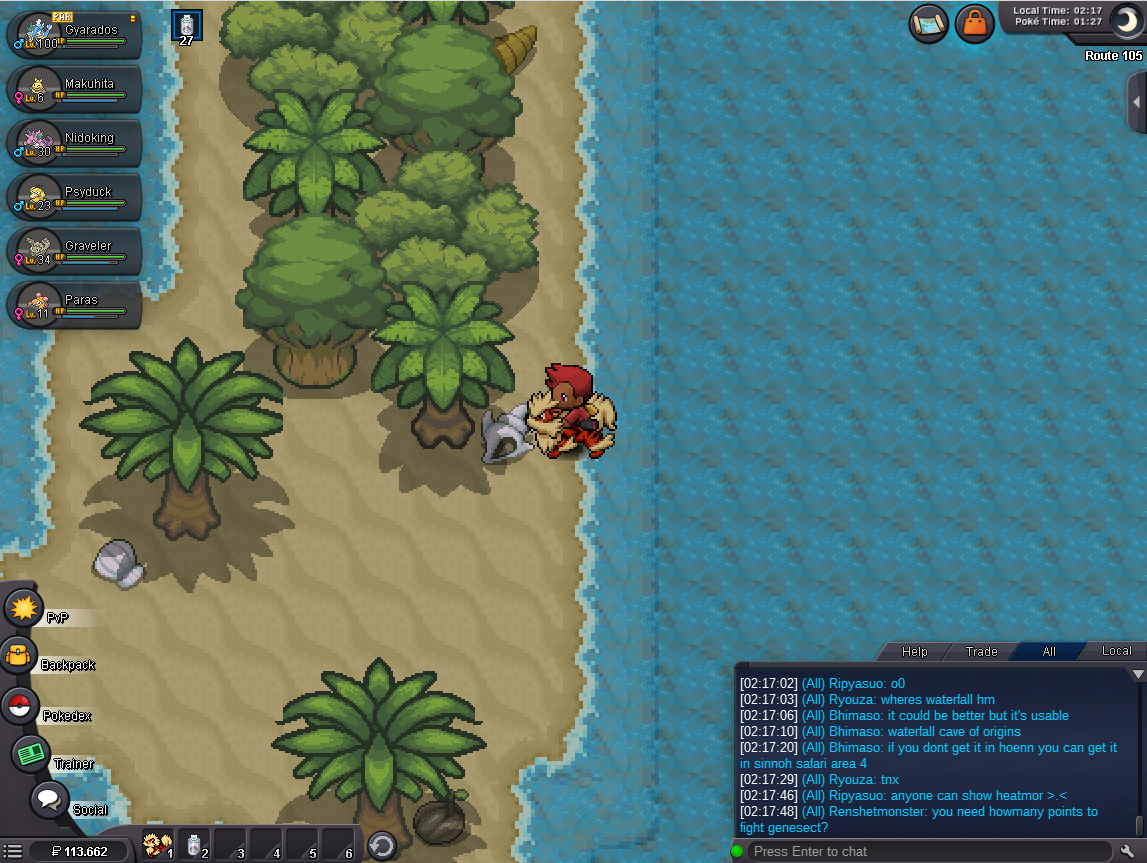
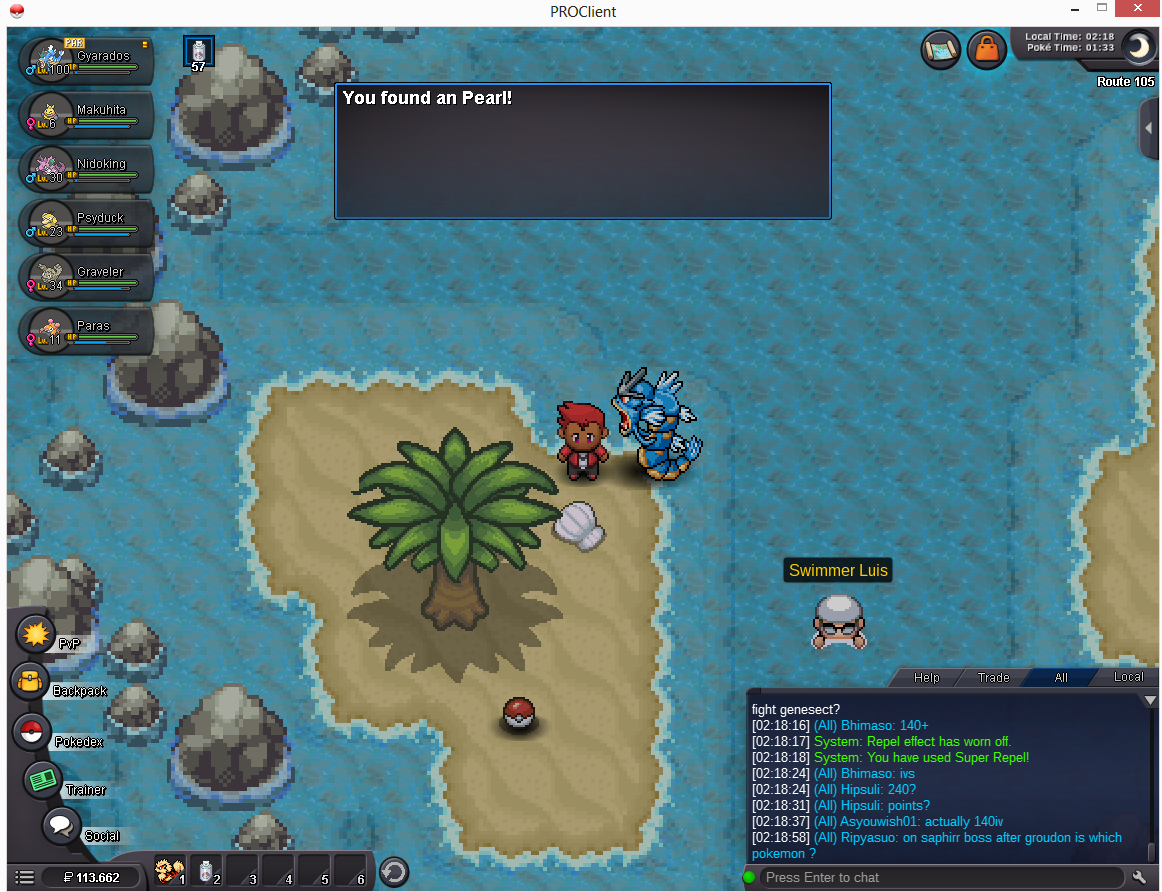


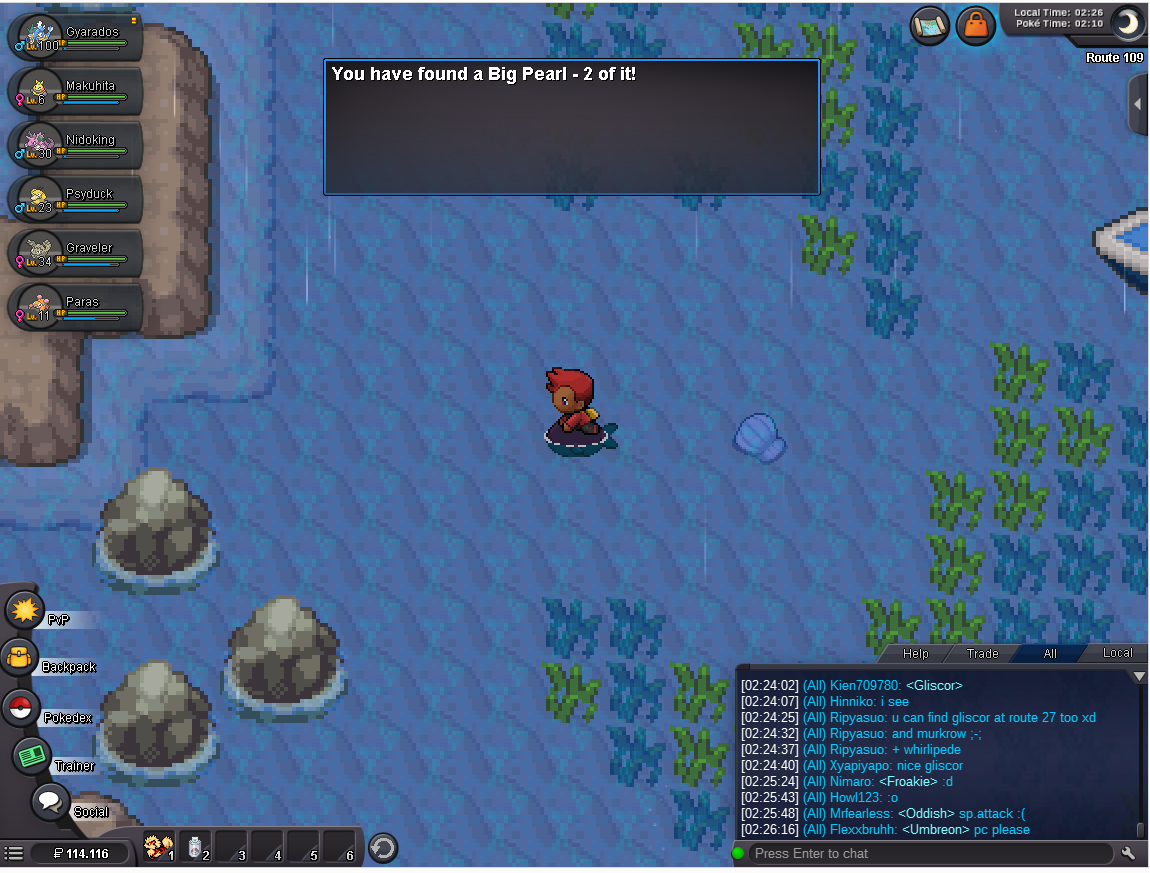
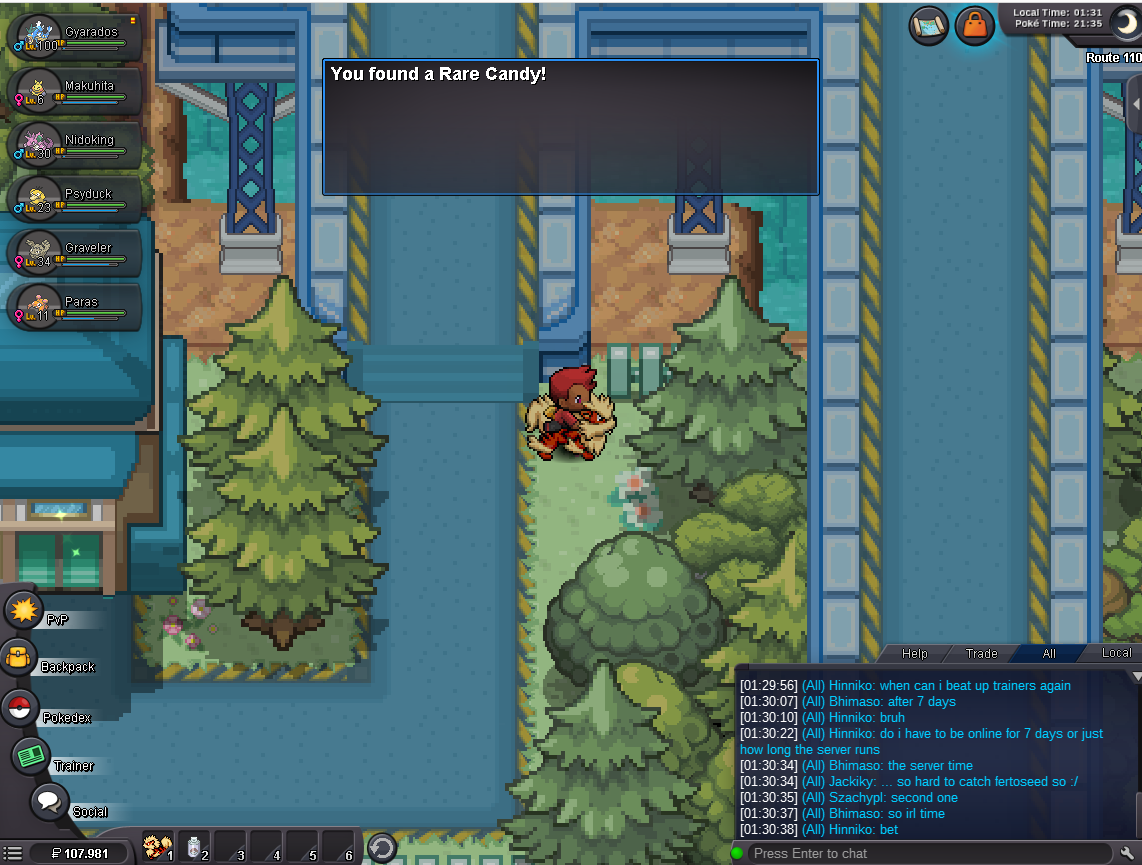

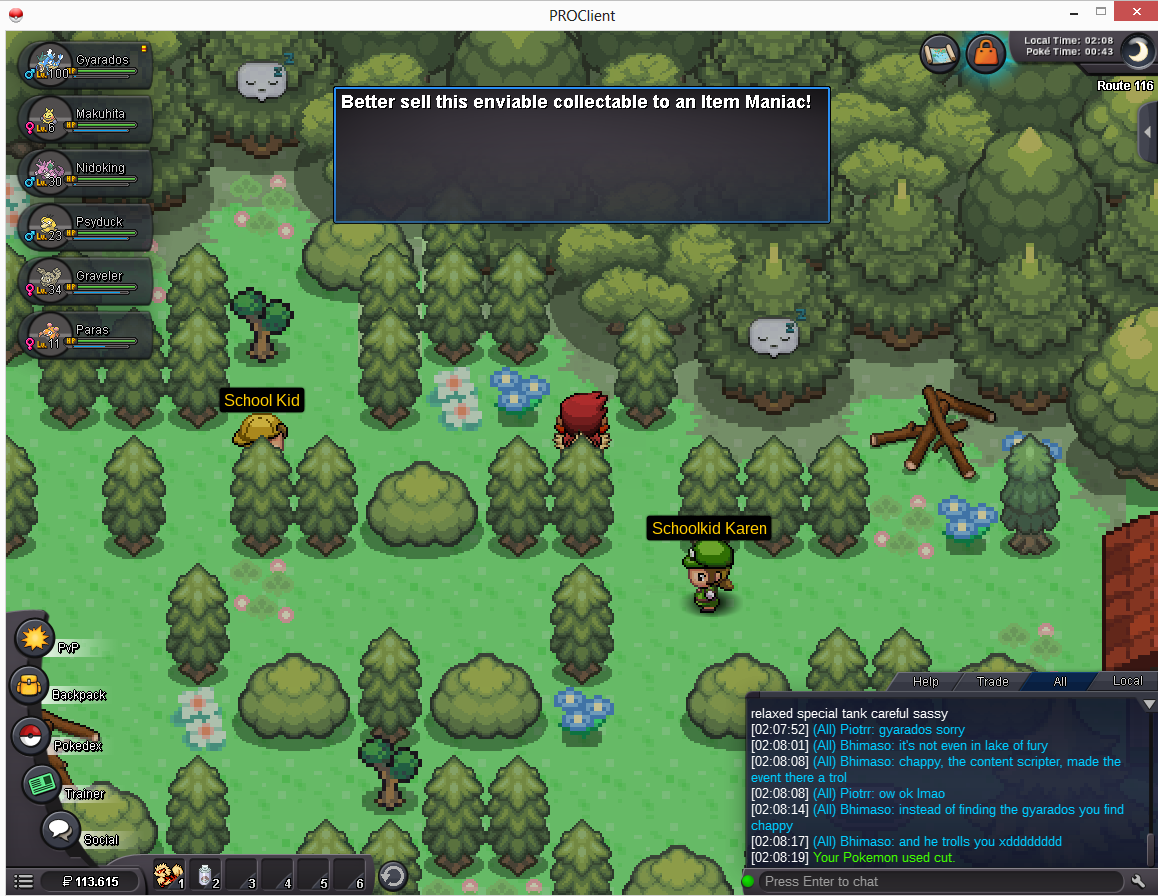
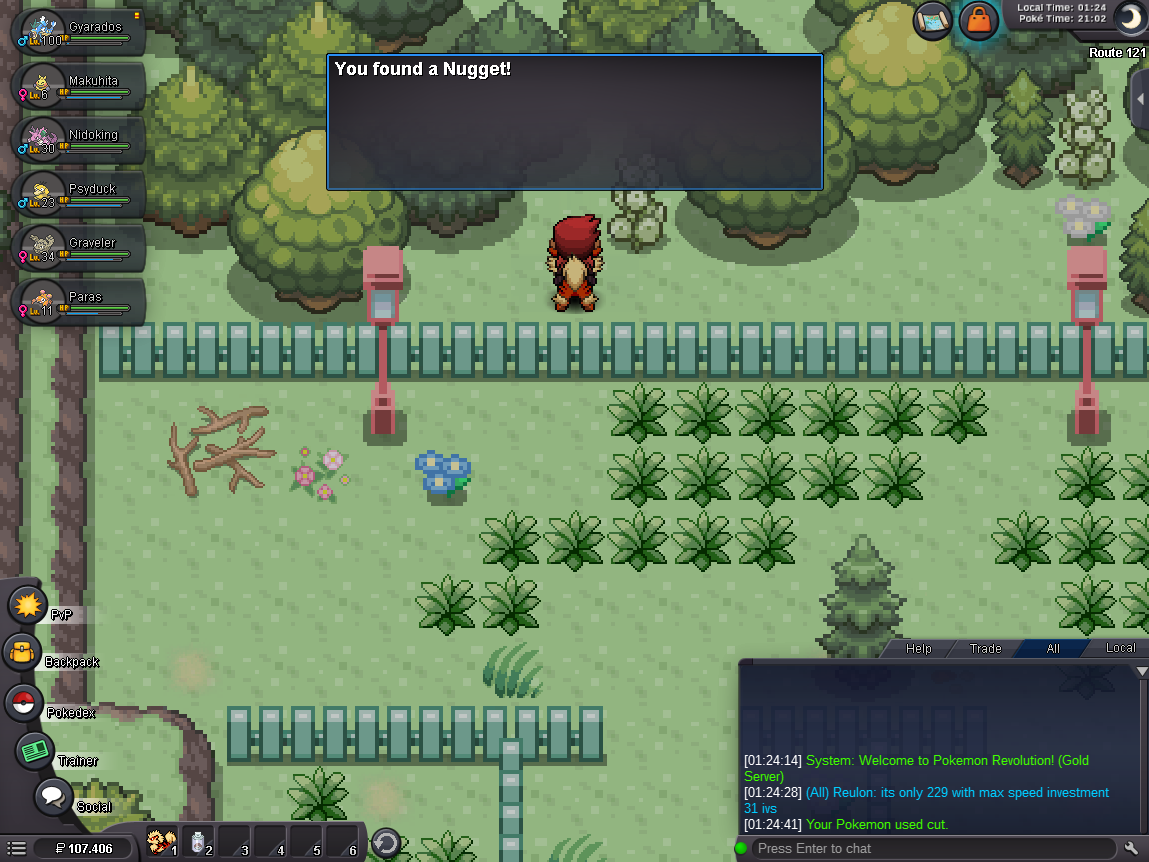
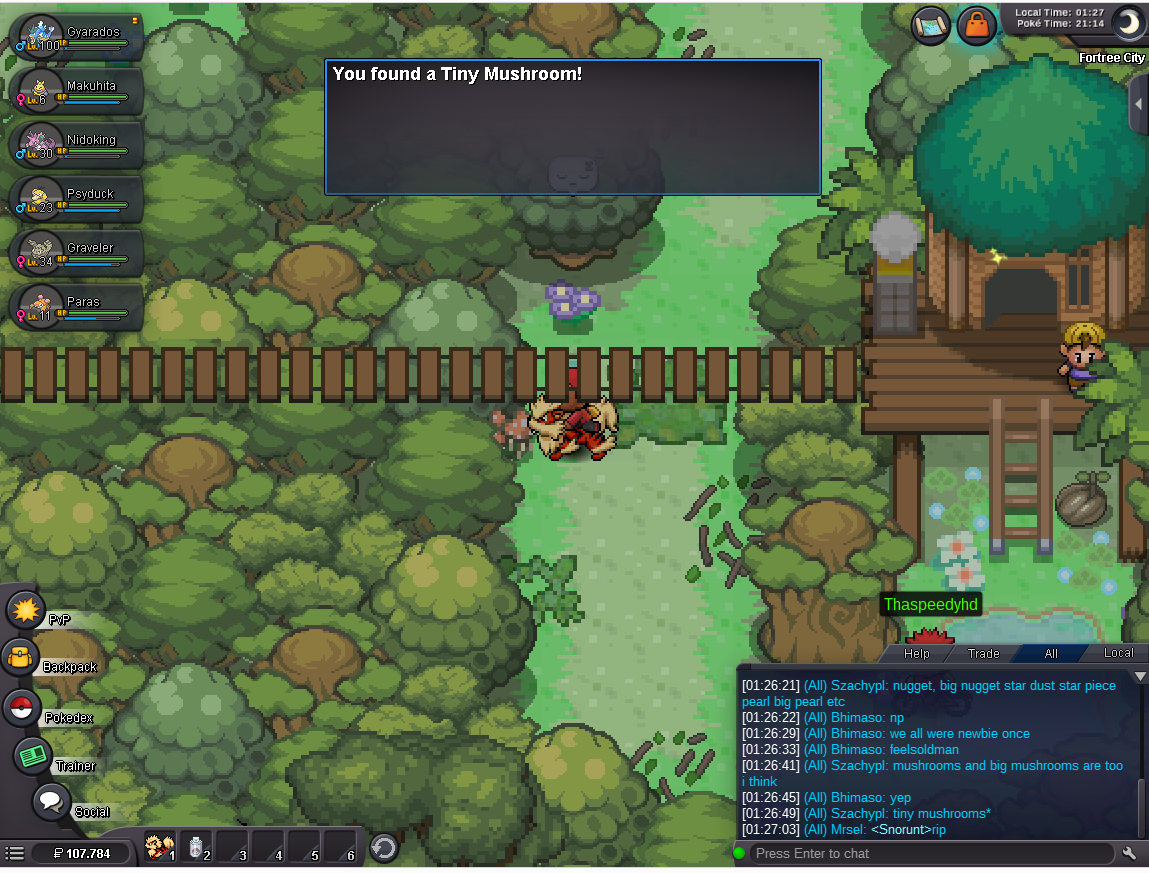
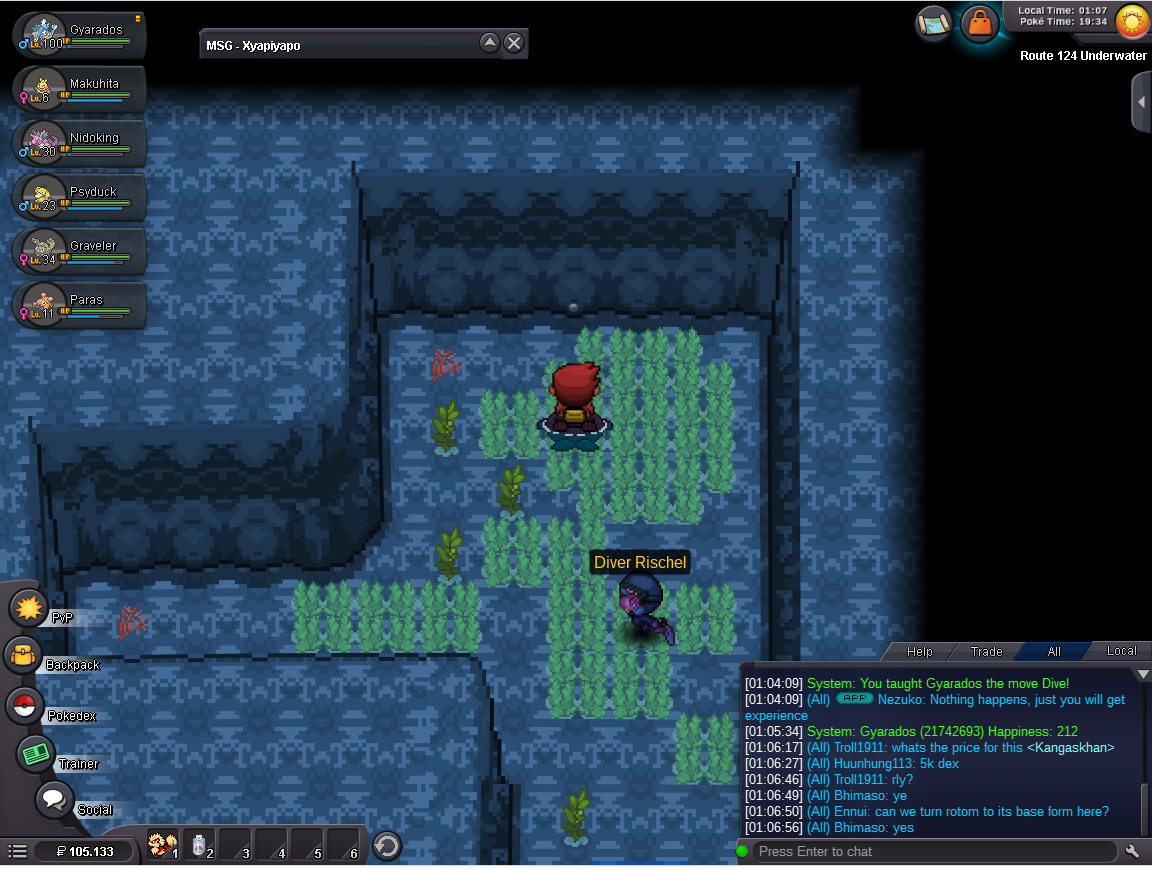
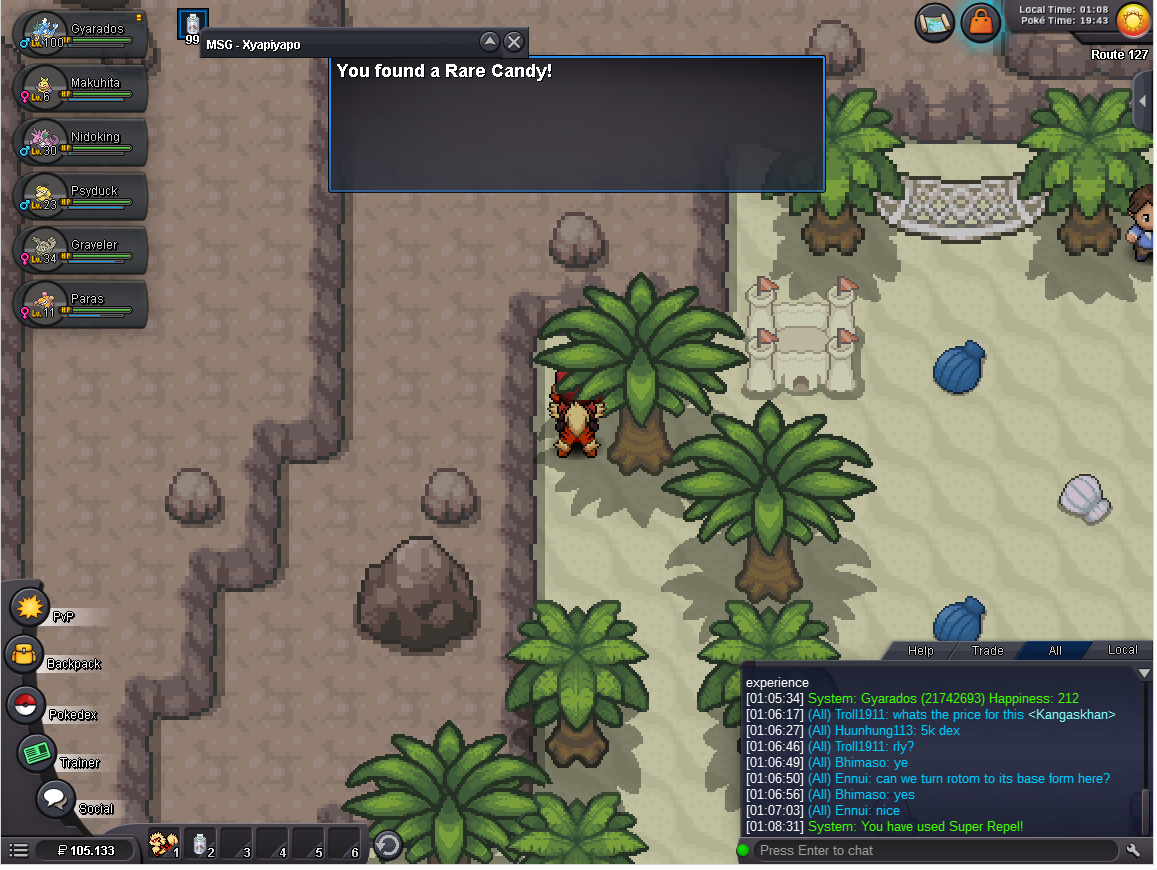
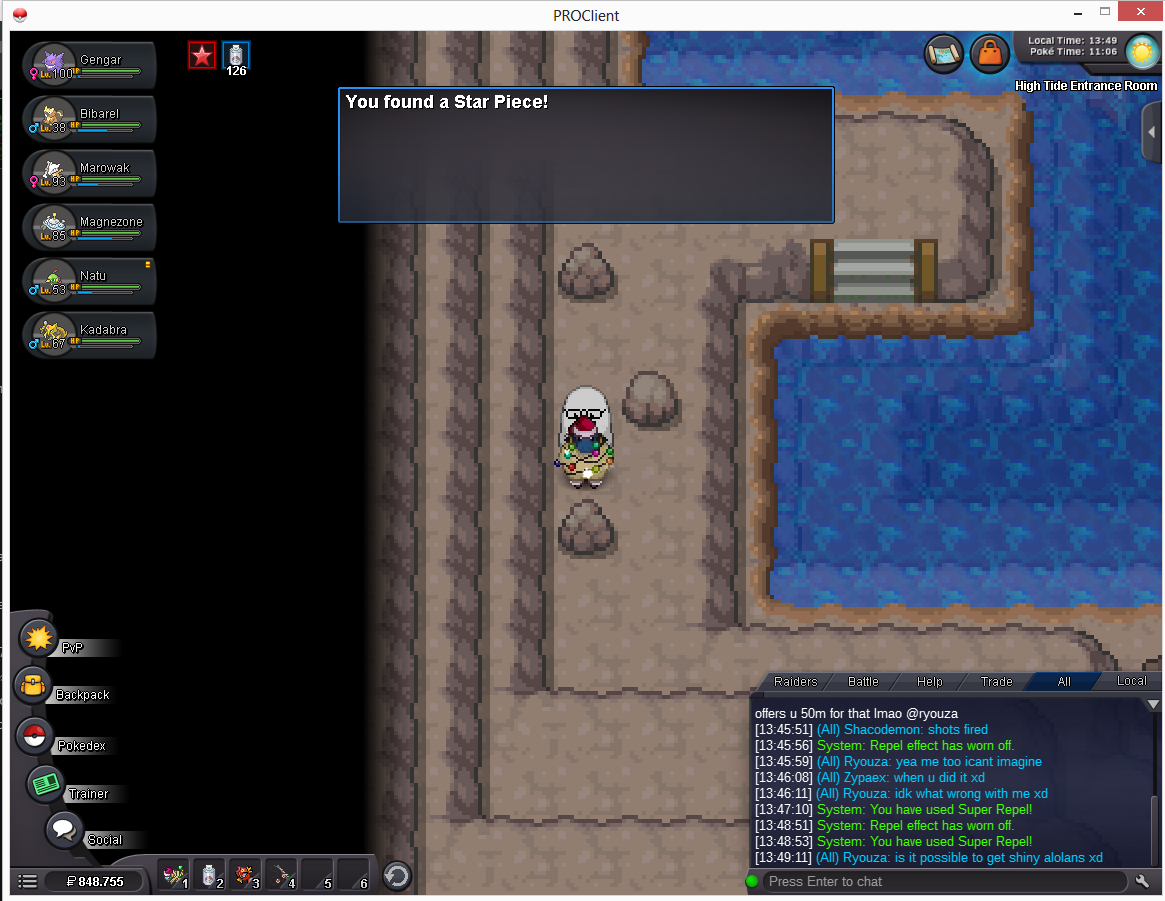
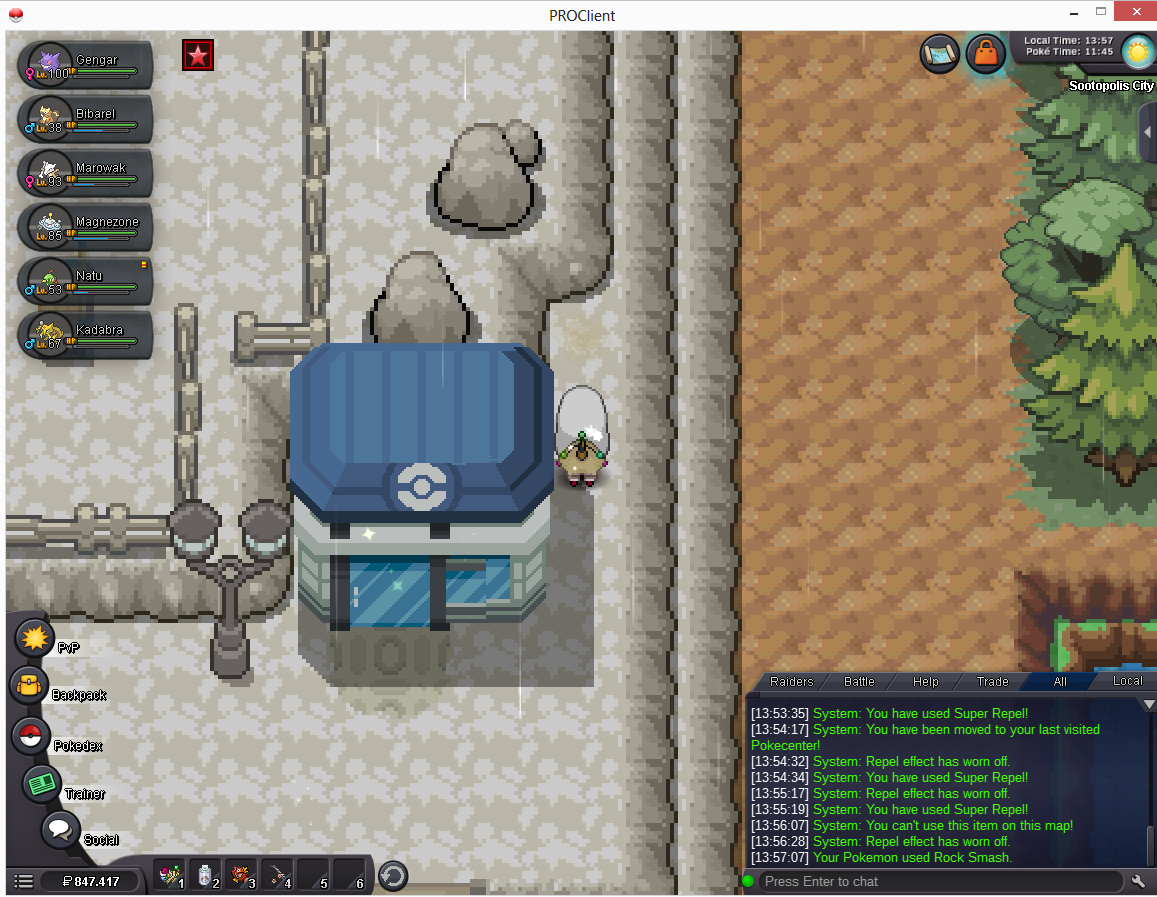
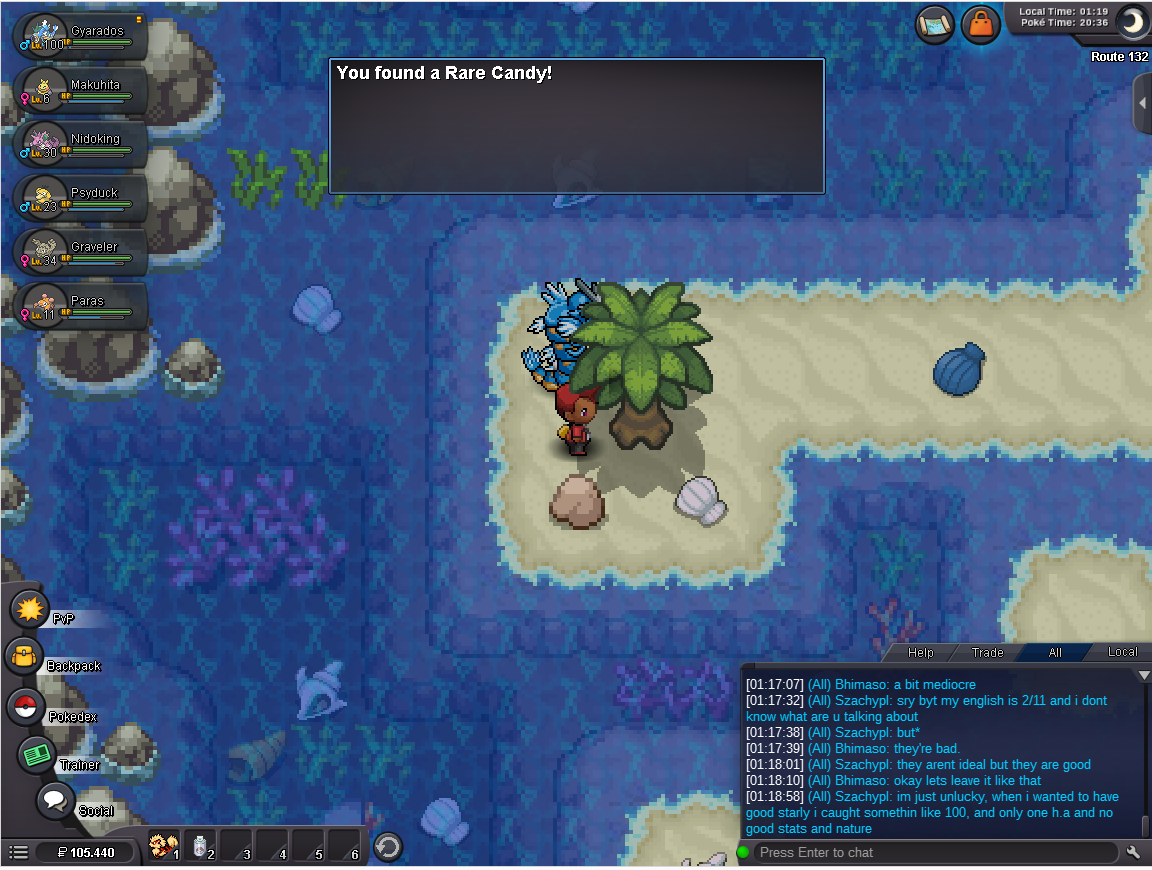

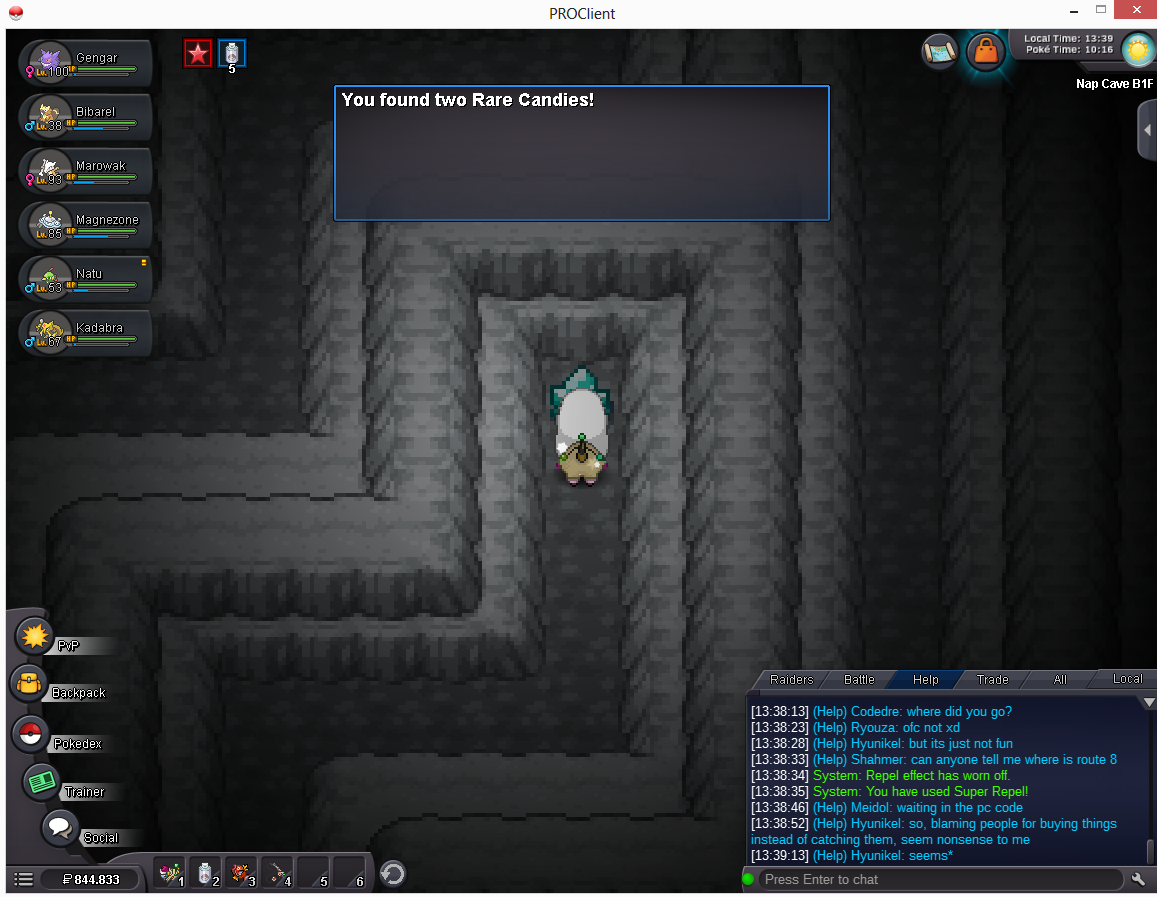

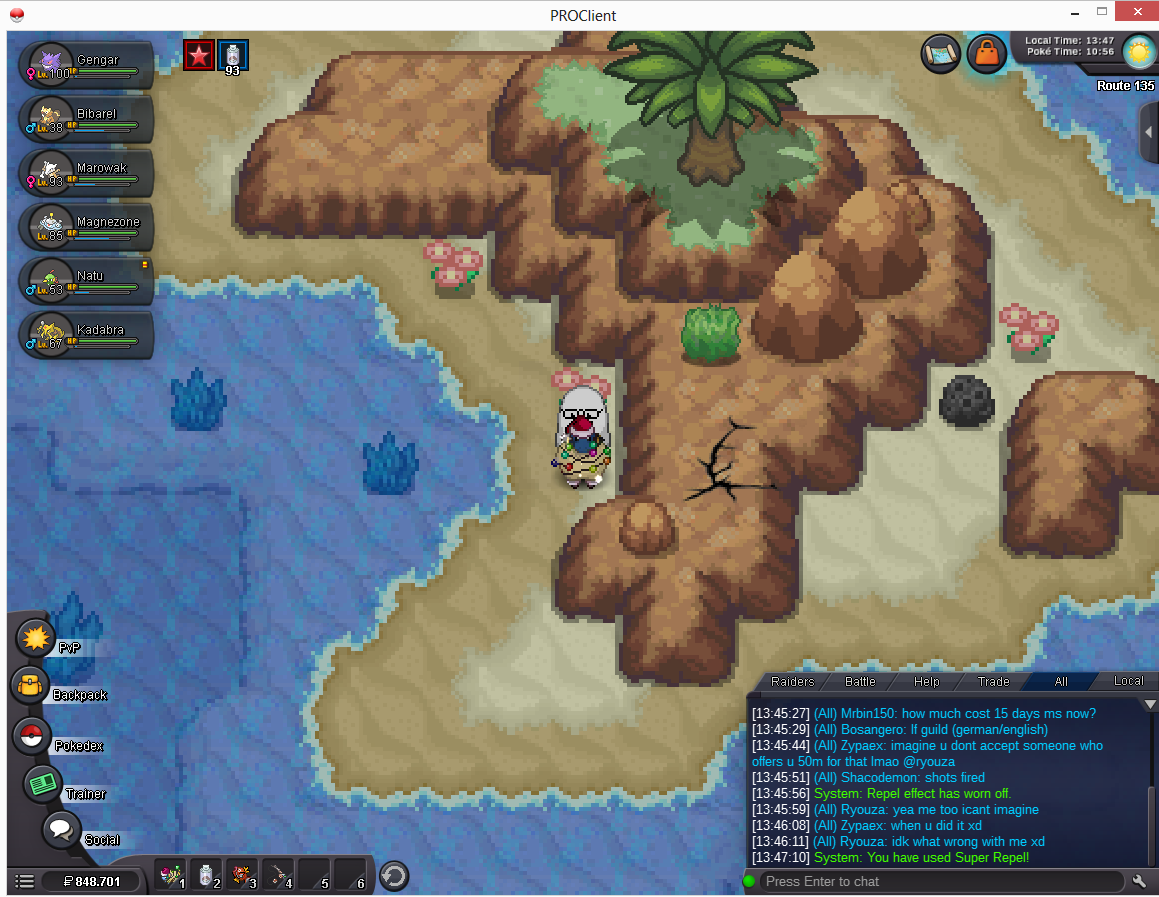
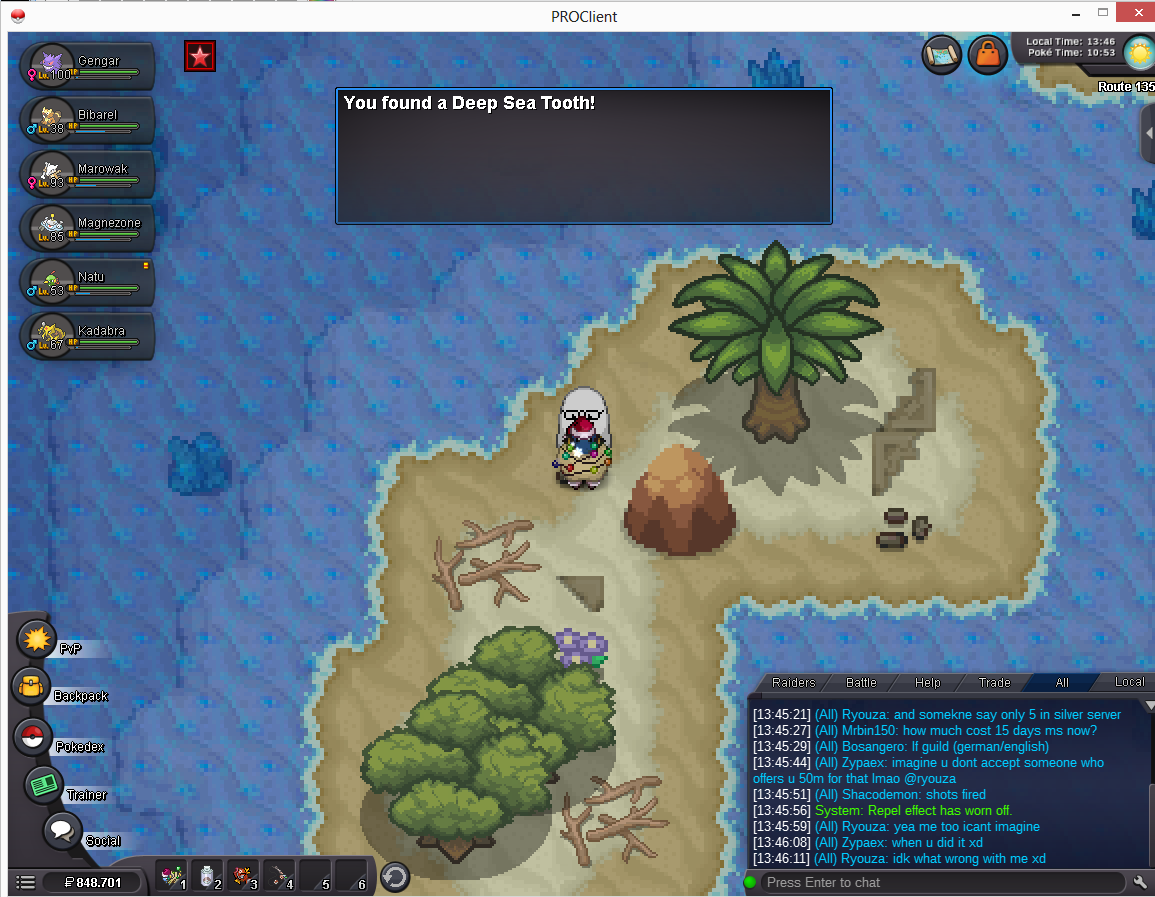
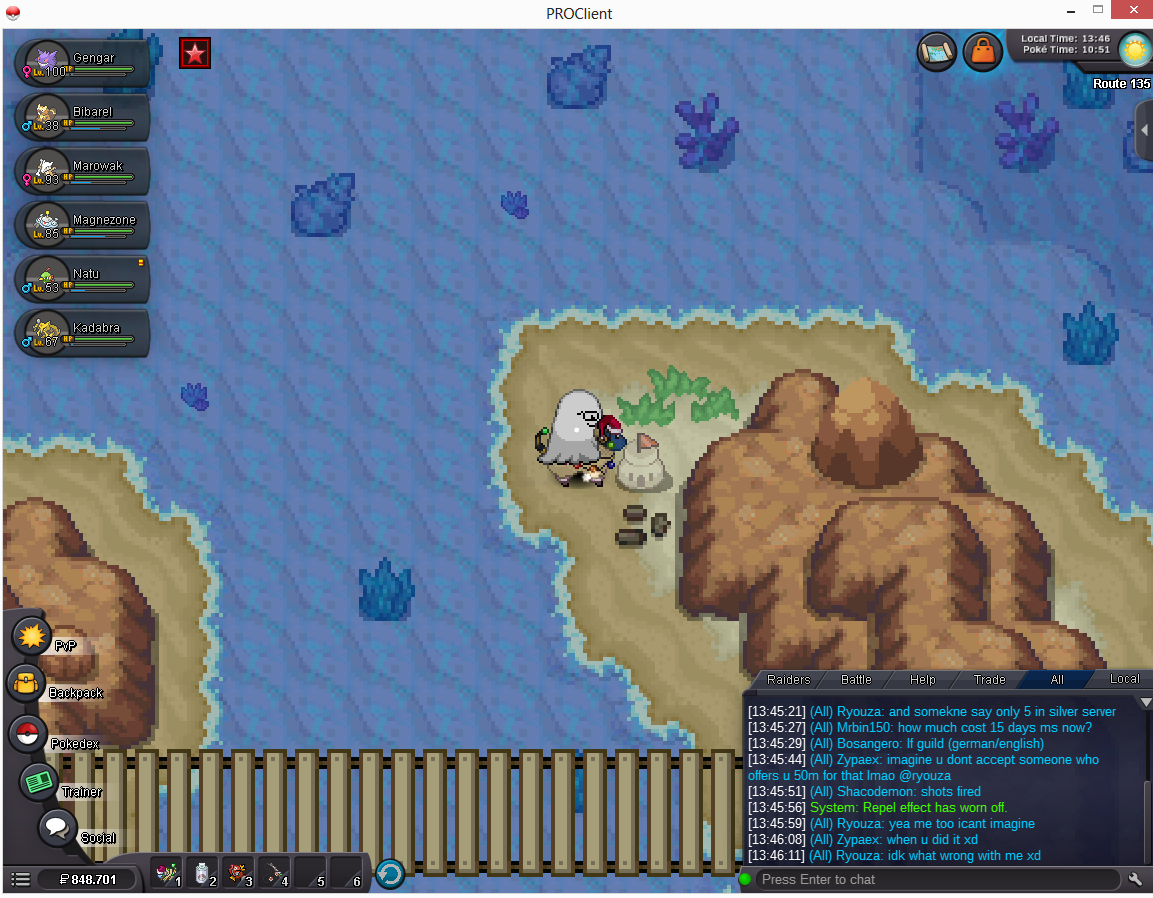

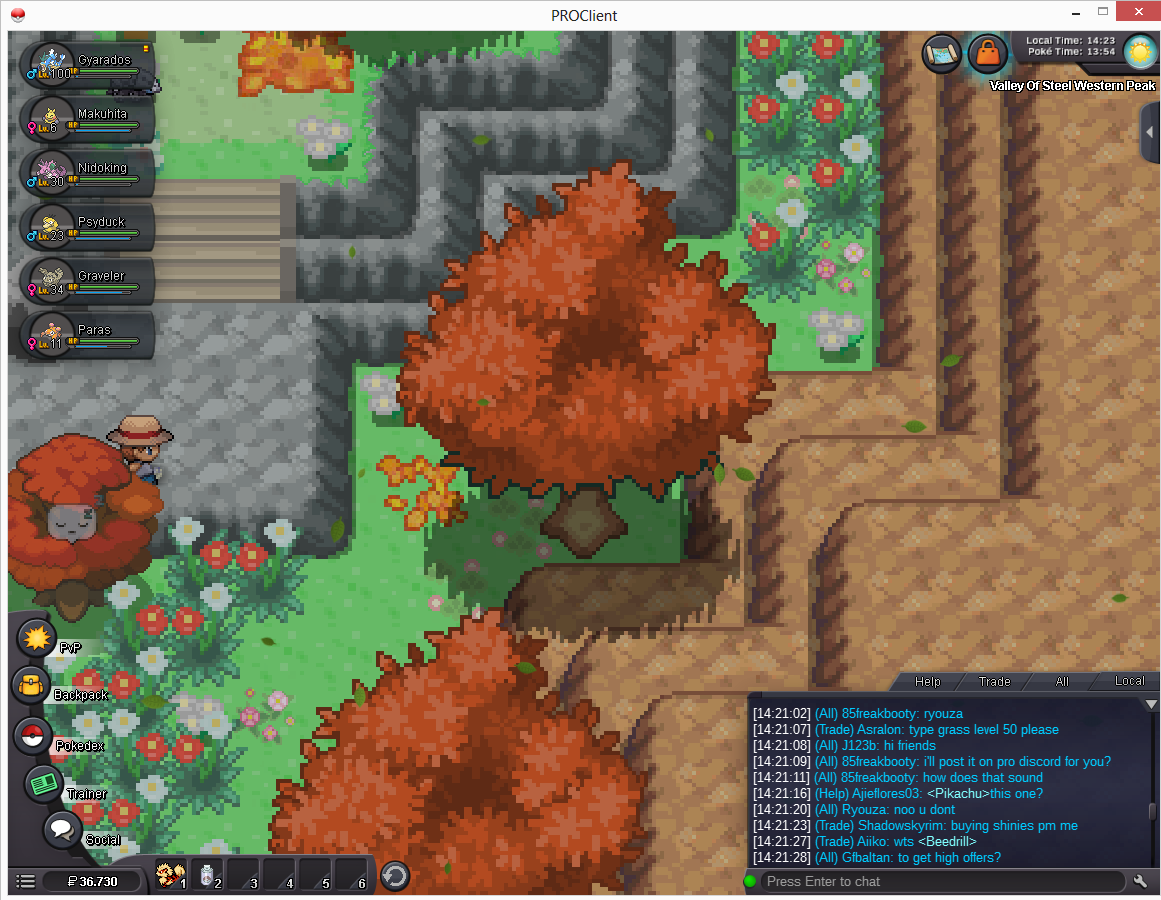
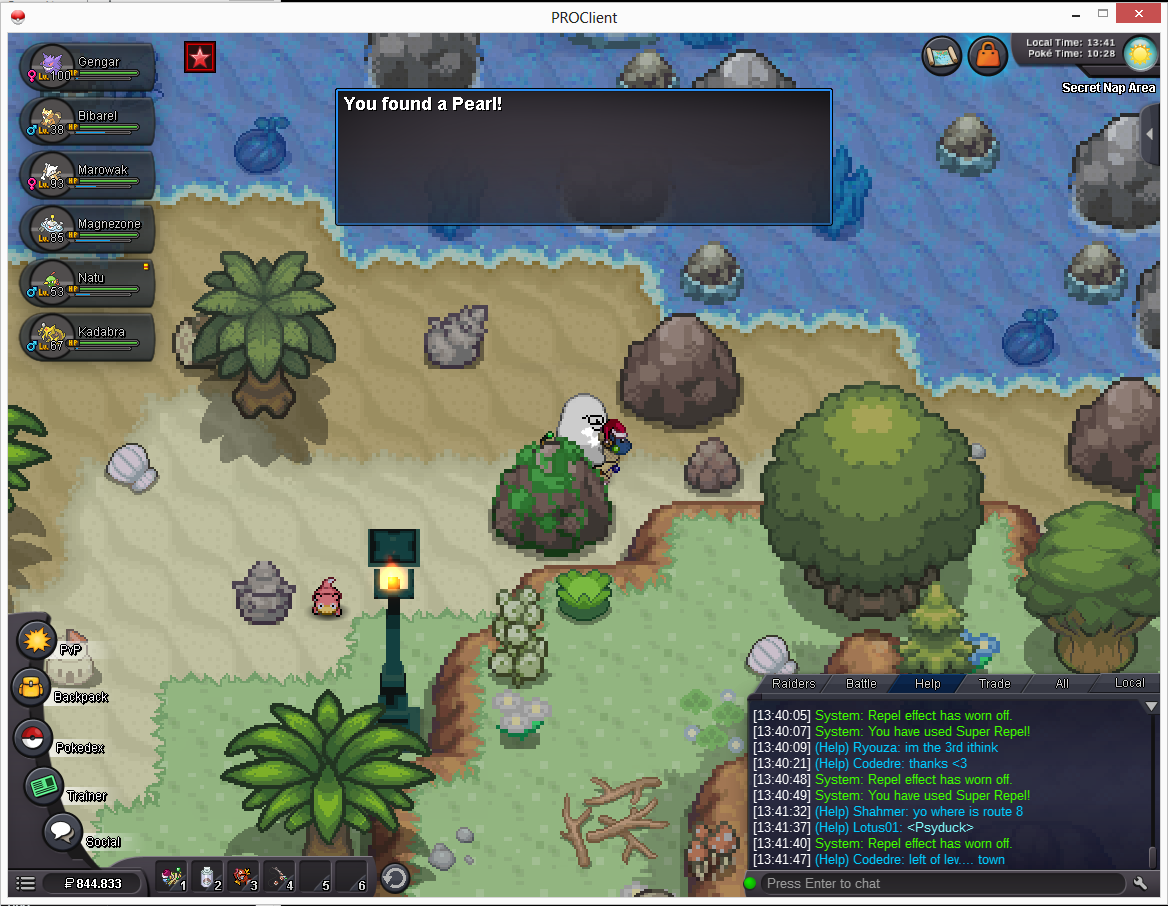

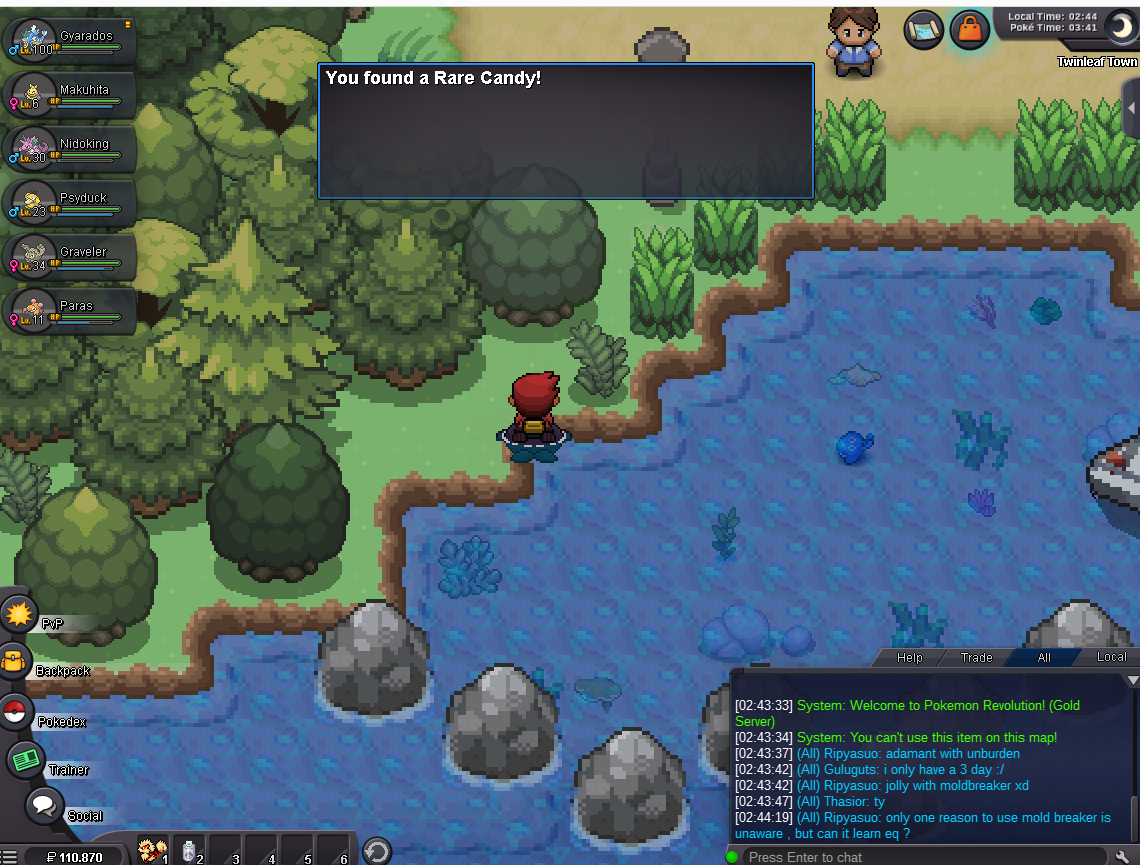
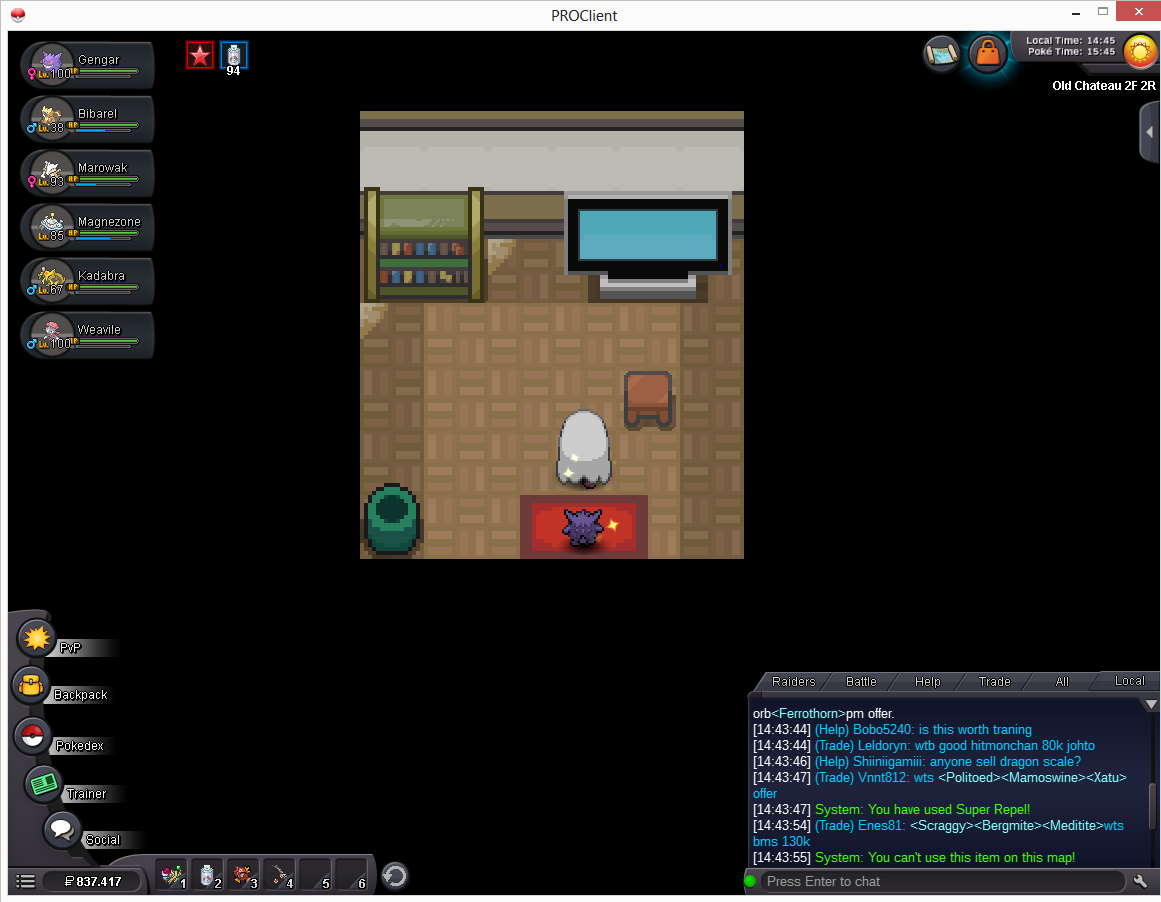
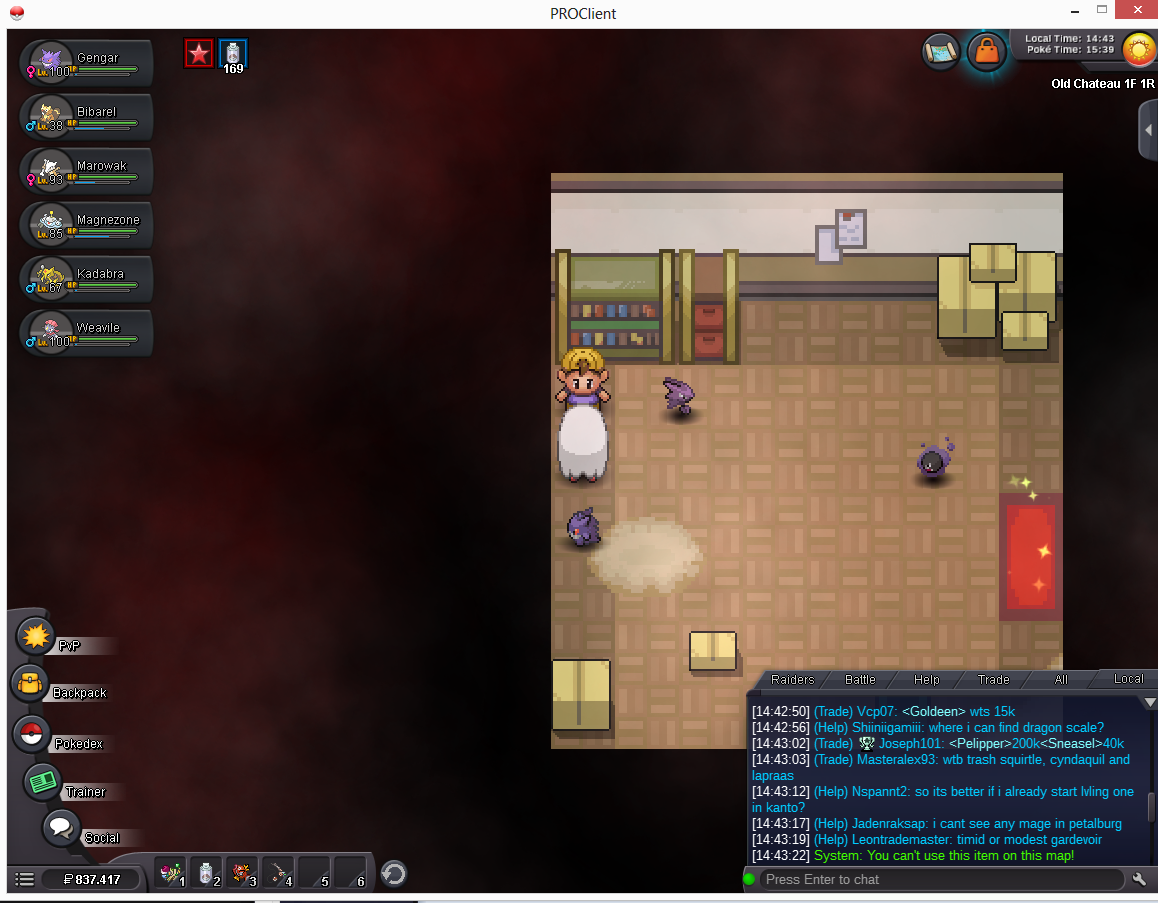
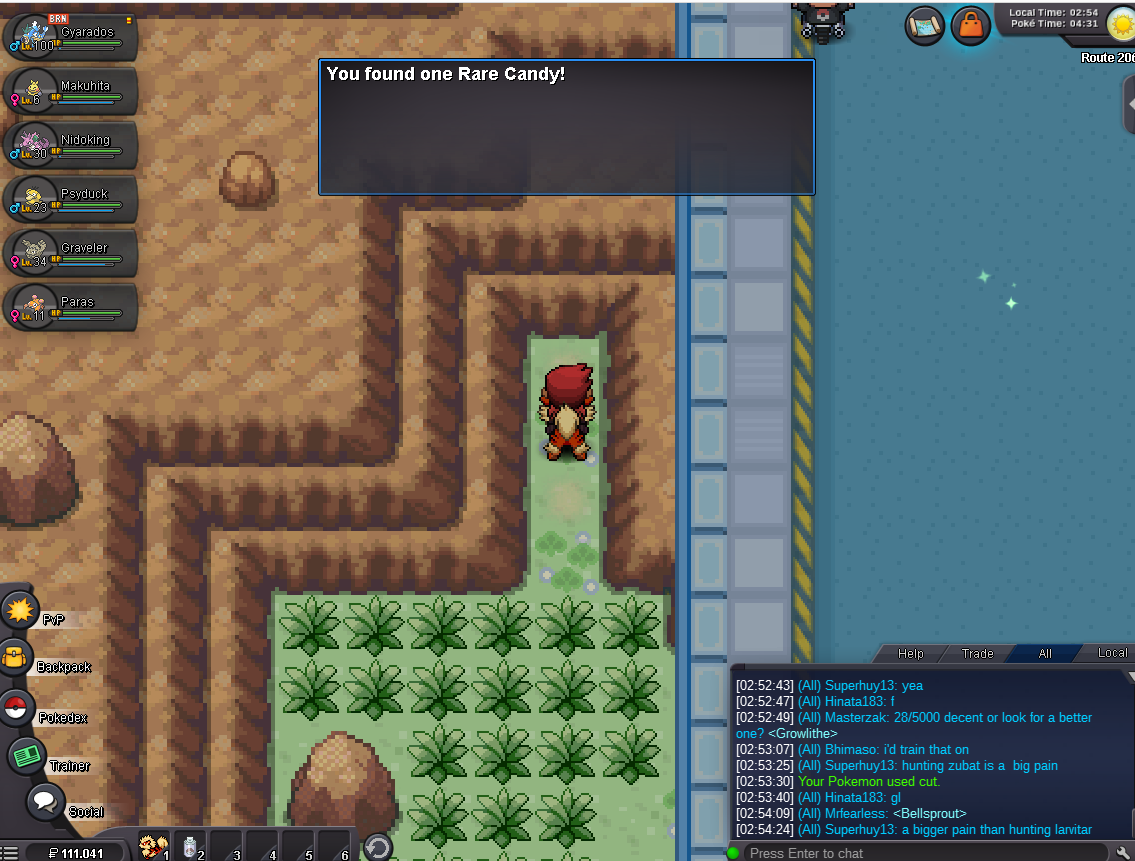
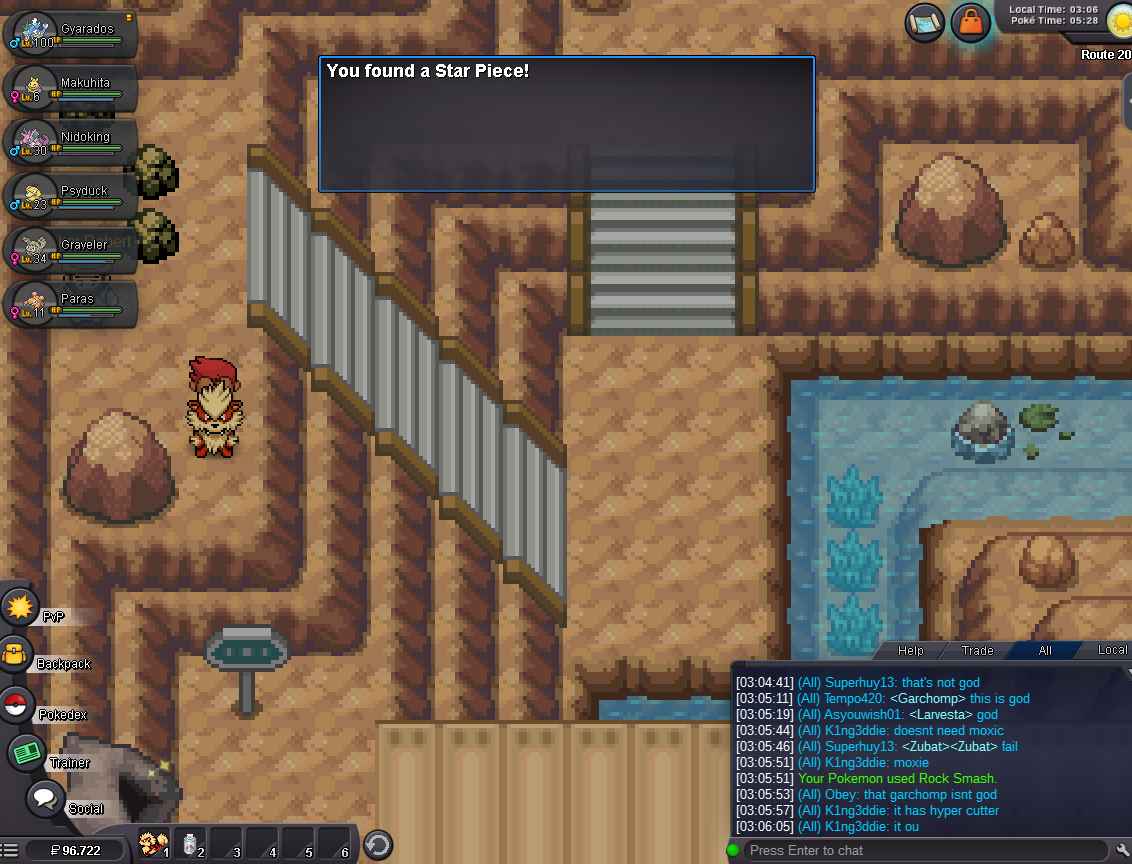
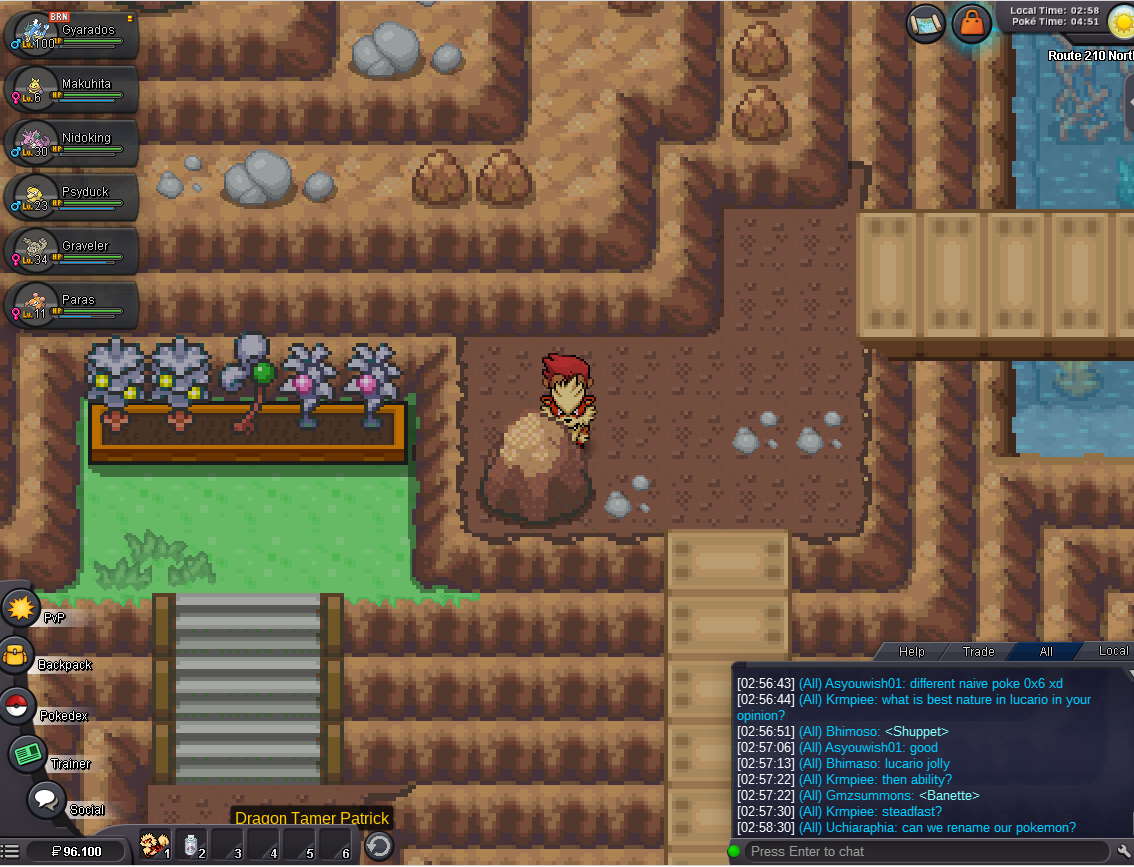
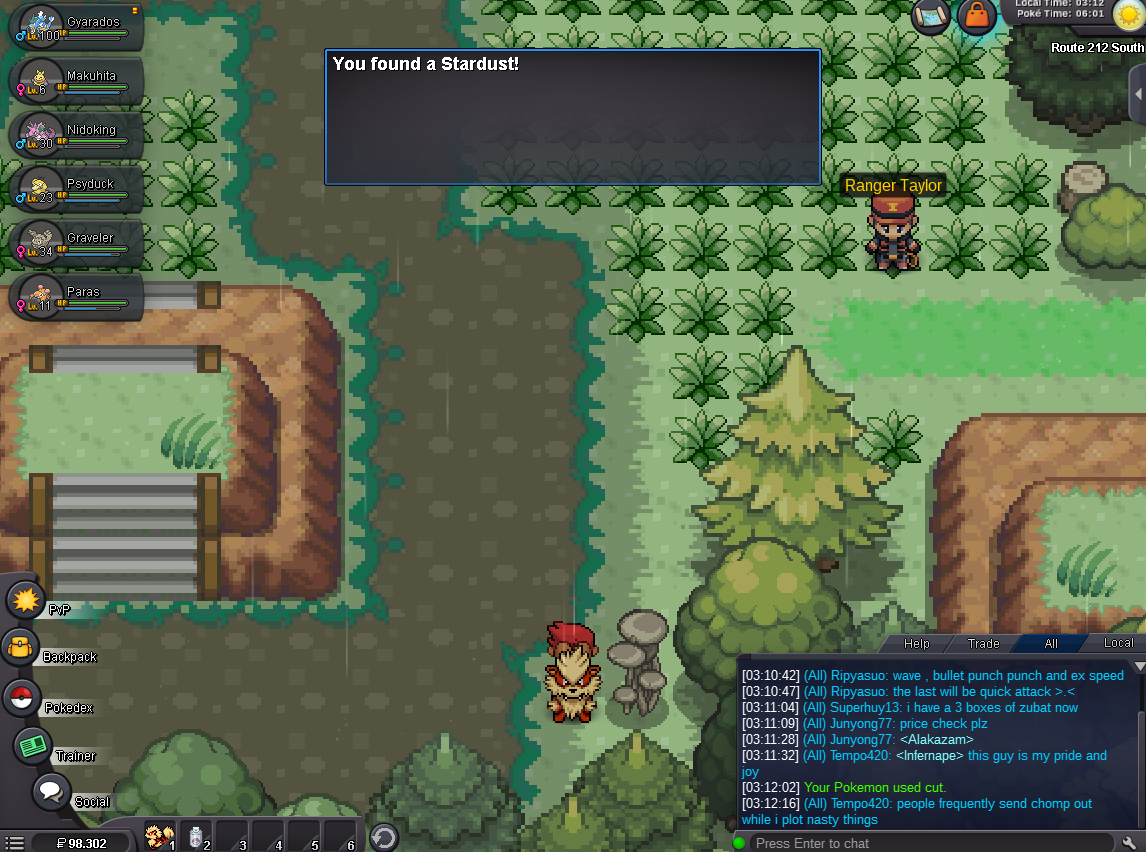

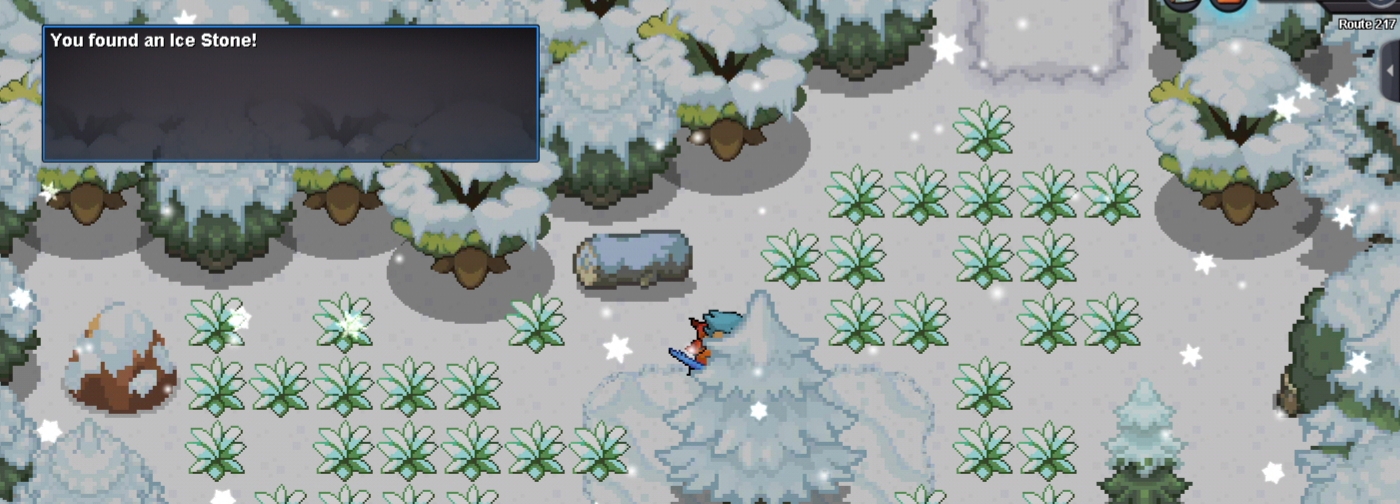

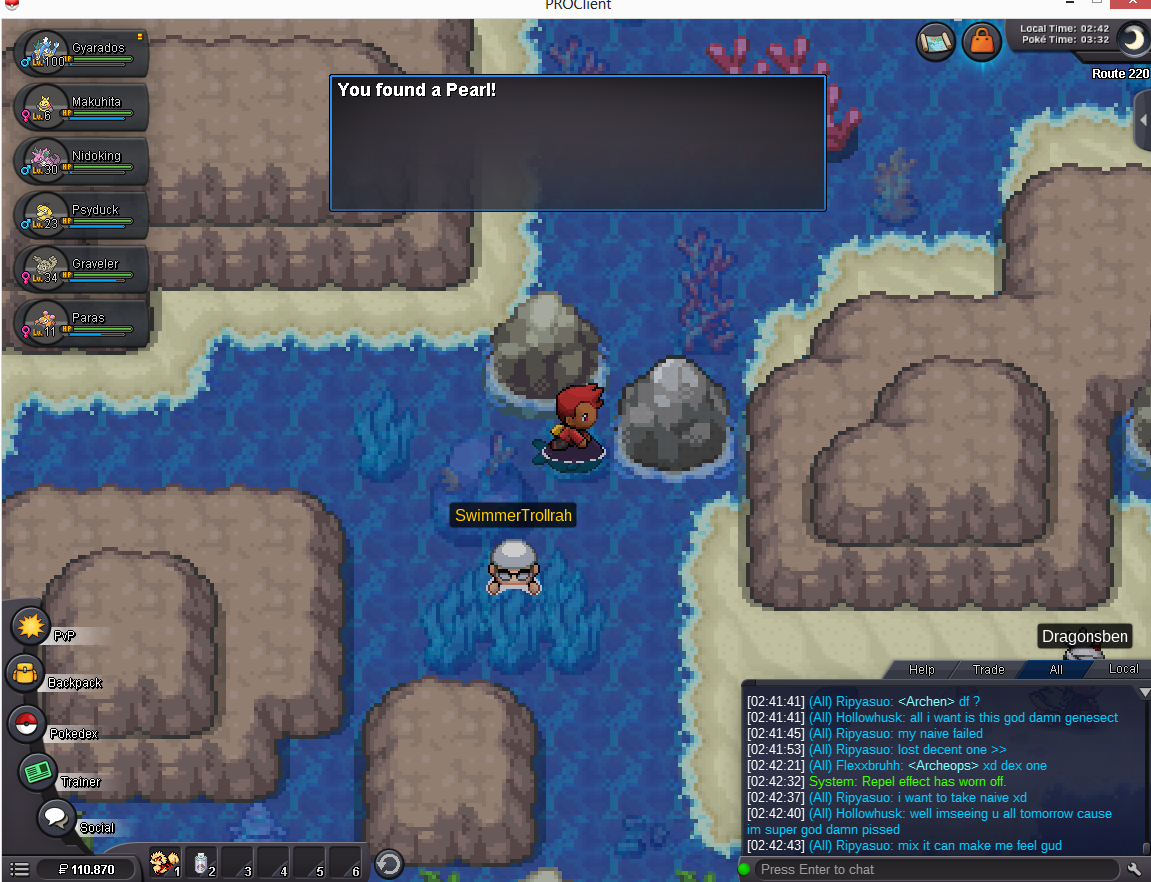
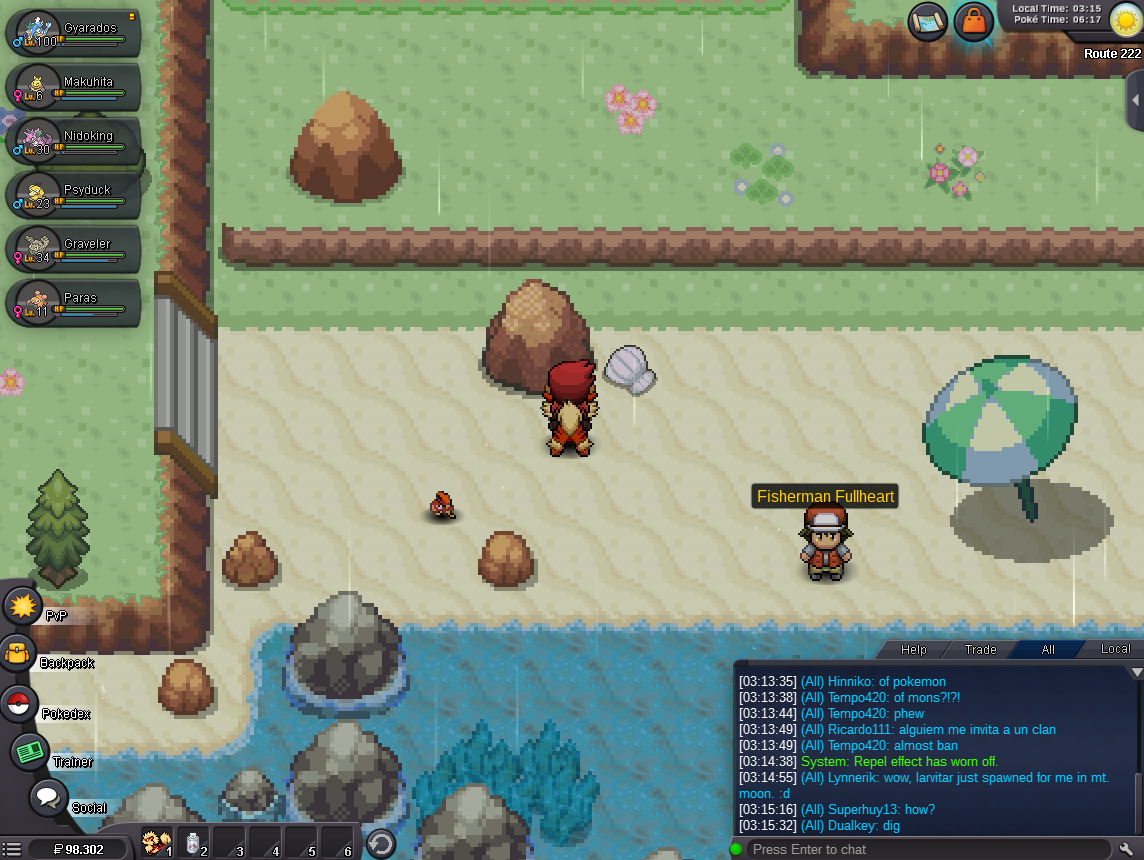
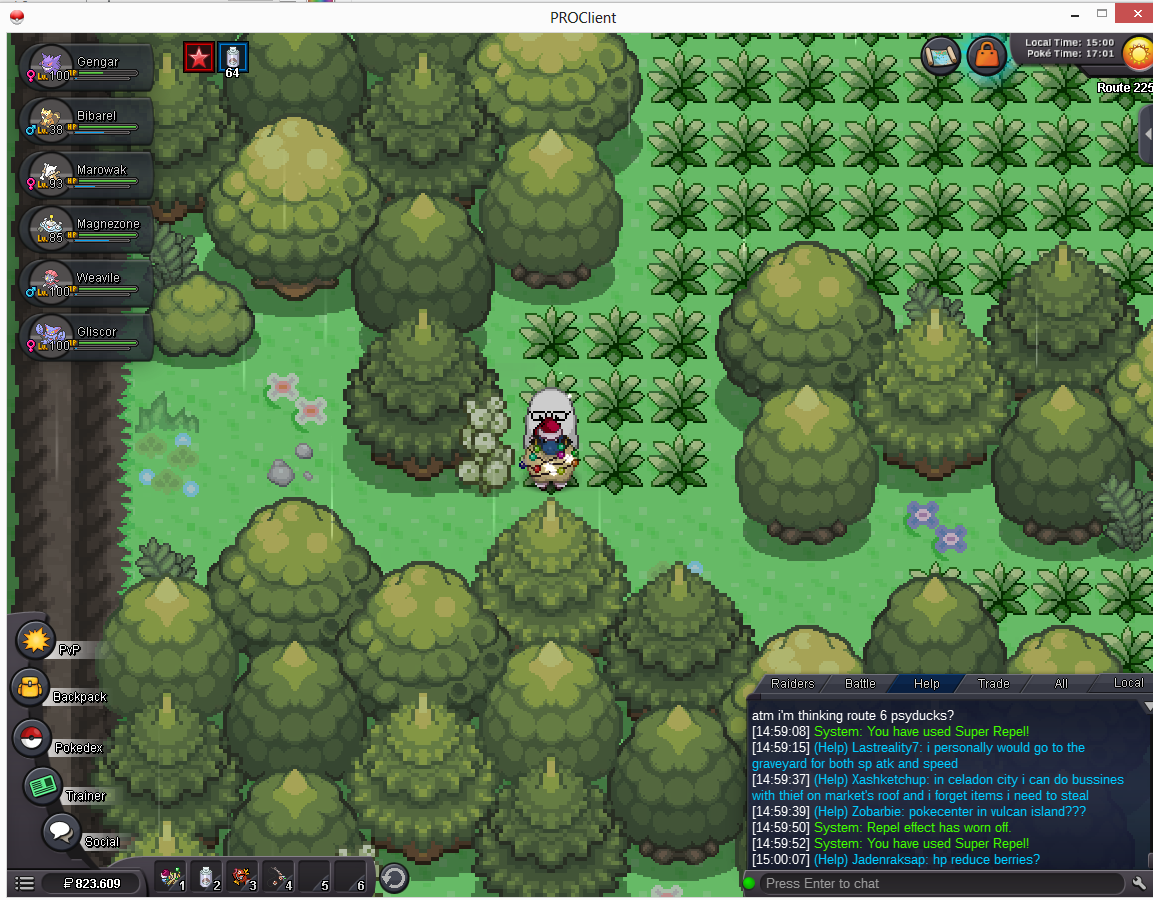


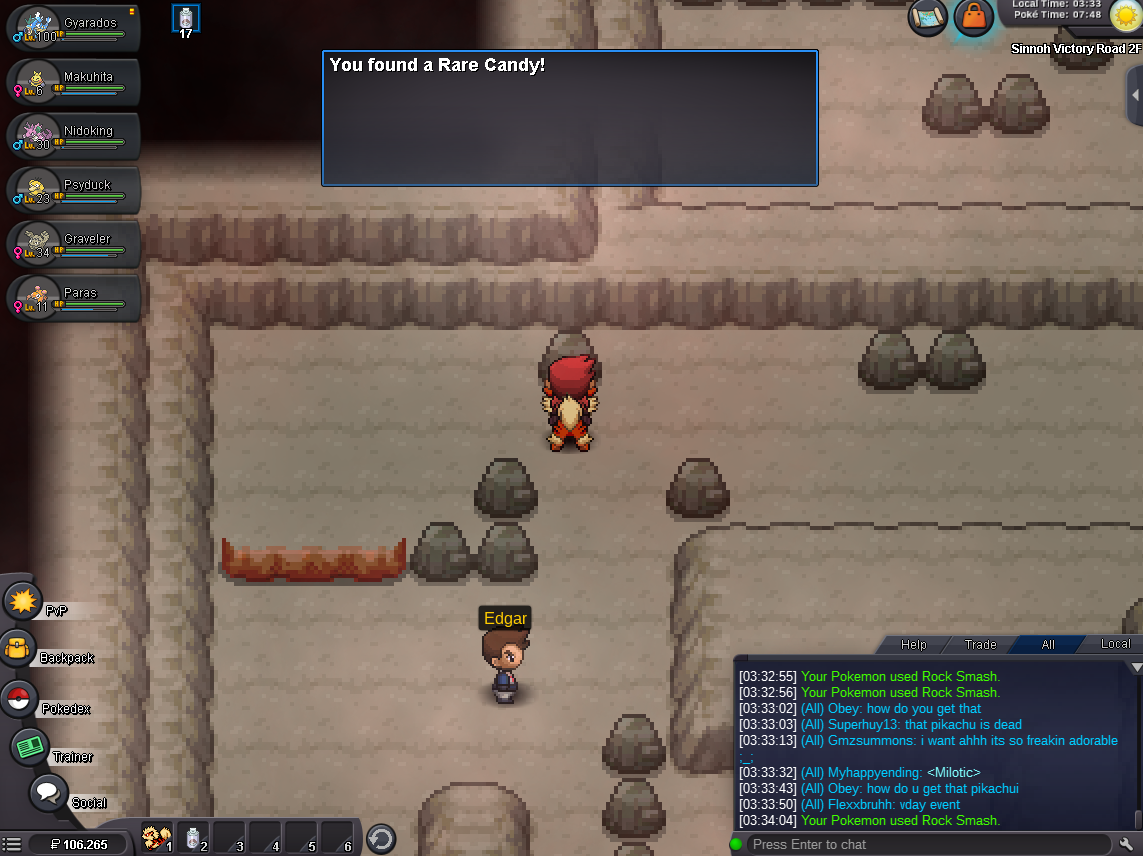
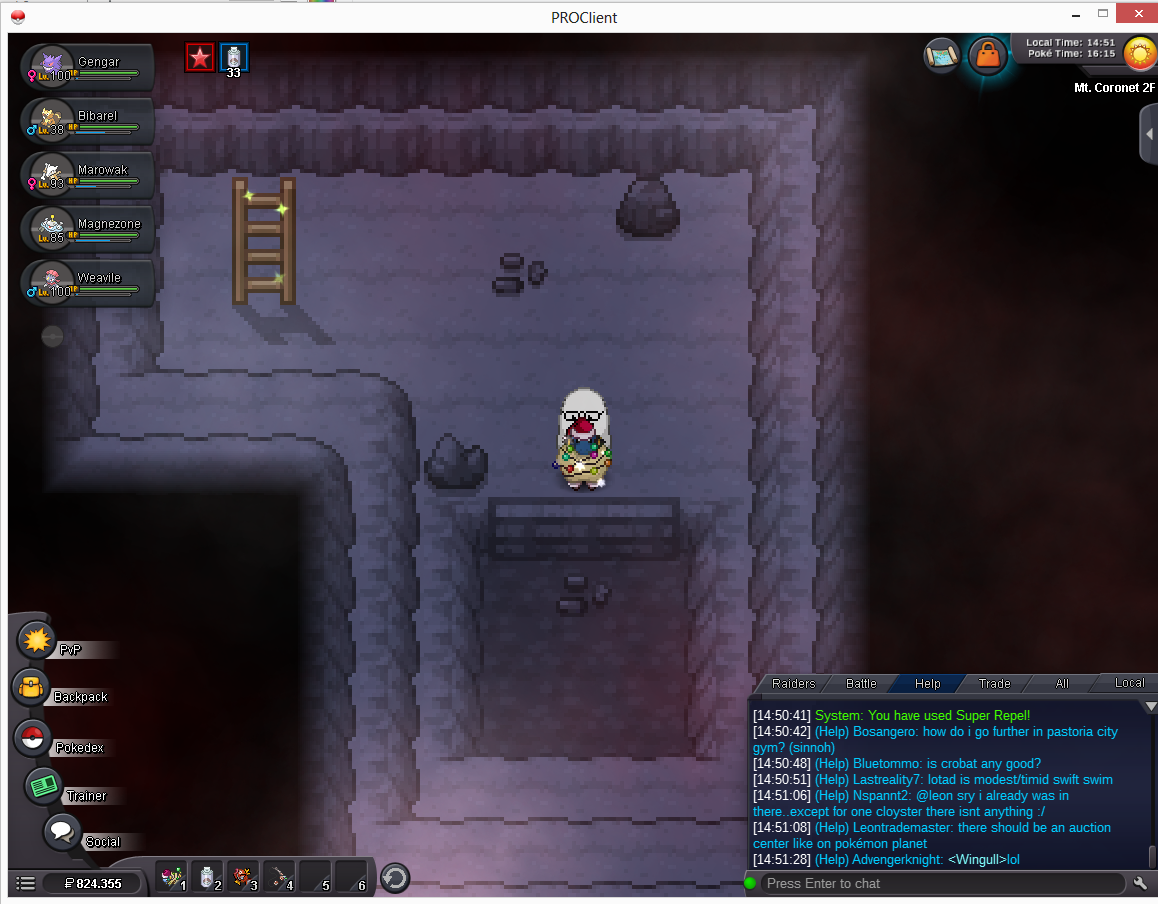
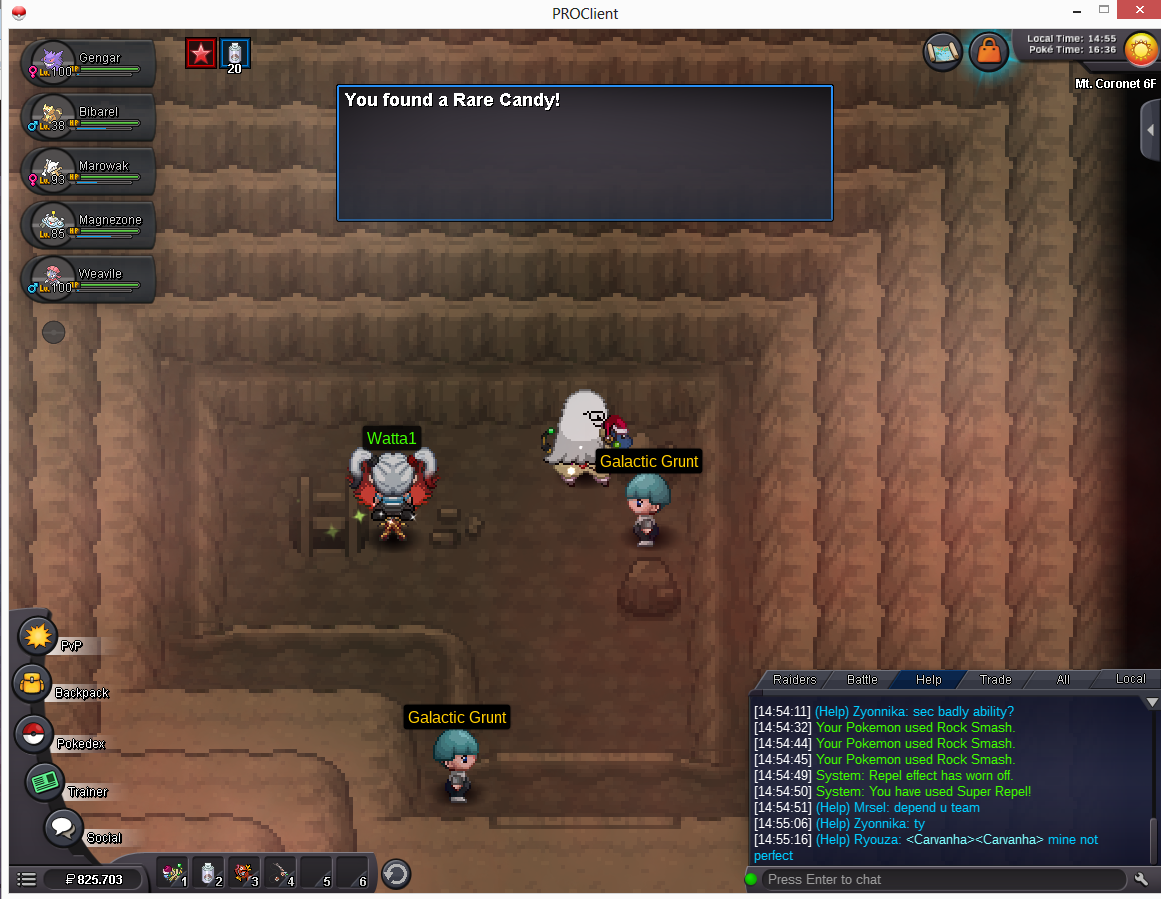

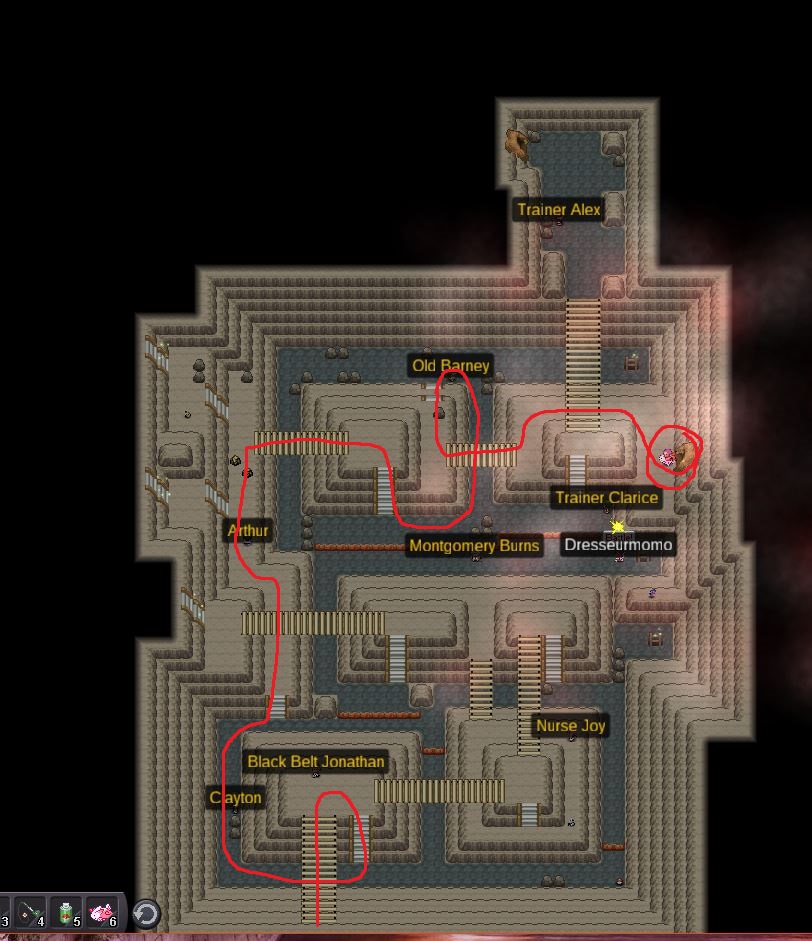
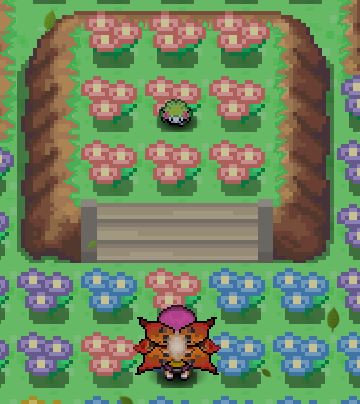

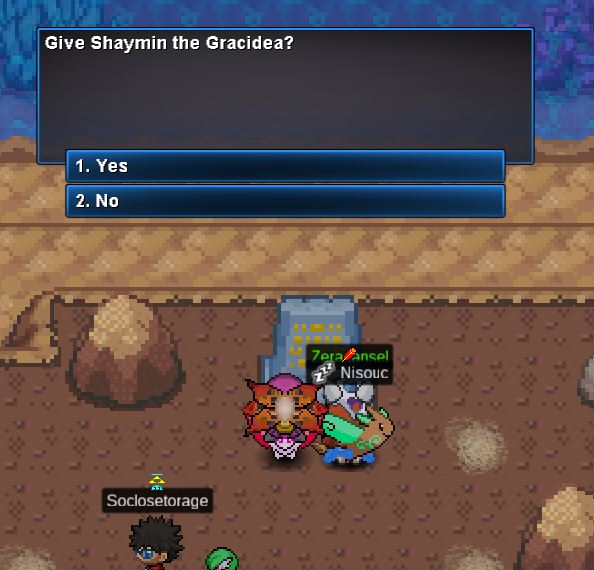
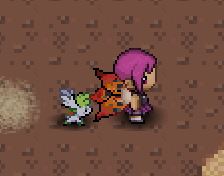
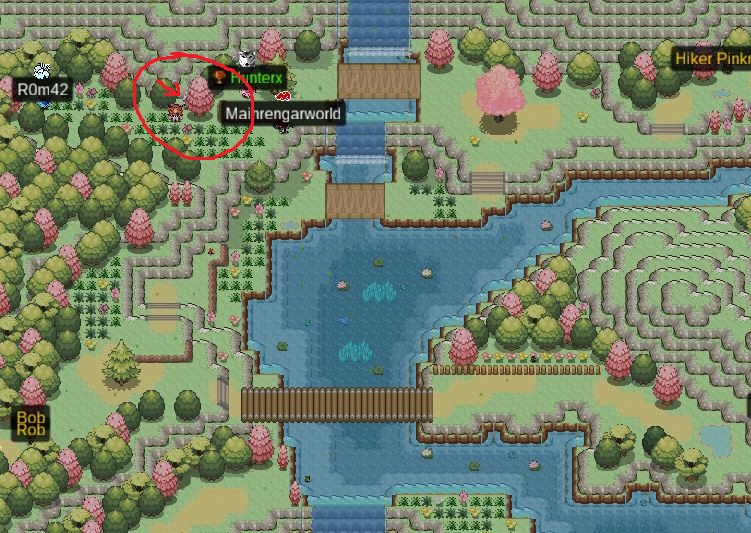
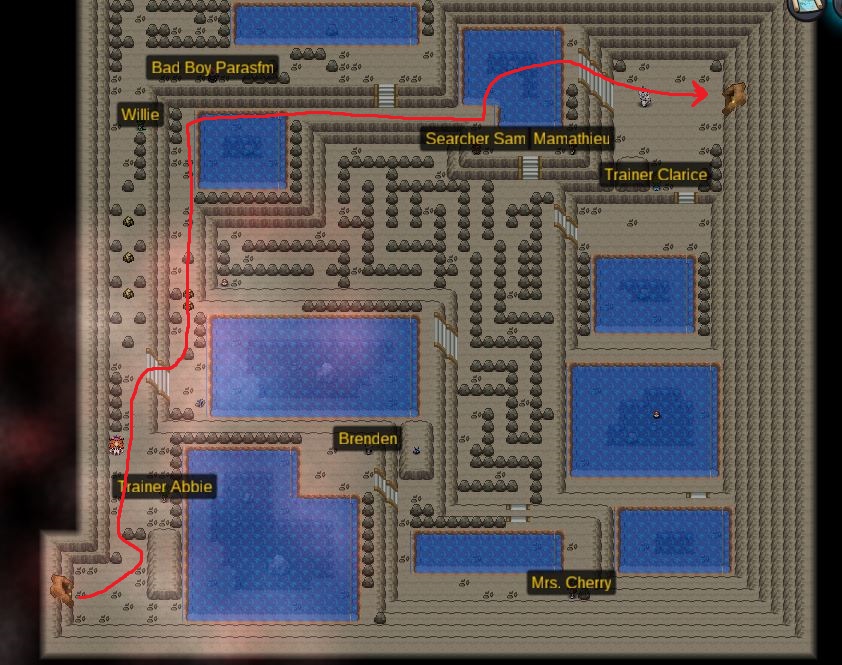


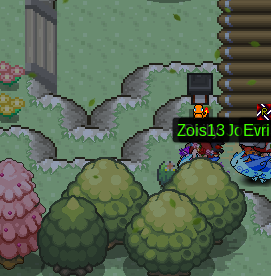

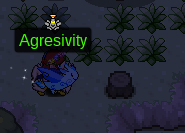

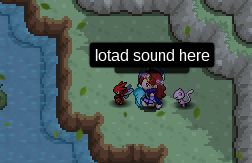
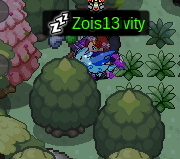

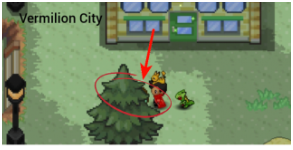

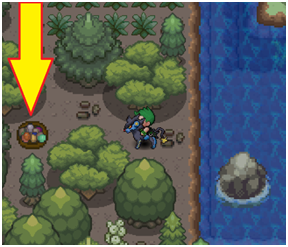
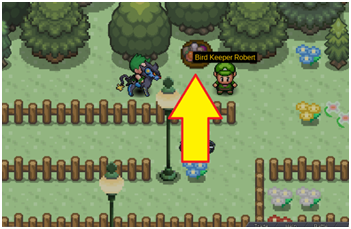
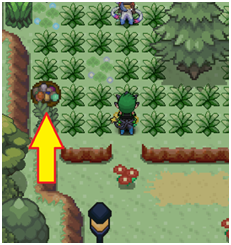
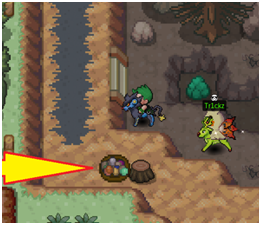
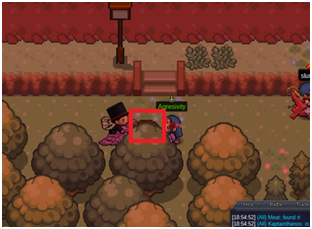

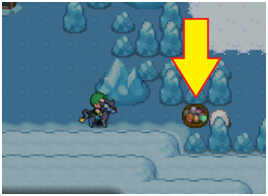


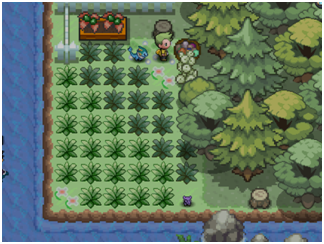
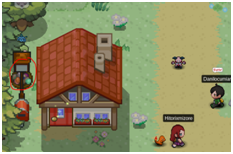
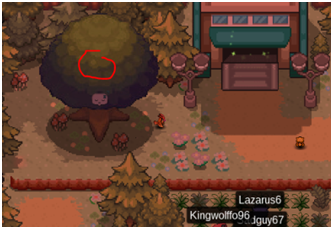
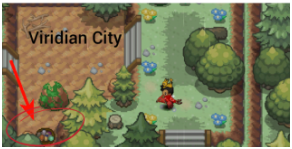
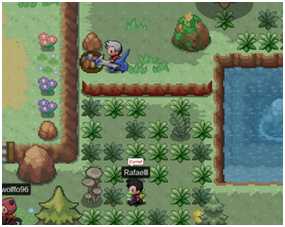

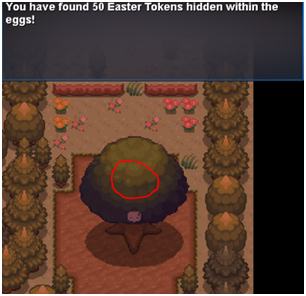

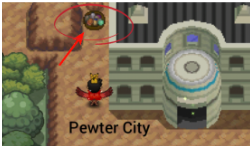
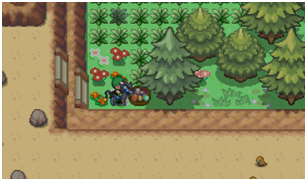
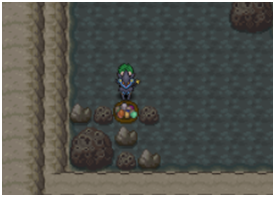
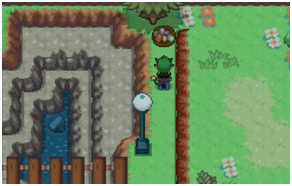
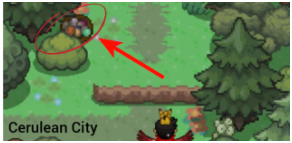
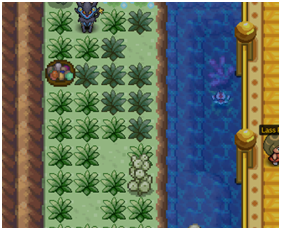

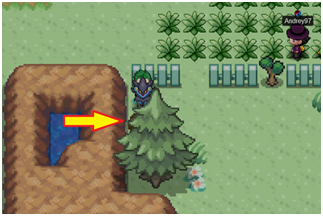
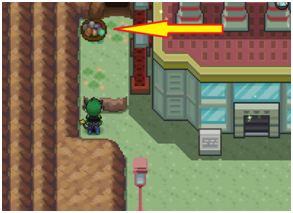
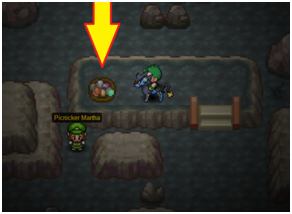
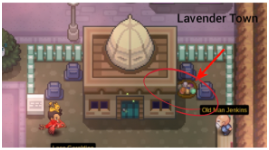
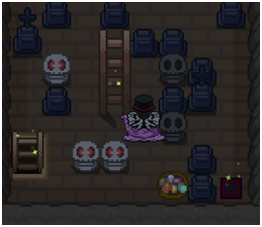


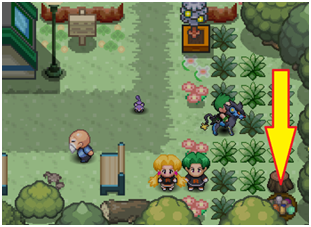

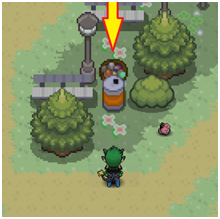
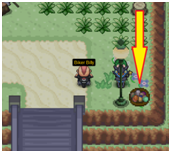

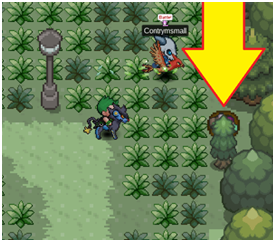

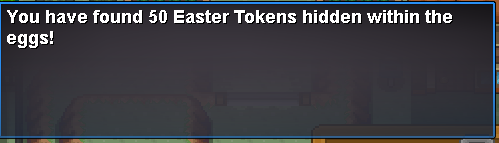
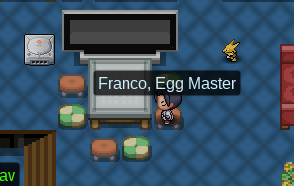


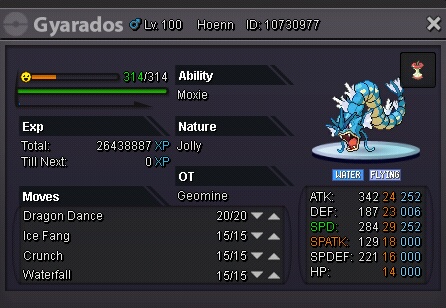
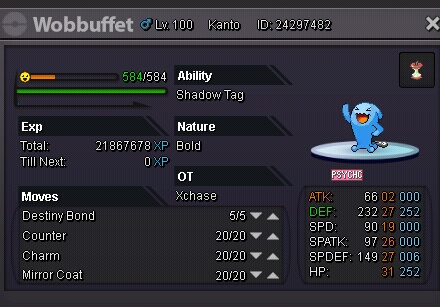
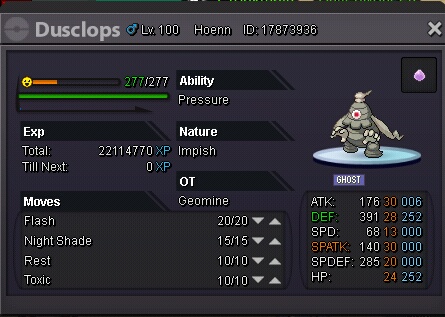


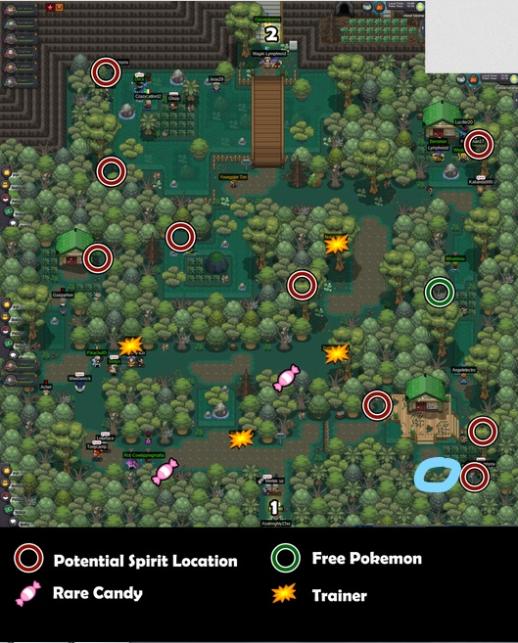

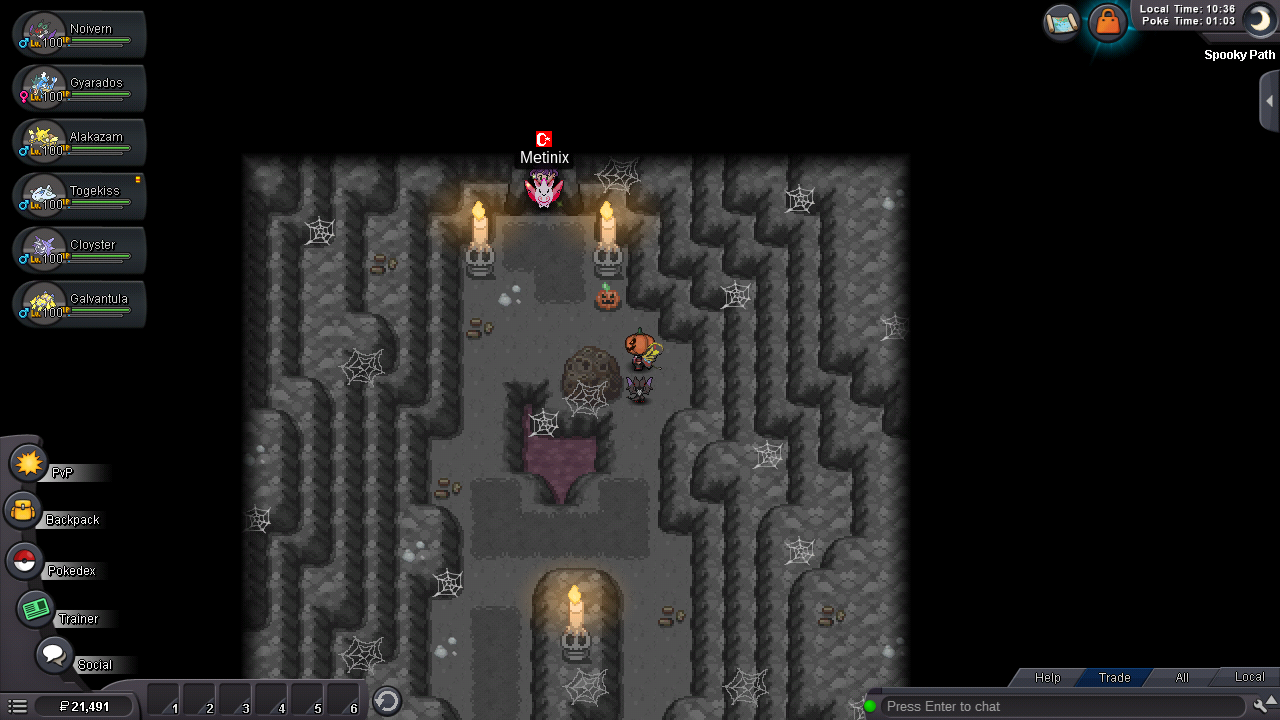

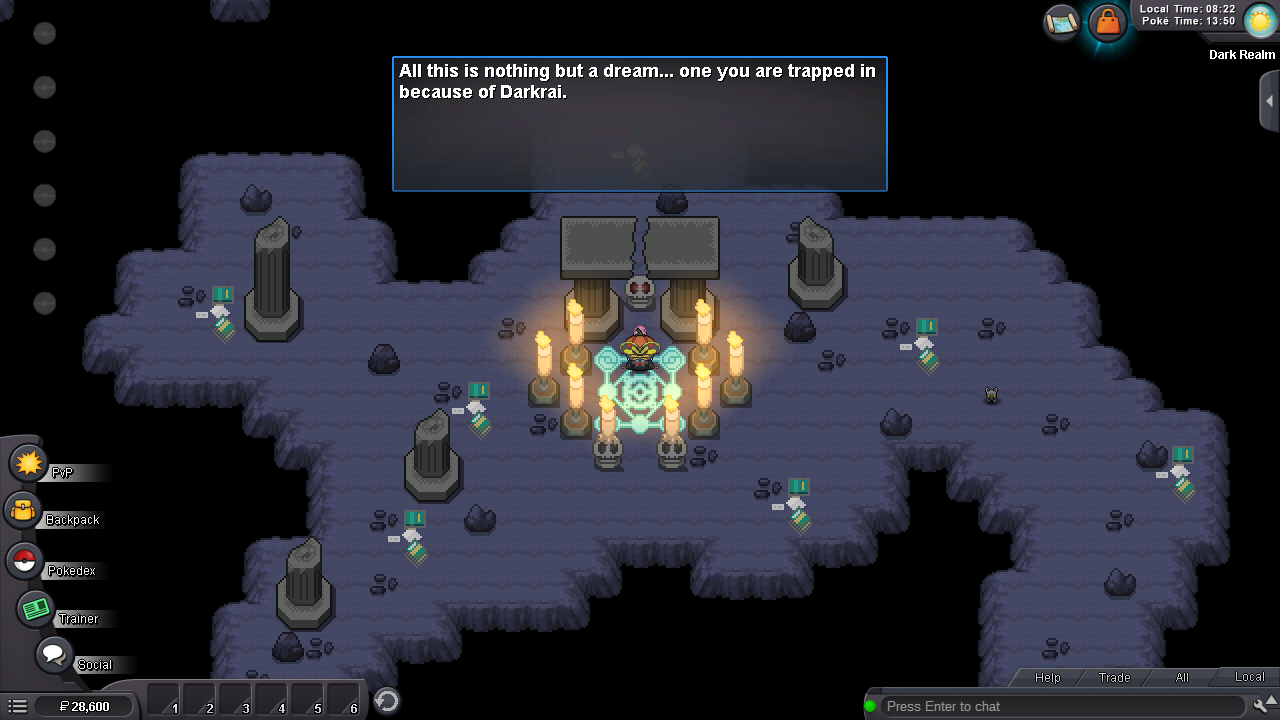
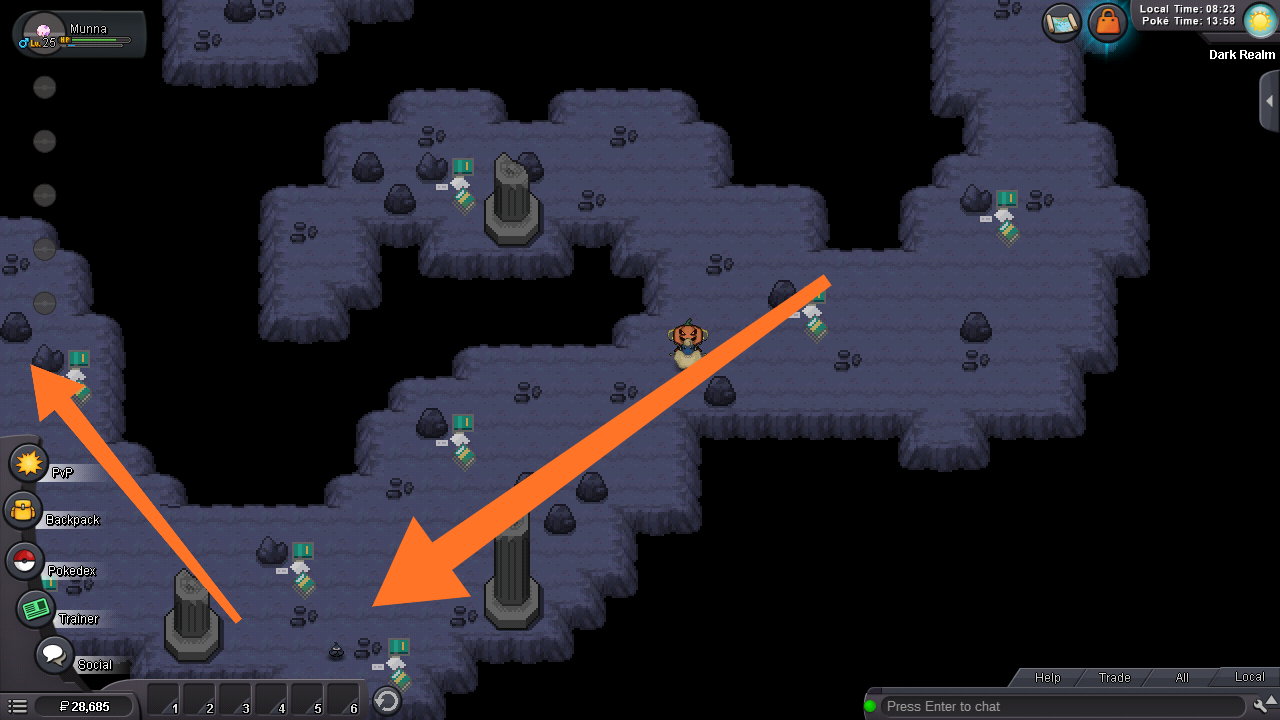
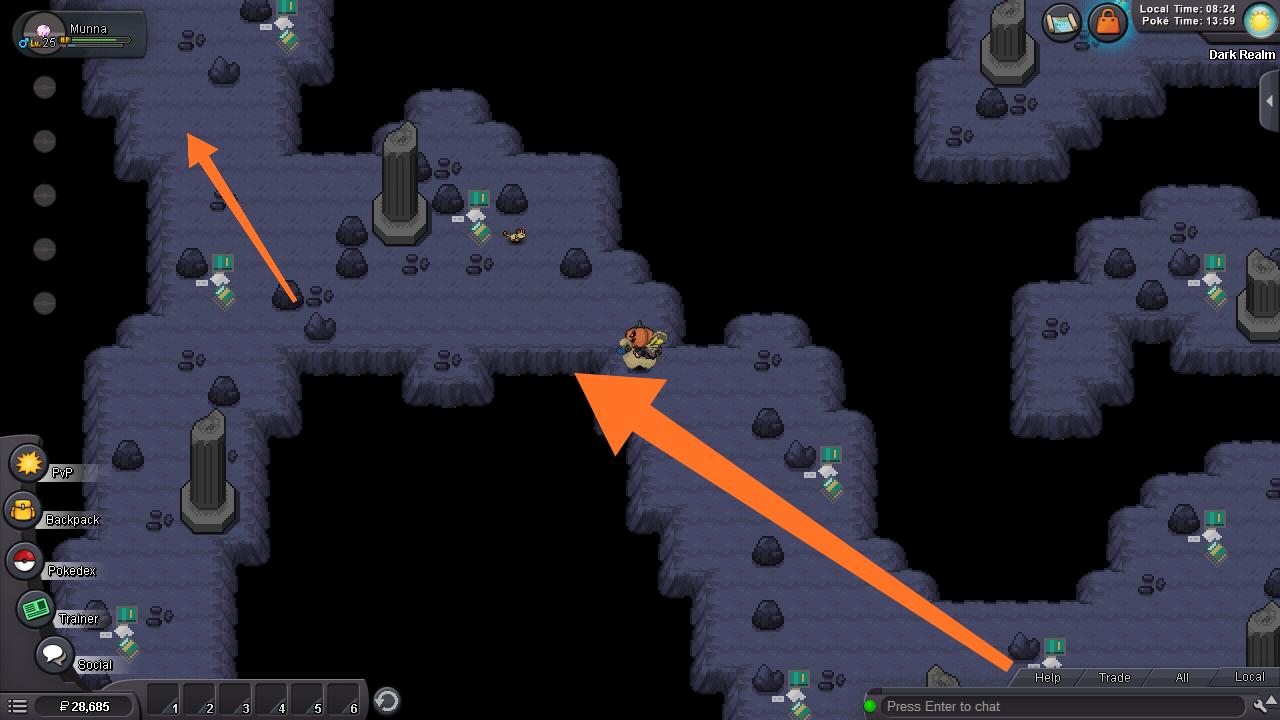
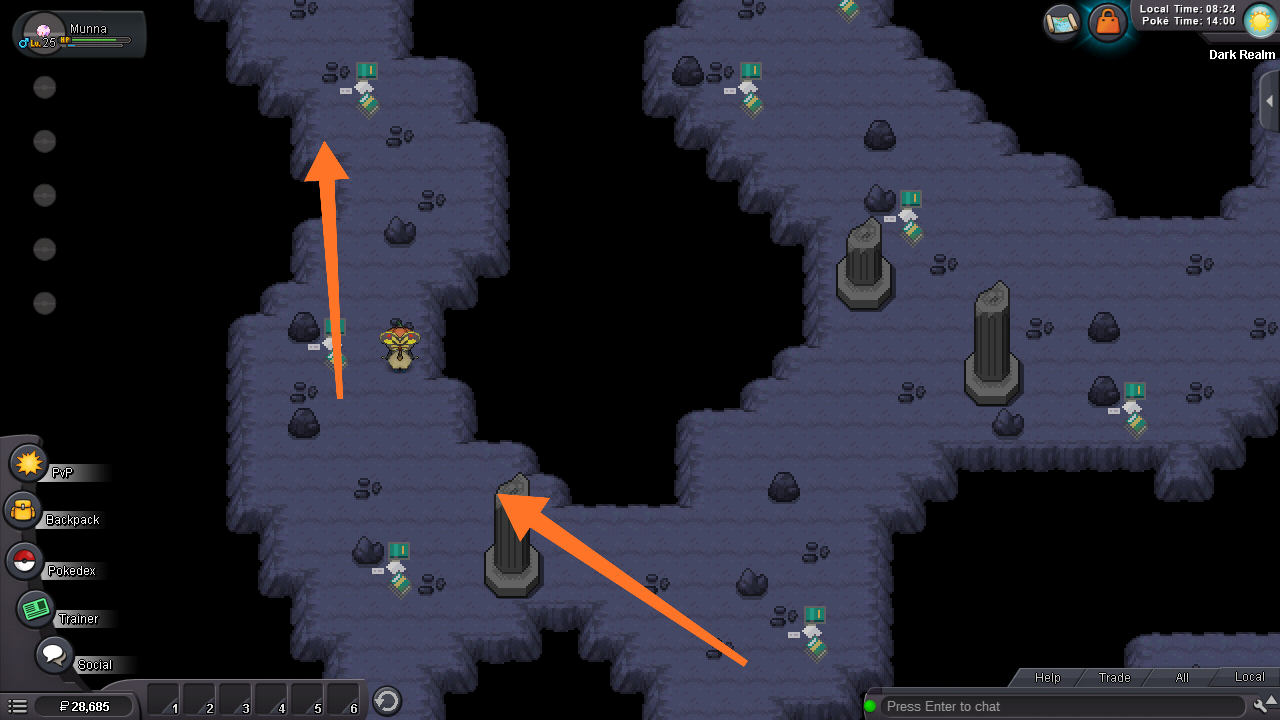
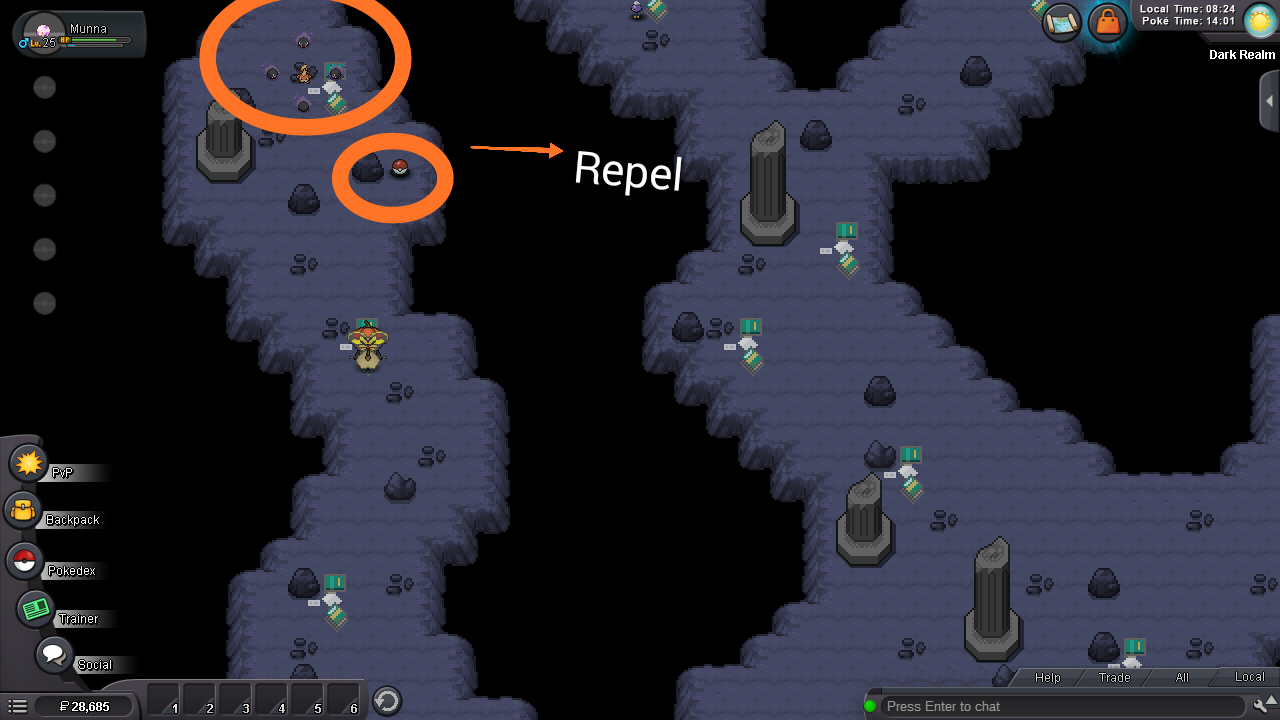
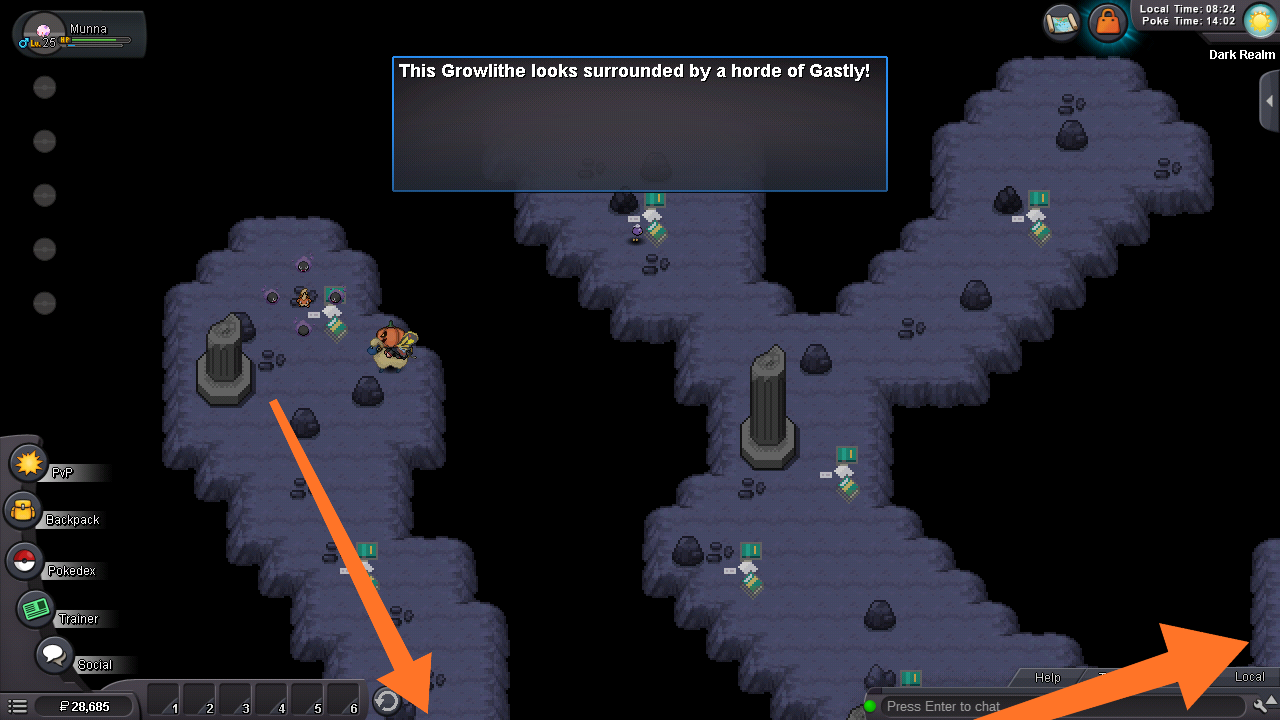


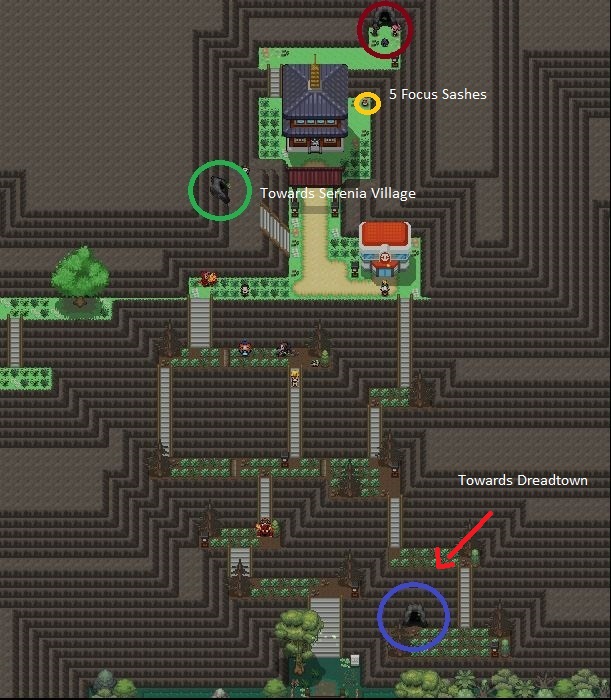


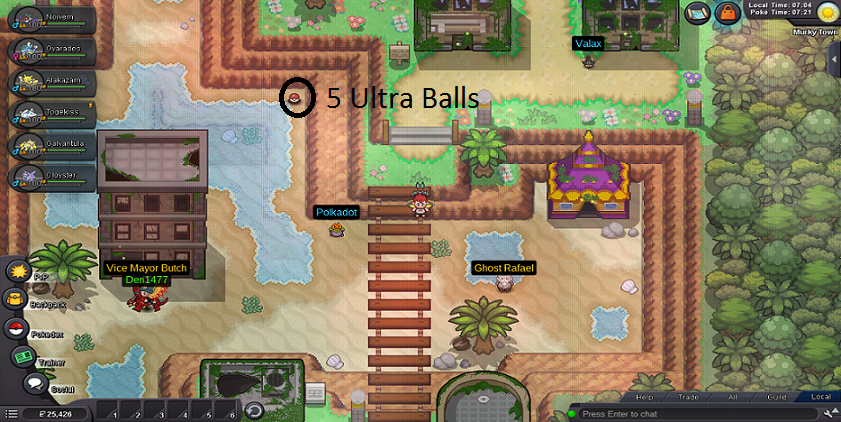


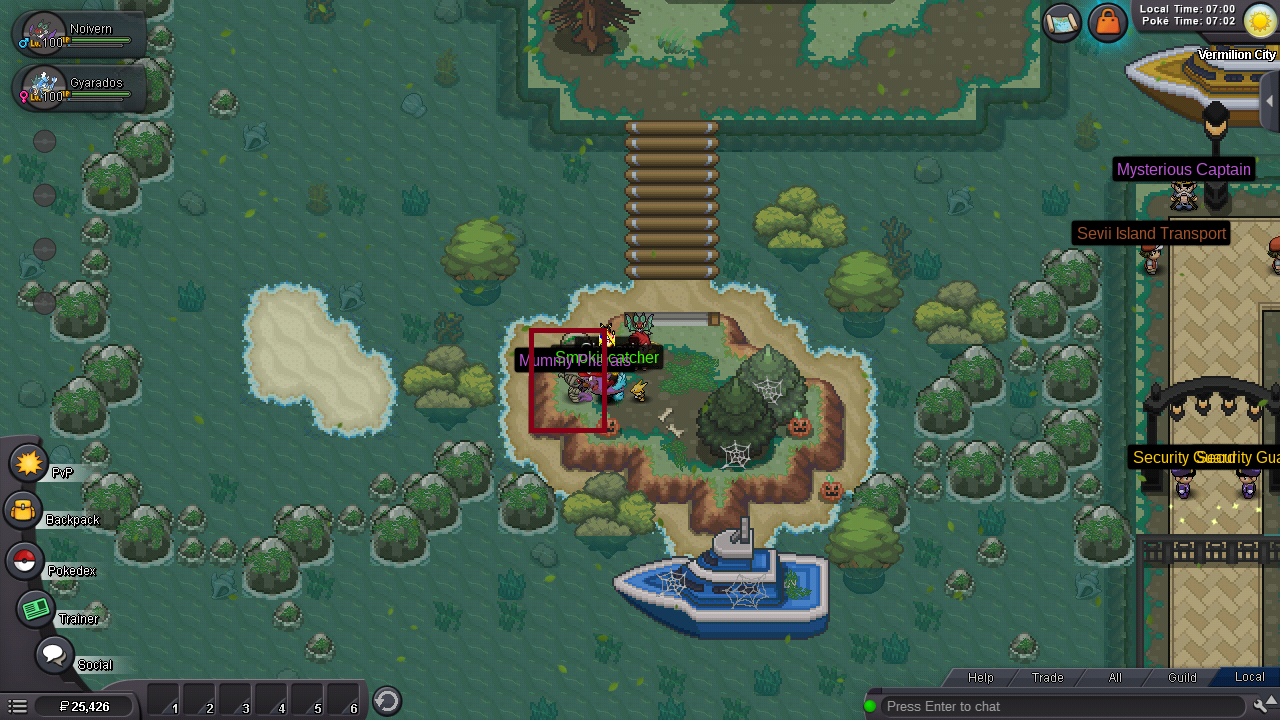

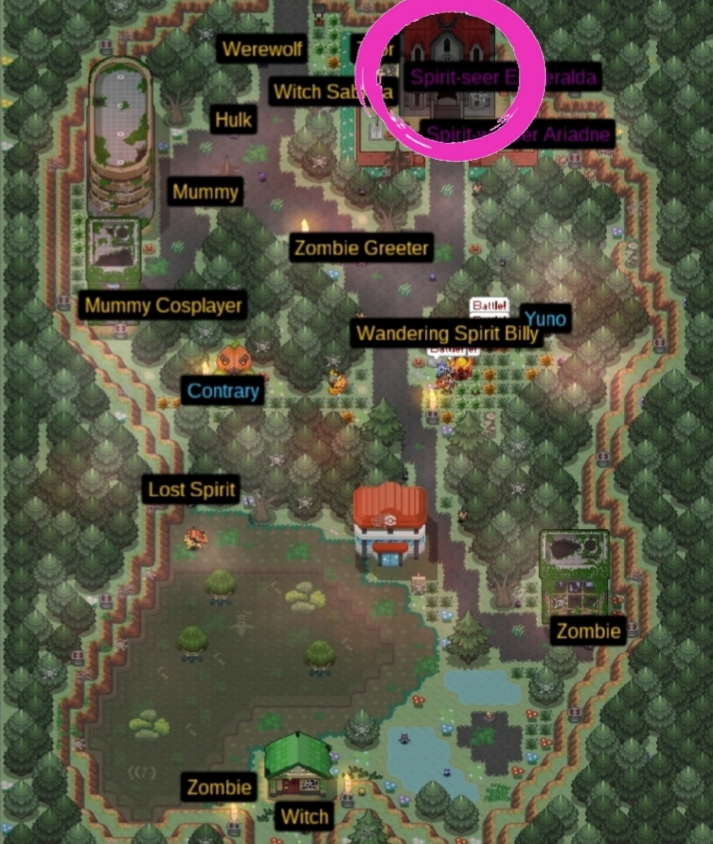


.png.bc32d520b863db68c71e9aaa31e890ed.png)
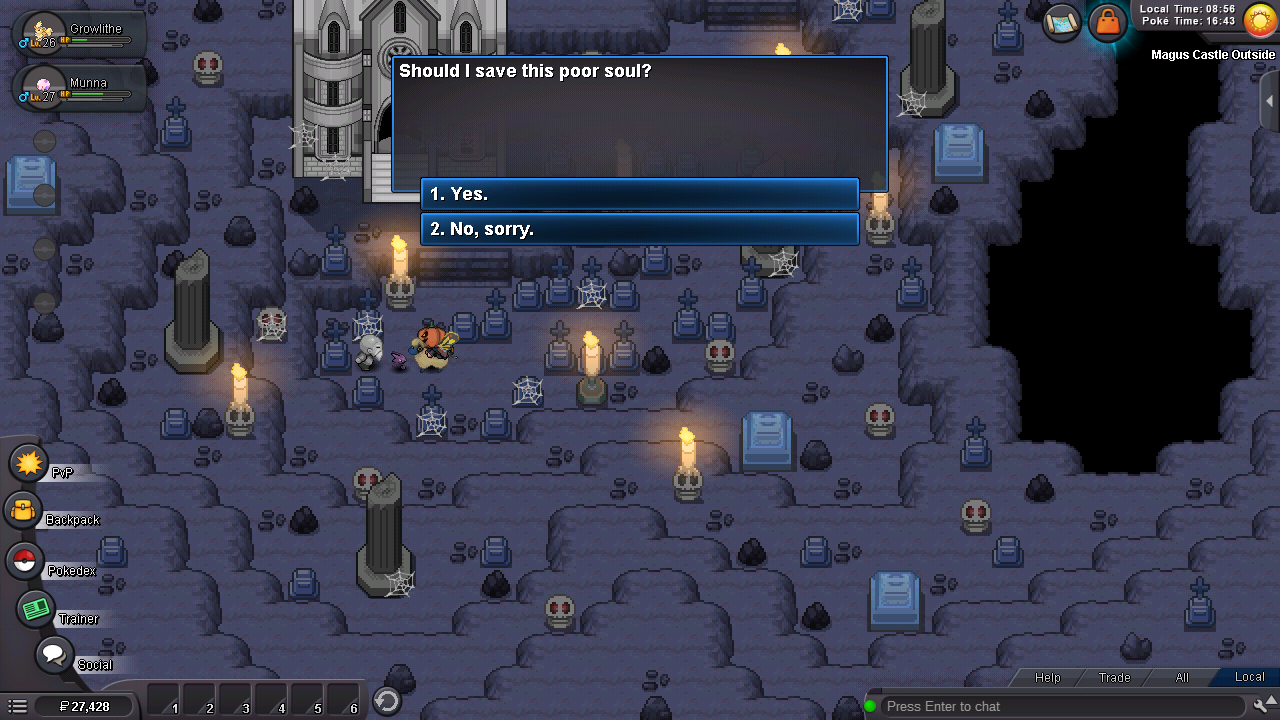
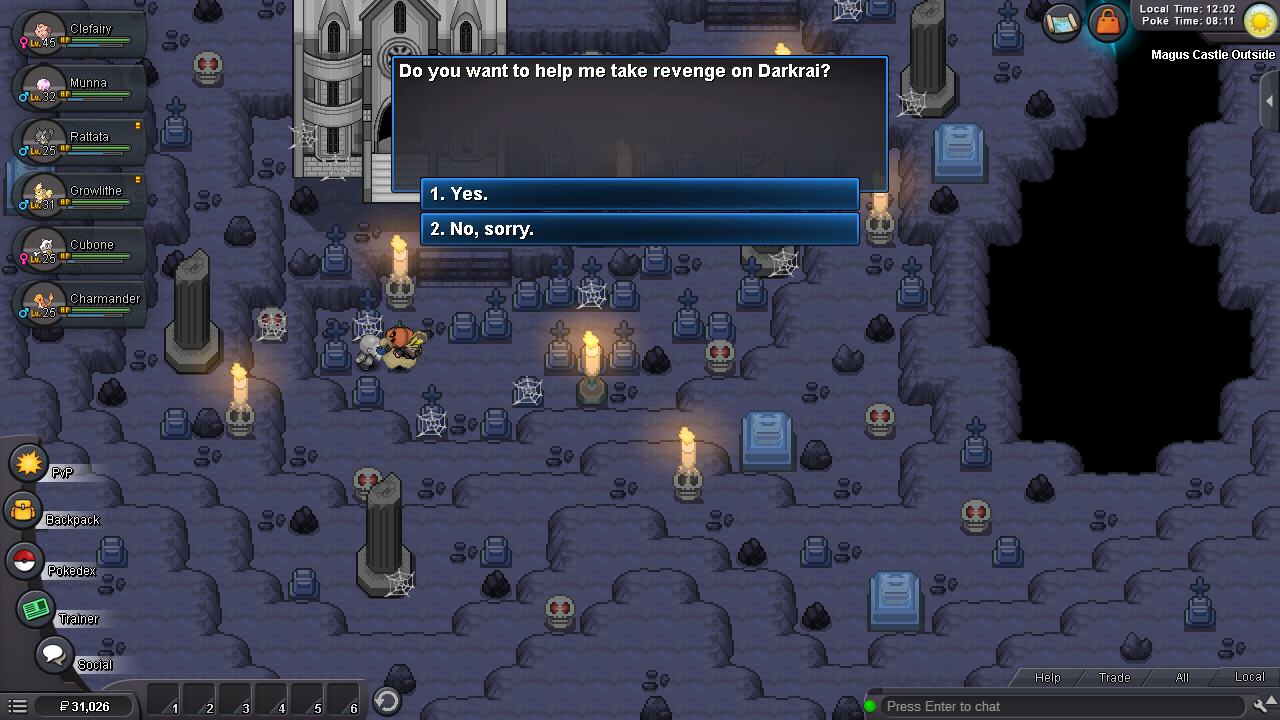
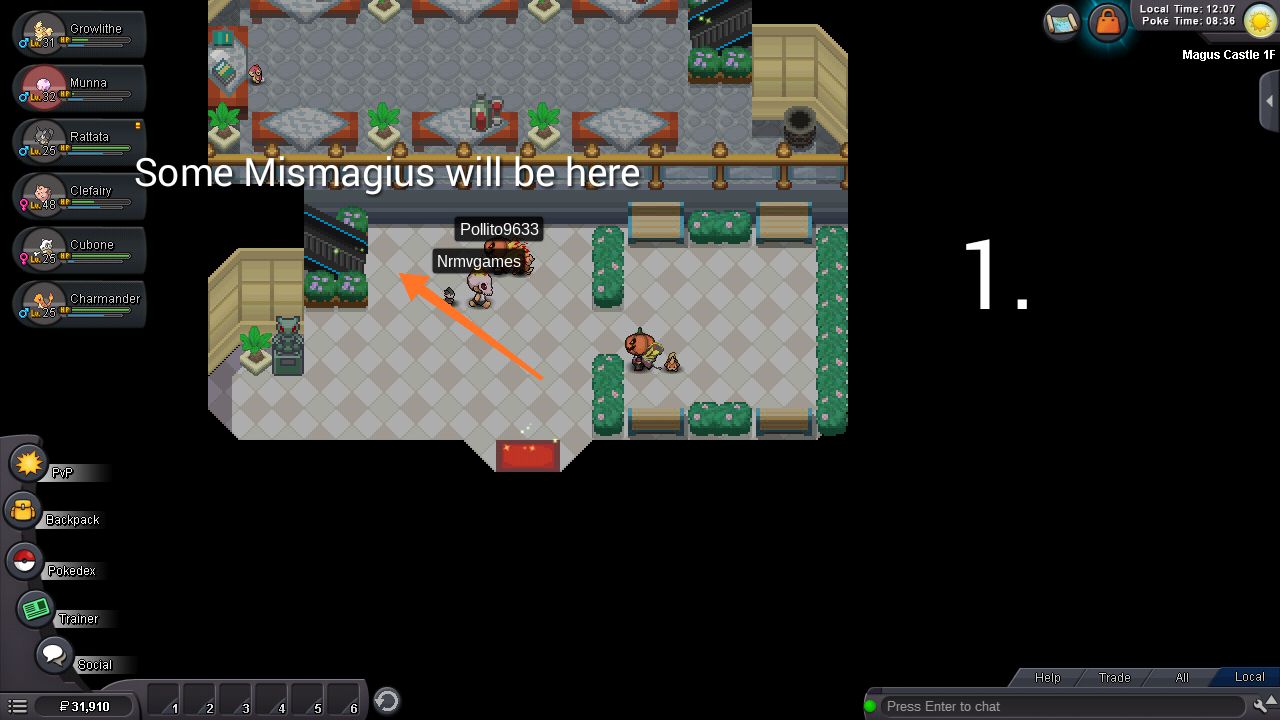
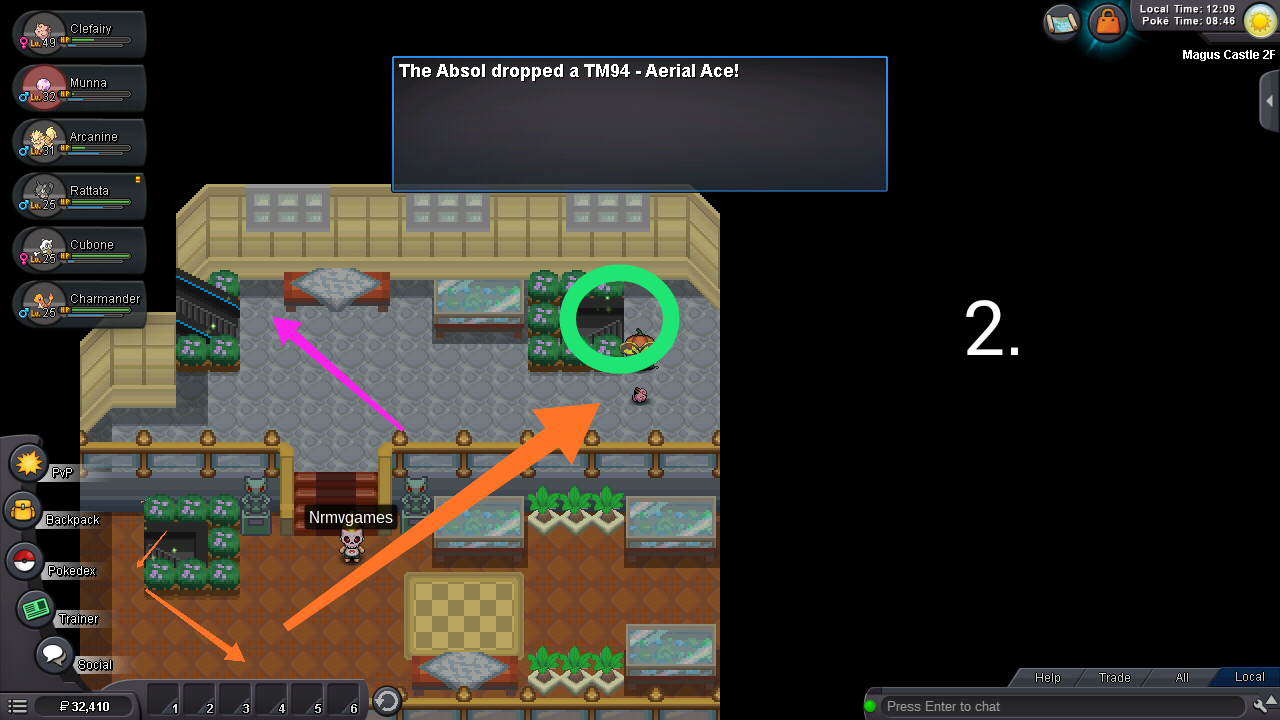
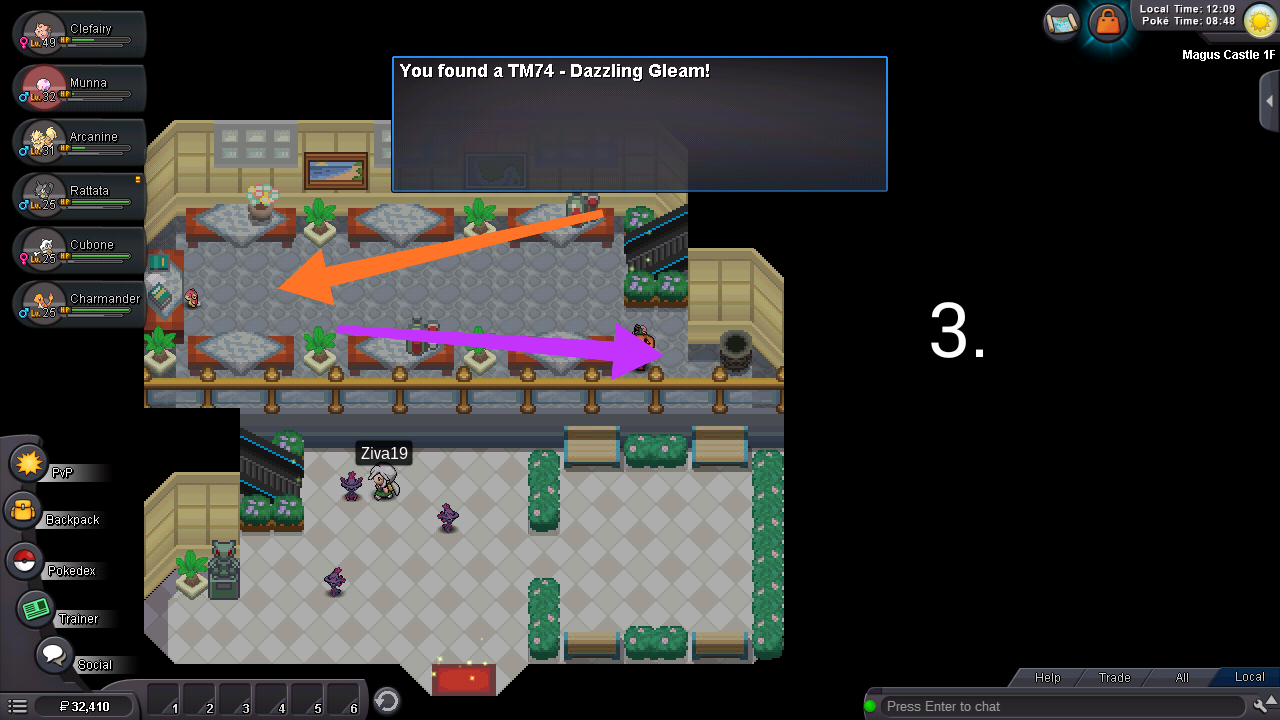
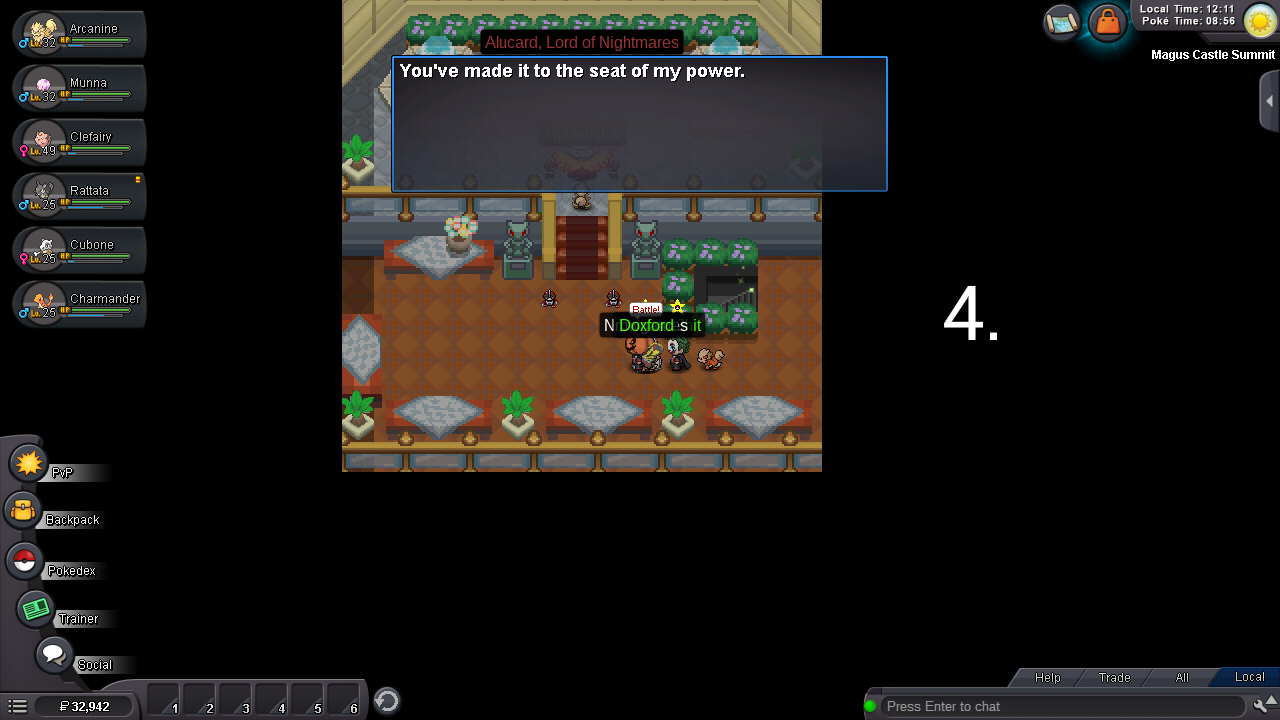
.jpeg.d8790cd500fb7c9a9457a5e0399bc819.jpeg)


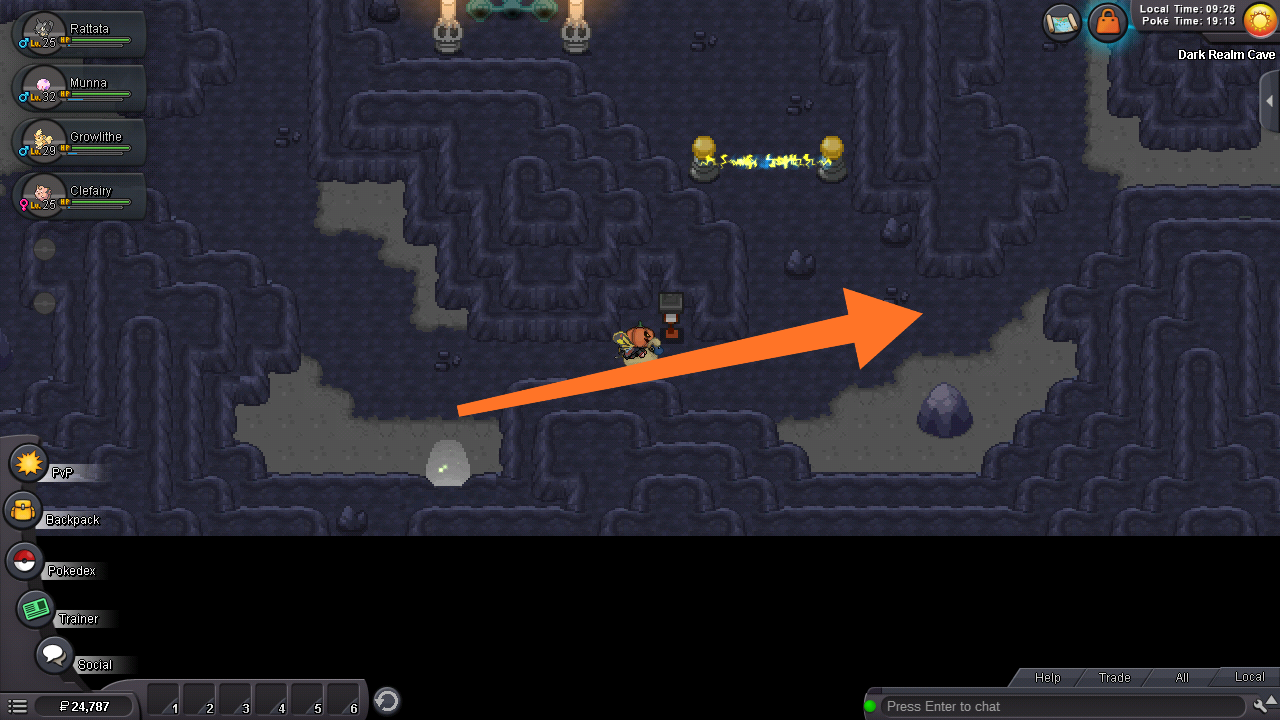
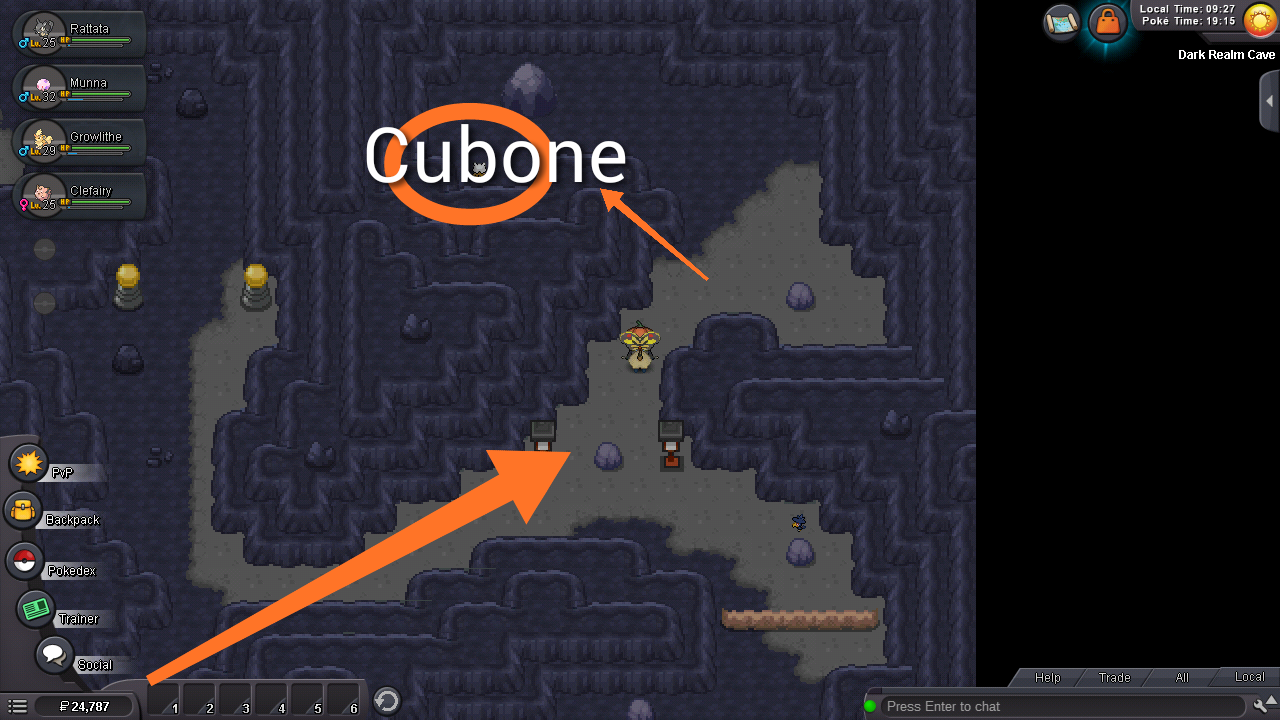


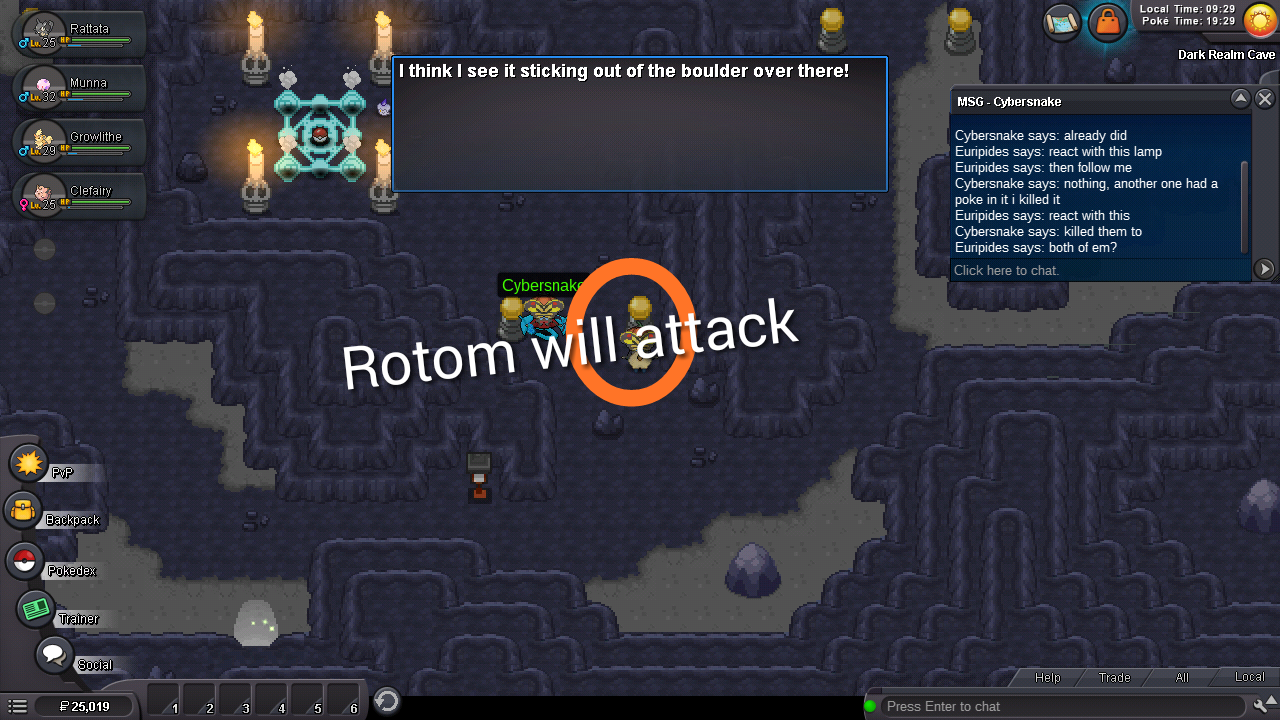
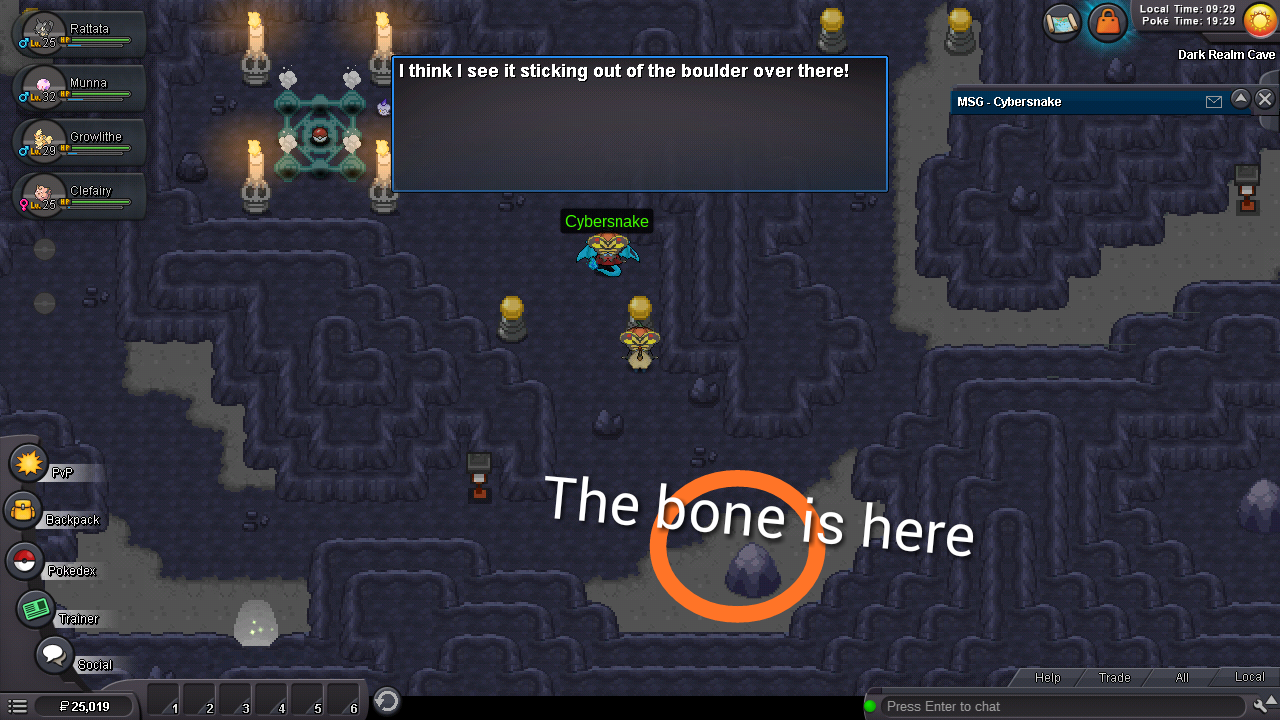


.png.b80fdc5633ecb7c9425146b4d1ed3caf.png)