Leaderboard


Popular Content
Showing content with the highest reputation on 12/22/20 in all areas
-
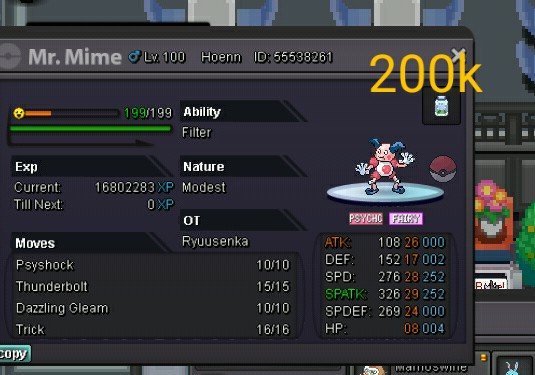
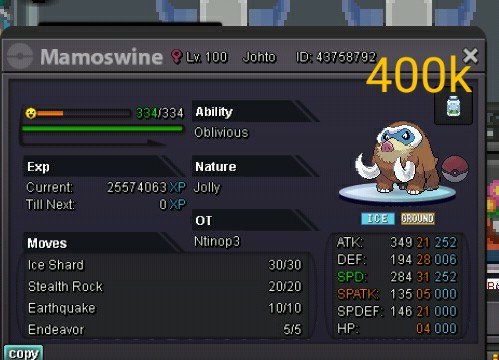
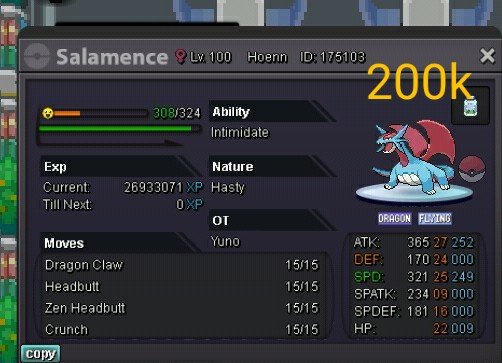
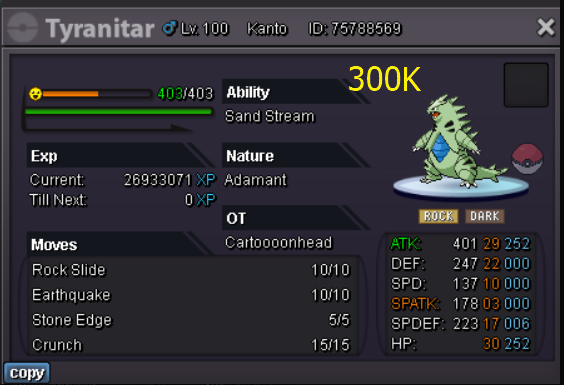
Welcome to Predators Guild Shop! We are selling various pokemon and items. We prefer cash payments, but items may work occasionally, depending on the guild's needs. Rules 1. Prices are negotiable in some cases (*) 2. Fake offers will be reported 3. We have every right to decline your offer 4. No discussions are allowed (keep that in-game/discord) 5. Offers cannot be revoked (you can't go back, so be sure to check if you have the amount of money required before the purchase) Contact: IG: Cartoooonhead Discord: poppunkdan#6291 Item-pokedollar ratio CC = 370k IV Reroll = 700k Nature Reroll = 350k Pokes have their names next to them, so that Ctrl + F can be used for easier browsing. Pokemon <500k 600k - 1m 1m-3m Sold mons Items
 1 point
 -
Hello and welcome! One of, if not, the most profitable parts of this game is the huuuge amount of boss battles you can do every 12 days. At times it seems like there may be too many bosses scattered around, and it's hard to know where to start. The Reborn-bot is an amazing resource to have, but it's boss cooldowns are often inaccurate due to the changes with bosses over time, so sometimes you miss boss fights completely, or revisit a bunch expecting to fight only to be told to come back in 3 days. I've compiled this walkthrough as a direct route that links every single repeatable (sorry, no Red/Lance/Maxie etc in here) boss together, so you know for sure that you haven't missed anybody. I think there are 48 in total, so the guide is gonna be a bit... wordy I believe it to be the most efficient route, however I am open to editing if you have tips or changes. I have based the entire route (or 95% of it anyway) on foot travel, rather than teleporting, to help players who don't have so much pokedollars and want to build some bank a little faster. Players using travel pass can breeze through bosses quite quickly, for those without it a boss run can be quite daunting so hopefully this helps. Before getting into it, I would like to take a moment to mention the travel pass. For semi-serious players and up, maybe for players who play more than 3x per week, in my opinion it is the absolute best way to spend your pokedollars in game; the underrated MVP. For $10k per day (which is the price of two single trips between regions without transit pass) you get unlimited travel. Until you try the pass, you have no idea how much more productive you can be. Being able to farm pokemon more efficiently, farming bosses and PVE activities quicker, you can easily pay off the price of the pass and then some. You can make around $1.5m pokedollars per month just by farming bosses on easy mode alone, and 2x or 5x that amount on the harder difficulties. I urge you to put aside just $300k out of that and try the transit pass at least once. With that out of the way, lets begin our journey at the games adopted hub, Vermilion City. KANTO Start – Vermilion City •Begin by battling Xylos in the fan club near Vermilion Poke Centre. •Next, take the North exit from the city into route 6. Cut left into Vermilion Graveyard on this route where you can battle the Pumpkin King •Head back to Route 6 and continue North into Saffron City. Near the southern stophouse where you will enter the city is Golds Gym, where you can find and battle Chuck. •(Optional/Conditional) if you have a level 100 Pikachu you can head to the nearby Poke Centre and withdraw him. Head through the West exit towards Celadon City where you can battle Jessie & James. Follow the awkward path around the back of the buildings to reach them. •Either way, head back to the North side of Saffron city now, and enter the dojo to show Koichi who is boss. •Next stop, Cerulean City, or route 25 to be precise. Take the north exit from Saffron, through route 5 and continue north through cerulean city, across Nugget Bridge. At the end of the bridge, you’ll find a cave containing Entei Guardian. •Hop onto the water outside E. Guardians cave and make the short trip south to Cerulean Cave, head through the cave to the basement where Naero awaits you. •Now head back into Cerulean city, and take the East exit from the town. Head through Rock Tunnel, and out the other side into Lavender Town. Enter the spooky tower here, and head up one or two floor to where Uruhara awaits. • Skip town to the South and head all the way down through routes 12, 14, 15 into Fuschia city. Surf or sail from here to Cinnabar Island, and enter the lab to battle Prof Oak. •Continue west off the Island and surf to Pallet town, then move north into Viridian City. Take the West exit through route 22, and continue west through the large building and route 28 on the other side of it, towards Mt Silver. Ensure you have a method of climbing waterfalls before heading into the cave, and then head up the two falls just inside the cave entrance, where you can find Terminator. •With the Terminator defeated, head back east into Viridian City, and then North into Viridian Forest. Head left as you enter the forest, to find the entrance to the Maze; bring flash or a flashlight! Inside the maze, head North East to find and battle Erika • After defeating Erika, head back Southwest to find the exit of the maze, then move North through the main forest into Pewter City. In the north east corner of the City is Pewter Jail where you can battle both Officer Shamac and thief George. •For our final stop on Kanto mainland, head back to the south exit of Pewter city. Cut the trees and hop into Digletts Cave, where you can wail on Brock. Continue through to the far exit of the cave to find yourself back in Vermilion City. All Kanto bosses are now down and you can move to the next region. •Before moving to Johto, you can visit Kantos optional islands where several bosses await, providing you have unlocked the respective islands and completed any prior quests required; •Love Island is the home of Shary and Shaui dual bosses who must be defeated together. •Pinkan Island houses Officer Jenny in the lighthouse, and Khlover in the islands meadow area. •Munchlax Resort contains Prehax and his army of Munchlax (4 total) which must be defeated using only two pokemon. JOHTO Next; to Johto. I would always advise you sail from Vermilion to Olivine rather than walk to Johto as it is a very long and tedious walk, and we have just made some bank from Kanto bosses. •Landing in Olivine City, we will hop straight back onto the boat and take the option for Dock Island for our first two bosses. When arriving on the island, surf over to the left side house to fight Battlebot or whatever it’s called, and afterwards head north through the island into the amazon forest to fight Bugsy. •Return to Olivine and head North and then East, away from the city. We will reach Ecruteak city, but just pass through and head out the east exit again. On route 42 we will reach Mt Mortar, a cave that contains the boss Bruno. Smack him and then head towards the eastern exit again, and take the short trip east from Route 42 into Mahogany town. •Take the North stophouse from Mahogany Town onto Route 43. Look for the water on this route and surf across it, this will allow you access to the hidden part of the Lake of Rage. Navigate the small, simple maze here to reach the secluded lake area where Suicine Guardian awaits your arrival. •Head back now into Mahogany Town again, and take the eastern route out onto route 44. Here you will find the Ice Path, where Lorelei lies deep within, plotting here revenge after getting rekt in the Elite Four earlier. •(optional/conditional) Despatch Lorelei and then move through the cave to the exit and Blackthorn City, where you can visit the Dragons Den training spot and battle boss Lance on the condition that you have 150+ evolved data in your dex. •Exit Blackthorn to the South and take the long walk down Route 45, heading west at the end into Cherrygrove City. Move North through Route 30 and west through route 31 into Violet City. Here, we climb the Sprout Tower and fight the master of Eeveelutions; Sage. •Whoop Sage and then head back down into the town. Look for the Northwestern exit onto Route 36, and then immediately South to Ruins of Alph. Prof Elm is waiting to battle here inside the small house on the right side. •Next, take the stophouse exit right outside Prof Elms house, onto Route 32. Another long route, head south all the way down to Union Cave. Use the dig point slightly away from the exit to skip through onto route 33. Scoot west through this route, and straight through Azalea town, into the dark Ilex Forest. Hidden in the depths of the forest, in the northeastern corner is boss Neroli. • Take the northern exit from Ilex Forest and into Goldenrod city. Here we have another dual boss battle, where you are not allowed to exit until both are beaten, so prepare a party that can deal with both foes lineups (they are mostly fairy types so it is not too difficult). Once ready, enter the Goldenrod Casino to battle both Pewdie and Diepy. •With the gamer duo defeated, we have pretty much finished our circuit of Johto. Stroll North out of Goldenrod city, and make your way back to Olivine. Near the docks in Olivine, you will see an exit in the southwest corner of the town, head this way to find a beach covered in Krabby and Wingull. Step through them and surf on the sea (ignore the Cianwood boat). Surf south through route 40, onto Route 41. As soon as you get onto this route, head left until you see Swimmer Thomas. Cut through the rocks using the whirlpool directly south of him, and enter the cave found here (Whirl Islands Northwest). Inside, head down the ladder into the main cave. Walk south from the ladder, down two staircases and climb the next ladder going down. At the base of this ladder, you’ll see a staircase with a cavern door by it. Ignore the cavern and continue down a further 4 staircases to a second cavern, which is home to boss Thor. •Retrace your steps back through the cave and out again, and surf past Thomas again to where you entered Route 41. Now, head directly south, past Swimmers Toby and Barry. Continue South some more to battle your childhood crush Misty, Johtos final boss. HOENN You can go back to Olivine and sail to Hoenn if you want, but for the sake of this guide we are surfing there! Head directly South again from Misty, into a new water route. Surf all the way south again, to Nap Island. Assuming you have cleared everything you need to on Nap Island and can just stroll through it; head through Nap Town and surf off the south side again, through Route 125 until you hit Mossdeep City. No need to hit the land here as it’s a pointless city, continue surfing West into Lilycove. •Now we are back on land, walk west through the port town and onto Route 121. A small concrete pier extends to the water; surf from here onto Route 122. You will have landmass either side of you. The grassy island to the right side is Mt Pyre, climb onto here to find a tower containing our first Hoenn Boss Morty. •Directly opposite the entrance/exit to Mt Pyre is another concrete pier which leads us to route 123. Head west all the way down here, hopping off a number of ledges which leads to route 119. Head west some more until we reach Mauville City. Take the southern exit from this town onto Route 110. Take the steps and surf across the water, to the east side of the lake where New Mauville cavern can be found. Inside it is a power plant type place, where boss Lt Surge has taken residence. •Exit New Mauville and head back to the steps where you began to surf from, and exit the water. Follow the path around this route, through the tall grass, until you see a weird bush in the water. Slightly south of here you will find another set of steps leading down to the water. Surf from here over to the strange bush, interacting with it will reveal it is the secret base of the last of the guardian trio; Raikou Guardian. Beat him up. •Next we will go to our only Boss in the southern half of the map. Hop back out of the water on route 110 and follow the route down to slateport city. Walk south through this town and surf off the southern coast, through route 109 and onto 108. Surf West on route 108 until you reach the Abandoned Ship in the water. Head inside and then down the steps, to find boss Toothless hiding out in one of the rooms. •For now, we will head back the way we came. Follow route 108-110 back to Mauville City, and this time take the North exit onto Route 111. Walk North straight up this route until we reach Route 111 Desert. Upon entering the desert, you will see a large rock face next to you, follow this all the way around and then head South through the Desert. Eventually you will reach a cave housing Naruto Fanboy boss. •(optional/conditional) Leave the Desert the same way we entered it and head back to Route 111. Make a short hop west onto route 117, which is a very short route ending in steps up a mountain side. Take the first steps up, then cut left past Hiker Trent and into Fiery Path. In here is an excavation site containing boss Gingery Jones who is available to battle providing you have 2400+ exca rating! • (optional/conditional) Whether you chose to battle Gingery Jones or not, time to head back to the mountainside on route 117 and continue up. Take the cable car to the top of Mt Chimney and head down Jagged Pass into Lavaridge Town. Here is access to Valley of Steel, a great hunting ground for steel pokes but you must pay to enter. Within VoS is boss Steven who will battle you providing that you have all of these; Finished his preliminary questline Two steel types in your party One pokemon in your party must know the Iron Defense move • Once you have either dealt with or skipped over GJ and Steven, its’ time to battle Prof Birch, our final boss in this region. Head back to Mauville City (if you battled Steven, take the east exit from Lavaridge town and hop down the mountain ledges), take Mauvilles west exit this time, onto route 117 and into Veranturf Town. Upon entry, you’ll see three houses to the south; Birch lives in the central one. With that out of the way, it’s time to move to Sinnohs bosses. Unfortunately the mapping on hoenn is not very cohesive, so it’s either teleport or make the long walk back to Lilycove now, from where we will set sail to Canalave City - as far as I am aware, there is no way of accessing Sinnoh without paying transit costs. SINNOH •Welcome to Sinnoh! Upon landing in Canalave we will take a walk through the town and exit on the south east side. Surf across the lake on Route 218 which brings us into Jubilife City. We will begin by visiting the Jubilife School here and battle Prof Rowan. •Next, head South to Sandgem town where boss Spectify is waiting for us in one of the houses. • After, make a short trip west to Twinleaf town. Interacting with the NPC Link will allow you, through dialog choices, to taunt him into battling you. •Head back to Jublife city now and take the East exit to route 203, at the end of which you will find Oreburgh Gate. This cave has an offshoot to the North inside it which requires Rock Smash, and grants access to the basement level. In the basement you will find Legends Cave, home to our next dual bosses Medusa and Eldir. •Do a 180 and head through the gate, right back to Jubilife city again, the hub of Sinnohs boss run. This time take the North exit and travel through route 204 and the Ravaged Path, through to Floaroma town. Take the east exit from this town onto Route 205, head towards the east side of this route before hitting the water and surfing. This will allow you to access the rear of Valley Windworks, where you will see a small opening in the rock face. Get out of the water and interact with it, to sneak through a crevice and find our next boss Letrix. •Next, head back onto Route 205 and take the small bridge across the water. Climb the steps ahead onto the mountain path and head north. After passing Camper Zackary, you will cross a wooden bridge; your next goal is to get underneath this bridge by doing a U-turn when you reach Picknicker Karina and heading south down the steps. Hop the ledge and head to the river, surfing North to reach Fuego Ironworks. In the trees on the south bank of the river is a small opening; enter here to find a secret entrance to the back of Floaroma Meadow where you can find boss Maribela. •Now we need to head back to Route 205 (again!) by hopping the ledge and going back through Floaroma town and East. Head back up the mountain path northbound, this time passing Karina and heading to Eterna City. Move east through Eterna City (ignore Arkos as he is no longer active as a boss), moving through Route 211 and into Mt Coronet Centre. This cavern splits into routes in all four directions, for now we want to go South, which requires Rock Smash. Follow this route now, it will lead you through caves past a number of Team Galactic grunts and up the mountain – the path may appear confusing but is actually very linear, you can only go one way. Eventually you will be brought outside on Coronet Summit. Take the huge stair sets directly in front of you, and head along the North-Eastern mountain face until you see a cave entrance with a Snover patrolling above it. Scoot in here; if you see two interactable Golbats patrolling inside, you are going the right way. Head up through a couple more linear caves lined with Galactic grunts to reach the Spear Pillar, and possibly the games hardest repeatable boss, Ash Westbrook. • Time once again, to retrace our steps back to Mt Coronet Centre, the chamber with the 4 routes we took moments ago. Head past Hiker Sam and take the East exit this time, which brings us to Celestic Town, and we are almost, almost done. Head east again through Celestic Town and onto Route 210 North. Move further east through this route, taking the steps next to Black Belt Adam to reach the walkway above. At the end of this walkway is a cave surrounded by Ace Trainers; The Cave of Justice hosts the games newest boss, Logan. •For our final stop on the boss run, I would recommend either teleporting from a Pokemon Centre or you can traverse Route 216 into Snowpoint City and surf from there; you should be aiming to reach the location named Survival Area which you may know from the Heatran Quest. From this Poke Centre, you must head East to Route 226, and then North to Route 227 where you can find the final, and furthest boss, Saphirr.1 point
-
I think there should be an Xmas Hippopotas. This came to me while I was trying to train some Pokemon. I want a Hippopotas for Christmas Only a Hippopotas will do Don't want Riolu Or an Eevee or a Flaaffy I need a Hippopotas to really make me happy I want a Hippopotas for Christmas I don't think pro's staff would mind, do you? Design them for the season, create a new code Sure they're higher tier but don't make this hard mode I just want them in or Christmas will be blue Can't you see us logging in on Christmas morning imagine our joy and great surprise When a Pokemon does materialize And our encounter at the finish Reveals a hippo hero, nature impish I want a Hippopotas for Christmas Only a Hippopotas will do No dragoniers, no senereteses I only like Hippopotases Unlike my numel, I think they'd like me too They're not cute to many, they ain't a region starter, they don't even got a mega form But only fools would underestimate them when they bring out their sandstorm I've got lots of space for them and their friends in my poke center boxes So after every battle, I'd take them to goldenrod for messages Can't you see us logging in on Christmas morning imagine our joy and great surprise When a Pokemon does materialize And our encounter at the finish Reveals an epic hippo, nature impish I want a Hippopotas for Christmas Only a Hippopotas will do No ursarings or gardevoireses I only like Hippopotases And Hippopotases like me too!1 point
-
I suggest adding a way to obtain salac berries. I know they are available in love island and pinkan island but after searching there a few times i have gathered exactly 0 and even if i keep searching i will get maybe 2-3 after a lot of attempts. Maybe add it in pve coin shop or something.1 point
-
psychic ramona gives pvp rewards only if u talk to her and then do the challenge pls change it so u dont have to talk to her every single time before the week starts i always forget pls make autotrigger task if possible because i dont like to pvp very often and am very forgetful ://1 point
-
Rotom sold to piproom and again sorry to all involved for all the confusion that was made in this auction1 point
-
sold for 250k
1 point
-
Auction started sunday 12.10 am / so it end tommorow at 12.10 am so around 18 hours left. Sorry again for the confusion.1 point
-
The trade has been reversed, do not let this happen again in the future as there will be a punishment if it happens again. This time it will just be a warning since there is no damage done. The auction will continue for the remaining time. I suggest for the next auction you do not blindly trust on the word of the player with the best offer but only on your own judgement. Have a nice day, Sincerely Hawluchaa.1 point
-
If u black out it costs u a small percentage of what u have but logging out isn't the one costing you money , so just in case when u know there is no chance of winning I would suggest u just log out re log Regards Dragonhunter71 point
-
Have a good night chief1 point
-
+1, berries which are viable in PvP should be accessed more easily. Also I am pretty sure by now they do not spawn on Love Island as I have been collecting the coconuts since forever and never gotten a Salac berry from there.1 point
-
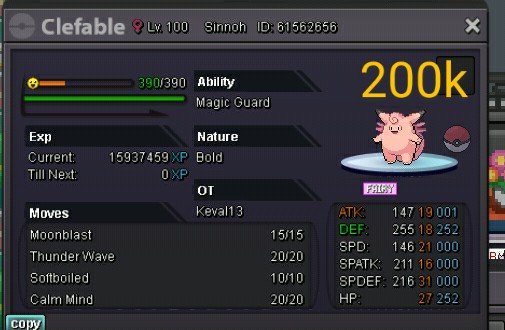
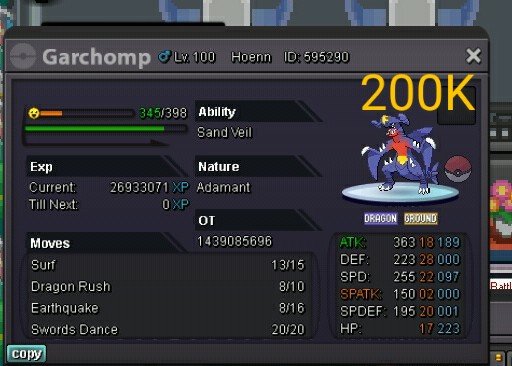
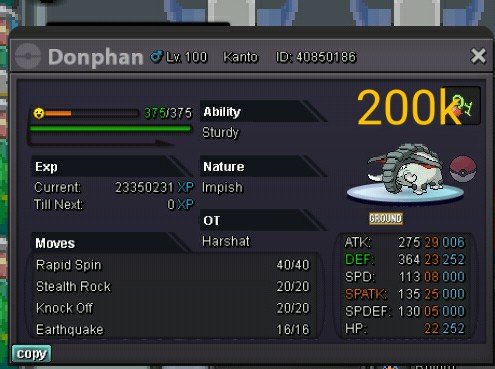
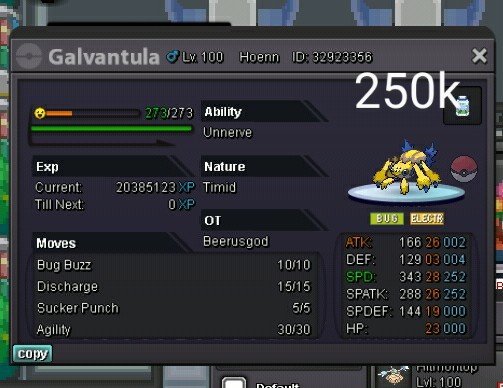
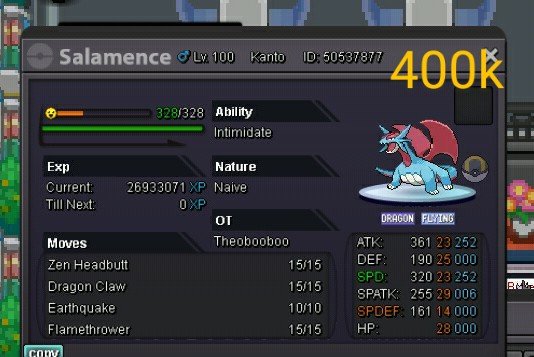
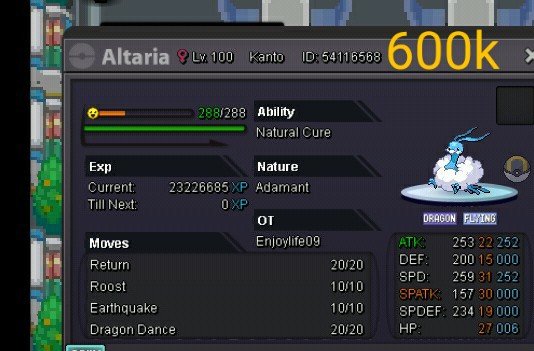
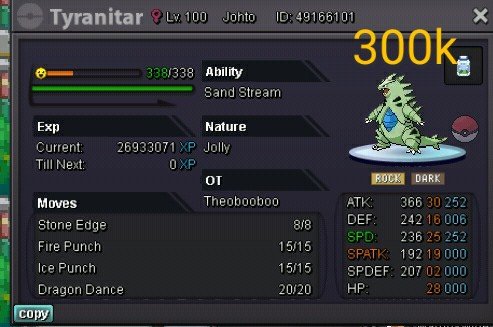
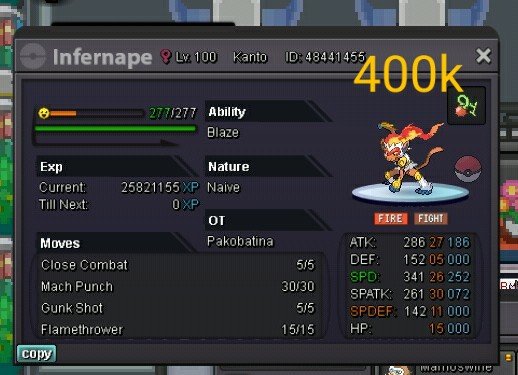
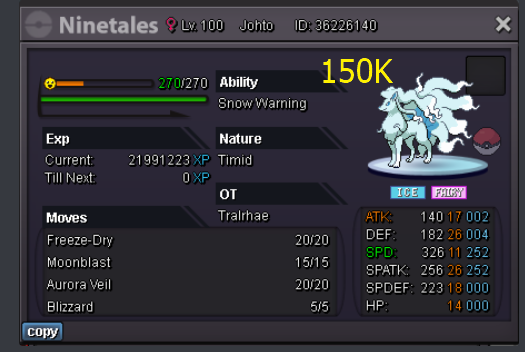
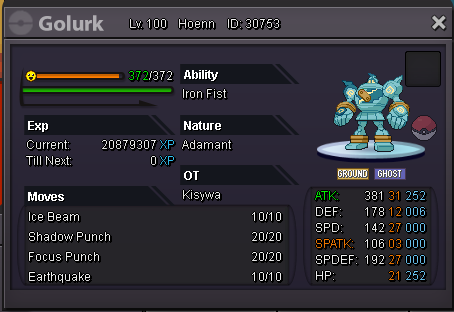
A Comprehensive Selling and Buying guide for Pokémon Revolution Online. Written by: Lysium and Forged. Introduction Greetings, Forged and I have decided to write this guide as a way of assisting new players in understanding the value of the Pokémon in their collection. We regularly get asked via in game message or discord, to price Pokémon. Although the art of “Price Checking” is mostly guess work there are many different things to consider when estimating the value of a given Pokémon. Below we have compiled a comprehensive list of things to consider when either selling or buying. Pricing is a combination of knowledge of the current PRO metagame, Smogon tier lists, PRO rarity tiers, and just how good is good enough to be competitive. Lastly a price check/estimation is a guess, a gut feeling. Prices can sway up to 50% based on who the buyer is and how desperate they are, or how competitive the market is for that Pokémon. *Please note that this guide is aimed at helping you identify valuable Pokémon for specific tips on selling and obtaining the best price please see the guide below. Selling Tips and Advice for PRO **If you have any comments or suggestions about this guide, please don’t hesitate to leave a comment below. Thanks 1. Rarity [spoiler=Rarity] [spoiler=Rarity] [spoiler=Rarity] [spoiler=Rarity]A rarity value or rating is given to a Pokémon based on how frequently they spawn during wild Pokémon encounters. The rating is a number scale from 1 meaning “abundant” or a very common spawn, all the way up to 10 “Unhuntable” meaning only obtainable through evolutions, boss rewards, fossils or some other means. It cannot be found through regular spawning mechanics. The value of poke increases significantly as the rarity of the poke increases. The rarity of a Pokémon can add significant value to it and should be one of the first things to consider when estimating the value. There are many helpful guides written on the forums about rarity and spawning mechanics. Including excavations sites, headbutt tree’s, fossils and boss rewards, please check there for further information on those spawning mechanics. Below is a link to the PRO wiki page with regard to the rarity of Pokémon in PRO. *Please note some of the rarity ratings on this website are outdated and not accurate. PRO Rarity Guide Example: In this situation even though both Pokémon are considered to be "Epic" and "PvP Ready" Blissey is by far the more valuable one simply because of it's rarity. 2. PRO Viability [spoiler=PRO Viability]Pro Viability is a difficult topic to articulate and many people can have a different opinion on the viability of a Pokémon. Essentially the more viable it is the greater the value. For example, While Ruby/Sapphire is infested with Shroomish, they are a fairly rare spawn in PRO, as well as being a competitively useful Pokémon (with the Technician ability) so the prices will be higher. Generally speaking, our advice is to look up on “Smogon” how competitive a Pokémon is based on the tier it is placed in. OU > UU > RU > NU > PU Most of the PRO metagame is between the Under Used (UU) tier and the Over Used (OU) tier. Tiers can change a lot and can be based on a variety of things such as team strategies, synergy etc. After determining what tier, a Pokémon is in you should research what competitive movesets are available to a given Pokémon and cross reference that with the currently available/legal move/abilities on PRO (some are either illegal or not-coded therefor not-legal in PvP). If a Pokémon is in the Over-used (OU) tier and has a viable/legal move set in PRO then the price will generally climb. *Note please see the following for a comprehensive list of viable Pokémon for the PRO metagame. With the release of Gen7 these viability rankings are likely to change significantly. PRO Viability list Gen6 **Note please see the link below for the current banned/illegal Pokémon, moves and move sets in PRO it is your responsibility to adhere to these rules. Any violation may result in your account being banned. Banned Moves PvP Banned Pokemon Example: In this situation again we compare Azumarill to another much rarer Blastoise with it's hidden ability interestingly Blastoise was the cheaper Pokémon because it's not very viable. 3. PvP Readiness [spoiler=PvP Readiness]The Value of a poke can increase based on it being PvP ready or not. Generally speaking, we add about 50k EV’s trained stat (510EVs) add up to 150k if EV trained and levelled. A Pokémon with proper IVs/Nature/Ability and Moveset is considered to be "PvP Ready" which can be seen as a convenience charge which can add another 100k on top of that. There are a few things that make a Pokémon “PvP Ready” this term is often thrown around a lot in the trade chat however it is not always used correctly. What makes a Pokémon PvP ready? · Trained: In order for a Pokémon to be “trained” it firstly needs to have its Ev’s administered correctly, often there can be a few different “spreads” for a given poke. Secondly a Poke should be fully evolved and at level 100. · Ability/Nature: In order for a Pokémon to be classed as “PvP ready” it should have the correct ability and a viable nature. For most poke there is only one competitive ability. Again Smogon is a good place to learn these. However, there are on occasions two viable abilities on a Pokémon. For example, a Venusaur can be bold with overgrow or modest with chlorophyll. They both constitute having a competitive nature and ability. *Note Pokémon that need their “Hidden ability” (HA) will be more valuable than Pokémon who do not require a HA. Venusaur is another good example of this. · IV/EV spread: A “PvP ready” Pokémon should have competitive Ev’s and IV’s. See below for more detail. *Note Unless you have a seriously “god” like Pokémon, you want to stay below the average prices of those "Tier 1" competitive Pokémon. While you may think the Pokémon is awesome, other people need to think so too or they'll pass over your listing. It's best to stay under the competitive prices of "Tier 1" Pokémon in order to sell quickly. If you are not in a rush to sell then you may wish to aim higher and hope for a desperate buyer. Example: In this example we compare two Clefables both of which have the correct ability and nature and both are almost "Epic" however one is considered to be "PvP Ready" and the other is not. In this situation it is reasonable to expect that the Pokémon that is "PvP Ready" could easily sell for an extra 200K. 4. Epic Status [spoiler=Epic Status]The Value of a Pokémon can increase significantly if it has “Epic” status. Most Top tier players will only use a Pokémon if it is Epic so what makes a Pokémon have “Epic” status. · Primary Stat: A Pokémon often has 2 sometimes 3 Primary stats and this will vary greatly depending on what role we want the poke to fill. A wall poke generally has 3 primary stats being Health/Defence/Sp.Defence. An offensive Poke Usually has 2 Primary stats Being Attack/Speed or Sp.Attack/Speed. For a Pokémon to be classed as “Epic” we need at least 25+ IV’s in each Primary stat. · Secondary Stat: The Stats that are not Primary stats are called secondary stats for a Poke to be classed as “Epic” it usually should have 20+ IV’s in each secondary stat. for an offense poke this includes defence/Health/Sp.Defence. For a wall poke this usually includes speed and either Attack or Sp.Attack. · Negative Stat: A negative stat is the one affected negatively by its nature, for example a bold poke has a negative stat in Attack usually this stat can be of any value to be classified as “Epic”. *Note this is only a guide and some Pokémon maybe require different elements to be classified as “Epic” like mixed attackers such as Nidoking. **Note please see the guide linked below for more detail on IV’s and EV’s PRO Bible: IV's, EV's, Nature, Abilities Example: In this Example we look at two Pokémon the first is what we would consider to be "Epic" note the Primary and secondary stats, The second at first glance appears to be "Epic" also however, on closer inspection we notice that it does not have the correct ability and therefore not considered to be "Epic". It is important to be very careful when buying Pokémon on the trade market because it can be very easy to overlook some details and you end up overpaying for something not very useful. 5. Market Viability [spoiler=Market Viability]The final thing to consider when estimating the price of a Pokémon is the market viability. For a variety of reasons sometimes the market can be "hot" or "cold" for not particular reason. Most recently Rotom has been a highly sought after Pokémon selling for up to 4+ Million. a few months ago an epic Rotom could have easily been purchased for under 500k. Obviously this has to do with the release of Rotom evolutions. However, it is still a good indication of how the market can be "hot" or "cold" on a particular Pokémon. Ideally it is best to sell a poke when it's “hot” and buy when it’s “cold” As the meta shift’s with the addition of a new generation of Pokémon more abilities and moves being coded into the game, prices are likely to vary significantly over the coming few weeks and months. It is a good idea to become familiar with these changes ahead of time to avoid making big mistakes. For example: Purchasing a Talonflame just before the introduction of Gen7. *Note at the end of the day it is your Pokémon and you have the final word on what you think it is worth. If you are not happy with the price, then simply don’t sell it or it could be something you regret down the line. Thanks for taking the time to read our guide. Peace <31 point
-
I will PM you the new password. You can change it later.1 point
-
@MolsBads your auction will continue with the 15m offer from @Kboww as the account who offered 20m had 0 hours and 0 money, meaning its fake. Sorry for this inconvenience. Have a nice day and good luck on the auction. Sincerely Hawluchaa0 points