Leaderboard
Popular Content
Showing content with the highest reputation on 03/08/20 in all areas
-
Game Testers. What are Game Testers? Game Testers are expert users who work alongside Developers, Content Scripters and Mappers and provide useful feedback as well as report any errors and bugs. We use a separate testing server where users are given a new character with access to anything that may aid in testing. Why do we need them? Our staff team is in need of Game Testers to test new and upcoming implementations to PRO. For a while now, we have been rewarding users who help us test various important updates before they're released. In order to bring better content to PRO, we are making the Game Tester an official rank in the staff team. This will streamline communication between content staff and testers to allow better and faster testing. How are they chosen? Game Testers have to go through an apprenticeship where they will be watched to see how efficiently they work as well as how well their communication and activity is. Game Testers will be given a new account that has access to various staff commands to aid their testing. Game Testers will be officially recognised as PRO Staff members once their apprenticeship is passed. Requirements & Application process. Requirements: All requirements are mandatory. You wont be considered if you do not meet the base requirements At least 500 hours of playtime. Be able to clearly communicate in English. Sinnoh champion. 18+ years old. Able to dedicate your time and deliver efficiently. What we're looking for: Strong communication. High patience levels. Reliability. Able to persistently repeat the same work. Can commit a fair amount of time to testing duties. Application form: If you are interested in the position, please fill in the application form below. Your application and results must remain confidential. We ask all applicants to keep the fact they have applied secret. Sharing your application status will result in the rejection of your application. Please be aware that all staff work is voluntary! This is not a career. Once complete, send your application form to me via a private message! (Click "Start Conversation" on my profile).1 point
-
Hello and welcome! One of, if not, the most profitable parts of this game is the huuuge amount of boss battles you can do every 12 days. At times it seems like there may be too many bosses scattered around, and it's hard to know where to start. The Reborn-bot is an amazing resource to have, but it's boss cooldowns are often inaccurate due to the changes with bosses over time, so sometimes you miss boss fights completely, or revisit a bunch expecting to fight only to be told to come back in 3 days. I've compiled this walkthrough as a direct route that links every single repeatable (sorry, no Red/Lance/Maxie etc in here) boss together, so you know for sure that you haven't missed anybody. I think there are 48 in total, so the guide is gonna be a bit... wordy I believe it to be the most efficient route, however I am open to editing if you have tips or changes. I have based the entire route (or 95% of it anyway) on foot travel, rather than teleporting, to help players who don't have so much pokedollars and want to build some bank a little faster. Players using travel pass can breeze through bosses quite quickly, for those without it a boss run can be quite daunting so hopefully this helps. Before getting into it, I would like to take a moment to mention the travel pass. For semi-serious players and up, maybe for players who play more than 3x per week, in my opinion it is the absolute best way to spend your pokedollars in game; the underrated MVP. For $10k per day (which is the price of two single trips between regions without transit pass) you get unlimited travel. Until you try the pass, you have no idea how much more productive you can be. Being able to farm pokemon more efficiently, farming bosses and PVE activities quicker, you can easily pay off the price of the pass and then some. You can make around $1.5m pokedollars per month just by farming bosses on easy mode alone, and 2x or 5x that amount on the harder difficulties. I urge you to put aside just $300k out of that and try the transit pass at least once. With that out of the way, lets begin our journey at the games adopted hub, Vermilion City. KANTO Start – Vermilion City •Begin by battling Xylos in the fan club near Vermilion Poke Centre. •Next, take the North exit from the city into route 6. Cut left into Vermilion Graveyard on this route where you can battle the Pumpkin King •Head back to Route 6 and continue North into Saffron City. Near the southern stophouse where you will enter the city is Golds Gym, where you can find and battle Chuck. •(Optional/Conditional) if you have a level 100 Pikachu you can head to the nearby Poke Centre and withdraw him. Head through the West exit towards Celadon City where you can battle Jessie & James. Follow the awkward path around the back of the buildings to reach them. •Either way, head back to the North side of Saffron city now, and enter the dojo to show Koichi who is boss. •Next stop, Cerulean City, or route 25 to be precise. Take the north exit from Saffron, through route 5 and continue north through cerulean city, across Nugget Bridge. At the end of the bridge, you’ll find a cave containing Entei Guardian. •Hop onto the water outside E. Guardians cave and make the short trip south to Cerulean Cave, head through the cave to the basement where Naero awaits you. •Now head back into Cerulean city, and take the East exit from the town. Head through Rock Tunnel, and out the other side into Lavender Town. Enter the spooky tower here, and head up one or two floor to where Uruhara awaits. • Skip town to the South and head all the way down through routes 12, 14, 15 into Fuschia city. Surf or sail from here to Cinnabar Island, and enter the lab to battle Prof Oak. •Continue west off the Island and surf to Pallet town, then move north into Viridian City. Take the West exit through route 22, and continue west through the large building and route 28 on the other side of it, towards Mt Silver. Ensure you have a method of climbing waterfalls before heading into the cave, and then head up the two falls just inside the cave entrance, where you can find Terminator. •With the Terminator defeated, head back east into Viridian City, and then North into Viridian Forest. Head left as you enter the forest, to find the entrance to the Maze; bring flash or a flashlight! Inside the maze, head North East to find and battle Erika • After defeating Erika, head back Southwest to find the exit of the maze, then move North through the main forest into Pewter City. In the north east corner of the City is Pewter Jail where you can battle both Officer Shamac and thief George. •For our final stop on Kanto mainland, head back to the south exit of Pewter city. Cut the trees and hop into Digletts Cave, where you can wail on Brock. Continue through to the far exit of the cave to find yourself back in Vermilion City. All Kanto bosses are now down and you can move to the next region. •Before moving to Johto, you can visit Kantos optional islands where several bosses await, providing you have unlocked the respective islands and completed any prior quests required; •Love Island is the home of Shary and Shaui dual bosses who must be defeated together. •Pinkan Island houses Officer Jenny in the lighthouse, and Khlover in the islands meadow area. •Munchlax Resort contains Prehax and his army of Munchlax (4 total) which must be defeated using only two pokemon. JOHTO Next; to Johto. I would always advise you sail from Vermilion to Olivine rather than walk to Johto as it is a very long and tedious walk, and we have just made some bank from Kanto bosses. •Landing in Olivine City, we will hop straight back onto the boat and take the option for Dock Island for our first two bosses. When arriving on the island, surf over to the left side house to fight Battlebot or whatever it’s called, and afterwards head north through the island into the amazon forest to fight Bugsy. •Return to Olivine and head North and then East, away from the city. We will reach Ecruteak city, but just pass through and head out the east exit again. On route 42 we will reach Mt Mortar, a cave that contains the boss Bruno. Smack him and then head towards the eastern exit again, and take the short trip east from Route 42 into Mahogany town. •Take the North stophouse from Mahogany Town onto Route 43. Look for the water on this route and surf across it, this will allow you access to the hidden part of the Lake of Rage. Navigate the small, simple maze here to reach the secluded lake area where Suicine Guardian awaits your arrival. •Head back now into Mahogany Town again, and take the eastern route out onto route 44. Here you will find the Ice Path, where Lorelei lies deep within, plotting here revenge after getting rekt in the Elite Four earlier. •(optional/conditional) Despatch Lorelei and then move through the cave to the exit and Blackthorn City, where you can visit the Dragons Den training spot and battle boss Lance on the condition that you have 150+ evolved data in your dex. •Exit Blackthorn to the South and take the long walk down Route 45, heading west at the end into Cherrygrove City. Move North through Route 30 and west through route 31 into Violet City. Here, we climb the Sprout Tower and fight the master of Eeveelutions; Sage. •Whoop Sage and then head back down into the town. Look for the Northwestern exit onto Route 36, and then immediately South to Ruins of Alph. Prof Elm is waiting to battle here inside the small house on the right side. •Next, take the stophouse exit right outside Prof Elms house, onto Route 32. Another long route, head south all the way down to Union Cave. Use the dig point slightly away from the exit to skip through onto route 33. Scoot west through this route, and straight through Azalea town, into the dark Ilex Forest. Hidden in the depths of the forest, in the northeastern corner is boss Neroli. • Take the northern exit from Ilex Forest and into Goldenrod city. Here we have another dual boss battle, where you are not allowed to exit until both are beaten, so prepare a party that can deal with both foes lineups (they are mostly fairy types so it is not too difficult). Once ready, enter the Goldenrod Casino to battle both Pewdie and Diepy. •With the gamer duo defeated, we have pretty much finished our circuit of Johto. Stroll North out of Goldenrod city, and make your way back to Olivine. Near the docks in Olivine, you will see an exit in the southwest corner of the town, head this way to find a beach covered in Krabby and Wingull. Step through them and surf on the sea (ignore the Cianwood boat). Surf south through route 40, onto Route 41. As soon as you get onto this route, head left until you see Swimmer Thomas. Cut through the rocks using the whirlpool directly south of him, and enter the cave found here (Whirl Islands Northwest). Inside, head down the ladder into the main cave. Walk south from the ladder, down two staircases and climb the next ladder going down. At the base of this ladder, you’ll see a staircase with a cavern door by it. Ignore the cavern and continue down a further 4 staircases to a second cavern, which is home to boss Thor. •Retrace your steps back through the cave and out again, and surf past Thomas again to where you entered Route 41. Now, head directly south, past Swimmers Toby and Barry. Continue South some more to battle your childhood crush Misty, Johtos final boss. HOENN You can go back to Olivine and sail to Hoenn if you want, but for the sake of this guide we are surfing there! Head directly South again from Misty, into a new water route. Surf all the way south again, to Nap Island. Assuming you have cleared everything you need to on Nap Island and can just stroll through it; head through Nap Town and surf off the south side again, through Route 125 until you hit Mossdeep City. No need to hit the land here as it’s a pointless city, continue surfing West into Lilycove. •Now we are back on land, walk west through the port town and onto Route 121. A small concrete pier extends to the water; surf from here onto Route 122. You will have landmass either side of you. The grassy island to the right side is Mt Pyre, climb onto here to find a tower containing our first Hoenn Boss Morty. •Directly opposite the entrance/exit to Mt Pyre is another concrete pier which leads us to route 123. Head west all the way down here, hopping off a number of ledges which leads to route 119. Head west some more until we reach Mauville City. Take the southern exit from this town onto Route 110. Take the steps and surf across the water, to the east side of the lake where New Mauville cavern can be found. Inside it is a power plant type place, where boss Lt Surge has taken residence. •Exit New Mauville and head back to the steps where you began to surf from, and exit the water. Follow the path around this route, through the tall grass, until you see a weird bush in the water. Slightly south of here you will find another set of steps leading down to the water. Surf from here over to the strange bush, interacting with it will reveal it is the secret base of the last of the guardian trio; Raikou Guardian. Beat him up. •Next we will go to our only Boss in the southern half of the map. Hop back out of the water on route 110 and follow the route down to slateport city. Walk south through this town and surf off the southern coast, through route 109 and onto 108. Surf West on route 108 until you reach the Abandoned Ship in the water. Head inside and then down the steps, to find boss Toothless hiding out in one of the rooms. •For now, we will head back the way we came. Follow route 108-110 back to Mauville City, and this time take the North exit onto Route 111. Walk North straight up this route until we reach Route 111 Desert. Upon entering the desert, you will see a large rock face next to you, follow this all the way around and then head South through the Desert. Eventually you will reach a cave housing Naruto Fanboy boss. •(optional/conditional) Leave the Desert the same way we entered it and head back to Route 111. Make a short hop west onto route 117, which is a very short route ending in steps up a mountain side. Take the first steps up, then cut left past Hiker Trent and into Fiery Path. In here is an excavation site containing boss Gingery Jones who is available to battle providing you have 2400+ exca rating! • (optional/conditional) Whether you chose to battle Gingery Jones or not, time to head back to the mountainside on route 117 and continue up. Take the cable car to the top of Mt Chimney and head down Jagged Pass into Lavaridge Town. Here is access to Valley of Steel, a great hunting ground for steel pokes but you must pay to enter. Within VoS is boss Steven who will battle you providing that you have all of these; Finished his preliminary questline Two steel types in your party One pokemon in your party must know the Iron Defense move • Once you have either dealt with or skipped over GJ and Steven, its’ time to battle Prof Birch, our final boss in this region. Head back to Mauville City (if you battled Steven, take the east exit from Lavaridge town and hop down the mountain ledges), take Mauvilles west exit this time, onto route 117 and into Veranturf Town. Upon entry, you’ll see three houses to the south; Birch lives in the central one. With that out of the way, it’s time to move to Sinnohs bosses. Unfortunately the mapping on hoenn is not very cohesive, so it’s either teleport or make the long walk back to Lilycove now, from where we will set sail to Canalave City - as far as I am aware, there is no way of accessing Sinnoh without paying transit costs. SINNOH •Welcome to Sinnoh! Upon landing in Canalave we will take a walk through the town and exit on the south east side. Surf across the lake on Route 218 which brings us into Jubilife City. We will begin by visiting the Jubilife School here and battle Prof Rowan. •Next, head South to Sandgem town where boss Spectify is waiting for us in one of the houses. • After, make a short trip west to Twinleaf town. Interacting with the NPC Link will allow you, through dialog choices, to taunt him into battling you. •Head back to Jublife city now and take the East exit to route 203, at the end of which you will find Oreburgh Gate. This cave has an offshoot to the North inside it which requires Rock Smash, and grants access to the basement level. In the basement you will find Legends Cave, home to our next dual bosses Medusa and Eldir. •Do a 180 and head through the gate, right back to Jubilife city again, the hub of Sinnohs boss run. This time take the North exit and travel through route 204 and the Ravaged Path, through to Floaroma town. Take the east exit from this town onto Route 205, head towards the east side of this route before hitting the water and surfing. This will allow you to access the rear of Valley Windworks, where you will see a small opening in the rock face. Get out of the water and interact with it, to sneak through a crevice and find our next boss Letrix. •Next, head back onto Route 205 and take the small bridge across the water. Climb the steps ahead onto the mountain path and head north. After passing Camper Zackary, you will cross a wooden bridge; your next goal is to get underneath this bridge by doing a U-turn when you reach Picknicker Karina and heading south down the steps. Hop the ledge and head to the river, surfing North to reach Fuego Ironworks. In the trees on the south bank of the river is a small opening; enter here to find a secret entrance to the back of Floaroma Meadow where you can find boss Maribela. •Now we need to head back to Route 205 (again!) by hopping the ledge and going back through Floaroma town and East. Head back up the mountain path northbound, this time passing Karina and heading to Eterna City. Move east through Eterna City (ignore Arkos as he is no longer active as a boss), moving through Route 211 and into Mt Coronet Centre. This cavern splits into routes in all four directions, for now we want to go South, which requires Rock Smash. Follow this route now, it will lead you through caves past a number of Team Galactic grunts and up the mountain – the path may appear confusing but is actually very linear, you can only go one way. Eventually you will be brought outside on Coronet Summit. Take the huge stair sets directly in front of you, and head along the North-Eastern mountain face until you see a cave entrance with a Snover patrolling above it. Scoot in here; if you see two interactable Golbats patrolling inside, you are going the right way. Head up through a couple more linear caves lined with Galactic grunts to reach the Spear Pillar, and possibly the games hardest repeatable boss, Ash Westbrook. • Time once again, to retrace our steps back to Mt Coronet Centre, the chamber with the 4 routes we took moments ago. Head past Hiker Sam and take the East exit this time, which brings us to Celestic Town, and we are almost, almost done. Head east again through Celestic Town and onto Route 210 North. Move further east through this route, taking the steps next to Black Belt Adam to reach the walkway above. At the end of this walkway is a cave surrounded by Ace Trainers; The Cave of Justice hosts the games newest boss, Logan. •For our final stop on the boss run, I would recommend either teleporting from a Pokemon Centre or you can traverse Route 216 into Snowpoint City and surf from there; you should be aiming to reach the location named Survival Area which you may know from the Heatran Quest. From this Poke Centre, you must head East to Route 226, and then North to Route 227 where you can find the final, and furthest boss, Saphirr.1 point
-
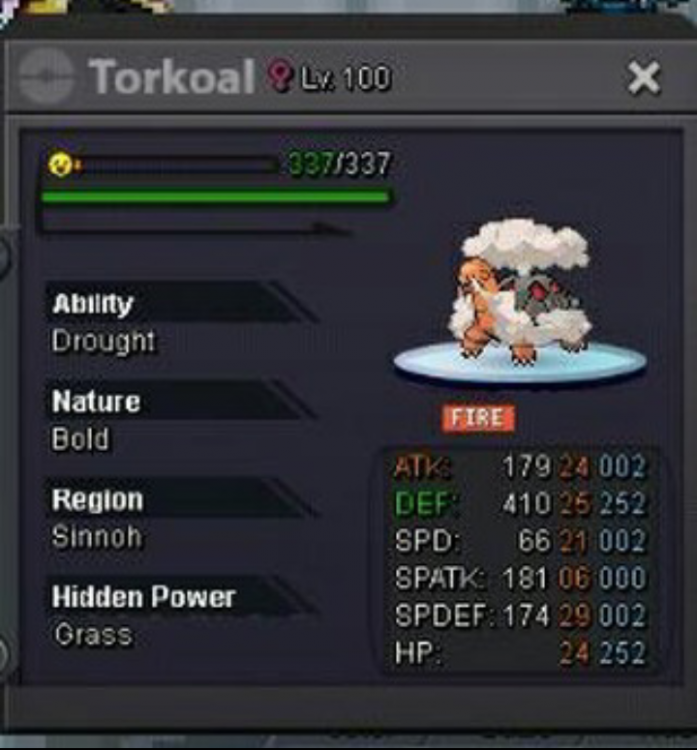
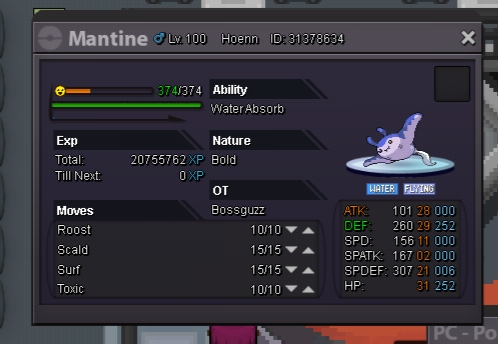
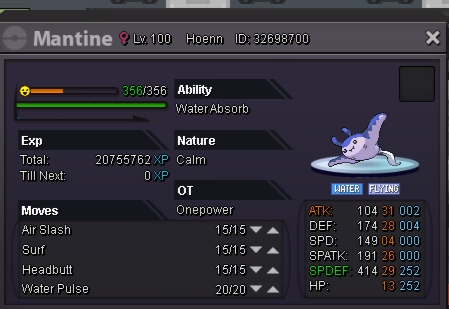
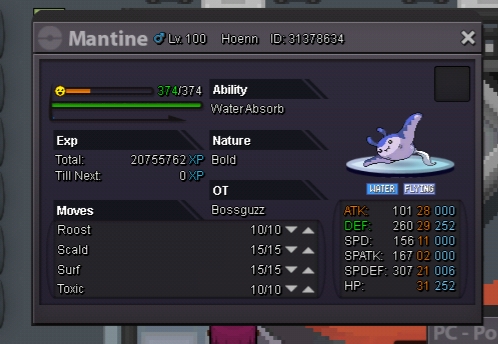
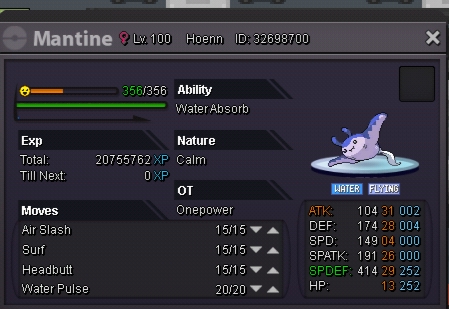
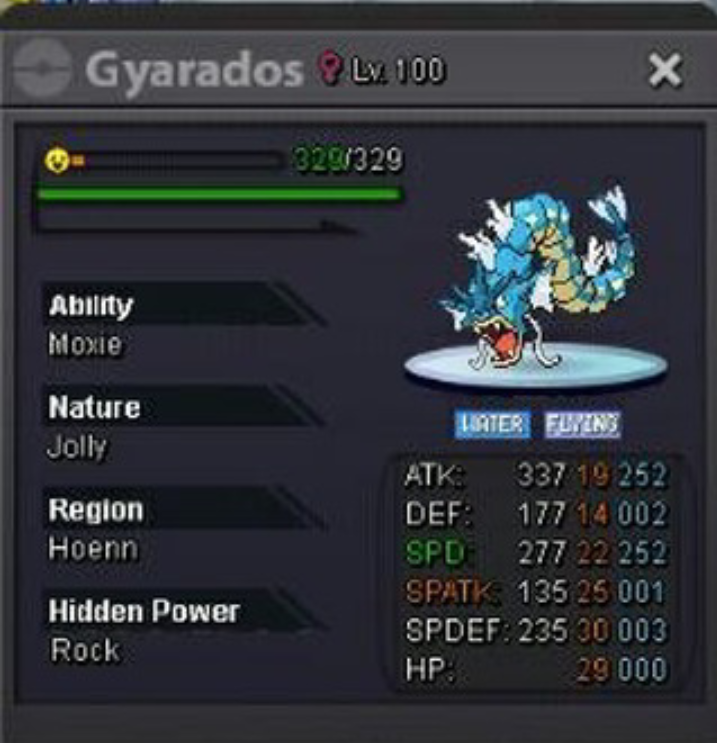
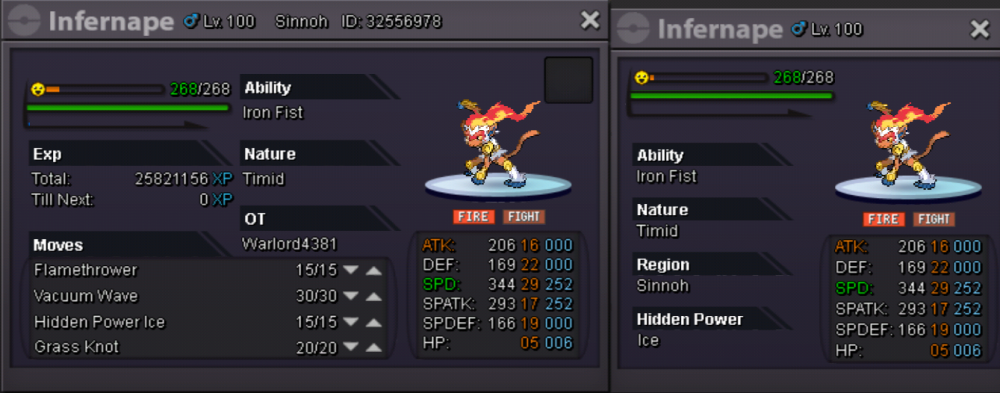
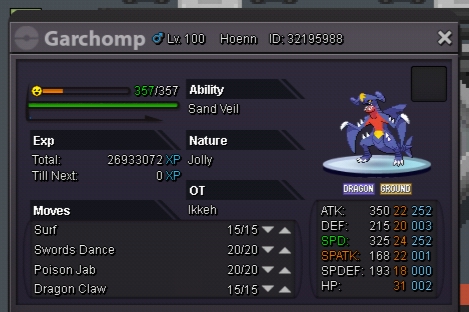
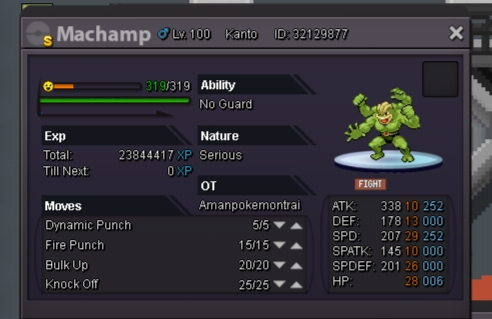
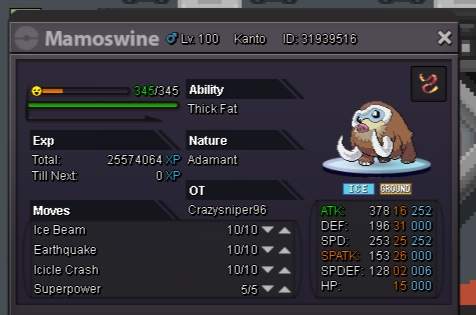
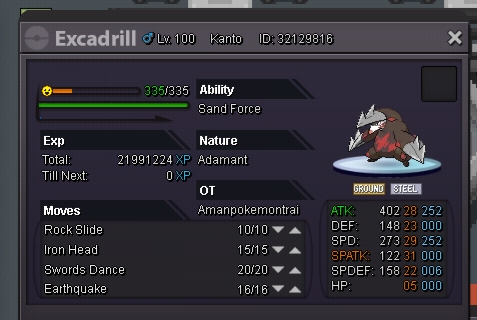
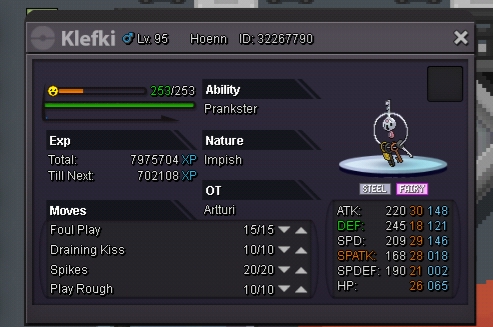
Greetings Hi guys i have some good pokes to sell for u.. I wish u find a good freind here.. Payment method *cas *cc=380k *reroll ticket =650k masterball=40k 1. Torkol c.o 200k, insta 400k 2. Mantine insta 400k (negotiable) insta 500k 3. Azurill c.o 280k insta 400k 4. Moxie gyarados insta 300k 5. Infernape(HP = ice) insta 600 k 6. Ampharos insta 200k 7. Friend gaurd cleffa insta 150k 8. Sand veil jolly garchomp insta 600k 9. Shiny machamp insta 200k. 10. Mamoswine insta 250k 11. Excadrill sand force insta 300k 12. Klefki insta 350k To contact : Reply here : contact : IGN= Amanpokemontrai : send me your discord tag wait to let me contact [bGCOLOR=rgb(97, 189, 109)]THANK YOU FOR SEEING MY POKES!!! [/bGCOLOR]1 point
-
1 point
-
1 point
-
1 point
-
1 point
-
1 point
-
1 point
-
1 point
-
1 point
-
1 point
-
1 point
-
1 point
-
1 point
-
1 point
-
1 point
-
1 point
-
1 point
-
1 point
-
1 point
-
1 point
-
1 point
-
Hey, i am FjAbio current leader of eternity guild :) I want to ask if you want to join our clan? we are on silver with a discord channel. if you want to know more check out our website. thanks and have a nice day !! https://pokemonrevolution.net/forum/topic/97588-url1 point
-
Shouldn’t this be in shiny and special Pokémon? i personally always go there when I’m looking for event pokes :) Gl selling bruh1 point
-
1 point
-
+1 imagine going to vermilion city just to try to get low level natu from headbutt, then going to somewhere to level up that natu before realizing...you over leevled it...1 point
-
for klefki light clay, toxic orb on gliscor, ampharos leftover, conke fire orb, gengar choice band,or no item chansey eviolite, but the items differ from boss to boss, it is mentioned in the guide which item to use on which boss, so get light clay eviolite leftover fire orb toxic orb. and a few focus sashes.1 point
-
Hey there ! I'm not the one who made this guide, HustleBank did, but I'll try my best to explain shortly how the strategy works. I'm not sure how experienced with pokemon you are, so I'll go in more in-depth with some details regarding this team. It will be useful as well if someone else needs it. Using this will require a bit of practice against certain bosses if you're a beginner in this area. The first thing to take in consideration here is the multiple pokemon roles and advantages : Defense : Klefki: Will be your primary line of defense. Klefki has access to the ability Prankster. This gives priority to status moves, which means that you will go first in a boss battle. Klefki will be used mostly to put screens. The screens will double your pokemon defense or special defense, allowing you to tank more hits. (Example of screens: light screen, reflect) Whimsicott: Whimsicott will be your principal de-buffer for pokemon that uses physical attacks. Charm will reduce the opponent's pokemon attack. It also has prankster, like klefki. Memento/flash/knock off will be useful too. OR/AND Ampharos: Will do the same as Whimsicott, but with spatk. Eerie impulse is the move to lower spatk. Gliscor: Will increase his attack and speed to use baton pass and give those buffs to conkeldurr. Using the move stealth rock also, which will make focus sash useless and assure that conkeldurr can one-hit everything. The combination of poison heal and toxic orb allows you to not get burned or frozen while healing you. Chansey: Casual stall pokemon that allows you to toxic and heal if something goes wrong. (Which rarely ever happens) Offense : 3 different options here, depending on what team you are facing. Conkeldurr: Will be the one who kills all the boss pokemon, 90% of the time. Cloyster: Used on magic guard alakazam that have sashes, because this ability blocks stealth rock damage. Cloyster has multiple skills that hit multiple time and this will ignore the focus sash effect. (Icicle spear for example) Mold breaker pokemon (Haxorus, Excadrill, etc): Used against unaware pokemon, since these pokemon ignore stats changes (Like de-buffs and buffs). Mold breaker ignores the opponent's ability, unaware in that case, so your attack buffs won't be ignored. Other : Gengar: Uses destiny bond if a pokemon could cause problems while de-buffing. The nature listed for each pokemon is the most optimal in terms to get more defense or attack. This will assure that you beat the bosses. The short summary of how a battle goes : Let's take a boss for example; Erika. 1st turn: Klefki➔ Reflect (Your pokemon will tanks physical hits better). Switch to Whimsicott. Turn 2, 3 and 4: Use charm 2 times with Whimsicott, then memento. (Will reduce the attack to the lowest point possible) Turn 5 to 11: Choose Gliscor. Use rock polish 3 times, Sword dance 3 times. (Buff your attack and speed to the highest level possible) Turn 12: Stealth rock (Against pokemon that hold focus sashes.) Turn 13: Baton pass your buffed stats to Conkeldurr. Turn 14 to the end: Kill all the boss pokemon with the moves provided. I hope you got all the answers you needed. Feel free to dm me if you are having issues or have more questions regarding this strategy. ~1 point
-
thank u for making this guide finally i can do those bosses on hard It really works1 point
-
Changelog (7/2/2019): rotom-w a -> s ferrothorn a -> a+ skarmory a+ -> a- tyranitar a+ -> a togekiss a -> a+ heatran a+ -> a mew a -> b+ gengar a -> a+ staraptor a -> b+ infernape a -> a- suicune a -> b+ alakazam a- -> b crawdaunt a- -> b magnezone a- -> a serperior a- -> a starmie a- -> b+ darmanitan b+ -> b- milotic b+ -> b reuniclus b+ -> b- roserade b+ -> b- scizor b+ -> a- scolipede b+ -> a celebi b -> b- conkeldurr b -> a- metagross b -> b- aerodactyl b- -> b+ alomomola b- -> b haxorus b- -> c+ honchkrow b- -> c+ espeon b- -> c toxicroak b- -> b torkoal c- -> c xatu c- -> c marowak-alolan unr -> c+ ninetales-alolan unr -> b- sandslash-alolan unr -> d shaymin unr -> c+ manaphy unr -> a+1 point
-
Hello I was wondering if everyone that bought costumes and mounts that if they still have them after they updated the game and wiped progress, I am unable to get anything I paid for back and I would like to have my mount as it is very useful thank you!1 point


.thumb.jpeg.facb3b78cac0fe15cac6fcc9227a330b.jpeg)
2.thumb.jpeg.8c7281e3346e77cfee8498663fa7050e.jpeg)

