


New Trade Zone
Trade Zone is now live
Use the new Trade Zone for auctions and instant-price trades so Pokemon and item offers are easy to find.
Leaderboard
-
.jpeg.2dfeff096fc6f8b0bfd946a34245b8ef.jpeg)
Raikaisa665
Registered User7Points632Posts -
370kibiryani
Registered User6Points2836Posts -
Suncity
Suspended4Points5399Posts -
Medu5a
Registered User3Points1968Posts


Popular Content
Showing content with the highest reputation on 05/30/23 in all areas
-
2 points
-
Hey everyone, my suggestion regarding the ingame links to forum auctions would be to add an additional confirmation window before you are directed to the forums. For me personally it happens a lot that I unintentionally click on forum links in the trade chat which can be a bit annoying and sometimes leads to a crash. This particularly happens when I play on my phone since clicks are less precise there. the suggested confirmation window could look like this: Furthermore it would be nice if there would be a possibility to decrease the size of forum links. This would avoid unintentionally clicking on them and would lessen the spam in trade chat. I don't know if that is technically possible. For example: https://pokemonrevolution.net/forum/forum/4-suggestions/ -> forums or link I would be interested in what you guys think about it! Let me know! 🙂 Sincerely, Saruron
 1 point
 -
1 pointFercholarga Event Shop Accepted payment methods: cc 350k iv rr 500k Halloween Xmas Easter Valentines Discord : Fercho#8455 Send the offers over in discord or forum pm ❤️ ❤️ ❤️1 point
-
1 point
-
1 point
-
Yes it's there. I set up that account for my little brother, seems like I lent Arbok to him and forgot. Thank you very much and really sorry to bother you.1 point
-
1 point
-
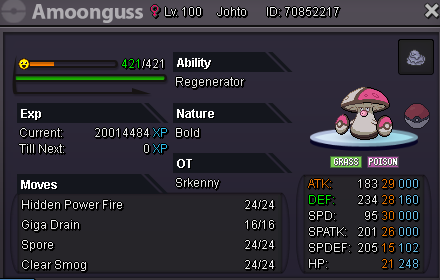
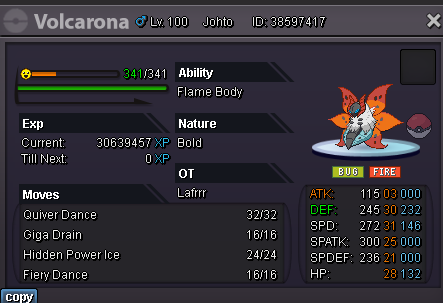
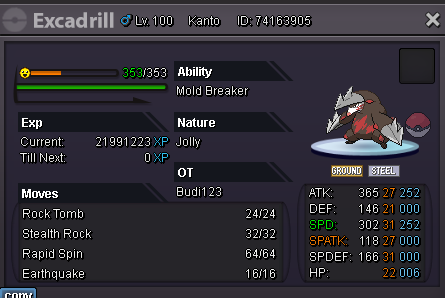
Epic Amoonguss BOLD HP FIRE Start: 8M Min bid: 100k No Insta 3 Days auction after first bid! Godly Volcarona BOLD HP ICE Start: 8M Min bid: 100k No Insta 3 Days auction after first bid! Godly Excadrill H.A 31 SPEED 21+ Start: 16M Min bid: 200k No Insta 3 Days Auction after first bid!
 1 point
 -
1 pointMiirajane is the winner of the auction Pm me in game kapsostam13 to receive ur mon1 point
-
1 point
-
1 point
-
1 point
-
1 point
-
1 point
-
1 point
-
1 point
-
1 point
-
1 point
-
1 point
-
1 point
-
1 point
-
1 point
-
1 point
-
1 point
-
1 point
-
1 point
-
1 point
-
1 point
-
1 point
-
1 point
-
1 point
-
1 point
-
1 point
-
1 point
-
1 point
-
1 point
-
1 point
-
1 point
-
1 point
-
1 point
-
1 point
-
1 point
-
1 pointwould be cool if its just npc name change to be banned player, pretty funny if i saw someone i know there lmao, hall of fames but banned version1 point
-
Another quest done! 29 quest megas and legendaries. Thnx Much, Glhf!
.png.195424c31e3e38117847ca0b1f3475d1.png)
.png.c6a9d80c11a9c5b530b623db6f53fa66.png) 1 point
1 point -
1 point
-
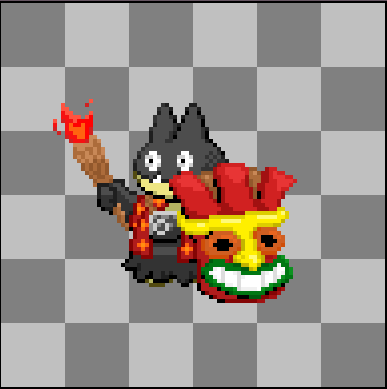
Event form season : Bidoof Day Note that this is an idea but I'm not talented enough to design something more sophisticated.. 2 internet meme sensations to celebrate this day I named it Kekouf
 1 point
 -
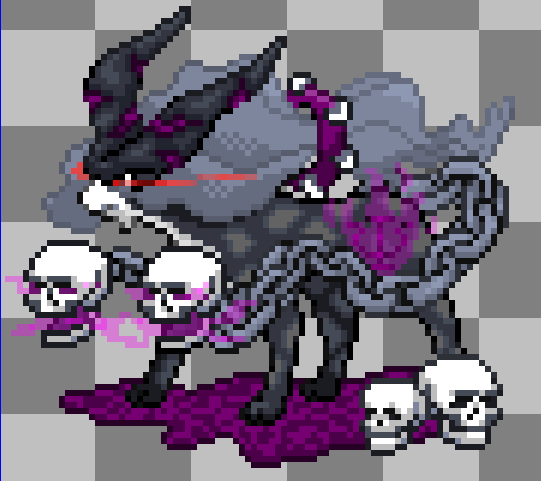
Event Form Season: Halloween Event Form Name: Corrupted Suicune Graphic: Event Form Season: Summer Event Form Name: Hawaiian Munchlax Event Form Season: Summer Event Form Name: Hawaiian Snorlax Event Form Season: April Fools Event Form Name: Pepe Croagunk & Pepe Toxicroak Event Form Season: Any Event Form Name: Zoan Zorua & Zoroark


 1 point
 -
Greetings, @Vinier You aren't allowed to change the duration of an auction, once it has started. This auction started with the bid of 1M by Ezcuerolcito, and had a a duration of 48 days. Therefore the end point of this auction is: 6/June/2023 5:51PM GMT+0 You have changed the auction time after this auction started. Please be more careful, and make sure to read our Auction Rules Kind Regards, * Zoruami *
 1 point
 -
Welcome to my guide;; This guide is basically for those who doesn't have discord OR those who have discord but doesn't have access. for some time. ____________________________________ REQUIREMENTS 1. Have completed at-least 2 regions ( Kanto & Johto ) ___________________________ I am also adding Alternative Place for those whose best location is not in kanto and johto. These alternative locations will have GREEN colour. __________________________________ For those pokes who can be caught by repel I will add one more section but pokes who can't be repeled I will only add best spawn area. ________________________________________ NOTE - This Guide doesn't Contain any event map / Area. ____________________________________ For Repelable Pokes the details will be written with yellow colour whereas for non repels details will be written in orange colour. ____________________________________ As this guide may contain minor mistakes , feel free to contact me if you found any. You can contact in forum DMs or in discord ( Superb#3564). _________________________ GEN - 1 _________________________ BULBASAUR Best Area - Safari Area 2 ( Kanto ) ____________________________________ CHARMANDER Best Area - Cinnebar Mention 3F ____________________________________ SQUIRTLE Best Area - Vermilion City ____________________________________ CATERPIE / METAPOD / BUTTERFREE Best Area - Route 2 / Route 2 / Bug catching Area ____________________________________ WEEDLE / KAKUNA / BEEDRILL Best Area - Route 2 / Route 2 / Amity Square Beedrill ( Alt ) - Viridian Forest ____________________________________ PIDGEY / PIDGEOTTO Best Area - Route 2 / Route 13 ____________________________________ RATTATA / RATICATE Best Area - Route 3 / Tohjo falls ____________________________________ SPEAROW / FEAROW Best Area - Route 45 / Route 45 ____________________________________ EKANS / ARBOK Best Area - Mt. Summer exterior / Cerulean cave 1F ____________________________________ PIKACHU Best Area - Viridian Forest BEST REPEL AREA - Power plant 1F ( M ) ( 23-26 level ) ____________________________________ RAICHU Best Area - Cerulean Cave 1F ____________________________________ Sandshrew / Sandslash Best Area - Mt. Moon 1F / Desert Lagoon ____________________________________ NIDORAN-F / NIDORINA / NIDOQUEEN Best Area - Route 10 / Route 13 / Safari Efford Ward - 2 ____________________________________ NIDORAN-MALE / NIDORINO / NIDOKING Best Area - Route 10/Route 13 / Route 120 ____________________________________ CLEFAIRY/CLEFABLE Best Area - Mt. Coronet B1F / Moon ____________________________________ Vulpix Best Area - Mt. Pyre Exterior Alt Area - Route 7 ____________________________________ JIGGLYPUFF / WIGGLYTUFF Best Area - Secret Nap Area / Cerulean Cave 2F Alt. Area - Route 4 / Moon 1F ____________________________________ ZUBAT / GOLBAT Best Area - Mt. Moon 1F / Dragons Den enterance ____________________________________ ODDISH / GLOOM / VILEPLUM Best Area - Route 25/Route 119A / Safari effort Ward 2 Gloom Alt. - Route 15 (M/N) ____________________________________ PARAS / PARASECT Best Area - Mt. Moon. 1F / Mt. silver 2F _________________________________________ Venonant / Venomoth Best Area - Route 13 / Cerulean cave B1F ____________________________________ DIGLETT / DUGTRIO Best Area - Digglets Cave ( Both ) ____________________________________ MEOWTH // PERSIAN Best Area - Route 39 / Route 7(N) ____________________________________ PSYDUCK / GOLDUCK Best Area - Cerulean Cave ( Both ) ____________________________________ MANKEY / PRIMAPE Best Area - Route 9 ( Both ) ____________________________________ GROWLITHE Best Area - Route 7 ____________________________________ Poliwag / Poliwhirl / Poliwrath Best Area - Ecruteak City / Cerulean Cave 1F / Safari Efford Wald 2 ____________________________________ ABRA / KADABRA Best Area - Granite Cave B2F / Cerulean Cave 1F Repel Area - Route 25 ( 15 - 17 level ) [ For both ] ____________________________________ Machop / Machoke / Machamp Best Area - Fiery Path / Route 227 / Victory Road Kanto 2F Alt. For machoke - Mt. Silver 2F ____________________________________ BELLSPROUT / WEEPINBELL / VICTREEBELL Best Area - Route 12 / Route 12 / Safari Effort Wald 1 ____________________________________ TENTACOOL / TENTACRUEL Best Area - Route 11 / Pallet town ____________________________________ GEODUDE / GRAVELER Best Area - Route 46 / Victory Road 1F _________________________________________ PONYTA / RAPIDASH Best Area - Route 22 / Mt. Silver exterior _________________________________________ SLOWPOKE / SLOWBRO Best Area - Fuschia City / Cerulean cave B1F _________________________________________ MAGNEMITE / MAGNETRON Best Area - New Mauville / Cerulean Cave 2F Magnemite Alt. - Route 6 _________________________________________ FARTHFETCH Best Area - Route 14 _________________________________________ DODUO / DODRIO Best Area - Route 17 / Route 26 _________________________________________ SEEL / DEWGONG Best Area - Seafoam B1F / Sinnoh victory road B1F deep _________________________________________ GRIMER / MUK Best area - Cinnebar mension 1F ( Both ) _________________________________________ SHELLDER Best Area - Route 126 _________________________________________ GASTLY / HAUNTER Best Area - Vermilion Graveyard / Bell tower _________________________________________ ONIX Best Area - Mt. silver lower mountainside _________________________________________ DROWSEE Best Area - Route 34 _________________________________________ HYPNO Best Area - Route 11 _________________________________________ KRABBY Best Area - Ecruteak City _________________________________________ VOLTORB / ELECTROD Best Area - Route 10 / Power Plant _________________________________________ EXEGGUTE Best Area - Route 39 _________________________________________ CUBONE / MAROWAK Best Area - Iron island 1F / Iron island 1F Repel Area - Rock tunnel ( 26-30 ) / Route 10 ( 24-27 ) _________________________________________ HITMONLEE Best Area - Mt. Silver lower mountainside Repel Area - Mt. silver lower mountainside ( 53-58 ) _________________________________________ HITMONCHAN Best Area - Mt. Silver lower mountainside Repel Area - Mt. Silver lower mountainside ( 56-59 ) _________________________________________ LICKITUNG Best Area - Route 144 _________________________________________ KOFFING / WEEZING Best Area - Amazon Forest / Eumi island Burned tower _________________________________________ RHYHORN / RHYDON Best Area - Cerulean cave 1F ( Both ) _________________________________________ CHANSEY Best Area - Route 13 Repel Area - Safari Exclusive ( 26-31 ) _________________________________________ TANGELA Best Area - Mt. silver exterior _________________________________________ KANGASKHAN Best Area - Safari Area 1 _________________________________________ HORSEA / SEADRA Best Area - Route 20 / Cerulean Cave 1F _________________________________________ GOLDEEN / SEAKING Best Area - Cerulean City / Tohjo falls _________________________________________ STARYU Best Area - Route 19 _________________________________________ MR. MIME Best Area - Route 21 _________________________________________ SCYTHER Best Area - Safari Exclusive Repel Area - Safari Area 1 ( 33-34 ) _________________________________________ JYNX Best Area - Ice Path B1F Repel Area - Safari johto snow zone ( 24-26 ) _________________________________________ ELECTABUZZ Best Area - Route 10 Repel Area - Power Plant (24-26) (N) _________________________________________ MAGMAR Best Area - Fuego Ironworks Alt. - Mt. Ember _________________________________________ PINSIR Best Area - Route 229 Repel Area / Alt. - Kanto Safari Area 2 (29-32 ) _________________________________________ TAUROS Best Area - Route 39 _________________________________________ MAGIKARP Best Area - Route 4 _________________________________________ GYARADOS Best Area - Route 213 Alt. - Route 20 _________________________________________ LAPRAS Best Area - Seafoam B4F Repel Area - Union Cave B2F ( 11-15 ) _________________________________________ DITTO Best Area - Route 13 Repel Area - Route 8 ( 23-27 ) _________________________________________ EEVEE Best Area - Kanto Safari Area 3 Repel Area - Kanto Safari Area 3( 23-24 ) _________________________________________ SNORLAX Best Area - Route 12 Repel Area - Route 11 ( 19-20 ) ( D ) _________________________________________ DRATINI Best Area - Guild Island Repel Area - Love island ( 18-22 ) (N) _________________________________________ DRAGONAIR Best Area - Dragons Den _________________________________________ If you want to hunt in pair of two pokes with same sync and can be used in PvP You may check This guide. Hope this Guide will help you; Thanks for taking a look here.1 point
-
Welcome to my guide;; This guide is basically for those who doesn't have discord OR those who have discord but doesn't have access. for some time. ____________________________________ REQUIREMENTS 1. Have completed at-least 2 regions ( Kanto & Johto ) ___________________________ I am also adding Alternative Place for those whose best location is not in kanto and johto. These alternative locations will have GREEN colour. __________________________________ For those pokes who can be caught by repel I will add one more section but pokes who can't be repeled I will only add best spawn area. ________________________________________ NOTE - This Guide doesn't Contain any event map / Area. ____________________________________ For Repelable Pokes the details will be written with yellow colour whereas for non repels details will be written in orange colour. ____________________________________ As this guide may contain minor mistakes , feel free to contact me if you found any. You can contact in forum DMs or in discord ( Superb#3564). _________________________ GEN - 2 ________________________ CHIKORITA Best Area - Route 226 Alt. Area - Safari Johto Grass Area ________________________ CYNDAQUIL Best Area - Safari Johto Mountain Zone ______________________________ TOTODILE Best Area - Safari Johto wet zone ____________________________ SENTRET / FURRET Best Area - Route 1 ( Both ) ____________________________ HOOTHOOT / NOCTOWL Best Area - Route 119 A/Route 210 North Best alt. - Route 37(M/N) / Route 8 (N) ______________________________ LEDYBA / LEDIAN Best Area - Forest Pit / BCC ______________________________ SPINARAK / ARIADOS Best Area - Route 1 / BCC ______________________________ CROBAT Best Area - Dragons Den ______________________________ CHINCHOU / LANTURN Best Area - Pallet Town / Route 40 ______________________________ PICHU Best Area - Love island ______________________________ CLEFFA Best Area - Mt. coronet Alt. Area - Secret Nap Area ______________________________ IGGLYBUFF Best Area - Moon 1F Alt. Area - Love Island ______________________________ TOGEPI / TOGETIC Best Area - Route 5 / Sendoff Spring Repel Area - Route 210 ( 22-26 ) Alt. Repel area - Route 5 (18-23) ( M/D) ______________________________ NATU Best Area - Route 28 ______________________________ MAREEP / FLAAFY / AMPHAROS Best Area - Route 43/Route 43 / Route 120 ______________________________ BELLOSSOM Best Area - Love Island ______________________________ MARILL/AZUMARILL Best Area - Route 104 / Route 114 Alt. Area - Lake Cave / Route 31 ______________________________ SUDOWOODO Best Area - Route 26 ______________________________ POLITOAD Best Area - Fuchsia City Repel Area - Route 120 ( 27-30 )(M) ______________________________ HOPPIP / SKIPLOOM Best Area - Route 33 / Route 14 ______________________________ AIPOM Best Area - Route 44 Repel Area - Route 33 (12-17 level ) ______________________________ SUNKERN Best Area - Forest Pit ______________________________ YANMA Best Area - Route 35 ______________________________ WOOPER / QUAGSIRE Best Area - Violet City / Route 10 ______________________________ UMBREON Best Area - Safari Exclusive ______________________________ MURKROW Best Area - Lost Cave Repel Area - Route 18 (M/N)(27-32) ______________________________ SLOWKING Best Area - Dragon Shrine ______________________________ MISDREAVUS Best Area - Mt. Silver 3F ______________________________ UNOWN Best Area - Ruins Of Alph Puzzle - 1 ______________________________ WOBBUFFET Best Area - Lave Valor ______________________________ GIRAFARIG Best Area - Route 43 ______________________________ PINECO Best Area - Route 48 Repel Area - Route 43 ( 21-25 ) ______________________________ DUNSPARCE Best Area - Forest Pit ______________________________ GLIGAR Best Area - Route 45 Repel Area - Route 45 ( 37-42 ) ______________________________ STEELIX Best Area - Mt. silver 2F Repel Area - Mt. Mortar northern (23-30) ______________________________ SNUBBULL Best Area - Leev town Port Alt. Area - Route 2 (N) ______________________________ QWILFISH Best Area - Route 12 ______________________________ SHUCKLE Best Area - Cianwood city ______________________________ HERACROSS Best Area - Route 47 Repel Area - Route 33 (12-17) _________________________________________ SNEASEL Best Area - Mt. Silver exterior _________________________________________ TEDDIURSA / URSARING Best Area - Rock tunnel 2 / Acuity Lakefront Alt. Area Ursaring - Mt. Silver expert Belt _________________________________________ SLUGMA / MAGCARGO Best Area - Route 18 / Route 113 _________________________________________ SWINUB Best Area - Ice Path 1F _________________________________________ CORSOLA Best Area - Route 14 _________________________________________ REMORAID / OCTILLERY Best Area - Route 44 / Route 222 _________________________________________ DELIBIRD Best Area - Ice Path 1F _________________________________________ MANTINE Best Area - Route 40 _________________________________________ SKARMORY Best Area - Route 45 Repel Area - Route 113 ( 19-24 ) _________________________________________ HOUNDOUR Best Area - Route 7 Repel Area - Route 7 ( 21-26 ) _________________________________________ KINGDRA Best Area - Dragons Den _________________________________________ PHANPY / DONPHAN Best Area - Route 45 / Mt. Silver lower mountainside Repel Area - Route 46 (M) (7-9) _________________________________________ STANTLER Best Area - Hoenn Safari Zone area 5 Alt. Area - Route 36 (N) _________________________________________ SMEARGLE Best Area - Route 212 North Alt. Area - Amazon Forest Repel Area - Ruins Of Alph ( 26-33 ) _________________________________________ TYROGUE Best Area - Route 112 Alt. Area - Mt. Mortar B1F _________________________________________ SMOOCHUM Best Area - Seafoam Island B2F _________________________________________ MAGBY Best Area - Fiery Path _________________________________________ MILTANK Best Area - Route 39 _________________________________________ LARVITAR / PUPITAR Best Area - Forest Pit / Mt. Silver Expert Belt Repel Area - Mt. Silver expert belt ( 55-59 ) ( For both ) _________________________________________ If you want to hunt in pair of two pokes with Same sync and can be used in PvP You may check This guide. Hope this Guide will help you; Thanks for taking a look here.1 point