Leaderboard

.thumb.jpeg.2b9184b98952801ac5d43ca521449bab.jpeg)
.thumb.png.b0bb38177dc994e309241fe36ae0b165.png)
.thumb.jpg.91d74b6138edb039f1004694747328a3.jpg)
Popular Content
Showing content with the highest reputation on 06/19/23 in all areas
-
I am auctioning this pokemon starting at 8m, increase 100k per offer (ig). Will end in 7 days. This is my first time setting an auction. So please ge patient with me. S.O (starting offer) - 8m Minimum Increase - 100k Auction ends in 7 days Note. I don't know if this is the auction website. I will say it again, this is my first time. https://www.tickcounter.com/countdown/4220347/shiny-gyarados-timer Here's the counter
 4 points
 -
S.o. 20m min bid. 500k insta:35m end 3days after first bid
4 points
-
3 points
-
2 points
-
24h after first bid S.o 1k Min bid 1k No insta
2 points
-
s.o = 1.5m min bid = 100k No insta End in 48hr after first bid Also accept cc = 360k rr = 500k
2 points
-
2 points
-
2 points
-
hi all; i have an idea tadd make the heavy ban where banned players can only log in the game but can not interact with digspot & excavation & can not meet or enconter any pokemons & battle npc trainers or bosses neither in chat nor in trade & pms but they can only travel from region to region & map to map i.e = banned player can only cross maps without having the power & the autority to do anything else as much as the appeal is going on.1 point
-
All Auctions end 48 hrs after s.o is met. cc=350k rr =500k https://www.tickcounter.com/countdown/4227586/my-countdown C.o 550k Min bid 50k No insta https://www.tickcounter.com/countdown/4224882/my-countdown SOLD 1.6m Min bid 50k Insta 2m https://www.tickcounter.com/countdown/4224882/my-countdown SOLD 1.2m Min bid 50k No insta https://www.tickcounter.com/countdown/4224882/my-countdown SOLD 600K Min bid 50k No insta https://www.tickcounter.com/countdown/4224882/my-countdown SOLD 1.7m Min bid 50k Insta 2.5m
1 point
-
S.o 3m1 Min bid : 100k insta 4m5 Ends 48hrs after first bid
1 point
-
current bid : 300k by Evan1011 min bid : 50k end in 24 hours accpeted currency : coin capsule : 350k reroll ticket : 500k goodluck to all bidders !
1 point
-
Welp this one hurts cause it's my personal favorite but time to invest So:350k Co:550k by Actavistt Min bid: 25k Insta 1.2 mil Ends 12 hours after the first bid.
1 point
-
toliet break1 point
-
pff javelin ruined the game,150k1 point
-
Countdown: https://www.tickcounter.com/countdown/4221622/politoed - Extra time. If a bid is received in the final 15 minutes of the auction, the end point will be delayed by 15 minutes from that bid, and will be delayed by 15 minutes for each new bid thereafter, until the current offer has been held for a full 15 minutes. Must be accurate to the minute that the auction is set to end. › e.g. If the auction ends at 15:00, it will end at 15:00:00. If a late bid is received in the final 15 minutes, at 14:46, the auction will end at 15:01. If another user bids at 15:00, the auction will be extended again, and will end at 15:15, this will be repeated until the current offer has been held for a full 15 minutes.1 point
-
@Milesd leads at 21,0011 point
-
insta buneary1 point
-
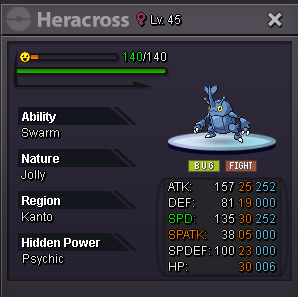
HP Flying 40M
1 point
-
Start buneary and lycan1 point
-
1512341 point
-
450k dedenne1 point
-
500k for natural happiny IGN: Lieubaohd51 point
-
Time ended? 15min since my bid1 point
-
I didn't won? Sry my bad I give up1 point
-
500k1 point
-
400k dedenne 350k weavile1 point
-
1 point
-
1 point
-
1 point
-
1 point
-
380k dedenne1 point
-
1 point
-
60k on raptor1 point
-
dedenne 370k minun 50k plusle 160k1 point
-
290k Weavile1 point
-
200k weavile1 point
-
360k dedenne1 point
-
40k pikachu 40k minun1 point
-
Edit :- Sry I'll fix all write every name in a few1 point
-
290k Dedenne1 point
-
230k dedenne1 point
-
1 point
-
3m5, very good poke for sharpedo stone quest1 point
-
200k dedenne1 point
-
1 point
-
1 point
-
bump1 point
-
1 point
-
Event form season: Summer Event Form Name: Fanta Cresselia Graphic : Event form season: Halloween Event Form Name: Forbidden Dud - Uxie Graphic : Event form season: Halloween Event Form Name: Jargigus - Cofragigus Graphic : Event form season: Summer Event Form Name: Glitchy Duck -Porygon Graphic : Event form season: Summer Event Form Name: Midoriwak Graphic : Event form season: Summer Event Form Name: GEMGD-Cross Graphic : Event form season: Summer Event Form Name: Candice Bronzor Graphic : Event form season: Hallo Event Form Name: Bronphim Graphic : Event form season: Hallo Event Form Name: Biblizong Graphic : Event form season: Summer Event Form Name: DoCham and MinggoRo Graphic :
1 point