
Bitterblade
-
Posts
705 -
Joined
-
Last visited
Everything posted by Bitterblade
-
 Good day @Luminusx48 I apologize for the delay. Are you still having these issues? I look forward to hearing from you. Regards, Bitterblade
 -
Good day @Dwinnyy You're welcome. Also, I see that you have acquired the seen data of the legendary birds you were missing. That's fantastic news. With that being said, I will be closing this thread now. If you have any further questions or concerns, do no hesitate to reach out. Regards, Bitterblade
-
Good day @Dwinnyy You can acquire the seen data for Zapdos in the Power Plant in Kanto. The Power Plant is east of Cerulean City (you will need to use Surf from the waters edge on Route 9). You can acquire the seen data for Articuno in the Seafoam Island. You can access Seafoam Islands via surfing on south and then west on the beach south of Fuchsia City or surfing east from Cinnabar Island. If you require a guide for the Cerulean Cave Quest, you can find one here. I hope this information finds you well and look forward to hearing of your successful acquisition of the remaining legendary birds seen data. Regards, Bitterblade
-
Good day @Turnine You are correct in noting that the move is both Fighting type and Flying type and that when used against Volcarona it should result in neutral damage. While this may be unexpected behavior when testing the move out from your perspective, the move Flying Press is noted in the section "Move - Not Coded". You can find a list of move either not coded or coded incorrectly via the PvP Rules section in-game or on the forums under the List of Broken Moves, Abilities & Items in PRO . Despite this, I thank you for bringing a potential bug and hope you continue to do so. As there is nothing to be resolved here, I will be closing this thread. If you have any further questions or concerns, do not hesitate to reach out. Regards, Bitterblade
-
Information on one of my pokemon...
Bitterblade replied to Infamousro's topic in Resolved General Support
Good day @Infamousro According to our database, you released this Cloyster. I have now restored it. I will be closing this thread now. If you have any further questions or concerns, do not hesitate to reach out. Regards, Bitterblade- 1 reply
-
- 1
-

-
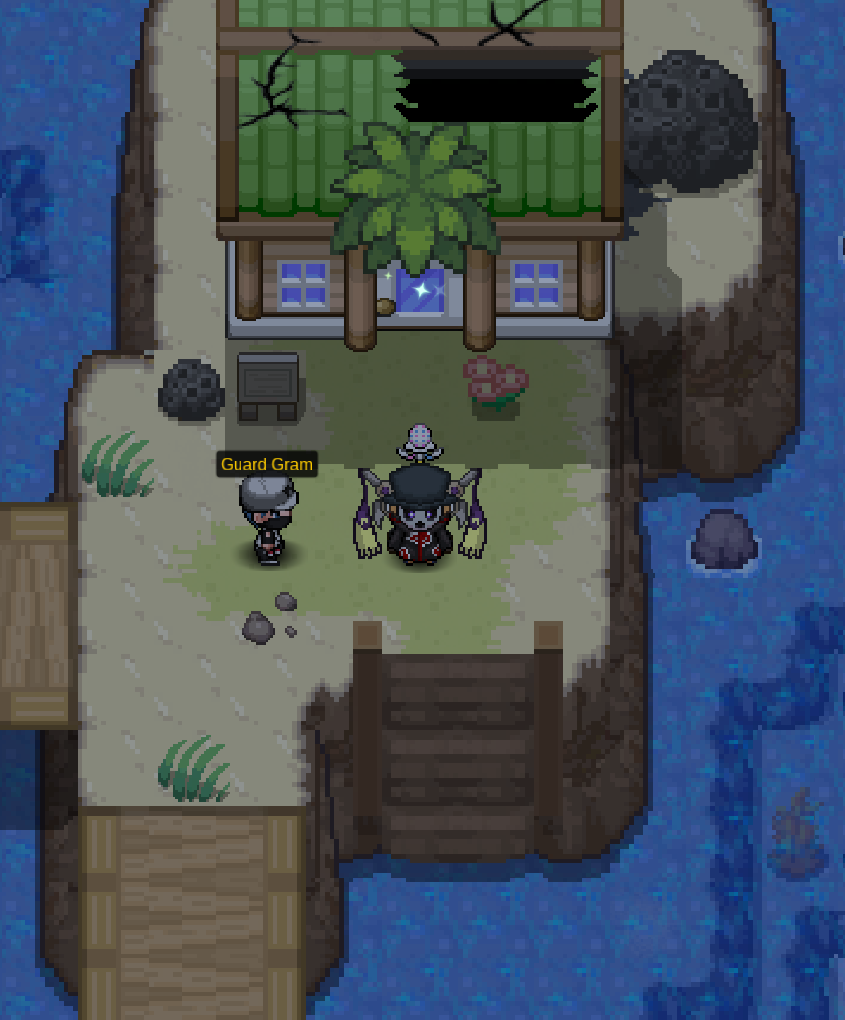
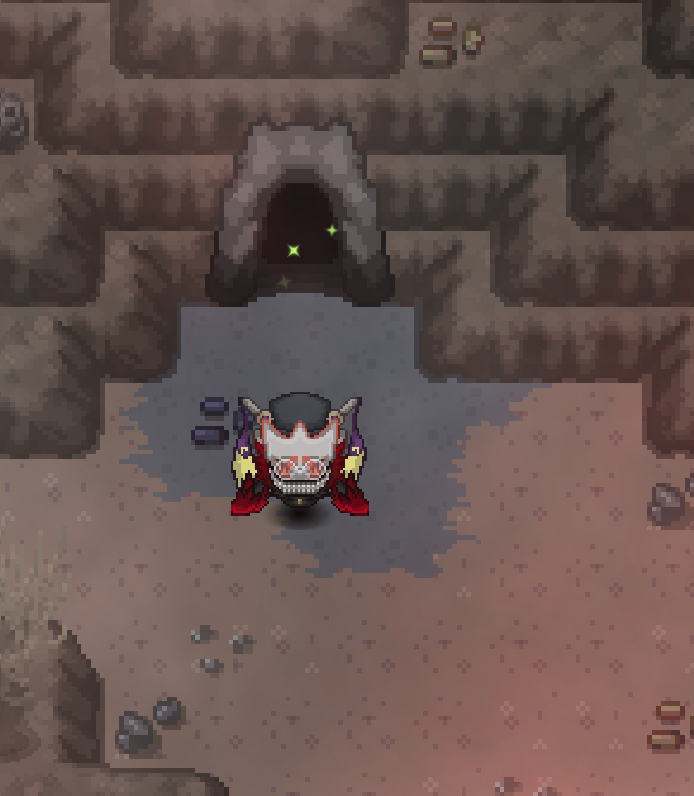
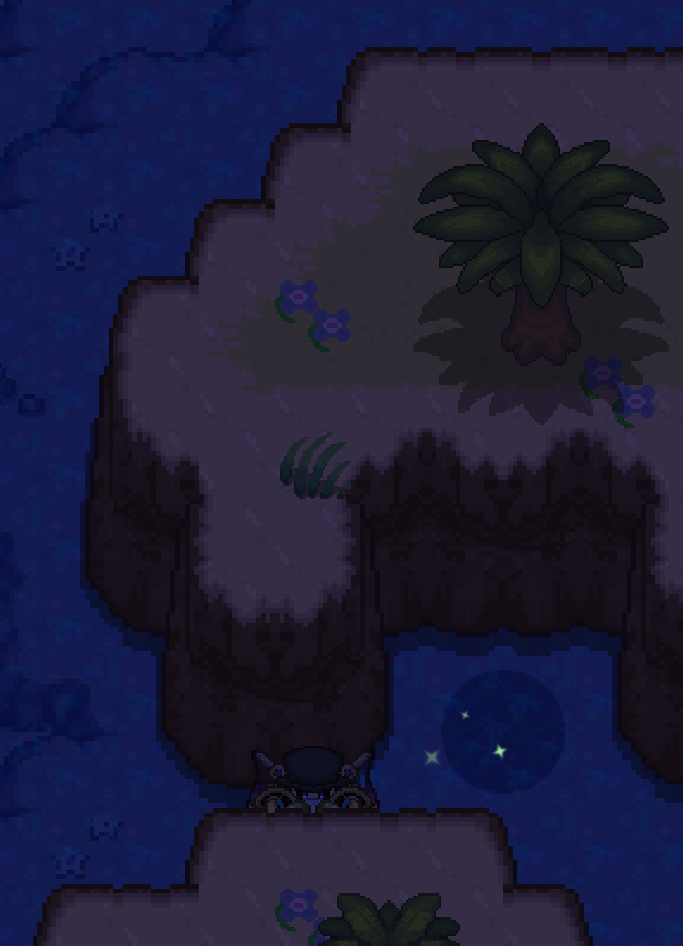
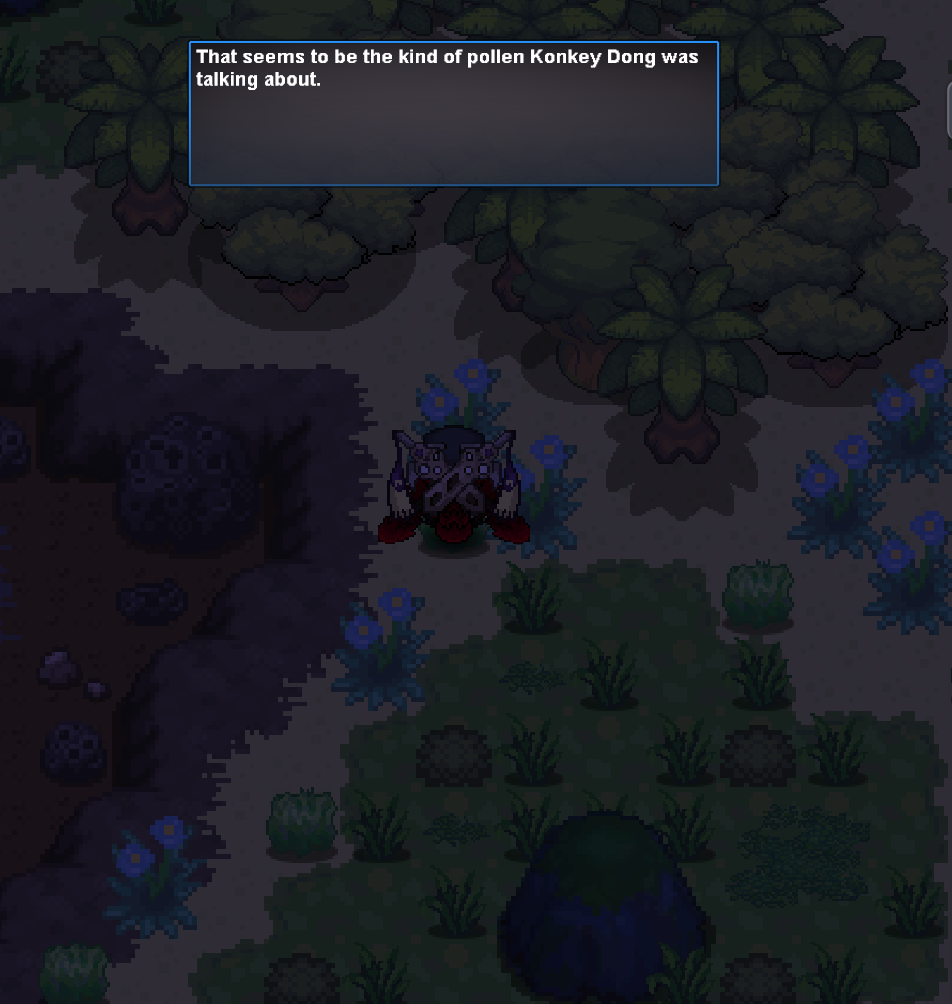
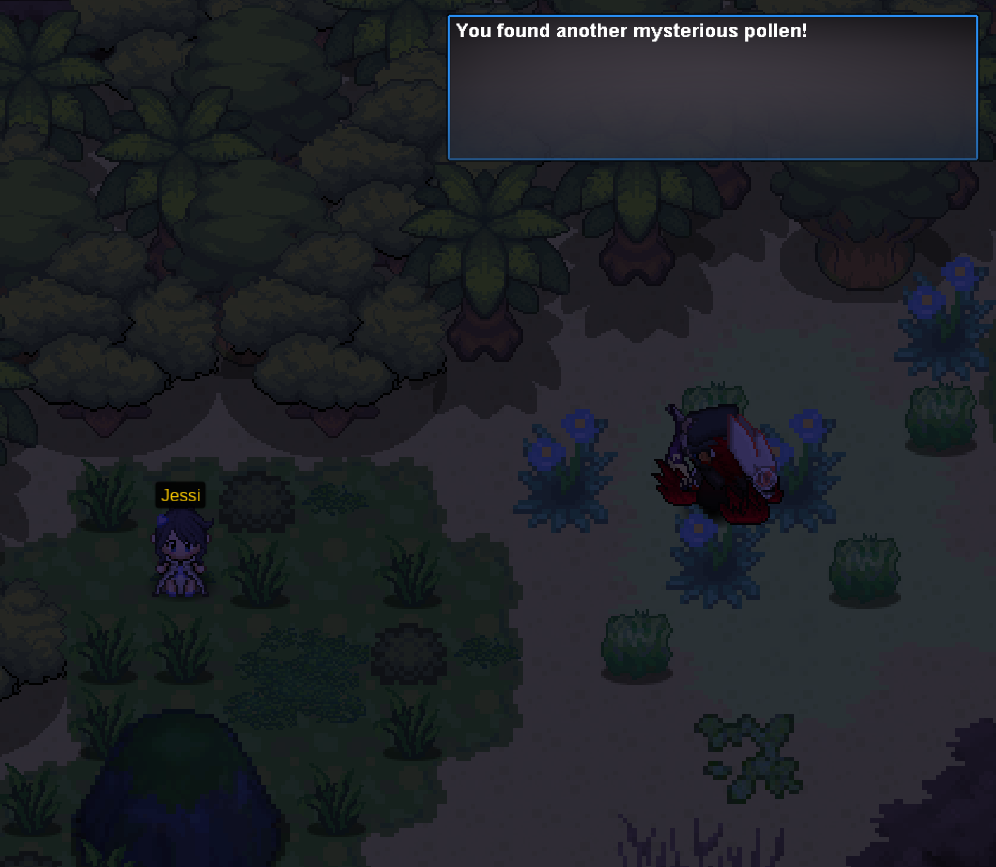
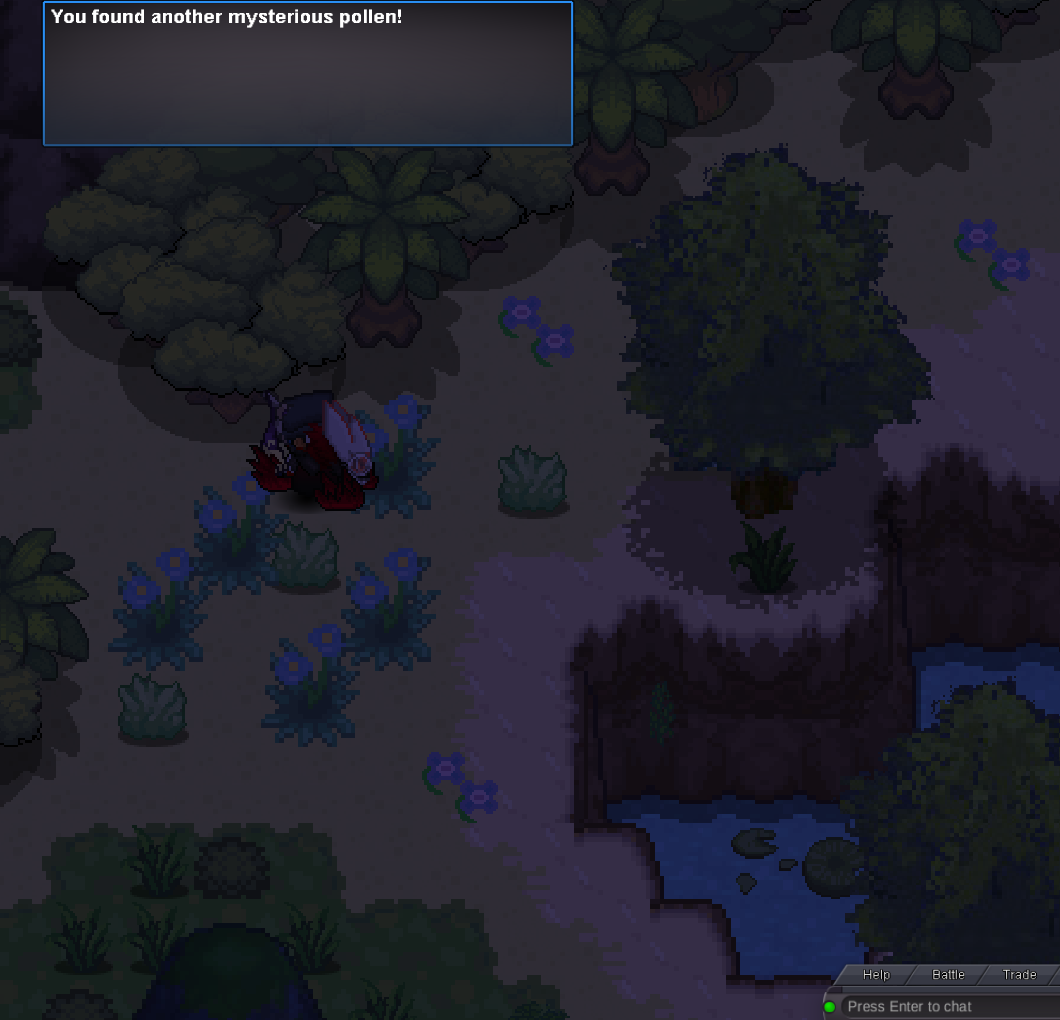
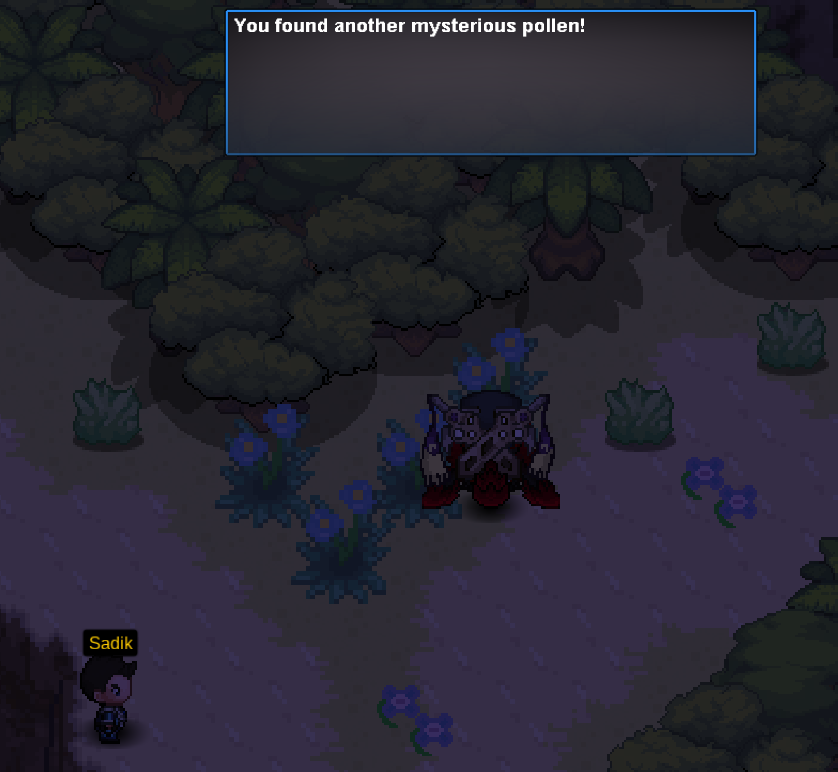
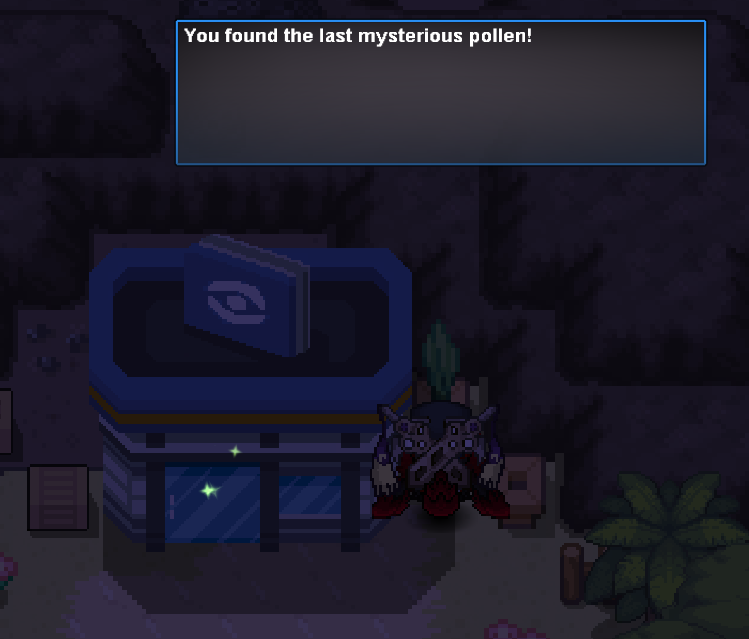
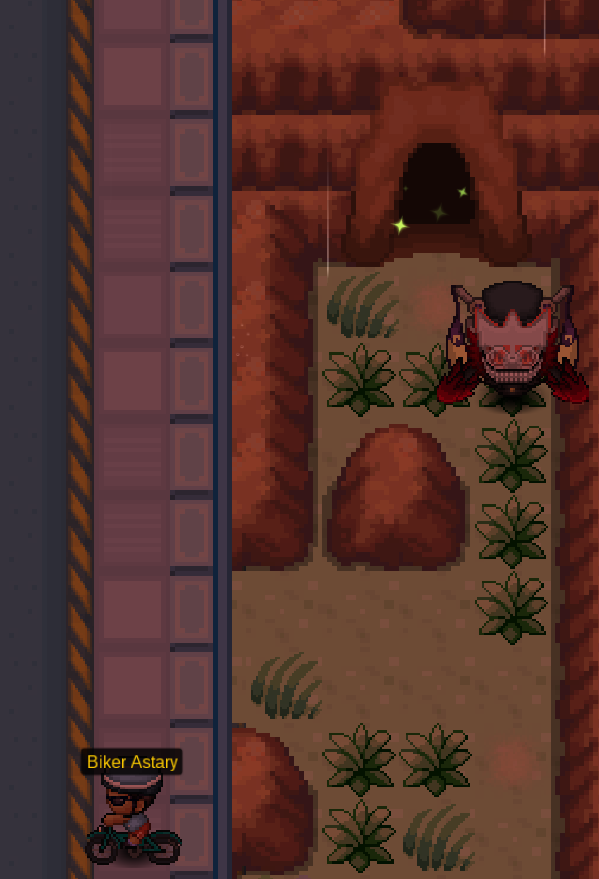
Requirements ★ Champion of the region you are in. ★ A strong team of Pokemon (every trainer is level 90+) Beginning the Quest To begin the quest, speak with Sailor James in Cinnabar Island who will take you to Eriyadu Island. This will cost you $5,000 Pokedollars. When you arrive to Eriyadu Island, surf north west and you will see a house up a staircase, this is the Eriyadu Welcome Center. Go onto the land and go up the staircase and enter the welcome center. There you will see Dr. Reinfield. Speak to him and he will require you to find three items: a Red Stone, Blue Pearl, and a Red Banana. Red Stone Leave the welcome center and head north using surf into Palpatoo Beak. Make your way onto the land and continue north to go up a set of stairs. Continue west after the stairs until you enter the Eriyadu Sulfur Pools. Here you will need to beat Calum along with the Mole Marc boss. Their teams can be seen below. Calum Mole Marc After defeating Mole Marc, he will instruct you to head south. Follow his directions and head south until you find Guard Gilbert in front of a cave. You will have to battle more trainers. Their teams can be seen below. Karen Purp Jim Finally you will arrive at Guard Gilbert. Speak with him and then proceed into the cave. After you enter the cave, go to the altar and retrieve the Pokeball holding the Red Stone. The Blue Pearl Head back to Palpatoo Beak and then head east to Breakers Beach. You will then head down to the shore area, battling trainers along the way. Once you make it to the beach, head west along the shoreline and enter Cape of Palpatoo. The NPC teams can be seen below in the order they occur. Pavel Yassin Sadik Once you make it to Cape of Palpatoo, Surf and head south until you see a dive spot and dive down to go to the Breakers Trench Underwater. Continue east over the lava and enter the cave on the other side. Surf north and retrieve the Blue Pearl. Red Banana Head back to Palpatoo Beak and then head north to Pola Tai Lagoon. Once you arrive at Pola Tai Lagoon, continue north and then surf west of the pyramid then speak to Konkey Dong. He will offer to trade you his Red Banana for five special pollen. Once you have collected all the five pollen, return to Konkey Dong to claim the Red Banana. This pollen can be found in the following locations: ★ Palpatoo Beak - East of the pit where the Chloe NPC is ★ Palpatoo Beak - East of the Jessie NPC ★ Breakers Beach - North of the Yassin NPC ★ Breakers Beak - North East of the Sadik NPC ★ In the flower pot near the Pokemart in Eriyadu Town (west of the Welcome Center) Finishing the Quest and Catching Volcanion Once you have the Red Banana, Blue Pearl, and Red Stone head back to Eriyadu Town and speak with Dr. Reinfield in the Welcome Center. Then head back to Pola Tai Lagoon and defeat the Crank Boss NPC. Her team can be seen below. Crank Once you defeat Crank, head back to Eriyadu Town and speak with Dr. Reinfield. He will enchant your items so that you can enter the location where Volcanion is. Get whatever you may need to catch Volcanion (synch, false swiper, etc.) and head back to where Crank was in Pola Tai Lagoon. Speak with Crank and she will give you access to the pyramid where Volcanion resides. Continue into the pyramid to begin the battle with Volcanion. Quest Complete!

-
Good day @Mexicantaco Your Growlithe identified in your screenshot has been restored. In the future, please use the Restore Megathread or the #request-chat in the PRO Official Discord. The link to the PRO Official Discord can be found on the Forum homepage and can be seen in the screenshot provided. I hope this information finds you well and I will be closing this thread now. Regards, Bitterblade
-
I can't find any Latias to capture after talking to TV
Bitterblade replied to Rastajamz's topic in Resolved General Support
Good day @Rastajamz It appears that you have successfully caught the Eon Duo of your choice. Well done! I will be closing this thread now. If you have any further questions or concerns, do not hesitate to reach out. Regards, Bitterblade -
Can't play after use Pokemon Storage
Bitterblade replied to Nephophile's topic in Resolved General Support
Good day @Nephophile I apologize for these issues. We are currently working and preparing a fix for this issue and ask for your patience in the meantime. Regards, Bitterblade -
Good day @Sesosojito It appears that you have acquired the missing caught data and also completed the quest! I will be closing this thread now. If you have any further questions or concerns, do not hesitate to reach out. Regards, Bitterblade
-
Good day @Sesosojito Access to Shamouti Island requires the start of the Legendary Birds Quest. To begin that quest, you must have all non-legendary caught data for Kanto. According to our database, you are missing the caught data for Marowak. Once you get the caught data for Marowak then you should be able to proceed without issue. For your reference, here is a guide for the Legendary Bird Quest. I hope this information finds you well and I look forward to hearing of your success. Regards, Bitterblade
-
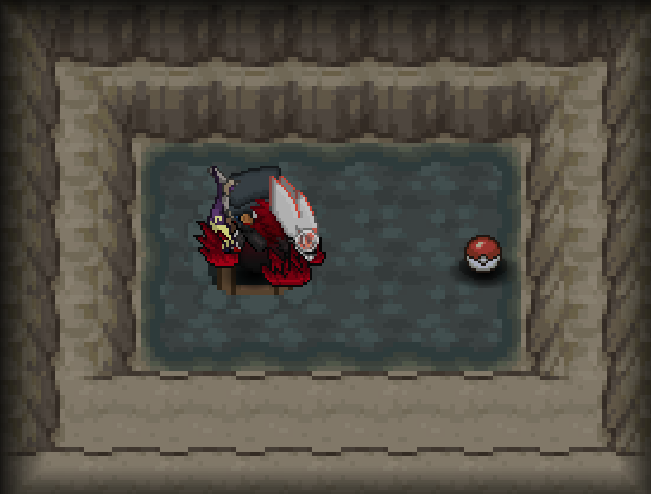
Pre-Requisites ★ Sinnoh Championship ★ A Pokémon with the move Surf (or a Surf Mount) ★ A Pokémon that has the ability Storm Drain with 100 or more IVs (your OT) ★ A Pokémon that has the ability Levitate with 100 or more IVs (your OT) ★ A Pokémon with the ability Lightning Rod with 100 or more IVs (your OT) Beginning the Quest To begin this quest, head to Mauville City House 1 and speak to the Jirachi inside. Jirachi will inform you that Team Magma is trying to capture the Forces of Nature and asks for your help to defeat them. Select the "Of course!" option to begin. This quest consists of a lot of trainer battles so prepare accordingly. If you lose a battle you will be teleported back to the Pokémon Center in Mauville City and will need to speak with Jirachi and have it give you more time. Once you have done that, head back to the area of which you lost the battle. Note: You will not have to redo the battles you have already won. If you make your way through one of the Stop House and you are not met with a dialogue box, go back and talk to Jirachi for more time. Landorus (Route 111) Head to Route 111 (North of Mauville City) to begin battling your way through Team Magma. As you make it through the stop house, you will have dialogue pop up and then appear on Route 111 South Destroyed. This is where the battles begin. The teams you need to defeat in battle are shown below and appear in the order of which you encounter. Magma Grunt 1 Level 80 Magma Grunt 2 Level 80 Magma Grunt 3 Level 80 Magma Grunt 4 Level 80 Magma Grunt 5 Level 80 After defeating all of the Magma Grunts, head into the blue portal. Now that you have entered the Landorus Cave, continue battling your way through until you reach Landorus. The Magma Grunt teams can be seen below. Magma Grunt 1 Level 80 Magma Grunt 2 Level 80 Magma Grunt 3 Level 80 After the third Magma Grunt you will need to interact with the fourth Magma Grunt surrounded by other grunts. His team can be seen below. Magma Grunt 4 Level 100 Finally, once you defeat the last Magma Grunt you need to battle Landorus who is level 100. Once you defeat Landorus, Jirachi will teleport you back to Mauville City. Thundurus (Route 110) Head to Route 110 (South of Mauville City) to begin battling your way through Team Magma. While not all Team Magma members require being battled, their teams are shown below in the order that they would be encountered if they were required. Magma Grunt 1 Level 80 Magma Grunt 2 Level 80 Magma Grunt 3 Level 80 Magma Grunt 4 Level 80 Magma Grunt 5 Level 80 Magma Grunt 6 Level 80 Magma Grunt 7 Level 80 Magma Grunt 8 Level 80 Magma Grunt 9 Level 80 After you defeat these Magma Grunts, enter the blue portal next to the Trick House. Now that you have arrived in the Thundurus Cave, continue through the cave defeating Magma Grunts. Their teams can be seen below. Magma Grunt 1 Level 80 Magma Grunt 2 Level 80 Magma Grunt 3 Level 80 Magma Grunt 4 Level 80 Just like in the Landorus Cave, there will be a Magma Grunt surrounded by 2 other grunts. You need to defeat him in order to battle Thundurus. His team is seen below. Magma Grunt 5 Level 100 Once you defeat the last Magma Grunt, battle Thundurus. After defeating Thundurus, Jirachi will teleport you back to Mauville City. Tornadus (Route 118) Head east from Mauville City to Route 118. Similar to the Landorus and Thundurus, you will have to fight a large amount of Magma Grunt. Their teams are presented below in the order which they can be battled. You will need Surf to proceed through this area. Magma Grunt 1 Level 80 Magma Grunt 2 Level 80 Magma Grunt 3 Level 80 Magma Grunt 4 Level 80 Magma Grunt 5 Level 80 After beating the 5 Magma Grunts, enter the portal next to the sign to the north. Once arriving in Tornadus Cave, continue defeating Magma Grunts until you make it to Tornadus. The Magma Grunt teams can be seen below. Magma Grunt 1 Level 80 Magma Grunt 2 Level 80 Magma Grunt 3 Level 80 After defeating the third Magma Grunt, you will need to fight the last one (again surrounded by other grunts). His team can be seen below. Magma Grunt 4 Level 100 After defeating the last grunt, defeat Tornadus and Jirachi will teleport you back to Mauville City. Magma Admin Courtney Now that you have defeated all of the Forces of Nature, you need to fight Magma Admin Courtney. Once your team is ready, head to Mauville City House 1 and speak to her there. Her team can be seen below and are all level 100. Magma Admin Courtney Level 100 Catching the Forces of Nature After defeating Magma Admin Courtney speak with Jirachi to select which of the Forces of Nature you would like to catch. Each one requires a specific Pokémon in your party. Have whatever you need to prepare to catch the Forces of Nature ready (synch, swipers, etc.). Note: You are able to catch all three of the Forces of Nature. Landorus - A Pokémon with at least 100 IVs with the Levitate ability (must be OT) Thundurus - A Pokémon with at least 100 IVs with the Lightning Rod ability (must be OT) Tornadus - A Pokémon with at least 100 IVs with the Storm Drain ability (must be OT) After having the appropriate Pokémon in your party, Jirachi will teleport you to the location to catch the Pokémon you chose. Once you catch the Pokémon you chose, then you will be teleported back to Mauville City. Quest Complete!
-
- 2
-
-
Can't play after use Pokemon Storage
Bitterblade replied to Nephophile's topic in Resolved General Support
Good day @Nephophile If you log out and log back in right now does the issue still occur? Regards, Bitterblade -
Support to return the deleted pokemon
Bitterblade replied to Steelman's topic in Resolved General Support
Good day @Steelman Firstly, welcome back to PRO! While you were gone, many changes happened. To catch up with those changes I would look through the Update Logs and the Content Update Logs. One of those changes, as you may have noticed, was the PC rework. Many functionality changes and quality of life changes have gone into place. I recommend familiarizing yourself with these changes, seen in the PC Storage Rework update log. Regarding the Pokemon that were accidently released, I have gone through and restored them. I hope this information finds you well and hope you enjoy your adventure in PRO! I will be closing this thread now but if you have any further questions or concerns, do not hesitate to reach out. Regards, Bitterblade -
I can't find any Latias to capture after talking to TV
Bitterblade replied to Rastajamz's topic in Resolved General Support
Good day @Rastajamz According to our database, you possess the Eon Ticket (which is given after you have decided which of the Eon Duo you desire to catch). This ticket allows you travel to the Southern Island where you can catch the whichever of the Eon Duo that you selected. You will need to head to Slateport City and speak with a sailor to board the S.S. TIDAL to travel here. I hope this information helps and I look forward to hearing of your success. Regards, Bitterblade -
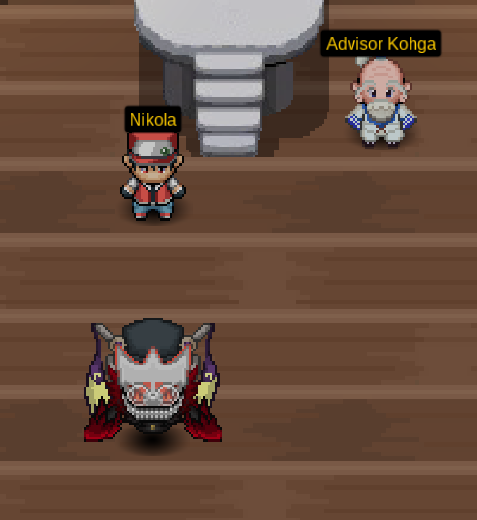
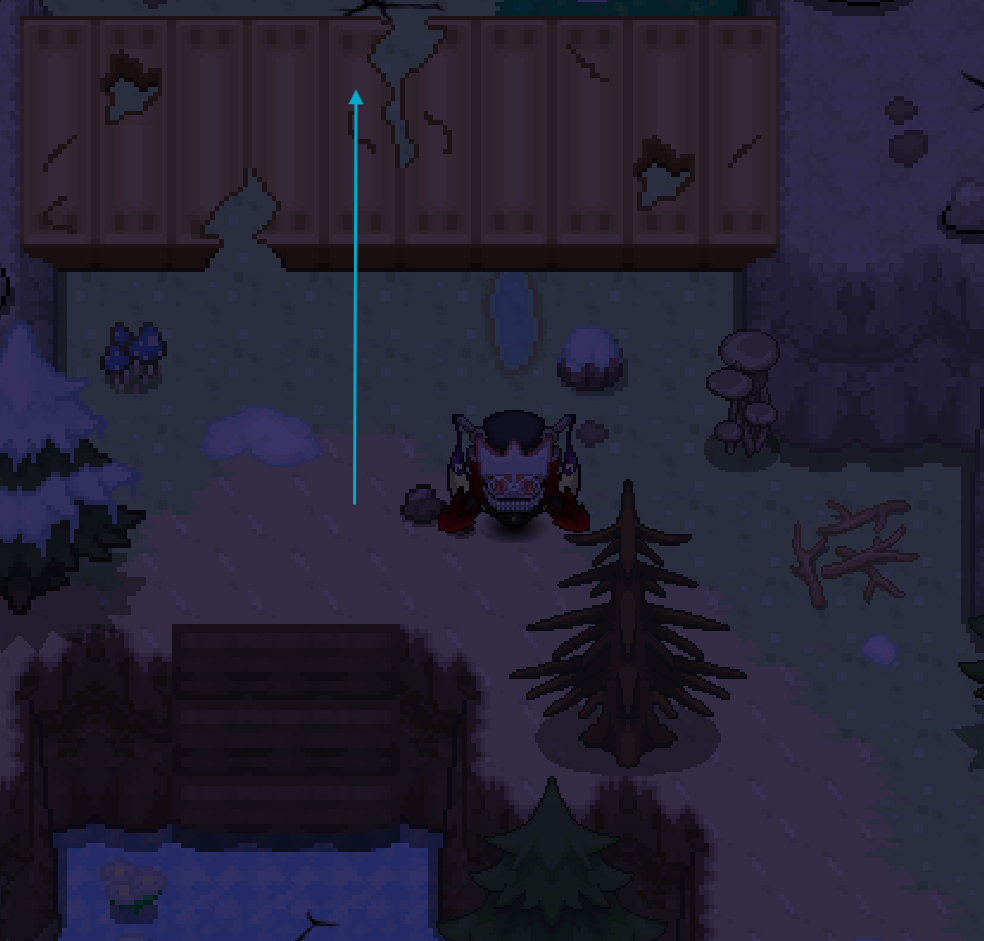
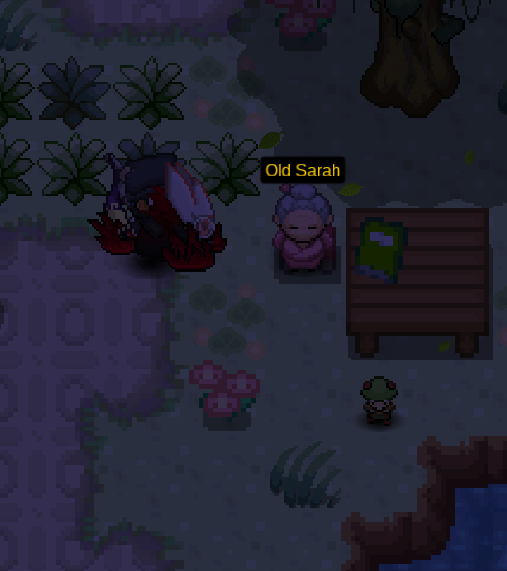
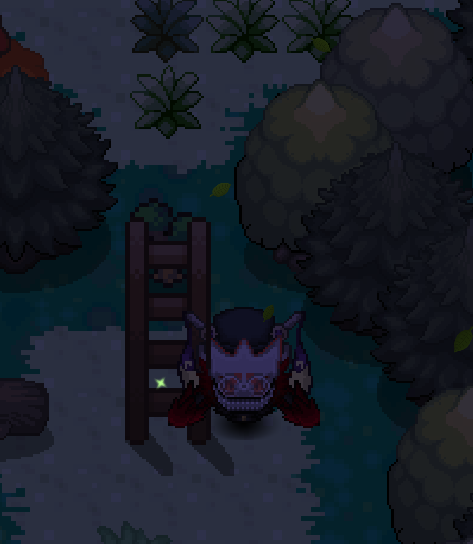
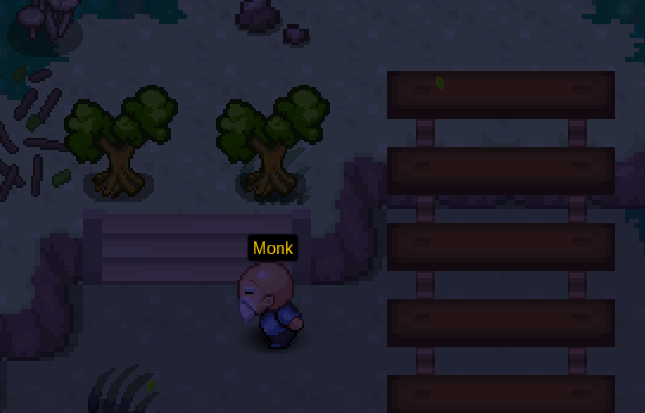
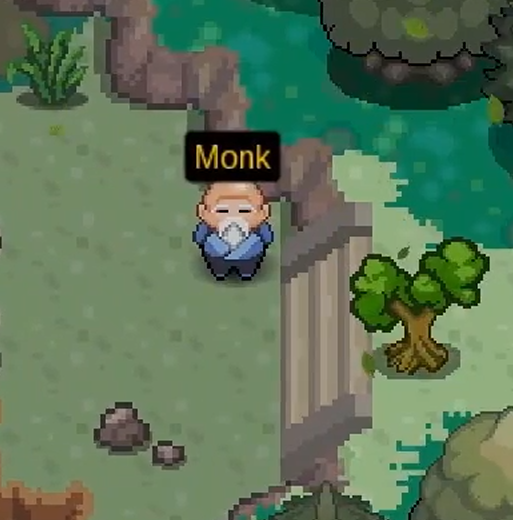
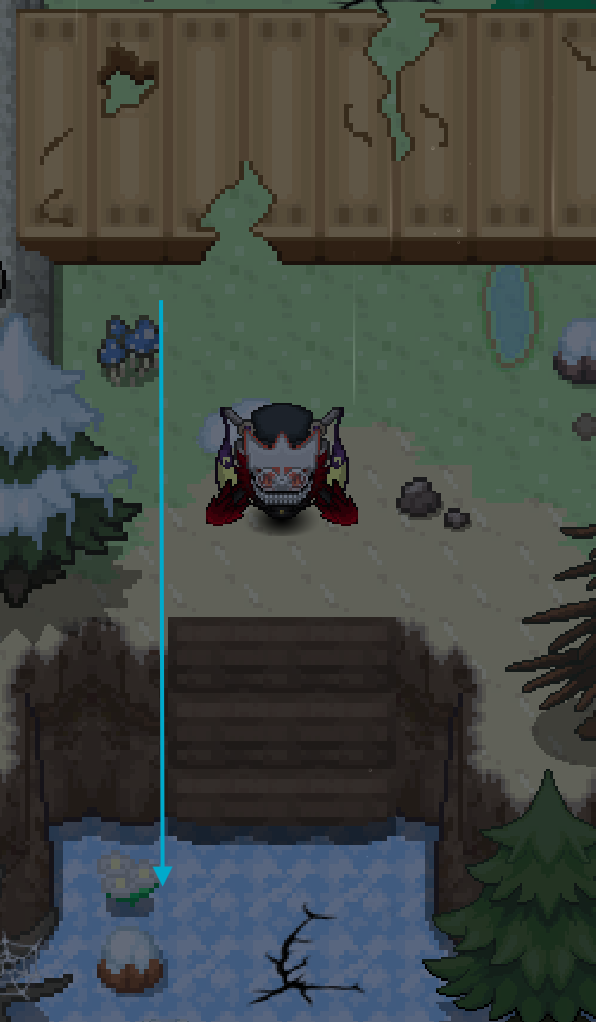
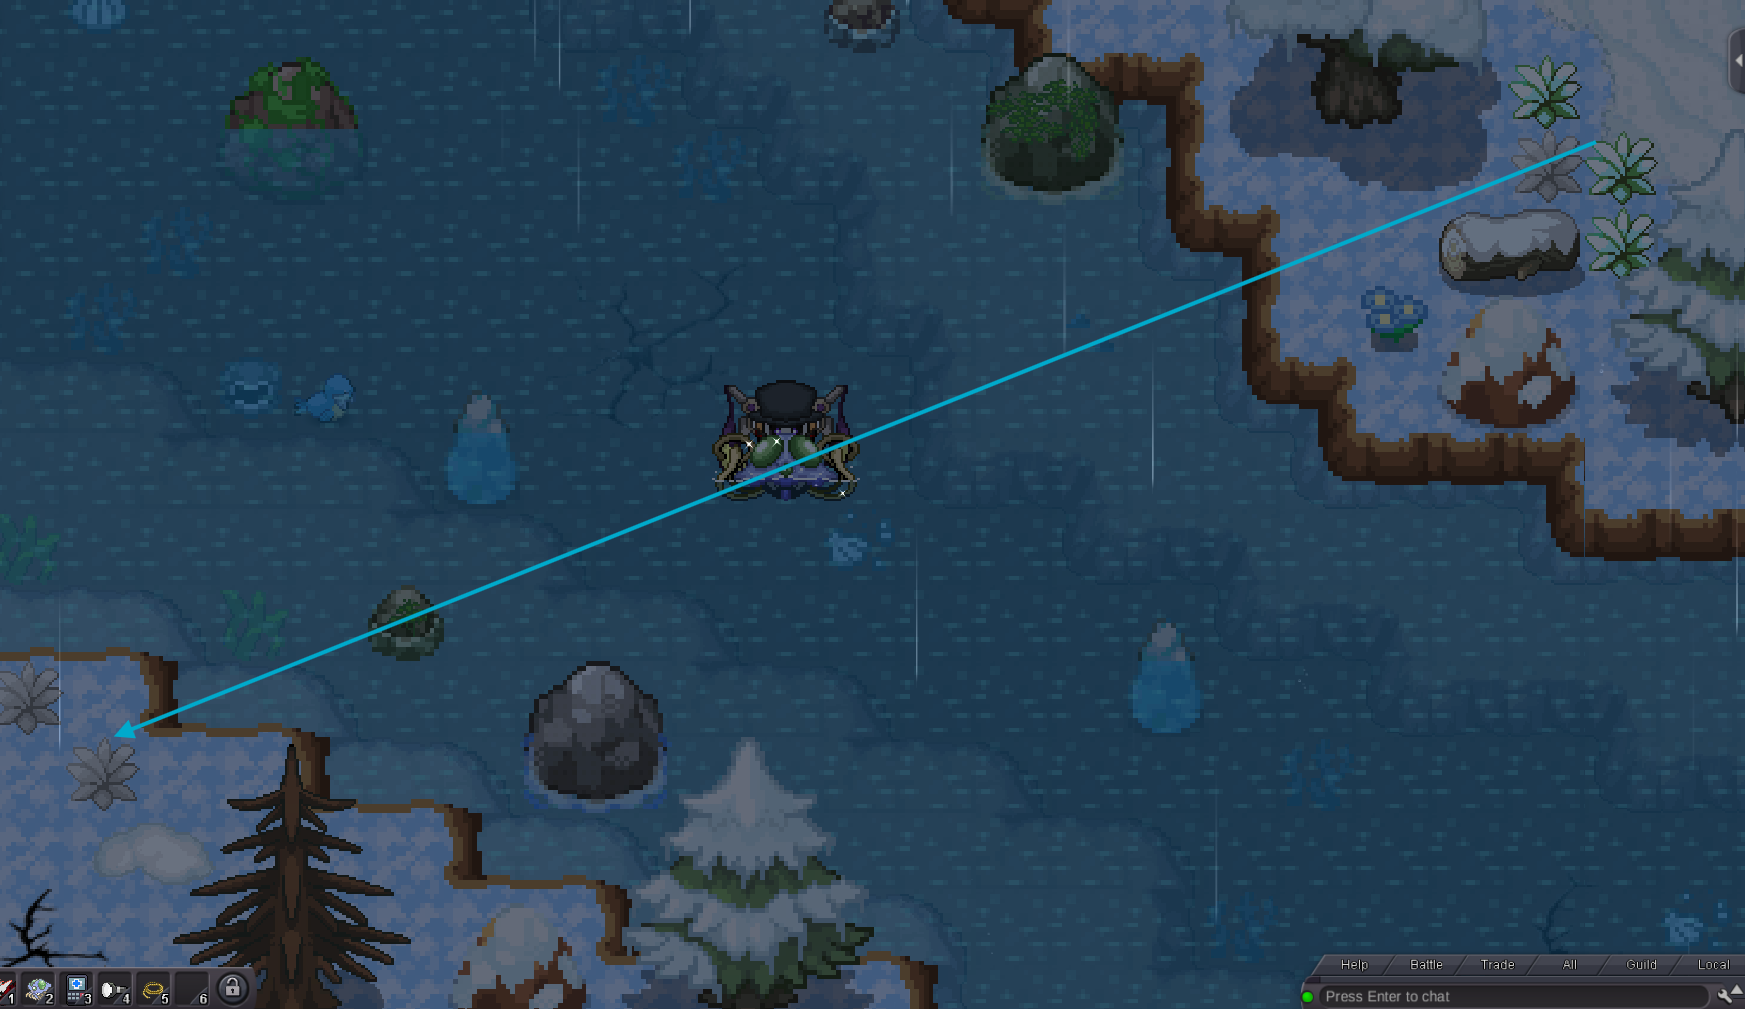
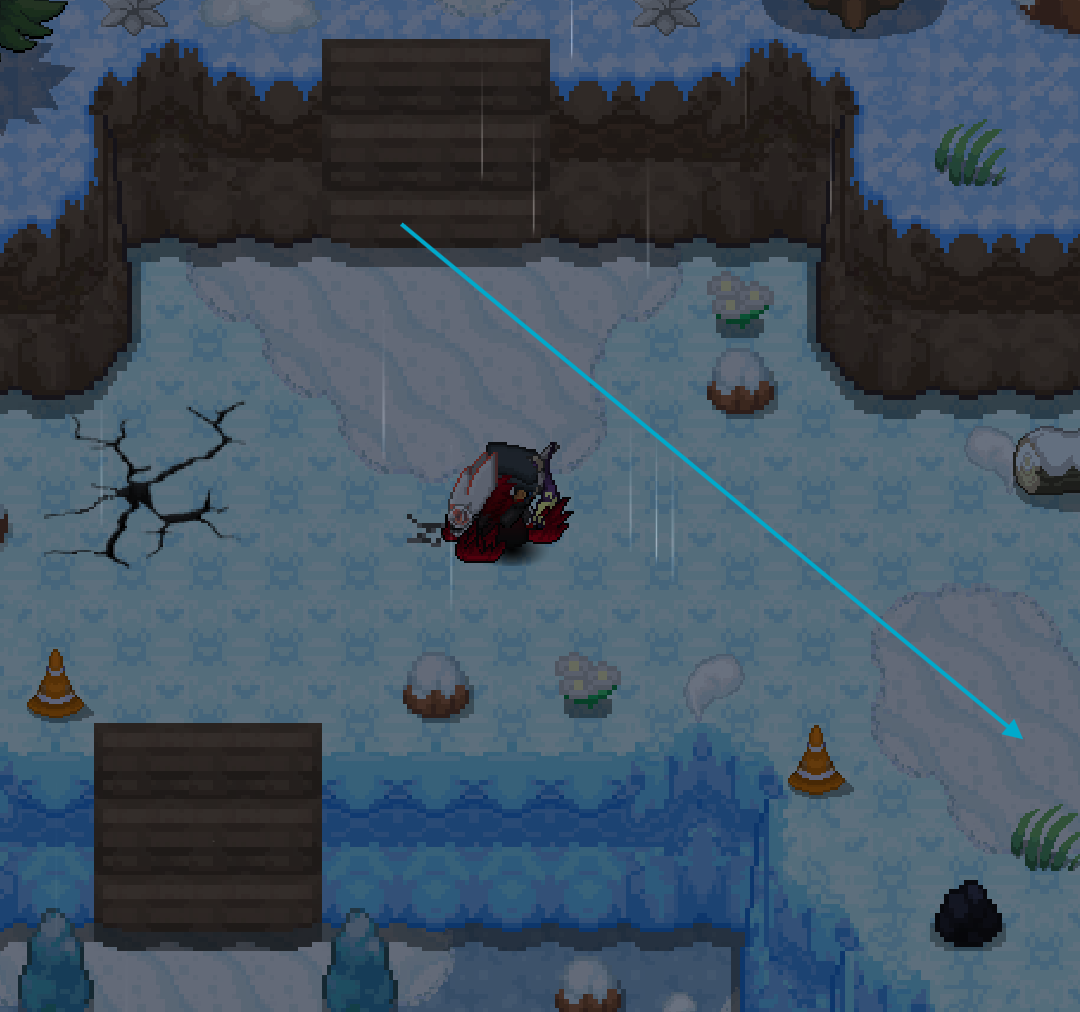
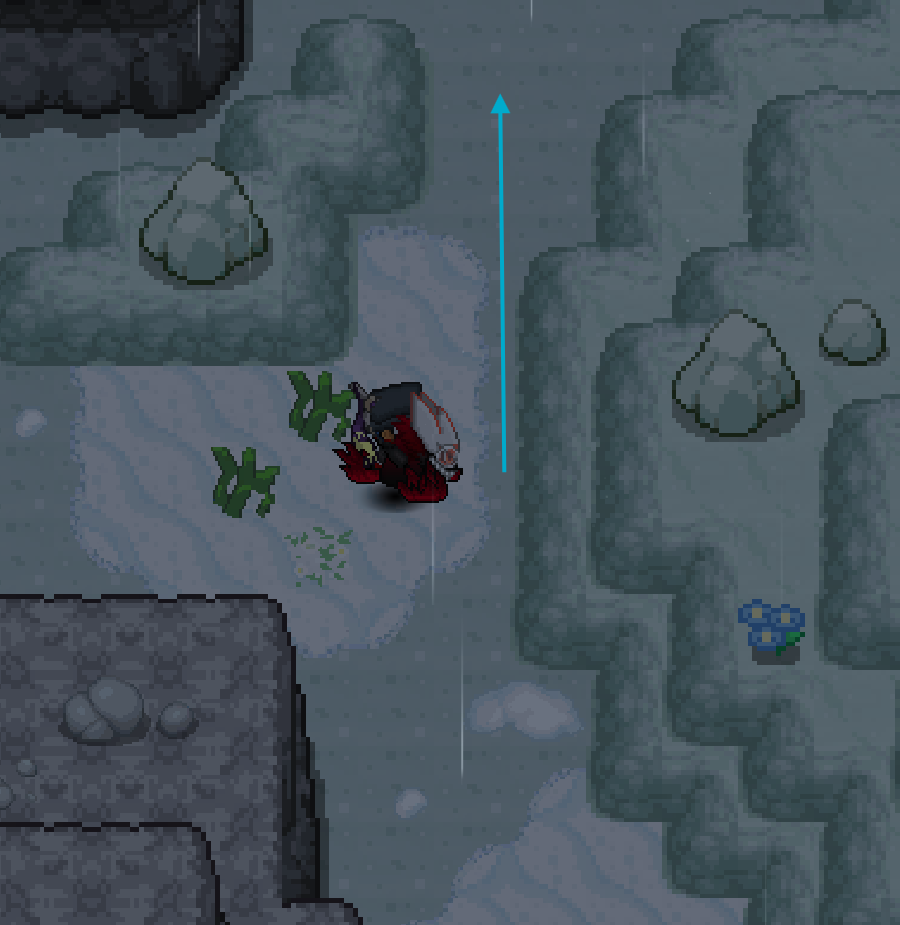
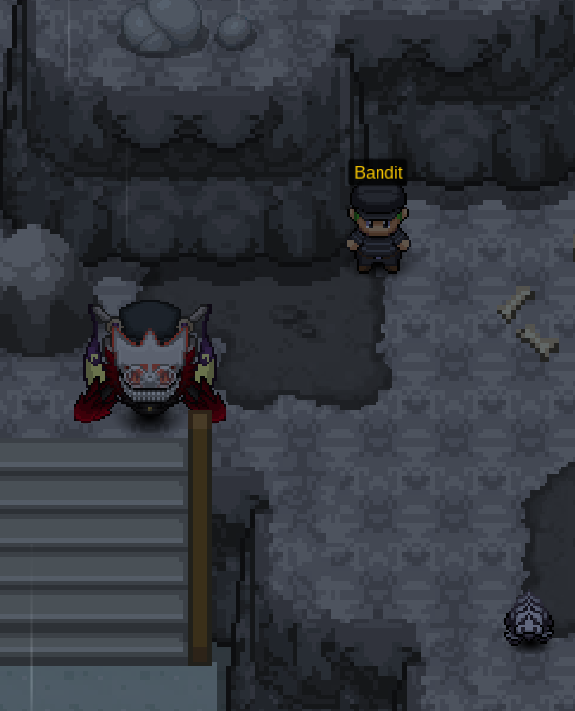
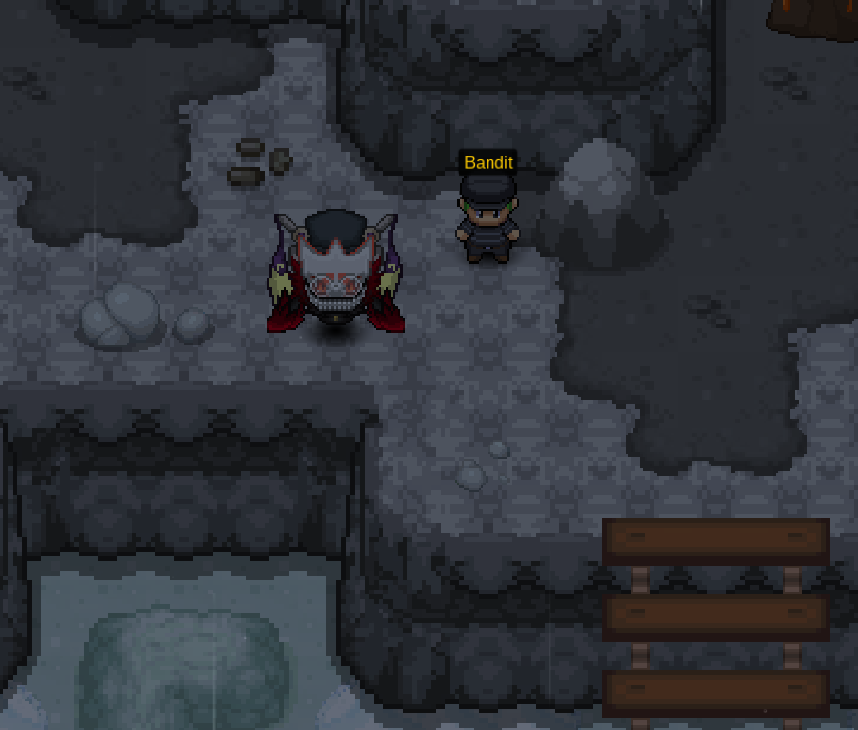
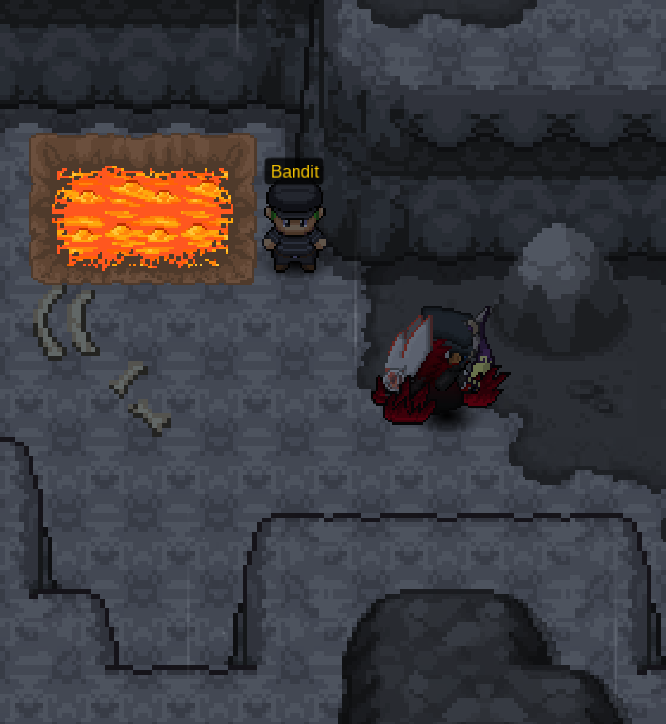
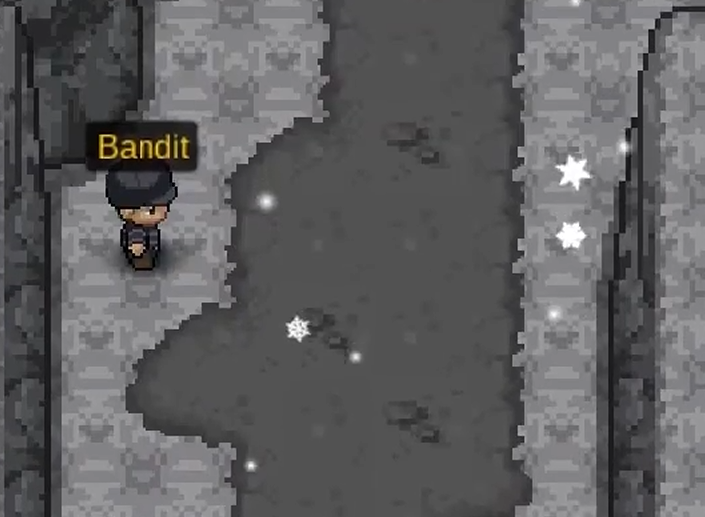
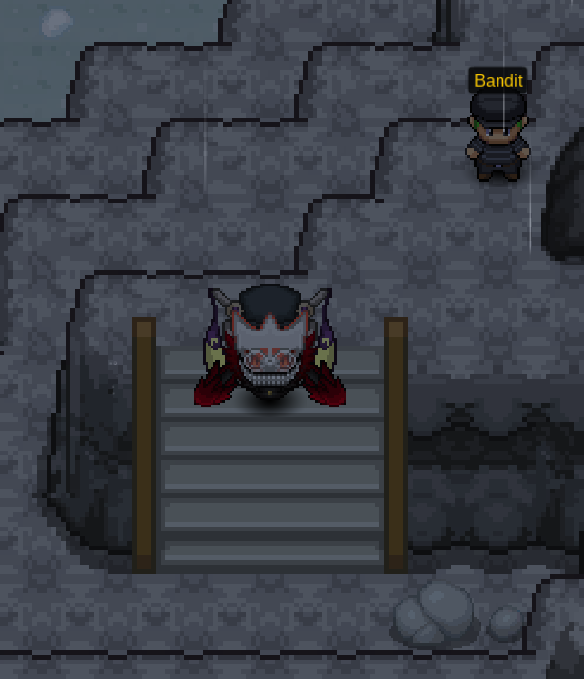
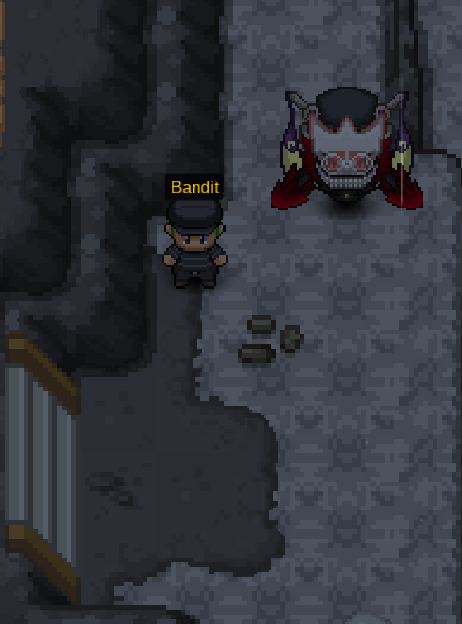
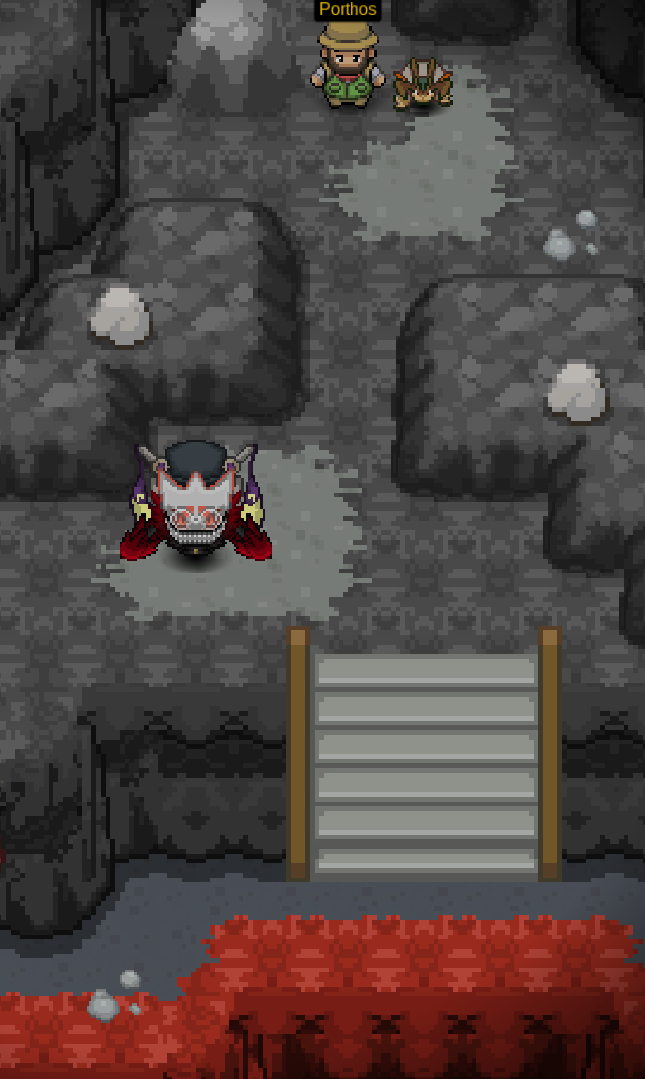
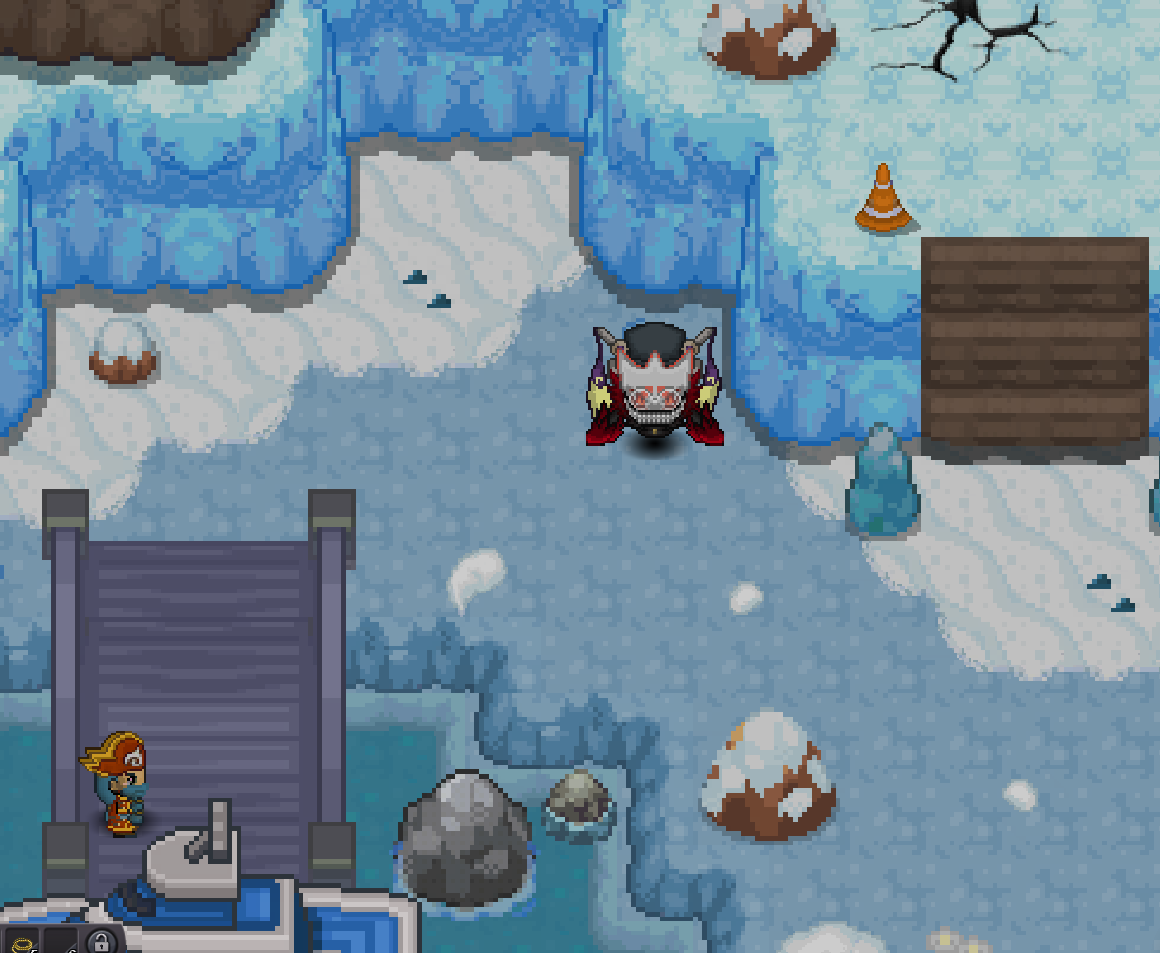
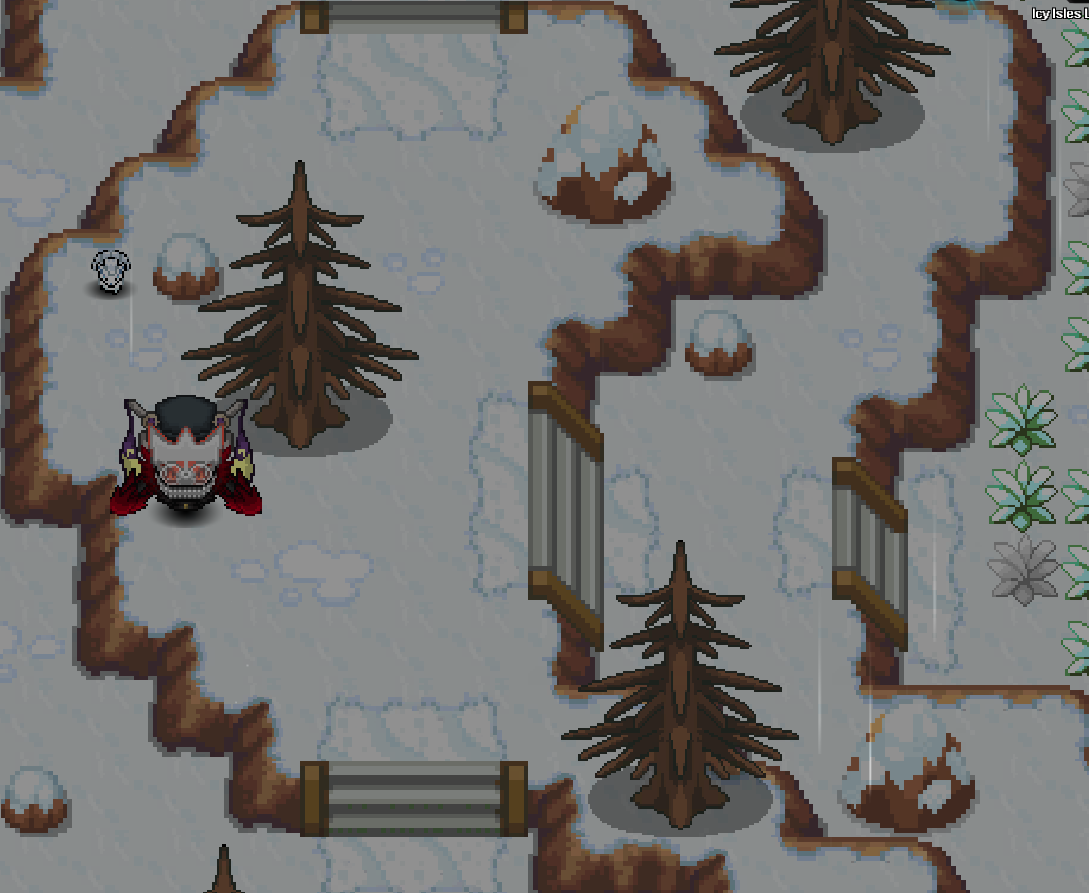
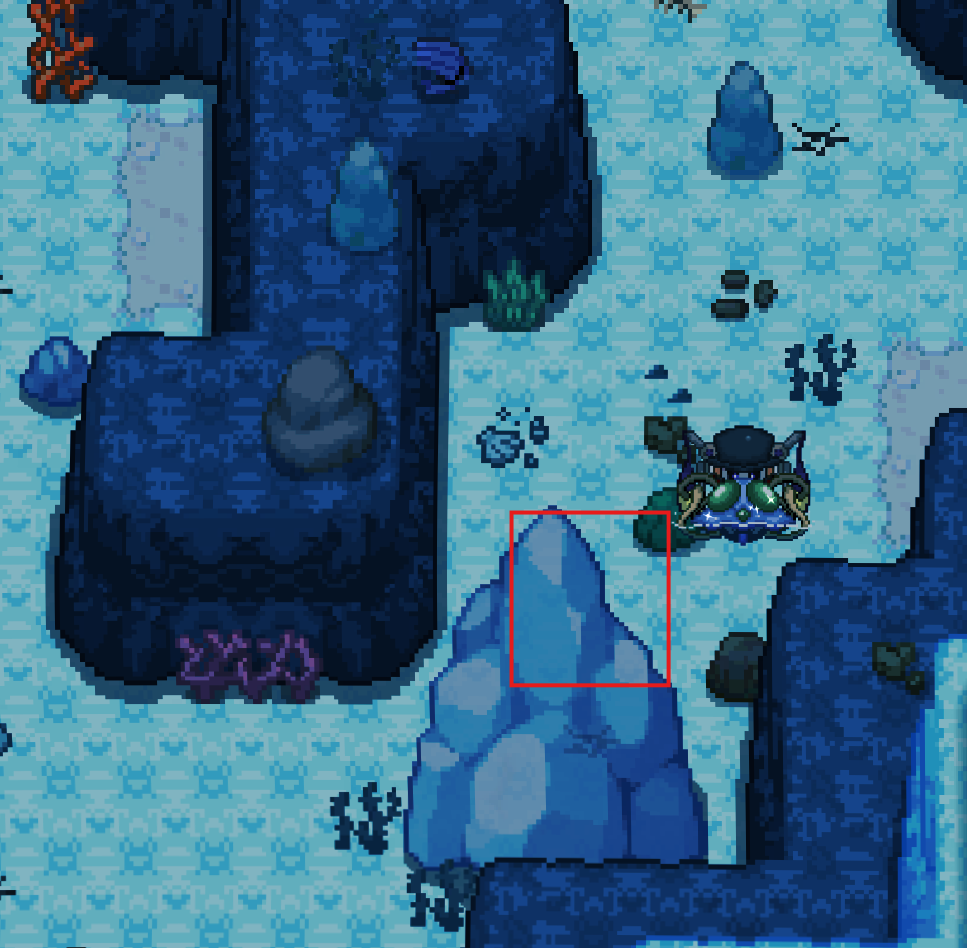
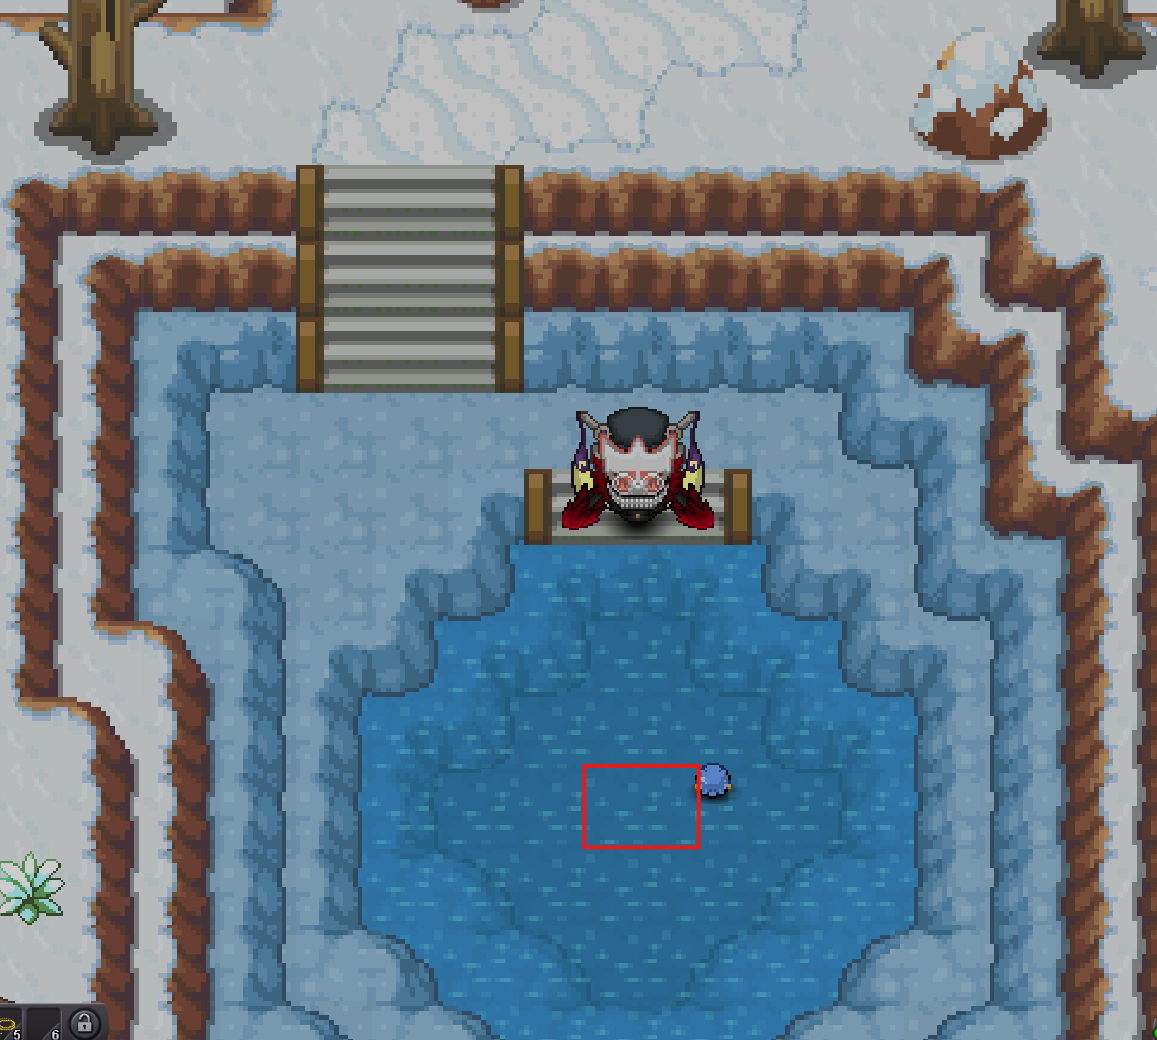
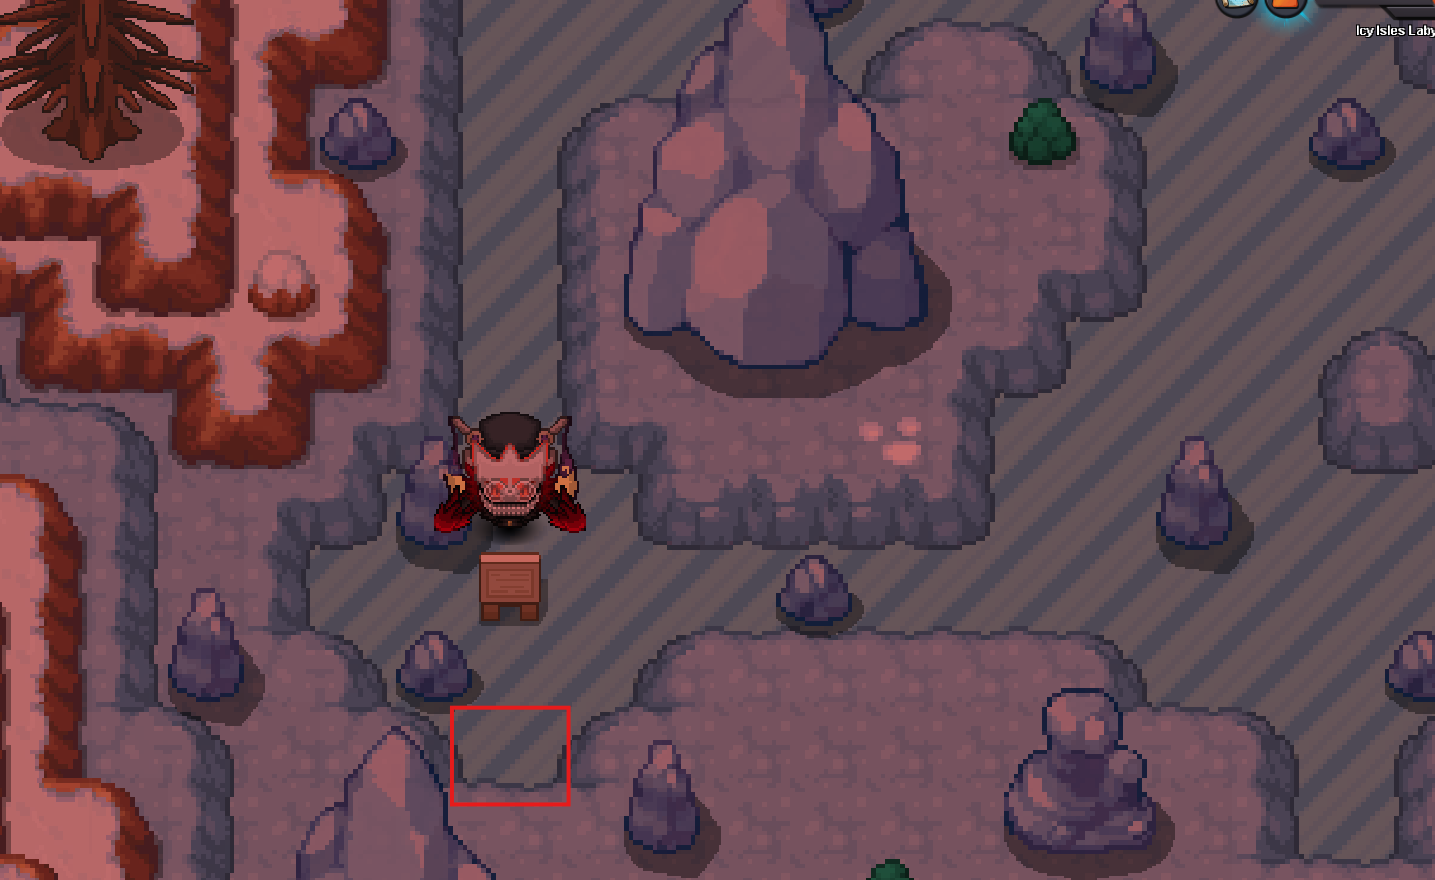
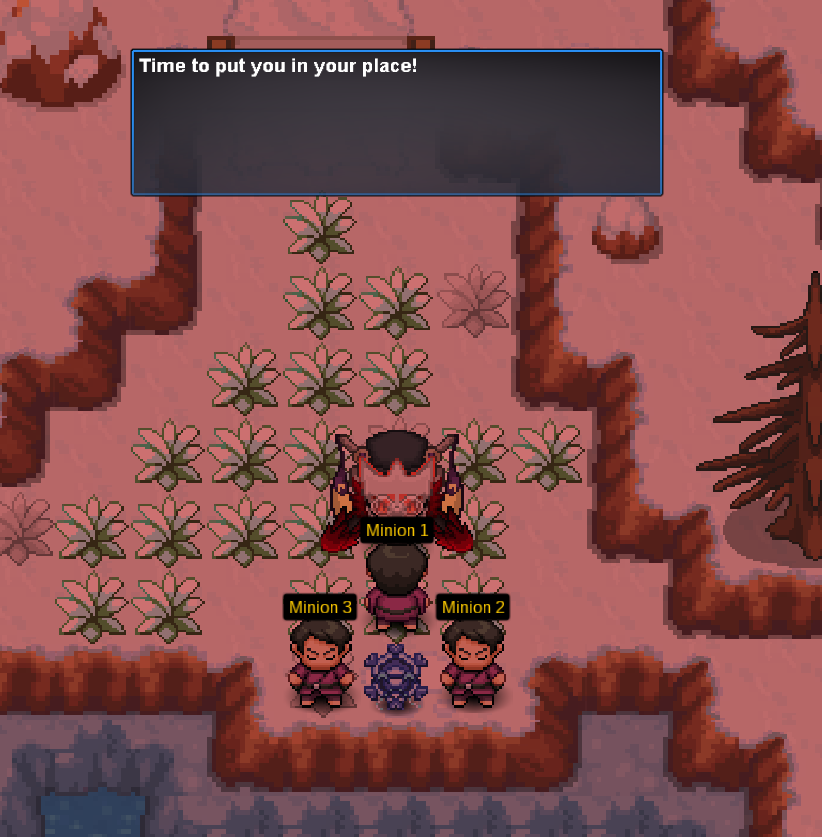
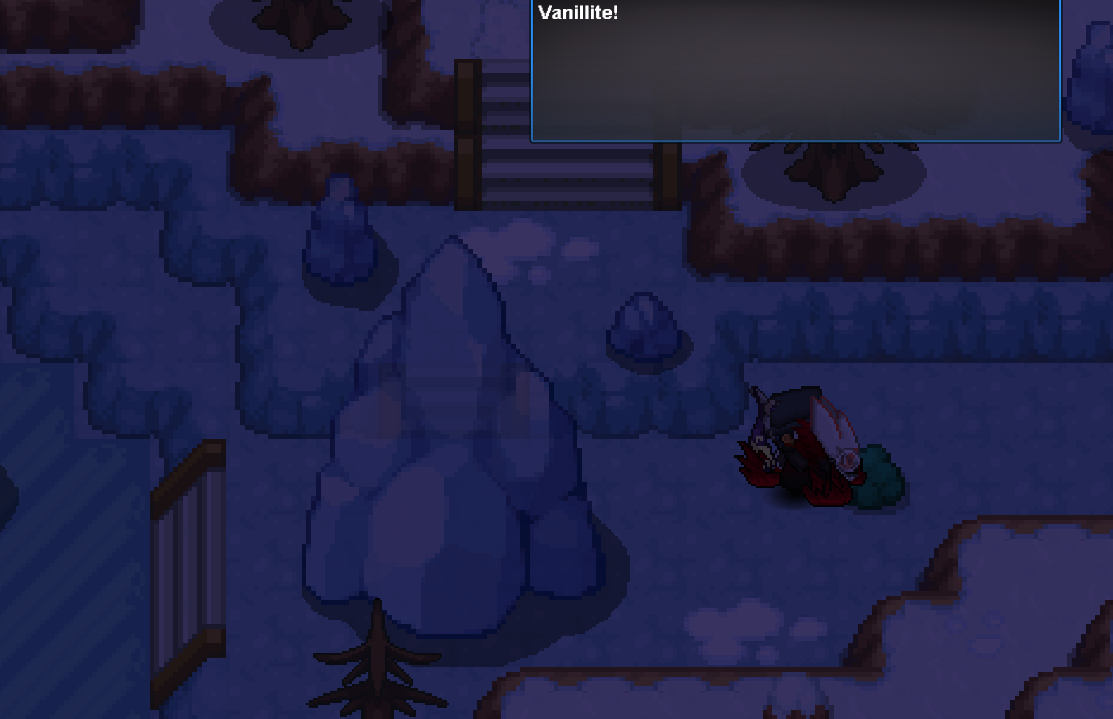
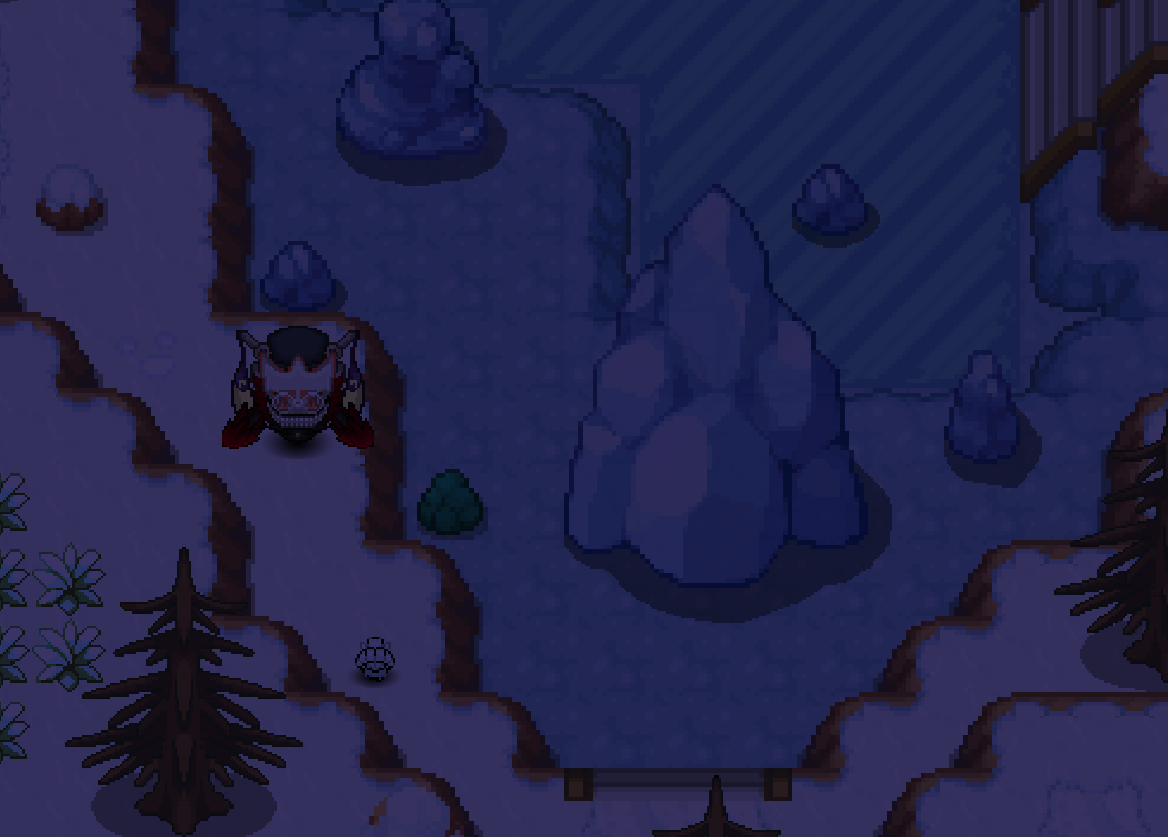
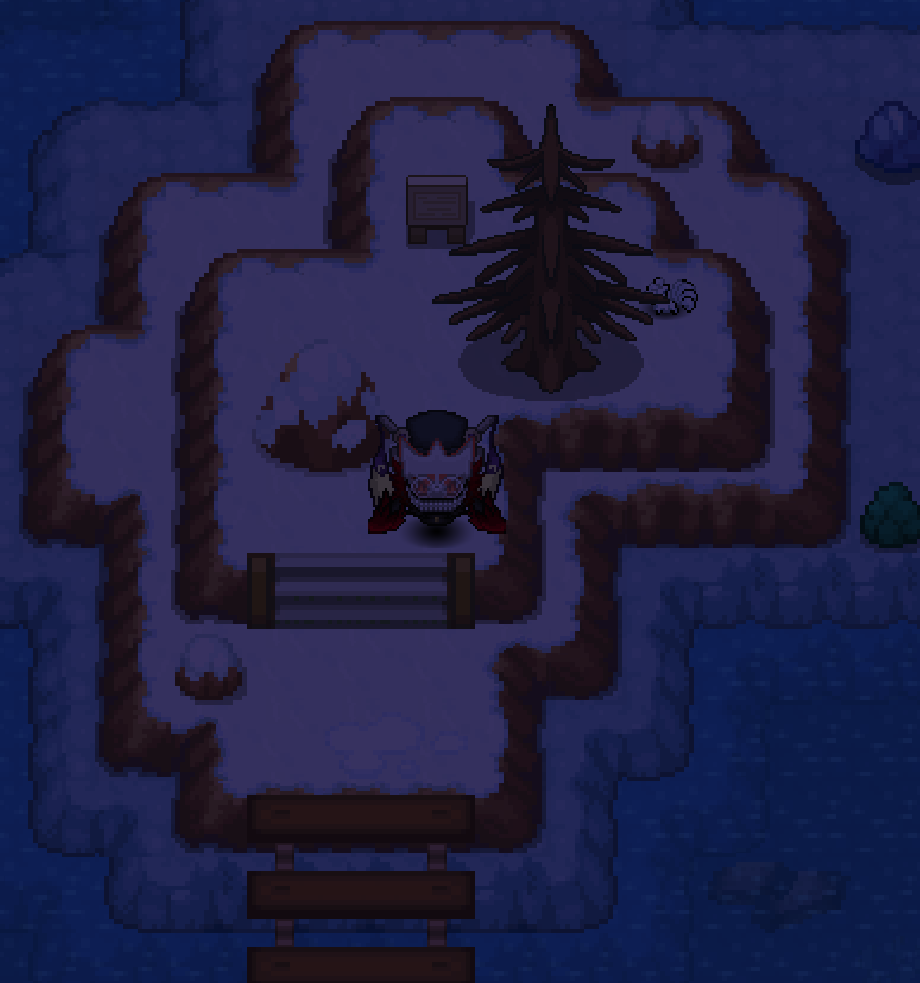
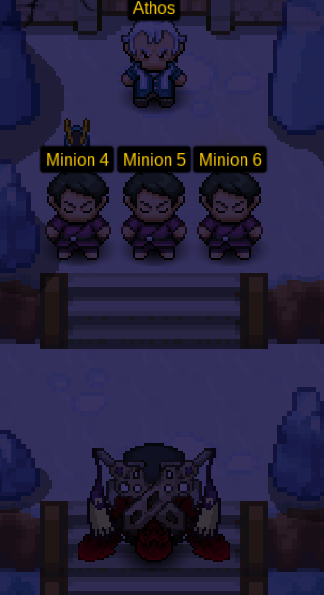
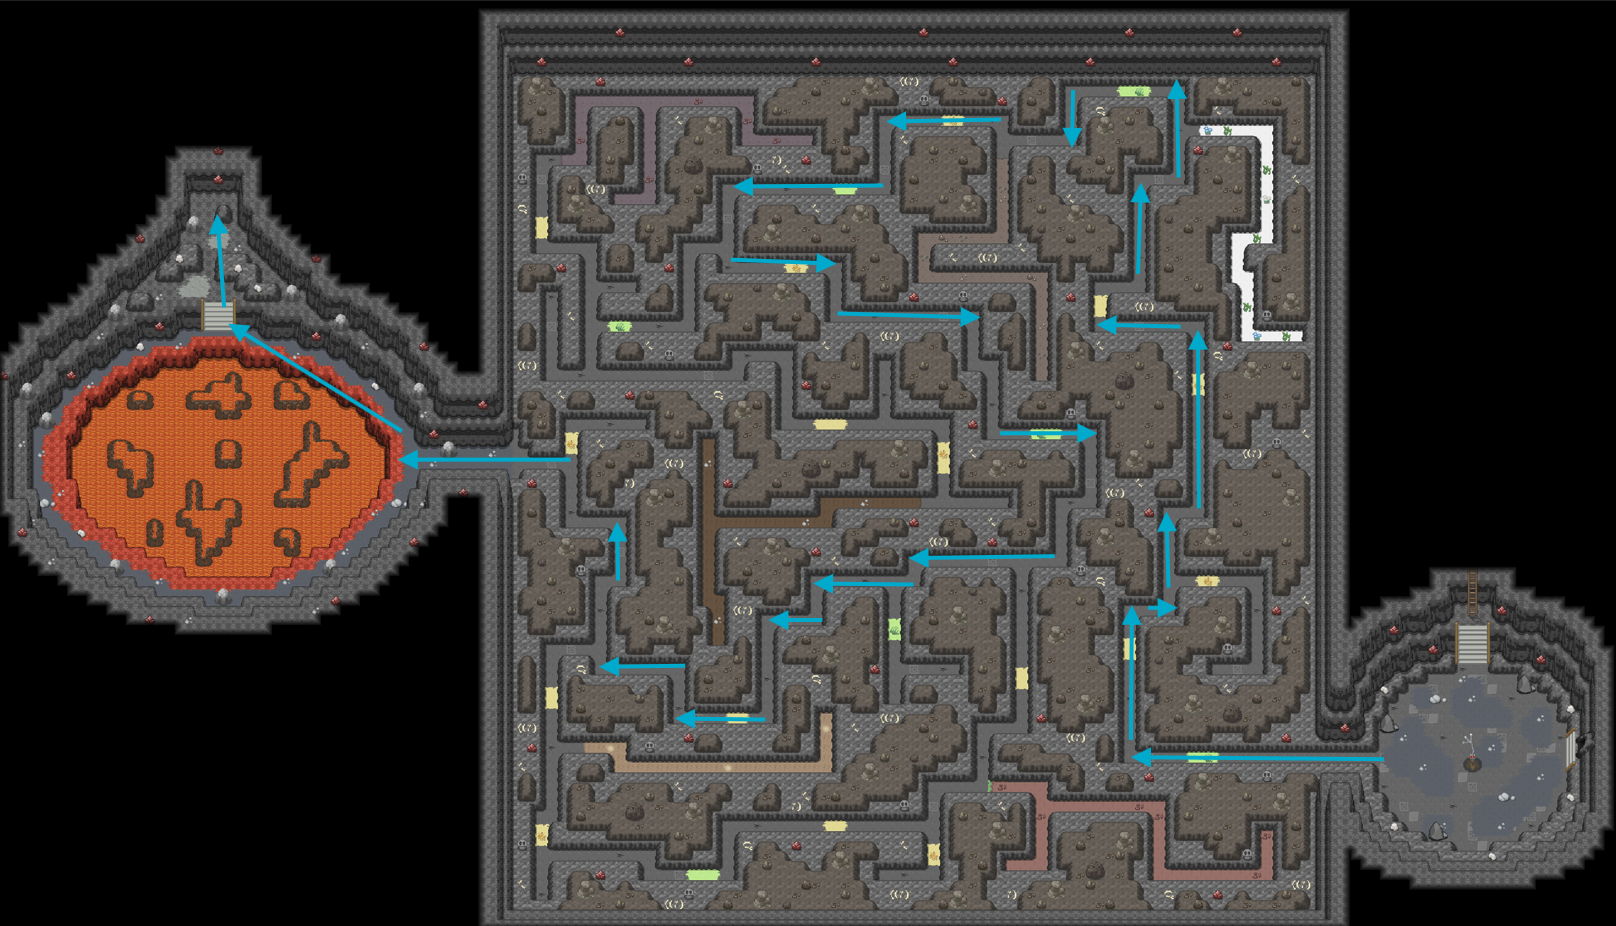
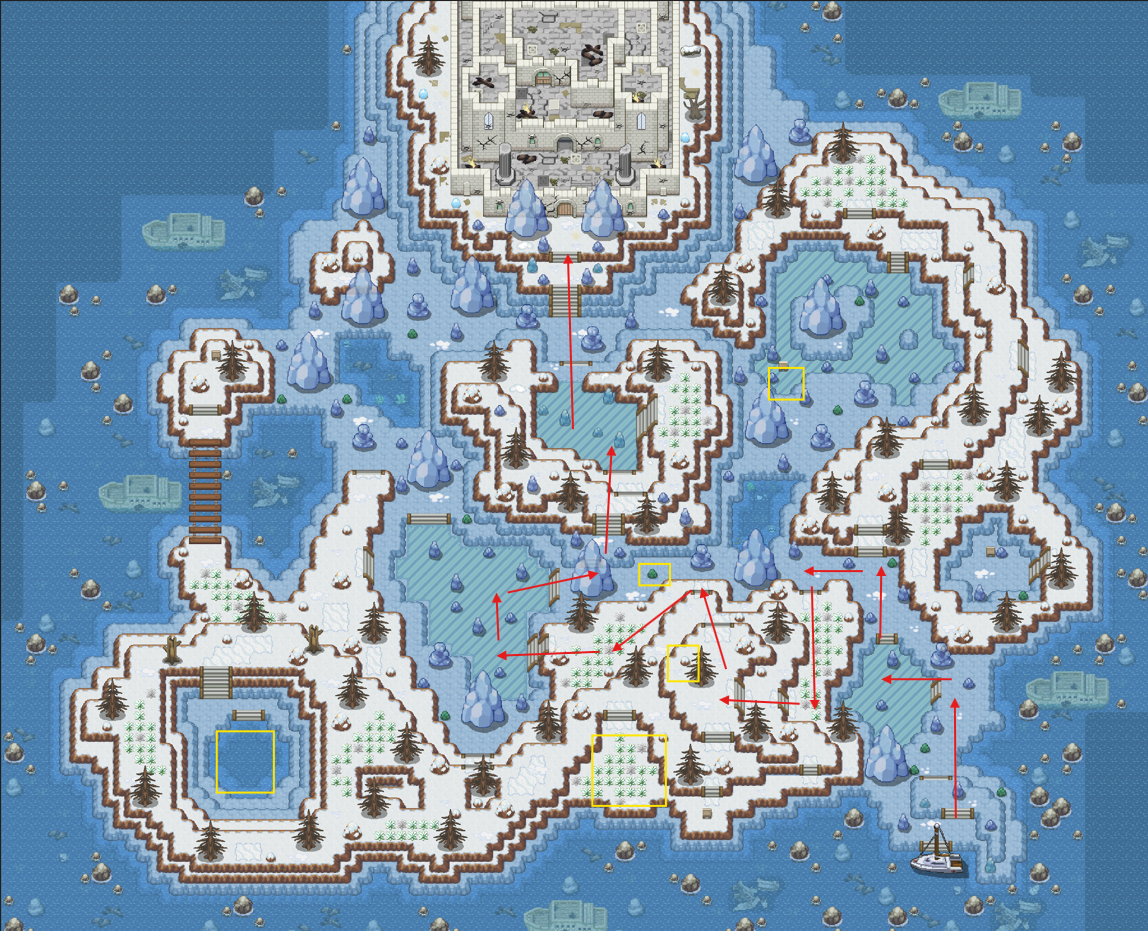
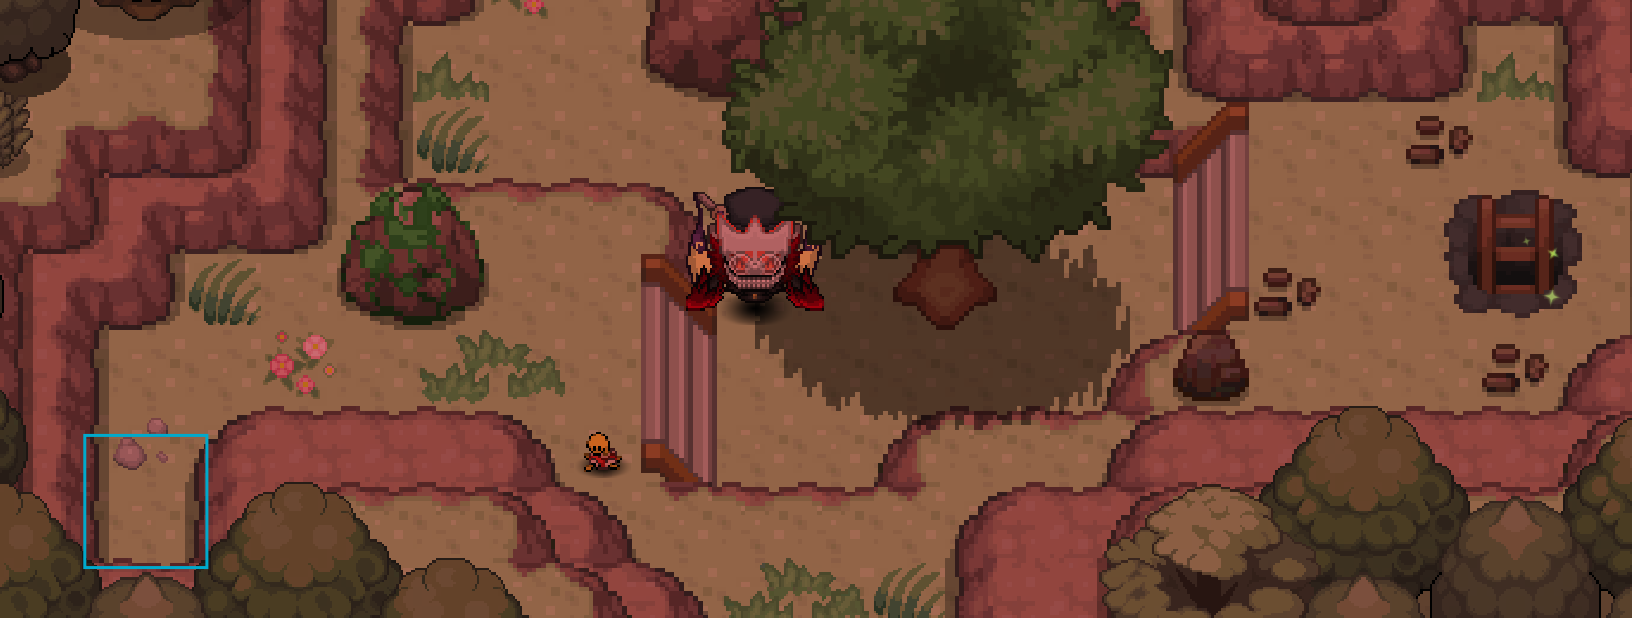
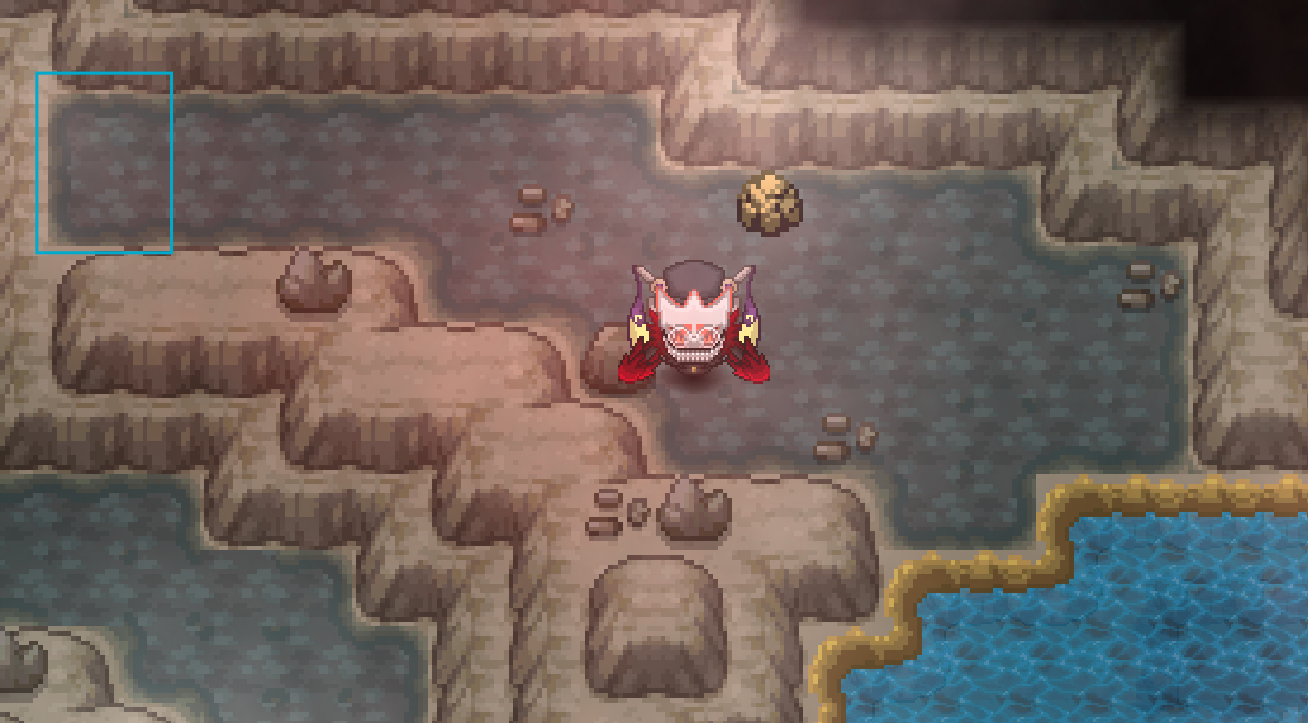
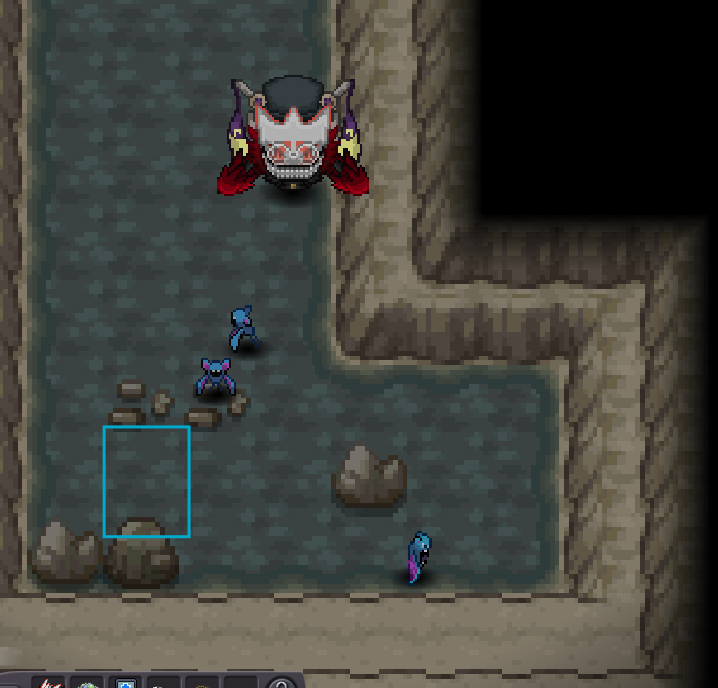
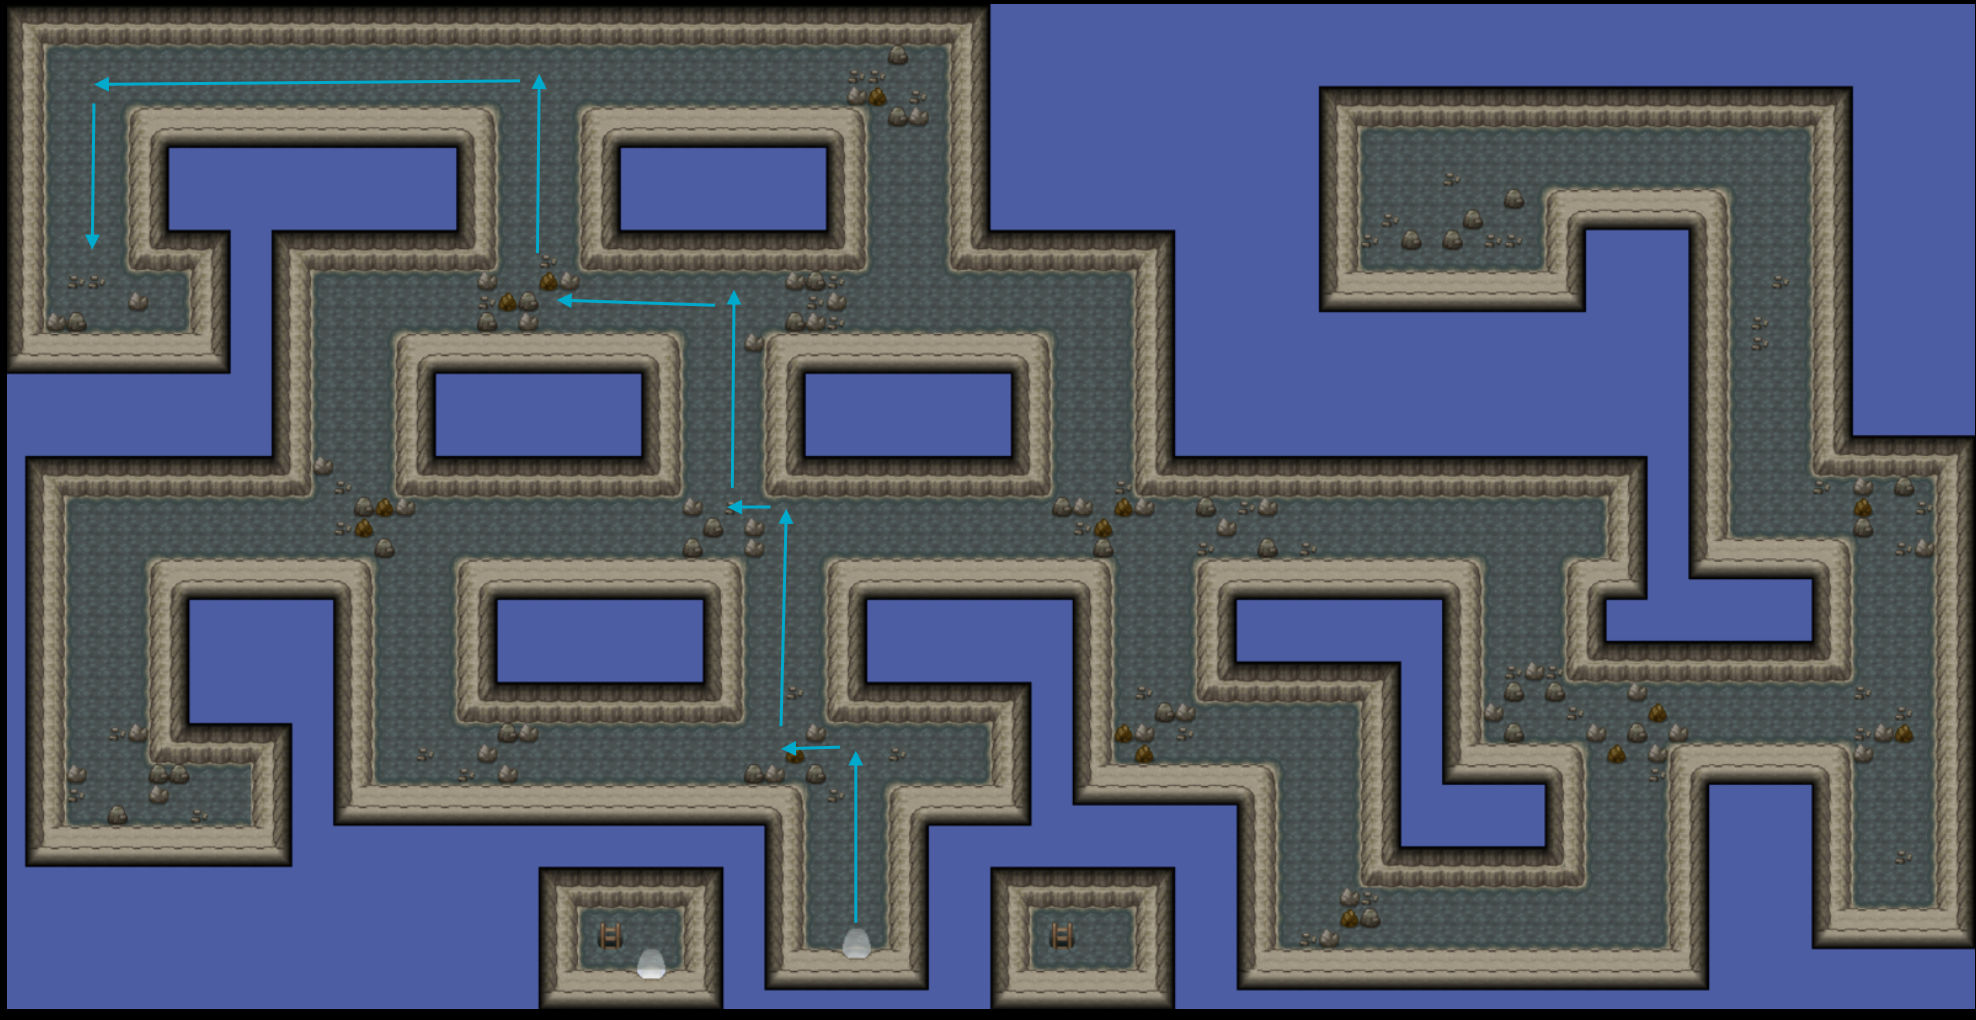
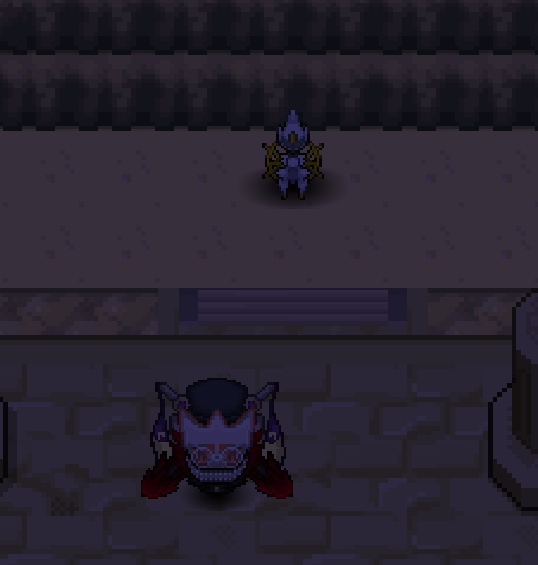
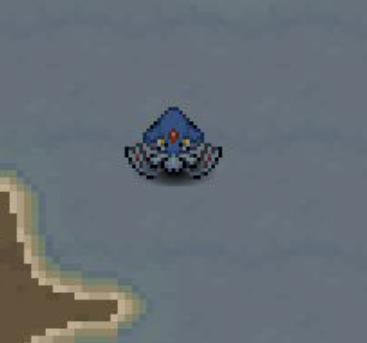
Pre-Requisites ★ Completion of the Keldeo Quest ★ A Pokémon with the move Cut (or the Tree Axe item) ★ A Pokémon with the move Flash (or the Flashlight item) Beginning the Quest The quest begins in Matsuki Village in the Sinnoh Region. To get to Matsuki Village, travel to the Resort Area (either by taking the Teleporter in a Pokemon Center or talking to the Sailor in Snowpoint City to go to Fight Area and then traveling east through Route 230 and 229) and then take the Aero Airlines (located east of the Pokémon Center). When you arrive in Matsuki Village, you will need to proceed to Matsuki Castle and speak with Nikola (beware of the Guard NPCs in the castle as they are quite strong). Nikola can be found in the far north of the castle. Darunia's Son The next step is to speak to Darunia's son (a Graveler) who can be found in the Wastelands. The Wastelands are southeast of Matsuki Village. Speak with him to learn that the Swords of Justice have been attacked and you need to help them. The Swords of Justice can be found in three different areas. - Virizion: Forest Maze - Terrakion: Mountain Area Maze - Cobalion: Icy Isles Labyrinth Virizion and the Forest Maze Continue west from where you spoke with Darunia's son, following the path into the Wastelands. When you come to a fork in the road, keep north and go under the bridge (do not take the path into the snow). Continue on following the path on land until you arrive in the Forest Dungeon Entrance. Speak with Old Sarah who tells you that some monks have captured Virizion and that you need to save it. Continue north into the Forest Maze. Take the path that leads directly north. When you arrive at the ladder, go behind it and cut down the cuttable tree to continue north to battle the first Monk. Once you defeat the Monk, interact with one of the plants above and it will require a specific berry, give the plant the berry it requires. Once you give the berry to the plant, it will be come a cuttable tree and you can continue north. Continue north, crossing the bridges, until you come across another set of strange plants to the south. Give the plant the berry it desires, cut it and continue to battle the next monk. Once you defeat the second Monk, continue following the path and then Surf across the water to fight the third Monk. After defeating this Monk, interact with the strange plant and give it the berry it desires. Cut down what remains and continue through the path. Finally, approach Aramis to trigger dialogue. Aramis will use Virizion and it will be Level 100. Once you defeat him Virizion will flee. Terrakion and the Mountain Area Maze Head back to that fork in the path in the Wastelands with the option to go into the snow area and Surf south west until you come across a path with the stairs. Continue down the first set of stairs then go east. Continue down this path and eventually go over the bridge leading to the Mountain Area. Speak with Darunia's son who will inform you that Terrakion is being held by a powerful trainer from Kalos and they will assist in defeating him. Continue east into the Mountain Area Dungeon and take the north path at the fork. Follow this path until you come across stairs with a bandit at the top. Battle the bandit. After defeating this bandit, continue down the north path. You will come across the second bandit. After defeating the second bandit, continue south across the bridge. Stay following the path until you reach the third bandit. Once you arrive at third bandit, battle him. After defeating the third bandit, continue west on the path to battle the fourth bandit. Continue north and then take the path to the east until you come across the fifth bandit. Continue east then south towards the sixth bandit. After defeating the sixth bandit, continue west around the path, up the stairs and down the ladder. Once down the ladder, activate Flash and move south then west to speak to Darunia's son. Darunia's son will take your Pokémon (temporarily) and accompany you instead. Now you will need to build out a team of Graveler to defeat Terrakion. These Graveler can be found throughout the maze. Those that are seen on the map are Darunia's son's family and will join your party after speaking with them. Wild Graveler can also be caught. Once you make your way through the maze, you will come across Porthos. You will have to battle him and he will use Terrakion who will be Level 90. Before you battle, be sure that your Graveler are at full health. Once you are ready, begin the battle. After defeating Porthos, Terrakion will leave and Darunia's son will approach you to trigger dialogue. Cobalion and the Icy Isle Labyrinth Head back to the Wastelands snowy area (south at the fork) then go down both sets of stairs and speak with with the Pirate. He will inform you that Cobalion has been taken by a trainer from Kalos. The pirate will lend you his Oshawott and informs you that you will need to recruit other Pokémon from the Icy Isles to assist you. If you are ready then select "Let's Sail!" and head to the Icy Isles Labyrinth. Note: the pirate will also hold on to your healing and most of your battle items. Once you arrive at Icy Isles Labyrinth you will need to grind out some levels on the Oshawott. Some Pokémon will require you to battle them (e.g., the roaming Swinub). You can heal via the Pirate whenever you need. The only Pokémon that you can fight are the roaming Pokémon . When you defeat them you will gain not only experience and EVs but items as well. An overall map can be seen in the screenshot below. The red arrows indicates the path from the Pirate to Athos. The yellow boxes indicate the locations of a Pokémon for your party (or the starting location of a Pokémon). NOTE: If you lose a fight you will lose money. So don't be shy about healing with the Pirate. Adding Pokémon to your Team - Alolan Vulpix First, there is an Alolan Vulpix. It can be found on the west side of the map and will run away from you twice. The first time you speak to it you will need to give it a Pecha Berry (acquired as a drop from roaming Pokémon). After fleeing, Vulpix can be found on the outside of the west side of the ice puzzle. This time, Vulpix will require a Chesto Berry. It will then flee again. Finally, the second location, head west and the north (crossing a bridge). Vulpix will be hiding behind the tree next to the sign. Interact with it and it will join your team Adding Pokémon to your Team - Vanillite To the right of the large (main) ice puzzle, there is a small green rock that you can interact with to add a Vanillite to your party. Adding Pokémon to your Team - Cryogonal Another Pokémon that you can add to your party is Cryogonal. You will need to go south of the Alolan Vulpix and defeat three Minions. You must beat all 3 Minions back to back with no healing in between. Once you defeat the Minions, you can interact with the Cryogonal to add it to your party. Adding Pokémon to your Team - Lapras Take the west path from the large icy puzzle and then make your way south and around, you will find a roaming Spheal in a small body of water. If you Surf to the center of the body of water, you will stumble upon a hidden entrance to Icy Isles Underwater South. From there you can go to the far eastern side of this underwater cave and you will find a Lapras behind a rock of ice. Interact with this Lapras and it will be added to your team. Adding Pokémon to your Team - Swinub Swinub is located in the Icy Isles Underwater North area which can be accessed via a hidden entrance under the ice in an ice puzzle. From the pirate go north and then east. You will come across a pair of roaming Swinub down some stairs (do not go down the stairs). Continue north following the path until you find two sets of stairs going south. Go down the two sets of stairs and into the ice puzzle. On the south west corner of the ice puzzle you will want to step on the tile of ice below the sign (specific tile provided via screenshot). Once you fall into the underwater cave, go to the north east corner and Swinub will be hiding behind an ice rock. Now that you have your party of Pokémon and have trained up your Oshawott (and evolved into Samurott), it is time to battle. Head towards the main, large ice puzzle and take the east stairs. Continue north along the path until you come across another ice puzzle. Keep north and you will encounter another set of minions that need to be defeated. After beating the minions, Athos will immediately battle you with a Level 50 Cobalion. Finishing the Quest Once you defeat Athos and Cobalion leaves, speak with the Pirate to leave Icy Isles Labyrinth and head back to Nikola in Matsuki Castle (once again, be careful of the guards). After talking to Nikola, he will tell you that he senses that one of the Swords of Justice wants to join you and you can go to the place where you previously battled it to catch it. Quest Complete!
-
Good day @Pikatranier786 I apologize for the issue you are experiencing and thank you for reporting. This is in fact a bug and it has been passed along to the appropriate party. While I do not have a permanent solution for you at this time, if you log out and log back in it should allow play to return to normal. Thank you again for reporting this issue. Regards, Bitterblade
-
Good day @Darknesskings I apologize for the issue you are experiencing and thank you for reporting. This is in fact a bug and it has been passed along to the appropriate party. While I do not have a permanent solution for you at this time, if you log out and log back in it should allow play to return to normal. Thank you again for reporting this issue. Regards, Bitterblade
-
Can't play after use Pokemon Storage
Bitterblade replied to Nephophile's topic in Resolved General Support
Good day @Nephophile I apologize for the issue you are experiencing and thank you for reporting. This is in fact a bug and it has been passed along to the appropriate party. While I do not have a permanent solution for you at this time, if you log out and log back in it should allow play to return to normal. Thank you again for reporting this issue. Regards, Bitterblade -
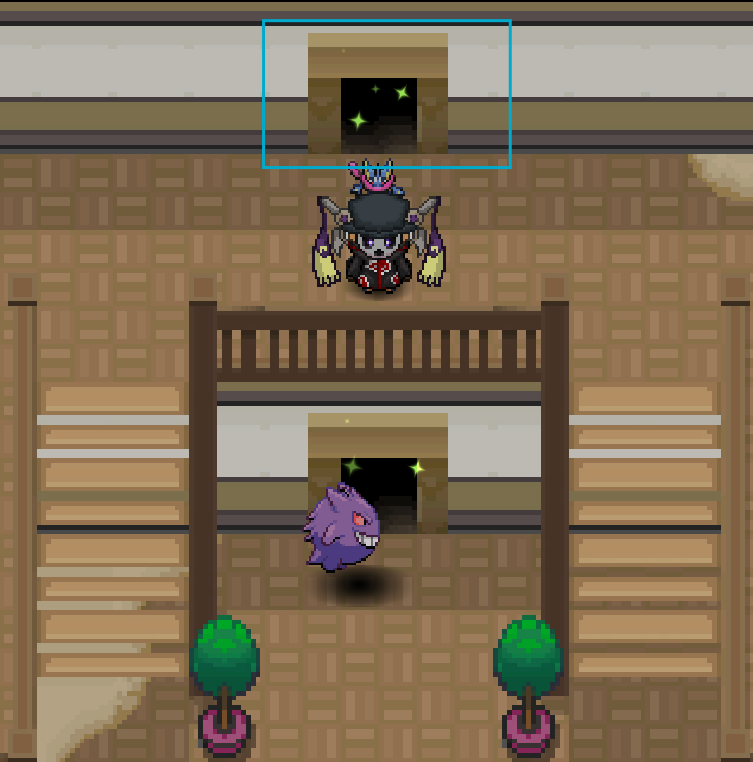
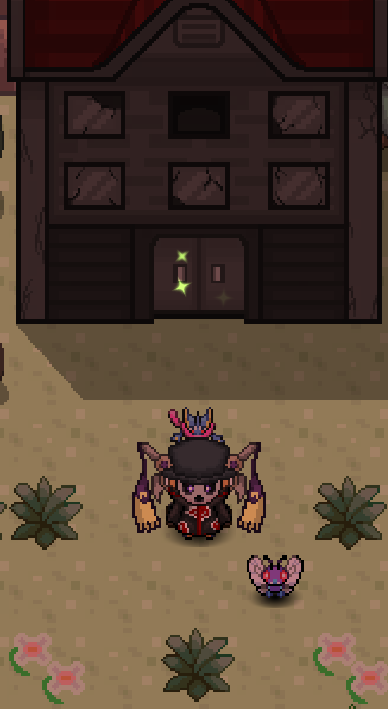
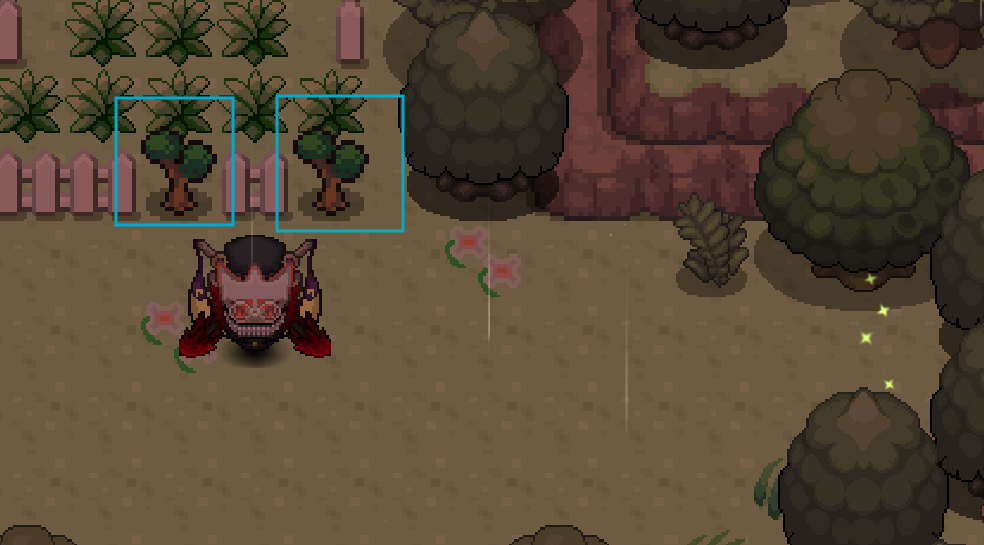
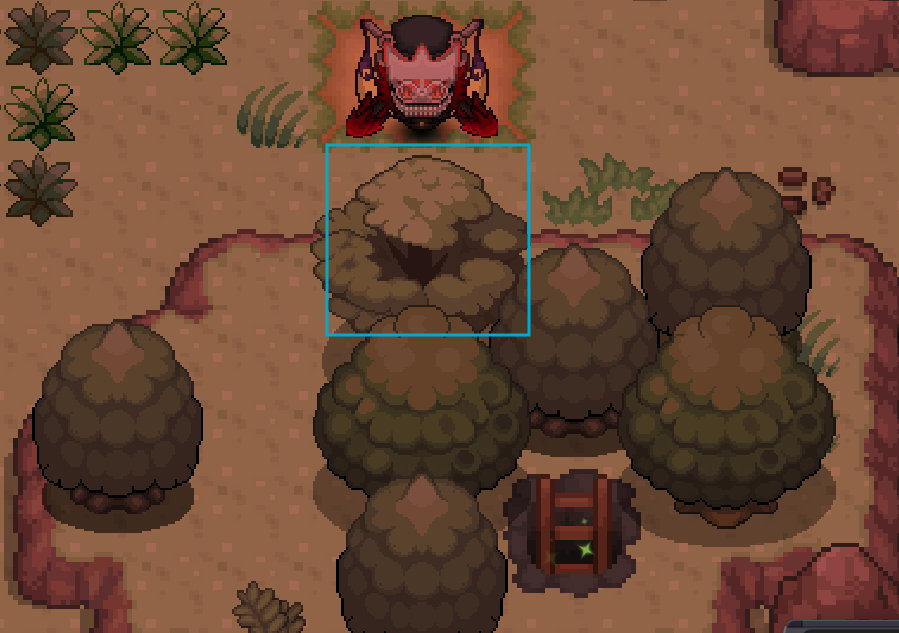
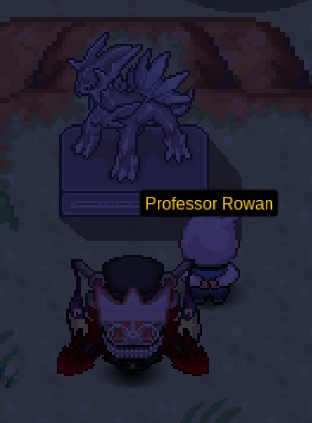
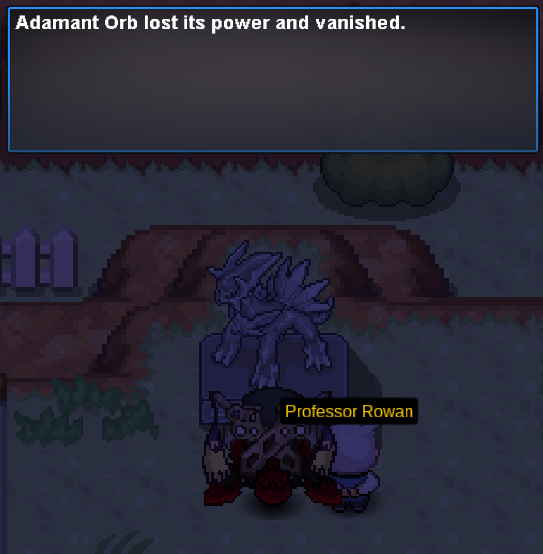
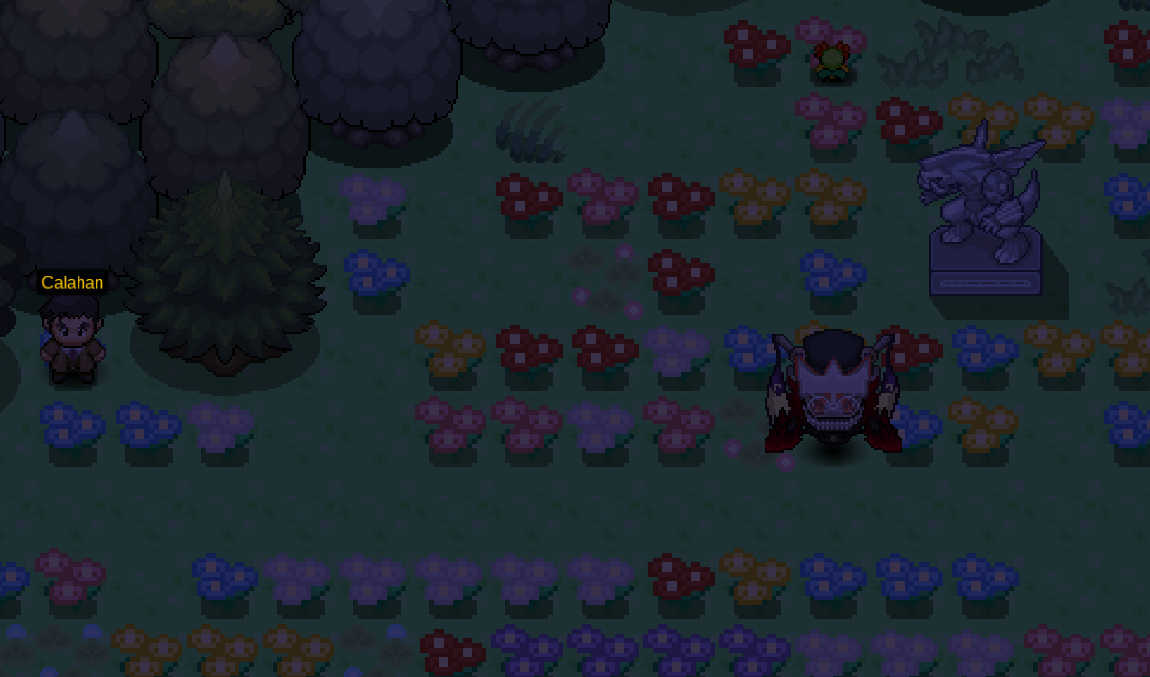
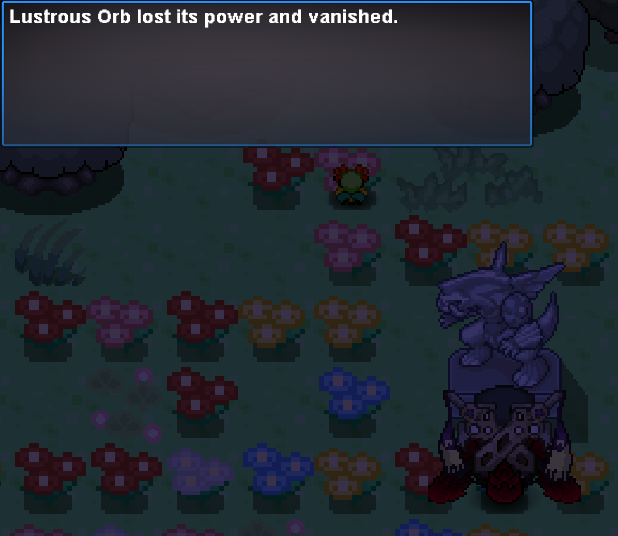
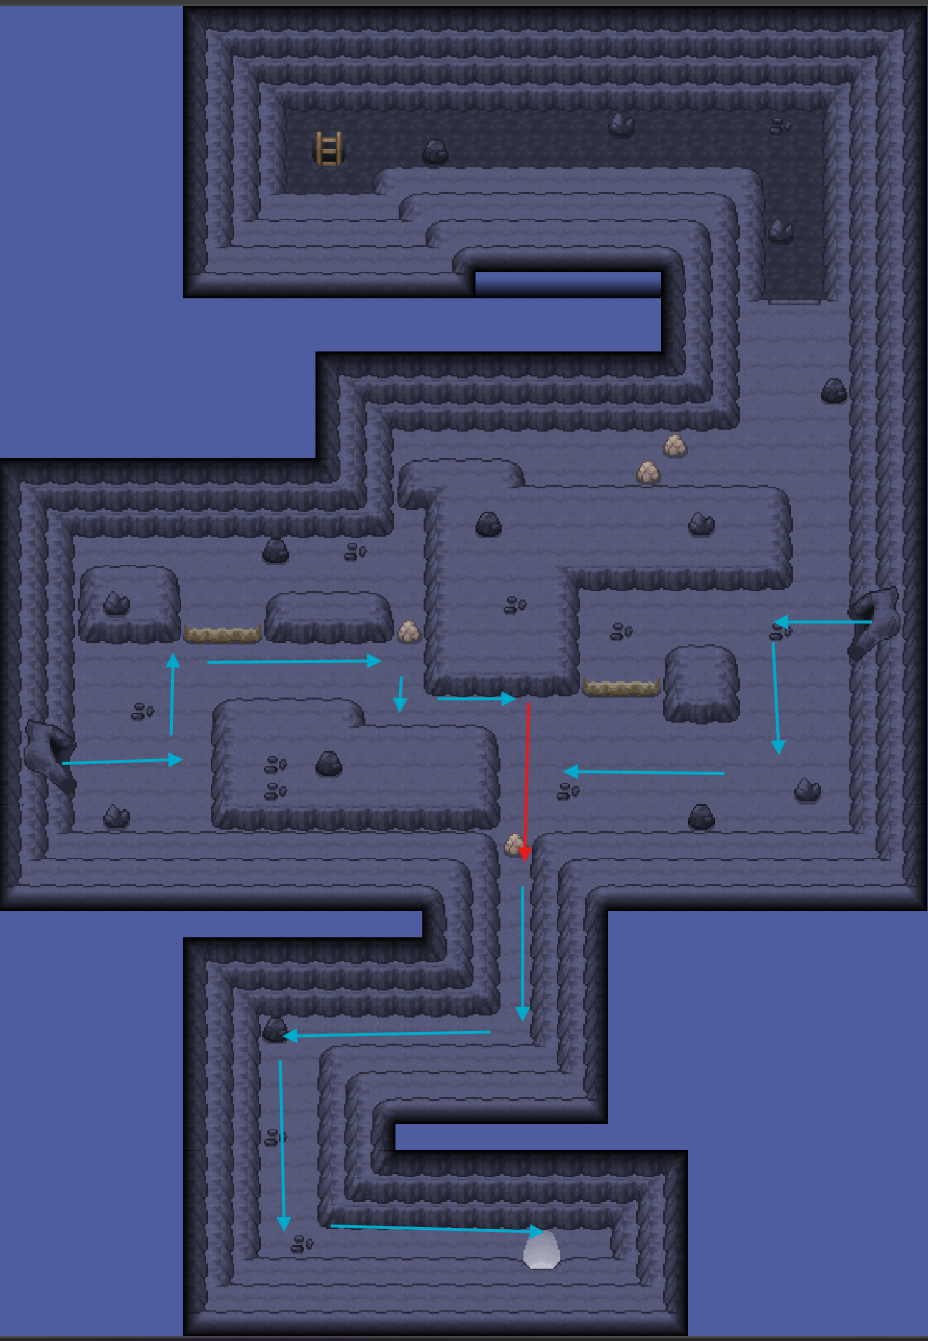
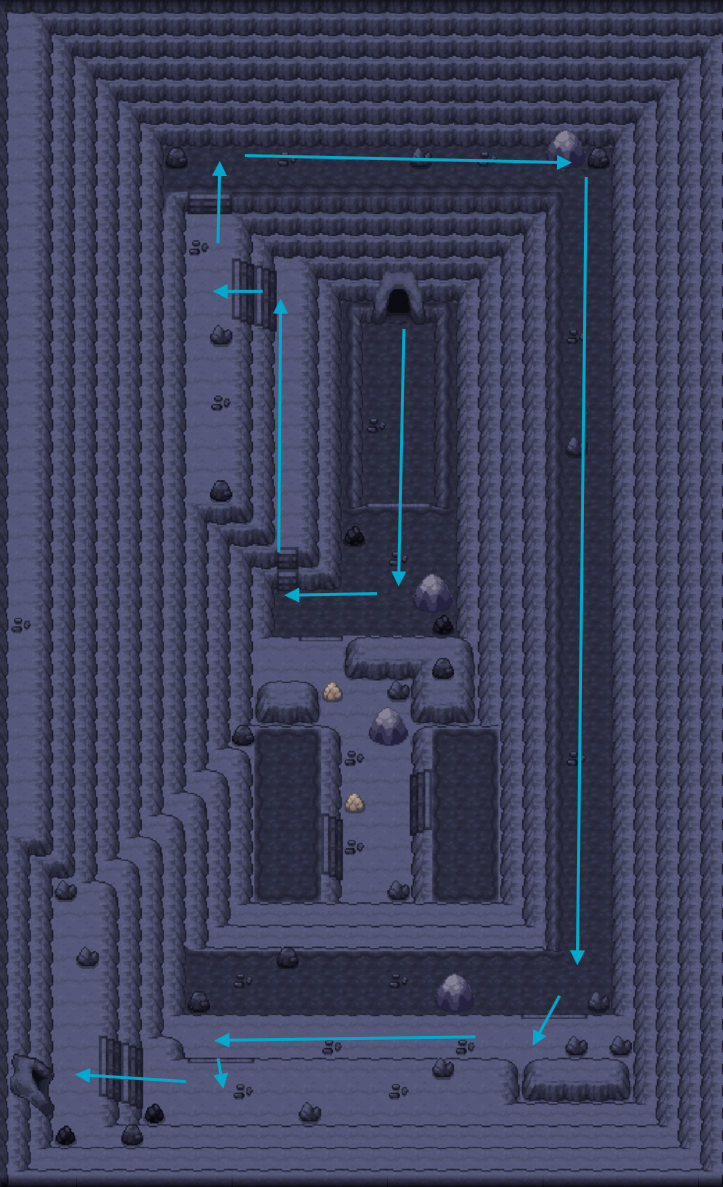
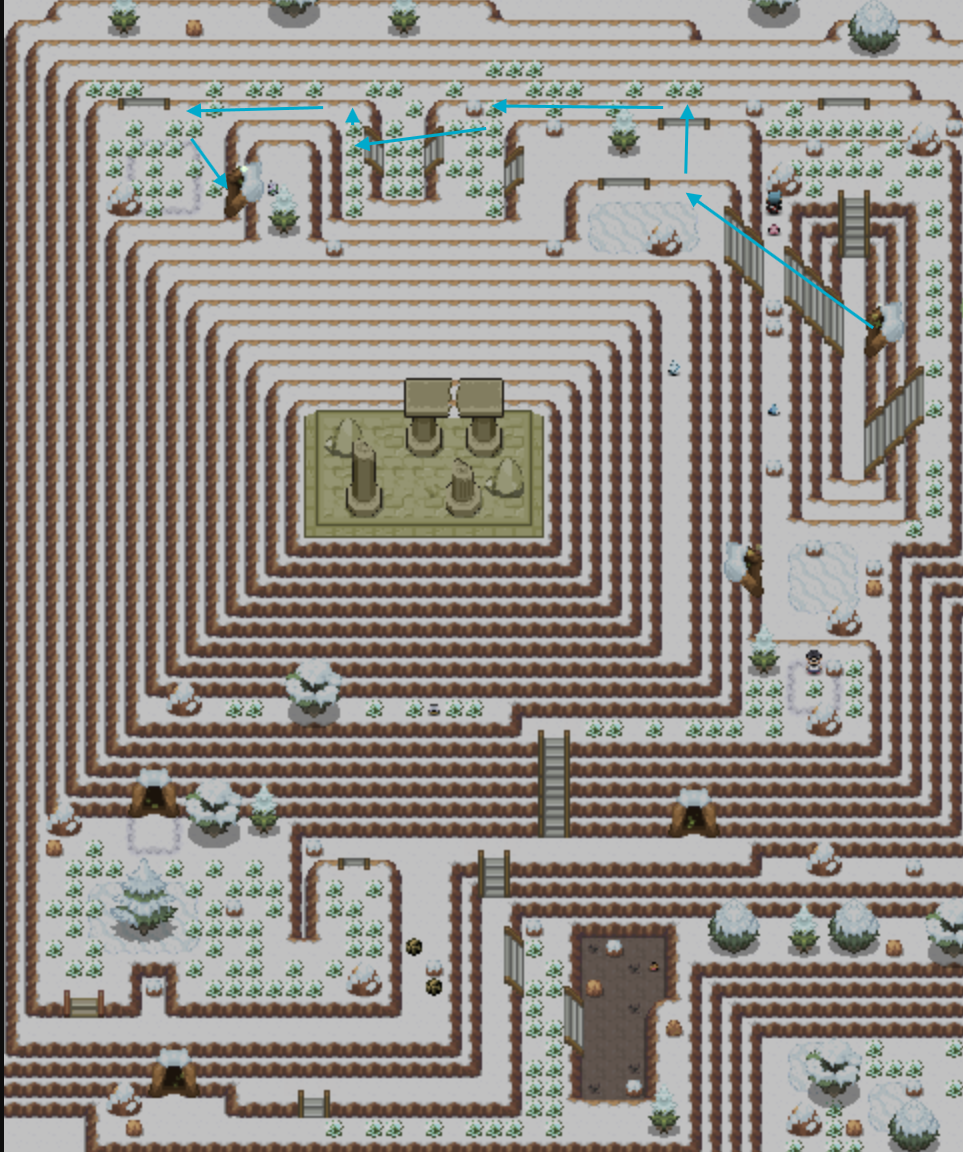
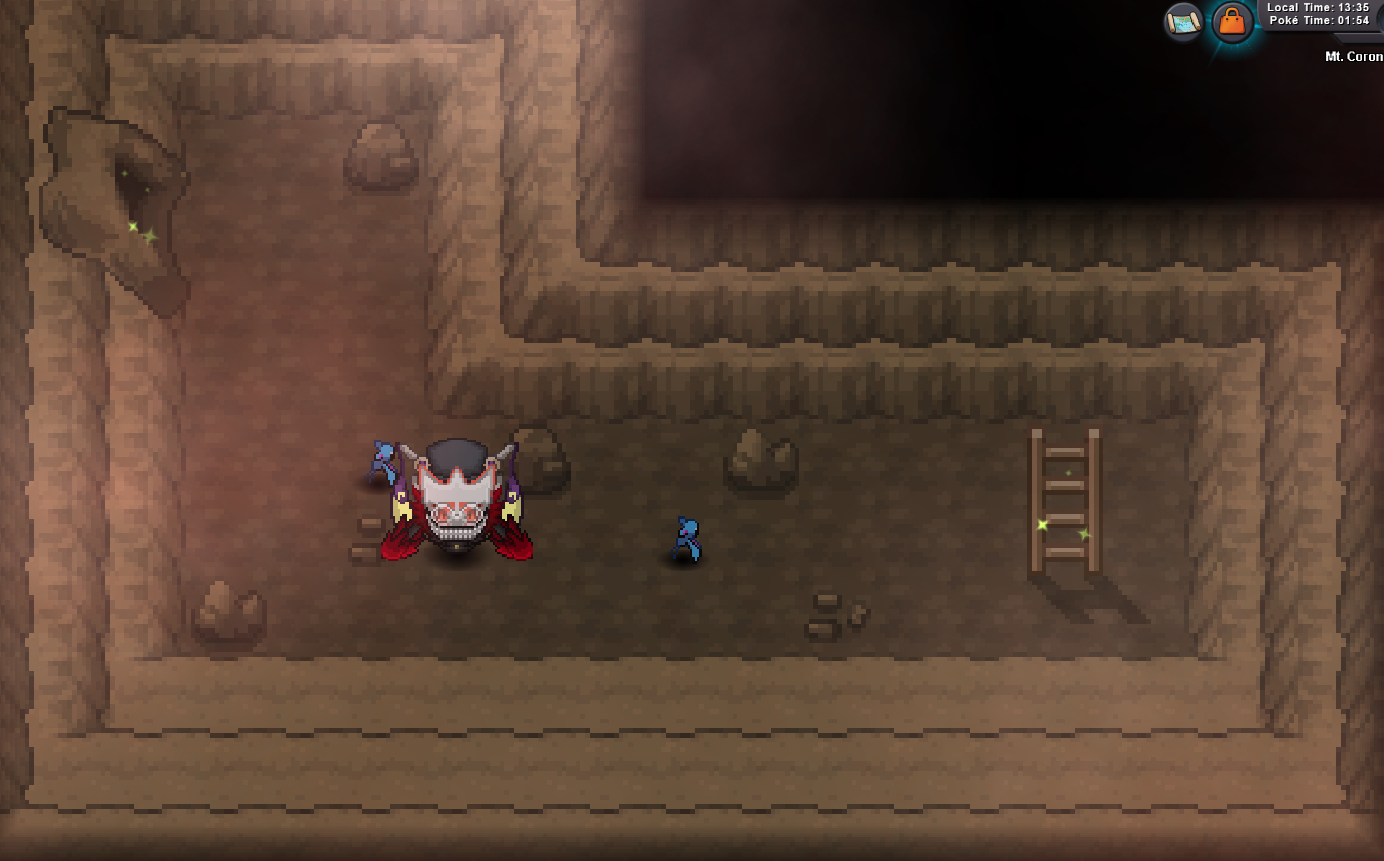
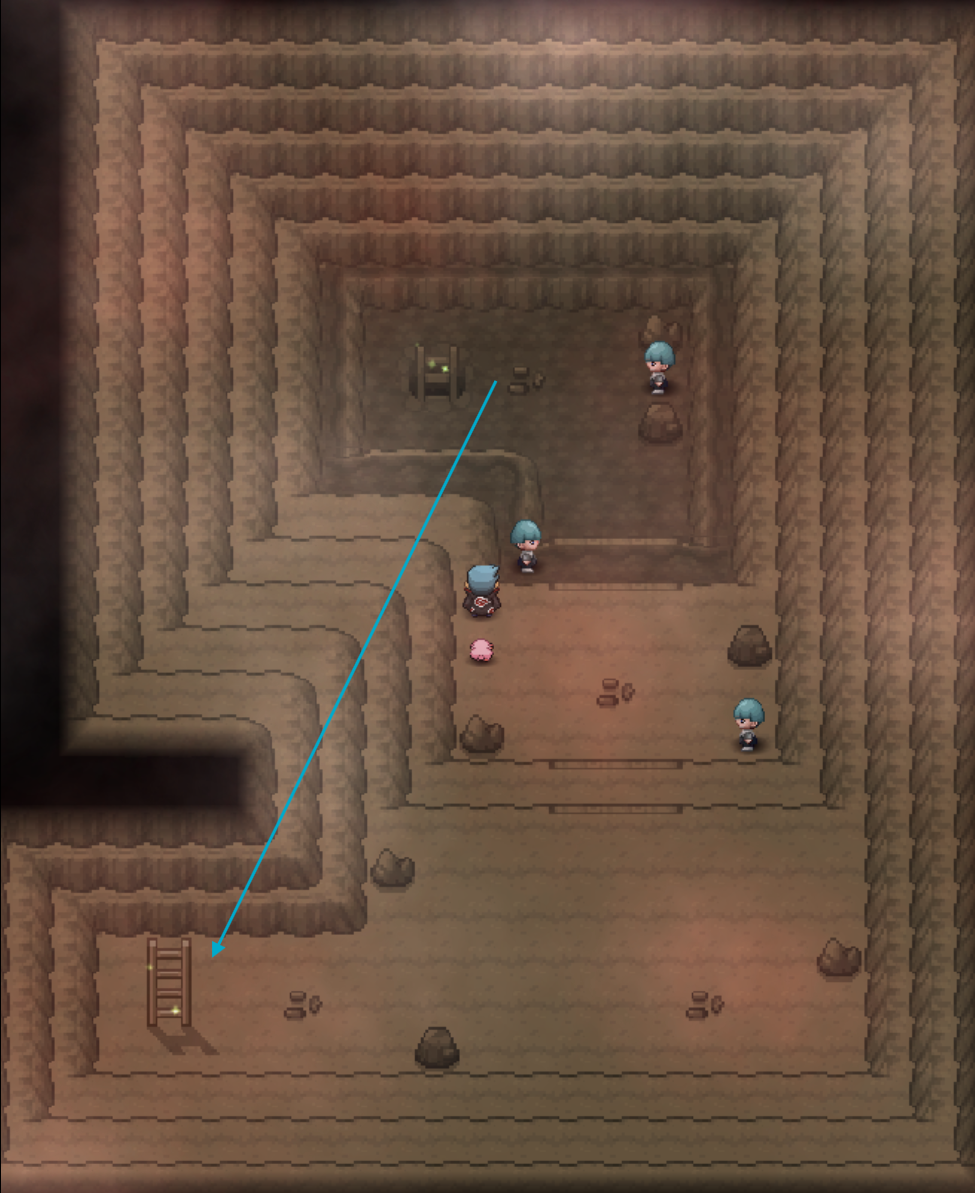
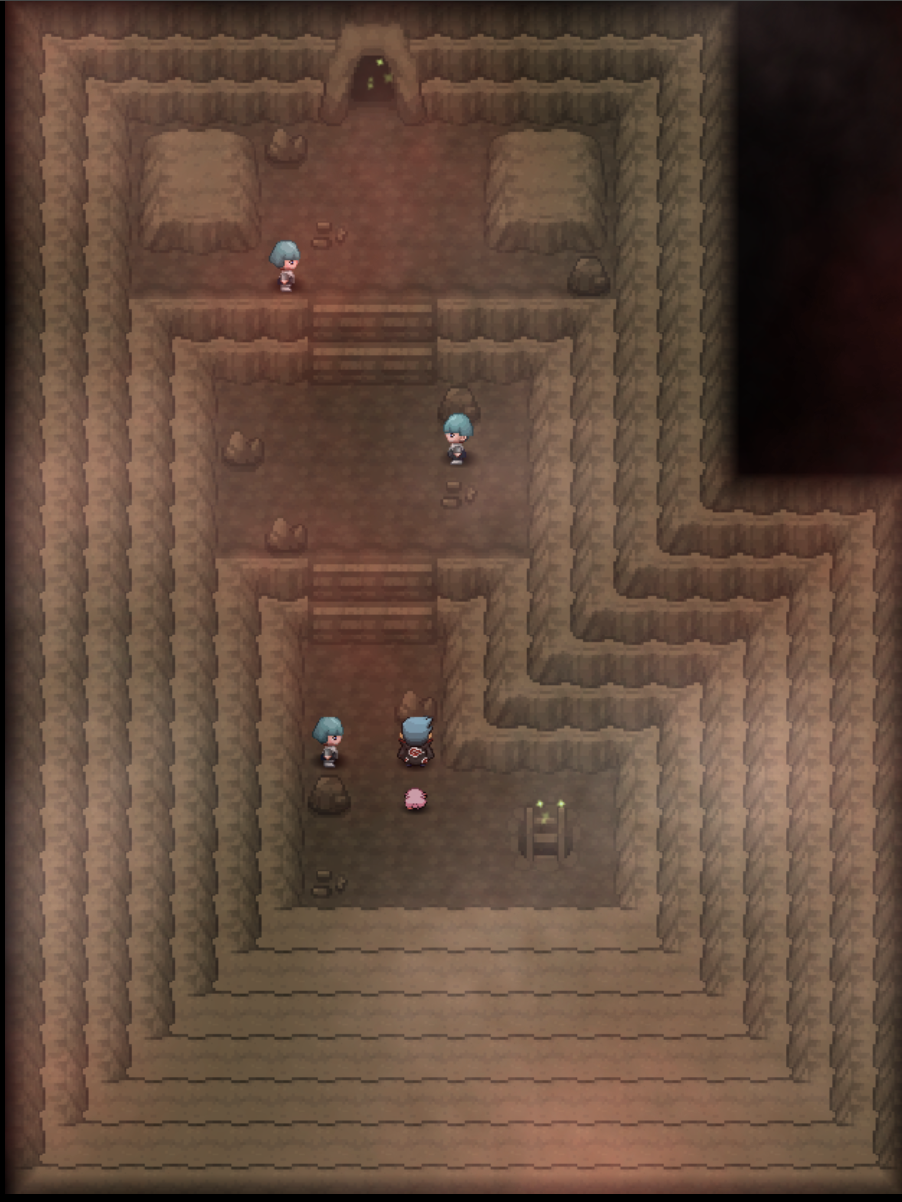
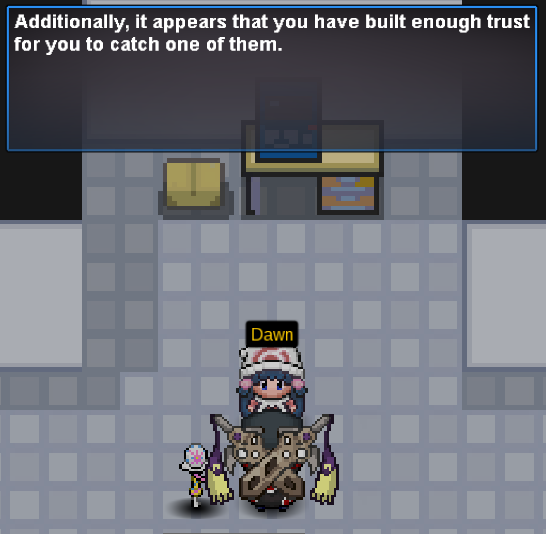
Pre-Requisites ★ Sinnoh Championship ★ All non-legendary Sinnoh caught data (Pokedex entry 387 - 479) ★ A Pokémon with Rock Climb (or the Abseil Rope item) ★ A Pokémon with Rock Smash (or the Pickaxe item) ★ A Pokémon with Flash (or the Flashlight item) ★ A Pokémon with Surf or a Surf mount Beginning the Quest To begin the quest, you need to speak with Professor Rowan in his lab in Sandgem Town. If you have the proper requirements completed, Professor Rowan will tell you to speak with Dawn in his lab. Head to Twinleaf Town and interact with the television in your home. You will be informed that no one has found the shiny spherical objects and that you should investigate Eterna Forest and Wayward Cave. Now you need to acquire the seen data for Palkia, Dialga, and Arceus. To get this seen data, you will need to acquire the Adamant Orb and Lustrous Orb. Adamant Orb The Adamant Orb can be found in one of three spots: two of the spots are in Eterna Forest Cave and the third spot is in Old Chateau 2F. Eterna Forest Cave Enter Eterna Forest and make your way towards the central area, where the ground is raised and you see a ladder entrance. From here you will go to the north side of this raised ground and interact with the wall behind the tree (tree provided in screenshots). This will require the use of Rock Climb. Once you interact with this part of the wall, you will climb up to the raised ground. Proceed around and behind the tree to down the stairs. Once in the cave, head north and then west through the rocks (requiring Rock Smash). Once you pass the Rock Smash locations, go up the ladder to the west. Go to the far west and, if present, the Adamant Orb will be there (refer to provided screenshots for exact location). Going back to the Rock Smash locations, you will want to go through the north pointing rock smash locations to proceed to the second spot in Eterna Cave. Once through, surf north to cross the water and, if present, the Adamant Orb will be at the end of the path (refer to screenshots for exact location). Old Chateau 2F Leave Eterna City to the west and enter Eterna Forest. From there you will immediately see two cuttable trees. This is the access point for Old Chateau. Cut down the tree and proceed north. Once upon the building, go through the door. After entering the Old Chateau, go up the stairs and through the door to access Old Chateau 2F. Then go into the door on the far right. If the orb is here then it will be in this room. Lustrous Orb After acquiring the Adamant Orb, you will head to Wayward Cave (On Route 206) in search of the Lustrous Orb. Wayward Cave's entrance is located underneath the Cycling Bridge. To access this area, you will need to make your way to the southern entrance of the Cycling Bridge and cut the trees then proceed north. Once you reach the water's edge, surf across and continue moving north. You will come across the entrance to Wayward Cave on the far north side of this path. Enter the cave. This cave is very dark and Flash is highly recommended. There are two different spots that the Lustrous Orb can be in Wayward Cave. One of the spots is in the main cave near a group of Golbat. Screenshot with directions is provided below. Note, you will need Rock Smash to proceed. The second possible location requires you to go through the Wayward Cave Secret Entrance (hidden directly under the Cycling Bridge). Once you enter, activate Flash and continue down the ladder and through the cave. Cross the bridge and go up the ladder. If the orb is here, then it will be in this small area. Getting Dialga, Palkia, and Arceus Seen Data Dialga and Palkia After you have both the Adamant Orb and the Lustrous Orb, you need to battle Dialga and Palkia. This can be done by interacting with each Pokémon's statue. Dialga's statue is located in Eterna City (north-east of the Pokémon Center next to Professor Rowan). Palkia's statue is located in Floaroma Town (on the north-east side of town). As you defeat Dialga and Palkia, their respective item will be consumed and disappear. You will also acquire their seen data. Arceus After beating these battles, Palkia's statue will say "SPEAR PILLAR". This indicates that you need to head to Spear Pillar to face Arceus. NOTE: It only says it initially and does not repeat it. Head to Mt. Coronet (either from Eterna City or Celestic Town). If you have access to Mt. Coronet Summit dig path, take that. Otherwise, enter Mt. Coronet Center and follow the path marked in the supplied screenshots. Once you reach Spear Pillar you will proceed north until you see Arceus. Interact with Arceus to begin the battle. After you defeat Arceus, head back to Dawn in Sandgem Town. Getting Seen Data for Uxie, Mesprit, and Azelf After speaking with Dawn in Professor Rowan's Lab, you will need to get the seen data of the Lake Trio by visit their respective lake. Uxie Uxie is located in the cave in Lake Acuity which is west of Snowpoint City. When you arrive, interact with the ghost NPC and he will ask you a question. The answer to this question is Bidoof. You will then need to show him a Bidoof native to Sinnoh (this Pokémon must be your OT). Once you do, he will grant access to the cave. Proceed into the cave and battle Uxie. Mesprit Mesprit is located in the cave at the center of Lake Verity which is west of Sandgem Town and can be accessed by following Route 201. Once you enter Lake Verity, Surf into the center of the water are to find the cave. Once there, interact with the ghost that blocks the cave entrance and you will be given a task to show him a Starly with max happiness that is native to the Sinnoh Region. This Starly needs to be caught by you (your OT). Once you show him the requested Pokémon you will be granted access. Proceed into the cave and battle Mesprit. Azelf Azelf is located in the cave at the center of Lake Valor which is located along Route 214 (between Veilstone and Pastoria City). Interact with the ghost NPC blocking the cave and you will be prompted to show him either a Goldeen, Magikarp, or Psyduck with at least 120 IVs. This Pokémon must be your OT. Once you show him the requested Pokémon, you will be granted access. Proceed into the cave and battle Azelf. Finishing the Quest and Catching your Lake Trio After acquiring the seen data for the Lake Trio Pokémon, head back to Dawn in Sandgem Town and she will inform you that you have built enough trust to catch one. You will then be prompted to select the one of your choice. Once you do, prepare however you need to catch the Legendary Pokémon and head to their respective lake to catch them. Quest Complete!
-
- 1
-
-
showing offline all frnd list
Bitterblade replied to Madhavxdark's topic in Client Bugs; Music, Graphics, etc.
Good day @Madhavxdark Regarding this issue, the testers are aware and will be investigating. With that being said, there may not be a resolution any time soon. Thank you for reporting this issue. Regards, Bitterblade -
This is beautiful, well done.
-
Boss fight loss due to ongoing server instability
Bitterblade replied to Ebeezuk's topic in Resolved Bugs
Good day @Ebeezuk While I do apologize for the delay, I want to remind you that every member of staff operates on a pure volunteer basis meaning that each member has outside obligations (work, school, etc.). Each member juggles these responsibilities while also volunteering time to support the game and its players. Yes, the game has been experiencing disconnections. Be that as it is, going into content where a lose (no matter the cause) results is a cooldown period is a risk is advised against during periods of instability. While we are glad that you have been around for quite some time, that does not entitle you to special treatment. Once again, knowing that the servers were experiencing instability and doing Boss NPC fight is risk that is advised against. To be clear, you do not lose the win streak that you have when you lose to a boss NPC. Specifically, if you win 2 matches, lose the 3rd, and win the 4th, then you are eligible for the 3rd win reward. You will have to wait for the cooldown of the boss and challenge them again at that time. I do apologize for the experience but there is nothing that can be done regarding the issue. With that being said, I will be closing this thread. If you have further questions or concerns, do not hesitate to reach out. Regards, Bitterblade -
Good day @Vuuu38 I thank you very much for your patience. Your PvP coins have been restored and the mount removed from your account. I will now be closing this thread. If you have any further questions or concerns, do not hesitate to reach out. Regards, Bitterblade
-
showing offline all frnd list
Bitterblade replied to Madhavxdark's topic in Client Bugs; Music, Graphics, etc.
Good day @Madhavxdark I apologize for the delay. Can you try removing and readding someone to your friends list to see if that fixes the issue? I look forward to your response. Regards, Bitterblade