Leaderboard
Popular Content
Showing content with the highest reputation on 03/03/20 in all areas
-
10 points
-
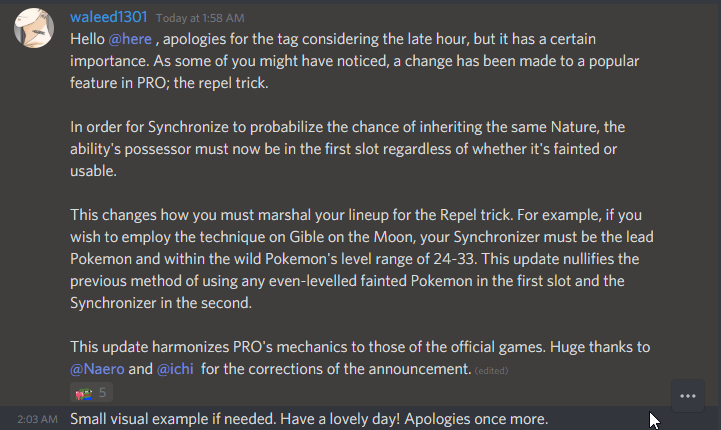
This change was uncalled for. Nobody asked for it and it wasn't a game breaking mechanic which needed patching/nerfing. So it's fair to question why was there time and development resources invested in a QoL downgrade. The main purpose of repel tricking is to money sink. The money is sinked because some players see worth in skipping unwanted spawns in exchange for money. So any change to the method should be carefully thought out and discussed and not justify it with "harmonizing PRO's mechanics to those of the official games" when PRO doesn't have official game mechanics since forever (namely breeding). It's not a valid point, therefore I'm not convinced this was the correct call. I've seen the "dead sync in slot 1 and trace in slot 2 was always the best option to hunt because it saves time from switching" argument, and I ask, who are you to decide what's best for me or anybody else ? Best or better will always be subjective if there's more than 1 path to take. That option was always there. If there are people complaining, it obviously wasn't the best option for them. And I can't blame them, it's being enforced an unnecessary mass sync storage with different levels and natures. I support the revert because there's literally nothing to lose from it.5 points
-
We would like to thanks everyone for having given their feedback on the recent change. We heard your opinions and we will discuss it within the staff team. Please, be patient in the while that we discuss it and take a decision about it. We will inform you as soon as possible. Have a wonderful day !4 points
-
First i don't even understand why they changed how it was before. What's the point of changing or making things harder and more complicated. On a game like pro where managing your pc is already annoying there is no point about asking people to have a sync of every levels for the pokes you wanna farm. It has been too long since this game is not really rewarding people farming pokemons instead of people farming money or just abusing the trade to get richer and buy wathever they want. We don't need this change and that'd be great to reverse it. May we just use our time to play at the game, farm and pvp as much as we want instead of wasting it to farm the sync? This isn't the funniest part of the gameplay and not something you want us to focus on i guess. Also people will a lot of hours will just need a 2nd account just to keep all they sync at this point, there's no reason to do that3 points
-
2 points
-
Hello and welcome! One of, if not, the most profitable parts of this game is the huuuge amount of boss battles you can do every 12 days. At times it seems like there may be too many bosses scattered around, and it's hard to know where to start. The Reborn-bot is an amazing resource to have, but it's boss cooldowns are often inaccurate due to the changes with bosses over time, so sometimes you miss boss fights completely, or revisit a bunch expecting to fight only to be told to come back in 3 days. I've compiled this walkthrough as a direct route that links every single repeatable (sorry, no Red/Lance/Maxie etc in here) boss together, so you know for sure that you haven't missed anybody. I think there are 48 in total, so the guide is gonna be a bit... wordy I believe it to be the most efficient route, however I am open to editing if you have tips or changes. I have based the entire route (or 95% of it anyway) on foot travel, rather than teleporting, to help players who don't have so much pokedollars and want to build some bank a little faster. Players using travel pass can breeze through bosses quite quickly, for those without it a boss run can be quite daunting so hopefully this helps. Before getting into it, I would like to take a moment to mention the travel pass. For semi-serious players and up, maybe for players who play more than 3x per week, in my opinion it is the absolute best way to spend your pokedollars in game; the underrated MVP. For $10k per day (which is the price of two single trips between regions without transit pass) you get unlimited travel. Until you try the pass, you have no idea how much more productive you can be. Being able to farm pokemon more efficiently, farming bosses and PVE activities quicker, you can easily pay off the price of the pass and then some. You can make around $1.5m pokedollars per month just by farming bosses on easy mode alone, and 2x or 5x that amount on the harder difficulties. I urge you to put aside just $300k out of that and try the transit pass at least once. With that out of the way, lets begin our journey at the games adopted hub, Vermilion City. KANTO Start – Vermilion City •Begin by battling Xylos in the fan club near Vermilion Poke Centre. •Next, take the North exit from the city into route 6. Cut left into Vermilion Graveyard on this route where you can battle the Pumpkin King •Head back to Route 6 and continue North into Saffron City. Near the southern stophouse where you will enter the city is Golds Gym, where you can find and battle Chuck. •(Optional/Conditional) if you have a level 100 Pikachu you can head to the nearby Poke Centre and withdraw him. Head through the West exit towards Celadon City where you can battle Jessie & James. Follow the awkward path around the back of the buildings to reach them. •Either way, head back to the North side of Saffron city now, and enter the dojo to show Koichi who is boss. •Next stop, Cerulean City, or route 25 to be precise. Take the north exit from Saffron, through route 5 and continue north through cerulean city, across Nugget Bridge. At the end of the bridge, you’ll find a cave containing Entei Guardian. •Hop onto the water outside E. Guardians cave and make the short trip south to Cerulean Cave, head through the cave to the basement where Naero awaits you. •Now head back into Cerulean city, and take the East exit from the town. Head through Rock Tunnel, and out the other side into Lavender Town. Enter the spooky tower here, and head up one or two floor to where Uruhara awaits. • Skip town to the South and head all the way down through routes 12, 14, 15 into Fuschia city. Surf or sail from here to Cinnabar Island, and enter the lab to battle Prof Oak. •Continue west off the Island and surf to Pallet town, then move north into Viridian City. Take the West exit through route 22, and continue west through the large building and route 28 on the other side of it, towards Mt Silver. Ensure you have a method of climbing waterfalls before heading into the cave, and then head up the two falls just inside the cave entrance, where you can find Terminator. •With the Terminator defeated, head back east into Viridian City, and then North into Viridian Forest. Head left as you enter the forest, to find the entrance to the Maze; bring flash or a flashlight! Inside the maze, head North East to find and battle Erika • After defeating Erika, head back Southwest to find the exit of the maze, then move North through the main forest into Pewter City. In the north east corner of the City is Pewter Jail where you can battle both Officer Shamac and thief George. •For our final stop on Kanto mainland, head back to the south exit of Pewter city. Cut the trees and hop into Digletts Cave, where you can wail on Brock. Continue through to the far exit of the cave to find yourself back in Vermilion City. All Kanto bosses are now down and you can move to the next region. •Before moving to Johto, you can visit Kantos optional islands where several bosses await, providing you have unlocked the respective islands and completed any prior quests required; •Love Island is the home of Shary and Shaui dual bosses who must be defeated together. •Pinkan Island houses Officer Jenny in the lighthouse, and Khlover in the islands meadow area. •Munchlax Resort contains Prehax and his army of Munchlax (4 total) which must be defeated using only two pokemon. JOHTO Next; to Johto. I would always advise you sail from Vermilion to Olivine rather than walk to Johto as it is a very long and tedious walk, and we have just made some bank from Kanto bosses. •Landing in Olivine City, we will hop straight back onto the boat and take the option for Dock Island for our first two bosses. When arriving on the island, surf over to the left side house to fight Battlebot or whatever it’s called, and afterwards head north through the island into the amazon forest to fight Bugsy. •Return to Olivine and head North and then East, away from the city. We will reach Ecruteak city, but just pass through and head out the east exit again. On route 42 we will reach Mt Mortar, a cave that contains the boss Bruno. Smack him and then head towards the eastern exit again, and take the short trip east from Route 42 into Mahogany town. •Take the North stophouse from Mahogany Town onto Route 43. Look for the water on this route and surf across it, this will allow you access to the hidden part of the Lake of Rage. Navigate the small, simple maze here to reach the secluded lake area where Suicine Guardian awaits your arrival. •Head back now into Mahogany Town again, and take the eastern route out onto route 44. Here you will find the Ice Path, where Lorelei lies deep within, plotting here revenge after getting rekt in the Elite Four earlier. •(optional/conditional) Despatch Lorelei and then move through the cave to the exit and Blackthorn City, where you can visit the Dragons Den training spot and battle boss Lance on the condition that you have 150+ evolved data in your dex. •Exit Blackthorn to the South and take the long walk down Route 45, heading west at the end into Cherrygrove City. Move North through Route 30 and west through route 31 into Violet City. Here, we climb the Sprout Tower and fight the master of Eeveelutions; Sage. •Whoop Sage and then head back down into the town. Look for the Northwestern exit onto Route 36, and then immediately South to Ruins of Alph. Prof Elm is waiting to battle here inside the small house on the right side. •Next, take the stophouse exit right outside Prof Elms house, onto Route 32. Another long route, head south all the way down to Union Cave. Use the dig point slightly away from the exit to skip through onto route 33. Scoot west through this route, and straight through Azalea town, into the dark Ilex Forest. Hidden in the depths of the forest, in the northeastern corner is boss Neroli. • Take the northern exit from Ilex Forest and into Goldenrod city. Here we have another dual boss battle, where you are not allowed to exit until both are beaten, so prepare a party that can deal with both foes lineups (they are mostly fairy types so it is not too difficult). Once ready, enter the Goldenrod Casino to battle both Pewdie and Diepy. •With the gamer duo defeated, we have pretty much finished our circuit of Johto. Stroll North out of Goldenrod city, and make your way back to Olivine. Near the docks in Olivine, you will see an exit in the southwest corner of the town, head this way to find a beach covered in Krabby and Wingull. Step through them and surf on the sea (ignore the Cianwood boat). Surf south through route 40, onto Route 41. As soon as you get onto this route, head left until you see Swimmer Thomas. Cut through the rocks using the whirlpool directly south of him, and enter the cave found here (Whirl Islands Northwest). Inside, head down the ladder into the main cave. Walk south from the ladder, down two staircases and climb the next ladder going down. At the base of this ladder, you’ll see a staircase with a cavern door by it. Ignore the cavern and continue down a further 4 staircases to a second cavern, which is home to boss Thor. •Retrace your steps back through the cave and out again, and surf past Thomas again to where you entered Route 41. Now, head directly south, past Swimmers Toby and Barry. Continue South some more to battle your childhood crush Misty, Johtos final boss. HOENN You can go back to Olivine and sail to Hoenn if you want, but for the sake of this guide we are surfing there! Head directly South again from Misty, into a new water route. Surf all the way south again, to Nap Island. Assuming you have cleared everything you need to on Nap Island and can just stroll through it; head through Nap Town and surf off the south side again, through Route 125 until you hit Mossdeep City. No need to hit the land here as it’s a pointless city, continue surfing West into Lilycove. •Now we are back on land, walk west through the port town and onto Route 121. A small concrete pier extends to the water; surf from here onto Route 122. You will have landmass either side of you. The grassy island to the right side is Mt Pyre, climb onto here to find a tower containing our first Hoenn Boss Morty. •Directly opposite the entrance/exit to Mt Pyre is another concrete pier which leads us to route 123. Head west all the way down here, hopping off a number of ledges which leads to route 119. Head west some more until we reach Mauville City. Take the southern exit from this town onto Route 110. Take the steps and surf across the water, to the east side of the lake where New Mauville cavern can be found. Inside it is a power plant type place, where boss Lt Surge has taken residence. •Exit New Mauville and head back to the steps where you began to surf from, and exit the water. Follow the path around this route, through the tall grass, until you see a weird bush in the water. Slightly south of here you will find another set of steps leading down to the water. Surf from here over to the strange bush, interacting with it will reveal it is the secret base of the last of the guardian trio; Raikou Guardian. Beat him up. •Next we will go to our only Boss in the southern half of the map. Hop back out of the water on route 110 and follow the route down to slateport city. Walk south through this town and surf off the southern coast, through route 109 and onto 108. Surf West on route 108 until you reach the Abandoned Ship in the water. Head inside and then down the steps, to find boss Toothless hiding out in one of the rooms. •For now, we will head back the way we came. Follow route 108-110 back to Mauville City, and this time take the North exit onto Route 111. Walk North straight up this route until we reach Route 111 Desert. Upon entering the desert, you will see a large rock face next to you, follow this all the way around and then head South through the Desert. Eventually you will reach a cave housing Naruto Fanboy boss. •(optional/conditional) Leave the Desert the same way we entered it and head back to Route 111. Make a short hop west onto route 117, which is a very short route ending in steps up a mountain side. Take the first steps up, then cut left past Hiker Trent and into Fiery Path. In here is an excavation site containing boss Gingery Jones who is available to battle providing you have 2400+ exca rating! • (optional/conditional) Whether you chose to battle Gingery Jones or not, time to head back to the mountainside on route 117 and continue up. Take the cable car to the top of Mt Chimney and head down Jagged Pass into Lavaridge Town. Here is access to Valley of Steel, a great hunting ground for steel pokes but you must pay to enter. Within VoS is boss Steven who will battle you providing that you have all of these; Finished his preliminary questline Two steel types in your party One pokemon in your party must know the Iron Defense move • Once you have either dealt with or skipped over GJ and Steven, its’ time to battle Prof Birch, our final boss in this region. Head back to Mauville City (if you battled Steven, take the east exit from Lavaridge town and hop down the mountain ledges), take Mauvilles west exit this time, onto route 117 and into Veranturf Town. Upon entry, you’ll see three houses to the south; Birch lives in the central one. With that out of the way, it’s time to move to Sinnohs bosses. Unfortunately the mapping on hoenn is not very cohesive, so it’s either teleport or make the long walk back to Lilycove now, from where we will set sail to Canalave City - as far as I am aware, there is no way of accessing Sinnoh without paying transit costs. SINNOH •Welcome to Sinnoh! Upon landing in Canalave we will take a walk through the town and exit on the south east side. Surf across the lake on Route 218 which brings us into Jubilife City. We will begin by visiting the Jubilife School here and battle Prof Rowan. •Next, head South to Sandgem town where boss Spectify is waiting for us in one of the houses. • After, make a short trip west to Twinleaf town. Interacting with the NPC Link will allow you, through dialog choices, to taunt him into battling you. •Head back to Jublife city now and take the East exit to route 203, at the end of which you will find Oreburgh Gate. This cave has an offshoot to the North inside it which requires Rock Smash, and grants access to the basement level. In the basement you will find Legends Cave, home to our next dual bosses Medusa and Eldir. •Do a 180 and head through the gate, right back to Jubilife city again, the hub of Sinnohs boss run. This time take the North exit and travel through route 204 and the Ravaged Path, through to Floaroma town. Take the east exit from this town onto Route 205, head towards the east side of this route before hitting the water and surfing. This will allow you to access the rear of Valley Windworks, where you will see a small opening in the rock face. Get out of the water and interact with it, to sneak through a crevice and find our next boss Letrix. •Next, head back onto Route 205 and take the small bridge across the water. Climb the steps ahead onto the mountain path and head north. After passing Camper Zackary, you will cross a wooden bridge; your next goal is to get underneath this bridge by doing a U-turn when you reach Picknicker Karina and heading south down the steps. Hop the ledge and head to the river, surfing North to reach Fuego Ironworks. In the trees on the south bank of the river is a small opening; enter here to find a secret entrance to the back of Floaroma Meadow where you can find boss Maribela. •Now we need to head back to Route 205 (again!) by hopping the ledge and going back through Floaroma town and East. Head back up the mountain path northbound, this time passing Karina and heading to Eterna City. Move east through Eterna City (ignore Arkos as he is no longer active as a boss), moving through Route 211 and into Mt Coronet Centre. This cavern splits into routes in all four directions, for now we want to go South, which requires Rock Smash. Follow this route now, it will lead you through caves past a number of Team Galactic grunts and up the mountain – the path may appear confusing but is actually very linear, you can only go one way. Eventually you will be brought outside on Coronet Summit. Take the huge stair sets directly in front of you, and head along the North-Eastern mountain face until you see a cave entrance with a Snover patrolling above it. Scoot in here; if you see two interactable Golbats patrolling inside, you are going the right way. Head up through a couple more linear caves lined with Galactic grunts to reach the Spear Pillar, and possibly the games hardest repeatable boss, Ash Westbrook. • Time once again, to retrace our steps back to Mt Coronet Centre, the chamber with the 4 routes we took moments ago. Head past Hiker Sam and take the East exit this time, which brings us to Celestic Town, and we are almost, almost done. Head east again through Celestic Town and onto Route 210 North. Move further east through this route, taking the steps next to Black Belt Adam to reach the walkway above. At the end of this walkway is a cave surrounded by Ace Trainers; The Cave of Justice hosts the games newest boss, Logan. •For our final stop on the boss run, I would recommend either teleporting from a Pokemon Centre or you can traverse Route 216 into Snowpoint City and surf from there; you should be aiming to reach the location named Survival Area which you may know from the Heatran Quest. From this Poke Centre, you must head East to Route 226, and then North to Route 227 where you can find the final, and furthest boss, Saphirr.1 point
-
Hello PRO players Im hosting in corporation with whiteshield guild a pvp tournament in pokemon showdown (Tier: OU [Gen 7]) with pro rules for both server player's REWARDS The rewards is all or nothing, that means only the winner of the tournament will get rewarded The winner will get 2million pokedollars Requirements You have to pay the entry fee 25k. You have to join our discord server. Tournament will start in 09/03/20201 point
-
How to Pay: Pokedollers Coins Capsules - 400k Re-Roll Tickets - ( Iv's - 650k ) ( Nature - 350k ) B.O. - 7m by SolidBullet Insta - 10M Min bid - 200k Auction time - 72 hours after first bid [ends day 6/March at 13:31 GMT+0] My discord: eNvy#96001 point
-
1 point
-
1 point
-
1 point
-
1 point
-
Sushantkm, i am sorry, i missclicked in edit, it's an 48hour auction which ends for 2 days :)1 point
-
1 point
-
1 point
-
1 point
-
Hello @takanam Just to be clear, out of 3 of those battles, your last 2 battles you gave Ferrothorn Assault Vest to hold? If so, then your Ferrothorn will always use struggle. The item Assault Vest gives the holder a 50% boost to its Special defense, however it can only select damaging moves. Here, we can see that your Ferrothorn's moveset consists of only non-damaging moves, hence to why it could only use Struggle. As for the first battle where you gave a Rocky Helmet to your Ferrothorn, perhaps the opponent used the move Taunt . As @envymeister stated, if you got taunted, then you're unable to move and will be forced to Struggle, considering your moveset. I hope this clears up any doubts you had. Please feel free to reply here if you have any further questions. Thank you and have a lovely day!1 point
-
I've sent u a friend request, ThunderSniper, we'll talk about where to meet on there1 point
-
-1 sync with good level for repel trick allow u to use trace ability in second and win a lot of time when ur farming and u talking about lose time for catch sync with good level there is a lot of spawn of natu /abra low tier for every level mtsilver 37-40 ruin of alph 18+ route 203 4+ and moreover u said losing time when u up box of alakazam lvl 100 (that was the worse waste of time for no reason ) i farming repel trick with sync at the level of repel trick since i farming and tbh that take u 15 mn max to catch a natu put him at the level u want for farming a long time in repel, ur reaction is like we cant sync in repel anymore wake up plz1 point
-
How does this system matter now that the synchronize pokemon has to be in the first slot?1 point
-
+1 Even though I think a lot of people are fine with hunting all the new needed synchs and it could spice up trading for some time, there are some problems along with this change. First of all the current storage system makes it really hard to pick the right pokemon if you have a lot of the same species. You would have to search through lets say all Abra/Kadabra/Alakazam, Natu/Xatu and some other possible synch pokemon. If you need a level 30 synch you would need to hover over every single level 30 pokemon to check if it has the right nature. If we could name boxes, filter for needed level and nature and some other possible options it might not be as bad of a change. There are other problems though. Lets say you spend the time to hunt a new synch and level it up to the needed level, if this pokemon levels up in what way ever you have to repeat this time consuming process all over again. If you encounter a Diglett or a Wobuffet you are forced to possibly killing it resulting in xp and level up. Another example would be that you fail to run away and a pokemon kills itself via Selfdestruct or some other selfharming move. I am sure there are more examples which would result in your synch to level up making it complety useless for the repel hunt you wanted it for. Making PRO as close to the originals as possible just does not work as a arguement here for me. There is no breeding which makes getting good pokemon harder. The old repel trick was a way to balance the missing breeding system. We can not use fly so the transport system keeps the economy going. I could come up with some other examples but the point is to show that not every change is good simply because it makes PRO closer to the original games. Some things work and some just do not. This change just makes hunting way more time-consuming than it already was resulting in frustration of many people. I know PRO is not supposed to be easy, I just think this change is not good for the state of the game. So it should be considered to revert this change in my opinion.1 point
-
+1 U want to do like the original game, so put the 100% to synch a wild pokemon like the original game, and not only what u want ^^1 point
-
1 point
-
1 point
-
+1, my two cents : - I've hunted with repels for a long time, this change not only makes every sync you have unusable for any repel hunt, but also makes you lose time & resources catching new sync of specific levels.. - Imagine the difference between players that have hunted with repel trick a certain poke, and that poke happens to be WQ, fewer people will be able to repel trick and will abuse to get 3% -> less people that can contribute to 0.5%. - The main argument for this change is : "We want to make the game closer to the OG game." But let's be real, PRO will never be like the OG games, example for breeding. You're just taking out something that has been used for a long time, and that's unfair for newer players that will discourage them from repel hunting.1 point
-
What's your IGN? Riklle77 How old are you? 19 What is Your Discord ID? Rikssito#5110 What's your goal in PRO? To be in the pvp ladder What is your favorite aspect of PRO? Pokemon MMO aspect, possibility to have social interactions with people from my country and other countries. What was your highest rating achieved in the last 3 PvP seasons? I didn't play a lot in PvP so my highest rating was around 60-70 but i want to invest myself into it to progress. I choose your guild because many of my friends are already into it and because you want to be the best guild and if I want to be in the PvP ladder I need to learn from Alixx71 point
-
*To use Dig outside of battle. Your pokemon must have 150+ Happiness. This can be viewed with the command /happy 1-6 being written in a chat for example /happy 1 for the pokemon in the first slot of your party. *Dig Spots have a 3 day cooldown *The Dig TM (TM28) can be acquired from: • FREE Cerulean House 6 • Celadon Mart - $3,500 • Route 36 Smuggler - $5,000 • Lilycove Mart - $4,000 • FREE Route 114 Pink-colored names denote that this Spawn or Area is exclusively active membership users. Area: Digletts Cave (Northwesternmost and Southeasternmost trench of the basement floor) Patches:8 Items: [TABLE] [TR] [TH][/TH] [TH]Item[/TH] [TH]Rarity[/TH] [/TR] [TR] [TD]alt=Pokéball.pnghttps://prowiki.info/images/b/b1/Pok%C3%A9ball.png[/img][/TD] [TD]Pokéball[/TD] [TD]Common[/TD] [/TR] [TR] [TD][/TD] [TD]Flying Gem[/TD] [TD]Common[/TD] [/TR] [TR] [TD]alt=Potion.pnghttps://prowiki.info/images/7/7a/Potion.png[/img][/TD] [TD]Potion[/TD] [TD]Uncommon[/TD] [/TR] [TR] [TD]alt=Fresh Water.pnghttps://prowiki.info/images/1/1e/Fresh_Water.png[/img][/TD] [TD]Fresh Water[/TD] [TD]Uncommon[/TD] [/TR] [TR] [TD]alt=Dawn Stone.pnghttps://prowiki.info/images/d/d3/Dawn_Stone.png[/img][/TD] [TD]Dawn Stone[/TD] [TD]Intermediate[/TD] [/TR] [TR] [TD]alt=Sun Stone.pnghttps://prowiki.info/images/0/0a/Sun_Stone.png[/img][/TD] [TD]Sun Stone[/TD] [TD]Intermediate[/TD] [/TR] [TR] [TD]alt=Level Ball.pnghttps://prowiki.info/images/5/5b/Level_Ball.png[/img][/TD] [TD]Level Ball[/TD] [TD]Intermediate[/TD] [/TR] [TR] [TD]alt=Carbos.pnghttps://prowiki.info/images/f/fe/Carbos.png[/img][/TD] [TD]Carbos[/TD] [TD]Rare[/TD] [/TR] [TR] [TD]alt=Helix Fossil.pnghttps://prowiki.info/images/d/d2/Helix_Fossil.png[/img][/TD] [TD]Helix Fossil[/TD] [TD]Intermediate[/TD] [/TR] [TR] [TD]alt=Dome Fossil.pnghttps://prowiki.info/images/5/52/Dome_Fossil.png[/img][/TD] [TD]Dome Fossil[/TD] [TD]Intermediate[/TD] [/TR] [TR] [TD][/TD] [TD]Icicle Plate[/TD] [TD]Very Rare[/TD] [/TR] [/TABLE] Pokemon: [TABLE] [TR] [TH][/TH] [TH]Pokémon[/TH] [TH]Rarity[/TH] [/TR] [TR] [TD]alt=50Icon.pnghttps://prowiki.info/images/b/b9/50Icon.png[/img][/TD] [TD]Diglett[/TD] [TD]Uncommon[/TD] [/TR] [TR] [TD]alt=51Icon.pnghttps://prowiki.info/images/5/5b/51Icon.png[/img][/TD] [TD]Dugtrio[/TD] [TD]Rare[/TD] [/TR] [TR] [TD]alt=529Icon.pnghttps://prowiki.info/images/d/d4/529Icon.png[/img][/TD] [TD]Drilbur[/TD] [TD]Very Rare[/TD] [/TR] [/TABLE] Area:Route 3 (Southwest and Southeast trench) Patches:8 Items: [TABLE] [TR] [TH][/TH] [TH]Item[/TH] [TH]Rarity[/TH] [/TR] [TR] [TD]alt=Pokéball.pnghttps://prowiki.info/images/b/b1/Pok%C3%A9ball.png[/img][/TD] [TD]Pokeball[/TD] [TD]Common[/TD] [/TR] [TR] [TD][/TD] [TD]Bug Gem[/TD] [TD]Common[/TD] [/TR] [TR] [TD]alt=Nugget.pnghttps://prowiki.info/images/f/f0/Nugget.png[/img][/TD] [TD]Nugget[/TD] [TD]Uncommon[/TD] [/TR] [TR] [TD]alt=Hyper Potion.pnghttps://prowiki.info/images/2/23/Hyper_Potion.png[/img][/TD] [TD]Hyper Potion[/TD] [TD]Uncommon[/TD] [/TR] [TR] [TD]alt=Sun Stone.pnghttps://prowiki.info/images/0/0a/Sun_Stone.png[/img][/TD] [TD]Sun Stone[/TD] [TD]Intermediate[/TD] [/TR] [TR] [TD]alt=Hard Stone.pnghttps://prowiki.info/images/5/59/Hard_Stone.png[/img][/TD] [TD]Hard Stone[/TD] [TD]Intermediate[/TD] [/TR] [TR] [TD]alt=Leftovers.pnghttps://prowiki.info/images/7/7f/Leftovers.png[/img][/TD] [TD]Leftovers[/TD] [TD]Intermediate[/TD] [/TR] [TR] [TD]alt=Iron.pnghttps://prowiki.info/images/4/45/Iron.png[/img][/TD] [TD]Iron[/TD] [TD]Rare[/TD] [/TR] [TR] [TD]alt=Old Amber.pnghttps://prowiki.info/images/f/fc/Old_Amber.png[/img][/TD] [TD]Old Amber[/TD] [TD]Intermediate[/TD] [/TR] [TR] [TD]alt=Helix Fossil.pnghttps://prowiki.info/images/d/d2/Helix_Fossil.png[/img][/TD] [TD]Helix Fossil[/TD] [TD]Intermediate[/TD] [/TR] [TR] [TD][/TD] [TD]Pixie Plate[/TD] [TD]Very Rare[/TD] [/TR] [/TABLE] Pokemon: [TABLE] [TR] [TH][/TH] [TH]Pokémon[/TH] [TH]Rarity[/TH] [/TR] [TR] [TD]alt=74Icon.pnghttps://prowiki.info/images/e/e8/74Icon.png[/img][/TD] [TD]Geodude[/TD] [TD]Uncommon[/TD] [/TR] [TR] [TD]alt=111Icon.pnghttps://prowiki.info/images/0/0d/111Icon.png[/img][/TD] [TD]Rhyhorn[/TD] [TD]Rare[/TD] [/TR] [TR] [TD]alt=304Icon.pnghttps://prowiki.info/images/3/31/304Icon.png[/img][/TD] [TD]Aron[/TD] [TD]Very Rare[/TD] [/TR] [/TABLE] Area:Route 14 (The Ditch behind Kiri and Jan) Patches:4 Items: [TABLE] [TR] [TH][/TH] [TH]Item[/TH] [TH]Rarity[/TH] [/TR] [TR] [TD]alt=Pokéball.pnghttp://prowiki.info/images/b/b1/Pok%C3%A9ball.png[/img][/TD] [TD]Pokeball[/TD] [TD]Common[/TD] [/TR] [TR] [TD][/TD] [TD]Fighting Gem[/TD] [TD]Common[/TD] [/TR] [TR] [TD]alt=Potion.pnghttp://prowiki.info/images/7/7a/Potion.png[/img][/TD] [TD]Potion[/TD] [TD]Uncommon[/TD] [/TR] [TR] [TD]alt=Fresh Water.pnghttp://prowiki.info/images/1/1e/Fresh_Water.png[/img][/TD] [TD]Fresh Water[/TD] [TD]Uncommon[/TD] [/TR] [TR] [TD]alt=Dawn Stone.pnghttp://prowiki.info/images/d/d3/Dawn_Stone.png[/img][/TD] [TD]Dawn Stone[/TD] [TD]Intermediate[/TD] [/TR] [TR] [TD]alt=Sun Stone.pnghttp://prowiki.info/images/0/0a/Sun_Stone.png[/img][/TD] [TD]Sun Stone[/TD] [TD]Intermediate[/TD] [/TR] [TR] [TD]alt=Level Ball.pnghttp://prowiki.info/images/5/5b/Level_Ball.png[/img][/TD] [TD]Level Ball[/TD] [TD]Intermediate[/TD] [/TR] [TR] [TD]alt=Carbos.pnghttp://prowiki.info/images/f/fe/Carbos.png[/img][/TD] [TD]Carbos[/TD] [TD]Rare[/TD] [/TR] [TR] [TD]alt=Helix Fossil.pnghttp://prowiki.info/images/d/d2/Helix_Fossil.png[/img][/TD] [TD]Helix Fossil[/TD] [TD]Intermediate[/TD] [/TR] [TR] [TD]alt=Dome Fossil.pnghttp://prowiki.info/images/5/52/Dome_Fossil.png[/img][/TD] [TD]Dome Fossil[/TD] [TD]Intermediate[/TD] [/TR] [TR] [TD][/TD] [TD]Sky Plate[/TD] [TD]Very Rare[/TD] [/TR] [/TABLE] Pokemon: [TABLE] [TR] [TH][/TH] [TH]Pokémon[/TH] [TH]Rarity[/TH] [/TR] [TR] [TD]alt=74Icon.pnghttp://prowiki.info/images/e/e8/74Icon.png[/img][/TD] [TD]Geodude[/TD] [TD]Uncommon[/TD] [/TR] [TR] [TD]alt=75Icon.pnghttp://prowiki.info/images/1/14/75Icon.png[/img][/TD] [TD]Graveler[/TD] [TD]Rare[/TD] [/TR] [TR] [TD]alt=328Icon.pnghttp://prowiki.info/images/a/af/328Icon.png[/img][/TD] [TD]Trapinch[/TD] [TD]Very Rare[/TD] [/TR] [/TABLE] Area:Route 15 Patches:5 Items: [TABLE] [TR] [TH][/TH] [TH]Item[/TH] [TH]Rarity[/TH] [/TR] [TR] [TD]alt=Pokéball.pnghttp://prowiki.info/images/b/b1/Pok%C3%A9ball.png[/img][/TD] [TD]Pokeball[/TD] [TD]Common[/TD] [/TR] [TR] [TD][/TD] [TD]Fire Gem[/TD] [TD]Common[/TD] [/TR] [TR] [TD]alt=Revival Herb.pnghttp://prowiki.info/images/4/45/Revival_Herb.png[/img][/TD] [TD]Revival Herb[/TD] [TD]Uncommon[/TD] [/TR] [TR] [TD]alt=Super Potion.pnghttp://prowiki.info/images/8/8f/Super_Potion.png[/img][/TD] [TD]Super Potion[/TD] [TD]Uncommon[/TD] [/TR] [TR] [TD]alt=Reaper Cloth.pnghttp://prowiki.info/images/d/d5/Reaper_Cloth.png[/img][/TD] [TD]Reaper Cloth[/TD] [TD]Intermediate[/TD] [/TR] [TR] [TD]alt=Level Ball.pnghttp://prowiki.info/images/5/5b/Level_Ball.png[/img][/TD] [TD]Level Ball[/TD] [TD]Intermediate[/TD] [/TR] [TR] [TD]alt=Nest Ball.pnghttp://prowiki.info/images/a/a6/Nest_Ball.png[/img][/TD] [TD]Nest Ball[/TD] [TD]Intermediate[/TD] [/TR] [TR] [TD]alt=Calcium.pnghttp://prowiki.info/images/f/f5/Calcium.png[/img][/TD] [TD]Calcium[/TD] [TD]Rare[/TD] [/TR] [TR] [TD]alt=Helix Fossil.pnghttp://prowiki.info/images/d/d2/Helix_Fossil.png[/img][/TD] [TD]Helix Fossil[/TD] [TD]Intermediate[/TD] [/TR] [TR] [TD]alt=Dome Fossil.pnghttp://prowiki.info/images/5/52/Dome_Fossil.png[/img][/TD] [TD]Dome Fossil[/TD] [TD]Intermediate[/TD] [/TR] [TR] [TD][/TD] [TD]Fire Plate[/TD] [TD]Very Rare[/TD] [/TR] [/TABLE] Pokemon: [TABLE] [TR] [TH][/TH] [TH]Pokémon[/TH] [TH]Rarity[/TH] [/TR] [TR] [TD]alt=74Icon.pnghttp://prowiki.info/images/e/e8/74Icon.png[/img][/TD] [TD]Geodude[/TD] [TD]Uncommon[/TD] [/TR] [TR] [TD]alt=95Icon.pnghttp://prowiki.info/images/2/22/95Icon.png[/img][/TD] [TD]Onix[/TD] [TD]Rare[/TD] [/TR] [TR] [TD]alt=436Icon.pnghttp://prowiki.info/images/e/e6/436Icon.png[/img][/TD] [TD]Bronzor[/TD] [TD]Very Rare[/TD] [/TR] [/TABLE] Area:Mt. Moon (Southwestern and Northeastern segment of 1F) Patches:8 Items: [TABLE] [TR] [TH][/TH] [TH]Item[/TH] [TH]Rarity[/TH] [/TR] [TR] [TD]alt=Pokéball.pnghttp://prowiki.info/images/b/b1/Pok%C3%A9ball.png[/img][/TD] [TD]Pokeball[/TD] [TD]Common[/TD] [/TR] [TR] [TD]alt=Dark Gem.pnghttp://prowiki.info/images/f/f0/Dark_Gem.png[/img][/TD] [TD]Dark Gem[/TD] [TD]Common[/TD] [/TR] [TR] [TD]alt=Stardust.pnghttp://prowiki.info/images/6/65/Stardust.png[/img][/TD] [TD]Stardust[/TD] [TD]Uncommon[/TD] [/TR] [TR] [TD]alt=Rare Candy.pnghttp://prowiki.info/images/a/a2/Rare_Candy.png[/img][/TD] [TD]Rare Candy[/TD] [TD]Uncommon[/TD] [/TR] [TR] [TD]alt=Hard Stone.pnghttp://prowiki.info/images/5/59/Hard_Stone.png[/img][/TD] [TD]Hard Stone[/TD] [TD]Intermediate[/TD] [/TR] [TR] [TD]alt=Moon Stone.pnghttp://prowiki.info/images/3/35/Moon_Stone.png[/img][/TD] [TD]Moon Stone[/TD] [TD]Intermediate[/TD] [/TR] [TR] [TD]alt=Sun Stone.pnghttp://prowiki.info/images/0/0a/Sun_Stone.png[/img][/TD] [TD]Sun Stone[/TD] [TD]Intermediate[/TD] [/TR] [TR] [TD]alt=Carbos.pnghttp://prowiki.info/images/f/fe/Carbos.png[/img][/TD] [TD]Carbos[/TD] [TD]Rare[/TD] [/TR] [TR] [TD]alt=Old Amber.pnghttp://prowiki.info/images/f/fc/Old_Amber.png[/img][/TD] [TD]Old Amber[/TD] [TD]Intermediate[/TD] [/TR] [TR] [TD]alt=Helix Fossil.pnghttp://prowiki.info/images/d/d2/Helix_Fossil.png[/img][/TD] [TD]Helix Fossil[/TD] [TD]Intermediate[/TD] [/TR] [TR] [TD][/TD] [TD]Draco Plate[/TD] [TD]Very Rare[/TD] [/TR] [/TABLE] Pokemon: [TABLE] [TR] [TH][/TH] [TH]Pokémon[/TH] [TH]Rartity[/TH] [/TR] [TR] [TD]alt=74Icon.pnghttp://prowiki.info/images/e/e8/74Icon.png[/img][/TD] [TD]Geodude[/TD] [TD]Unommon[/TD] [/TR] [TR] [TD]alt=111Icon.pnghttp://prowiki.info/images/0/0d/111Icon.png[/img][/TD] [TD]Rhyhorn[/TD] [TD]Rare[/TD] [/TR] [TR] [TD]alt=679Icon.pnghttp://prowiki.info/images/1/12/679Icon.png[/img][/TD] [TD]Honedge[/TD] [TD]Very Rare[/TD] [/TR] [/TABLE] Area:Mt. Moon (Northernmost and Middlemost chamber of B2F) Patches:8 Items: [TABLE] [TR] [TH][/TH] [TH]Item[/TH] [TH]Rarity[/TH] [/TR] [TR] [TD]alt=Pokéball.pnghttp://prowiki.info/images/b/b1/Pok%C3%A9ball.png[/img][/TD] [TD]Pokeball[/TD] [TD]Common[/TD] [/TR] [TR] [TD][/TD] [TD]Dragon Gem[/TD] [TD]Common[/TD] [/TR] [TR] [TD]alt=Rare Candy.pnghttp://prowiki.info/images/a/a2/Rare_Candy.png[/img][/TD] [TD]Rare Candy[/TD] [TD]Uncommon[/TD] [/TR] [TR] [TD]alt=Revive.pnghttp://prowiki.info/images/1/13/Revive.png[/img][/TD] [TD]Revive[/TD] [TD]Uncommon[/TD] [/TR] [TR] [TD]alt=Moon Stone.pnghttp://prowiki.info/images/3/35/Moon_Stone.png[/img][/TD] [TD]Moon Stone[/TD] [TD]Intermediate[/TD] [/TR] [TR] [TD]alt=Moon Ball.pnghttp://prowiki.info/images/b/b0/Moon_Ball.png[/img][/TD] [TD]Moon Ball[/TD] [TD]Intermediate[/TD] [/TR] [TR] [TD]alt=Net Ball.pnghttp://prowiki.info/images/b/bb/Net_Ball.png[/img][/TD] [TD]Net Ball[/TD] [TD]Intermediate[/TD] [/TR] [TR] [TD]alt=Iron.pnghttp://prowiki.info/images/4/45/Iron.png[/img][/TD] [TD]Iron[/TD] [TD]Rare[/TD] [/TR] [TR] [TD]alt=Old Amber.pnghttp://prowiki.info/images/f/fc/Old_Amber.png[/img][/TD] [TD]Old Amber[/TD] [TD]Intermediate[/TD] [/TR] [TR] [TD]alt=Helix Fossil.pnghttp://prowiki.info/images/d/d2/Helix_Fossil.png[/img][/TD] [TD]Helix Fossil[/TD] [TD]Intermediate[/TD] [/TR] [TR] [TD]alt=Dread Plate.pnghttp://prowiki.info/images/4/43/Dread_Plate.png[/img][/TD] [TD]Dread Plate[/TD] [TD]Very Rare[/TD] [/TR] [/TABLE] Pokemon: [TABLE] [TR] [TH][/TH] [TH]Pokémon[/TH] [TH]Rarity[/TH] [/TR] [TR] [TD]alt=95Icon.pnghttp://prowiki.info/images/2/22/95Icon.png[/img][/TD] [TD]Onix[/TD] [TD]Uncommon[/TD] [/TR] [TR] [TD]alt=618Icon.pnghttp://prowiki.info/images/0/0e/618Icon.png[/img][/TD] [TD]Stunfisk[/TD] [TD]Rare[/TD] [/TR] [TR] [TD]alt=246Icon.pnghttp://prowiki.info/images/a/a8/246Icon.png[/img][/TD] [TD]Larvitar[/TD] [TD]Very Rare[/TD] [/TR] [/TABLE] Area:Rock Tunnel (Nearby the northern Route 10 entryway on 1F.) Patches:6 Items: [TABLE] [TR] [TH][/TH] [TH]Item[/TH] [TH]Rarity[/TH] [/TR] [TR] [TD]alt=Pokéball.pnghttp://prowiki.info/images/b/b1/Pok%C3%A9ball.png[/img][/TD] [TD]Pokeball[/TD] [TD]Common[/TD] [/TR] [TR] [TD][/TD] [TD]Electric Gem[/TD] [TD]Common[/TD] [/TR] [TR] [TD]alt=Nugget.pnghttp://prowiki.info/images/f/f0/Nugget.png[/img][/TD] [TD]Nugget[/TD] [TD]Uncommon[/TD] [/TR] [TR] [TD]alt=Rare Candy.pnghttp://prowiki.info/images/a/a2/Rare_Candy.png[/img][/TD] [TD]Rare Candy[/TD] [TD]Uncommon[/TD] [/TR] [TR] [TD]alt=Level Ball.pnghttp://prowiki.info/images/5/5b/Level_Ball.png[/img][/TD] [TD]Level Ball[/TD] [TD]Intermediate[/TD] [/TR] [TR] [TD]alt=Net Ball.pnghttp://prowiki.info/images/b/bb/Net_Ball.png[/img][/TD] [TD]Net Ball[/TD] [TD]Intermediate[/TD] [/TR] [TR] [TD]alt=Moon Ball.pnghttp://prowiki.info/images/b/b0/Moon_Ball.png[/img][/TD] [TD]Moon Ball[/TD] [TD]Intermediate[/TD] [/TR] [TR] [TD]alt=Carbos.pnghttp://prowiki.info/images/f/fe/Carbos.png[/img][/TD] [TD]Carbos[/TD] [TD]Rare[/TD] [/TR] [TR] [TD]alt=Old Amber.pnghttp://prowiki.info/images/f/fc/Old_Amber.png[/img][/TD] [TD]Old Amber[/TD] [TD]Intermediate[/TD] [/TR] [TR] [TD]alt=Helix Fossil.pnghttp://prowiki.info/images/d/d2/Helix_Fossil.png[/img][/TD] [TD]Helix Fossil[/TD] [TD]Intermediate[/TD] [/TR] [TR] [TD][/TD] [TD]Earth Plate[/TD] [TD]Very Rare[/TD] [/TR] [/TABLE] Pokemon: [TABLE] [TR] [TH][/TH] [TH]Pokémon[/TH] [TH]Rarity[/TH] [/TR] [TR] [TD]alt=50Icon.pnghttp://prowiki.info/images/b/b9/50Icon.png[/img][/TD] [TD]Diglett[/TD] [TD]Uncommon[/TD] [/TR] [TR] [TD]alt=75Icon.pnghttp://prowiki.info/images/1/14/75Icon.png[/img][/TD] [TD]Graveler[/TD] [TD]Rare[/TD] [/TR] [TR] [TD]alt=343Icon.pnghttp://prowiki.info/images/7/72/343Icon.png[/img][/TD] [TD]Baltoy[/TD] [TD]Very Rare[/TD] [/TR] [/TABLE] Area:Rock Tunnel (patches near the southernmost stairways on the basement floor.) Patches:8 Item: [TABLE] [TR] [TH][/TH] [TH]Item[/TH] [TH]Rarity[/TH] [/TR] [TR] [TD]alt=Pokéball.pnghttp://prowiki.info/images/b/b1/Pok%C3%A9ball.png[/img][/TD] [TD]Pokeball[/TD] [TD]Common[/TD] [/TR] [TR] [TD][/TD] [TD]Fairy Gem[/TD] [TD]Common[/TD] [/TR] [TR] [TD]alt=Star Piece.pnghttp://prowiki.info/images/6/6a/Star_Piece.png[/img][/TD] [TD]Star Piece[/TD] [TD]Uncommon[/TD] [/TR] [TR] [TD]alt=Revive.pnghttp://prowiki.info/images/1/13/Revive.png[/img][/TD] [TD]Revive[/TD] [TD]Uncommon[/TD] [/TR] [TR] [TD]alt=Hard Stone.pnghttp://prowiki.info/images/5/59/Hard_Stone.png[/img][/TD] [TD]Hard Stone[/TD] [TD]Intermediate[/TD] [/TR] [TR] [TD]alt=Moon Stone.pnghttp://prowiki.info/images/3/35/Moon_Stone.png[/img][/TD] [TD]Moon Stone[/TD] [TD]Intermediate[/TD] [/TR] [TR] [TD]alt=Leftovers.pnghttp://prowiki.info/images/7/7f/Leftovers.png[/img][/TD] [TD]Leftovers[/TD] [TD]Intermediate[/TD] [/TR] [TR] [TD]alt=Iron.pnghttp://prowiki.info/images/4/45/Iron.png[/img][/TD] [TD]Iron[/TD] [TD]Rare[/TD] [/TR] [TR] [TD]alt=Dome Fossil.pnghttp://prowiki.info/images/5/52/Dome_Fossil.png[/img][/TD] [TD]Dome Fossil[/TD] [TD]Intermediate[/TD] [/TR] [TR] [TD]alt=Helix Fossil.pnghttp://prowiki.info/images/d/d2/Helix_Fossil.png[/img][/TD] [TD]Helix Fossil[/TD] [TD]Intermediate[/TD] [/TR] [TR] [TD][/TD] [TD]Fist Plate[/TD] [TD]Very Rare[/TD] [/TR] [/TABLE] Pokemon: [TABLE] [TR] [TH][/TH] [TH]Pokémon[/TH] [TH]Rarity[/TH] [/TR] [TR] [TD]alt=436Icon.pnghttp://prowiki.info/images/e/e6/436Icon.png[/img][/TD] [TD]Bronzor[/TD] [TD]Uncommon[/TD] [/TR] [TR] [TD]alt=343Icon.pnghttp://prowiki.info/images/7/72/343Icon.png[/img][/TD] [TD]Baltoy[/TD] [TD]Rare[/TD] [/TR] [TR] [TD]alt=304Icon.pnghttp://prowiki.info/images/3/31/304Icon.png[/img][/TD] [TD]Aron[/TD] [TD]Very Rare[/TD] [/TR] [/TABLE] Area:Dark Cave South (northwesternmost patches from Route 46's entryway.) Patches:3 Items: [TABLE] [TR] [TH][/TH] [TH]Item[/TH] [TH]Rarity[/TH] [/TR] [TR] [TD]alt=Pokéball.pnghttps://prowiki.info/images/b/b1/Pok%C3%A9ball.png[/img][/TD] [TD]Pokeball[/TD] [TD]Common[/TD] [/TR] [TR] [TD][/TD] [TD]Ground Gem[/TD] [TD]Common[/TD] [/TR] [TR] [TD]alt=Soda Pop.pnghttps://prowiki.info/images/6/6a/Soda_Pop.png[/img][/TD] [TD]Soda Pop[/TD] [TD]Uncommon[/TD] [/TR] [TR] [TD]alt=Paralyze Heal.pnghttps://prowiki.info/images/d/d6/Paralyze_Heal.png[/img][/TD] [TD]Paralyze Heal[/TD] [TD]Uncommon[/TD] [/TR] [TR] [TD]alt=Reaper Cloth.pnghttps://prowiki.info/images/d/d5/Reaper_Cloth.png[/img][/TD] [TD]Reaper Cloth[/TD] [TD]Intermediate[/TD] [/TR] [TR] [TD]alt=Leftovers.pnghttps://prowiki.info/images/7/7f/Leftovers.png[/img][/TD] [TD]Leftovers[/TD] [TD]Intermediate[/TD] [/TR] [TR] [TD]alt=Lure Ball.pnghttps://prowiki.info/images/0/0a/Lure_Ball.png[/img][/TD] [TD]Lure Ball[/TD] [TD]Intermediate[/TD] [/TR] [TR] [TD]alt=Calcium.pnghttps://prowiki.info/images/f/f5/Calcium.png[/img][/TD] [TD]Calcium[/TD] [TD]Rare[/TD] [/TR] [TR] [TD]alt=Root Fossil.pnghttps://prowiki.info/images/7/7d/Root_Fossil.png[/img][/TD] [TD]Root Fossil[/TD] [TD]Intermediate[/TD] [/TR] [TR] [TD]alt=Claw Fossil.pnghttps://prowiki.info/images/3/3e/Claw_Fossil.png[/img][/TD] [TD]Claw Fossil[/TD] [TD]Intermediate[/TD] [/TR] [TR] [TD]alt=Meadow Plate.pnghttps://prowiki.info/images/2/2e/Meadow_Plate.png[/img][/TD] [TD]Meadow Plate[/TD] [TD]Very Rare[/TD] [/TR] [/TABLE] Pokemon: [TABLE] [TR] [TH][/TH] [TH]Pokémon[/TH] [TH]Rarity[/TH] [/TR] [TR] [TD]alt=95Icon.pnghttps://prowiki.info/images/2/22/95Icon.png[/img][/TD] [TD]Onix[/TD] [TD]Uncommon[/TD] [/TR] [TR] [TD]alt=299Icon.pnghttps://prowiki.info/images/d/d8/299Icon.png[/img][/TD] [TD]Nosepass[/TD] [TD]Rare[/TD] [/TR] [TR] [TD]alt=679Icon.pnghttps://prowiki.info/images/1/12/679Icon.png[/img][/TD] [TD]Honedge[/TD] [TD]Very Rare[/TD] [/TR] [/TABLE] Area:Mt. Mortar (The area from Route 42's eastern entryway on 1F, The allotment north of Route 42's centric entryway on 1F and The allotments north of the entryway near the berry-tree plants on Route 42.} Patches:11 Item: [TABLE] [TR] [TH][/TH] [TH]Item[/TH] [TH]Rarity[/TH] [/TR] [TR] [TD]alt=Pokéball.pnghttps://prowiki.info/images/b/b1/Pok%C3%A9ball.png[/img][/TD] [TD]Pokeball[/TD] [TD]Common[/TD] [/TR] [TR] [TD][/TD] [TD]Ice Gem[/TD] [TD]Common[/TD] [/TR] [TR] [TD][/TD] [TD]Star Dust[/TD] [TD]Uncommon[/TD] [/TR] [TR] [TD]alt=Revival Herb.pnghttps://prowiki.info/images/4/45/Revival_Herb.png[/img][/TD] [TD]Revival Herb[/TD] [TD]Uncommon[/TD] [/TR] [TR] [TD]alt=Lure Ball.pnghttps://prowiki.info/images/0/0a/Lure_Ball.png[/img][/TD] [TD]Lure Ball[/TD] [TD]Intermediate[/TD] [/TR] [TR] [TD]alt=Sun Stone.pnghttps://prowiki.info/images/0/0a/Sun_Stone.png[/img][/TD] [TD]Sun Stone[/TD] [TD]Intermediate[/TD] [/TR] [TR] [TD]alt=Dawn Stone.pnghttps://prowiki.info/images/d/d3/Dawn_Stone.png[/img][/TD] [TD]Dawn Stone[/TD] [TD]Intermediate[/TD] [/TR] [TR] [TD]alt=Protein.pnghttps://prowiki.info/images/d/d8/Protein.png[/img][/TD] [TD]Protein[/TD] [TD]Rare[/TD] [/TR] [TR] [TD]alt=Root Fossil.pnghttps://prowiki.info/images/7/7d/Root_Fossil.png[/img][/TD] [TD]Root Fossil[/TD] [TD]Intermediate[/TD] [/TR] [TR] [TD]alt=Claw Fossil.pnghttps://prowiki.info/images/3/3e/Claw_Fossil.png[/img][/TD] [TD]Claw Fossil[/TD] [TD]Intermediate[/TD] [/TR] [TR] [TD][/TD] [TD]Splash Plate[/TD] [TD]Very Rare[/TD] [/TR] [/TABLE] Pokemon: [TABLE] [TR] [TH][/TH] [TH]Pokémon[/TH] [TH]Rarity[/TH] [/TR] [TR] [TD]alt=74Icon.pnghttps://prowiki.info/images/e/e8/74Icon.png[/img][/TD] [TD]Geodude[/TD] [TD]Uncommon[/TD] [/TR] [TR] [TD]alt=618Icon.pnghttps://prowiki.info/images/0/0e/618Icon.png[/img][/TD] [TD]Stunfisk[/TD] [TD]Rare[/TD] [/TR] [TR] [TD]alt=529Icon.pnghttps://prowiki.info/images/d/d4/529Icon.png[/img][/TD] [TD]Drilbur[/TD] [TD]Very Rare[/TD] [/TR] [/TABLE] Area:Slowpoke Well (All Patches on 1F.) Patches:12 Items: [TABLE] [TR] [TH][/TH] [TH]Item[/TH] [TH]Rarity[/TH] [/TR] [TR] [TD]alt=Pokéball.pnghttps://prowiki.info/images/b/b1/Pok%C3%A9ball.png[/img][/TD] [TD]Pokeball[/TD] [TD]Common[/TD] [/TR] [TR] [TD][/TD] [TD]Ghost Gem[/TD] [TD]Common[/TD] [/TR] [TR] [TD]alt=Nugget.pnghttps://prowiki.info/images/f/f0/Nugget.png[/img][/TD] [TD]Nugget[/TD] [TD]Uncommon[/TD] [/TR] [TR] [TD]alt=Soda Pop.pnghttps://prowiki.info/images/6/6a/Soda_Pop.png[/img][/TD] [TD]Soda Pop[/TD] [TD]Uncommon[/TD] [/TR] [TR] [TD]alt=Fast Ball.pnghttps://prowiki.info/images/f/f8/Fast_Ball.png[/img][/TD] [TD]Fast Ball[/TD] [TD]Intermediate[/TD] [/TR] [TR] [TD]alt=Nest Ball.pnghttps://prowiki.info/images/a/a6/Nest_Ball.png[/img][/TD] [TD]Nest Ball[/TD] [TD]Intermediate[/TD] [/TR] [TR] [TD]alt=Leftovers.pnghttps://prowiki.info/images/7/7f/Leftovers.png[/img][/TD] [TD]Leftovers[/TD] [TD]Intermediate[/TD] [/TR] [TR] [TD]alt=Calcium.pnghttps://prowiki.info/images/f/f5/Calcium.png[/img][/TD] [TD]Calcium[/TD] [TD]Rare[/TD] [/TR] [TR] [TD]alt=Root Fossil.pnghttps://prowiki.info/images/7/7d/Root_Fossil.png[/img][/TD] [TD]Root Fossil[/TD] [TD]Intermediate[/TD] [/TR] [TR] [TD]alt=Claw Fossil.pnghttps://prowiki.info/images/3/3e/Claw_Fossil.png[/img][/TD] [TD]Claw Fossil[/TD] [TD]Intermediate[/TD] [/TR] [TR] [TD][/TD] [TD]Insect Plate[/TD] [TD]Very Rare[/TD] [/TR] [/TABLE] Pokemon: [TABLE] [TR] [TH][/TH] [TH]Pokémon[/TH] [TH]Rarity[/TH] [/TR] [TR] [TD]alt=74Icon.pnghttps://prowiki.info/images/e/e8/74Icon.png[/img][/TD] [TD]Geodude[/TD] [TD]Uncommon[/TD] [/TR] [TR] [TD]alt=618Icon.pnghttps://prowiki.info/images/0/0e/618Icon.png[/img][/TD] [TD]Stunfisk[/TD] [TD]Rare[/TD] [/TR] [TR] [TD]alt=524Icon.pnghttps://prowiki.info/images/c/cc/524Icon.png[/img][/TD] [TD]Roggenrola[/TD] [TD]Very Rare[/TD] [/TR] [/TABLE] Area:Slowpoke Well (All Patches on L1.) Patches:8 Items: [TABLE] [TR] [TH][/TH] [TH]Item[/TH] [TH]Rarity[/TH] [/TR] [TR] [TD]alt=Pokéball.pnghttps://prowiki.info/images/b/b1/Pok%C3%A9ball.png[/img][/TD] [TD]Pokeball[/TD] [TD]Common[/TD] [/TR] [TR] [TD][/TD] [TD]Grass Gem[/TD] [TD]Common[/TD] [/TR] [TR] [TD]alt=Potion.pnghttps://prowiki.info/images/7/7a/Potion.png[/img][/TD] [TD]Potion[/TD] [TD]Uncommon[/TD] [/TR] [TR] [TD]alt=Paralyze Heal.pnghttps://prowiki.info/images/d/d6/Paralyze_Heal.png[/img][/TD] [TD]Paralyze Heal[/TD] [TD]Uncommon[/TD] [/TR] [TR] [TD]alt=Leftovers.pnghttps://prowiki.info/images/7/7f/Leftovers.png[/img][/TD] [TD]Leftovers[/TD] [TD]Intermediate[/TD] [/TR] [TR] [TD]alt=Dusk Stone.pnghttps://prowiki.info/images/3/39/Dusk_Stone.png[/img][/TD] [TD]Dusk Stone[/TD] [TD]Intermediate[/TD] [/TR] [TR] [TD]alt=Friend Ball.pnghttps://prowiki.info/images/3/30/Friend_Ball.png[/img][/TD] [TD]Friend Ball[/TD] [TD]Intermediate[/TD] [/TR] [TR] [TD]alt=Protein.pnghttps://prowiki.info/images/d/d8/Protein.png[/img][/TD] [TD]Protein[/TD] [TD]Rare[/TD] [/TR] [TR] [TD]alt=Root Fossil.pnghttps://prowiki.info/images/7/7d/Root_Fossil.png[/img][/TD] [TD]Root Fossil[/TD] [TD]Intermediate[/TD] [/TR] [TR] [TD]alt=Claw Fossil.pnghttps://prowiki.info/images/3/3e/Claw_Fossil.png[/img][/TD] [TD]Claw Fossil[/TD] [TD]Intermediate[/TD] [/TR] [TR] [TD][/TD] [TD]Iron Plate[/TD] [TD]Very Rare[/TD] [/TR] [/TABLE] Pokemon: [TABLE] [TR] [TH][/TH] [TH]Pokémon[/TH] [TH]Rarity[/TH] [/TR] [TR] [TD]alt=74Icon.pnghttps://prowiki.info/images/e/e8/74Icon.png[/img][/TD] [TD]Geodude[/TD] [TD]Uncommon[/TD] [/TR] [TR] [TD]alt=231Icon.pnghttps://prowiki.info/images/7/7f/231Icon.png[/img][/TD] [TD]Phanpy[/TD] [TD]Rare[/TD] [/TR] [TR] [TD]alt=449Icon.pnghttps://prowiki.info/images/4/45/449Icon.png[/img][/TD] [TD]Hippopotas[/TD] [TD]Very Rare[/TD] [/TR] [/TABLE] Area:Maniac Tunnel (East side of Maniac Tunnel located South of Veilstone City.) Patches:6 Items: [TABLE] [TR] [TH][/TH] [TH]Item[/TH] [TH]Rarity[/TH] [/TR] [TR] [TD]alt=Pokéball.pnghttps://prowiki.info/images/b/b1/Pok%C3%A9ball.png[/img][/TD] [TD]Pokéball[/TD] [TD]Common[/TD] [/TR] [TR] [TD][/TD] [TD]Normal Gem[/TD] [TD]Common[/TD] [/TR] [TR] [TD]alt=Ether.pnghttps://prowiki.info/images/3/3c/Ether.png[/img][/TD] [TD]Ether[/TD] [TD]Uncommon[/TD] [/TR] [TR] [TD]alt=Antidote.pnghttps://prowiki.info/images/7/71/Antidote.png[/img][/TD] [TD]Antidote[/TD] [TD]Uncommon[/TD] [/TR] [TR] [TD]alt=Ultra Ball.pnghttps://prowiki.info/images/3/34/Ultra_Ball.png[/img][/TD] [TD]Ultra Ball[/TD] [TD]Intermediate[/TD] [/TR] [TR] [TD]alt=Friend Ball.pnghttps://prowiki.info/images/3/30/Friend_Ball.png[/img][/TD] [TD]Friend Ball[/TD] [TD]Intermediate[/TD] [/TR] [TR] [TD]alt=Reaper Cloth.pnghttps://prowiki.info/images/d/d5/Reaper_Cloth.png[/img][/TD] [TD]Reaper Cloth[/TD] [TD]Intermediate[/TD] [/TR] [TR] [TD]alt=Zinc.pnghttps://prowiki.info/images/c/cb/Zinc.png[/img][/TD] [TD]Zinc[/TD] [TD]Rare[/TD] [/TR] [TR] [TD]alt=Jaw Fossil.pnghttps://prowiki.info/images/4/47/Jaw_Fossil.png[/img][/TD] [TD]Jaw Fossil[/TD] [TD]Intermediate[/TD] [/TR] [TR] [TD]alt=Sail Fossil.pnghttps://prowiki.info/images/1/1a/Sail_Fossil.png[/img][/TD] [TD]Sail Fossil[/TD] [TD]Intermediate[/TD] [/TR] [TR] [TD][/TD] [TD]Spooky Plate[/TD] [TD]Very Rare[/TD] [/TR] [/TABLE] Pokemon: [TABLE] [TR] [TH][/TH] [TH]Pokémon[/TH] [TH]Rarity[/TH] [/TR] [TR] [TD]alt=95Icon.pnghttps://prowiki.info/images/2/22/95Icon.png[/img][/TD] [TD]Onix[/TD] [TD]Uncommon[/TD] [/TR] [TR] [TD]alt=231Icon.pnghttps://prowiki.info/images/7/7f/231Icon.png[/img][/TD] [TD]Phanpy[/TD] [TD]Rare[/TD] [/TR] [TR] [TD]alt=246Icon.pnghttps://prowiki.info/images/a/a8/246Icon.png[/img][/TD] [TD]Larvitar[/TD] [TD]Very Rare[/TD] [/TR] [/TABLE] Area:Mt. Coronet Summit (South side of Mt. Coronet Summit.) Patches:5 Items: [TABLE] [TR] [TH][/TH] [TH]Item[/TH] [TH]Rarity[/TH] [/TR] [TR] [TD]alt=Pokéball.pnghttps://prowiki.info/images/b/b1/Pok%C3%A9ball.png[/img][/TD] [TD]Pokéball[/TD] [TD]Common[/TD] [/TR] [TR] [TD][/TD] [TD]Poison Gem[/TD] [TD]Common[/TD] [/TR] [TR] [TD]alt=Antidote.pnghttps://prowiki.info/images/7/71/Antidote.png[/img][/TD] [TD]Antidote[/TD] [TD]Uncommon[/TD] [/TR] [TR] [TD]alt=Ice Heal.pnghttps://prowiki.info/images/4/41/Ice_Heal.png[/img][/TD] [TD]Ice Heal[/TD] [TD]Uncommon[/TD] [/TR] [TR] [TD]alt=Everstone.pnghttps://prowiki.info/images/8/86/Everstone.png[/img][/TD] [TD]Everstone[/TD] [TD]Intermediate[/TD] [/TR] [TR] [TD]alt=Leftovers.pnghttps://prowiki.info/images/7/7f/Leftovers.png[/img][/TD] [TD]Leftovers[/TD] [TD]Intermediate[/TD] [/TR] [TR] [TD]alt=Soft Sand.pnghttps://prowiki.info/images/e/e9/Soft_Sand.png[/img][/TD] [TD]Soft Sand[/TD] [TD]Intermediate[/TD] [/TR] [TR] [TD]alt=Zinc.pnghttps://prowiki.info/images/c/cb/Zinc.png[/img][/TD] [TD]Zinc[/TD] [TD]Rare[/TD] [/TR] [TR] [TD]alt=Jaw Fossil.pnghttps://prowiki.info/images/4/47/Jaw_Fossil.png[/img][/TD] [TD]Jaw Fossil[/TD] [TD]Intermediate[/TD] [/TR] [TR] [TD]alt=Sail Fossil.pnghttps://prowiki.info/images/1/1a/Sail_Fossil.png[/img][/TD] [TD]Sail Fossil[/TD] [TD]Intermediate[/TD] [/TR] [TR] [TD][/TD] [TD]Stone Plate[/TD] [TD]Very Rare[/TD] [/TR] [/TABLE] Pokemon: [TABLE] [TR] [TH][/TH] [TH]Pokémon[/TH] [TH]Rarity[/TH] [/TR] [TR] [TD]alt=75Icon.pnghttps://prowiki.info/images/1/14/75Icon.png[/img][/TD] [TD]Graveler[/TD] [TD]Uncommon[/TD] [/TR] [TR] [TD]alt=343Icon.pnghttps://prowiki.info/images/7/72/343Icon.png[/img][/TD] [TD]Baltoy[/TD] [TD]Rare[/TD] [/TR] [TR] [TD]alt=529Icon.pnghttps://prowiki.info/images/d/d4/529Icon.png[/img][/TD] [TD]Drilbur[/TD] [TD]Very Rare[/TD] [/TR] [/TABLE] Area:Oreburgh Gate B1F. (West of Oreburgh city, enter to Oreburgh Gate B1F and surf to access to the Dig Spots.) Patches:5 Items: [TABLE] [TR] [TH][/TH] [TH]Item[/TH] [TH]Rarity[/TH] [/TR] [TR] [TD]alt=Pokéball.pnghttps://prowiki.info/images/b/b1/Pok%C3%A9ball.png[/img][/TD] [TD]Pokéball[/TD] [TD]Common[/TD] [/TR] [TR] [TD][/TD] [TD]Psychic Gem[/TD] [TD]Common[/TD] [/TR] [TR] [TD]alt=Elixir.pnghttps://prowiki.info/images/4/43/Elixir.png[/img][/TD] [TD]Elixir[/TD] [TD]Uncommon[/TD] [/TR] [TR] [TD]alt=Ice Heal.pnghttps://prowiki.info/images/4/41/Ice_Heal.png[/img][/TD] [TD]Ice Heal[/TD] [TD]Uncommon[/TD] [/TR] [TR] [TD]alt=Dawn Stone.pnghttps://prowiki.info/images/d/d3/Dawn_Stone.png[/img][/TD] [TD]Dawn Stone[/TD] [TD]Intermediate[/TD] [/TR] [TR] [TD]alt=Ultra Ball.pnghttps://prowiki.info/images/3/34/Ultra_Ball.png[/img][/TD] [TD]Ultra Ball[/TD] [TD]Intermediate[/TD] [/TR] [TR] [TD]alt=Net Ball.pnghttps://prowiki.info/images/b/bb/Net_Ball.png[/img][/TD] [TD]Net Ball[/TD] [TD]Intermediate[/TD] [/TR] [TR] [TD]alt=PP Up.pnghttps://prowiki.info/images/d/d2/PP_Up.png[/img][/TD] [TD]PP Up[/TD] [TD]Rare[/TD] [/TR] [TR] [TD]alt=Jaw Fossil.pnghttps://prowiki.info/images/4/47/Jaw_Fossil.png[/img][/TD] [TD]Jaw Fossil[/TD] [TD]Intermediate[/TD] [/TR] [TR] [TD]alt=Sail Fossil.pnghttps://prowiki.info/images/1/1a/Sail_Fossil.png[/img][/TD] [TD]Sail Fossil[/TD] [TD]Intermediate[/TD] [/TR] [TR] [TD][/TD] [TD]Toxic Plate[/TD] [TD]Very Rare[/TD] [/TR] [/TABLE] Pokemon: [TABLE] [TR] [TH][/TH] [TH]Pokémon[/TH] [TH]Rarity[/TH] [/TR] [TR] [TD]alt=618Icon.pnghttps://prowiki.info/images/0/0e/618Icon.png[/img][/TD] [TD]Stunfisk[/TD] [TD]Uncommon[/TD] [/TR] [TR] [TD]alt=299Icon.pnghttps://prowiki.info/images/d/d8/299Icon.png[/img][/TD] [TD]Nosepass[/TD] [TD]Rare[/TD] [/TR] [TR] [TD]alt=524Icon.pnghttps://prowiki.info/images/c/cc/524Icon.png[/img][/TD] [TD]Roggenrola[/TD] [TD]Very Rare[/TD] [/TR] [/TABLE] Area:Ravaged Path. (North of Jubilife city, enter to Ravaged Path and surf to access to the Dig Spots.) Patches:4 Items: [TABLE] [TR] [TH][/TH] [TH]Item[/TH] [TH]Rarity[/TH] [/TR] [TR] [TD]alt=Pokéball.pnghttps://prowiki.info/images/b/b1/Pok%C3%A9ball.png[/img][/TD] [TD]Pokéball[/TD] [TD]Common[/TD] [/TR] [TR] [TD][/TD] [TD]Rock Gem[/TD] [TD]Common[/TD] [/TR] [TR] [TD]alt=Stardust.pnghttps://prowiki.info/images/6/65/Stardust.png[/img][/TD] [TD]Stardust[/TD] [TD]Uncommon[/TD] [/TR] [TR] [TD]alt=Burn Heal.pnghttps://prowiki.info/images/1/10/Burn_Heal.png[/img][/TD] [TD]Burn Heal[/TD] [TD]Uncommon[/TD] [/TR] [TR] [TD]alt=Dusk Stone.pnghttps://prowiki.info/images/3/39/Dusk_Stone.png[/img][/TD] [TD]Dusk Stone[/TD] [TD]Intermediate[/TD] [/TR] [TR] [TD]alt=Soft Sand.pnghttps://prowiki.info/images/e/e9/Soft_Sand.png[/img][/TD] [TD]Soft Sand[/TD] [TD]Intermediate[/TD] [/TR] [TR] [TD]alt=Net Ball.pnghttps://prowiki.info/images/b/bb/Net_Ball.png[/img][/TD] [TD]Net Ball[/TD] [TD]Intermediate[/TD] [/TR] [TR] [TD]alt=HP Up.pnghttps://prowiki.info/images/1/1e/HP_Up.png[/img][/TD] [TD]HP Up[/TD] [TD]Rare[/TD] [/TR] [TR] [TD]alt=Jaw Fossil.pnghttps://prowiki.info/images/4/47/Jaw_Fossil.png[/img][/TD] [TD]Jaw Fossil[/TD] [TD]Intermediate[/TD] [/TR] [TR] [TD]alt=Sail Fossil.pnghttps://prowiki.info/images/1/1a/Sail_Fossil.png[/img][/TD] [TD]Sail Fossil[/TD] [TD]Intermediate[/TD] [/TR] [TR] [TD][/TD] [TD]Zap Plate[/TD] [TD]Very Rare[/TD] [/TR] [/TABLE] Pokemon: [TABLE] [TR] [TH][/TH] [TH]Pokémon[/TH] [TH]Rarity[/TH] [/TR] [TR] [TD]alt=27Icon.pnghttps://prowiki.info/images/c/cf/27Icon.png[/img][/TD] [TD]Sandshrew[/TD] [TD]Uncommon[/TD] [/TR] [TR] [TD]alt=231Icon.pnghttps://prowiki.info/images/7/7f/231Icon.png[/img][/TD] [TD]Phanpy[/TD] [TD]Rare[/TD] [/TR] [TR] [TD]alt=304Icon.pnghttps://prowiki.info/images/3/31/304Icon.png[/img][/TD] [TD]Aron[/TD] [TD]Very Rare[/TD] [/TR] [/TABLE] Area:Route 209. (South of Soleceon Town) Patches:5 Items: [TABLE] [TR] [TH][/TH] [TH]Item[/TH] [TH]Rarity[/TH] [/TR] [TR] [TD]alt=Pokéball.pnghttps://prowiki.info/images/b/b1/Pok%C3%A9ball.png[/img][/TD] [TD]Pokéball[/TD] [TD]Common[/TD] [/TR] [TR] [TD][/TD] [TD]Steel Gem[/TD] [TD]Common[/TD] [/TR] [TR] [TD]alt=Nugget.pnghttps://prowiki.info/images/f/f0/Nugget.png[/img][/TD] [TD]Nugget[/TD] [TD]Uncommon[/TD] [/TR] [TR] [TD]alt=Burn Heal.pnghttps://prowiki.info/images/1/10/Burn_Heal.png[/img][/TD] [TD]Burn Heal[/TD] [TD]Uncommon[/TD] [/TR] [TR] [TD]alt=Everstone.pnghttps://prowiki.info/images/8/86/Everstone.png[/img][/TD] [TD]Everstone[/TD] [TD]Intermediate[/TD] [/TR] [TR] [TD]alt=Great Ball.pnghttps://prowiki.info/images/4/45/Great_Ball.png[/img][/TD] [TD]Great Ball[/TD] [TD]Intermediate[/TD] [/TR] [TR] [TD]alt=Repeat Ball.pnghttps://prowiki.info/images/7/75/Repeat_Ball.png[/img][/TD] [TD]Repeat Ball[/TD] [TD]Intermediate[/TD] [/TR] [TR] [TD]alt=PP Up.pnghttps://prowiki.info/images/d/d2/PP_Up.png[/img][/TD] [TD]PP Up[/TD] [TD]Rare[/TD] [/TR] [TR] [TD]alt=Jaw Fossil.pnghttps://prowiki.info/images/4/47/Jaw_Fossil.png[/img][/TD] [TD]Jaw Fossil[/TD] [TD]Intermediate[/TD] [/TR] [TR] [TD]alt=Sail Fossil.pnghttps://prowiki.info/images/1/1a/Sail_Fossil.png[/img][/TD] [TD]Sail Fossil[/TD] [TD]Intermediate[/TD] [/TR] [TR] [TD][/TD] [TD]Mind Plate[/TD] [TD]Very Rare[/TD] [/TR] [/TABLE] Pokemon: [TABLE] [TR] [TH][/TH] [TH]Pokémon[/TH] [TH]Rarity[/TH] [/TR] [TR] [TD]alt=27Icon.pnghttps://prowiki.info/images/c/cf/27Icon.png[/img][/TD] [TD]Sandshrew[/TD] [TD]Uncommon[/TD] [/TR] [TR] [TD]alt=299Icon.pnghttps://prowiki.info/images/d/d8/299Icon.png[/img][/TD] [TD]Nosepass[/TD] [TD]Rare[/TD] [/TR] [TR] [TD]alt=328Icon.pnghttps://prowiki.info/images/a/af/328Icon.png[/img][/TD] [TD]Trapinch[/TD] [TD]Very Rare[/TD] [/TR] [/TABLE] Area:Route 210 North. (East of Celestic Town) Patches:5 Items: [TABLE] [TR] [TH][/TH] [TH]Item[/TH] [TH]Rarity[/TH] [/TR] [TR] [TD]alt=Pokéball.pnghttps://prowiki.info/images/b/b1/Pok%C3%A9ball.png[/img][/TD] [TD]Pokéball[/TD] [TD]Common[/TD] [/TR] [TR] [TD][/TD] [TD]Water Gem[/TD] [TD]Common[/TD] [/TR] [TR] [TD]alt=Elixir.pnghttps://prowiki.info/images/4/43/Elixir.png[/img][/TD] [TD]Elixir[/TD] [TD]Uncommon[/TD] [/TR] [TR] [TD]alt=Awakening.pnghttps://prowiki.info/images/b/b7/Awakening.png[/img][/TD] [TD]Awakening[/TD] [TD]Uncommon[/TD] [/TR] [TR] [TD]alt=Oval Stone.pnghttps://prowiki.info/images/2/24/Oval_Stone.png[/img][/TD] [TD]Oval Stone[/TD] [TD]Intermediate[/TD] [/TR] [TR] [TD]alt=Dawn Stone.pnghttps://prowiki.info/images/d/d3/Dawn_Stone.png[/img][/TD] [TD]Dawn Stone[/TD] [TD]Intermediate[/TD] [/TR] [TR] [TD]alt=Soft Sand.pnghttps://prowiki.info/images/e/e9/Soft_Sand.png[/img][/TD] [TD]Soft Sand[/TD] [TD]Intermediate[/TD] [/TR] [TR] [TD]alt=PP Max.pnghttps://prowiki.info/images/2/23/PP_Max.png[/img][/TD] [TD]PP Max[/TD] [TD]Rare[/TD] [/TR] [TR] [TD]alt=Jaw Fossil.pnghttps://prowiki.info/images/4/47/Jaw_Fossil.png[/img][/TD] [TD]Jaw Fossil[/TD] [TD]Intermediate[/TD] [/TR] [TR] [TD]alt=Sail Fossil.pnghttps://prowiki.info/images/1/1a/Sail_Fossil.png[/img][/TD] [TD]Sail Fossil[/TD] [TD]Intermediate[/TD] [/TR] [TR] [TD]alt=Big Nugget.pnghttps://prowiki.info/images/d/d9/Big_Nugget.png[/img][/TD] [TD]Big Nugget[/TD] [TD]Very Rare[/TD] [/TR] [/TABLE] Pokemon: [TABLE] [TR] [TH][/TH] [TH]Pokémon[/TH] [TH]Rartity[/TH] [/TR] [TR] [TD]alt=27Icon.pnghttps://prowiki.info/images/c/cf/27Icon.png[/img][/TD] [TD]Sandshrew[/TD] [TD]Uncommon[/TD] [/TR] [TR] [TD]alt=231Icon.pnghttps://prowiki.info/images/7/7f/231Icon.png[/img][/TD] [TD]Phanpy[/TD] [TD]Rare[/TD] [/TR] [TR] [TD]alt=449Icon.pnghttps://prowiki.info/images/4/45/449Icon.png[/img][/TD] [TD]Hippopotas[/TD] [TD]Very Rare[/TD] [/TR] [/TABLE] Area:Route 211 (Dig Spots divided in 2 sides: East of Eterna City and West of Celestic Town.) Patches:6 Items: [TABLE] [TR] [TH][/TH] [TH]Item[/TH] [TH]Rarity[/TH] [/TR] [TR] [TD]alt=Pokéball.pnghttps://prowiki.info/images/b/b1/Pok%C3%A9ball.png[/img][/TD] [TD]Pokéball[/TD] [TD]Common[/TD] [/TR] [TR] [TD]alt=Rare Candy.pnghttps://prowiki.info/images/a/a2/Rare_Candy.png[/img][/TD] [TD]Rare Candy[/TD] [TD]Common[/TD] [/TR] [TR] [TD]alt=Full Heal.pnghttps://prowiki.info/images/9/9c/Full_Heal.png[/img][/TD] [TD]Full Heal[/TD] [TD]Uncommon[/TD] [/TR] [TR] [TD]alt=Full Restore.pnghttps://prowiki.info/images/c/c3/Full_Restore.png[/img][/TD] [TD]Full Restore[/TD] [TD]Uncommon[/TD] [/TR] [TR] [TD]alt=Oval Stone.pnghttps://prowiki.info/images/2/24/Oval_Stone.png[/img][/TD] [TD]Oval Stone[/TD] [TD]Intermediate[/TD] [/TR] [TR] [TD]alt=Great Ball.pnghttps://prowiki.info/images/4/45/Great_Ball.png[/img][/TD] [TD]Great Ball[/TD] [TD]Intermediate[/TD] [/TR] [TR] [TD]alt=Repeat Ball.pnghttps://prowiki.info/images/7/75/Repeat_Ball.png[/img][/TD] [TD]Repeat Ball[/TD] [TD]Intermediate[/TD] [/TR] [TR] [TD]alt=PP Max.pnghttps://prowiki.info/images/2/23/PP_Max.png[/img][/TD] [TD]PP Max[/TD] [TD]Rare[/TD] [/TR] [TR] [TD]alt=Jaw Fossil.pnghttps://prowiki.info/images/4/47/Jaw_Fossil.png[/img][/TD] [TD]Jaw Fossil[/TD] [TD]Intermediate[/TD] [/TR] [TR] [TD]alt=Sail Fossil.pnghttps://prowiki.info/images/1/1a/Sail_Fossil.png[/img][/TD] [TD]Sail Fossil[/TD] [TD]Intermediate[/TD] [/TR] [TR] [TD]alt=Macho Brace.pnghttps://prowiki.info/images/9/9a/Macho_Brace.png[/img][/TD] [TD]Macho Brace[/TD] [TD]Very Rare[/TD] [/TR] [/TABLE] Pokemon: [TABLE] [TR] [TH][/TH] [TH]Pokémon[/TH] [TH]Rarity[/TH] [/TR] [TR] [TD]alt=75Icon.pnghttps://prowiki.info/images/1/14/75Icon.png[/img][/TD] [TD]Graveler[/TD] [TD]Uncommon[/TD] [/TR] [TR] [TD]alt=343Icon.pnghttps://prowiki.info/images/7/72/343Icon.png[/img][/TD] [TD]Baltoy[/TD] [TD]Rare[/TD] [/TR] [TR] [TD]alt=679Icon.pnghttps://prowiki.info/images/1/12/679Icon.png[/img][/TD] [TD]Honedge[/TD] [TD]Very Rare[/TD] [/TR] [/TABLE] Area:Sevii Island 6 (Water Path) Patches: 7 Items: [TABLE] [TR] [TH][/TH] [TH]Item[/TH] [TH]Rarity[/TH] [/TR] [TR] [TD]alt=Pokéball.pnghttps://prowiki.info/images/b/b1/Pok%C3%A9ball.png[/img][/TD] [TD]Pokeball[/TD] [TD]Common[/TD] [/TR] [TR] [TD]alt=Rare Candy.pnghttps://prowiki.info/images/a/a2/Rare_Candy.png[/img][/TD] [TD]Rare Candy[/TD] [TD]Common[/TD] [/TR] [TR] [TD]alt=Full Restore.pnghttps://prowiki.info/images/c/c3/Full_Restore.png[/img][/TD] [TD]Full Restore[/TD] [TD]Uncommon[/TD] [/TR] [TR] [TD]alt=Full Heal.pnghttps://prowiki.info/images/9/9c/Full_Heal.png[/img][/TD] [TD]Full Heal[/TD] [TD]Uncommon[/TD] [/TR] [TR] [TD]alt=Everstone.pnghttps://prowiki.info/images/8/86/Everstone.png[/img][/TD] [TD]Everstone[/TD] [TD]Intermediate[/TD] [/TR] [TR] [TD]alt=Oval Stone.pnghttps://prowiki.info/images/2/24/Oval_Stone.png[/img][/TD] [TD]Oval Stone[/TD] [TD]Intermediate[/TD] [/TR] [TR] [TD]alt=Lure Ball.pnghttps://prowiki.info/images/0/0a/Lure_Ball.png[/img][/TD] [TD]Lure Ball[/TD] [TD]Intermediate[/TD] [/TR] [TR] [TD]alt=HP Up.pnghttps://prowiki.info/images/1/1e/HP_Up.png[/img][/TD] [TD]HP Up[/TD] [TD]Rare[/TD] [/TR] [TR] [TD]alt=Root Fossil.pnghttps://prowiki.info/images/7/7d/Root_Fossil.png[/img][/TD] [TD]Root Fossil[/TD] [TD]Intermediate[/TD] [/TR] [TR] [TD]alt=Sail Fossil.pnghttps://prowiki.info/images/1/1a/Sail_Fossil.png[/img][/TD] [TD]Sail Fossil[/TD] [TD]Intermediate[/TD] [/TR] [TR] [TD]alt=Macho Brace.pnghttps://prowiki.info/images/9/9a/Macho_Brace.png[/img][/TD] [TD]Macho Brace[/TD] [TD]Very Rare[/TD] [/TR] [/TABLE] Pokemon: [TABLE] [TR] [TH][/TH] [TH]Pokémon[/TH] [TH]Rarity[/TH] [/TR] [TR] [TD]alt=50Icon.pnghttps://prowiki.info/images/b/b9/50Icon.png[/img][/TD] [TD]Diglett[/TD] [TD]Uncommon[/TD] [/TR] [TR] [TD]alt=328Icon.pnghttps://prowiki.info/images/a/af/328Icon.png[/img][/TD] [TD]Trapinch[/TD] [TD]Rare[/TD] [/TR] [TR] [TD]alt=524Icon.pnghttps://prowiki.info/images/c/cc/524Icon.png[/img][/TD] [TD]Roggenrola[/TD] [TD]Very Rare[/TD] [/TR] [/TABLE] Area:Sevii Island 7 (Tanboy Key - Patches behind the Tyranitar) Patches:7 Items: [TABLE] [TR] [TH][/TH] [TH]Item[/TH] [TH]Rarity[/TH] [/TR] [TR] [TD]alt=Pokéball.pnghttps://prowiki.info/images/b/b1/Pok%C3%A9ball.png[/img][/TD] [TD]Pokeball[/TD] [TD]Common[/TD] [/TR] [TR] [TD]alt=Rare Candy.pnghttps://prowiki.info/images/a/a2/Rare_Candy.png[/img][/TD] [TD]Rare Candy[/TD] [TD]Common[/TD] [/TR] [TR] [TD]alt=Ice Heal.pnghttps://prowiki.info/images/4/41/Ice_Heal.png[/img][/TD] [TD]Ice Heal[/TD] [TD]Uncommon[/TD] [/TR] [TR] [TD]alt=Paralyze Heal.pnghttps://prowiki.info/images/d/d6/Paralyze_Heal.png[/img][/TD] [TD]Paralyze Heal[/TD] [TD]Uncommon[/TD] [/TR] [TR] [TD]alt=Everstone.pnghttps://prowiki.info/images/8/86/Everstone.png[/img][/TD] [TD]Everstone[/TD] [TD]Intermediate[/TD] [/TR] [TR] [TD]alt=Repeat Ball.pnghttps://prowiki.info/images/7/75/Repeat_Ball.png[/img][/TD] [TD]Repeat Ball[/TD] [TD]Intermediate[/TD] [/TR] [TR] [TD]alt=Dawn Stone.pnghttps://prowiki.info/images/d/d3/Dawn_Stone.png[/img][/TD] [TD]Dawn Stone[/TD] [TD]Intermediate[/TD] [/TR] [TR] [TD]alt=PP Max.pnghttps://prowiki.info/images/2/23/PP_Max.png[/img][/TD] [TD]PP Max[/TD] [TD]Rare[/TD] [/TR] [TR] [TD]alt=Helix Fossil.pnghttps://prowiki.info/images/d/d2/Helix_Fossil.png[/img][/TD] [TD]Helix Fossil[/TD] [TD]Intermediate[/TD] [/TR] [TR] [TD]alt=Sail Fossil.pnghttps://prowiki.info/images/1/1a/Sail_Fossil.png[/img][/TD] [TD]Sail Fossil[/TD] [TD]Intermediate[/TD] [/TR] [TR] [TD]alt=Macho Brace.pnghttps://prowiki.info/images/9/9a/Macho_Brace.png[/img][/TD] [TD]Macho Brace[/TD] [TD]Very Rare[/TD] [/TR] [/TABLE] Pokemon: [TABLE] [TR] [TH][/TH] [TH]Pokémon[/TH] [TH]Rarity[/TH] [/TR] [TR] [TD]alt=75Icon.pnghttps://prowiki.info/images/1/14/75Icon.png[/img][/TD] [TD]Graveler[/TD] [TD]Uncommon[/TD] [/TR] [TR] [TD]alt=343Icon.pnghttps://prowiki.info/images/7/72/343Icon.png[/img][/TD] [TD]Baltoy[/TD] [TD]Rare[/TD] [/TR] [TR] [TD]alt=246Icon.pnghttps://prowiki.info/images/a/a8/246Icon.png[/img][/TD] [TD]Larvitar[/TD] [TD]Very Rare[/TD] [/TR] [/TABLE] Major Credit goes out to Magic Bounce. Thank you for the help.1 point
-
i did this quest with my friends and one of them lost to Giovanni 5 times and he didnt gave up haha lol1 point
-
Hello guys, I am going to show you how can you get free Ted Hat: This quest is simple, but time costing (or depends on your luck) do it if you are free. :Grin:1 point
















.png.588b4192979a33c6a112893c49e31db4.png)




.png.a3fc3d928526d6fa1f418432cfa68c5d.png)


.png.b2bb8c4e0eb606e75877c831289d006a.png)


