Leaderboard


Popular Content
Showing content with the highest reputation on 08/25/19 in all areas
-
I don't really post too much both in game or out of game, but I want to try and show off my art. Hope I used the right thread, still new at posting.
 2 points
 -
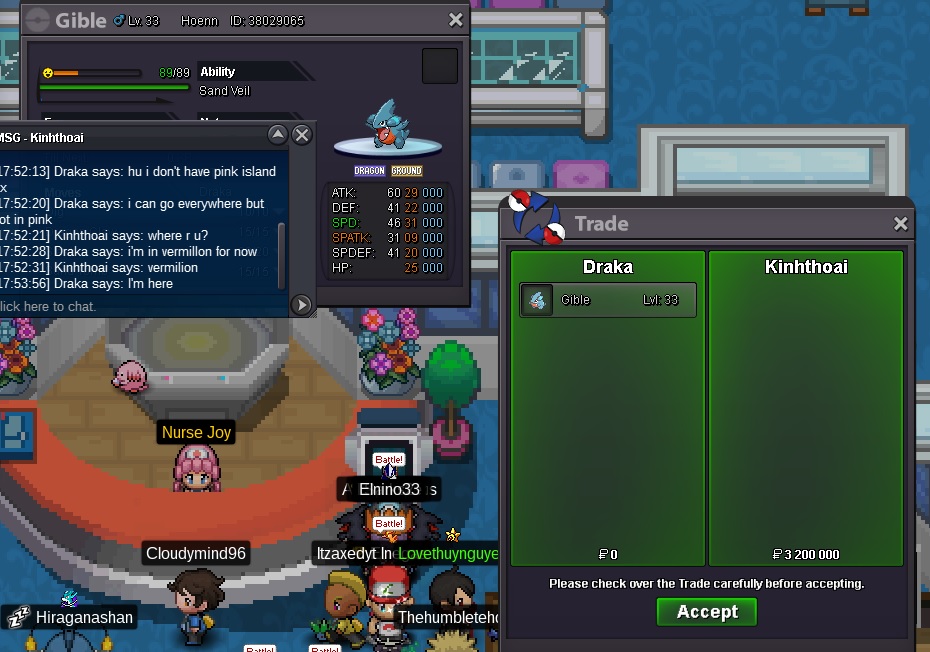
KinhThoai won the B.O. wp to him Stop troll me Alixx xD
2 points
-
Hey, I have created this guide to help players that may need help completing the Sinnoh region! I will cover the Sinnoh Region from start to finish in this guide and also include how to go to Sinnoh! I hope that you find this guide helpful! If you need help with the previous regions, check out these guides: JollyOlNathan's Kanto Guide Sugarred9's Johto Guide ArielGG's Hoenn Guide That being said, let's begin our adventure! That was it! Congrats on becoming the Sinnoh champion and I hope this walkthrough has guided you well through it.
1 point
-
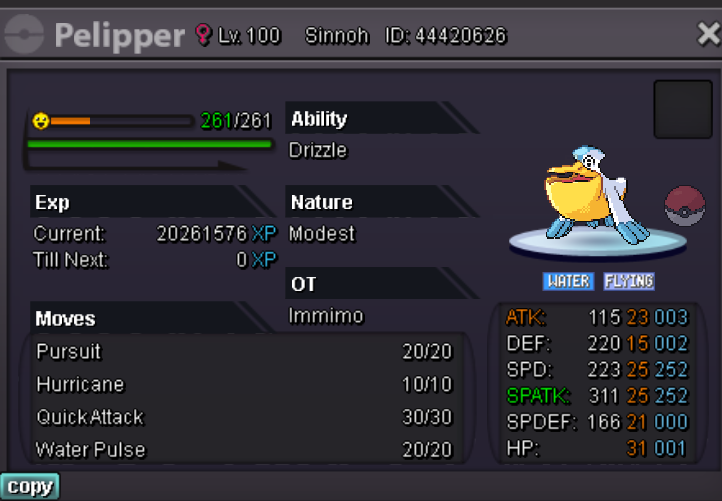
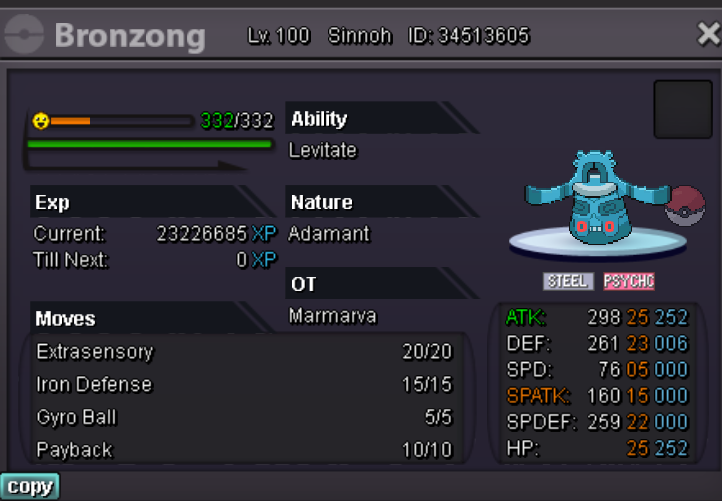
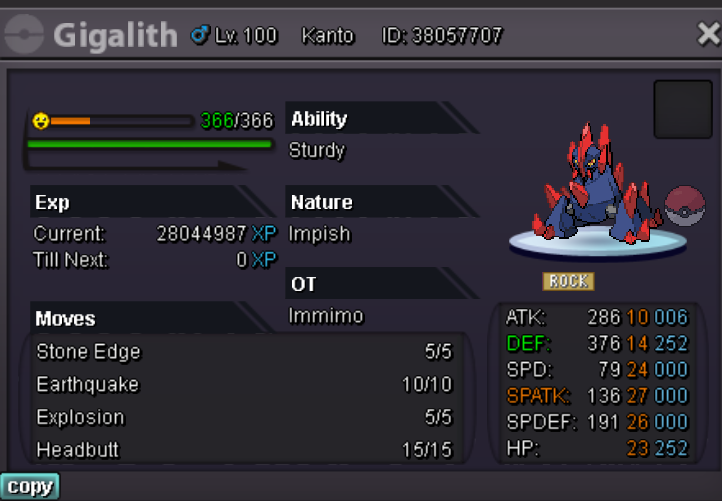
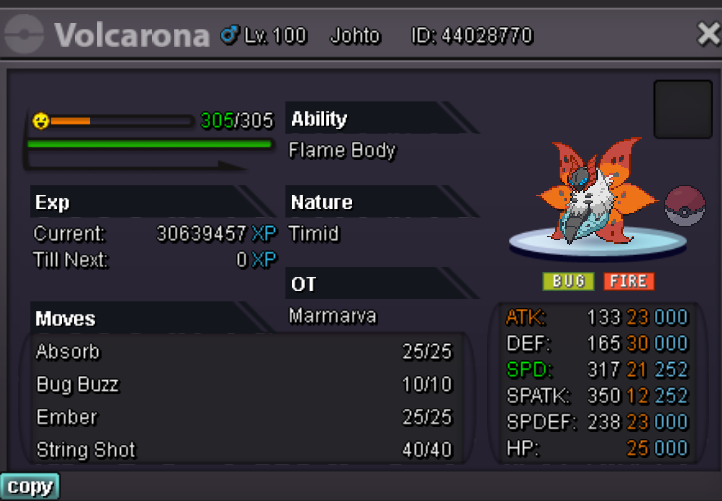
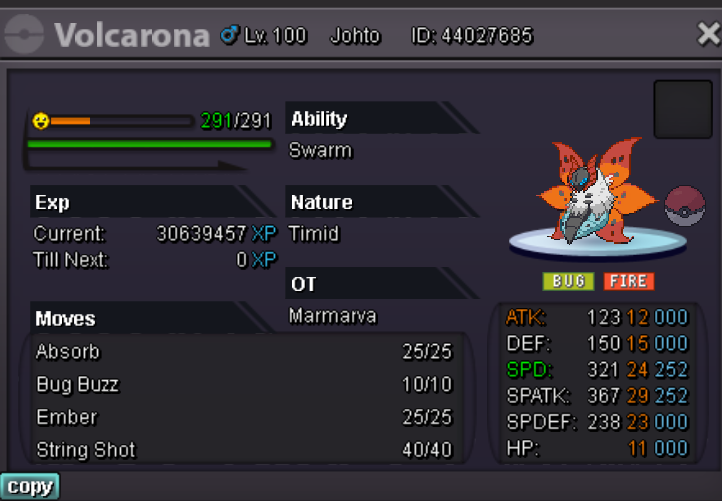
Welcome to: How to make money, the guide! Before we start with the guide, I'd like to clarify certain things: This guide is mainly aimed to those newbies, semi advanced and somewhat experienced players that are in desperate need of money to survive on PRO's economy. This guide is not really aimed at expert multimillionaire players. However, some of these players might appreciate some of the advice and make use of some of the guide I'll be writing down here. I'll be mentioning a LOT of options and brainstorming a lot of ideas for any player to use. (Also, I'll add a lot of humour into it :v) These are also REALISTIC things you can do, not impossible or overcomplicated stuff. They're basic and easy. Are you stuck in Kanto trying to get a bike but these pokeballs keep making you poor? Are you hardstuck on Sabrina and have completely lost faith on moving on? Are you trying to defeat Mewtwo but he keeps oneshotting your team and you have no idea how to farm money to buy potions because you didn't bother to spend 5 minutes to google that the ability Sturdy would've helped you? If so, this is your guide! Welcome to how to make money in PRO 101! or "how did Bhimoso lose his sanity to this level to make guides instead of playing the game"! This guide will first be aimed at you newbies who are still in Kanto trying to buy a bike, a good rod, a parcel, and a house on route 19 (Spoilers: you can't, sadly). Then, we'll go over your monetary options in Johto, in Hoenn (spoiler alert: Hoenn sucks when it comes to making money. Seriously. IT SUCKS.) and finally, Sinnoh. I will try to condense as much info and options as I can for you all. I will also read comments on this guide and link other guides that may help you out or have relevant info. You can bring in suggestions too, although I have a big selection of stuff to post. Choose the region you've reached to or the ones you're interested in the most. As an extra and very useful decision: Remember you can have up to 4 accounds and play in all of them, complete the story 4 times, trade with yourself and help yourself a bit. If you have 4 accounts, you can do all of these methods four times and gain four times the normal amount of money. That will make you rich beyond absurd levels and will skyrocket your money gain. You can gain millions in a day just by doing all of this stuff in your accounts. I repeat: MILLIONS. Keep in mind it is no longer allowed to do Dig Spots and Bosses in both servers as it's against PRO's Rules because of economy reasons (according to developers). Remember to do Dig Spots every three days, Pokestops every day and a half, Mushrooms every 2 weeks, Bosses every 2 weeks, daily excavations and fight trainers every week for maximized money gains. You'll earn absurd amounts of money this way. Let's get into it! Kanto If you're a newbie, I will be assuming you are just starting, have reached the middle point of Kanto and noticed you REALLY need money for that bike or you're ultra desperate in the Elite Four. If not, you can still do all of these, and include Bosses, Love Island extras and more stuff! Missions Let's start with the simplest and first option, before we move onto the others: Missions. If you remember from your visits in Viridian City, you'll have noticed the officer there has missions for you. These missions can be done in almost all Kanto cities which have gyms: Viridian, Pewter, Cerulean, Celadon and Cinnabar. All these cities have 2+ missions each, some of which are easy and appropriate for the current situation you're in, but some are a bit too hard to do them economically. I'll list all of these which are easily manageable for newbies and the ones not so manageable. Remember you can only do missions once! Viridian City: Take the Rattata Hair quest. Teach TM Thief to a pokemon that is a physical attacker and is a good hm slave (Sentret/Nidoran when they evolve will be), ensure he has no items equipped and spam Thief against Rattatas in route 1. Once he steals a Rattata hair, be sure to remove it from him and get 2 more Rattata hair (3 in total). Go and get the reward for the quest, this is an easy money making one. You will also be able to steal items from other pokemon if you feel so. (This is of great use later on!) Beat Bug Catcher Gerald in Viridian Forest. This is just free money, just beat him lol. Same goes with catching a sentret. However, they only appear at morning and day time in route 1 (if you do not know when does a pokemon spawn, use the Reborn Bot in the official PRO discord. -> https://discord.gg/98pMNxq ). Do all quests in Viridian, basically. Total gain: 15.5k pokedollars. (that's a LOT at the beggining of PRO) Pewter City: Beat Brock (yes, it's a quest reward lol). Then talk to Jenny to get a bit of money. Afterwards, catch a Pikachu in Viridian Forest. They're not very common but they're easy to find. For the Headbutt quest: teach Headbutt in the entrance of Viridian Maze (the tree in Viridian Forest which has a hole, north from the entrance from the south) to a HM Slave. Show it to Jenny and she'll give you a lot of money (it will pay more than the 2k you need to teach headbutt to a pokemon.) Try to headbutt trees in the first routes and cities and get a Silcoon. Show it to her and you'll get extra money. You'll get 7750 pokedollars if you did not give the Silcoon, you'll get an extra 9k if you do. Cerulean City: Here, one of the quests is not really manageable, which sucks a bit. Do the teaching dig to a pokemon quest: either train a Sandshrew or Diglett until they learn dig via level-up and then show it to Jenny, or teach the TM to a Pokemon that can learn it (preferably a HM slave). When you've done this, you'll get a Soft Sand (increases ground type moves power). If you then go to route 3 and Mt Moon and dig up dig spots (or in other places) and bring atleast two different gems to Jenny, you'll get a Big Pearl. Sell it to the item maniac in route 25 for 9k pokedollars! Afterwards, you can try your luck with the Clefairy one: to know if it has Cute Charm, poison it. If it loses HP, it either has Cute Charm or its hidden ability. If it doesn't, it has Magic Guard. However, be ready for the pain, because he's not common and he only appears in night time in MT Moon. Then, bring it to Jenny for a reward. Then, give it to the girl in the library in Vermillion to get two rare candies. Afterwards, go back to Jenny and get a lot of money for it. The other quest is to EV train a pokemon partially. I'll explain: You need to EV train a pokemon so that one of its stats has more than 50 EVS in comparison to another stat. These are the blue numbers in your pokemon's description. You can google what EVs (or Effort Values) mean and how they work. I'll do a guide on it soon! -> https://bulbapedia.bulbagarden.net/wiki/Effort_values The pokemon you train must have 50 or more EVS over another stat's EVS. For example, its attack EVs have to be 51 if its HP EVs are 0. As long as this condition applies to two stats, you can show the pokemon to Jenny and she'll reward you. In total, you will get 29k pokedollars. Celadon City: There are two bounties here for two missions. However, the Fight Michael one should be avoided for now: it requires you to get the bike (thus, you'd need to spend 60k money for it). However, if you managed to get the bike, go and fight Michael in route 17 and beat him. Talk to Jenny and you'll get some nice 10k! Afterwards, do the HP up one, this gives a LOT of money: 14k! Here's the catch though: you need to either buy an HP up for around 8k in the department store and give it to Jenny, so you'll receive 6k in benefits. However, you can also obtain it via digging or in pokeballs in certain routes! If you manage to find one, bring it to her, or simply but it for the 6k. Your choice.! You'll gain 16k, 24k if you dug up the HP UP or obtained it somewhere else. Cinnabar Island: There are three quests you can do here. The easiest and most rewarding one is to fightArticuno and get its seen data. To get it, you only need to fight it, the result of the fight does not matter. He's in the depths of Seafoam Islands, in B4F. You can look up the map in the PRO Wiki (https://prowiki.info/index.php?title=Seafoam_Islands) and try to get to him. He's around level 60-70. You can choose to destroy him with rock, steel, electric or fire moves or just relog while fighting him and be teleported back to Cinnabar with its seen data. You'll get 12k for this. Revive a Fossil in the Cinnabar Island (any fossil you dug up or the one obtained in Mt Moon). Show it to Jenny and you'll get 6k and a Hard stone. You'll have earned 18k in total. Ignore the Corsola quest completely: it only rewards 10 Lure Balls. Pokestops Our next resource is: Pokestops! Have you seen these clowns around Kanto, which walk around certain areas? If you talk to them after having beaten 4 Kanto Badges, you will be able to obtain items from them! These items may vary from simple Potions or Repels to PP Ups and Rare Candies. We are looking for these 2, which are the rarest items to get from them (it's around a 10% chance to get them each time you talk to a clown). These are INCREDIBLE items for the lategame, and so, you can sell PP Ups for around 3k and Rare Candies for 7k in Trade Chat. If you get lucky and get a few Rare Candies in Kanto, you'll be able to get a lot of money pretty quickly if you sell them. The full list of locations are: Viridian City: Under the gym. Viridian Forest: In front of the Viridian Maze Tree, go to the east. Pewter City: East from the museum, top right of Pewter. Route 3 Pokecenter: In front of the Mt Moon entrance, outside of the Pokecenter, to its left, in front of the tunnel entrance. Route 4: In front of the Cerulean Cave Entrance (requires surf). Route 25: In front of Bill's House. Route 5: In front of the Daycare. Vermillion City (Harbor): Just walking around there. Diglett Cave: Entrance from Vermillion, just go inside. Route 10: There's one next to the Pokecenter and another one in the Power Plant Entrance. As an extra: some of the pokestops VERY rarely give useful TMs you can use while in Kanto Story. The powerplant one can give you TM Thunderbolt and the one in Viridian gives you TM Earthquake. You can also buy them in Gym 3 and Gym 8 in Kanto, respectively. Pokestops have a cooldown of only 36 hours. After a day and a half of having talked to them all, go and talk to them again, and pray to the RNGesus gods to bless some Rare Candies upon you. You'll normally always get atleast 15k+ worth of items every time you do it. Dig Spots Here comes the real money maker of our guide: Dig spots will basically either skyrocket your savings or troll you extremely hard and give you a lot of basic stuff such as pokeballs and evolution stones that might help a bit, but not as much as getting rich, which is our aim right now. Dig spots require you to either own a Shovel or a Pokemon in your team who knows the move Dig (can be taught with the TM number 28 which can be bought in Celadon Department store and other places, can also be learned upon level up by Diglett and Sandshrew). The pokemon must also have more than 150 happiness. Dig spots are spread across the world and you can look for them and their locations in the wiki (http://prowiki.info/index.php?title=Diggable_Patches). Digging these spots will either spawn a wild pokemon (some of which are really rare and useful for Kanto Story!) or a lot of rare and useful items you will make use of by selling or using them a lot. We will go over the route you should follow, what places you should really visit and which dig spots you can skip if you don't want to waste too much time while running on four accounts. Along this route we will also grab some hidden items and overworld items we can sell later on. The locations for dig spots in kanto are: Route 3, Mt Moon, Rock Tunnel, Route 14, Route 15, Diglett Cave, and if you have access to Sevii Islands (which requires having beaten Kanto E4 and having a Membership active (donate to the game, it helps improve it!) there are also in Water Path and Tanoby Ruins. Hidden and Overworld items. All along PRO there are hidden items spread everywhere which are very hard to find: some block your road and you'll accidentally bump into them, and you'll interact with them and grab them by accident thinking: "owo watz diz? *touches interact button and grabs item* basically. Other useful items are overworld ones which you'll see in the form of pokeballs in the overworld. There's way too many items in the game to name them all, but since I wanted to make this guide and allow anyone to become rich as soon as Kanto goes, I listed ALL of the monetary items findable in pro in a guide. In this guide, we'll make routes so that you can pick up as many of these as you can along your adventure, routing along certain specific spots and grabbing and picking up certain items. It will be a long process, but the amount of money you'll earn is insane. I will also detail what tools you will need to get to all required places. For now, look up all the places available in Kanto, since it's what matters for now, and it's (right now) directed towards newbies. Services and Trading This is basically the least profitable method in the early game. You don't have a macho brace (diggable if you have absurd luck, obtainable in an easy trade in Goldenrod) to give EV services (however, you can always buy it from someone else!), it would cost money and EV Safari wald costs 10k per visit, no access to mega high level areas to level up such as Cerulean Cave (however, you do have access to Smoke Balls in wild Weezings and Koffings in Cinnabar Mansion and False swipers in Cubone, since it learns it at level 27 in Rock Tunnel), no access to reliable Sync hunting methods (you'd have to hunt Abras forever... you'd be required to have a Diglett with Arena trap, which is not hard to get, but they're tier 6 and they take forever to hunt in the early game), basically nothing that is profitable right now. What you have to do is to trade. Sell the Rare Candies you obtained along the way during pokestops, dig spots and hidden items for around 7k each in trade chat. Never go for a lower place. Try to buy Kanto synchs (natus obtained in route 28 by more advanced players) that can be useful for your story and that you can invest in hunting pvpable pokemon that are immediately sellable untrained such as Gastly, which requires no black medallion, is tier 1 in Vermillion Graveyard (as early as pre 3rd badge) and is extremely easy to hunt and sell. However, I heavily do not suggest you to do this now. I suggest that you invest from 5 to 10k per natu synch nature to hunt useful pokemon with good natures for your story. The Kanto later gyms are pretty hard, and the E4 is a mindless grind without using decent pokemon. Bosses For now, your option to do Bosses is near impossible and almost non-existant. You can't obtain a macho brace unless you trade, can't obtain most boss pokemon unless you trade, you would only be able to make a team with insane synchronise luck and only kanto obtainable pokemon (Slowbro, Gyarados, Steelix, etc). You would be extremely restricted when it comes to options, have next to no resources unless you save up with 4 accounts doing all what this guide recommends you and someone helps you out A LOT. Aside from that, you'd have to buy exp services since you don't have access to Cerulean Cave, you don't meet almost any requirements for any boss... yeah, you get the point. Bosses should be skipped ATLEAST until you beat Johto E4. However, if someone lends you an entire Kanto Only Boss Team, then try out your luck! They require a lot of strategy, but if you believe you can do it with these teams, then try it out! Here you can have more info about it. https://prowiki.info/index.php?title=Bosses Trainer/Wild battles If you have a Membership active, one of your options is to fight wild battles as it will double the money gain you earn (and this is basically the last resort once you've done everything else). My recommendation is that you fight every single trainer you find after earning the 4th badge, and that you grind money in Kanto (if you've not beaten the E4 yet) fighting wild pokemon and leveling up at the same time (it will pay off, trust me) in Seafoam Islands B4F, Cinnabar Mansion and Victory Road B3F. It is incredibly worth it to train your pokemon nonstop. Avoid trainer battles before the 4th badge that you believe you don't really need. Trainer battles reset after 7 days, so refight them if you're desperate for money! Reroll Ticket Quest If you donate five Fossils to the Pewter City Museum (Dome Fossil, Helix Fossil, Old Amber, Claw Fossil and Root Fossil), you'll be able to claim a Reroll Ticket. This can be once per account, up to four accounts (as you're allowed to).. This IV Reroll Ticket can be sold in Trade Chat for over 650 or 700k per ticket and will give you alarming amounts of money while in Kanto. However, there is an issue: To donate these fossils, you need the Caught data in your Pokedex of Kabuto, Omanyte, Aerodactyl, Anorith and Lileep. To revive Anorith and Lileep, you need to first find the fossils in dig spots, revive Dome and Helix fossil, level Omanyte and Kabuto to obtain Omastar and Kabutops evolved data, and THEN go to Ruins of Alph and revive Claw and Root fossil after having dug them up to obtain their seen data. If you want to skip all of this trouble (aside from just reviving Aerodactyl, Omanyte, Kabutops in Cinnabar and the other two fossils in Johto), simply do Dig Spots a few times until you have dug these 5 fossils. Then, ask a friend to trade you the 5 revived pokemon so you can get the Dex Caught data from them and you do not waste your fossils reviving them. Donate them in the museum, obtain the Reroll Ticket and sell it in Trade Chat for 650k or even more. Enjoy your free money! It can be done once per account. Route to Farm: Explanation We will now make a route that is easy to go around, requires just a bit of time and is plausible to do for any newbie. We will choose the two options and explain both of them: with and without hidden items. The difference between grabbing hidden items or not is the time difference, HM slave requirements and the fact that the hidden items do not have the same cooldowns as overworld items, and some items have different cooldowns (for some strange reason). Thus, I'll try to highlight which items do respawn and how often you should do every route. You should do the Pokestop route every 36 hours, the Dig Spots every 72 hours and the Item route every 14 days (yes, I can't multiply 14 x 24 because I failed maths in highschool, don't bully me okay?) Remember: You need to have beaten the 4th badge (and preferably, the 5th and have access to HM Surf) to do all of this. This is very early in the game, and the route is planned to help you as much as it can to fight Sabrina and the next leaders and E4. Missions can be done as early as having no badges, but you need to have beaten the 4th badge to be able to reach ALL Kanto dig spots and that Pokestops will give you items. If you talk to them before you earn the 4th badge, they won't give you anything and disappear for 36 hours! If you want to do Pokestops and Dig Spots, I've designed a route that works for both things at the same time so you do not need to learn different routes. If you also want to take overworld items and hidden items into account, you'll have to do small detours at the beginning of Kanto, and at the end, there will be a bit of exploring Seafoam Islands. I will try to explain the combined route and add the hidden items you can find as extras. Remember I put the link with all the locations above, it's super detailed, check it out! We will start in Viridian City. Here, go to the bottom left part, cross the bridge and grab the pokeball to get a Rare Candy. It respawns every 7 days. Go in front of the gym and talk to the pokestop. Go north until you reach Viridian Forest, reach the Viridian Maze Tree, then grab the hidden rare candy on the left behind the tree (use the link above for hidden items). Talk to the pokestop on the right of that tree. Head to Pewter City and talk to the Pokestop on the top east corner of the city, east from the Museum. Head to route 3 and immediately go down. Check out all stones (there's a Stardust hidden in one of them), grab all dig spots, continue through route 3 and grab the next dig spots. Reach the Mt Moon pokecenter, talk to the pokestop and enter the Pokecenter to have a reset relog point. (This is just to come back after you grab all dig spots in Mt Moon). In Mt Moon, immediately go to the left and south to grab 4 dig spots next to the fat mountain guy. Go to the top right of the same floor and grab these 4 dig spots, go back to almost the entrance and go down the ladder. Grab the pokeballs along the way, since one of these has a Star Piece (the one when you just went down the ladder). Go deep in that ladder path and you'll find a few dig spots. Leave the ladder, go to the top right as you did before to grab those 4 dig spots, but now go to the left, go down that ladder, grab the next dig spots and relog in any wild fight. Afterwards, use the dig shortcut to skip Mt Moon, then head to Cerulean Cave entrance, surf and talk to the Pokestop after having crossed Route 4 (if you do not have surf yet and are doing this at 4 badges, ignore this one, go to Cerulean and continue). Go up to route 24, head to route 25 and talk to the next Pokestop there. Go south to Cerulean, then south to route 5 and talk to the next pokestop. Go to the right of Cerulean and get to Route 9. Reach Route 10, enter the pokecenter, talk to the pokestop, then go north to route 9, surf to the Power Plant, talk to the pokestop and enter a wild battle and relog to teleport to the pokecenter. Enter Rock Tunnel, grab the 6 dig spots, leave in the same exit you entered, use the dig hole skip to reach Lavender's side, enter Rock Tunnel again, head to the left ladder and grab the dig spots by going down and up the multiple stairs (spoilers: there's a lot) Now leave south for Lavender and enter the pokecenter, leave it and head south to route 12. Go south and grab the Rare Candy mentioned in the guide above, then head south nonstop until you reach routes 13 and 14. In route 14, grab the dig spots in the southeastern corner, head west to grab the dig spots in route 15. Now you can choose to take a detour: If you have surf, go to Fuchsia, head south to route 19, then go to the west and enter Seafoam Islands. Use the guide above to get around 20k in value in worth of items, then enter a wild battle, and relog. If you do not have it, relog after grabbing route 15's dig spots. Go to Vermillion, grab the Pokestop in the Harbor, enter Diglett Cave to grab the last missing Kanto pokestop and go through it to grab the remaining 8 dig spots. Congratulations, you just earned an absurd amount of money! If you have surf, beat Kanto e4 and have a membership active: grab the dig spots in Tanoby Ruins and Water Path (Sevii Islands, deep into the quest, it's pretty fast and they're worth it!. The route 27 rare candy, the love island one (if you have access to it, you need 120 Kanto native pokes caught data in dex and 38 evolved. Talk to Oak in Pallet Town to know how much progress you've made!) There's a LOT of hidden items worth a lot in the Sevii Islands. Visit them! Remember: You can do Pokestops every 36 hours, Dig Spots every 72 hours and Items every 2 weeks. Enjoy the money! I hope this helps newbies a lot Johto Here we have the second region of the game which encompasses the second generation, the Johto Region! Similar to Kanto, it has a lot of resources to search from! Pokestops Following Kanto's same procedure, there are nine Pokestops spread across Johto's map. They give the same approximate rewards and they're still profitable too as you can get PP UP or Rare Candies with some luck. However, there's a catch. You can only access Pokestops after you obtain the 8th badge! Thus, I do not recommend you do any route for Johto until you reach the 8th badge (as you can't dig early in the game, either). The pokestops are in: Violet City Union Cave Slowpoke Well Ilex Forest National Park Burned Tower Olivine Lighthouse Lake of Rage Dark Cave (Blackthorn Side) Dig Spots As there were Dig Spots in Kanto, there are also Dig Spots in Johto! Sadly, there's only 3 different locations instead of the massive amounts of locations where dig spots would be located in Kanto. However, there's a LOT of Dig Spots in all Johto locations, specially in Slowpoke Well, where RNG Gods normally bless you with absurd amounts of good monetary items. As mentioned before with the info in the Kanto Dig Spots, you can find them in Dark Cave starting from Violet's side, with some help using Surf and Rock Smash (and Flash, since I am incredibly blind, I cannot get through caves without it), Slowpoke Well (where there are dig spots literally EVERYWHERE, in both the entrance floor and the one below using surf) and Mt Mortar, in which depths resides the Item Recycler, which we might use later. The ones in Mt Mortar are in the 3 entrances available from the route east from Ecruteak. Thus, just go inside one room in all of them, dig the 4 spots in each room, leave and enter from the next entrance (one at the west, one at the east and one at the center while surfing). Hidden and Overworld Items As present in Kanto too, there are some Overworld and Hidden items really useful and thankfully, these are pretty easy to obtain! (Unlike Hoenn, which will be an incredible pain lol.) There's not many obtainable items in Johto, but there's a lot of Nuggets and they are all easy to obtain. Aside from that, only two require some extra stuff (such as the Forest Pit one), unlike Kanto's, a lot of these before required to have beaten Kanto's E4 or have done sidequests or fulfilled a lot of requirements. We will be picking up some nice juicy Rare Candies too while on the way to our routing! Bug Catching Contest The Bug Catching Contest is... unreliable at its best. However, it's still a somewhat good way to make money. I'll go straight to the point: If you get first place, you gain a lot of money. However, that's not even 2 nuggets worth of prizes and it's only every 24 hours. We are not focusing on the Contest itself for that. (Check out more info:) https://prowiki.info/index.php?title=Bug_Catching_Area What we are focusing on is the incredibly rare wild pokemon that exclusively appear here. You have 20 minutes to hunt very rare pokémon and try to sell them later once the contest is done. There's a long list of sellable pokemon here. I don't recommend doing any of this, to be fair, as selling will be complicated unless you get a really good pokemon (Larvesta, for example). Nonetheless, I'll leave you all of this info linked, so that you can give it a try! Services and Trading After having reached Johto, a lot of possibilities open up! You gain access to the Macho Brace in Goldenrod, thus allowing you to give EV Services. You also unlock Dragon's Den and, with a lot of hard work, you can unlock Cerulean Cave. You also gain access to Mt Silver after the E4, and thus, you can start giving EXP and EV Services. You also now are able to trade more stuff from the two regions that you find around and you can try your luck in the Bug Catching Contest and capture really rare pokemon and sell them. Johto Spawns also give you the chance to find a lot more rare pokemon and if you're lucky, sell them for some nice money! You can also sell Synchs you find in Ruins of Alph and Route 28! Get them, they're easy money! Bosses In Johto, you can't really do many bosses as you've just gotten into the second region and you might not yet have a boss team. However, you can actually build one easily: get a macho brace in goldenrod, a smoke ball from wild koffings and weezings, natu synchs from ruins of alph (or route 28) and get a few boss pokemon! To give you an example, you can get two Memento Weezings, a Sturdy Hazard Forretress, a Screen setter Bronzong, a Paralyser Chansey and a sweeper Volcarona. They're all perfectly obtainable in the first two regions and are a near perfect team to fight all bosses in PRO. Good luck! Trainer and Wild Battles So we have some good news here: You can now farm money while fighting pokemon in Dragon's Den! You can get up to 550 pokedollars per fight with ms active, which is quite a lot (20 pokemon = 10k! That's not bad!) and if you unlock Cerulean Cave, the number goes up to 620! Aside from this, you can also do the same process as you did after Kanto: just defeat all trainers after the 4th badge. I heavily suggest grinding in Dragon's Den while surfing to get some easy money. Route to Farming We'll do the same as we did in Kanto: We first need to explain that to obtain the Pokestop prizes from them, you actually need the 8th badge in Johto, in contrast with the 4th badge of Kanto (I have no idea why). Thus, it is more recommendable that you simply skip dig spots until you've beaten 8th badge so you can farm dig spots, pokestops, hidden items, trainers and dragon's den in that order. I will also design a route that takes pokestops and dig spots into account while grabbing hidden items. I will also add the optional hidden ones you can grab or the ones that are harder to obtain but might be worth it (the deep sea tooth one for example). I suggest you bring a lot of hm slaves because you'll really need them. We will begin in Violet City, by grabbing the hidden rare candy behind the gym sign, and talking to the pokestop next to Bellsprout Tower. Afterwards, we will head east to Route 31, dig to the other side and talk to the pokestop. Dig to route 31 again and enter the cave, go into its depths using rock smash and dig the 5 spots inside. Relog in a battle to appear in Violet. We will head south until we reach the Union Cave, talk to the Pokestop and use the dig shortcut. We will talk to the Pokestop in Slowpoke Well and instead of heading inside, we will go to Ilex Forest and talk to the next pokestop. Now go inside of Slowpoke Well and pray to the RNG Gods while you dig all of the first floor and second floor, which will (if you have a bit of luck) make you rich like Jeff Bezos. Relog in a wild battle after you've dug up everything. We will now head west from Violet to the National Park, grab the pokestop there and go south to route 35. Surf and grab the hidden Nugget under the Berry Tree and relog in a wild battle. Head to Ecruteak and enter the Pokecenter, we will use it to teleport two or three times. Talk to the Pokestop in the Burned Tower and grab the Nugget in the second floor inside, relog in a wild battle. We will ignore the Bell Tower Rare Candy since it's a bit hard to obtain. Take it if you want, but it takes ages to grab it. Now, we will assume you have not reached Hoenn yet, and thus, we will not take the route to Olivine yet. We will now go to the east route from Ecruteak, enter Mt Mortar from the left entrance, grab the dig spots, use the dig shortcut outside, enter from there and grab the dig spots, leave, surf to the left and enter Mt Mortar again. dig the spots, go down the ladder and grab the Rare Candy in the north. If you've beaten Johto E4, go deep into Mt Mortar and grab the other hidden item in Forest Pit (check the guide I linked before). Relog in a wild battle, and if you're willing to, travel to Lake of Fury, grab the pokestop there and relog. It's positioned in a really awkward place to reach, so there's basically no other choice than just going there and relogging in a fight. We will then go to Olivine City, but before reaching it, grab the Nugget in the Lampost in the northern exit (check the guide), grab the Pearl in Olivine City near the gym in the small fence, grab the Rare Candy in front of the Lighthouse and talk to the Pokestop. Everything in Johto is done now, but if you want an extra: Surf south from Route 41, grab the hidden items along the way, Pearls and Deep Sea items, and reach Hoenn (if you completed the requirements!) Hoenn Here we access PRO's third region, based on the third generation (wow, who wondered). Spoiler alert: Hoenn SUCKS at making money. The main issue with the region is the absence of dig spots, pokestops and other resources we had in previous regions. Furthermore, the distance between hidden items is absurd, to absurd extents. Yea, it sucks. Hidden and Overworld Money Items We'll start with a few good news: Hoenn is FILLED WITH AN ABSURD AMOUNT OF VALUABLES. By absurd, and by writing it in caps, I mean there's a LOT of GOOD money to gain in Hoenn. There's items practically everywhere in the map. You'll become a multimillonaire quicker than I can pronounce potato. See? You already own a company. You're rich! They're mainly placed in water zones so you'll need surf, and you'll also be able to obtain the Deep Sea items after the Hoenn E4 to get to Sinnoh. Services and Trading In Hoenn, you'll be able to find highly valuable pokemon such as Timburr, Ferroseed, and other really, REALLY good PVP/Bossable pokemon that can easily be sold for absurdly high amounts of money (also one of my favs like Deino). I really recommend you take the time and visit Valley of Steel, a zone where you can catch really rare stuff, and that you travel around Hoenn and find incredibly rare pokemon. Do it, boy, DO IT! You also gain access to Hoenn pokemon, so I guess that's good lol. You'll be able to sell and buy more stuff. Also, hunt Gibles on the Moon! Excavations While I do not generally recommend excavations to make money, it's still worth it in the VERY long run, or in the very lategame of PRO. You need 100k pokedollars to unlock them. You also need to pay 2.5k pokedollars to enter an excavation (guess why I didn't recommend them to make money in the first place lol). You can farm certain rare pokemons there by bringing your sync pokemon with you and capturing rare pokemon with correct natures to resell them. You can also farm artifact pieces to purchase rare items and fossils to resell whatever stuff you obtain. If you also happen to find rare bones, you'll be able to sell them to an item maniac. I don't recommend it, but well, it's really fun to try it daily. Mushrooms If you go to Petalburg Forest, you'll find a lot of shrooms there. If you talk to them, you can harvest shrooms to later sell them in the pokemon maniac. If you bring a Paras/Parasect with you, the next time you gather the shrooms, they'll have multiplied. I really recommend doing this since it grants a lot of extra money. Do this every 2 weeks, with Paras and Parasect in your team. It's free real shrooms! Bosses Hoenn has a nice amount of extra bosses to fight against, and I recommend doing the optional fights vs the overworld pokemon minibosses too. Farm them every 2 weeks fo some nice money, if you get lucky, you might get PVP items to resell! Trainer and Wild Battles My suggestion here is to fight EVERY TRAINER that is placed after the 5th badge in Petalburg. Thus, after surfing from Mauville (or surfing southwest from Petalburg or south from Slateport), fight ALL THE TRAINERS YOU FIND. They give a decent amount and there's a massive amount of trainers in Hoenn. (That's why it's really painful, mainly). Also, be aware that almost all of them will be swimmers, so bring a surfer with you. Route to Farming The route in Hoenn is easier to follow than before. if you start in Lilycove, we'll start a clockwise route by defeating everything in our way, picking up hidden items and reaching Slateport. From there, we'll go south until we get to Dewford, destroying everything and picking up hidden items, We'll go north to Rustboro, grab the pokecenter there, grab everything in Oldale and Route 103 and Route 110 and teleport back. We'll go north to Meteor Falls to pick some hidden stuff (Stardust) and we'll go south afterwards and reach Mauville, from there, it's just going back to Lilycove. I suggest starting in Lilycove. We'll go east to route 124, beat everything and pick whatever items we find. Reach Mossdeep, go to the north and defeat everything, enter route 135 if you have beaten the E4 and pick the Deep Sea Items. Go south again, and from Mossdeep head south. Continue picking up items as you visit all water routes and keep defeating everything for money. Continue south and then reach the water town to the west. Continue your journey until Slateport and grab the pokecenter there. Go north to route 110, pick up the stuff there (including New Mauville), pick up the stuff in route 103 too and the Rare Candy in the town, get an encounter and log out to teleport back. We'll now go South from Slateport, go through the water routes fighting everything and grabbing multiple items until we reach Dewford. Repeat the same process north and reach Rustboro. Grab the pokecenter here because we'll visit Meteor Falls just to grab the stardust and teleport back. Grab the shrooms in the forest and then we'll proceed to go to Mauville through the route 116 tunnel, and then go east. We'll go north until we reach Fortree while fighting everything and then go down fighting all trainers until we reach Lilycove. Sinnoh We will now dwelve into PRO's fourth and (currently) final region. Sinnoh has (Thankfully) some stuff to do and grind, such as Dig Spots, the Battle Tower (although I won't cover it here because it doesn't grant you an important gain), and the aforementioned activities you can do. However, the issue with Sinnoh is its weird structure, as trying to grind trainers who are spread out throughout the region is way harder than in previous regions. In Kanto, you could do them in a circle, same as in Johto. In hoenn, you had to take two routes to defeat them. Here it's just a spread fest of trainers, but we'll eventually get there. There are no pokestops here, sadly. Dig spots Sinnoh brings back the Dig Spots mechanic for good: there are spread dig spots throughout the region and there are a lot of them. The best thing is that they usually carry some good monetary items you'll be able to sell and, if you get lucky, you'll dig up some rare pokemon that are otherwise extremely hard to find (yey). There are Dig Spots spread around: The first ones are in the cave above Jubilife city, then to the east of Eterna City, before and after the dig spot shortcut, and if we head east from Celestic Town, we'll find more. We'll then go to the Southeast to Veilstone and head southwest through the tunnel to find more dig spots and end up in Solaceon. We'll finally head south to Hearthorne while grabbing the dig spots on the way and climb Mt Coronet to find a few dig spots on the summit (Although I don't really recommend grabbing these, they barely ever grant anything useful and they're just hard to find and get to). We'll return to Jubilife and make a small trip to the east, enter Oreburgh Gate and surf in the floor below to grab the last dig spots. Hidden and Overworld Items The Hidden and Overworld items in Sinnoh suffer from the exact same problem as Hoenn did: While there's a lot of interesting and good hidden items we can sell, they're really spread out. Some are super far away (one is near Snowpoint, the Ice Stone to evolve Alolan Vulpix), and some are near other hidden items, in good grinding areas versus high level trainers (Victory Road), but still far from other places. However, I highly suggest grabbing them all, even though they're all spread in weird places (such as the south of Sandgem Town). Services and Trading Fun and weird fact: Sinnoh actually doesn't have all that many interesting pokemon to hunt that are not found in other regions. It mainly has some niche stuff that you can use in PVP and hunt down, but not that much. However, what we can make use of it is the fact that we'll now have unlocked ALL region accessible pokemon in the world and thus, we'll be able to trade anything in the game we're interested in and we'll resell it. Heliolisk is a nice pokemon to hunt, such as Metang! Bosses Such as with previous regions, Sinnoh has MANY really difficult bosses (it's normal, considering by this point in the game you should've become an advanced player and close to an expert in PRO), as you have progressed into the game. It has really high rewards for each of them and I highly suggest you fight them all. You can gain really interesting items and a LOT of money if you get lucky enough. Trainer and Wild Battles Fighting trainers in Sinnoh is... weird. You should fight all trainers after the 4th gym, but they're all over the place. You would have to fight these around Canalave, Pastoria, the route to Snowpoint and the mountain and the ending part of Sinnoh in the southeast of the world, and the Victory Road trainers. It's a bit complicated to get to all zones, and to also fight the trainers in MT Coronet. The route is just uncomfortable because it demands that you go to all places in Sinnoh, practically, instead of just being able to cross certain routes. If you're still in, however, get ready to travel and fight A LOT. Solaceon Daily Quest In Solaceon, you can find the News Reporter Building. There, you can show them the pokemon they will ask you every day. If you do this seven consecutive days, the last day reward can be a Reroll Ticket or other super big prizes. You will also obtain Master Balls and other extremely useful stuff for players that can be traded and sold in Trade Chat. These pokemons will range from the Starters in Sinnoh to the last Sinnoh Pokemon. The list is entirely comprised of SINNOH DEX POKEMON. The other requirement is that YOU MUST CATCH THESE POKEMONS YOURSELF. THEY CANNOT BE FROM ANOTHER PLAYER. Route to Farming The route in Sinnoh can be a bit weird, considering it's mainly a square we can more or less navigate through, but it has weird extensions (Canalave, Snowpoint, the eastern part) where you will basically get a bit lost to be able to farm money if you want to obtain extra stuff. If you're not into losing too much time to gather money, just do Dig Spots and Bosses in Sinnoh. It's not a big deal, you can make up the small money you would earn from trainers via grinding pokemon instead. We will try to start in Canalave, taking the southern Big Pearl and moving east onto route 218, grabbing the Rare Candy. We will enter the pokecenter in Jubilife, travel to the starting town to get the rare candy, then going to Sandgem Town (as we crossed earlier) and going down to the water routes, fighting everything in our way and picking up the hidden items. Relog while in battle and we'll head north from Jubilife, do the Dig Spots in the cave and continue and exit to the north to the next town. We'll continue north to Eterna to enter the pokecenter, go south to the route under the bike lane to pick up another item, relog in a fight and head east from Eterna. We'll pick up the dig spots in both sides of the mountain, enter the pokecenter in Celestic, and optionally, we will take the time to enter Mt Coronet, fight all galaxy members, then pick up the Mt Coronet dig spots, relog in a fight, travel through Mt Coronet and leave through the northern exit. We will fight all trainers in the snowy route until Snowpoint and pick up the Ice Stone in route 217. This part is optional, but really worth it! After this, we'll head east from Celestic, pick up the Nugget, dig spots and then head southeast until we reach Veilstone. If you want, enter the pokecenter here, then head south and decide: If you want to do the optional route, fight all trainers going south, then going east to the last gym badge city while picking up the hidden items on the route. You can also try and go to Pastoria and find the hidden items around the city, but this is pretty time consuming. Once you reach the last gym badge city, go north, fight everything, grab all hidden items in Victory Road and fight the trainers there. Find a wild encounter and teleport back. Now you can continue the normal route, do the dig spots in the tunnel and reach Solaceon, go south and dig the other last dig spots. Reach Hearthorne, enter the pokecenter and optionally, pick up the Mt Coronet dig spots if you didn't pick them up before. Go through the mountain to reach Oreburgh, to enter Oreburgh Gate and pick up the last dig spots in the region and thus, congratulations! You've done everything in this guide Enjoy your money now!
1 point
-
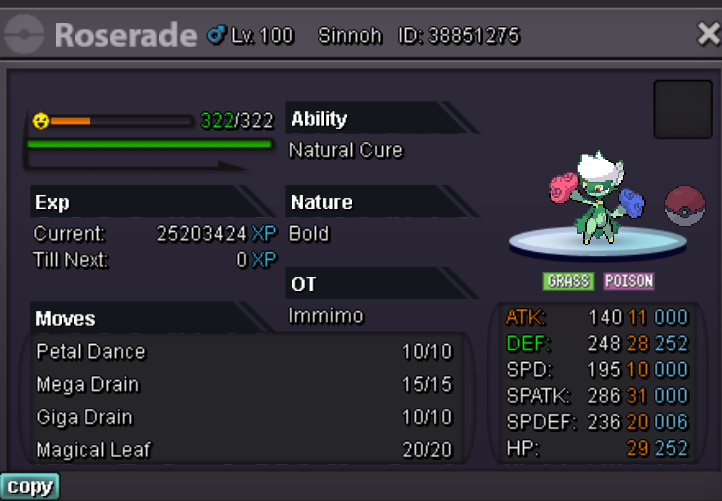
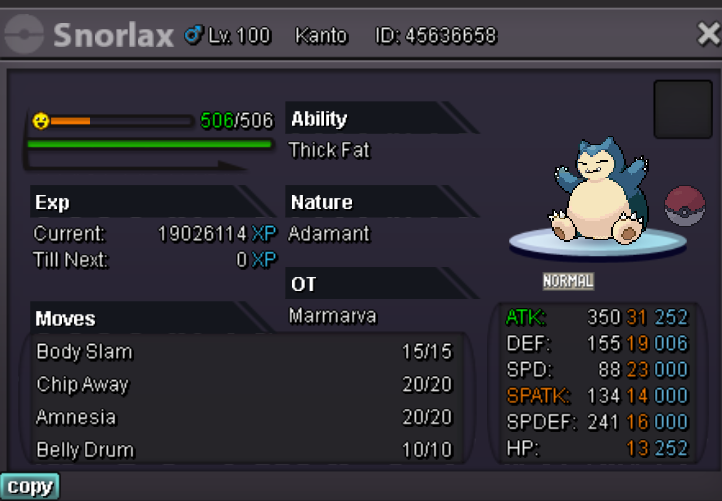
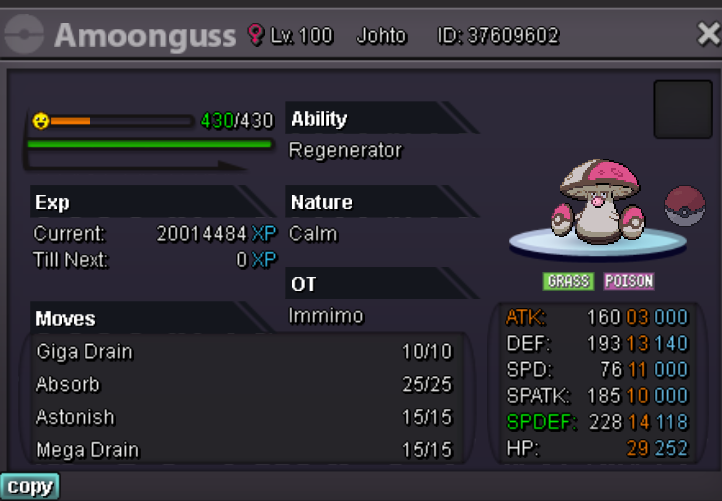
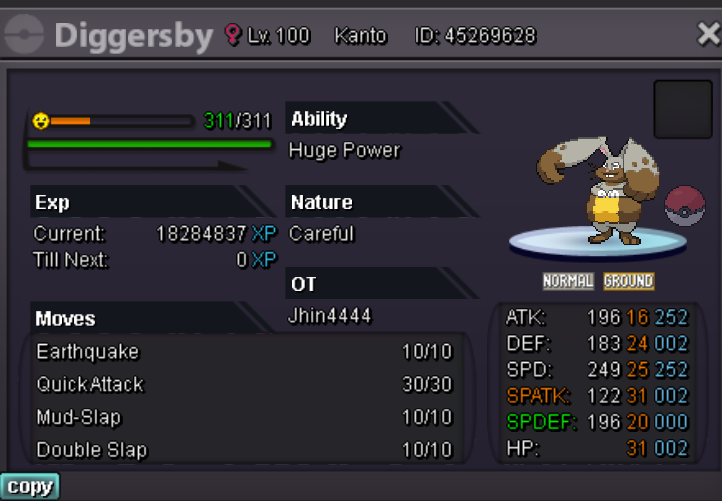
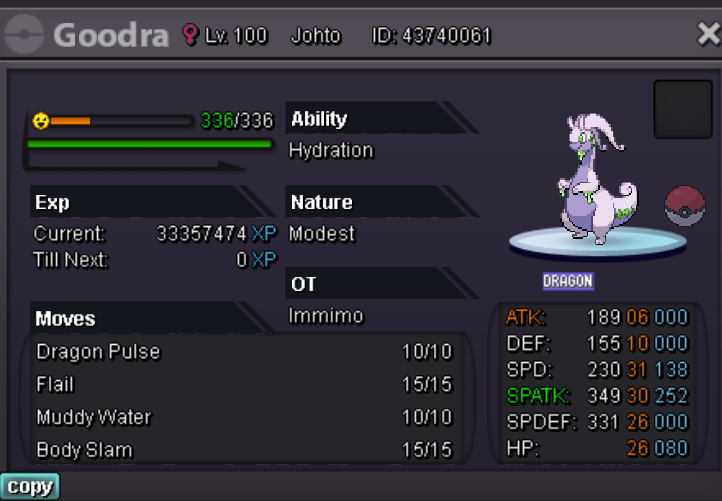
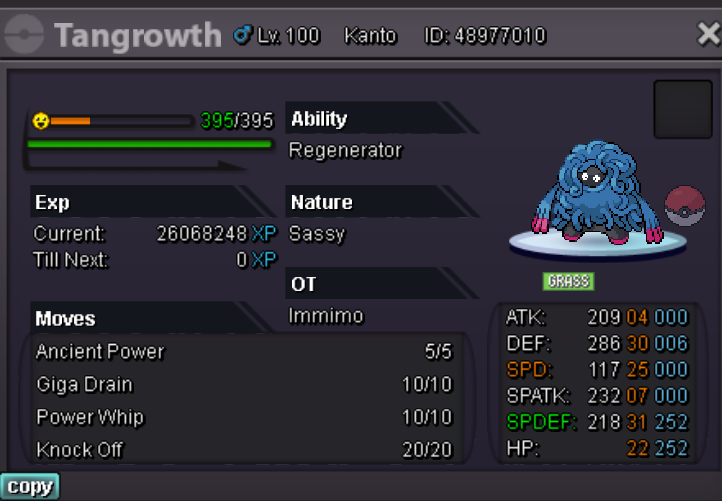
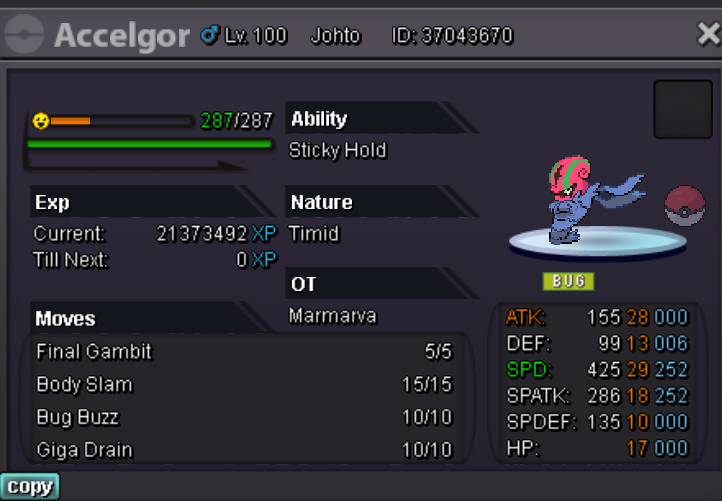
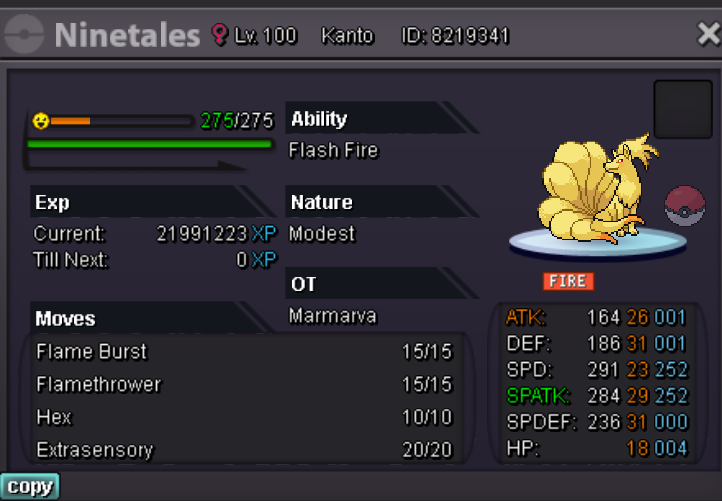
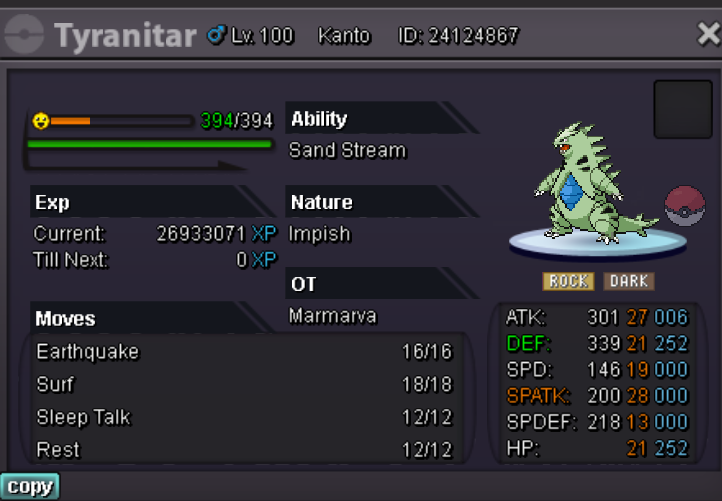
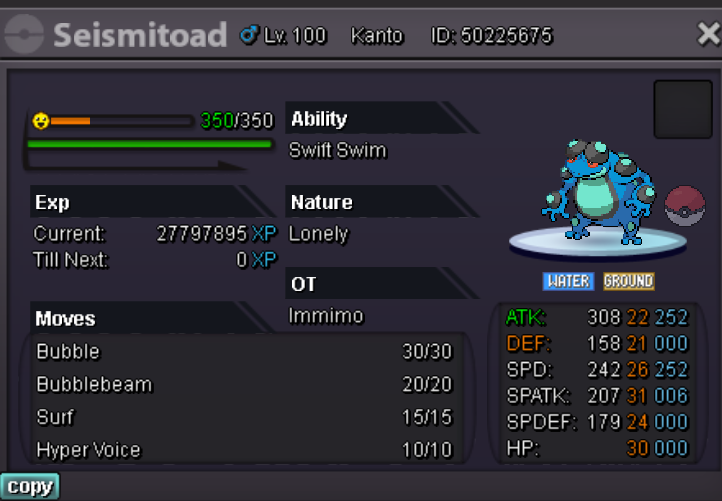
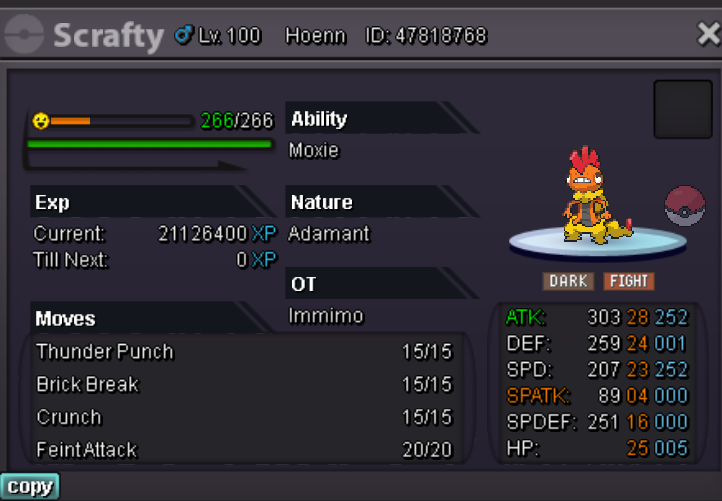
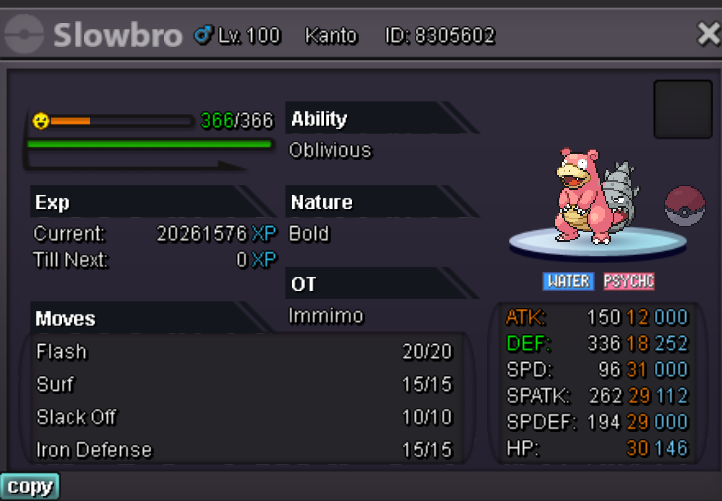
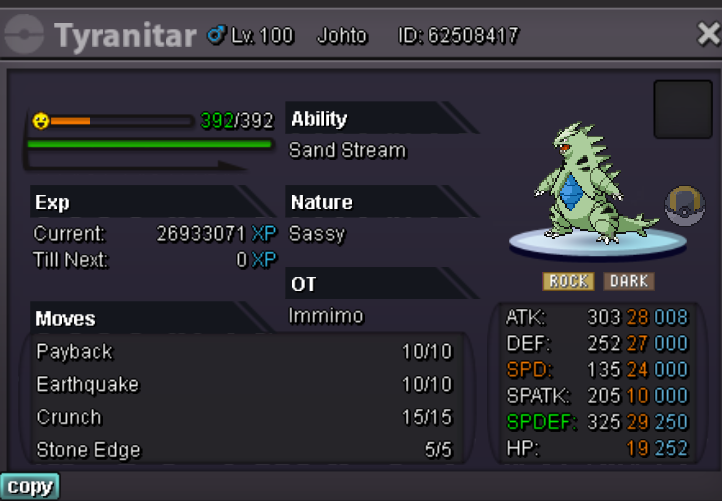
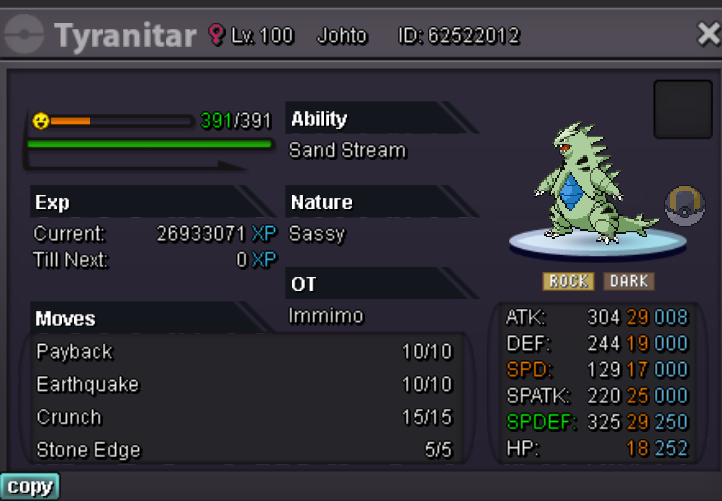
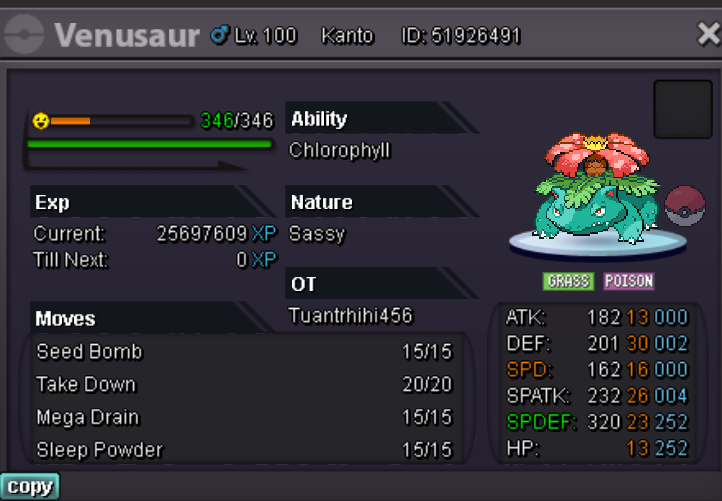
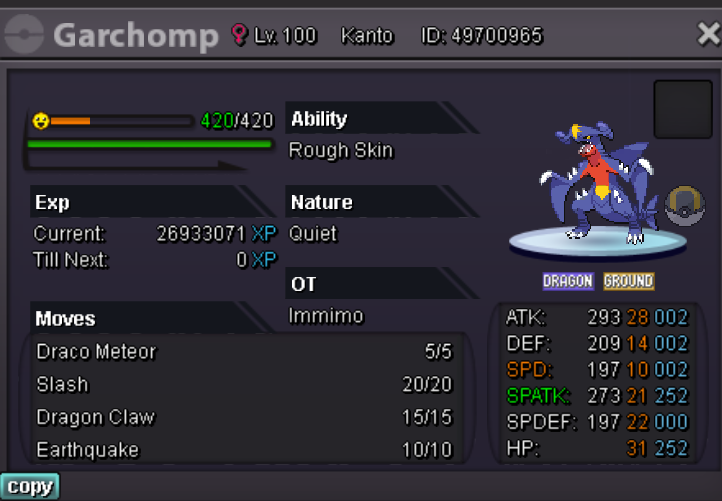
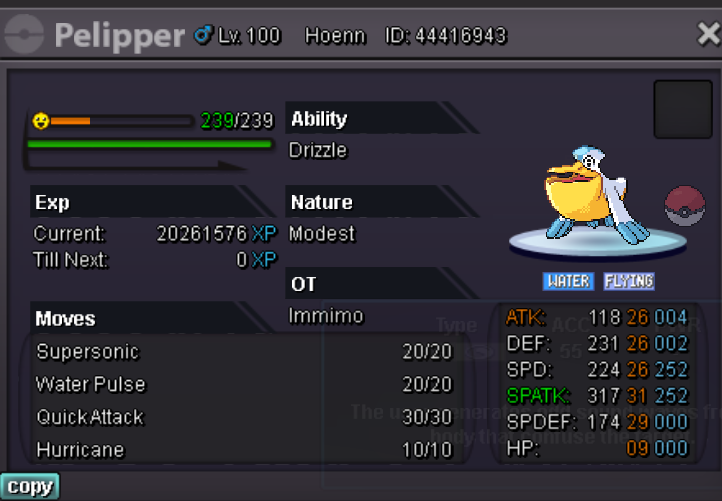
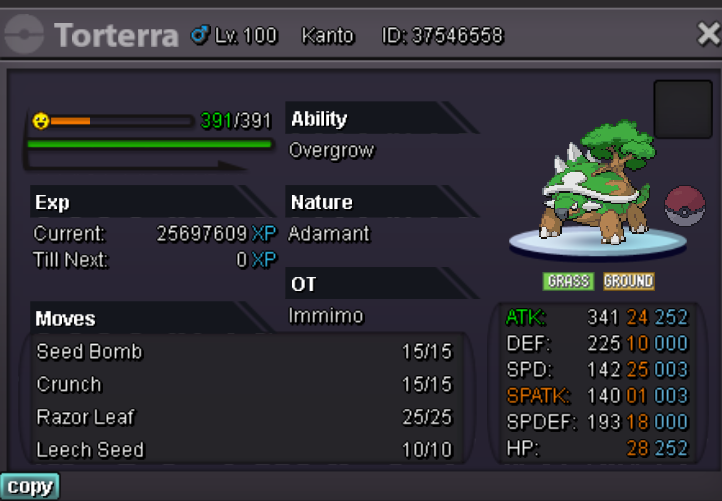
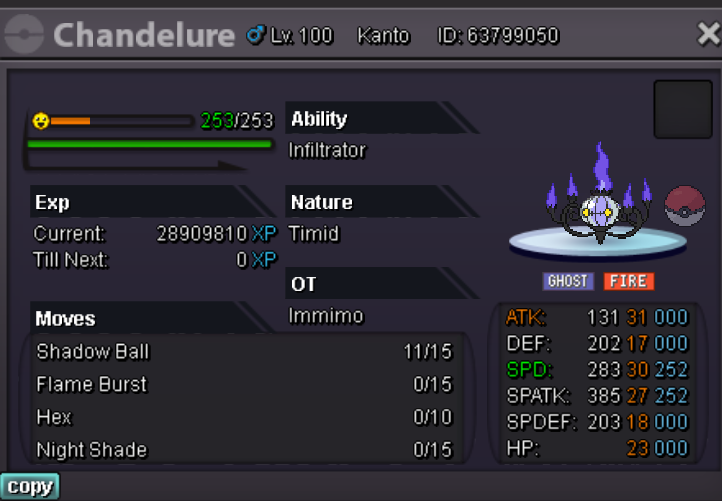
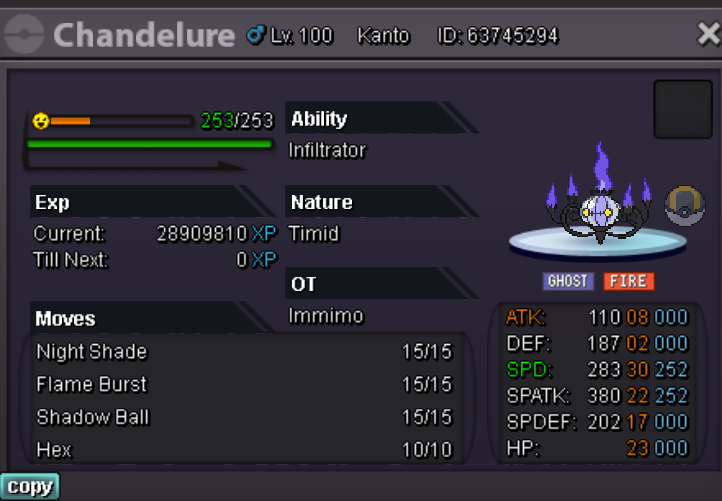
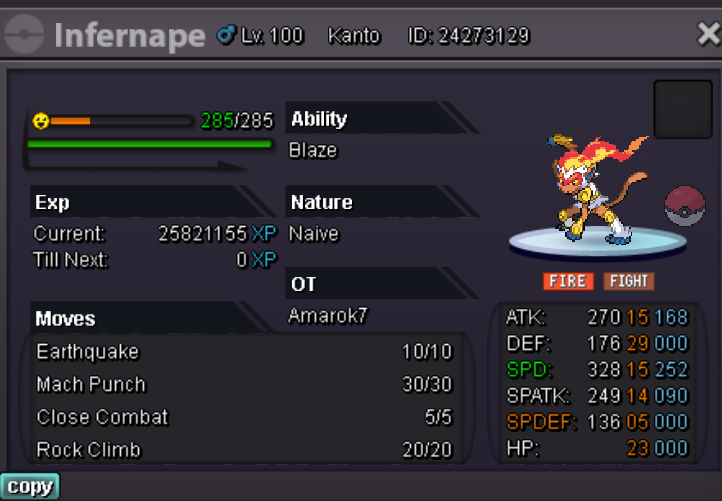
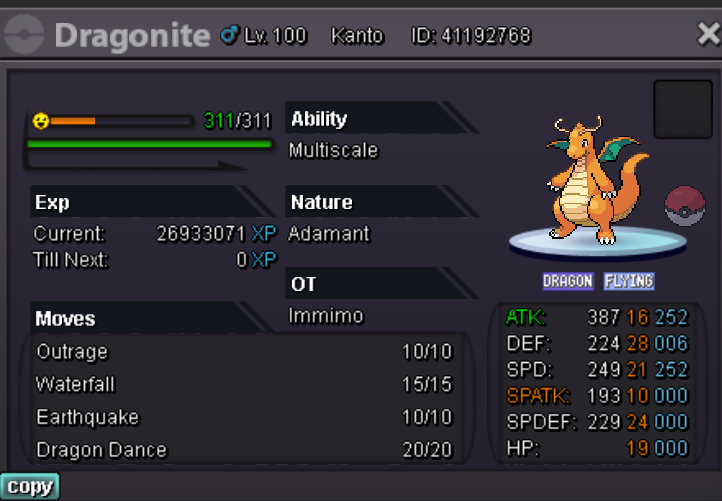
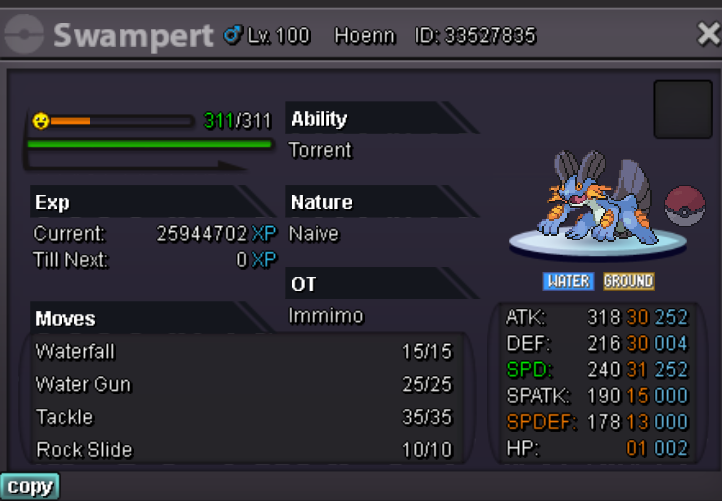
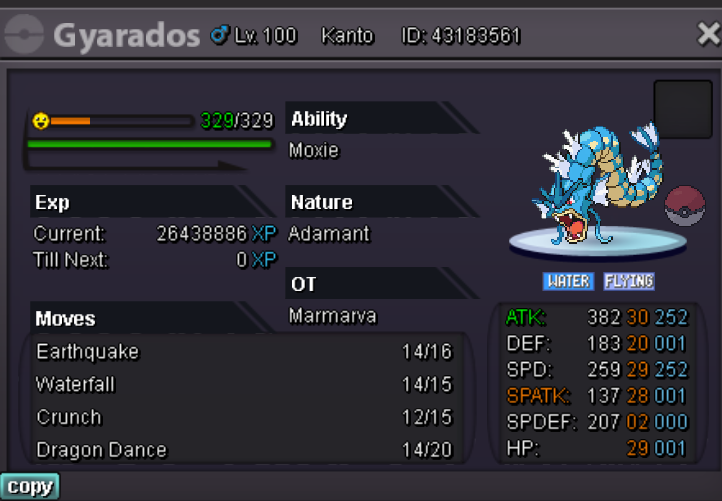
Welcome back to my store! Rules: 1. Prices are negotiable 2. Fake offers will be reported 3. I Have every right to decline your offer 4. No discussions, or any type of non business related comments are allowed (keep that in-game) 5. Once you offer, it's final (you can't go back, so be sure to check if you have the amount of money required before the purchase) 6. If for any reason you are banned from my store, you will not be able to buy or offer at any time (ignore in game, bad behavior, etc) Payment Options: CC 400k Iv Reroll 700k Nature Reroll 350k Pokedollars Contact Contact me in game immimo or via Discord immiimo#9067 Untrained Pokes Trained Pokes 100k~499k 500k~999k 1m~+ Reserved
1 point
-
ORIGIN Frozen like a leaf in a dead twig environment. When the echoes and the fireworks slumber in the fire. When the wind blows from the North, may the star seem to sparkle, when the night gloats on the hill as it floats above the ripples of a scar. When a twig broke from a breeze, will the debris starts to scatter, in the latter in freeze, in the ever resting desire. If a needle were to breach a permafrosted seed, will the shades begin to dissipate in a crescent degree. When the flames engulfs the blanket in the frozen fields, will the leaves be evergreen in the defrosted sphere. -Cloaked STORY OF ORIGIN Origin, the land of unknown where the sparks flown from the embers of a warrior's desire and sparkled into a glorious star. A utopia for ambitious individuals that is generated from a blight of a person's heart. A land where the light intertwines with shadows and formed an an equilibrium in the ripples of a scar. A kingdom that may be seen afar from reality, incredibly marveled from the horizon and wisened from entitled idle individuals that majestically triumped in the war. A turmoil in the tranquil state of Origin led to an oblivion, from the ripples of decisions and tramautic reason that resonated with the dark. The majestic state crumbled like the sands in the dessert and spiralled into the chasm that left a void in the legends enthusiasm and left behind a mark. Though the droplets of the rain of the ancestral pain flooded the lifeless grain and the mightless vains of the wasteland. As the roots become distained, and the twigs defrosted from the exhausted crane, that lifted the crushing boulder that caused the Originators to stand and take the pain to disband in the frozen hearts. A star may die but marvelous sight gets reflected from a remarkable height that can be seen naked in the eye, arise from the pinnacle of the paradise in the sky. So the warriors will rise again from the ashes in order to take their rightful throne of glory which was lost decades ago. ORIGIN REBORN HIERARCHY ANCESTRAL FOUNDER CLOAKED LASTHOPE4 ANCESTRAL ORIGINATORS LASTHOPE4 ME1IODAS NORNORNOR44 SOVEREIGNS THEJESTER JUMPLEBOW VACANT VACANT VACANT VACANT DIVINE COUNCIL VACANT VACANT VACANT OUR GOALS Our goal is to build an unbrEakable bond within our family and to achieve consecutive top placements in the guild ladder. We want to build a competitive but yet, a socially active, loving and persevering community. We experienced setbacks which undoubtedly hindered our progress towards our current state. Now we are Expanding to the land of Gold. With meticulous leadership that will advance our family towards divination, we will set greater heights that will leave a mark in the vast ocean of stars HOW TO APPLY TO THE GUILD? 1. Whats your IGN ( In Game Name) ? 2. Why do you want to join Origin ? 3. Do you like PvP? 4. Favorite Pokemon? 5. Whats your personal goal in PRO? 6. Please provide a screenshot of your in game Trainer Card. Please answer the questions above and leave a reply , thanks! From the Leading of Origin we wish you all Good Luck & Good Game!
1 point
-
C.o 850k by Lokigodofchaos (Retracted) insta 1.2m Min bid 100k cc as 250k - Iv reroll as 550k Fake offers will be reported. Offers ingame will be screenshotted and posted here.
1 point
-
Heya :) Im new to this game and im looking for a fun guild, to help me grow in this game. Im 29 and i live in the Netherlands. Hit me up if you want me to join :)1 point
-
nice guide
1 point
-
Owo nice guide finally I can be rish1 point
-
Hello, you should now be able to see Raikou again. kind regards1 point
-
sold in game have topwarrior chansey 9m sell1 point
-
3.4m Edit : I think it is too late..... GG1 point
-
Greetings, @Royalboss Sorry for the inconvenience. I have delevel your happiny to level 98. Please remember next time use our megathread to delevel your pokemons, if you dont know how to access just click HERE Since the issue has been resolved i will proceed to close this thread. Please do not hesitate in create another post if you have more doubts or issues. Have a great day. Nezuko1 point
-
Insta lowered to 1.2m.1 point
-
1 point
-
275k1 point
-
1 point
-
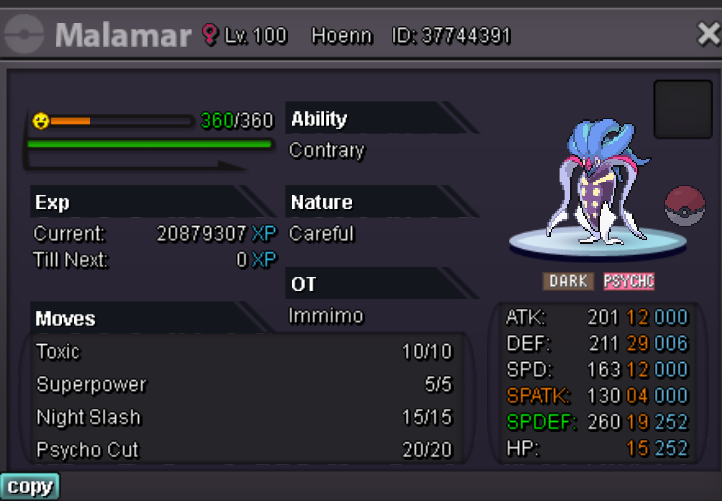
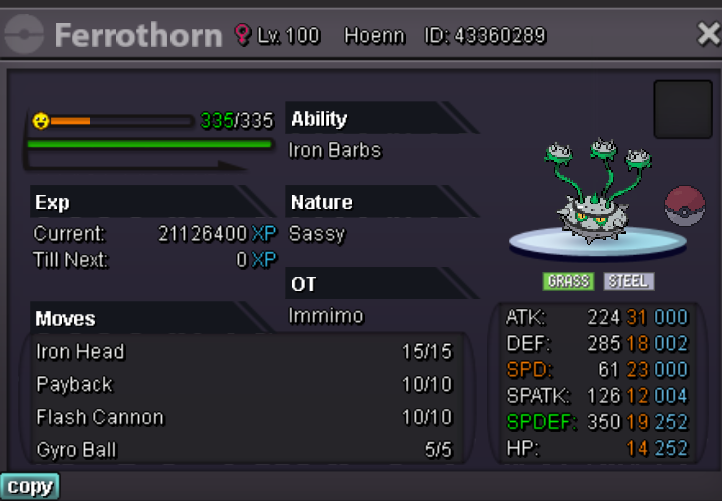
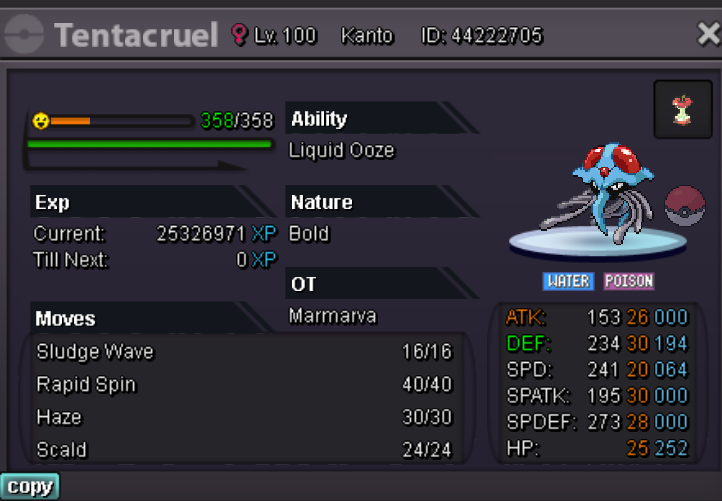
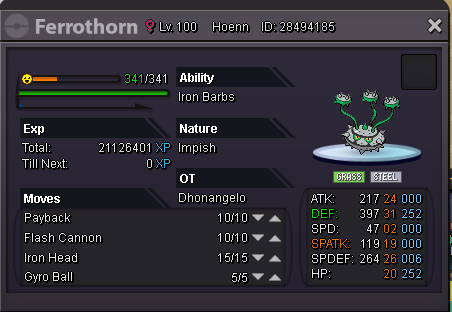
Wow that ferro bt look at poor me1 point
-
[uSER=1759]@rajaragoonath[/uSER] has bid for the modest first, if you want to buy it you have to raise the bid. Anyway, you're winning your timid bid for now1 point
-
Nice Ferro, max def is really great.1 point
-
Thank you for the suggestion, going over it now!1 point
-
Cool Guide idea Maybe add a list of what daily / weekly things are worth’s dn which not like dig spots / petalburg shrooms etc1 point
-
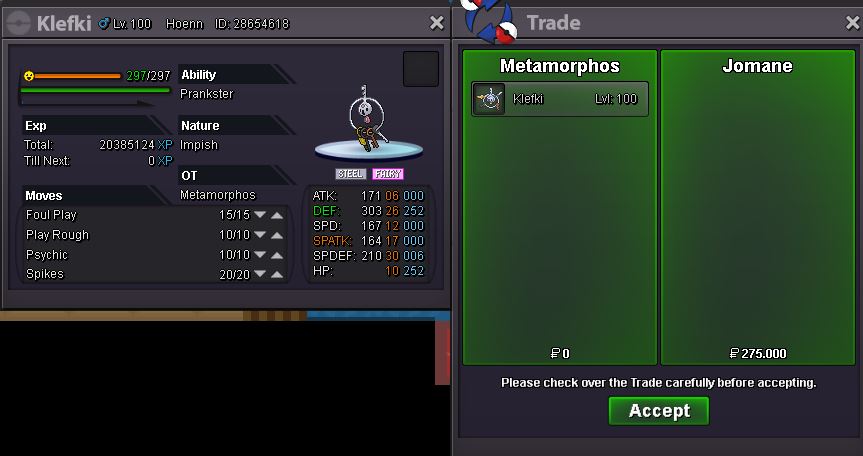
start for first klefki 250k1 point
-
retracted1 point
-
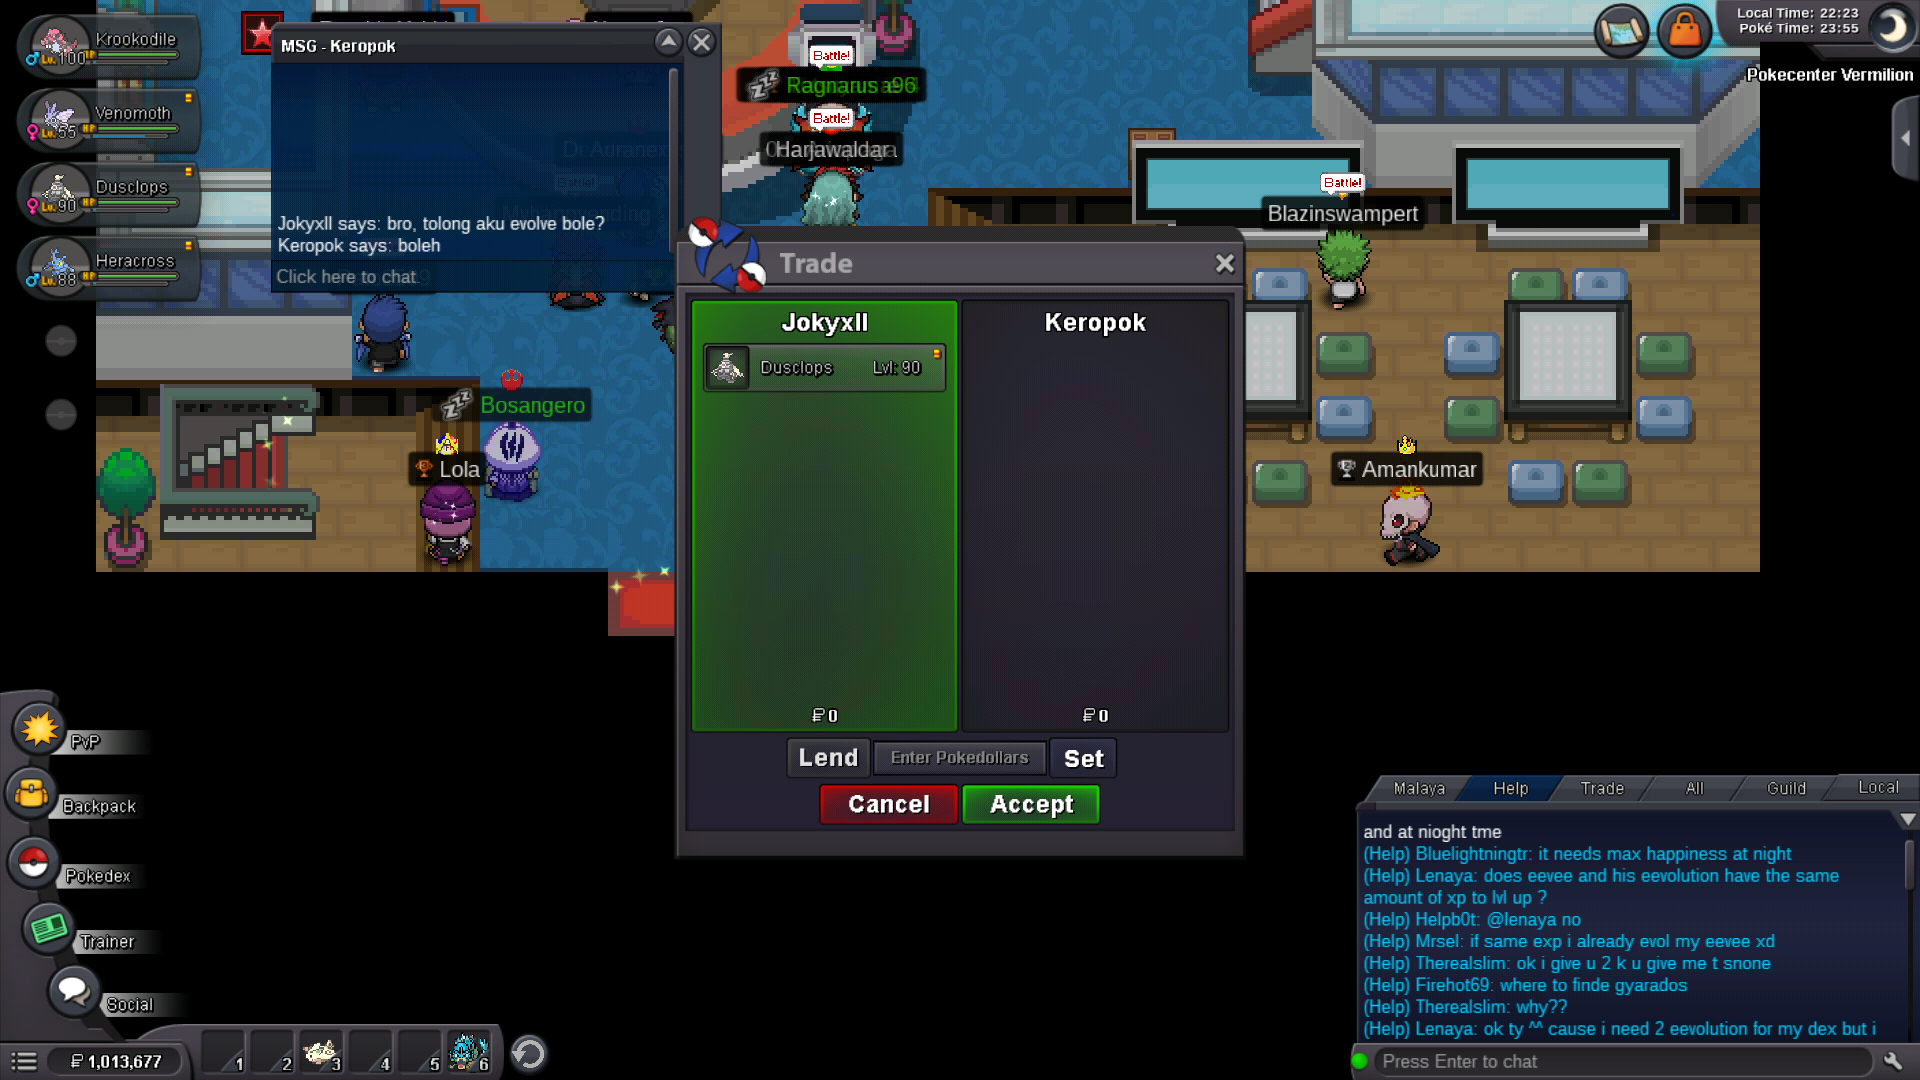
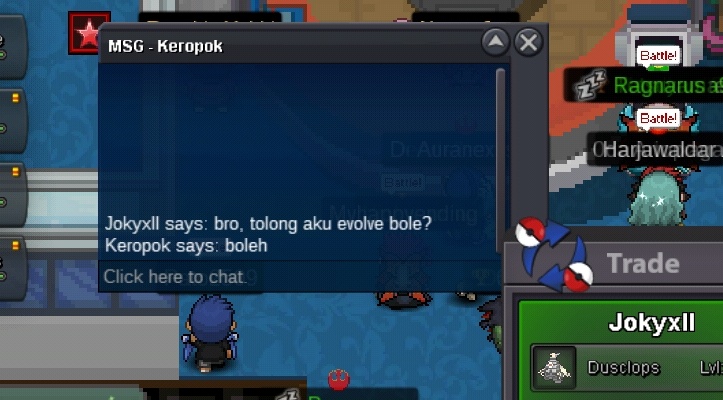
I (JokyXLL) asked my friend (Keropok) to help me evolve my dusclops into dusknoir (sinnoh poke) without knowing that he not start sinnoh yet. chat; jokyxll : bro, can u help me evolve my poke? keropok : sure
1 point
-
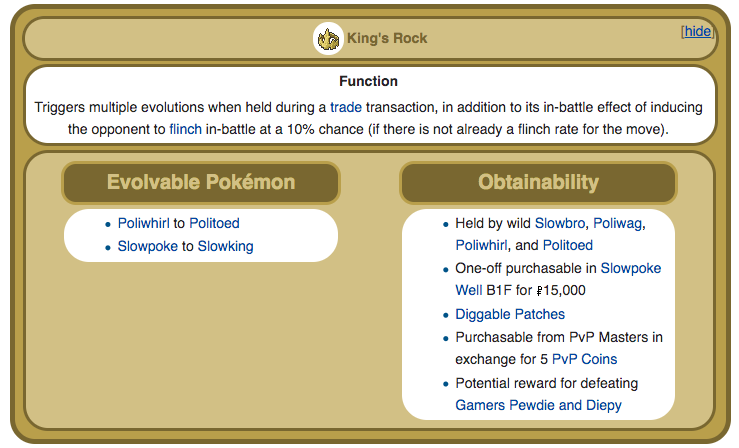
Hey @Degi0 , The Wiki provides a lot of useful information when trying to find items you need in game. Here is a very useful link that can direct you to all the different item wiki pages. Items Kings Rock; Hope this helps.
1 point
-
I might be expanding into a ralts-gardevoir shop. Please vote so i can see your opinion!1 point
-
Acquired in game.1 point
-
Comment price here or pm me ingame. Looking for decent or semi epic1 point
-
Wish you the best of luck in your guild!1 point
-
Comment the price here or pm me ingame thanks1 point
-
Thanks got one from hayme. This trend can be closed.1 point
-
Up still looking high budget........1 point
-
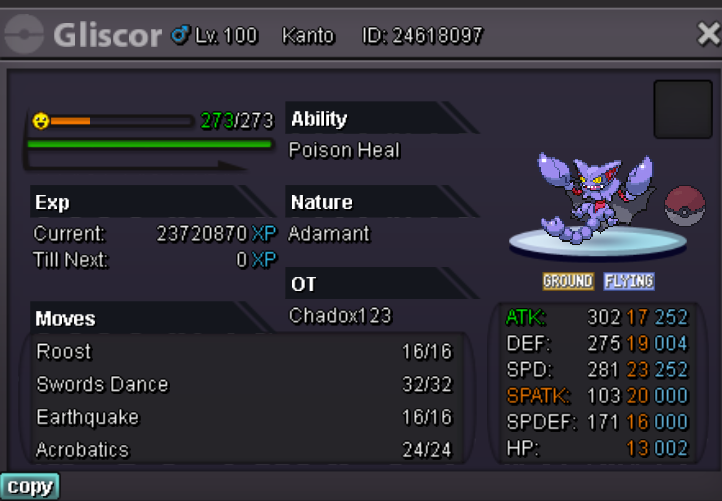
Buy this one.
1 point
-
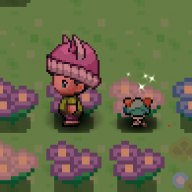
nice shop, btw wtb this poke
1 point
-
Bump1 point
-
pm me mate I buy in game1 point
-
still available?
1 point
-
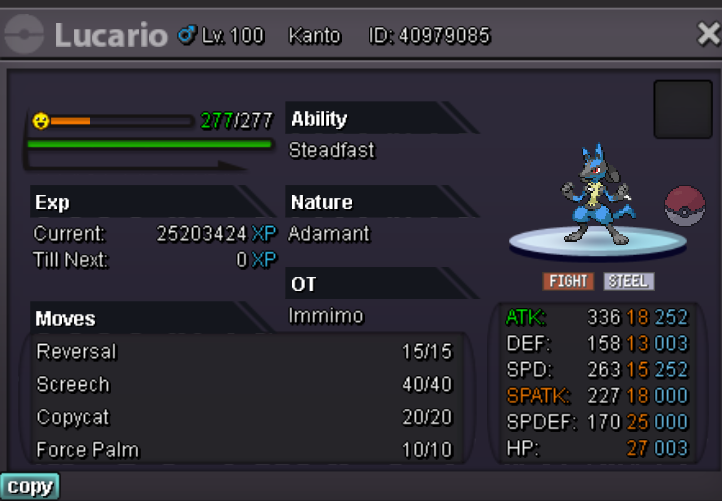
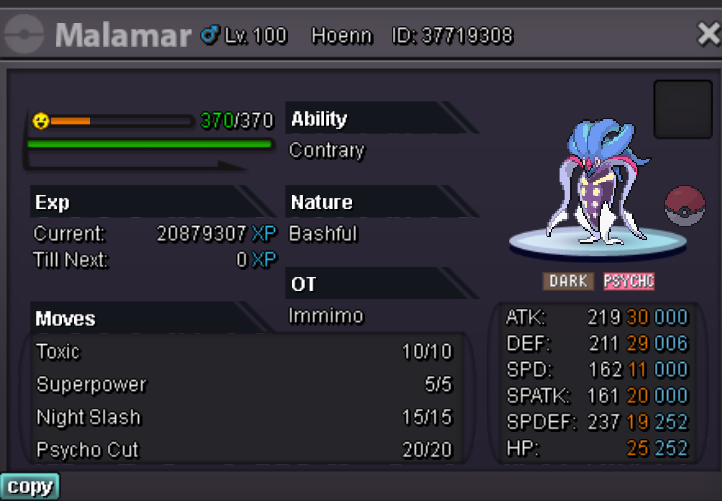
start mamo
1 point
-
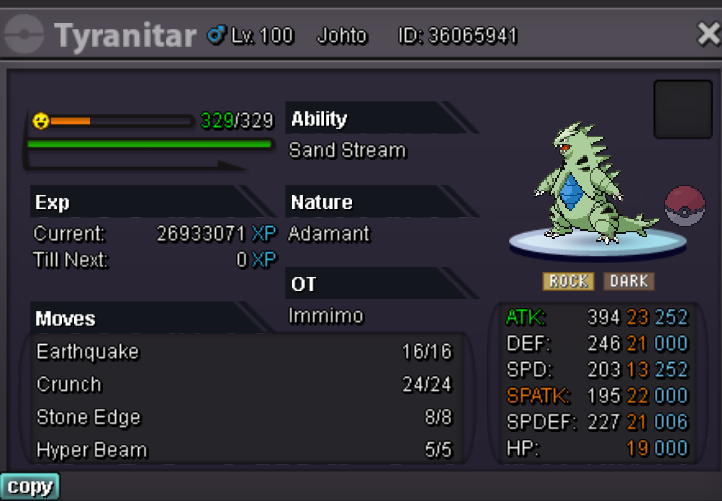
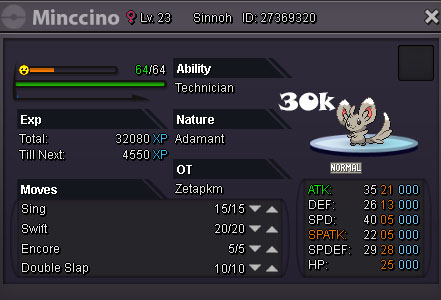
buying mincinno.
1 point
-
Name Change Username: Katakuri23 New Username: HyeEun Server to charge the money from: Gold1 point
-
I heard you can. However I have not done that bit yet1 point
-
Here is a list of things that you can do after you have beaten Sinnoh: Sinnoh Region Hidden Items & Abandon Poke Guide Sinnoh Spawn Guide How to Get Heatran How to get one of the Lake guardians1 point
-
⋯⋯⋯⋯⋯⋯⋯⋯⋯⋯⋯⋯⋯⋯⋯⋯⋯⋯⋯⋯⋯⋯⋯⋯⋯⋯⋯⋯⋯⋯⋯⋯⋯⋯⋯⋯1 point