


Leaderboard


Popular Content
Showing content with the highest reputation on 09/29/22 in all areas
-
As we know PRO was not implementing animation on every move, i think that make us boring, playing years and no update for important things. I know hoping PRO release sprite with 3d / moving sprite is a way to impossible, but at least make the coded move having animation.2 points
-
2 points
-
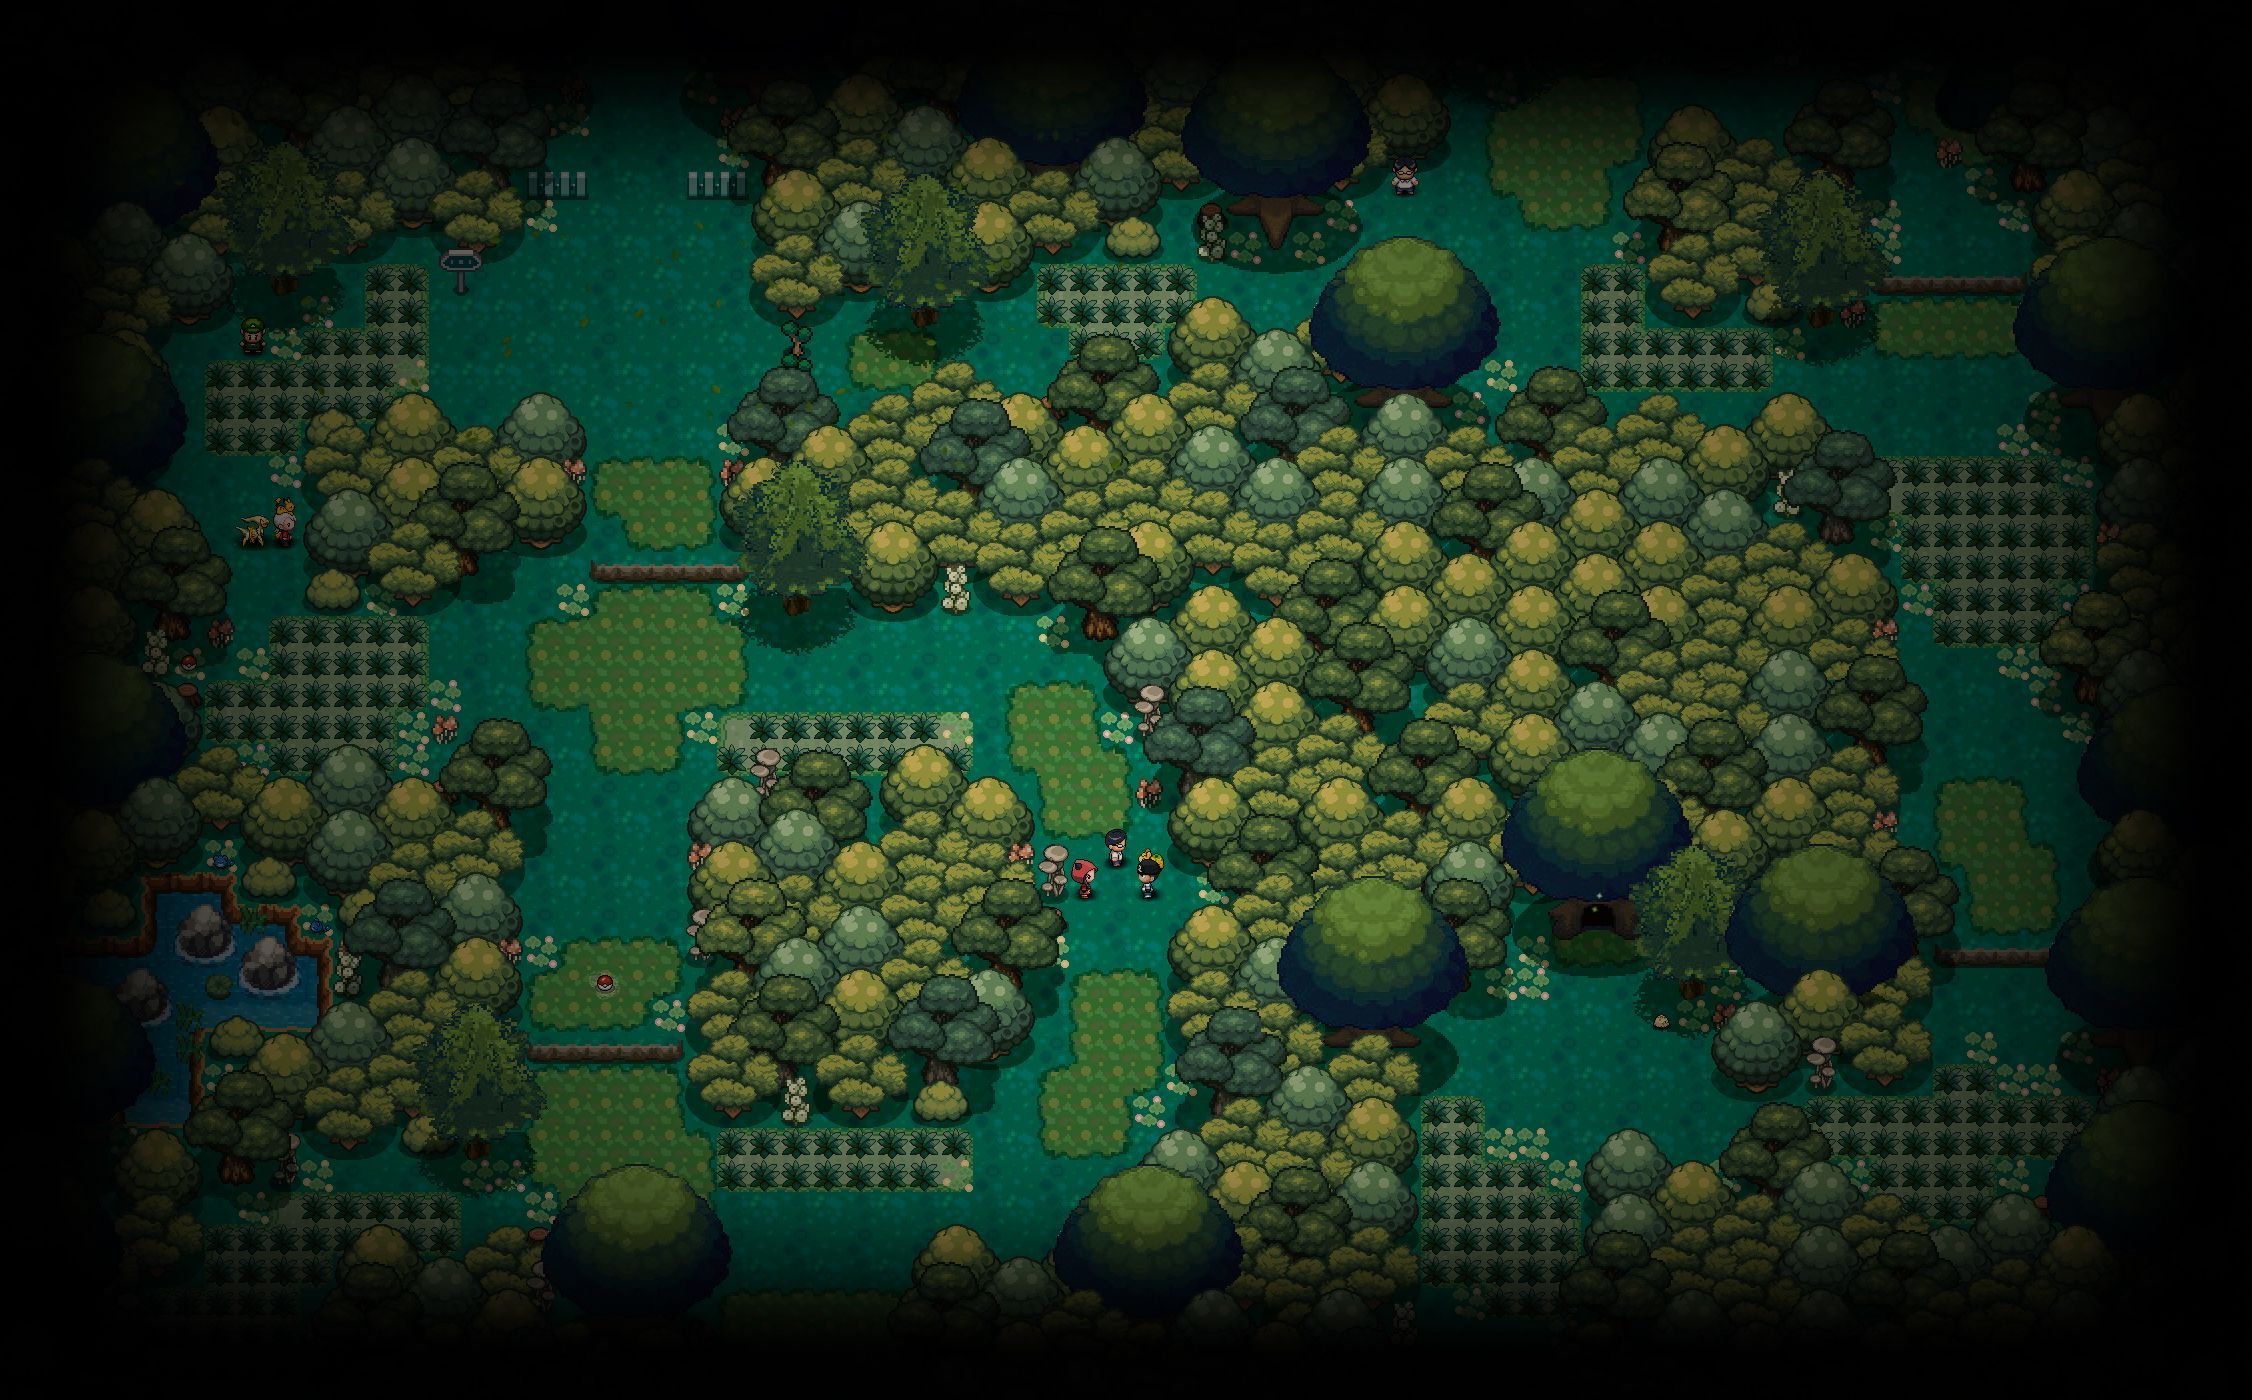
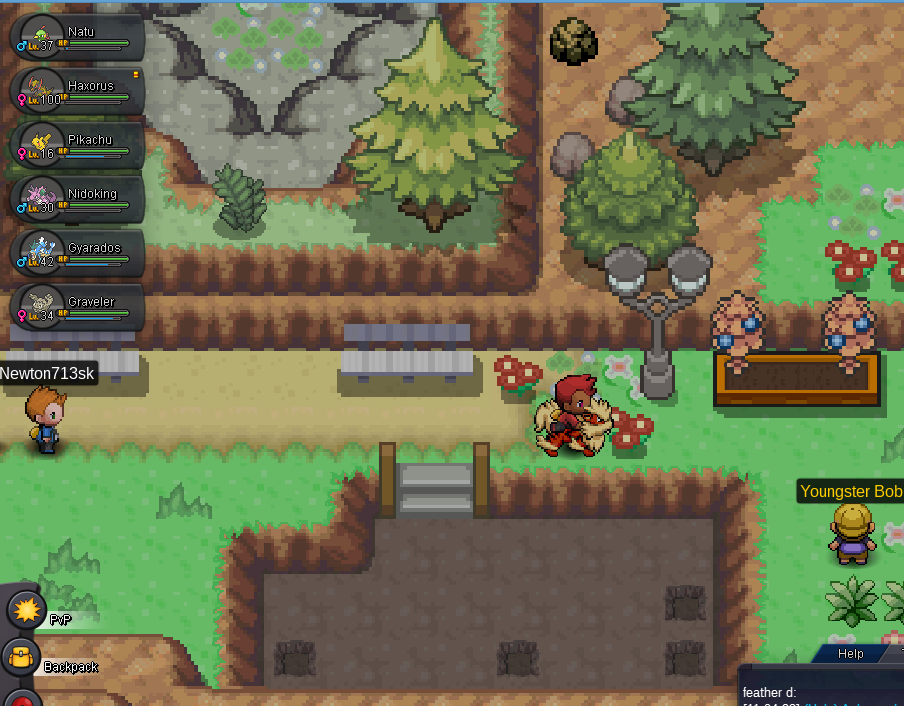
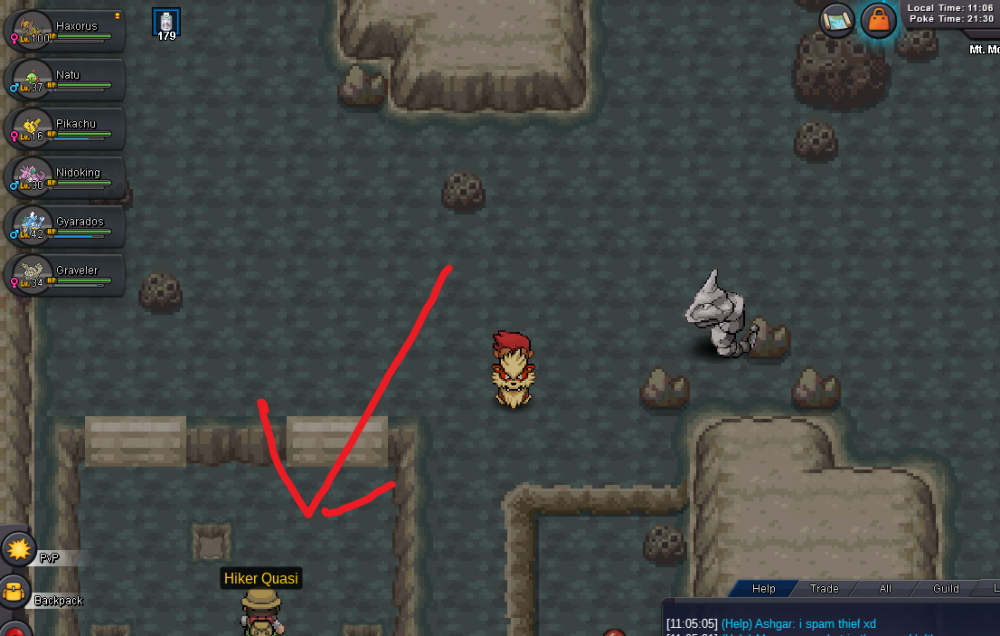
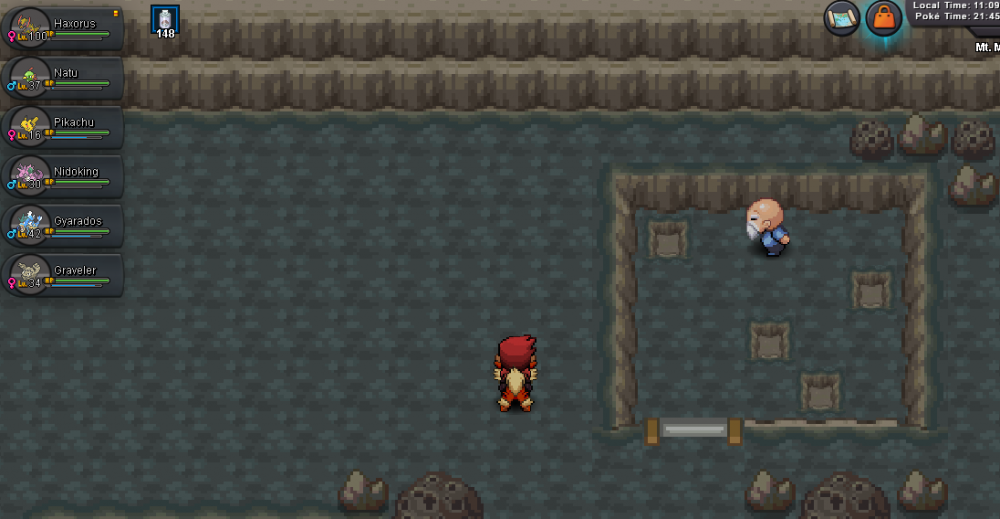
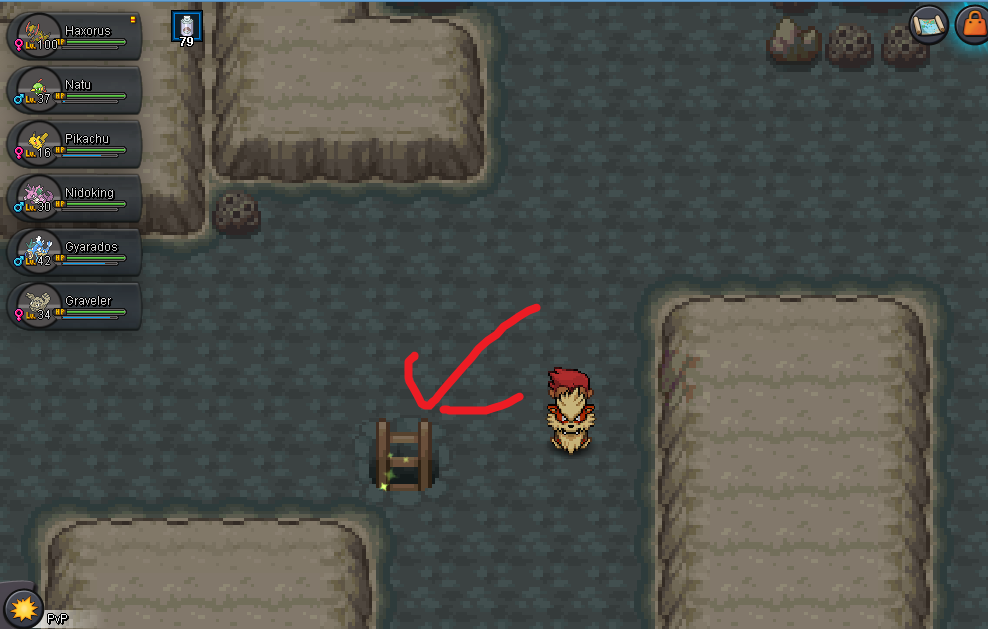
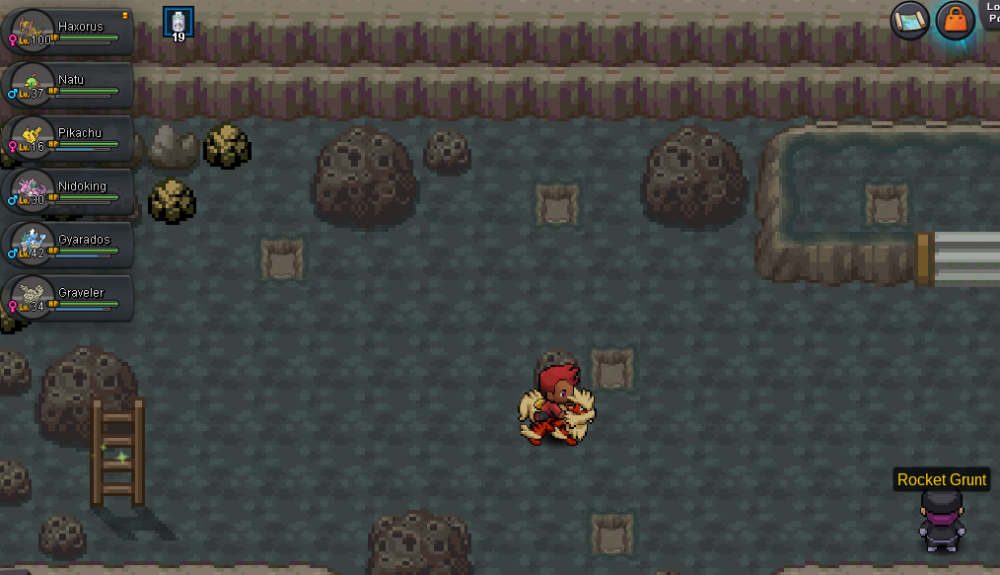
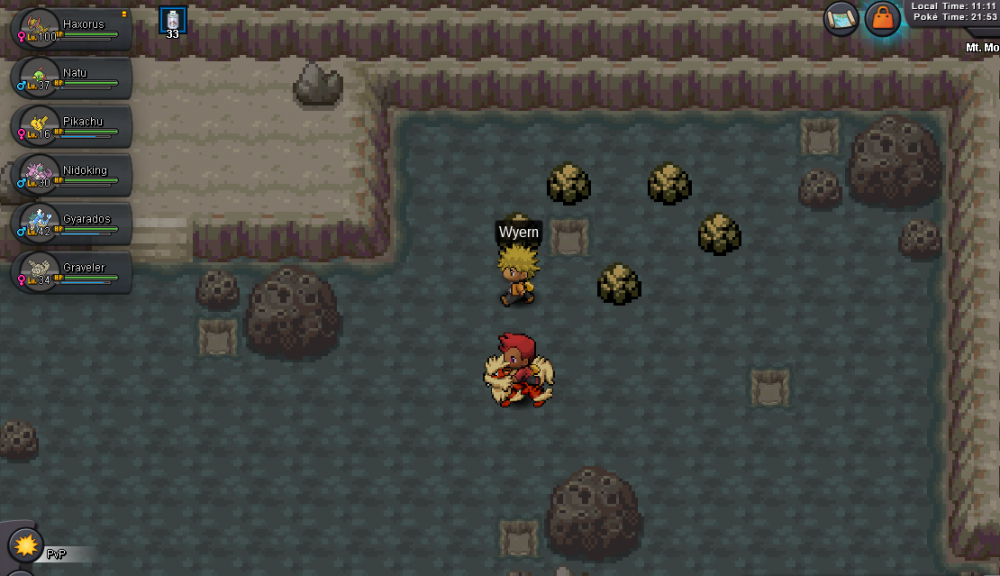
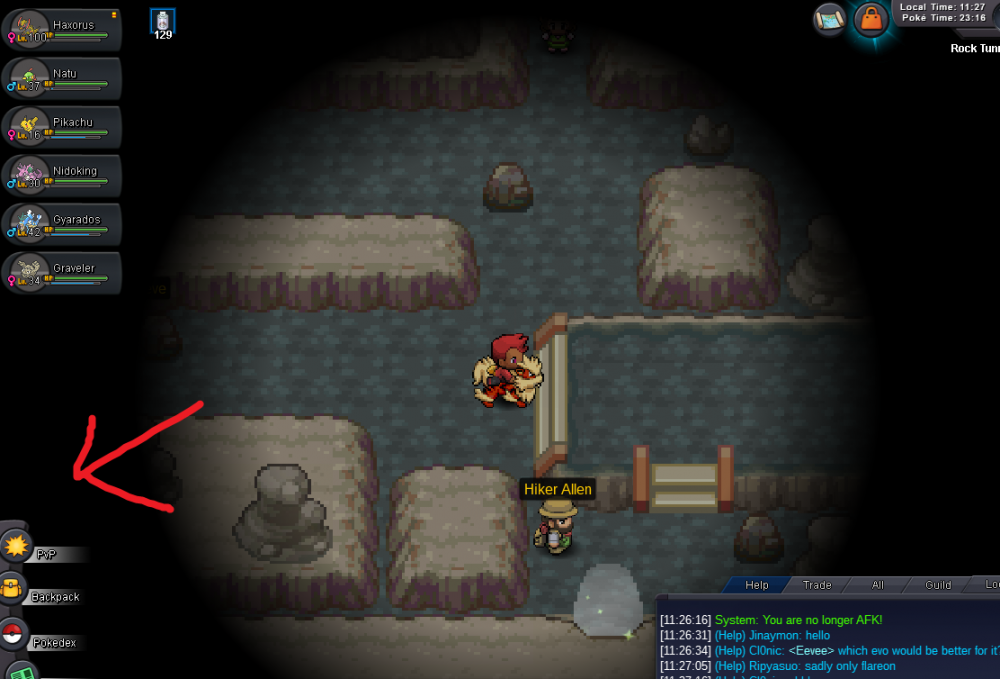
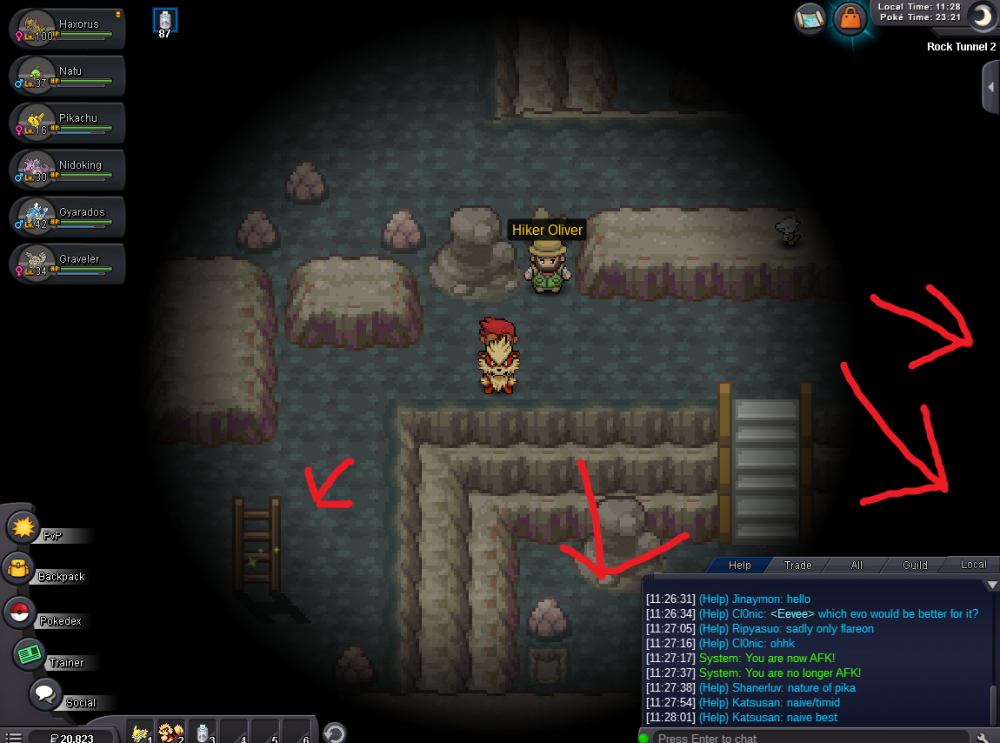
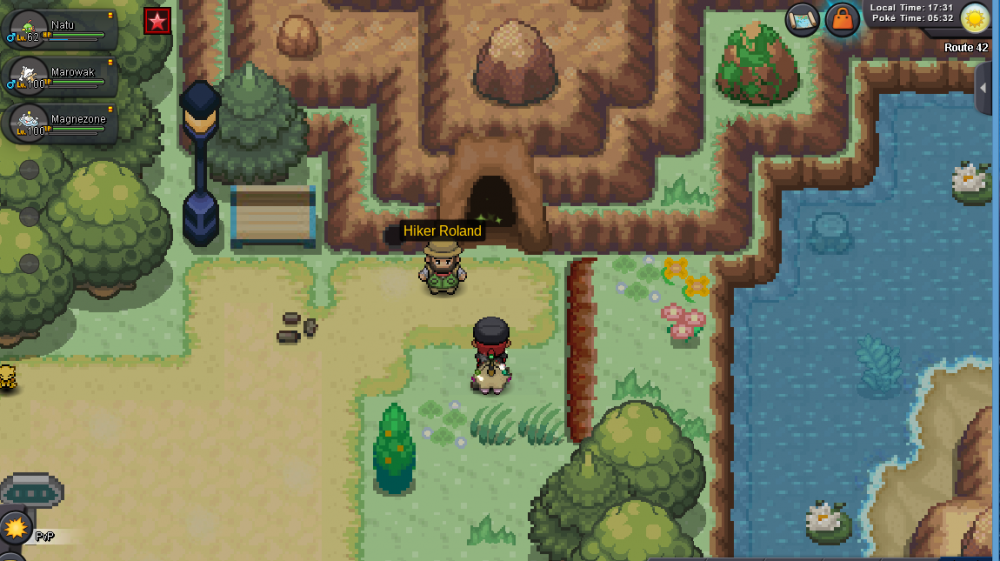
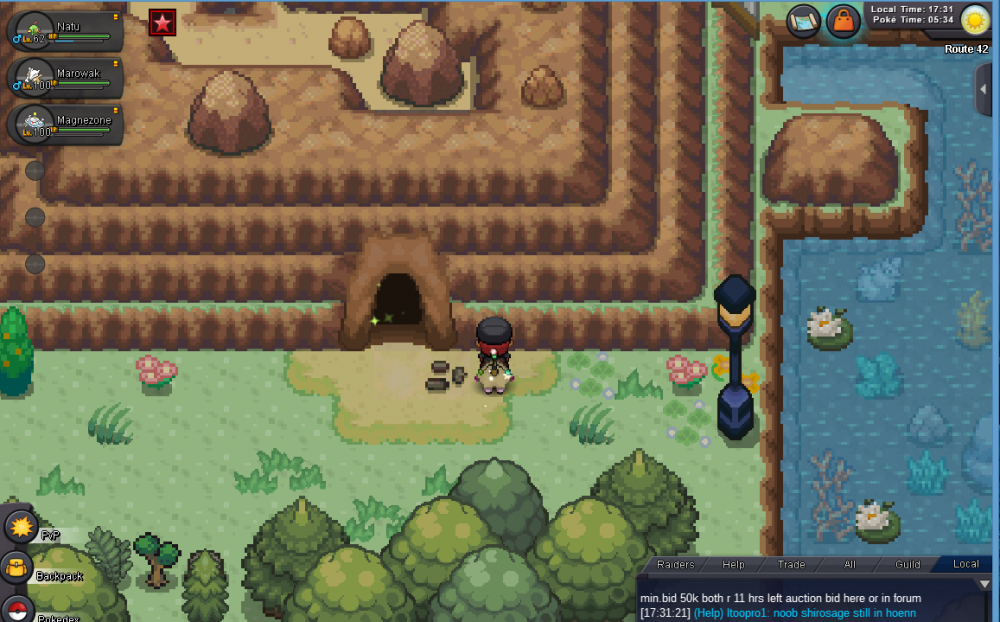
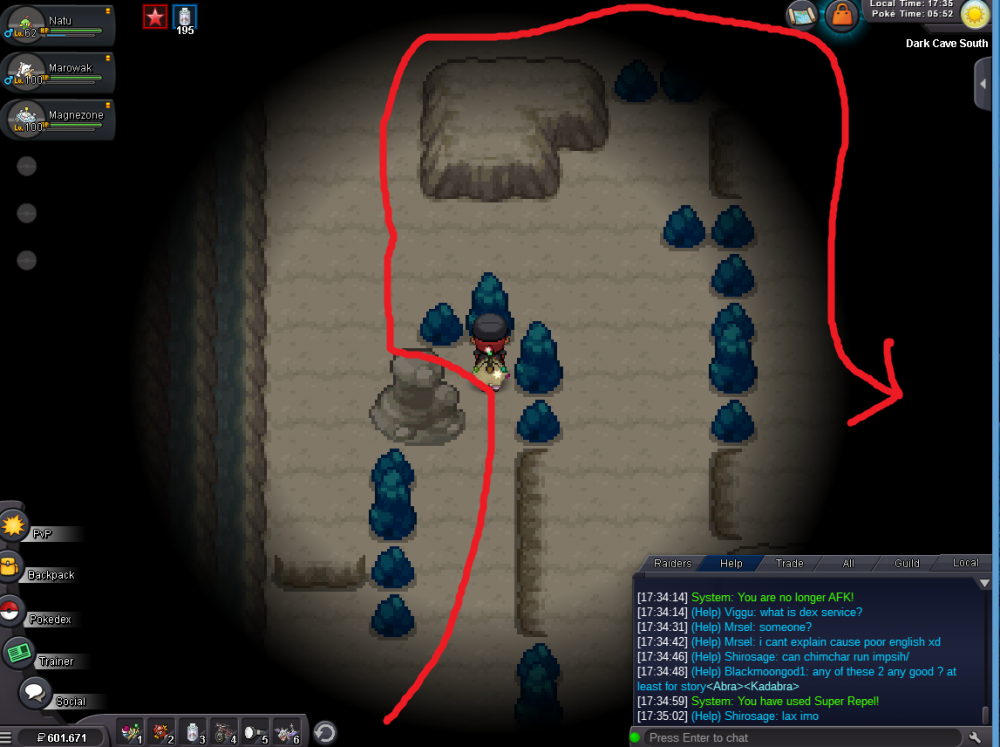
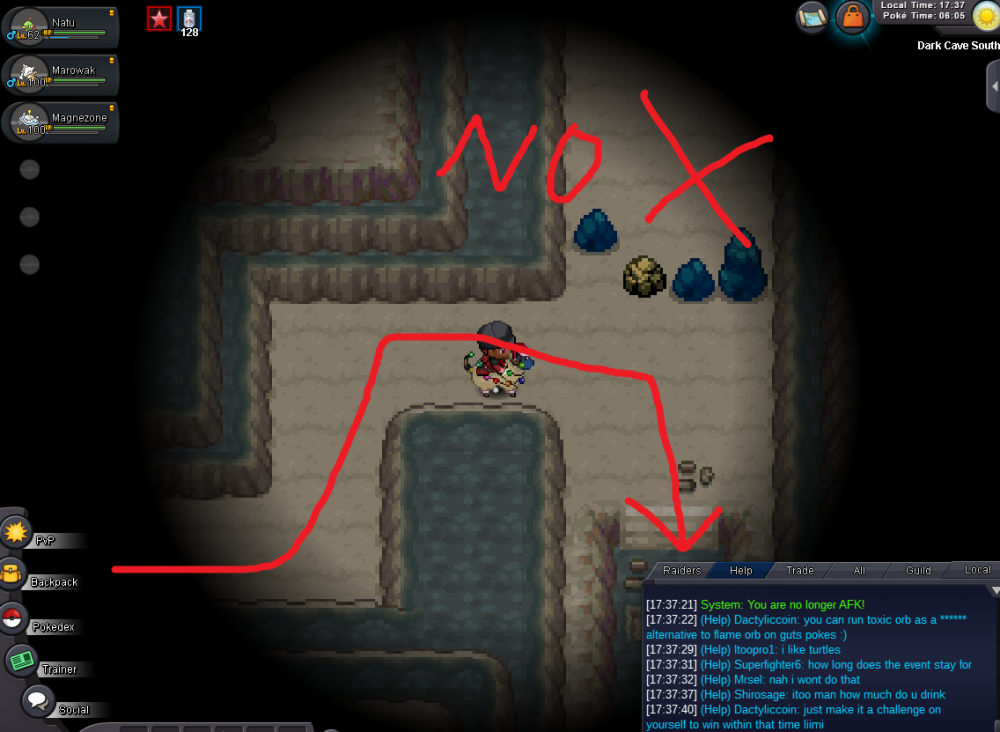
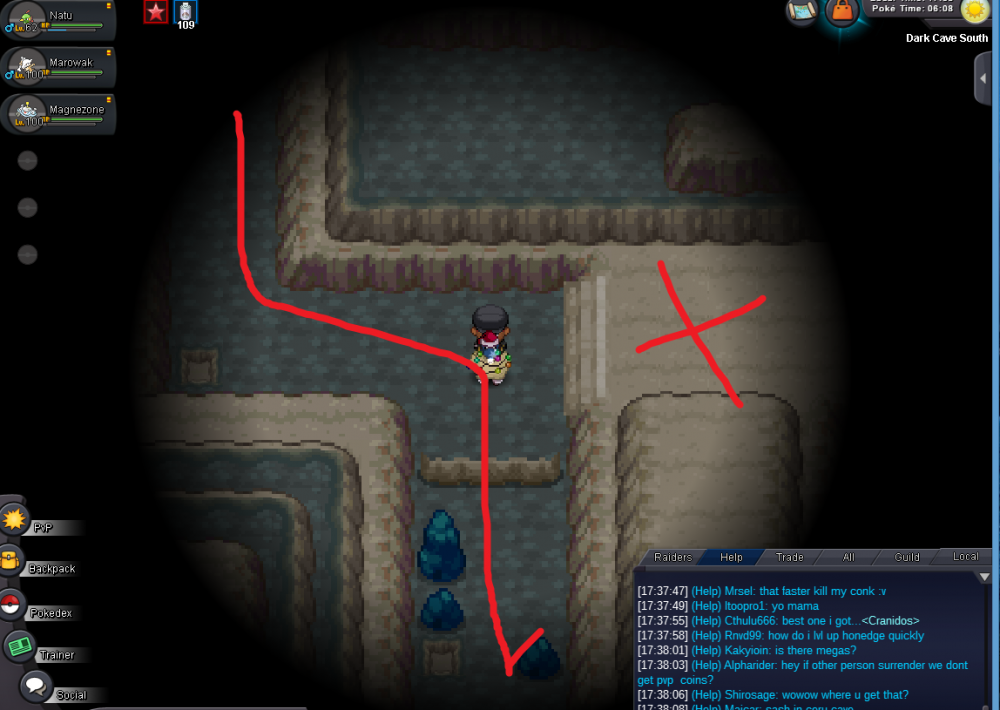
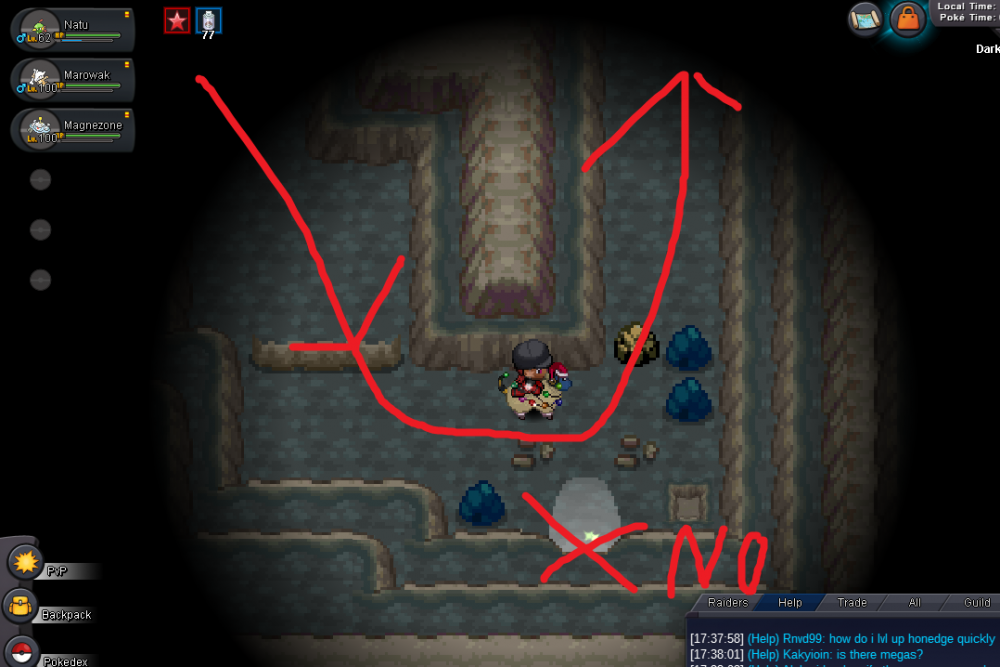
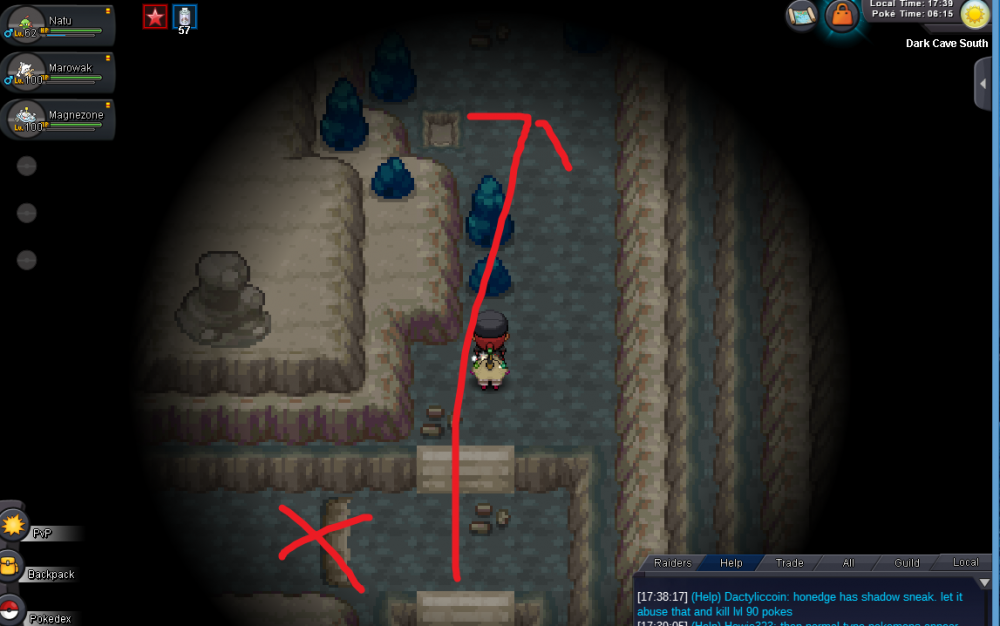
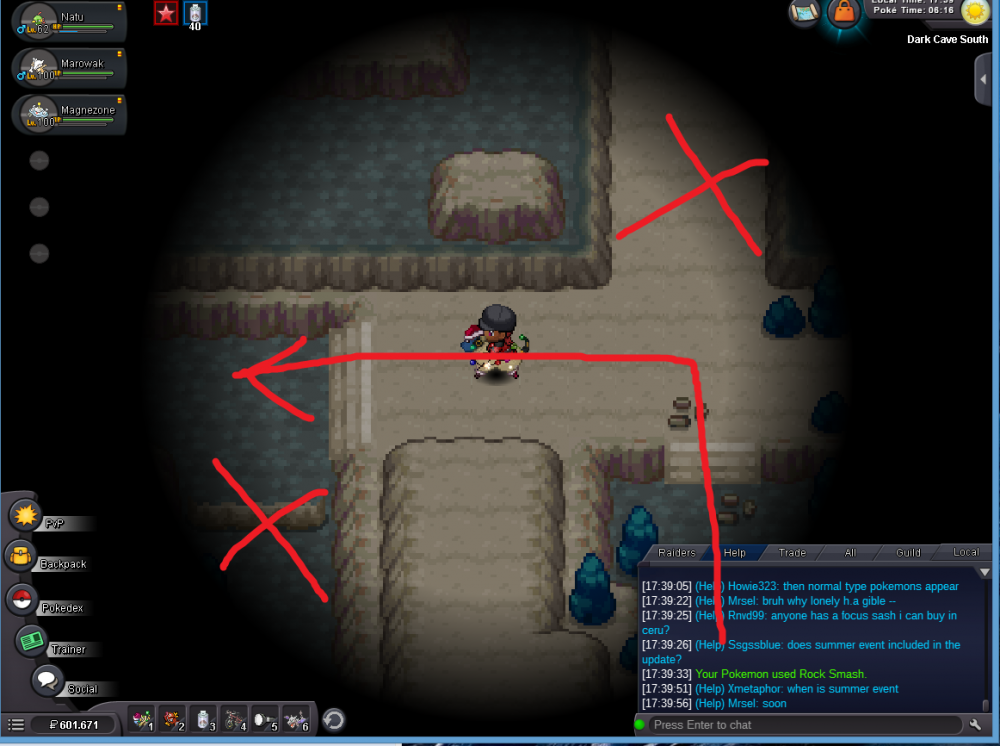
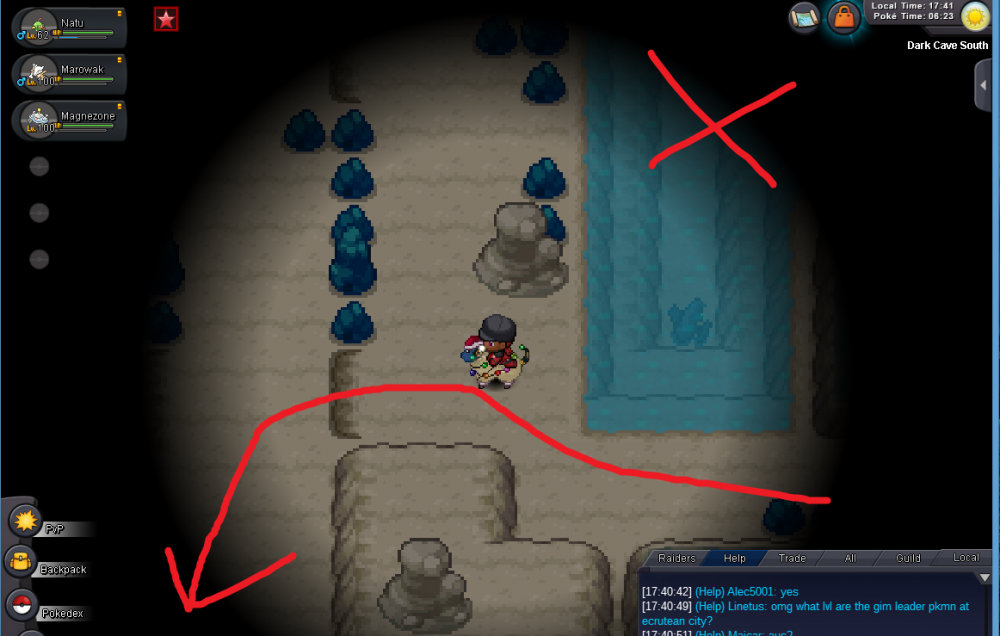
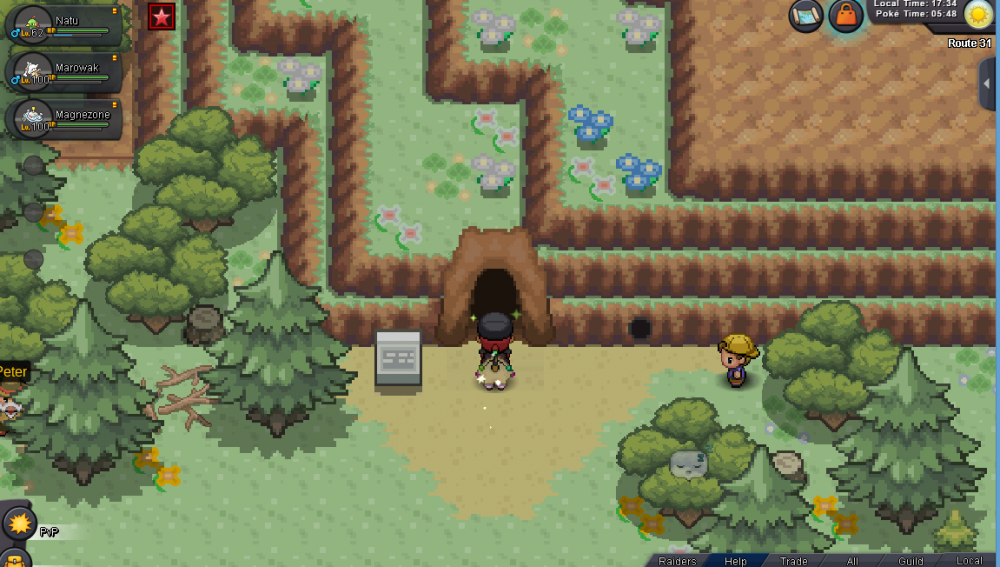
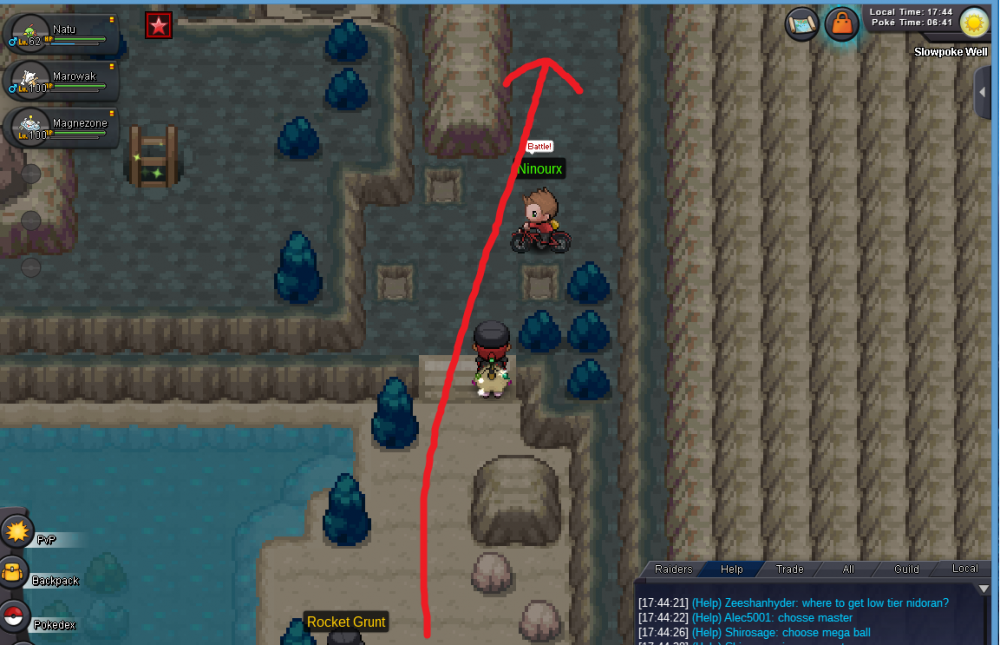
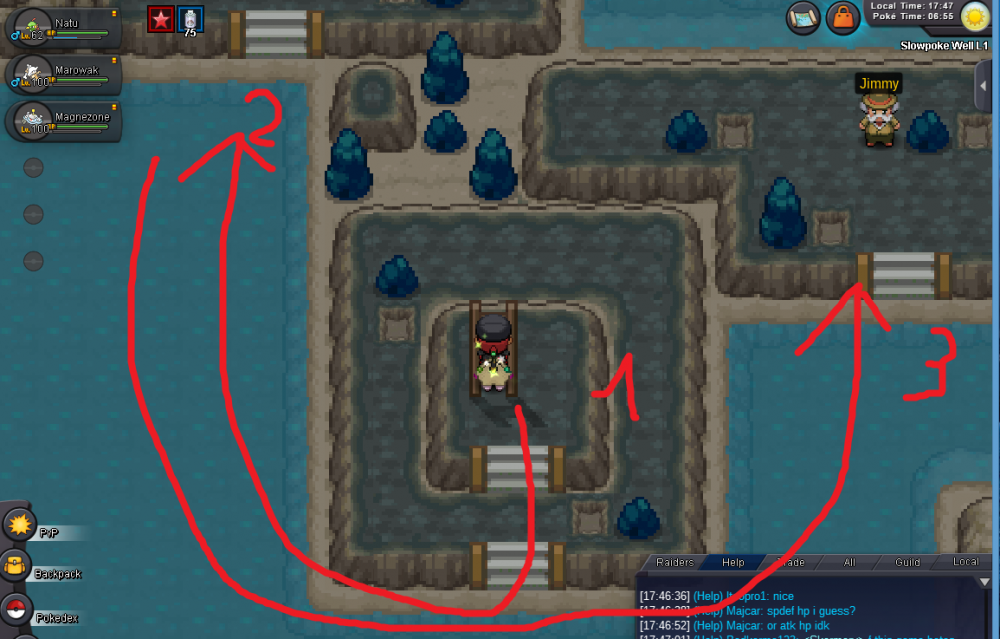
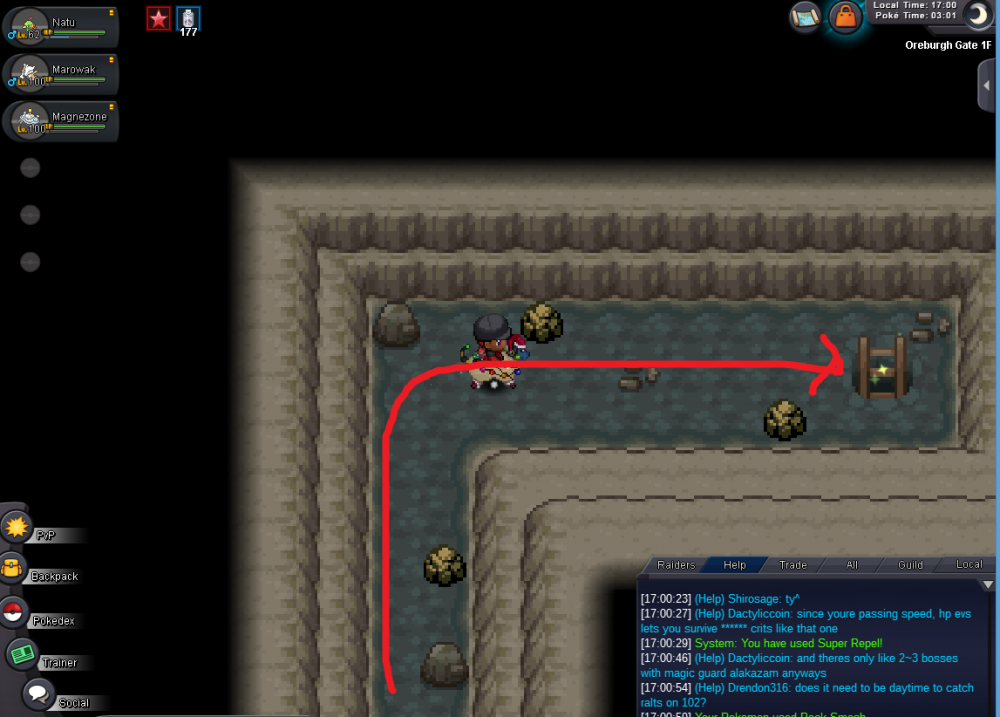
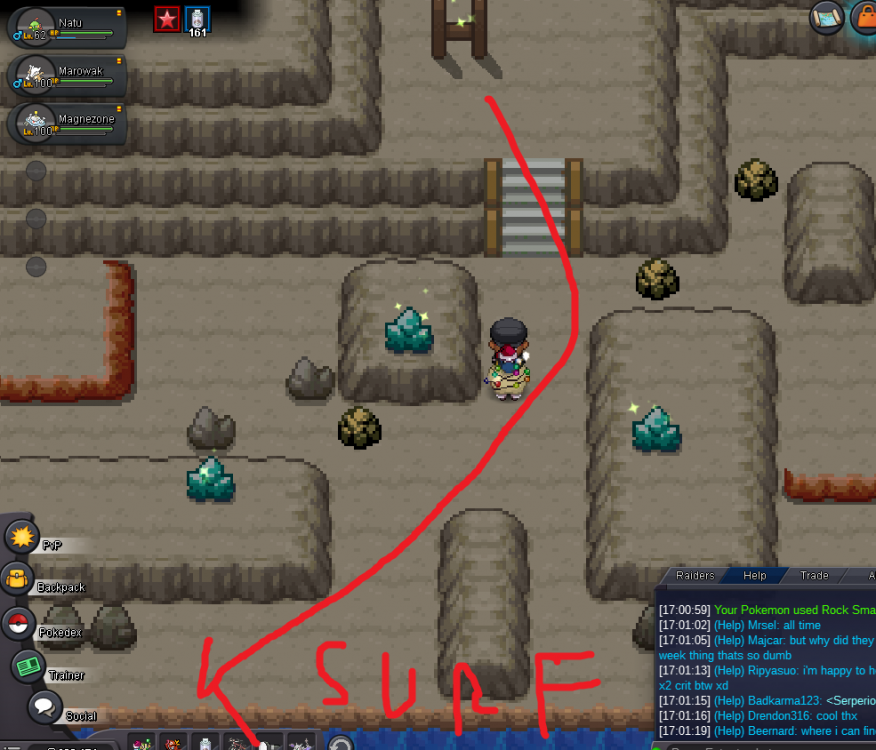
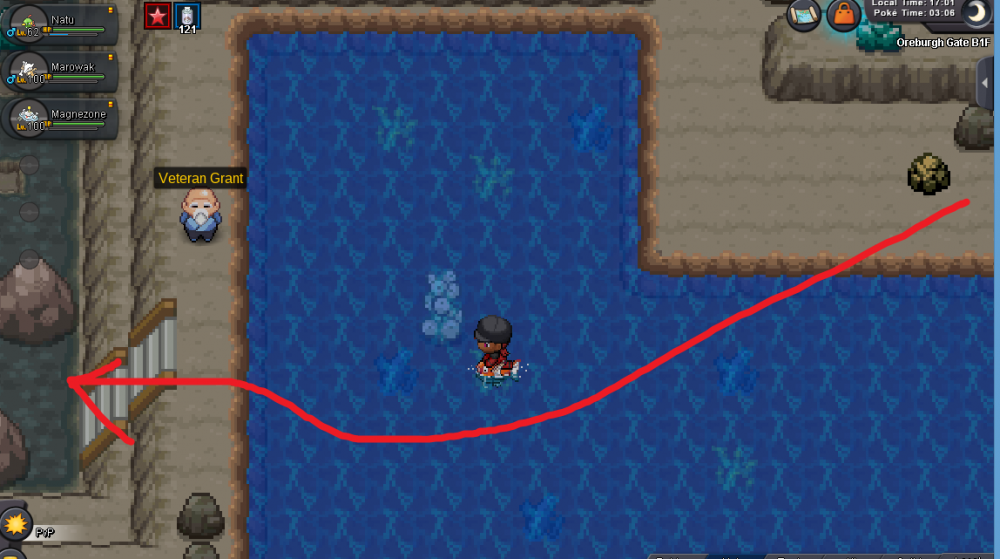
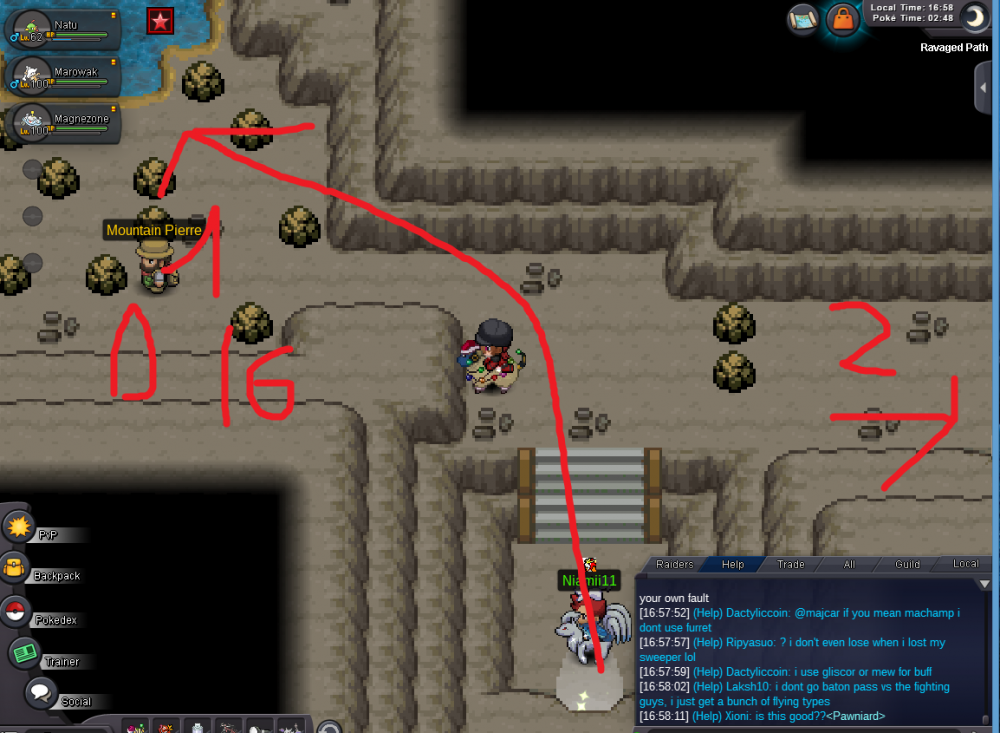
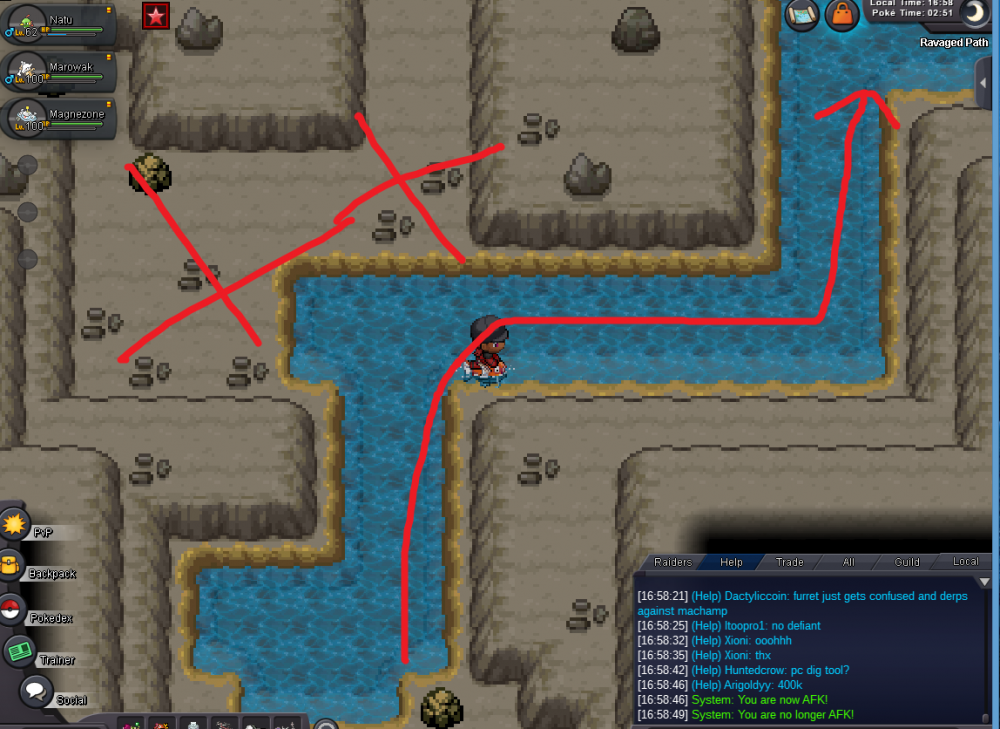
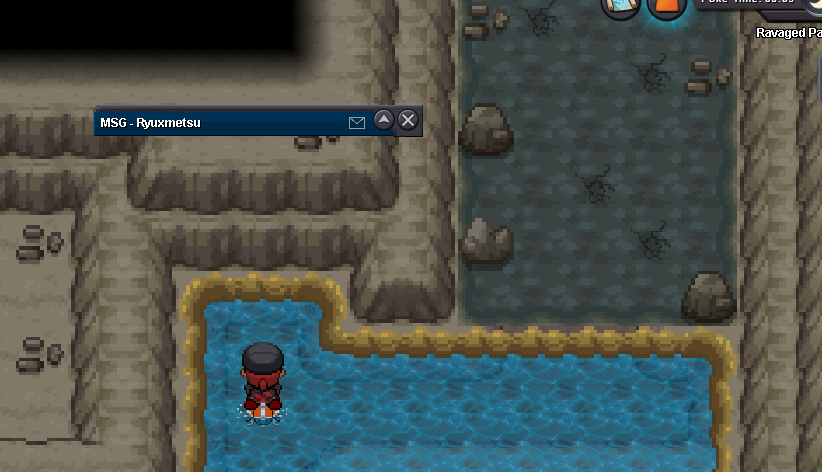
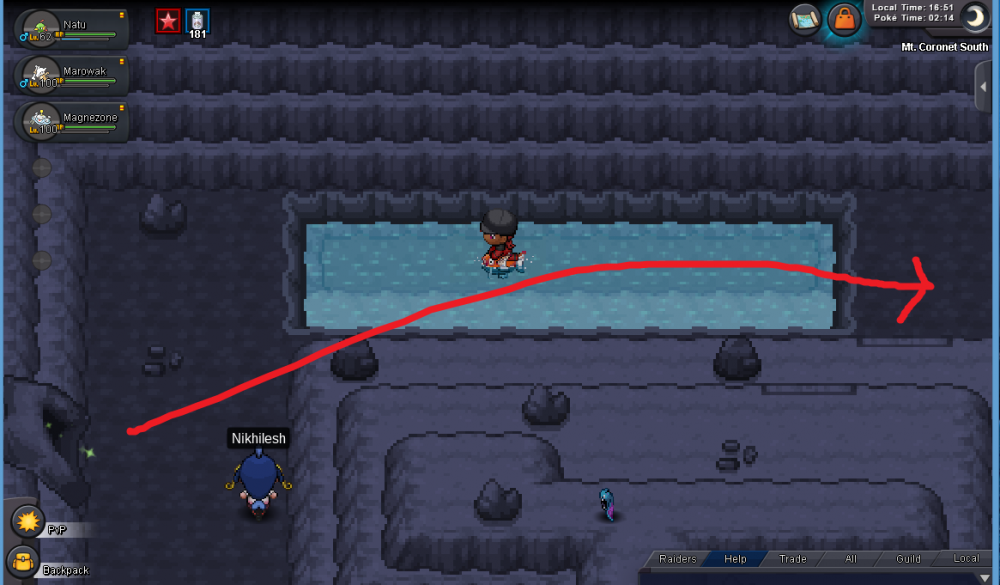
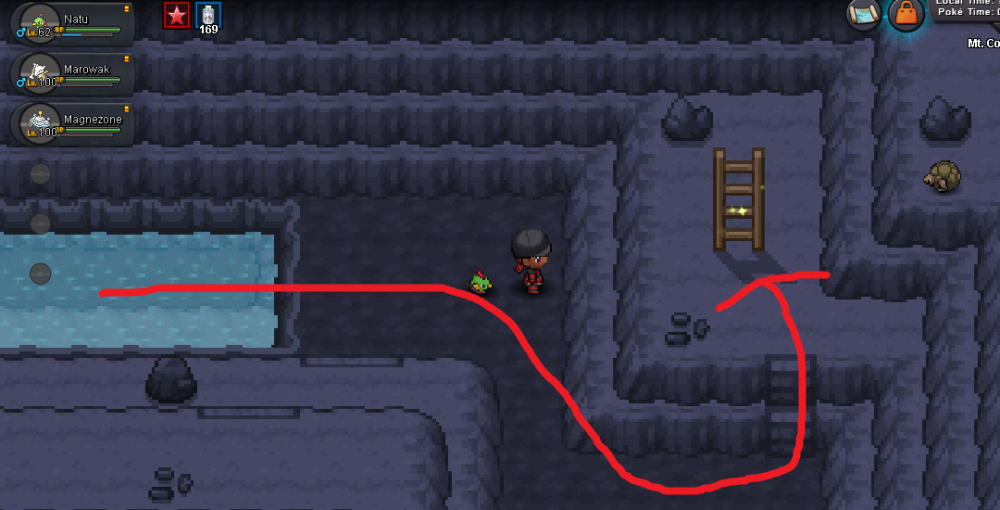
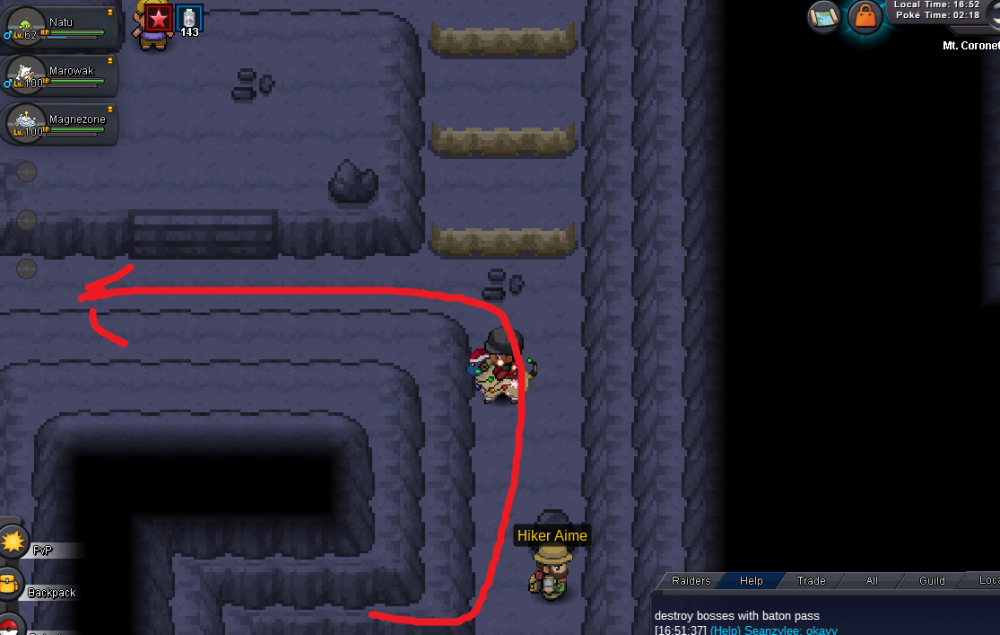
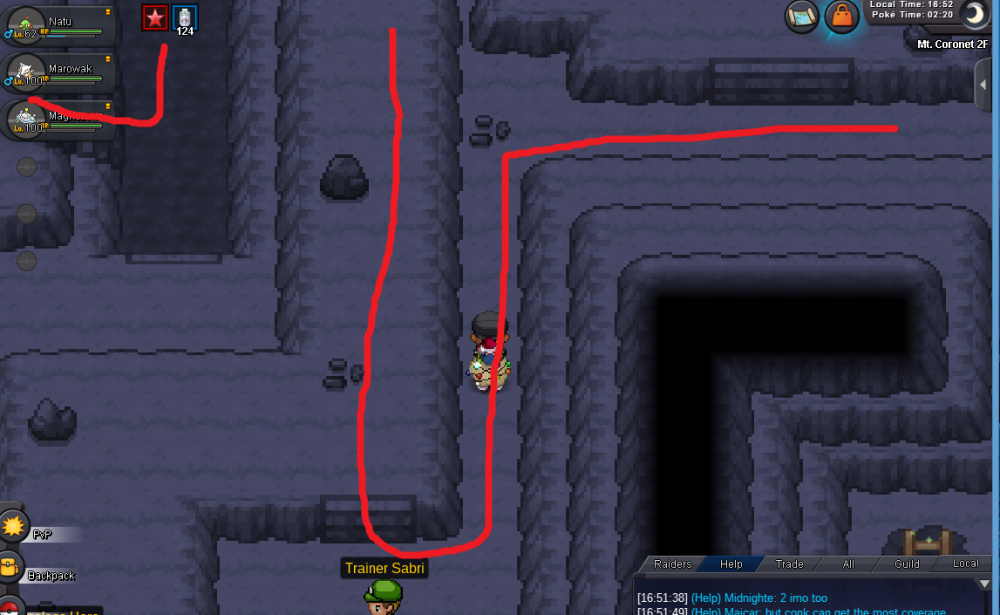
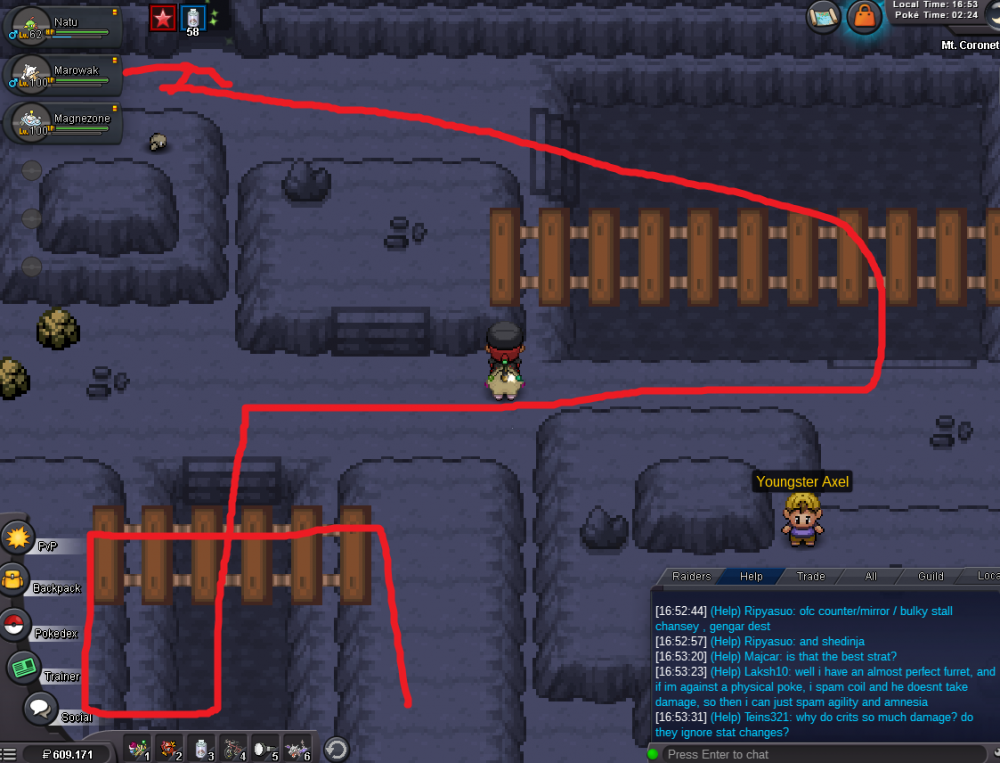
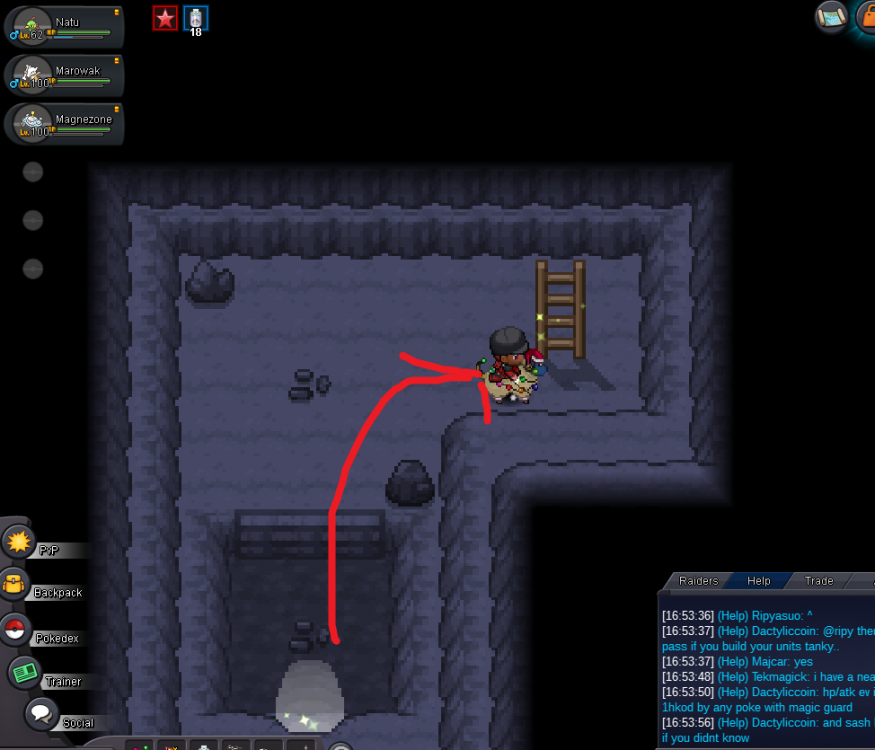
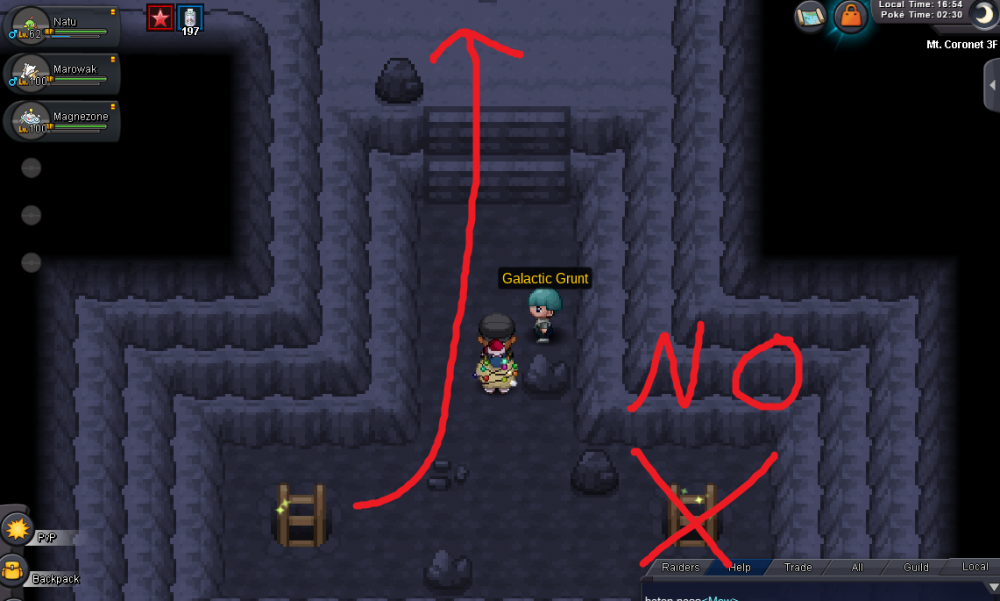
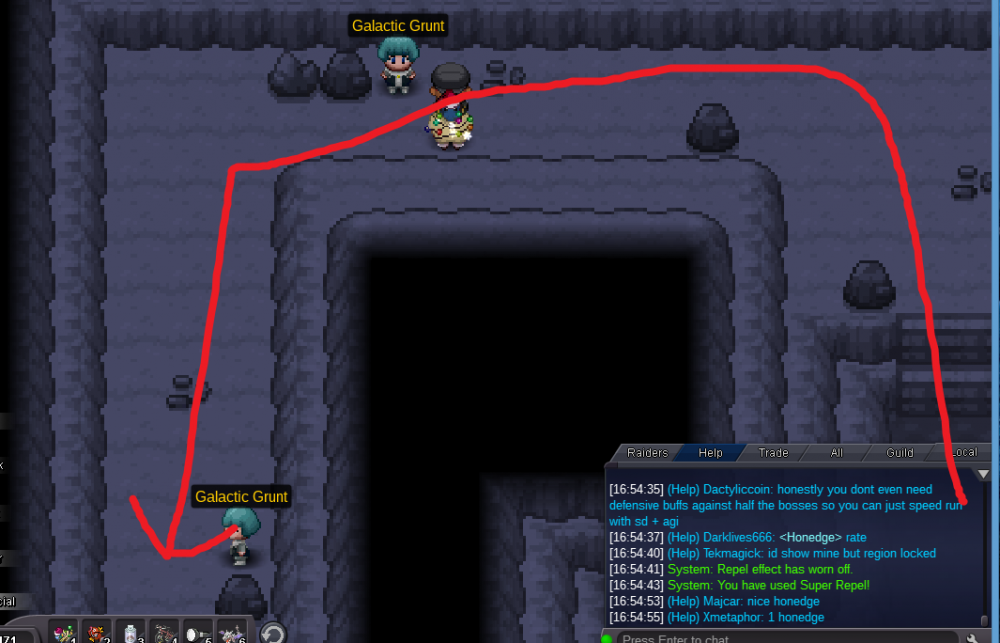
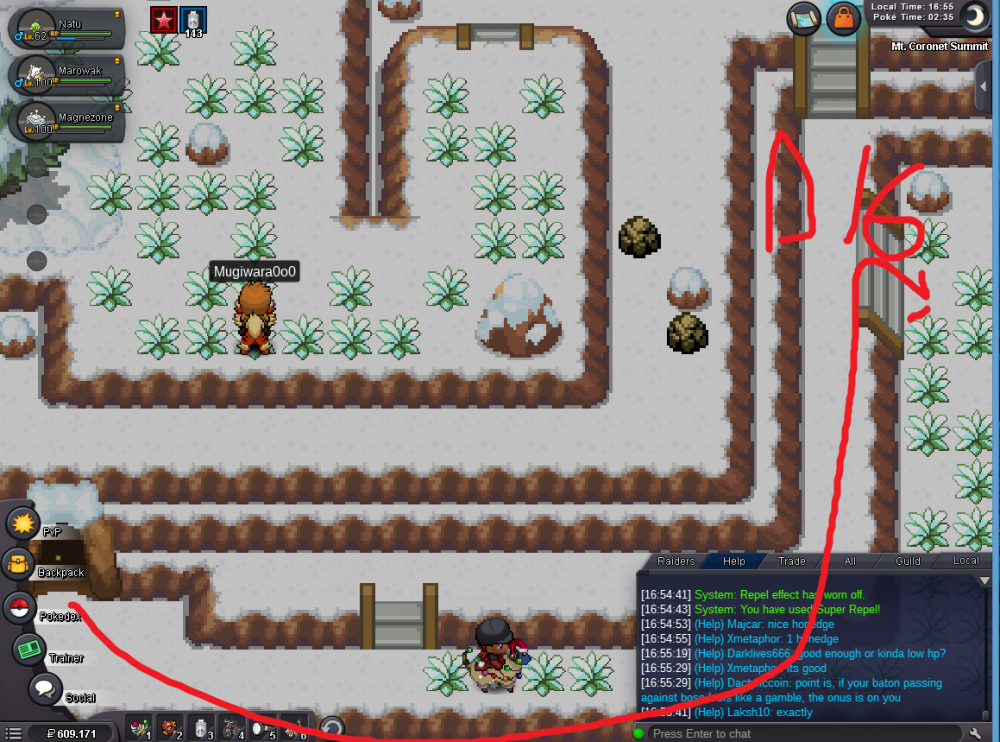
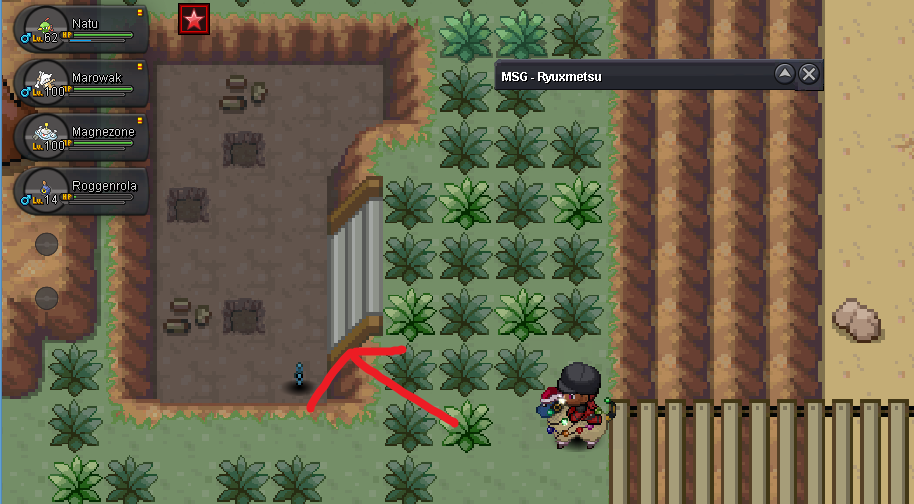
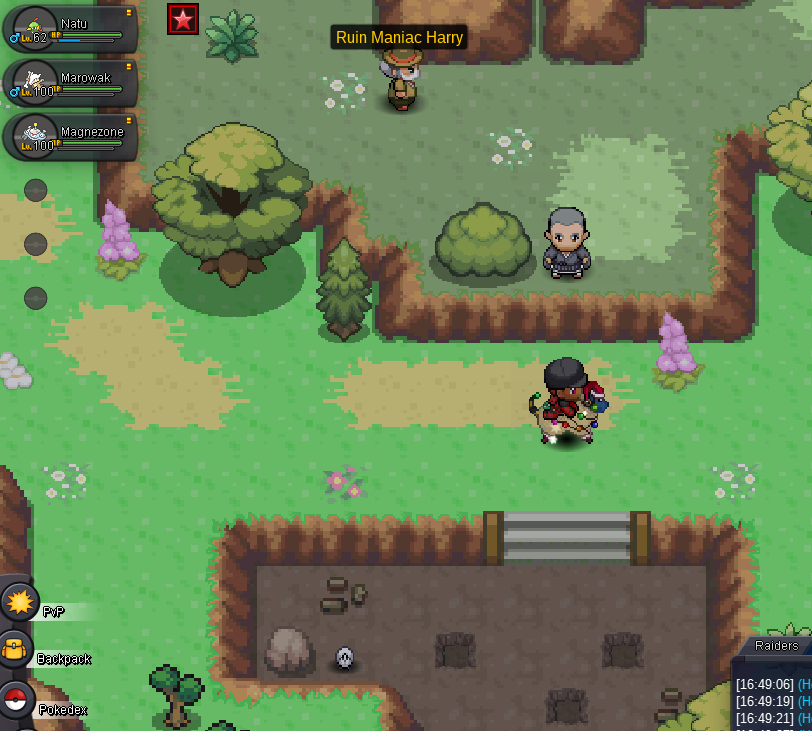
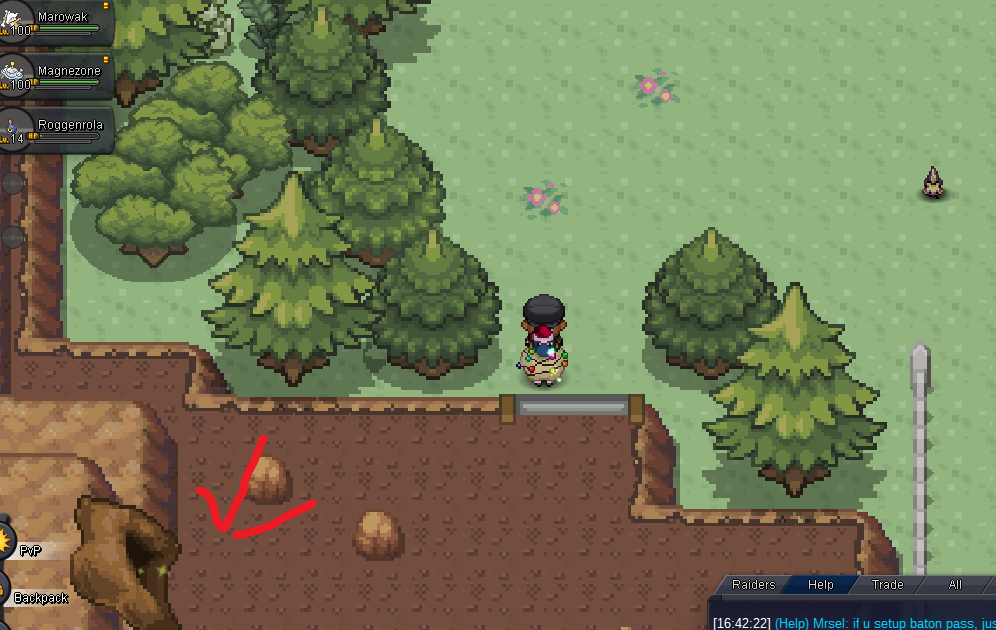
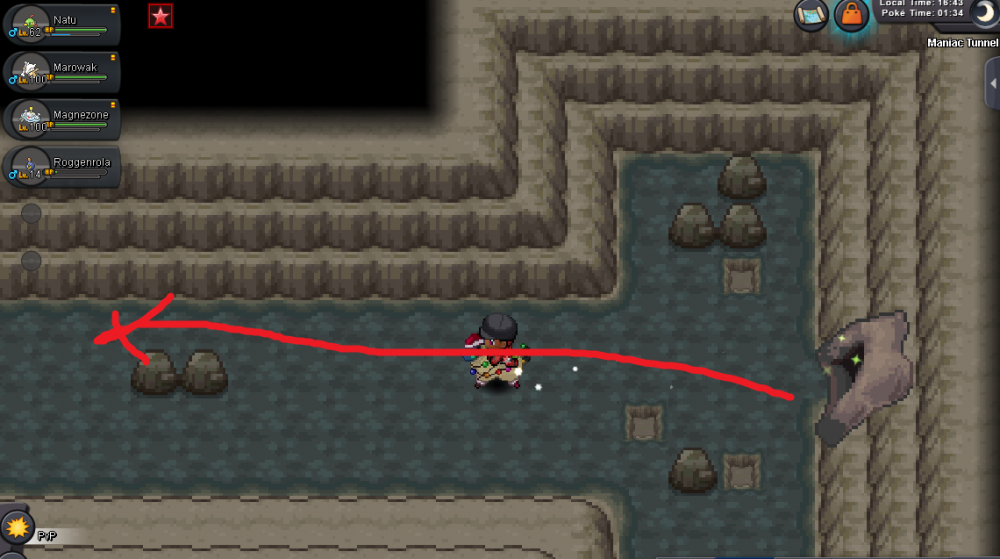
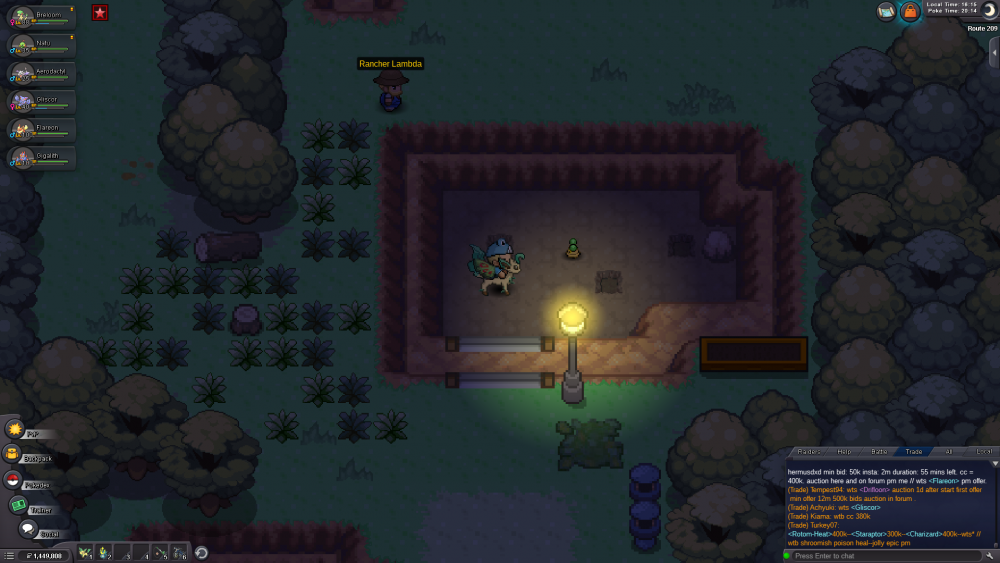
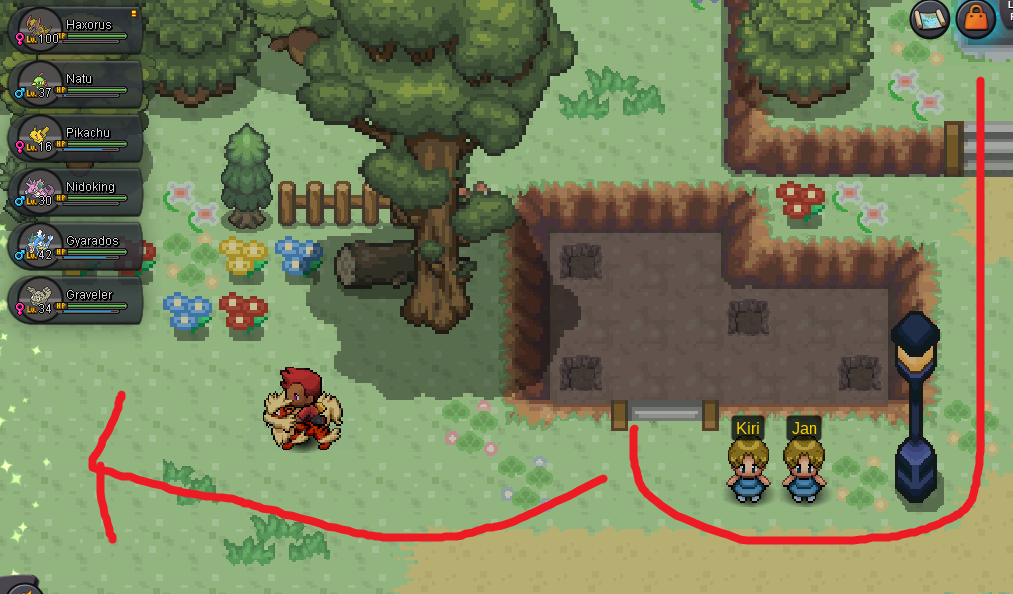
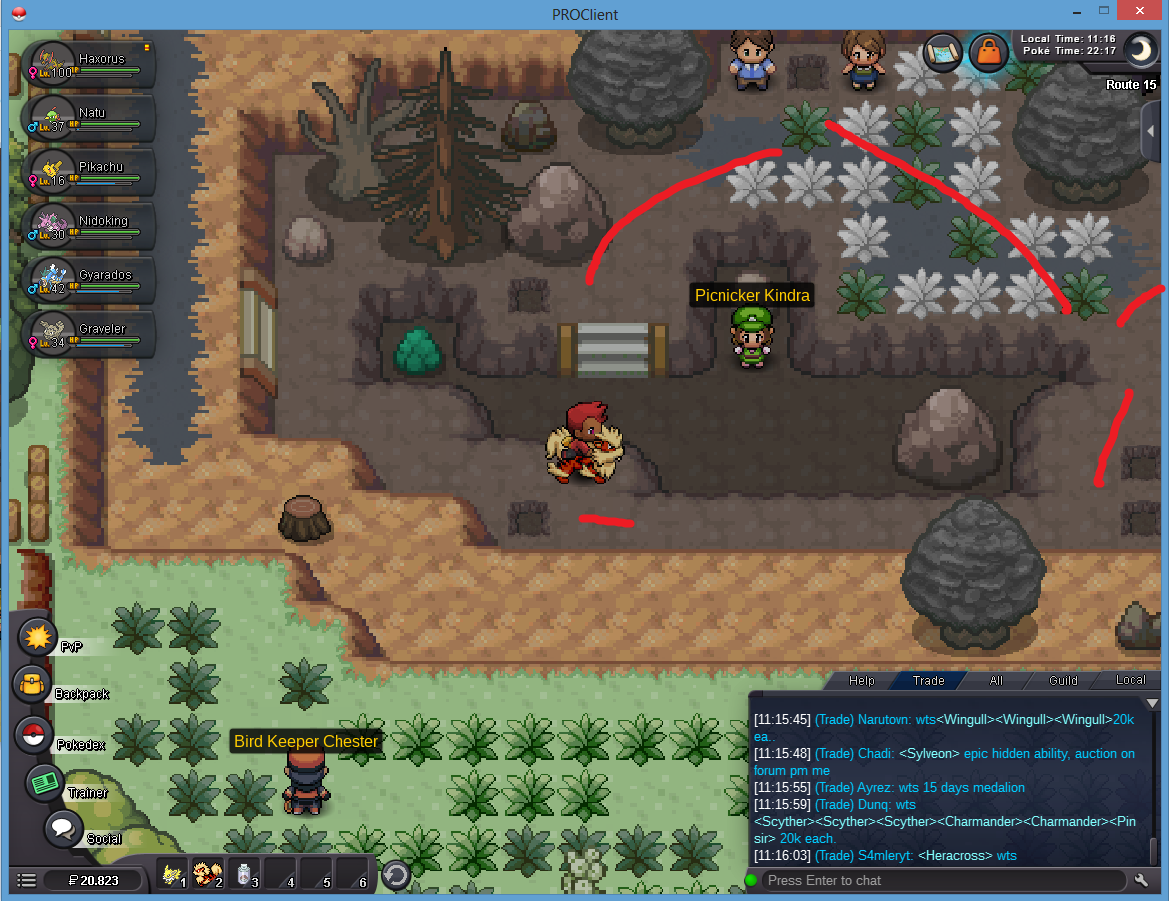
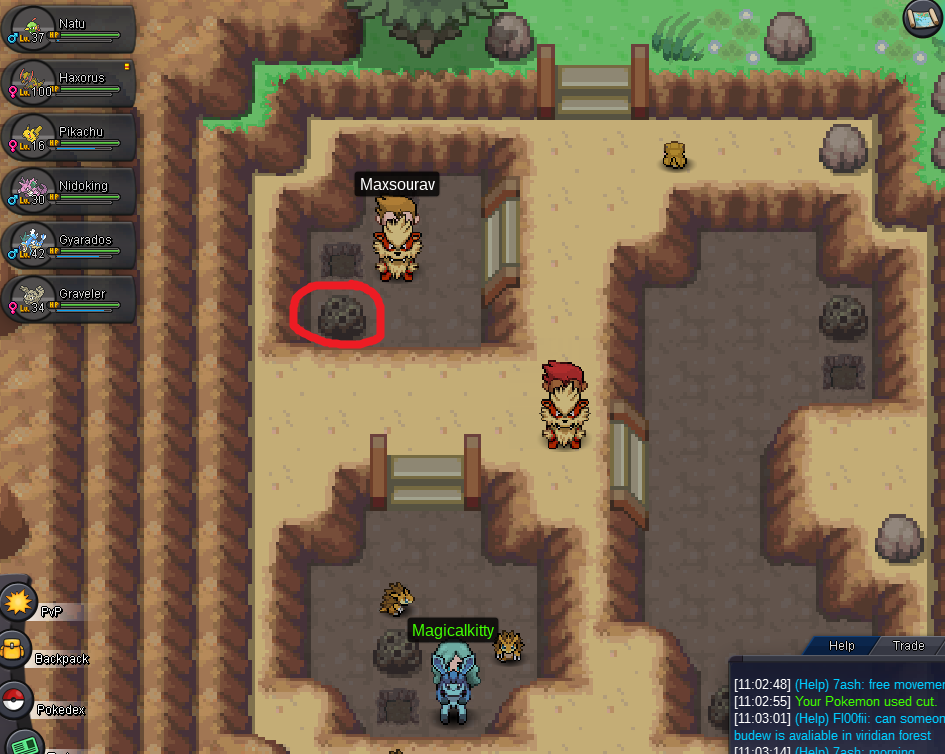
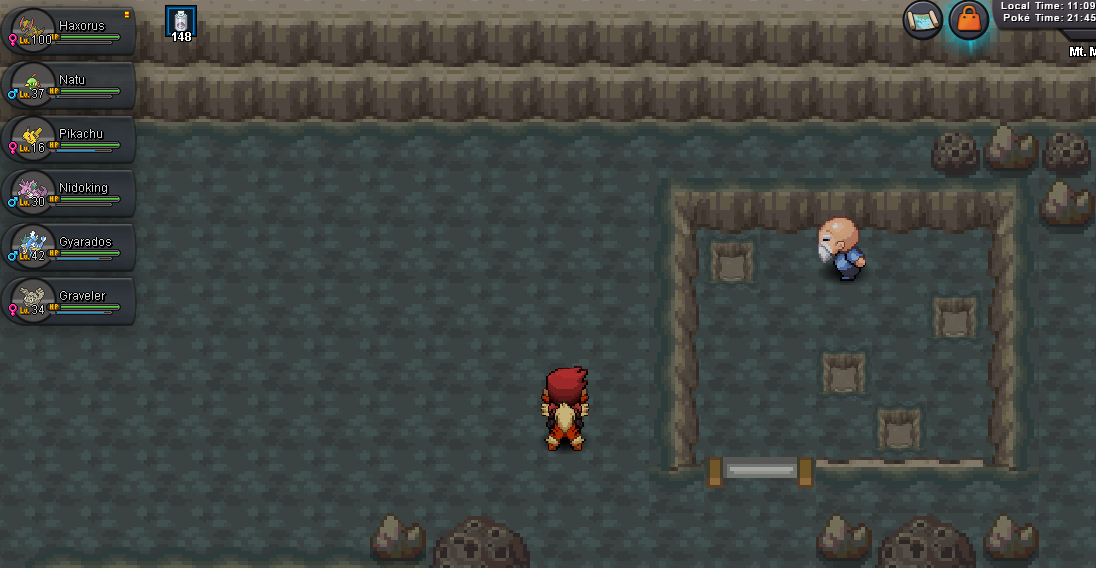
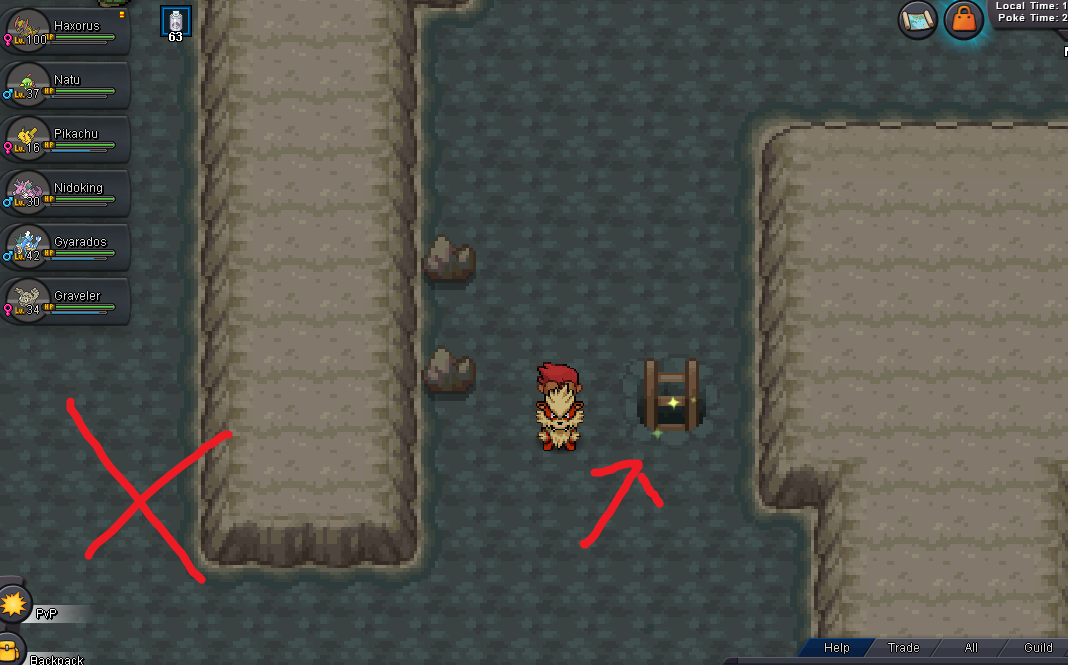
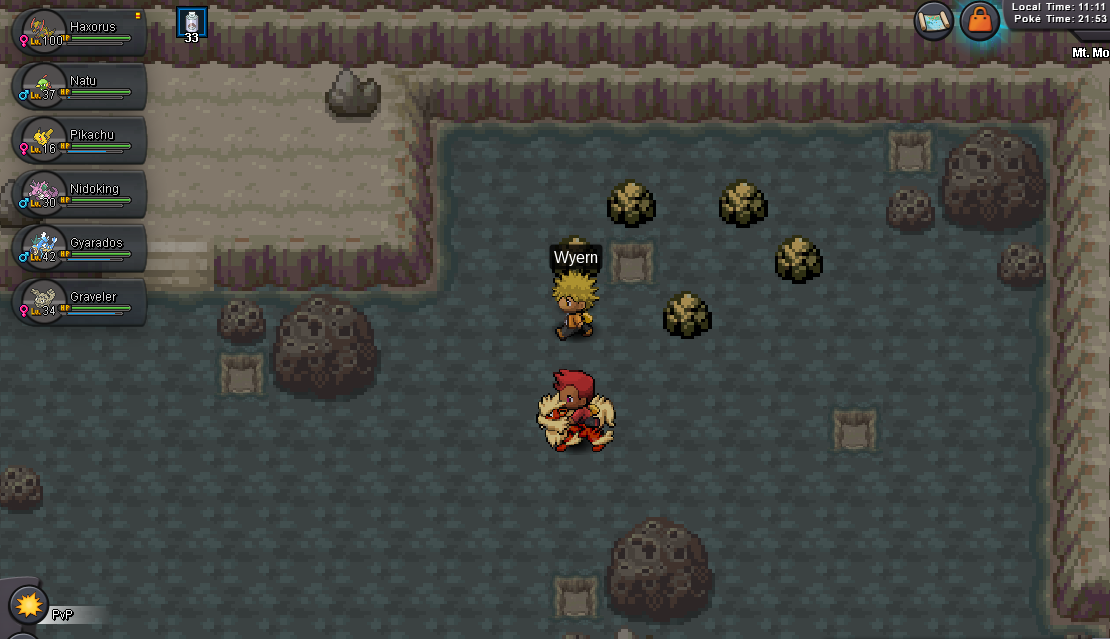
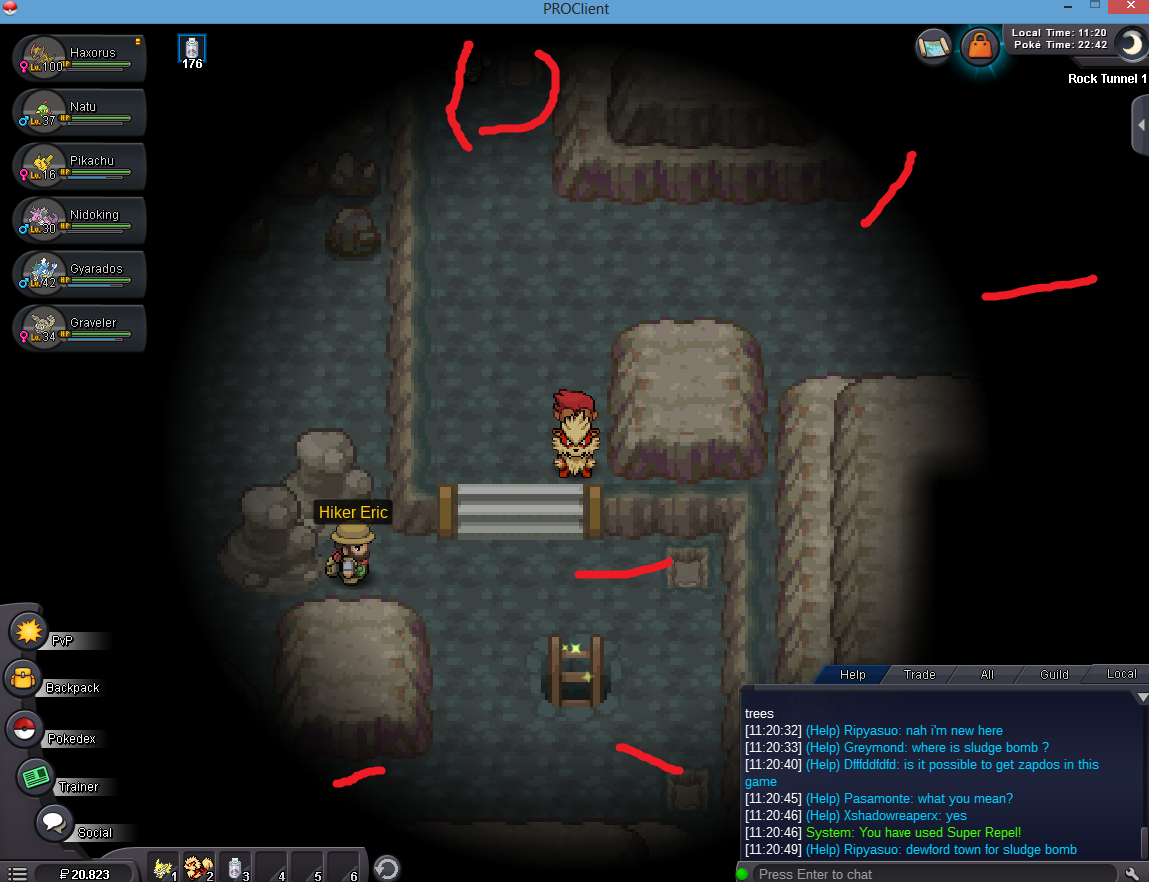
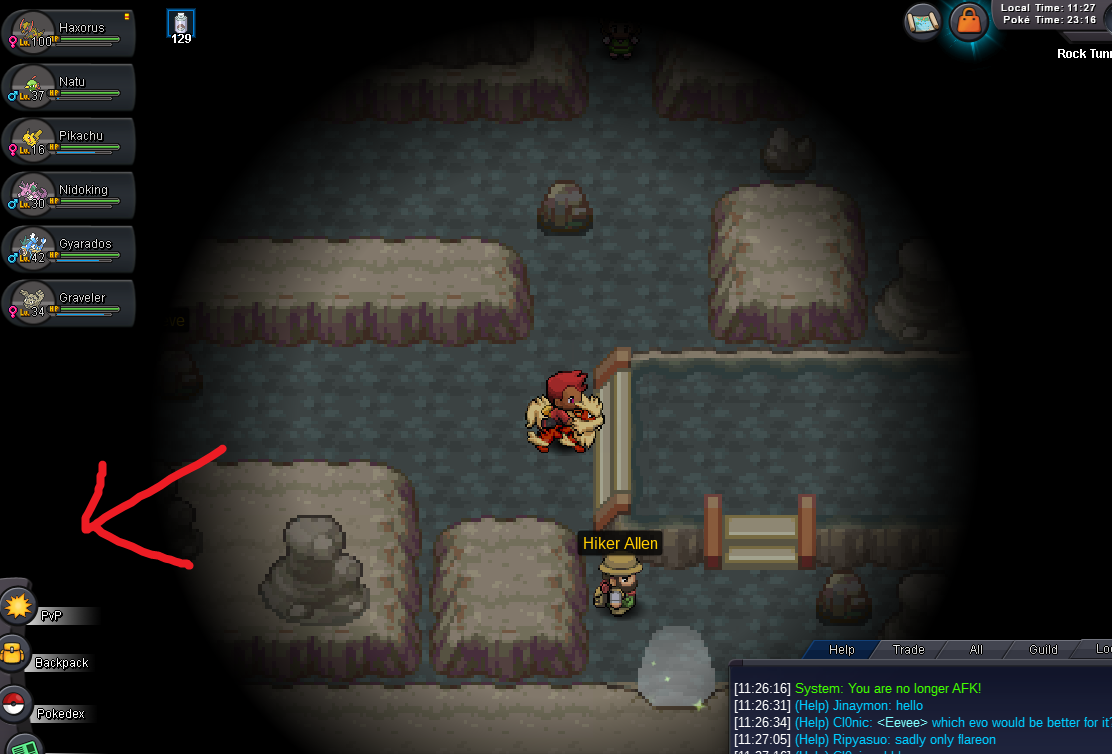
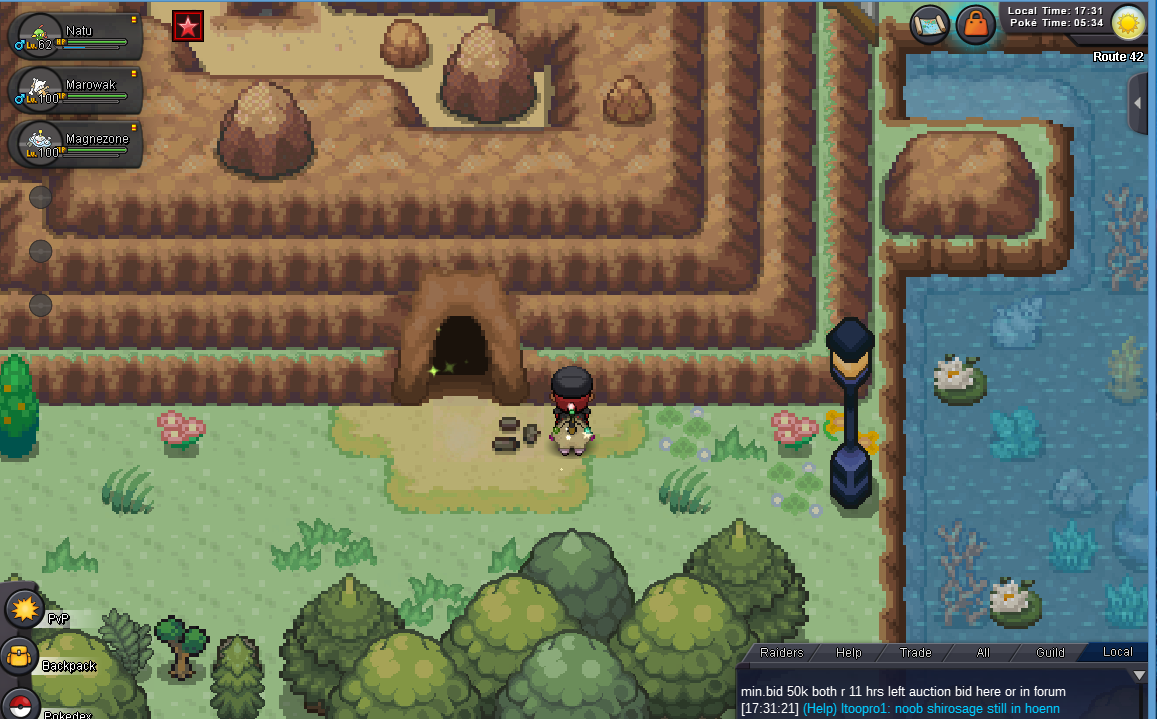
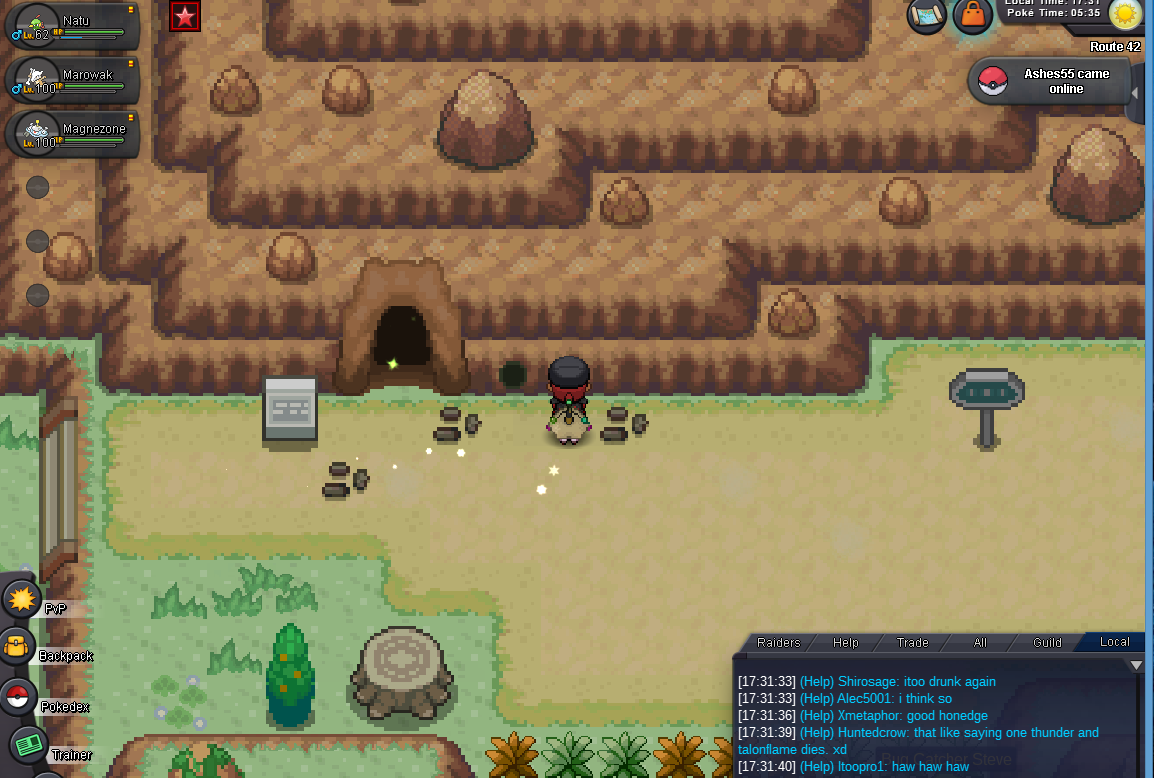
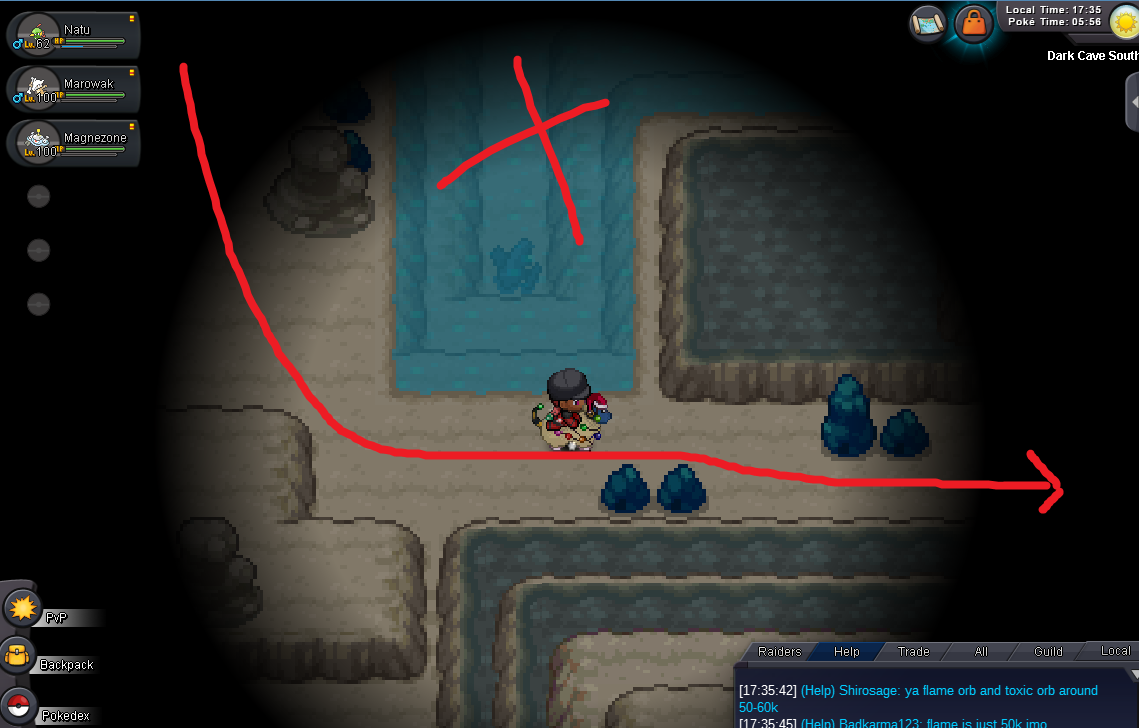
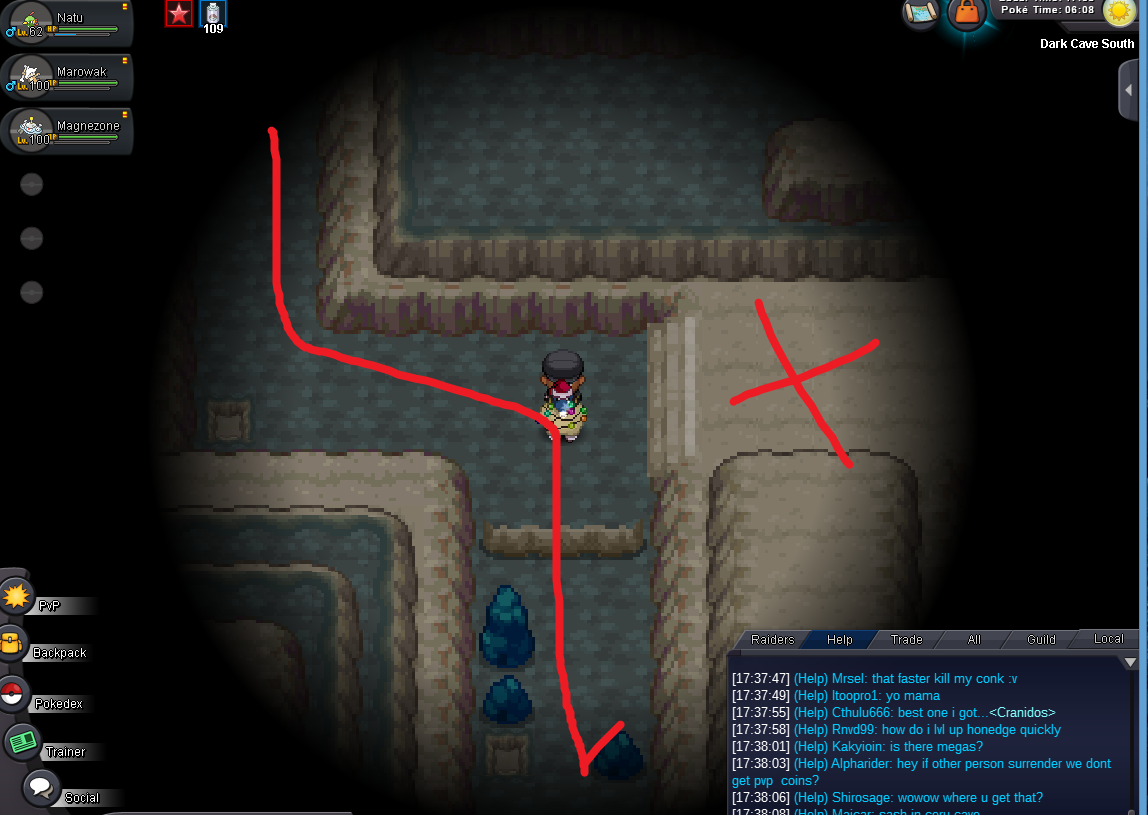
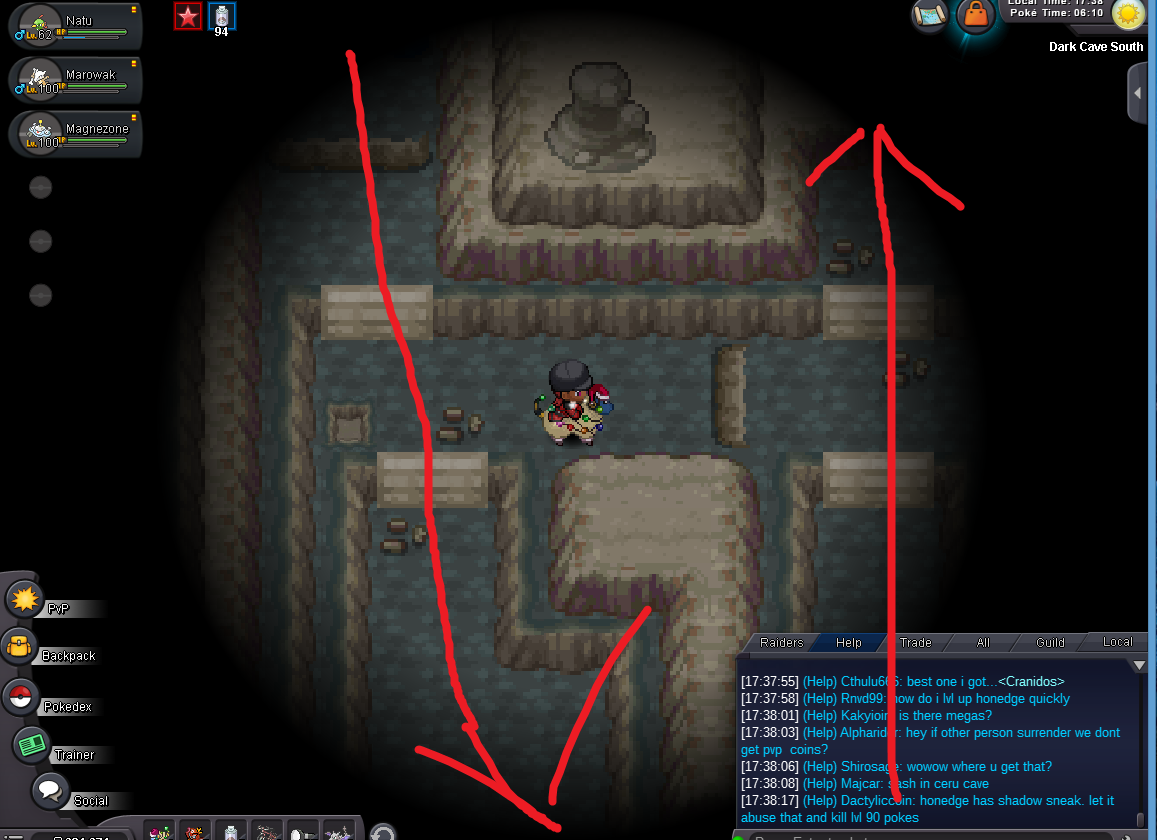
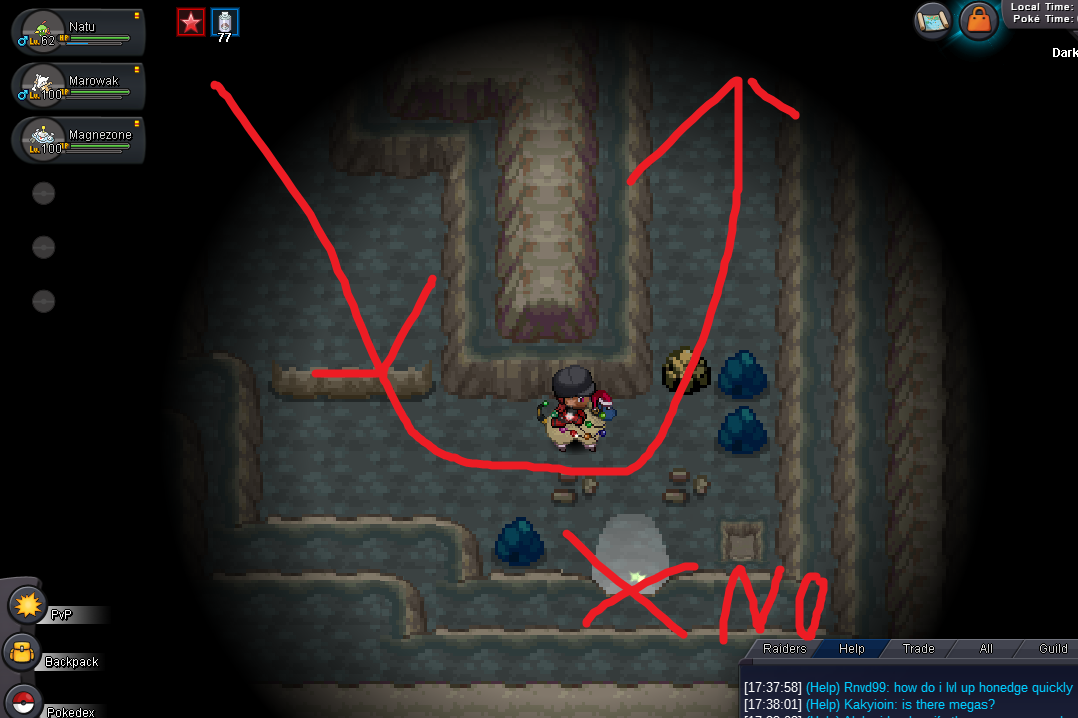
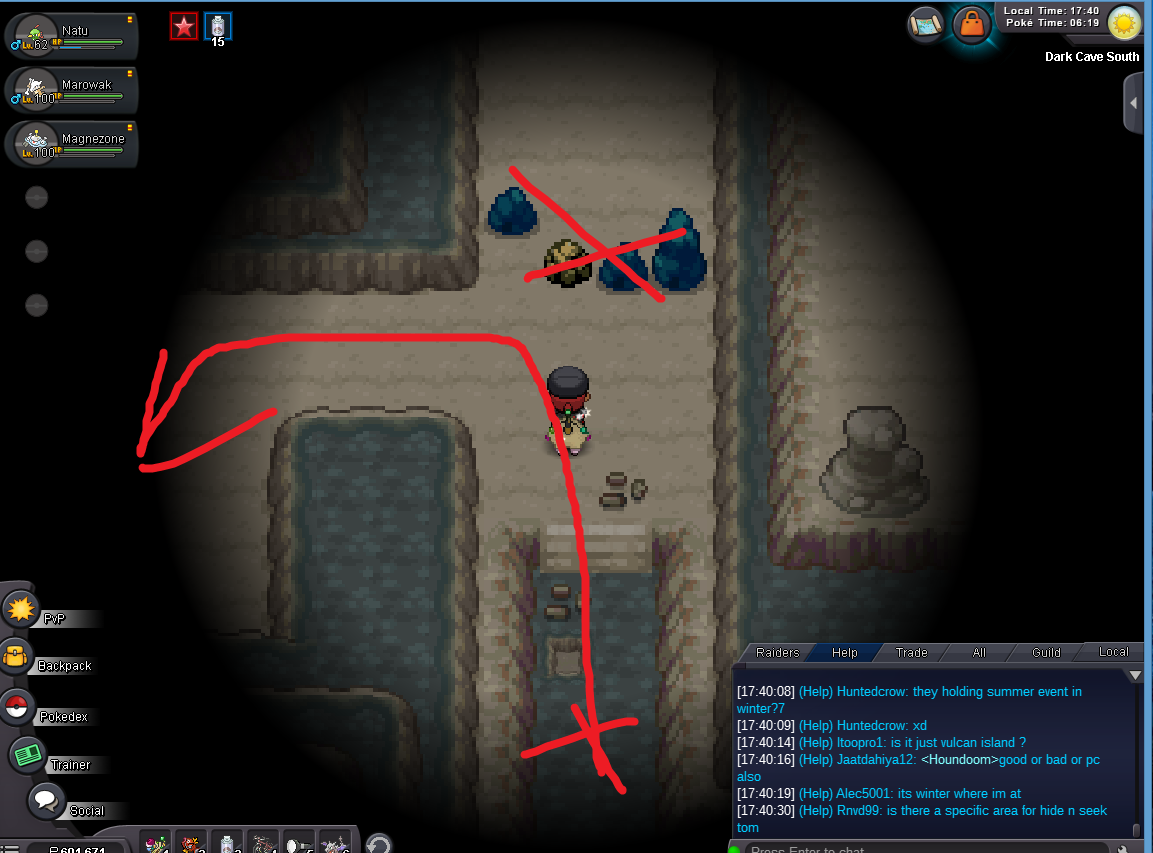
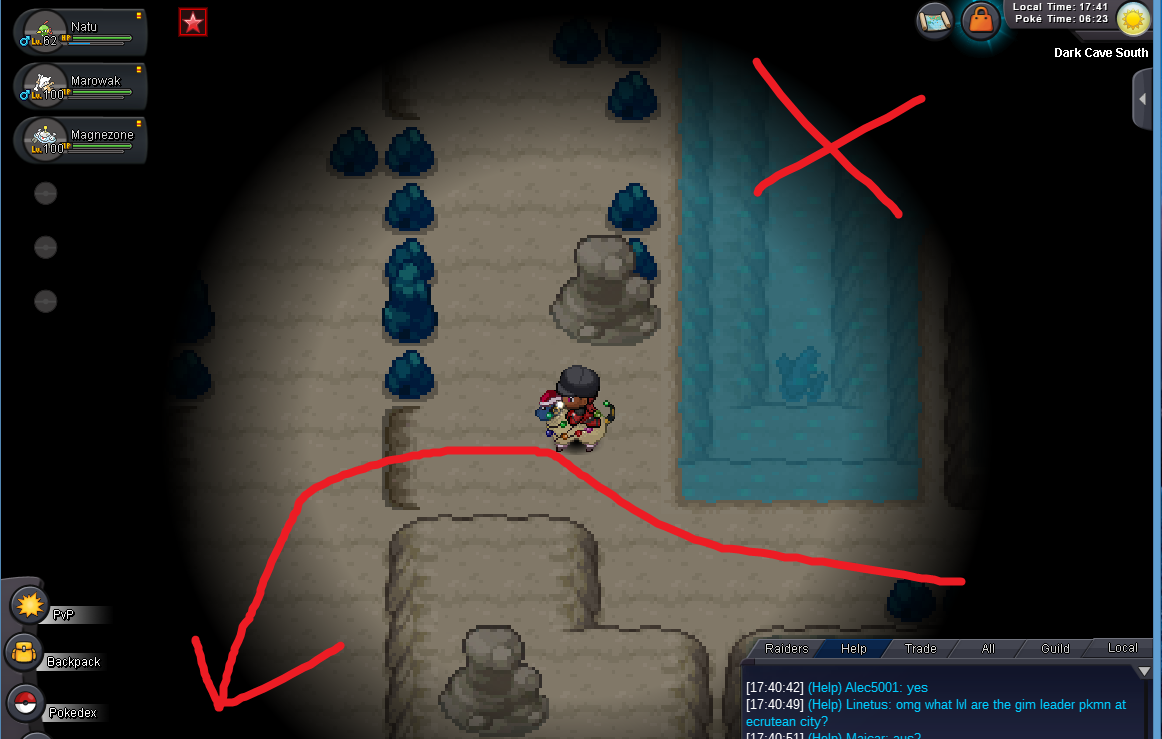
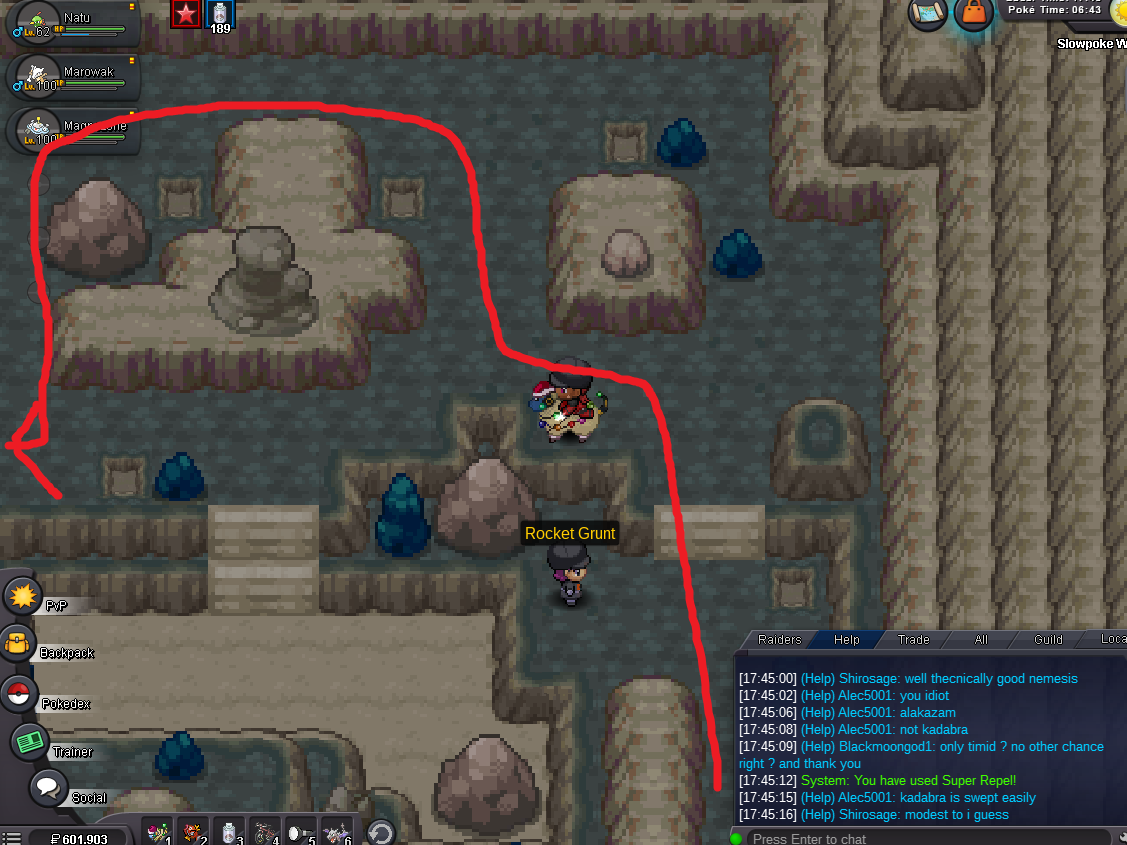
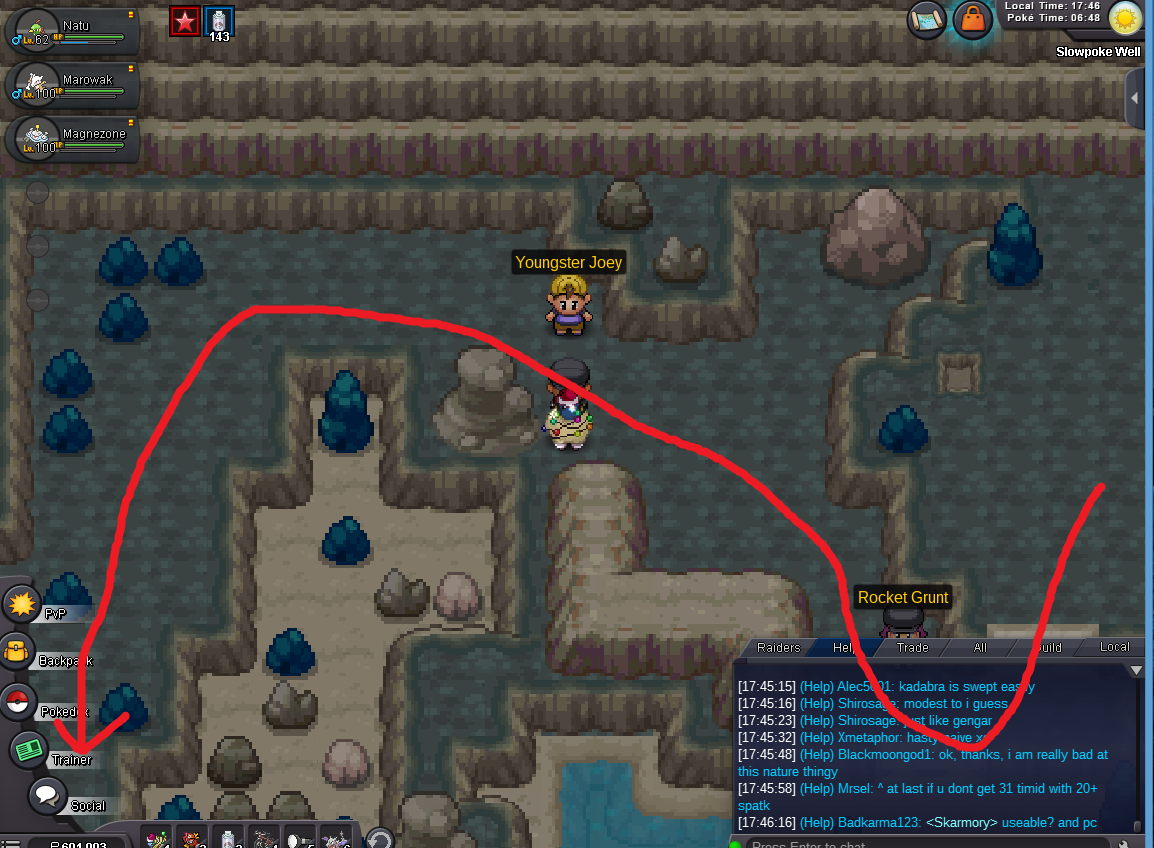
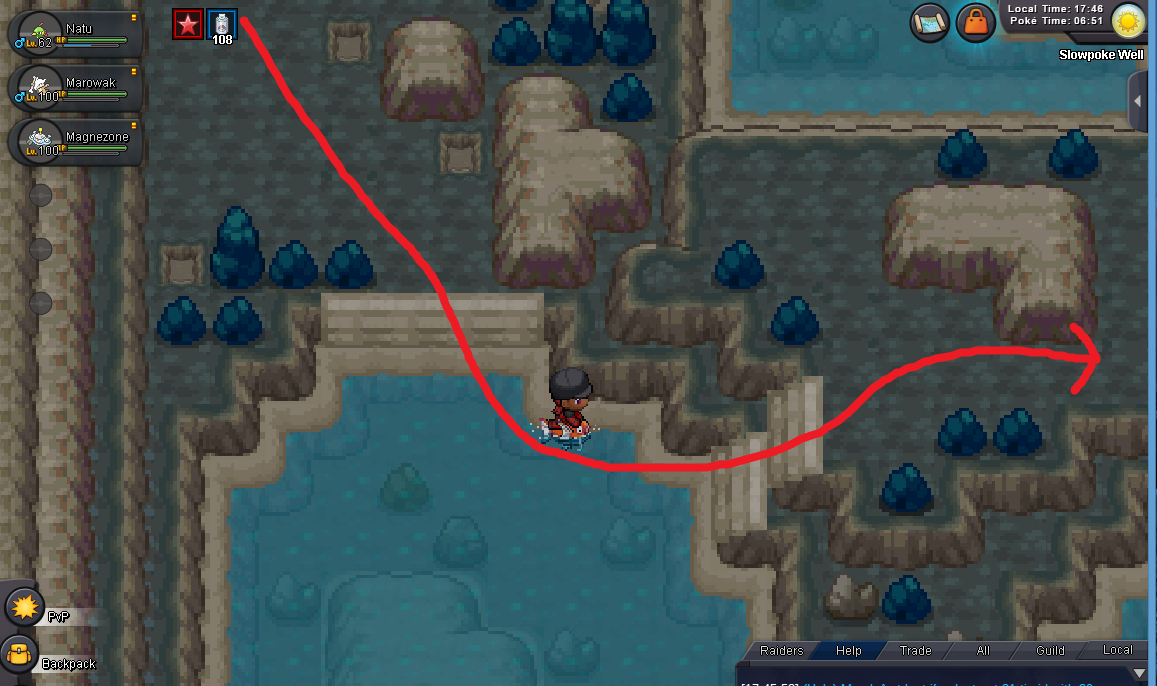
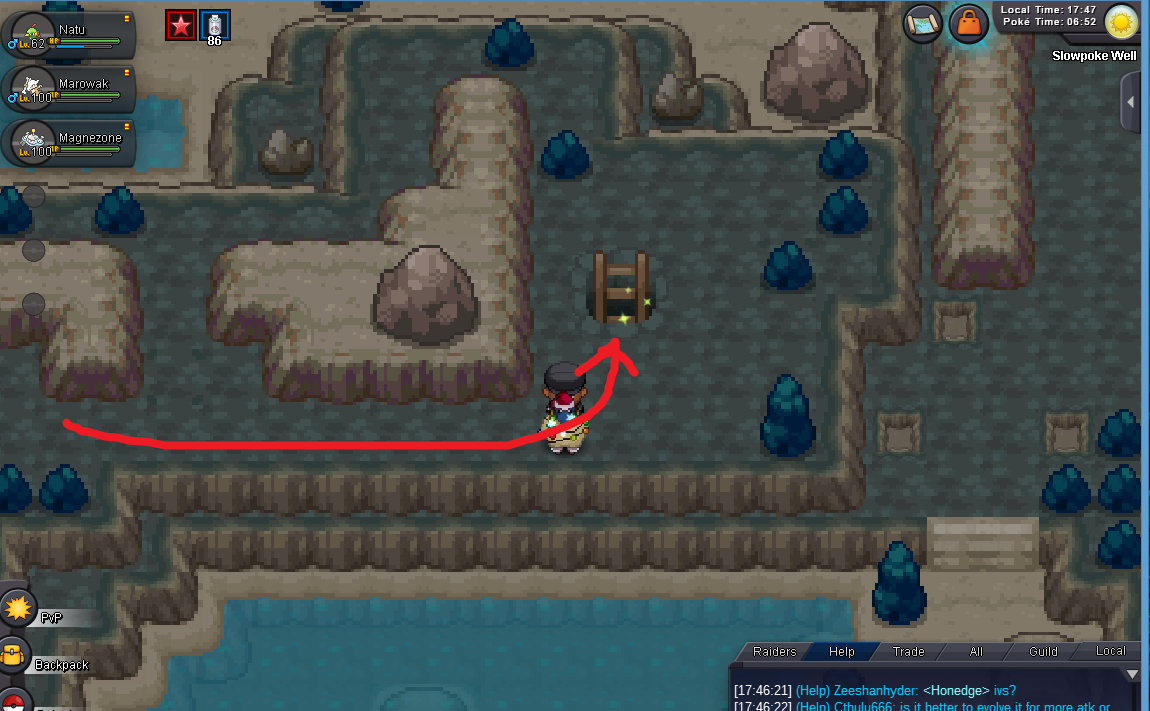
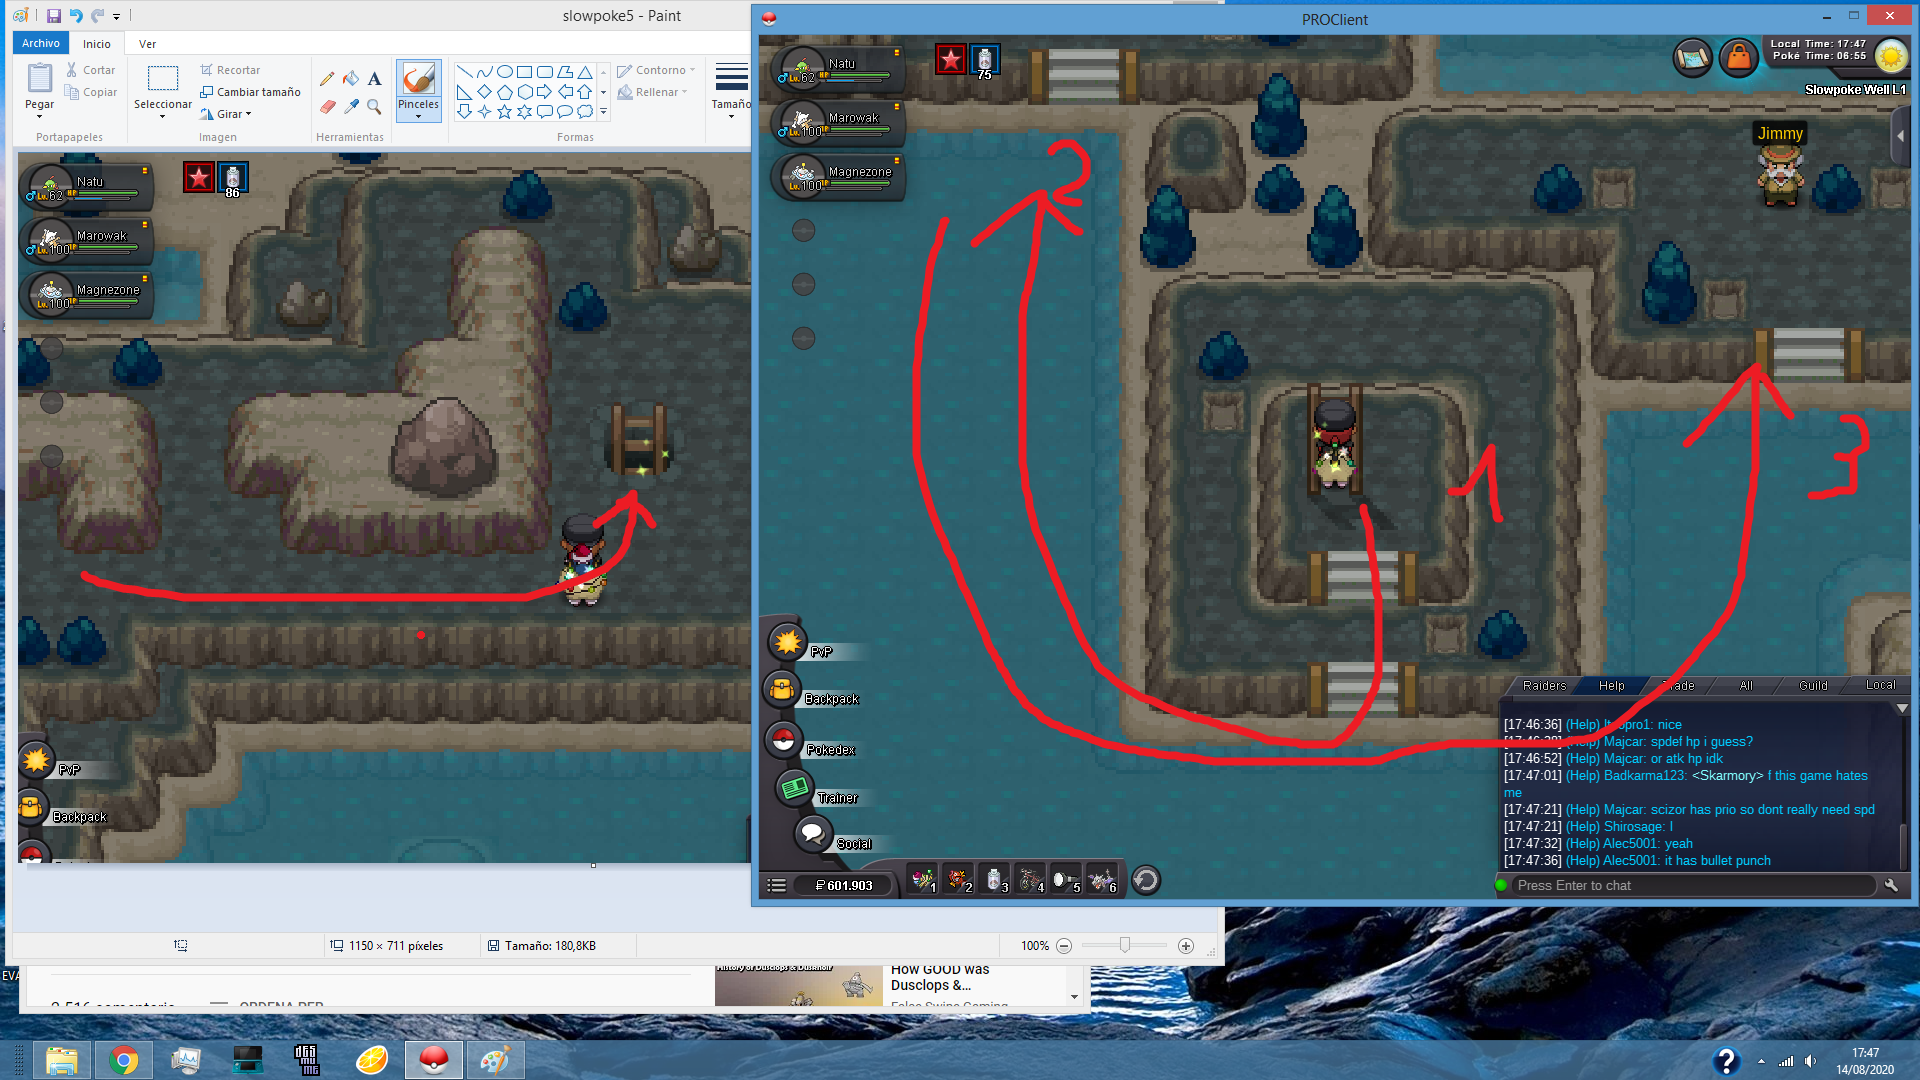
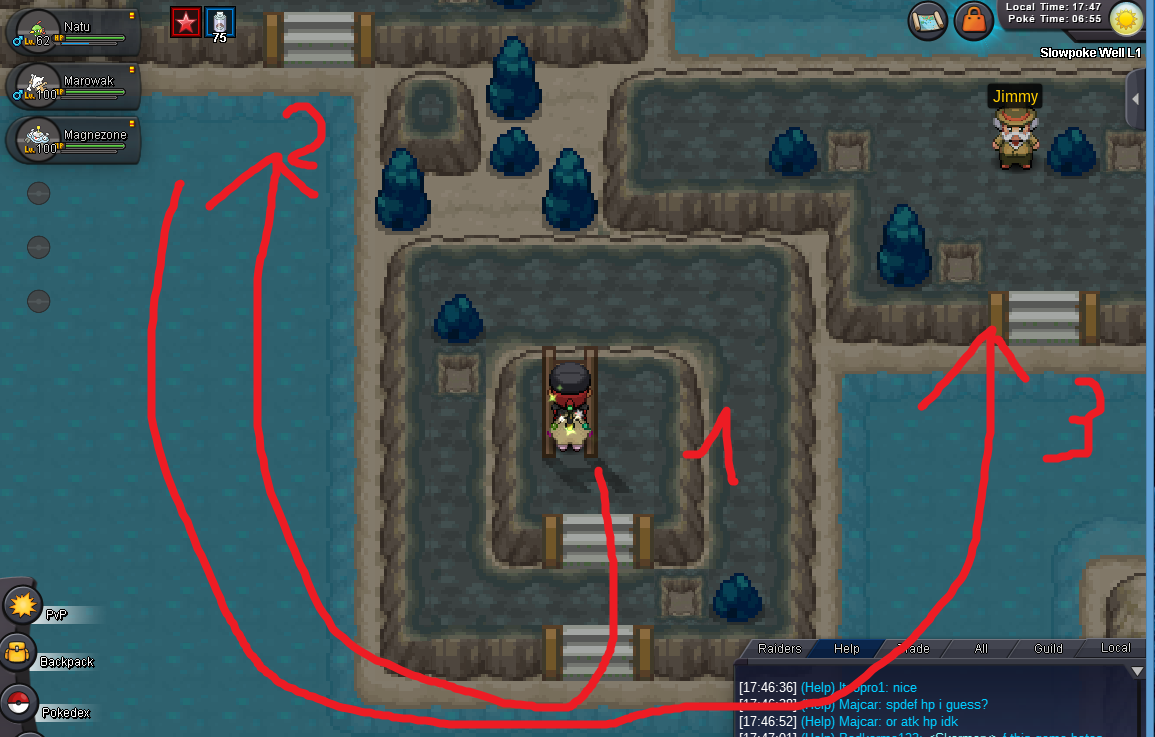
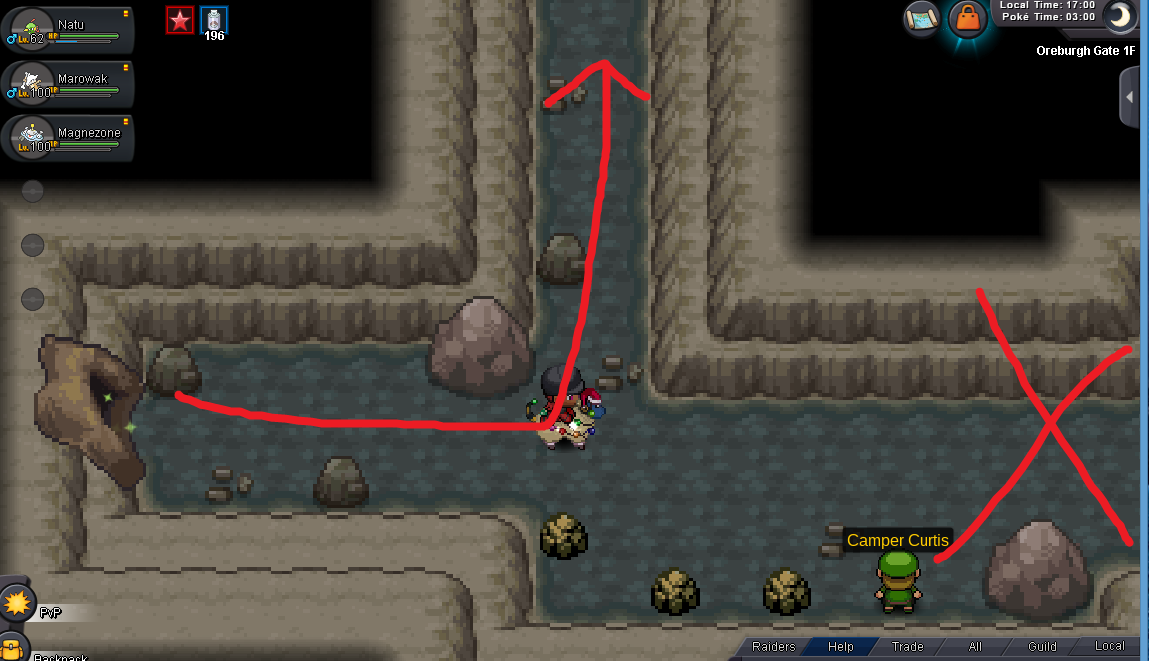
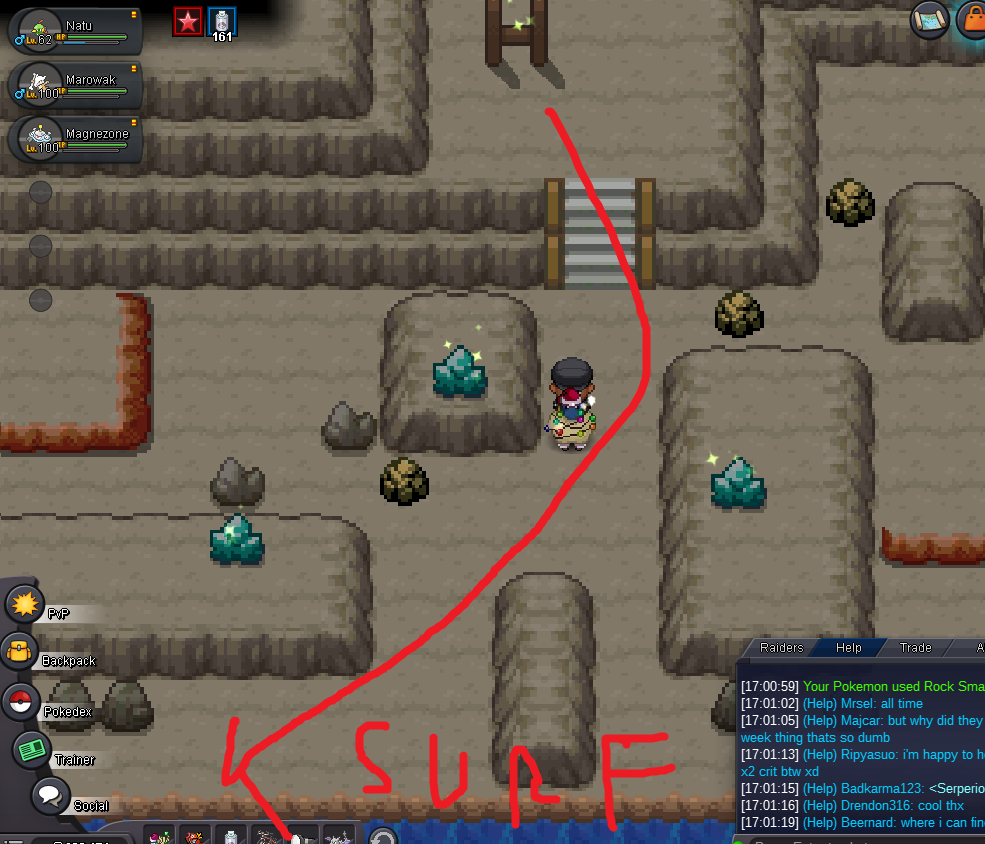
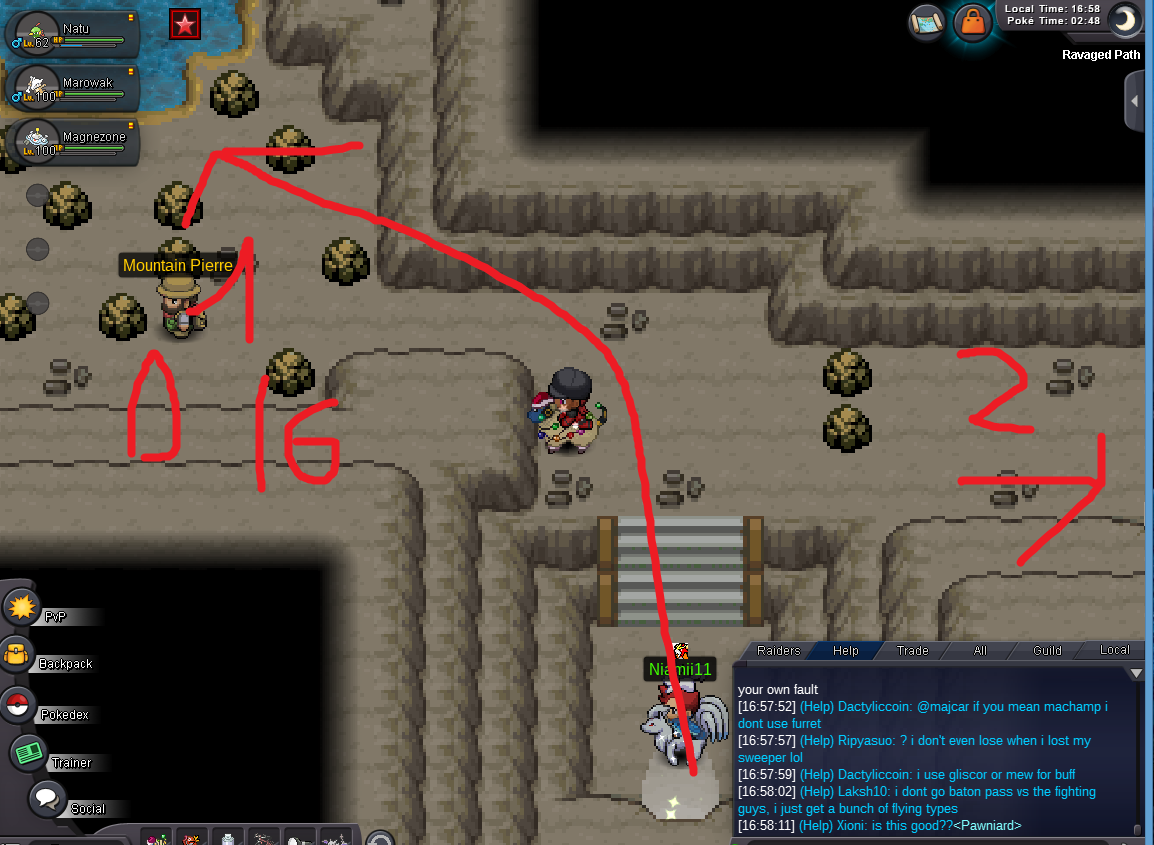
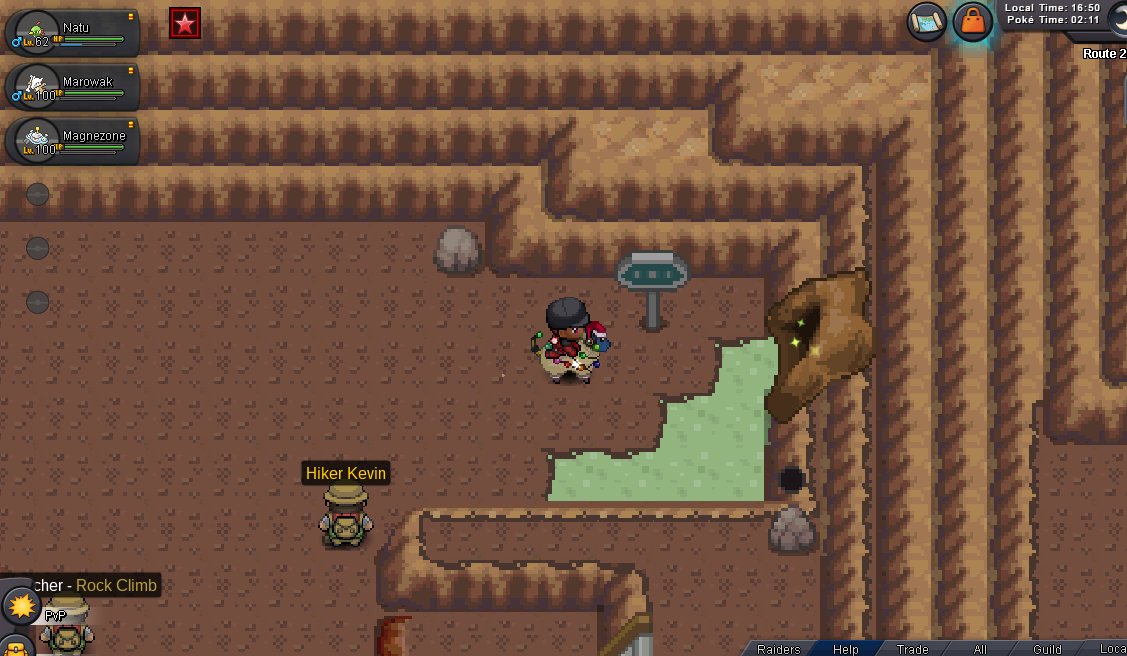
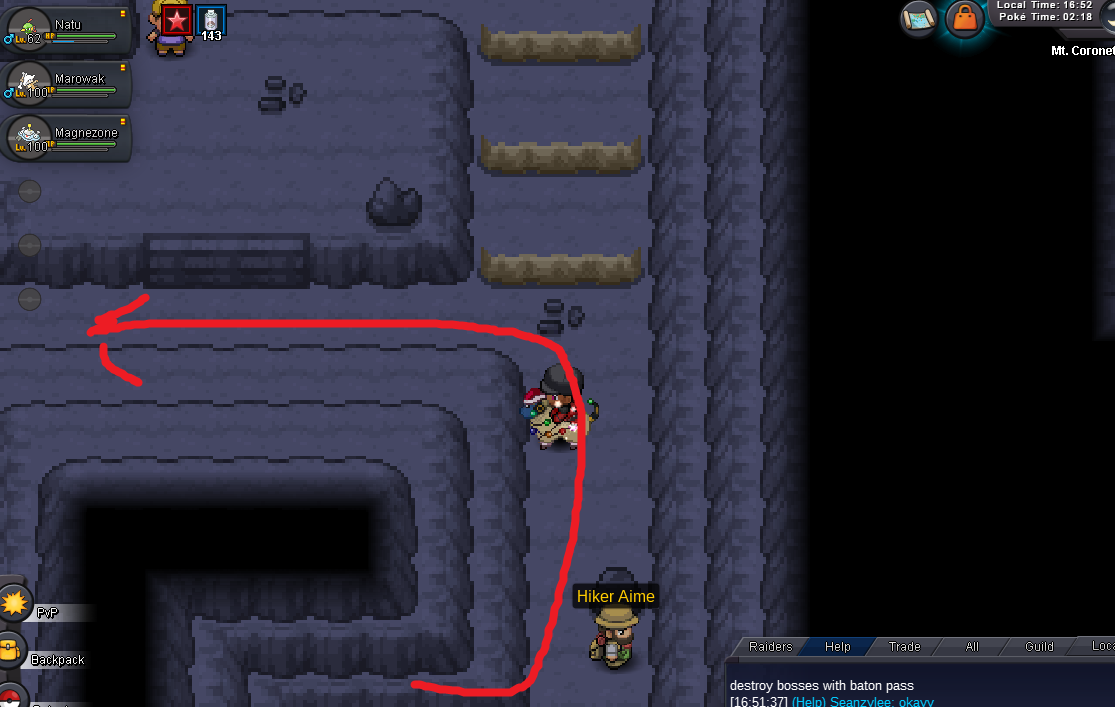
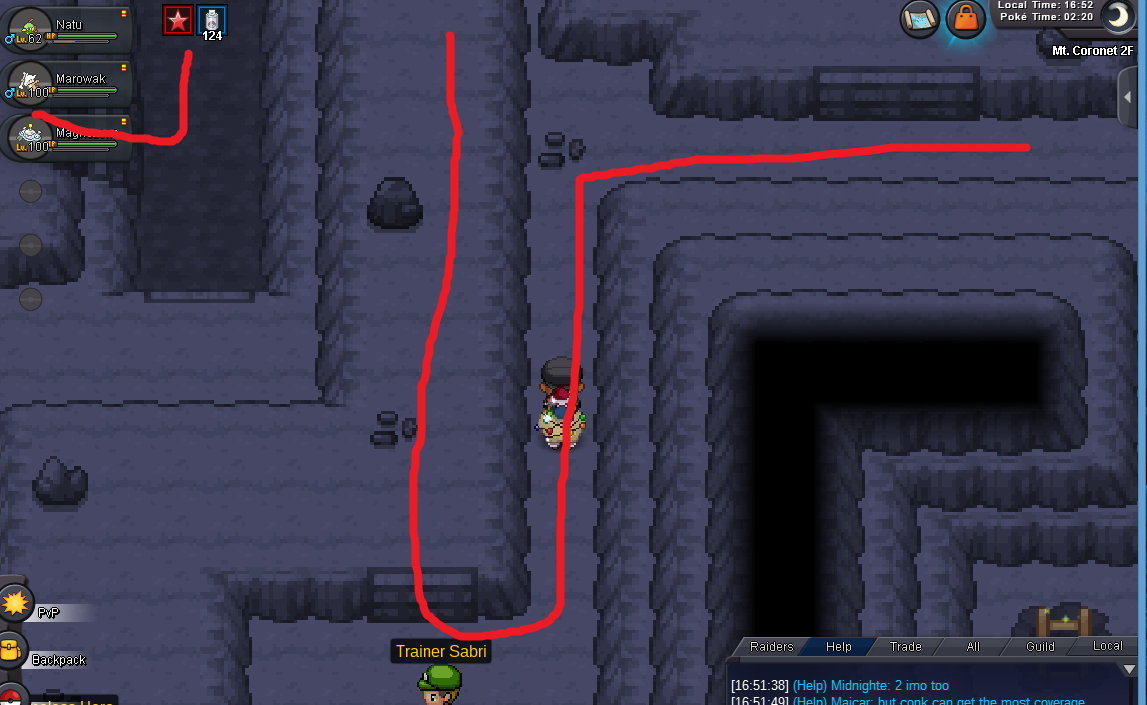
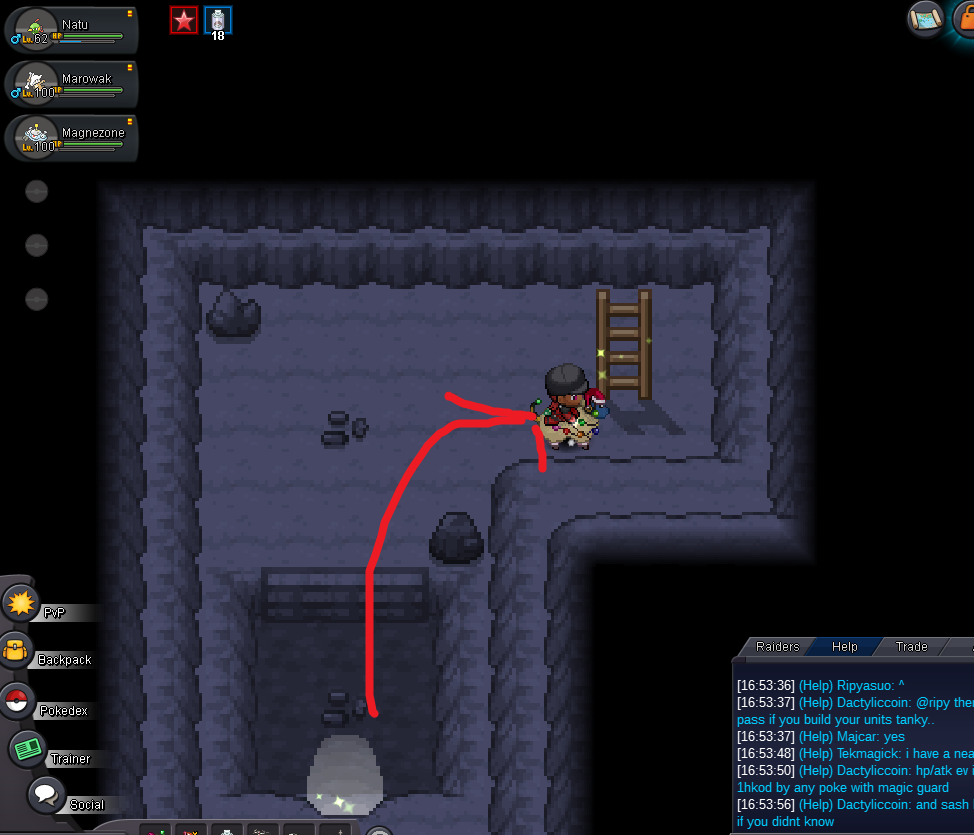
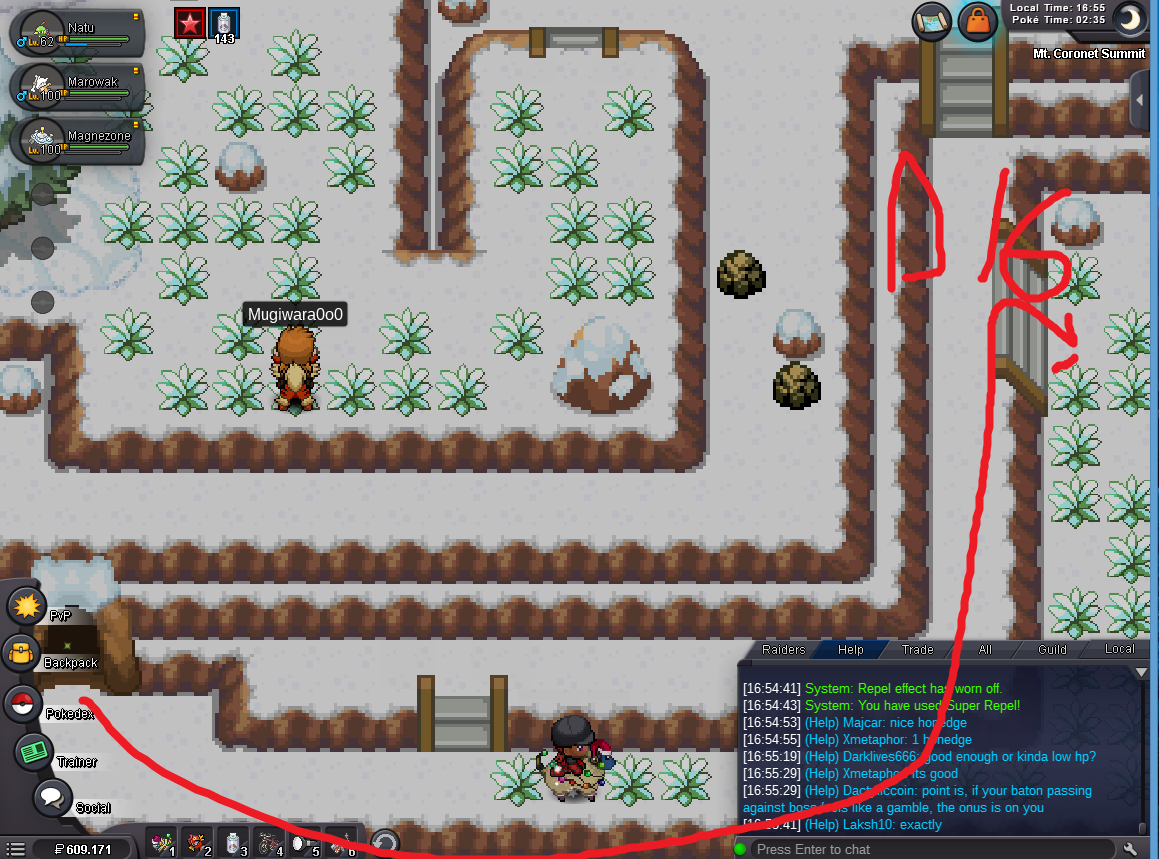
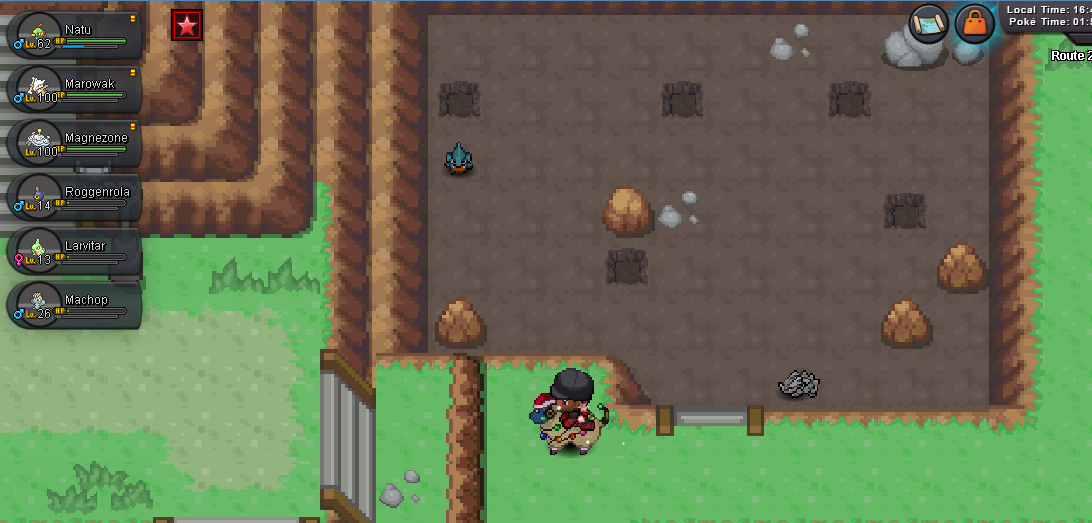
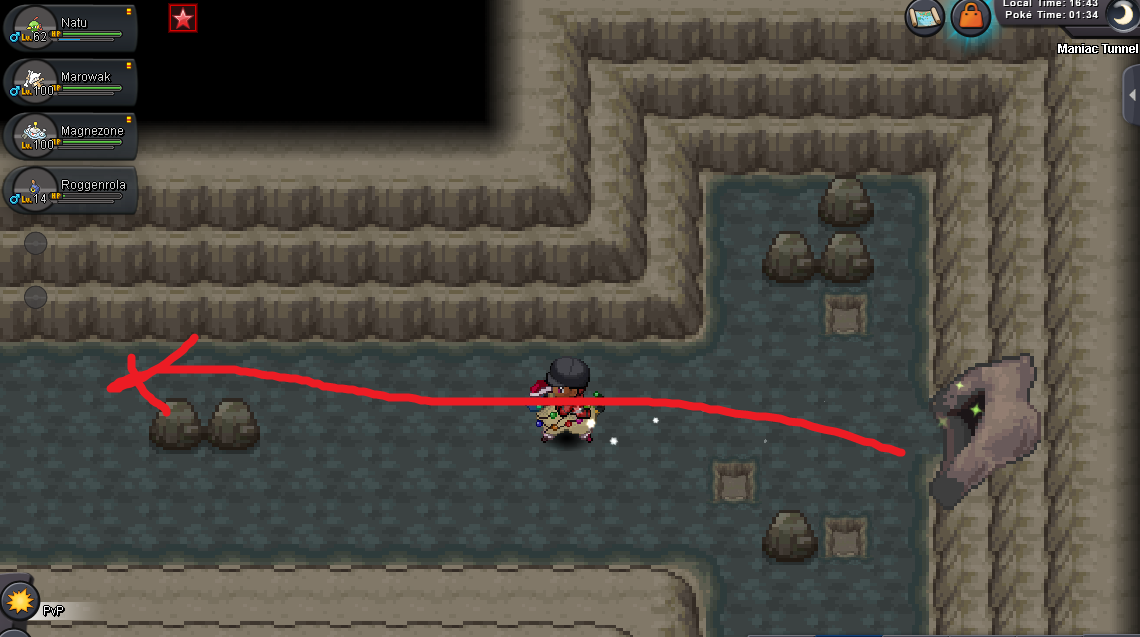
Welcome to the Mini-Guide on optimising your Dig Spots, Pokestops and Monetary Items route! This guide will aim to provide newbies, advanced and expert players a way to route their Dig Spots, Pokestops and some of the respawnable monetary items that you can pick up each week or every two weeks. This guide will also showcase the fastest (in theory) route to do this. I have done dig spots hundreds of times over the last years (four accounts, two times a week, you can start doing the maths) and while I believe starting from Viridian instead of Cerulean feels awkward, it’s still the best place to do so. The topic was covered in my money guide, but I guess it’s better to make a separate guide about it. This guide was requested due to popular request (not really, just Gore asked me to do it because he was too lazy to find it out himself and I could just pump this quick and add it to my Guide list, basically) as newbies throughout Kanto can use this to quickly do their dig spots and pokestops round, grab their hidden items and get their bike, old rod, thief tm to get smoke ball, etc etc. You get the point. This guide is just aimed to help you out and do these tasks twice a week while not taking too long and just doing it as fast as possible. It should only take you from 30 minutes to 1 hour to do all of them, once every 3 days per account. It takes me up to 4 hours as I do it in four accounts while I answer questions in Help Chat. It should take you just an hour as a max. I will try to also provide calculations at the end of how much money can you theoretically make at a minimum from these dig spots. However, I’ve estimated that the minimum amount of money you can get can be as little as 10k, but have a LOT of value in recyclable items or sellable items in help chat, or you get something as absurd as 200k but no recyclable items at all. Thus, the money gain from dig spots is very unstable and RNG base. However, as long as you know how to economise (haha rare candy selling go brrrr), you’ll be fine. Stock up on recyclable items, sell monetary items and then sell everything you got from it to get a few hundred thousand pokedollars a week if done properly. Only keep what is really needed! This guide will NOT cover all monetary items, just a few we can pick up (such as the Nugget in route 210, for which we have to detour). These items are already covered in two other forum guides (which, coincidentally, I made too). I’ll link them below. This guide also does not cover Tanoby Key and Water Path because you are forced to use a Membership and an entire Quest to get there, They’re not worth it at all. Shall we now begin? Let’s go! Minimum requirements for Kanto: Move Dig on a Pokemon with 150+ Happiness or a Shovel. Cut on any Pokemon or the tool to Cut trees. Flash or a Flashlight. Surf or a Surf mount. Remember that you also require the minimum badges for each HM. Also, you should have a HM Slave that can do most of these (Nidoking can Surf, Dig, Cut and Rock Smash for later regions, if needed, Parasect can use Cut, Flash, Dig, False Swipe, Spore, etc. He can be used if you go to Hoenn’s Petalburg Forest and grab the Shrooms there.) Minimum badge to do all of Kanto things: 5th badge (As you need Surf to access one Pokestop and the Hidden Items in Seafoam). 8th (to access Sevii Islands dig spots if you have a membership active for Tanoby Key and Water Path) or Cerulean Cave unlocked (there’s a weekly rare candy there and a biweekly nugget). Minimum requirements for Johto: Apply the same HM usages as before. However, we have to add in Rock Smash, as if we don’t have a Rock Smash pokemon we would have to travel around Blackthorn three times (Which is just beyond stupid). Dark Cave is REALLY annoying to go through. Minimum badge: We need the 8th badge as we cannot talk to Pokestops for items until the 8th badge. Minimum requirements for Sinnoh: Same HM usages as before. ROCK SMASH IS OBLIGATORY. We can’t access Oreburgh Gate dig spots without it. We DO NOT NEED ROCK CLIMB, we will use a route to totally avoid it. It’s boring, long and unnecessary. Minimum badge: We need the 7th badge to access the top of Mt Coronet. Optional tools we can use for our Dig Spots, Pokestops and Items: Smoke Ball (please, PLEASE bring one, because if you find a Diglett in a dig spot and it has Arena Trap and you have no moves to damage it, you’ll be stuck and forced to relog and will lose a LOT of time). Synch (equip Smoke Ball to it). I heavily suggest you change the synch sometimes from region to region, that you use the discord bot to check what synch can help with each individual dig spots section, as there are really, REALLY rare pokemon in some of them. With your Membership active, you can find Aegislash’s preevo and Larvitar in Mt Moon, and more rare pokemon elsewhere. I heavily recommend Adamant, Jolly, Brave, Careful, Impish, Relaxed and Sassy synchs. Bring them whenever you do dig spots. Always check spawns before you begin! Super Repels and Repels: Buy 100 Super Repels (in every account you will do dig spots) and 50 Repels. They will last for atleast 10 dig runs. 100 super repels = 50k. In 1 dig round you’ve already made up that cost easily, so do not worry. We will use them properly timed to avoid having to fight battles continuously. For example, we need two for Mt Moon, one for Rock Tunnel, one for Diglett Cave (this can be a normal repel), one for Dark Cave, one for Slowpoke Well, one for Mt Mortar (this can be a normal repel), one for Oreburgh Gate (normal repel if we relog to Jubilife, or super repel if you want to walk back), one for Ravaged Path (we can normal repel but going back to the exit might be annoying), and one for Mt Coronet (if you don’t have the dig spot unlocked in the top of the mountain, you’ll need 1 super repel to enter from below and get to the top to unlock it for future usage, or 1 normal repel that will barely let you go through the 4th floor, and another normal repel to go back from it). Thus, 10 super repels (or 8 supers and 2-3 normals). As mentioned above, you can bring any extra tools to avoid carrying too many HM slaves. I will link below the location of all hidden items and their respawn time in all regions in case you want to visit Hoenn to get shrooms and do excavations (don’t really recommend this personally, takes up daily time and it doesn’t always provide good rewards, it’s also a high investment if you don’t earn good stuff). I made a guide that you can use with pictures to check any of the places mentioned. Bring a Bike for Rare Candy in Route 16, or a mount to go fast, and a surf mount to avoid surfing slowly. https://pokemonrevolution.net/forum/topic/132722-url Let’s begin! From Viridian City, we want to pick up the Rare Candy at the southern bridge. This respawns every 7 days. We will also talk to the pokestop. Now, we will head to Viridian Forest, there’s a hidden Rare Candy next to the big tree to Viridian Maze (for some reason, this might respawn every 14 days and not 7, but I personally don’t know why). We will also talk to the Pokestop right to the east. We will leave from the south and use cut to skip the Forest through the Route 2 quick way. We will enter Pewter City’s pokecenter and we will go and talk to the pokestop in the Museum. Then, we’ll head back to Route 2, talk to the hole outside, enter Diglett Cave and use a Super/Normal Repel. We’ll get the 8 dig spots and talk to the Pokestop on the other side. When we leave, we’ll talk to the hole to leave it unlocked for future uses, and we’ll head east to Route 11 and south through Route 12. We’ll grab the Rare Candy here, which respawns every 7 days. We will continue south until Route 14, where we’ll dig the four spots, and we’ll then head west to dig a few more Route 15 spots. We’ll talk to any NPC to enter a fight, log out and be teleported back. Optionally here, you can travel and grab the Rare Candy in Route 16 (every week, requires a Bike), and the one time monetary items in Seafoam Island (make sure you find a map before you travel there!). We will now head to Route 3 and pick up the Stardust in one of the rocks and the dig spots just below the entrance. Then, we will reach the pokecenter and excavate the dig spots just below it. We will enter the pokecenter, and enter Mt Moon. Use your first super repel here. To the bottom left there’s 4 dig spots. We’ll then get the ones in the ladder in the middle (they’re at the end). If you see any pokeballs pick them up, the first one is a Star Piece (the second is just TM Water Gun). Go until the end down the ladder, pick up the dig spots, use your second super repel and go back to the main floor. Then, head northeast to the old man, excavate the dig spots, then go to the west until you see the next ladder. Go down, take all the dig spots, find an encounter and relog. We will now use the dig spot outside to teleport to the other side of Mt Moon (just talk to it from both sides to unlock it). We will surf northeast from Route 4, talk to the Pokestop in front of Cerulean Cave, go back, go to Route 5 below Cerulean to talk to the pokestop. Now, we’ll go east to Route 9 and then surf so we can quickly reach the Power Plant pokestop. There’s no need to repel here because until we enter Route 10, there are no water spawns. (No idea why this is like this). Surf back to Route 9, and go down to the pokecenter to heal up. Talk to the Pokestop outside, enter the cave, use your super repel, use flash and dig the 6 dig spots you’ll immediately see. Instead of going down the ladder, exit the cave and use the dig spot to teleport to the other side. (Pokecenter side) Immediately enter, go to the leftmost ladder, then go and pick the dig spots there. Find an encounter when your repel ends, relog, and teleport again (this is faster than trying to leave from the same exit). We’ll now head to Vermillion harbor and talk to the last Kanto pokestop there (aside from the Route 25 one, which we pick up at the end of the route), and jump on the boat to Olivine City! Enter the pokecenter and heal up. We will pick up the Pearl and Rare Candy hidden in Olivine and the Pokestop next to the lighthouse. We’ll now travel to Ecruteak and talk to the Pokestop. We’ll head east and in Route 42 we’ll enter Mt Mortar and use a normal repel. We will grab the dig spots, enter the next hole, then leave through the next one (they’re adjacent, don’t go up any stairs) and get the dig spots next to the hiker. When we leave the cave, surf left, enter the next cave there, grab the 4 dig spots and if you want to, you can go deep inside to get two Rare Candies, one in a pokeball and one hidden in Forest Pit (after you beat the Johto Elite Four). Another choice is to just enter a hole, grab the dig spots, leave and surf to the next one. I'll show the three entrances below. We will now head to Lake of Fury, talk to the Pokestop there, and head back and east until we reach Blackthorn. Teleport through Ice Path, and talk to the Pokestop in Dark Cave. Teleport to the other side (route 31), use a super repel inside, and use Flash, break the rocks, and go counter clockwise (left, down, east, north, then left again) to pick up all dig spots and try to head back to the route 31 exit. DON’T EXIT THROUGH THE SOUTH EXIT OF THE SMASHABLE ROCKS. Head to Violet City. Talk to the Pokestop and grab the Rare Candy behind the Gym Sign (you need surf). Head west to Route 36, then west and up to National Park. Talk to the Pokestop and then head south to Route 35. Pick up the Nugget, then head south to Ilex Forest and use a repel (if you want, not worth it much though). Talk to the Pokestop, head east to Slowpoke Well through Azalea Town and talk to the Pokestop. Don’t enter it though. First, go east to Union Cave and teleport through the dig tunnel. Talk to the Pokestop and go back. Now you can enter Slowpoke well. Use a super repel when you’re next to the first dig spot. You’ll be able to go through the entire two floors with a single one of them. Grab the first three, then go north and west continuously digging everything up. Then, head southwest for the last three and surf east to go down the ladder. Pick the two that are next to the ladder and then finally surf once west for three digspots and east for four of them. Find an encounter and log out. We’ll be in Olivine City! We will now grab the boat to Canalave. Surf south and find the big tree at the end, talk to it to find a Big Pearl. Enter the pokecenter in Canalave and heal up. We’ll now head to Jubilife and enter the pokecenter. From here, we’ll go east to Oreburgh Gate, and we’ll be using a Repel (not a Super) and trying to get all the dig spots in the depths. We’ll talk to the old man for a fight or find a wild pokemon and relog to Jubilife. We’ll then head north to Ravaged Path, the way to Floaroma town. We’ll use a super repel (or repel if you want, but on the returning way you might eat some encounters) and exit it. We’ll head to Floaroma and then to Eterna. The path splits here: if you’ve previously unlocked Mt Coronet’s dig teleport hole, we will simply excavate the dig spots in Route 211 and use the teleport hole, one repel and get the holes in the summit and teleport back. If you’ve not, I recommend you head south through the bike tunnel, then go east and when you see Mt Coronet’s entrance (to the other side you would reach Hearthorne), enter, use a super repel, surf, go upstairs, go around the area until you reach the northwestern door, then climb up until you get to the summit. Then, you just need to talk to the dig hole to unlock it. After you do all of that, head east to Celestic town and to Route 210. There’s a hidden nugget in one of the rocks. Continue east to excavate the five dig spots. Head south to the restaurant and go east until you reach Veilstone. Go south and in the route below enter the tunnel to the left. Dig the few spots and continue going left digging everything you see. Exit in Solaceon, head to the southern route (208), check the last dig spots and congratulations! You just finished the money route! From this point onwards, once you’ve practised this a bit, you can repeat this nonstop. Every week, keep getting the Kanto items I’ve indicated as they’re weekly (including the Rare Candy in Cerulean Cave’s entrance). I also heavily suggest you take a trip every two weeks to get the shrooms in Petalburg Forest. However, that’s already covered in my previous guides. Focus solely on Dig Spots and Pokestops for now! I hope you have enjoyed this guide and found a good use to it! Please, use the Monetary and Money guides I made to check out on all possible optional money items you can check out on if you take optional paths while you follow this guide. Remember some respawn and some others don't! You can also check their locations there if you can't find them in this guide.


 1 point
 -
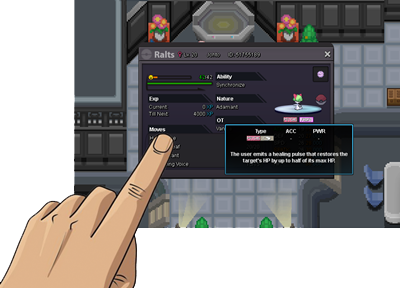
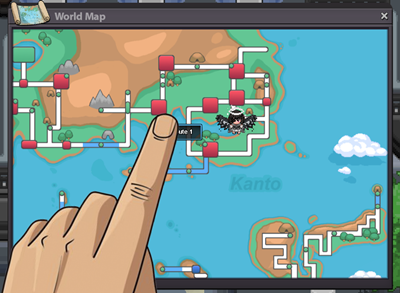
World Map Text Adjustment (Android) - Checking the name of the location in World Map is kinda covered by the finger when pressed in Android so its a bit hard to view the location name. Maybe adjust the text a little to the right similar to checking Pokemon Move details and Inventory Item Details? Thank you very much! Additional Reconnect Time I think the current reconnect timer (like 30 seconds) is a bit short. Is it possible to adjust to at least a minute, to give the players enough time to switch internet connection? Thank you very much~! Enjoy the upcoming Halloween Event everyone! 👻 PvE Tradeable Drifloon mount please. 😆
 1 point
 -
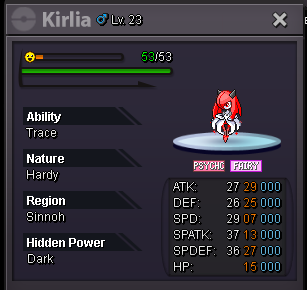
1 pointStart bid: 1m Min raise: 1m No insta 7 days after start bid c.o 85m5k Accepted Payments: -Pokedollars -CC (360k/ea) - Iv reroll (660k/ea) Countdown-->https://www.tickcounter.com/countdown/3508126/my-countdown
.png.8bcf11d1699a1ddd5d22024bcb9361a0.png) 1 point
1 point -
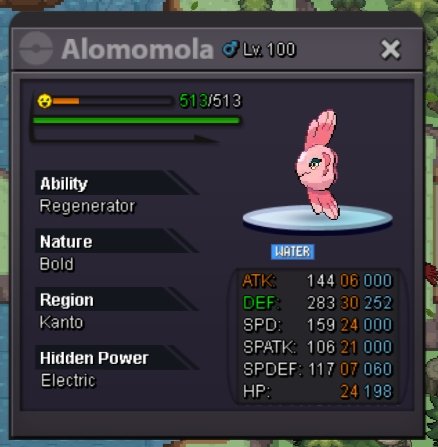
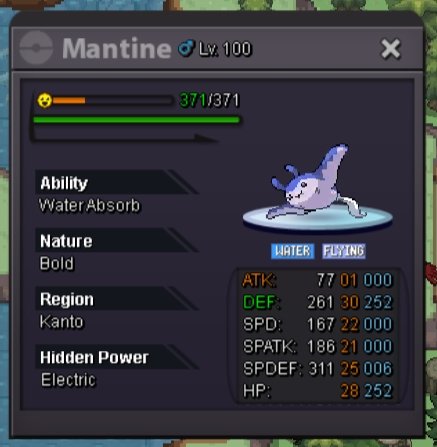
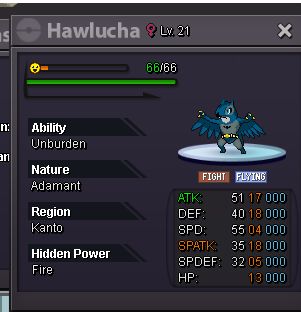
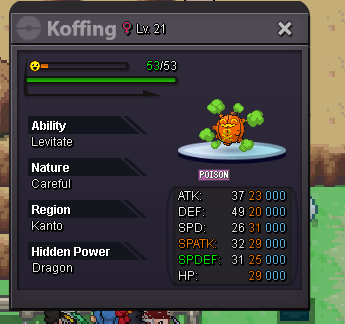
OSEAN AUCTION HOUSE THIRD AND FOURTH POKEMON FOR AUCTION REGENERATOR BOLD ALOMOMOLA Sold insta Min. bid 50k Insta 1.5m End point 15 min Ends at October 01, 11:14am [PHtime] WATER ABSORB BOLD MANTINE C.o 700k Min. bid 50k Insta 2m End point 15 min Ends on October 01, 11:04am [PHtime] ACCEPTED PAYMENT Rc — 6.5K Coin Capsule — 360k IV Reroll — 680k In-game name: Osean02
 1 point
 -
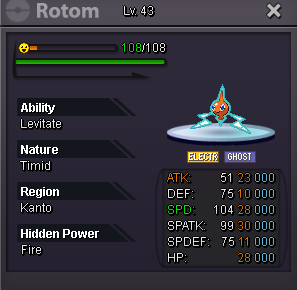
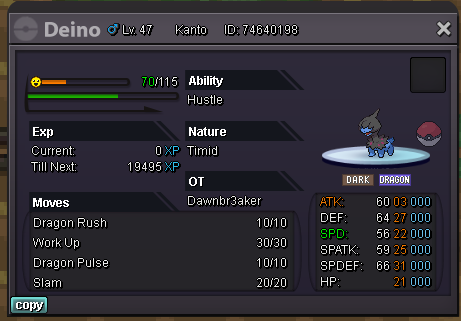
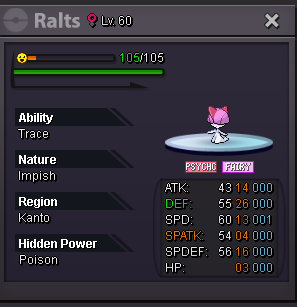
ING: Dawnbr3aker For Rotom: Start: 500k Co: 800k SOLD to Rizlax Min bid:100k Insta: 4 mil I accept cc=360k, iv rr = 680k Auction Time 48 hrs from Start. For Deino: Start: 200k Co: 250k SOLD to Ayuzh Min bid:50k Insta: 1 mil I accept cc=360k, iv rr = 680k Auction Time 48 hrs from Start.
 1 point
 -
1 point
-
1 point
-
1 point
-
Hello, due to our very poor move animation implementation it's not only a lot work for artists but also for devs to add new move animations. We sadly don't have the artist manpower and we devs have higher prioritized projects. I do plan to rework it in the future but even then it's questionable if we add more as most players deactivate them for faster battles anyways. Right now, I have to deny your suggestion but we might work more on them in the future if we get an artist that'd like to make them.1 point
-
Hello, added a hardcoded off-set for tooltips in the Android client and increased the reconnect timer from 45 seconds to 120 seconds. The tooltip off-set might change from being always a problem to sometimes a problem. Please keep me informed if there are problems. This will be live with the October 1st server-client release.1 point
-
1 point
-
1 point
-
1 point
-
1 point
-
1 point
-
1 point
-
1 pointAs discussed with both parties privately, due to difficulties in meeting each other in the past few days, I have forced the trade for the leveling service. Please find ways to stay in contact better in the future to avoid miscommunication, as it has already happened this time. Locked as resolved.1 point
-
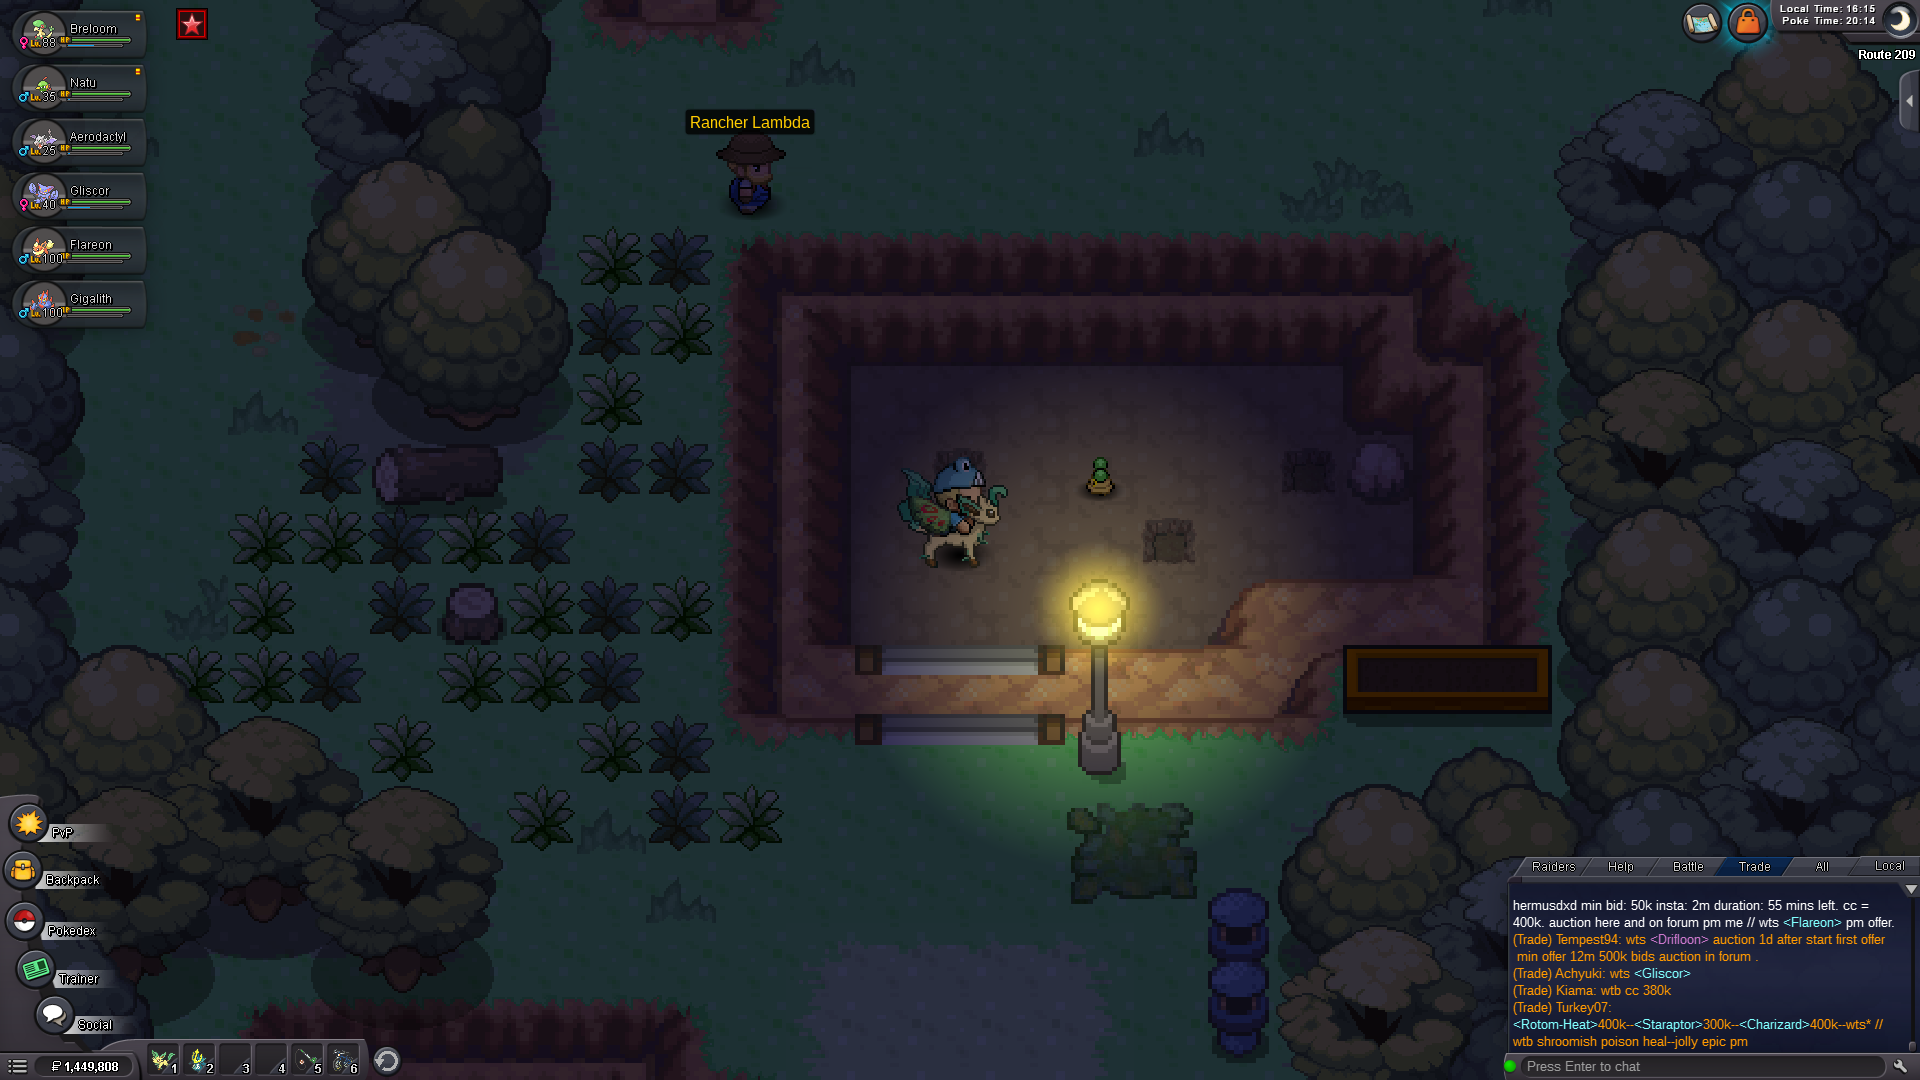
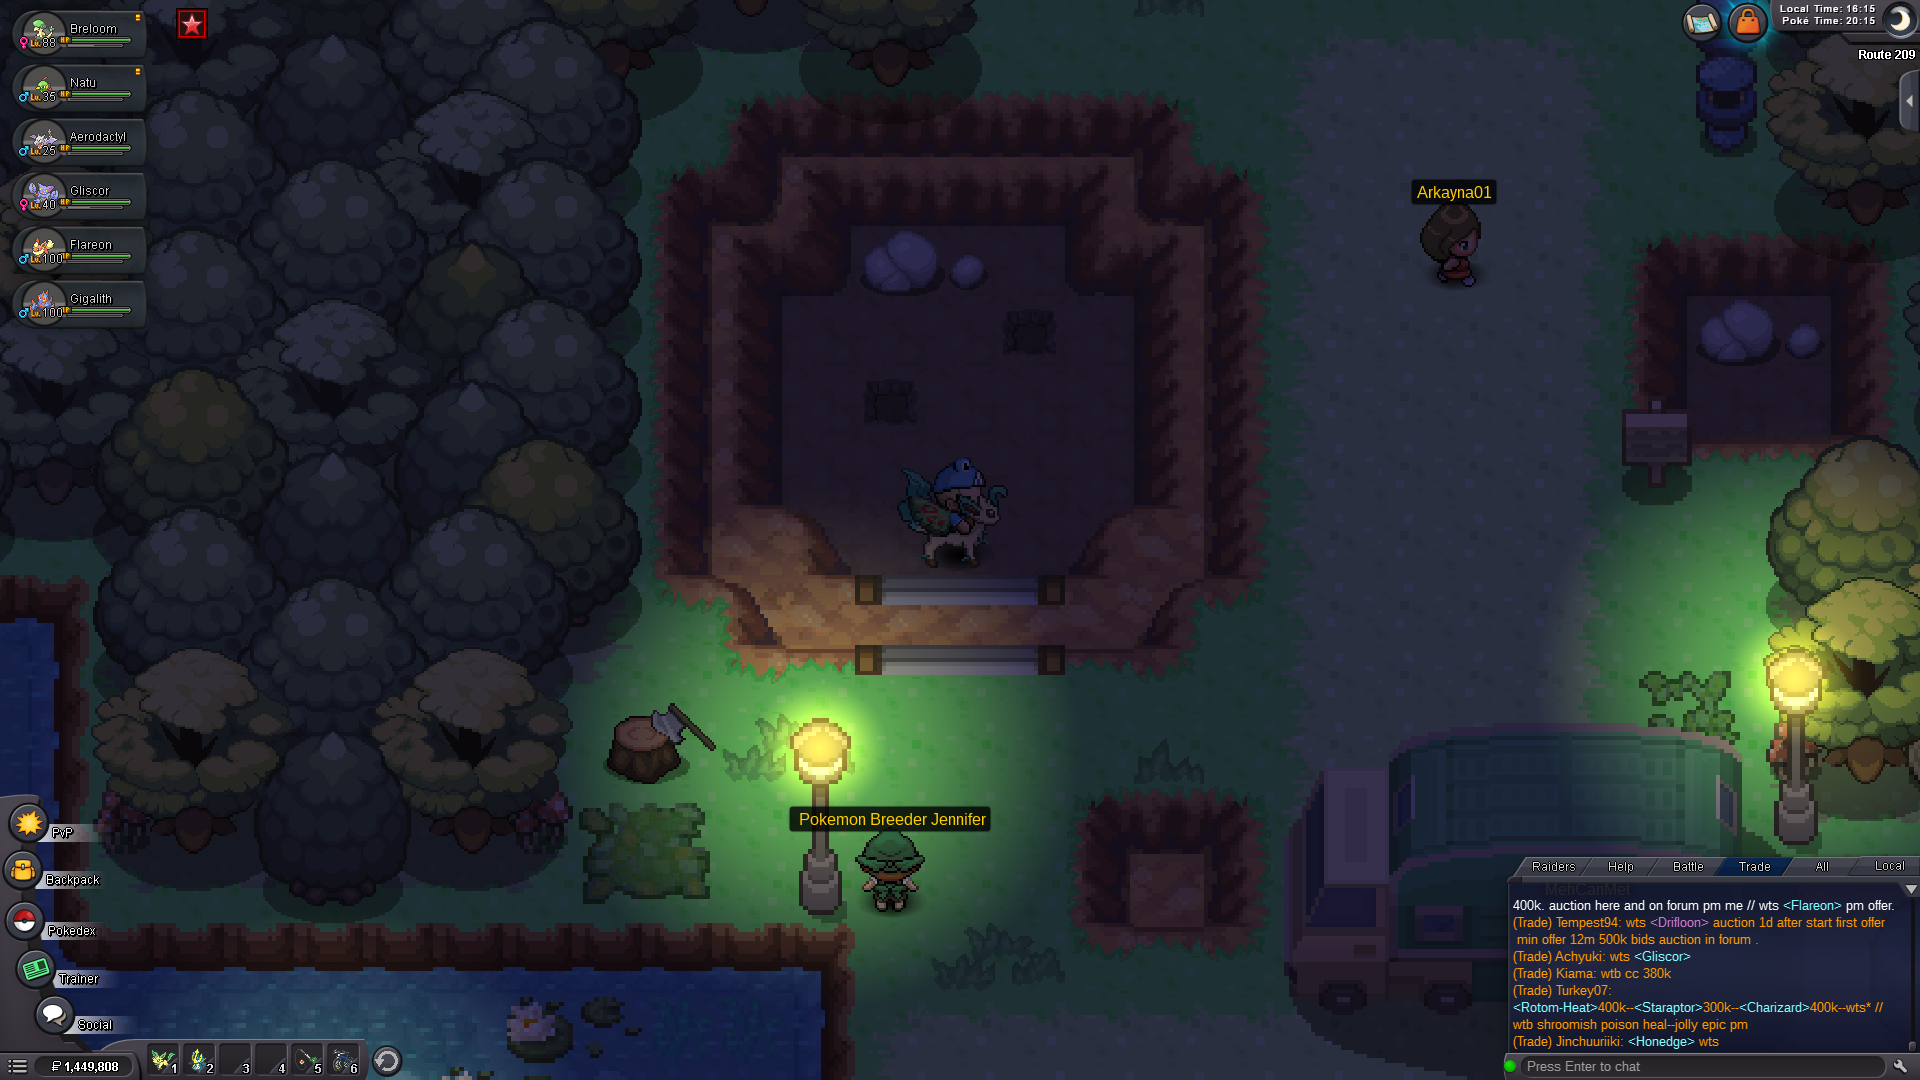
Somewhat +1. The current levels between 60 to 64 are fine, if an area is made with permanent access similar to Cerulean Cave with higher levels, people will very probably abandon it for the latter. I'd say each region should have side optional high level zones from 60 to 64 with evolved forms that you unlock through quests with different pokemon types. Example: Johto - Bell Tower converted into a Flying Type area with level 60 to 64 pokemon locked behind a quest. (The Celebi one for example, idk, I would give Burned Tower and Bell Tower some usage. Maybe even Ruins of Alph having a secret 60 to 64 area with Psychic types) Hoenn - Water type cave area in Route 134, similar to 3rd gen where the Regi Trio puzzle is located. Sinnoh - Snowpoint Temple - Ice type area with level 60 to 64 pokemon. All with 2nd to 3rd stage pokemon similar to Cerulean Cave. Cerulean Cave could also get slight reworks to be honest.1 point
-
1 point
-
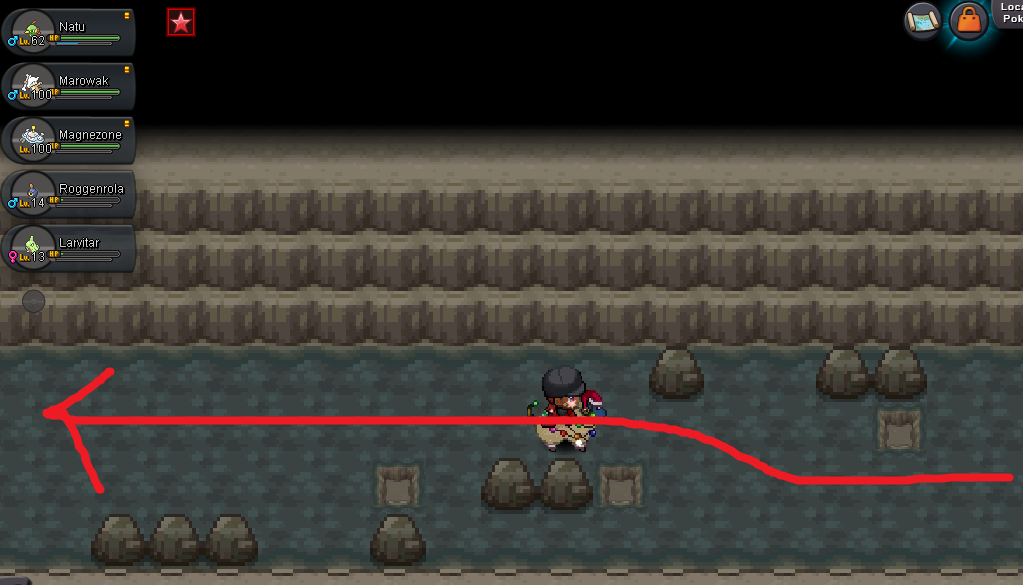
1 point+1 wish it would be Smash-able with the tool aswell since im not having always that specific poke with me, almost never xd1 point
-
0 pointsHello i was wondering about training my pokemon in new maps where we can find pokemon at high level ( 65+) like cerulean cave or dragon shrine, this could be funny and a nice add, thank you , share your opinion ❤️ .0 points
-
0 pointsHello i never understand why i can't destroy rocks with my pickaxe in love island, why not change this since that tool is a real money stuff, everyone think that tool is usable everywhere. share your opinion thank you.0 points
-
0 points
-
0 points
-
0 points
-
0 points
-
0 points
-
0 points
-
0 points
-
0 points
-
0 points
-
1.2m impish0 points
-
0 points
-
0 points
-
2.5m ada0 points
-
0 points
-
0 points
-
0 points
-
0 points0 points0 points0 pointsUsername: Oddtrainer Server: gold Your streamlink: https://www.twitch.tv/oddjokergamer What type of content do you stream: pokemon, apex, kingdom of amalur re-reckoning, kingdom hearts multiverse and more0 points


.thumb.jpeg.b1b4628e7a2954ffe4be86eea9ce7659.jpeg)


.thumb.jpeg.e30ec3a7c00c3a8ad7af7808b9f2aa17.jpeg)


.thumb.gif.98a41ca4a34455f026009a5a15768497.gif)


.thumb.png.bcc99ba8b23e9f9c9c419ec75a121d06.png)