Leaderboard


Popular Content
Showing content with the highest reputation on 12/27/20 in all areas
-
Hallo Ihr Lieben, wir, die deutschsprachige Gilde „MewtusRache“, suchen immer nach aktiven Spielern, die eine Gemeinschaft und Mitspieler suchen, um den Spaß am Spiel mit anderen zu teilen. Bei uns steht der Spielspaß immer an erster Stelle und wir setzen keine Voraussetzungen im Storyfortschritt oder PvP-Ranking. Wenn wir weiterhin motiviert und zielgerichtet voranschreiten werden, wird sich das Gildenranking irgendwann von allein aufbauen. Aus diesem Grund nehmen wir gerne auch Neulinge im Spiel auf. Egal ob bei Problemen in der Story, Fragen zu PvP-Knowledge oder allgemeinen Fragen zum Spiel, wird man bei uns immer jemanden finden der mit fachkundigem Expertenwissen auf seinem Gebiet Lösungen kennt und diese auch gerne mit dir teilt. Wir bieten einen Exp-Bonus von 7.5%. Weiterhin bieten wir unseren eigenen Discord-Server, der neben dem Reborn-Helferbot und einem gildeninternen Marktplatz unter anderem auch genug Platz bietet, um seine Ideen und Vorschläge kundzugeben und zu diskutieren. Gildeninterne relevante Veränderungen von Terminen oder sonstigem werden hier selbstverständlich auch angekündigt. Um das Gemeinschaftsgefühl zu stärken veranstalten wir regelmäßig Gildenevents. Unser wöchentliches Hide&Seek Event mit lohnenden Preisen hat schon vielen glücklichen Gewinnern den Sonntag verschönert. Wenn ihr Lust bekommen habt mal das Zusammenspielen in einer Gilde kennenzulernen, allgemein Gesellschaft beim Spielen sucht, eure alte Gilde in Inaktivität versinkt oder ihr neu im Spiel seid und noch mit einem großen „?“ durchs Spiel lauft, schreibt mir einfach unter diesem Beitrag, meldet euch bei Brickx, Marksman1303, alucaardx, Limette515, Ikurashy, Cardiolo, Quantendynamik oder einem anderen Spieler mit unserem Gildenlogo. Wir sehen uns Online
 3 points
 -
You'd be better off posting it here as it's dedicated to suggestions like that one https://pokemonrevolution.net/forum/topic/156933-map-improvement-megathread/2 points
-
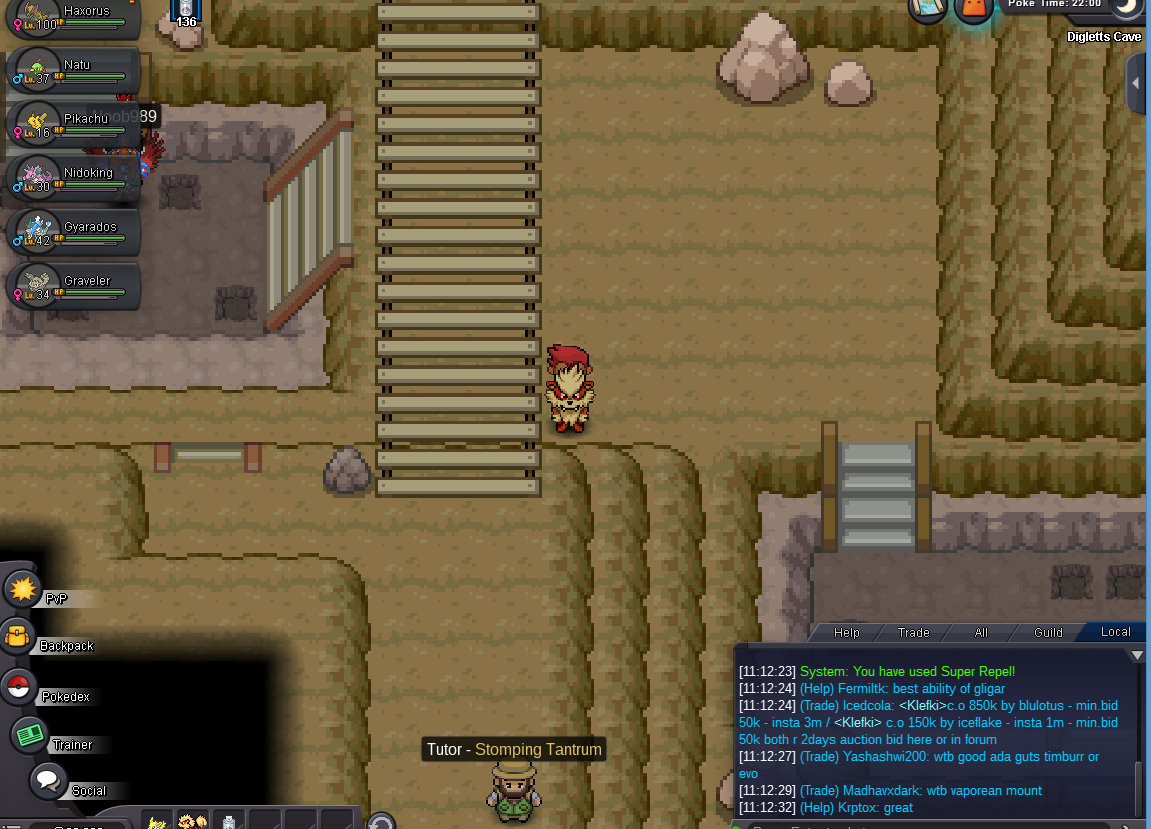
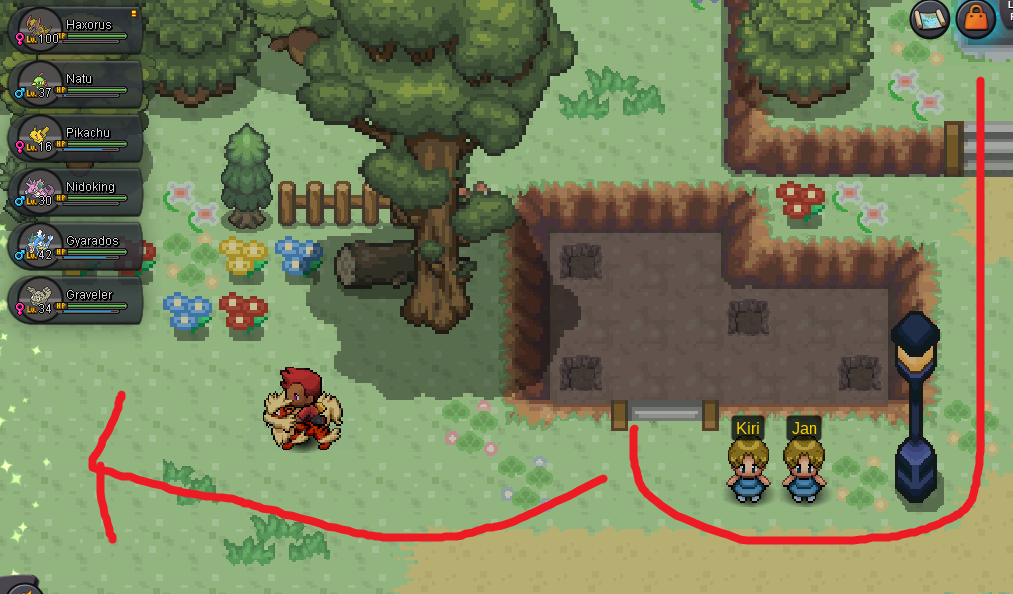
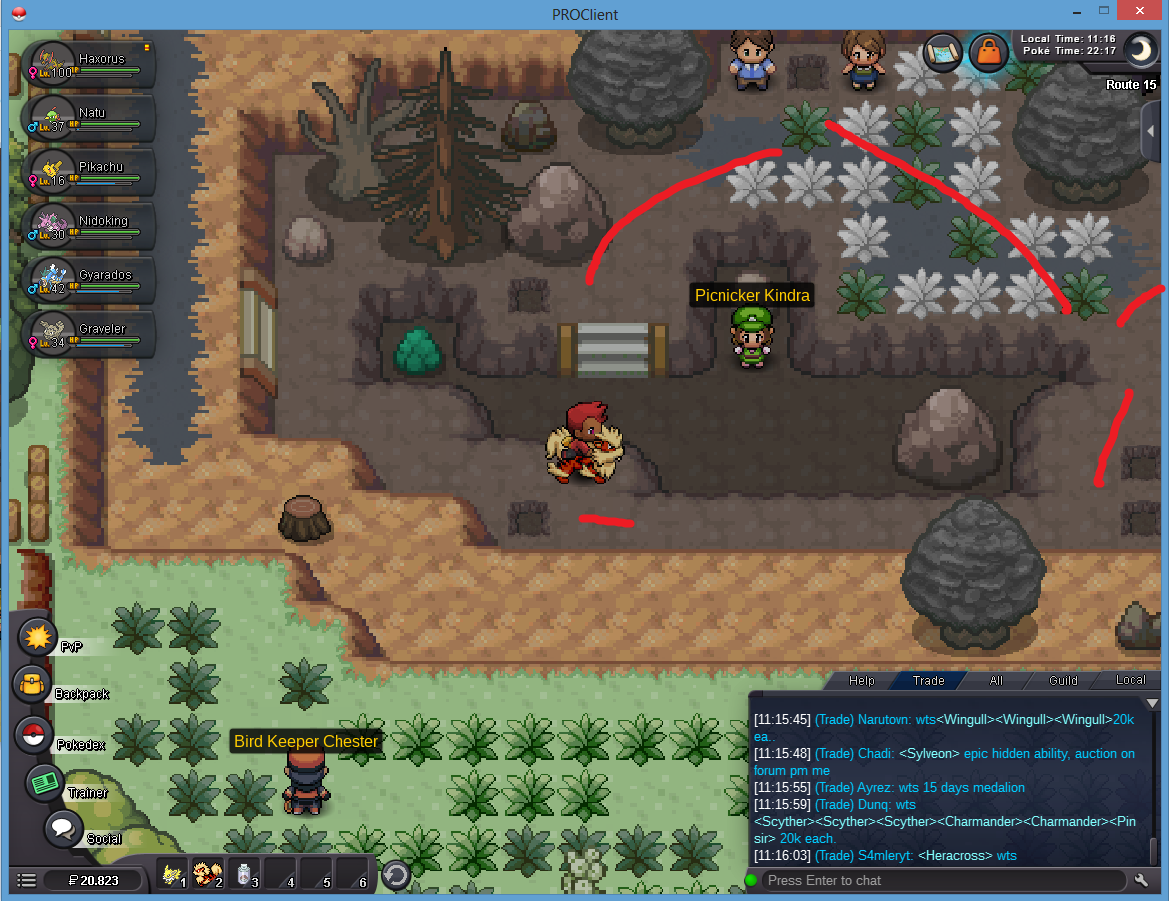
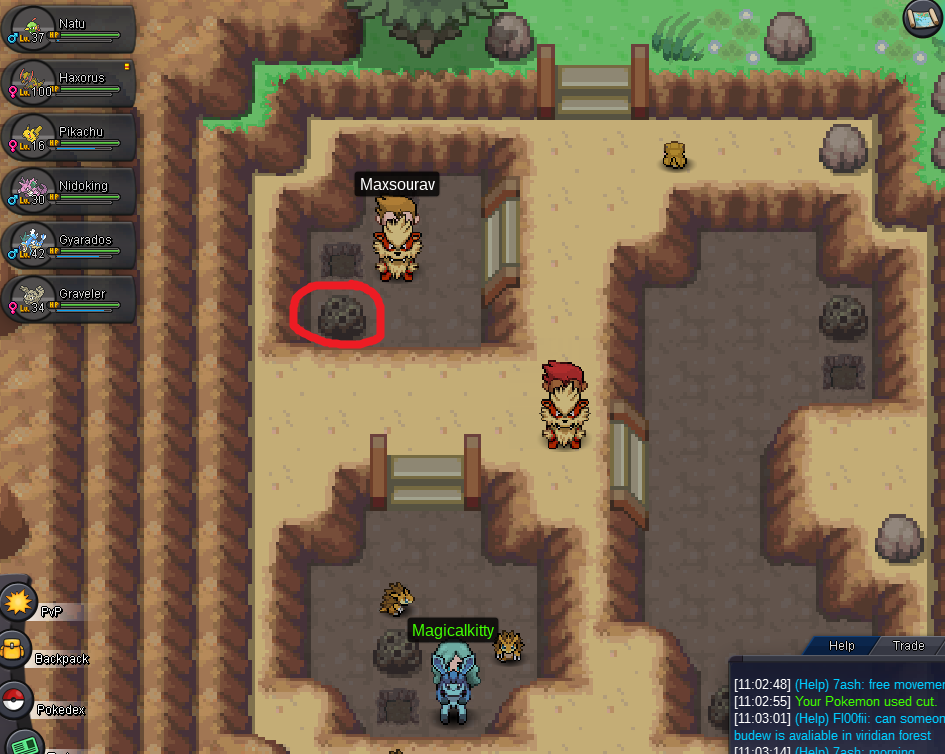
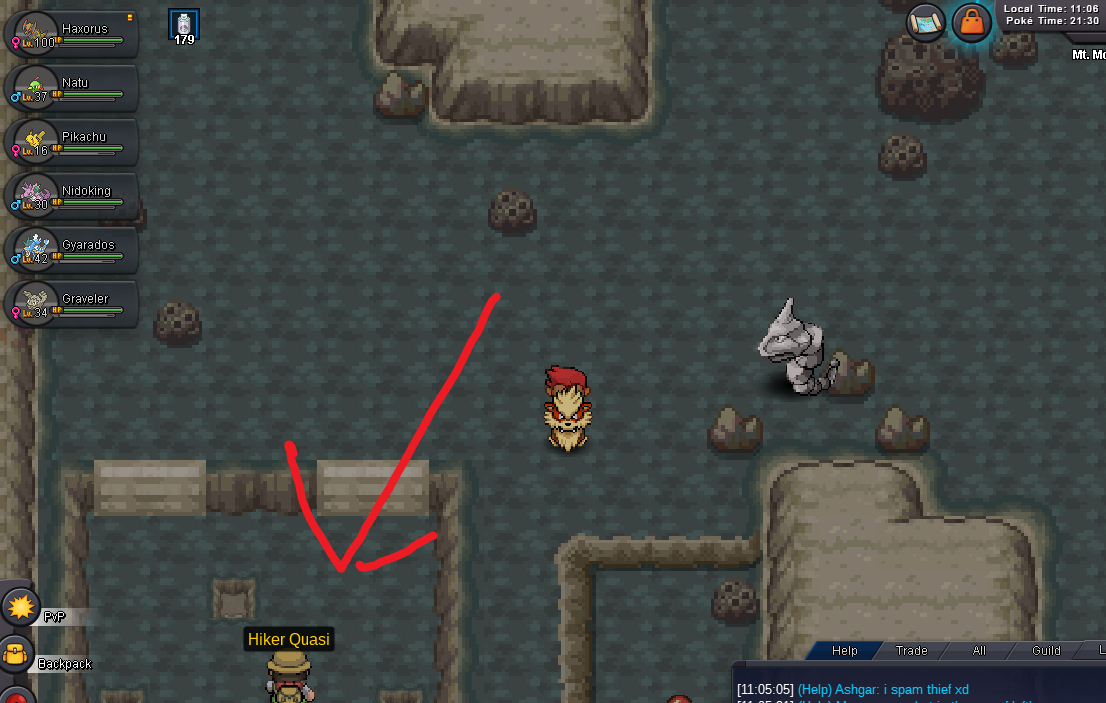
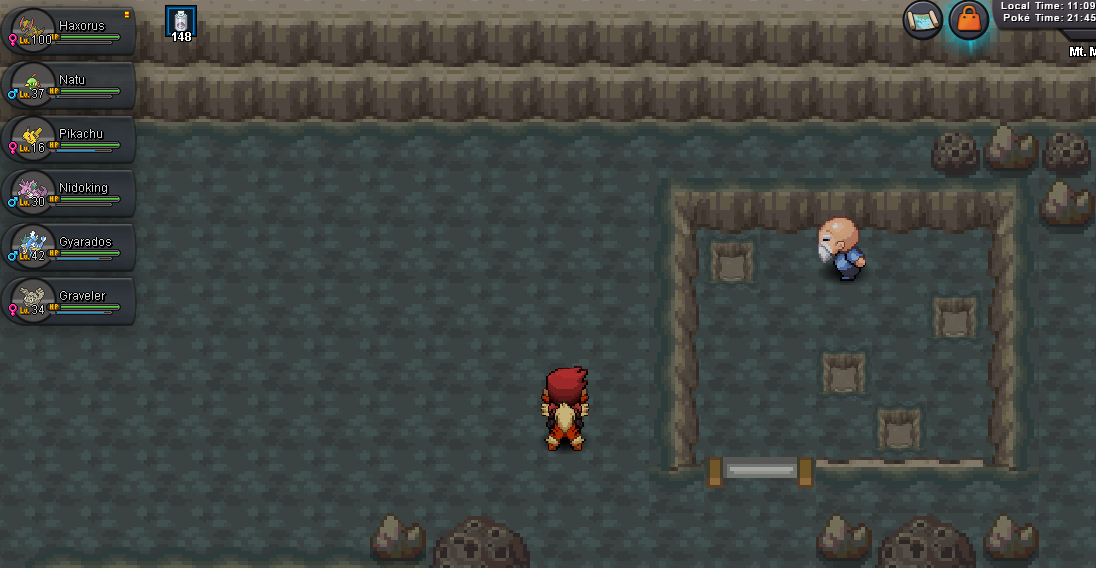
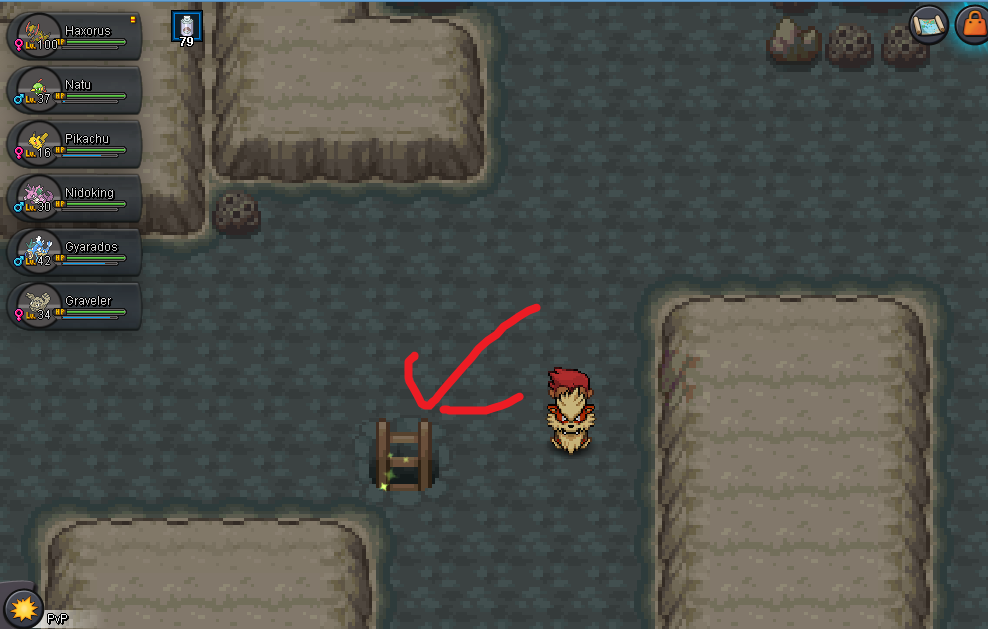
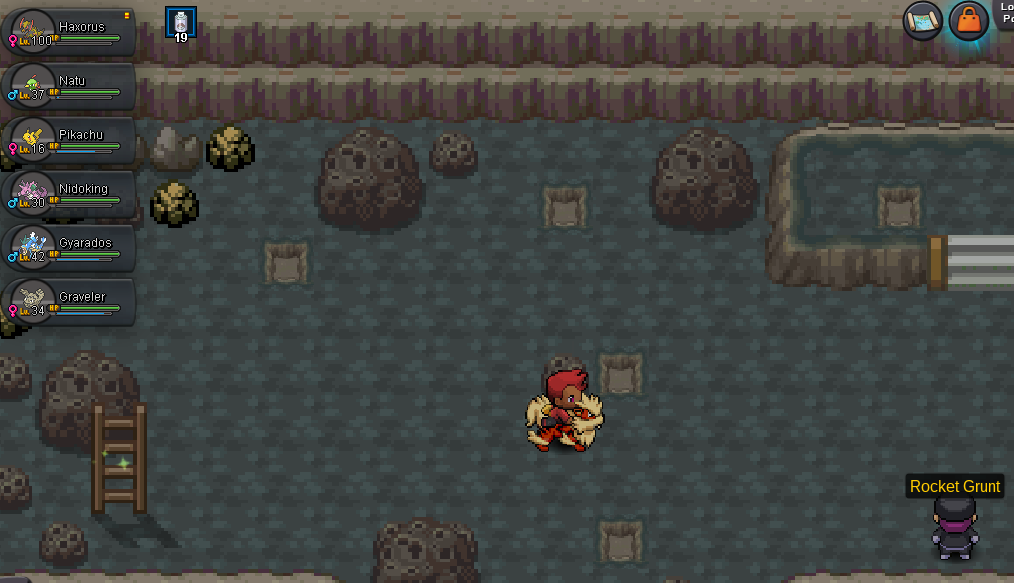
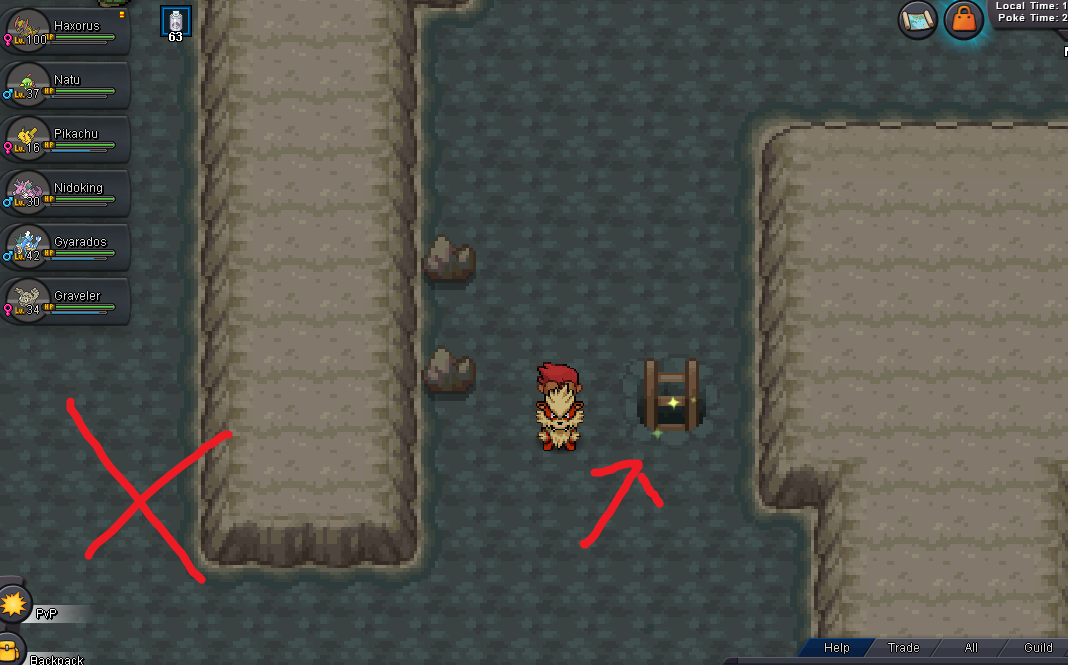
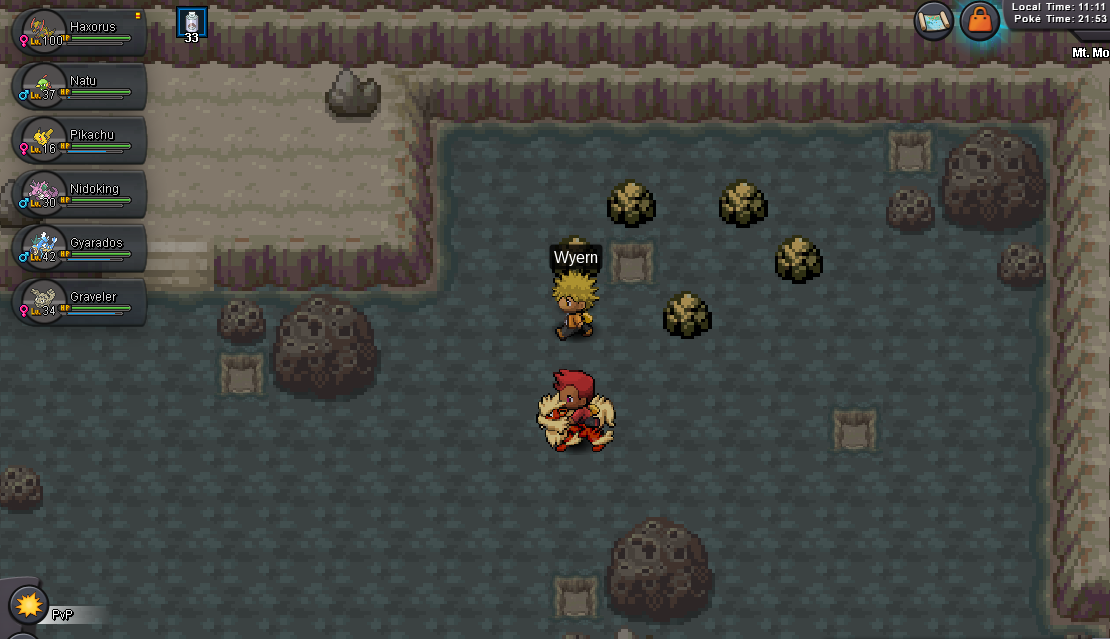
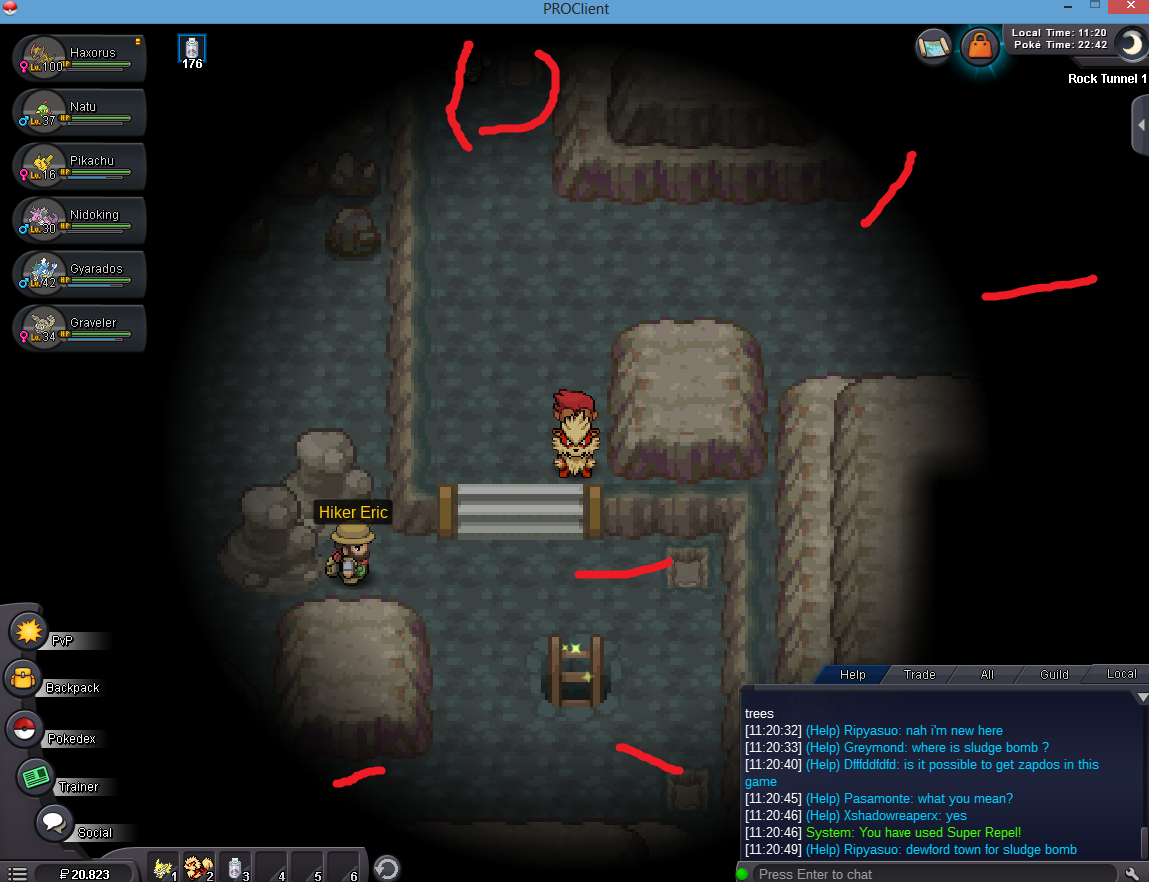
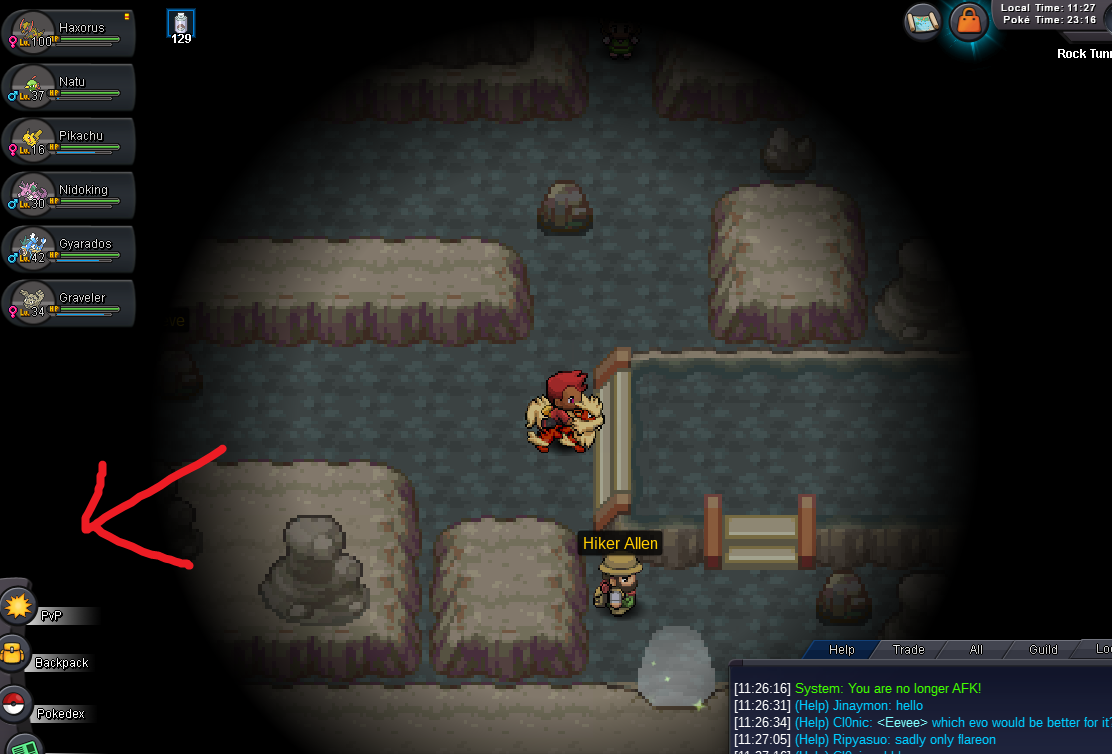
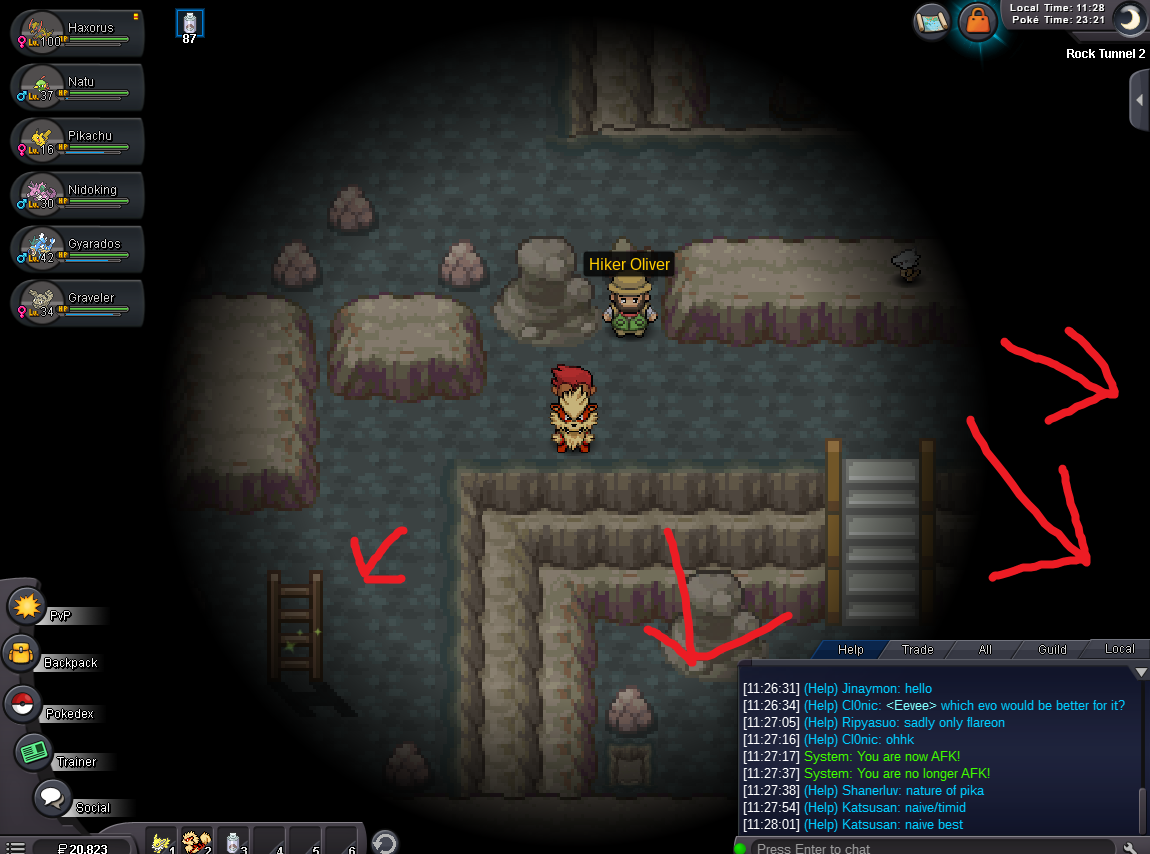
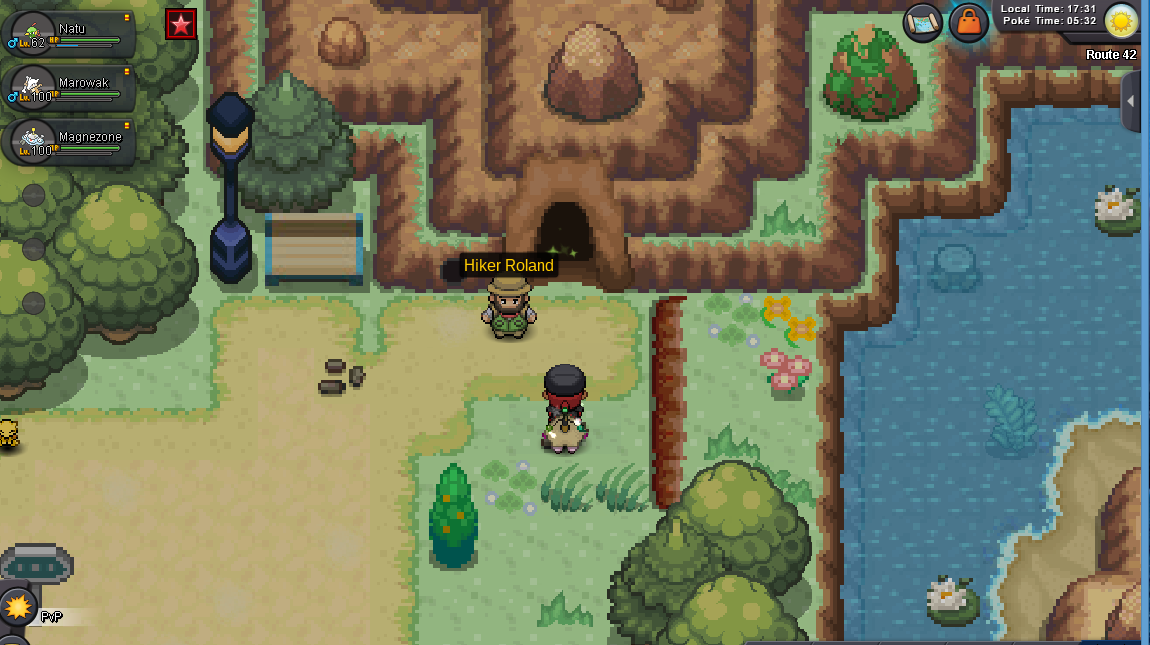
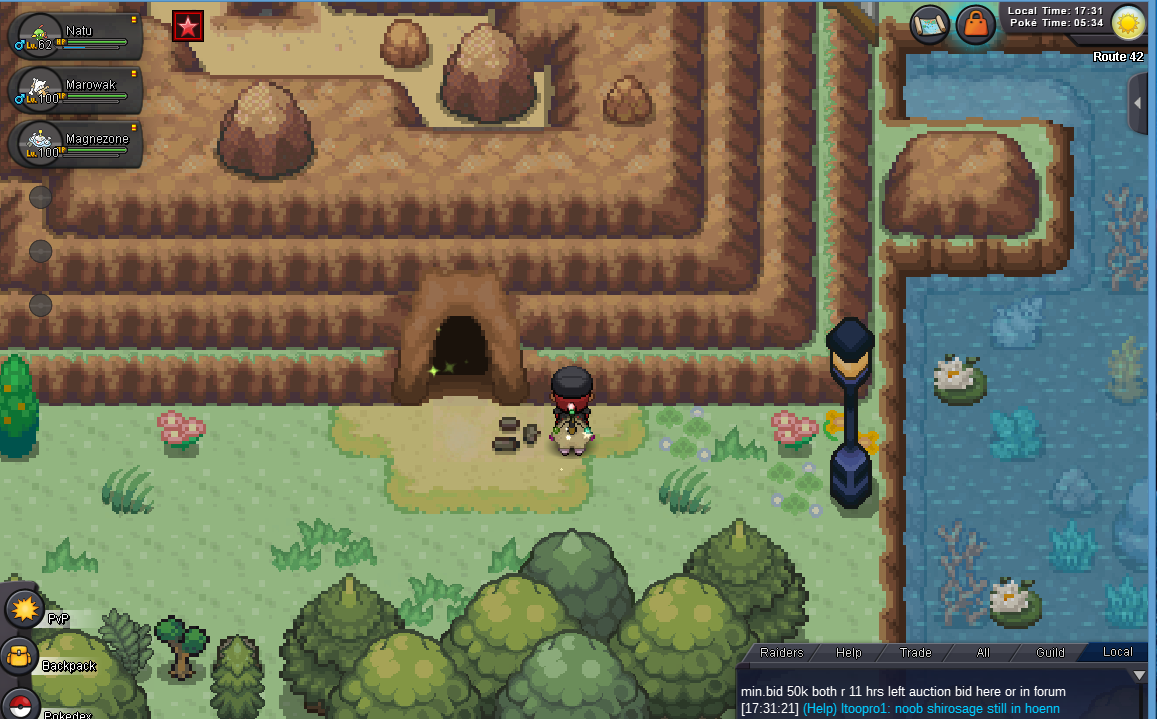
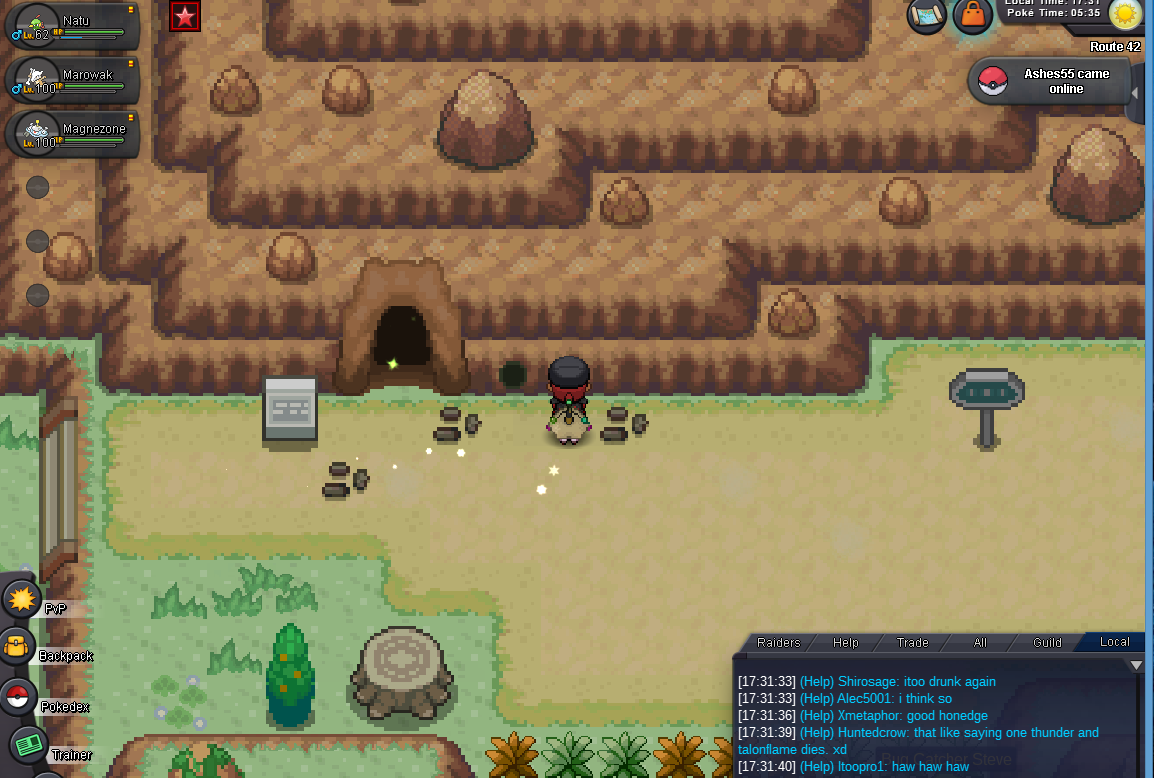
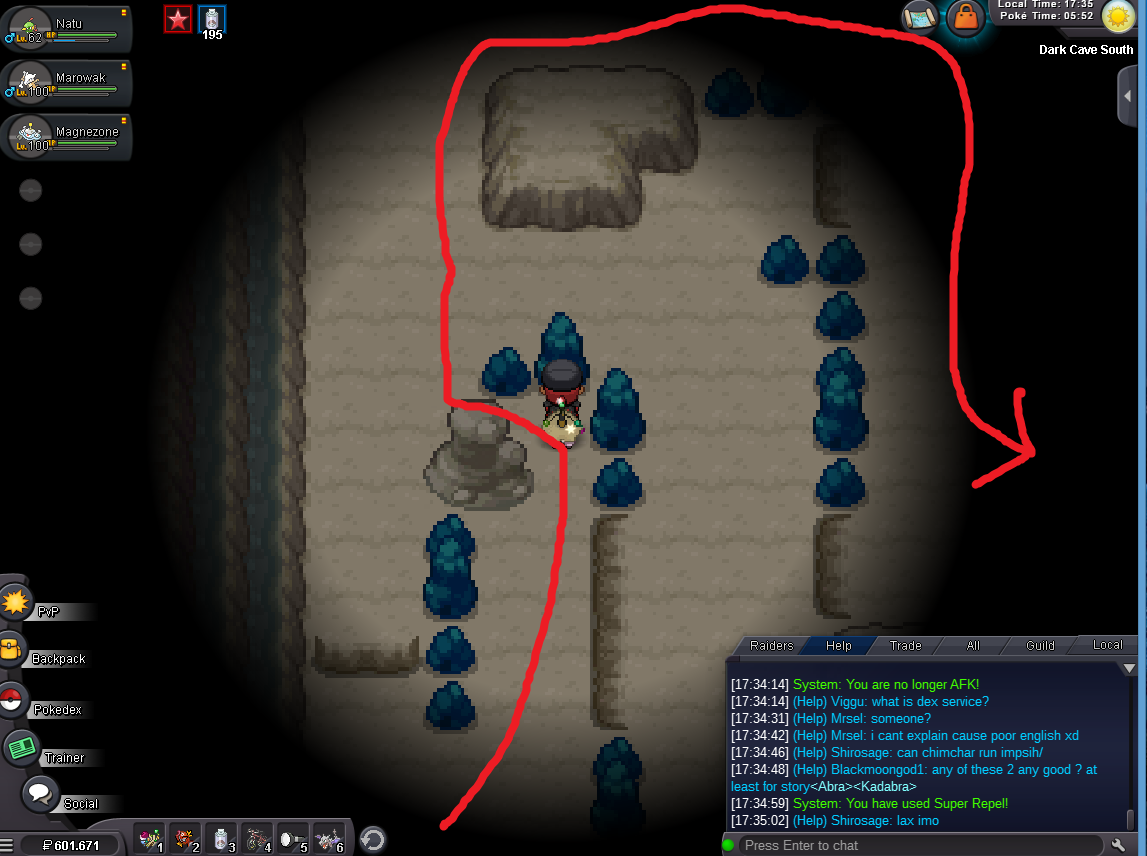
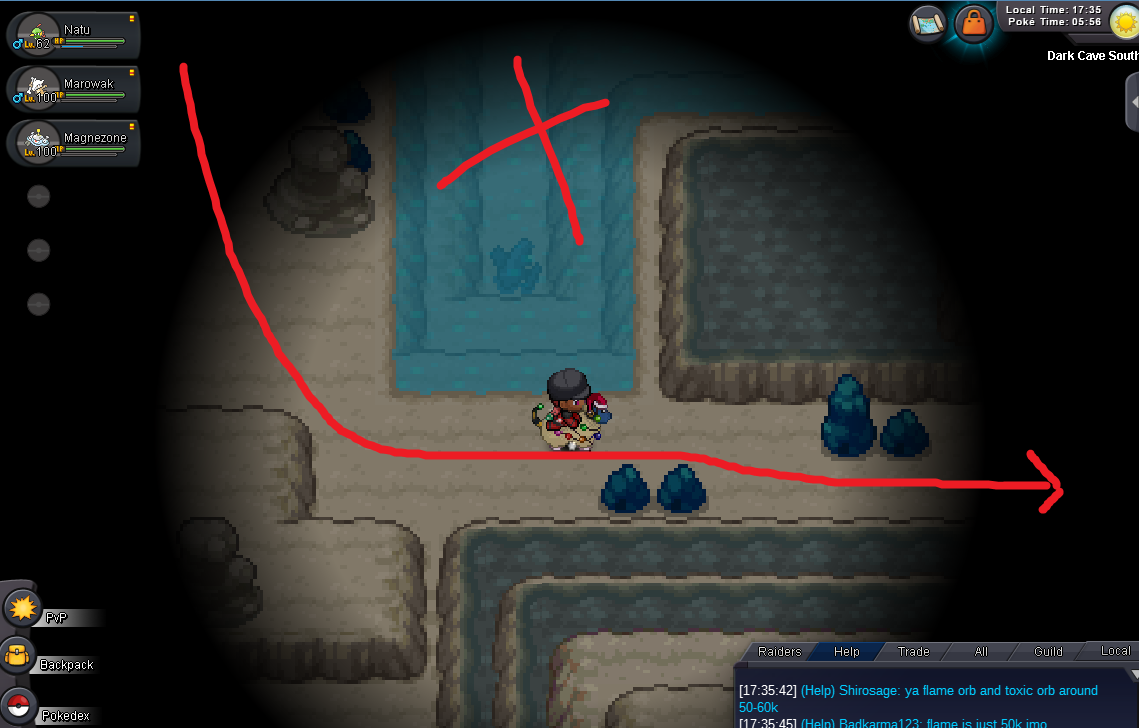
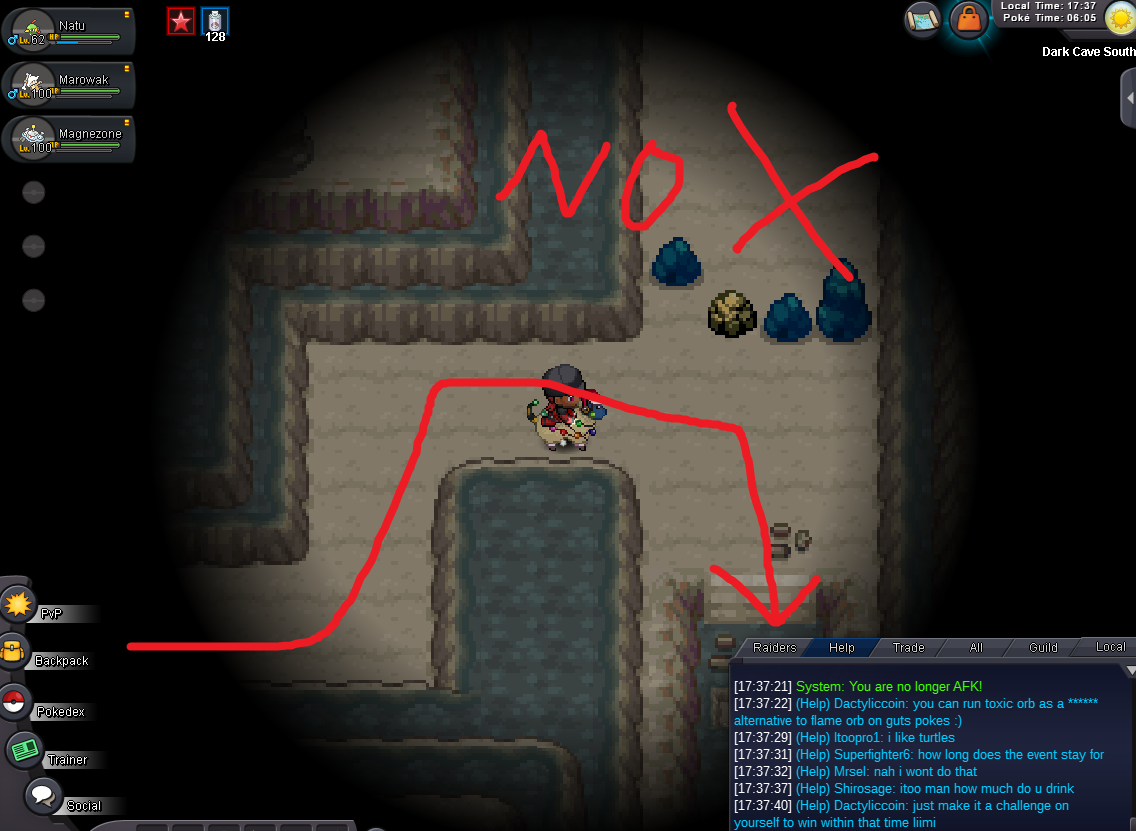
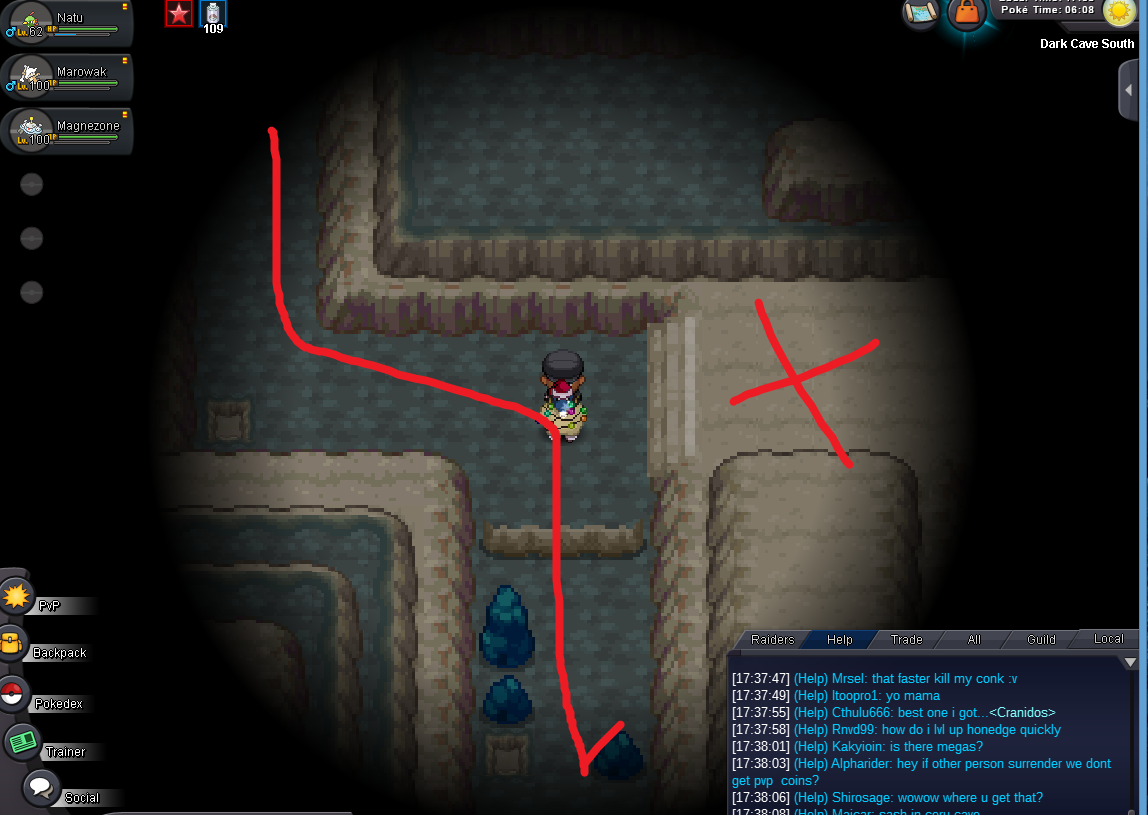
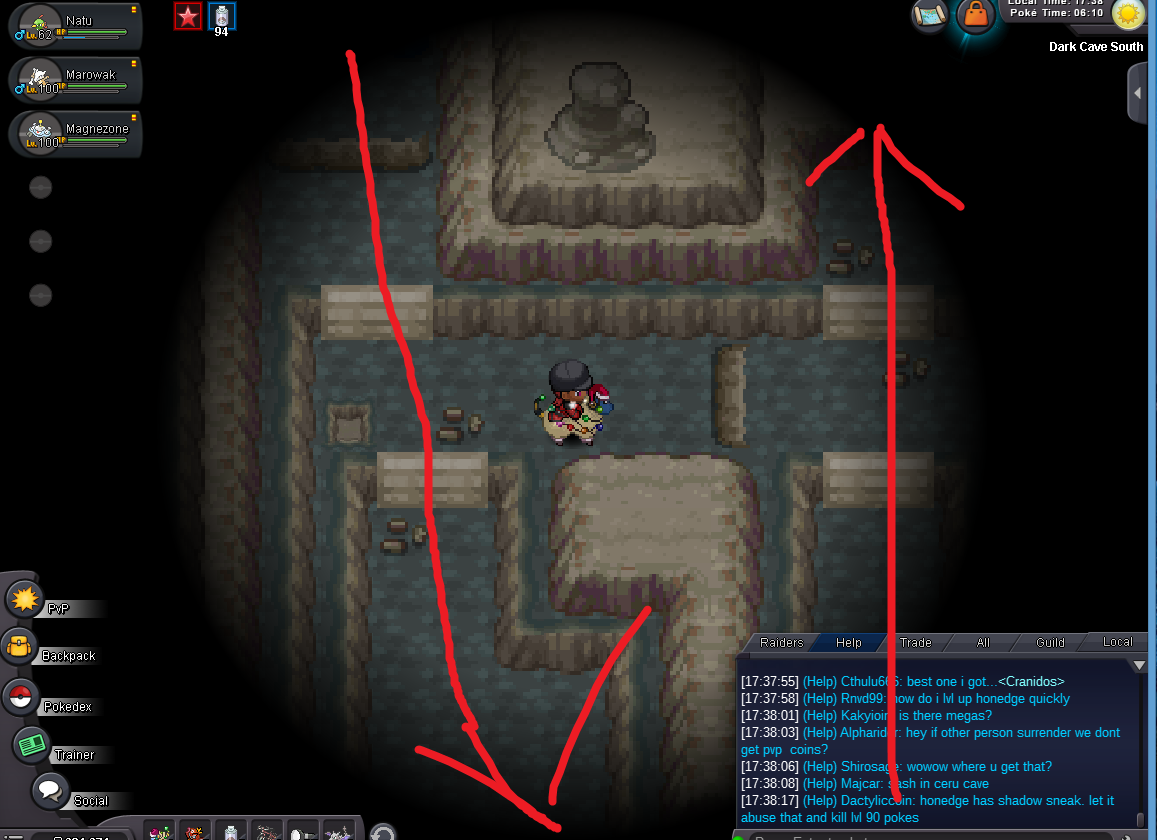
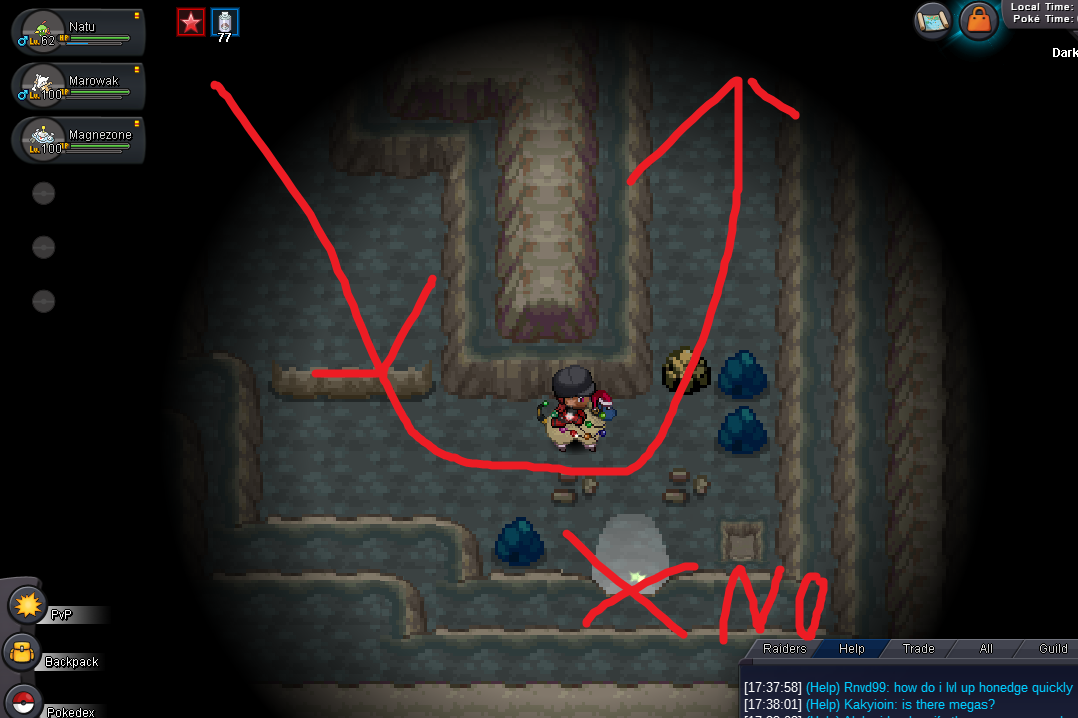
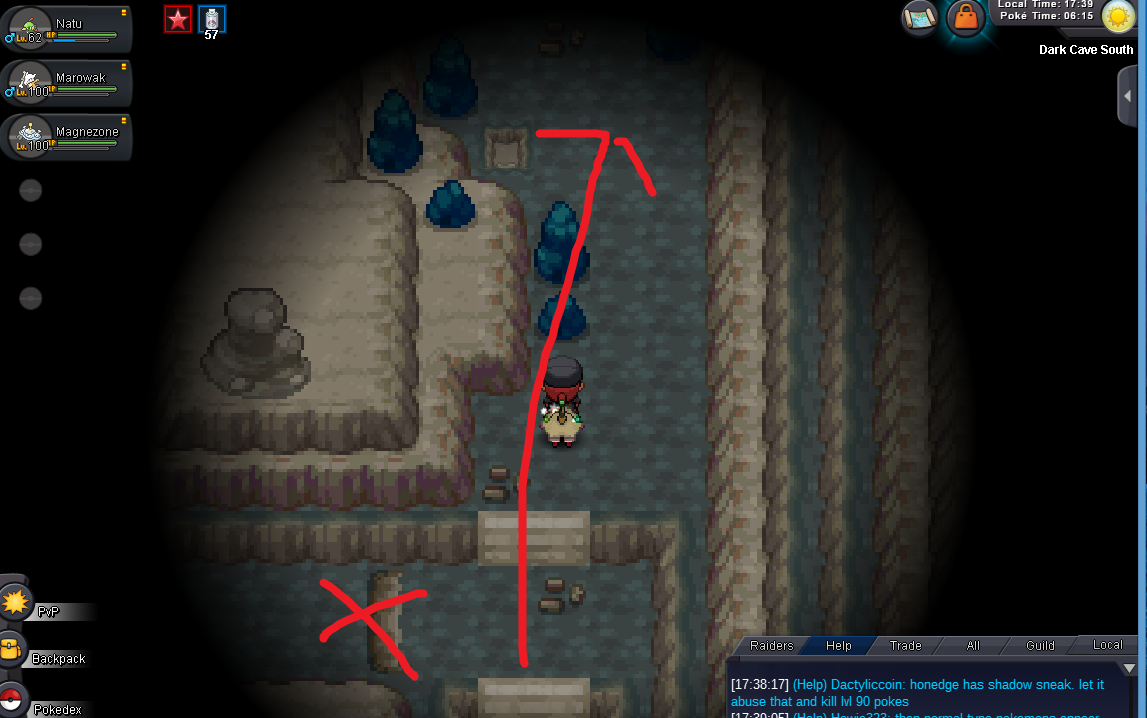
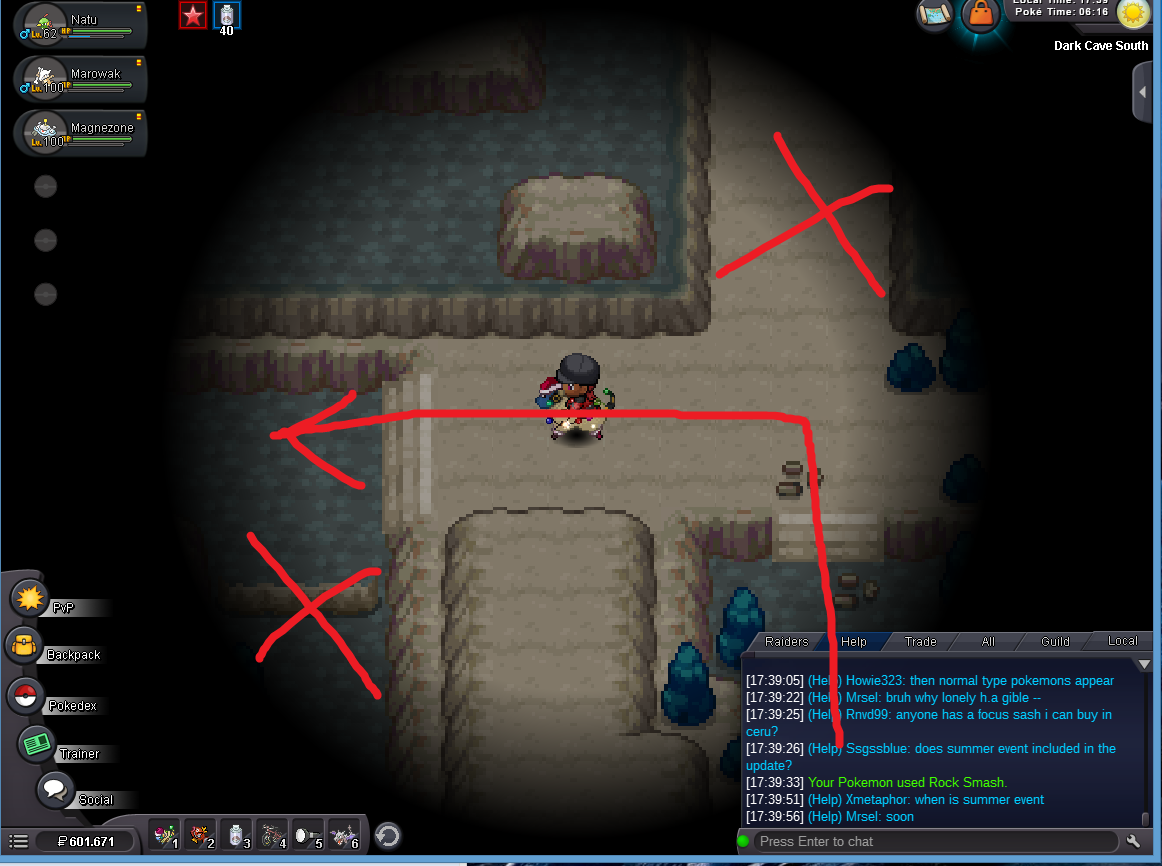
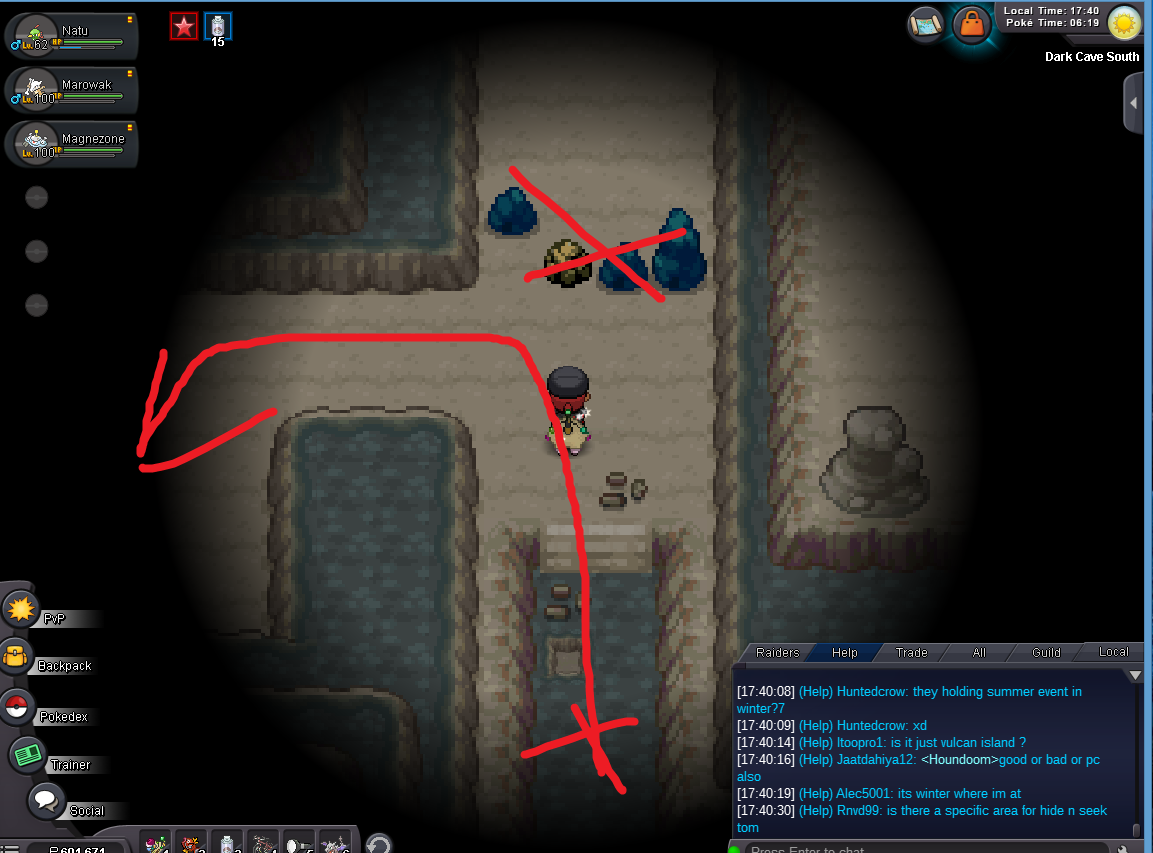
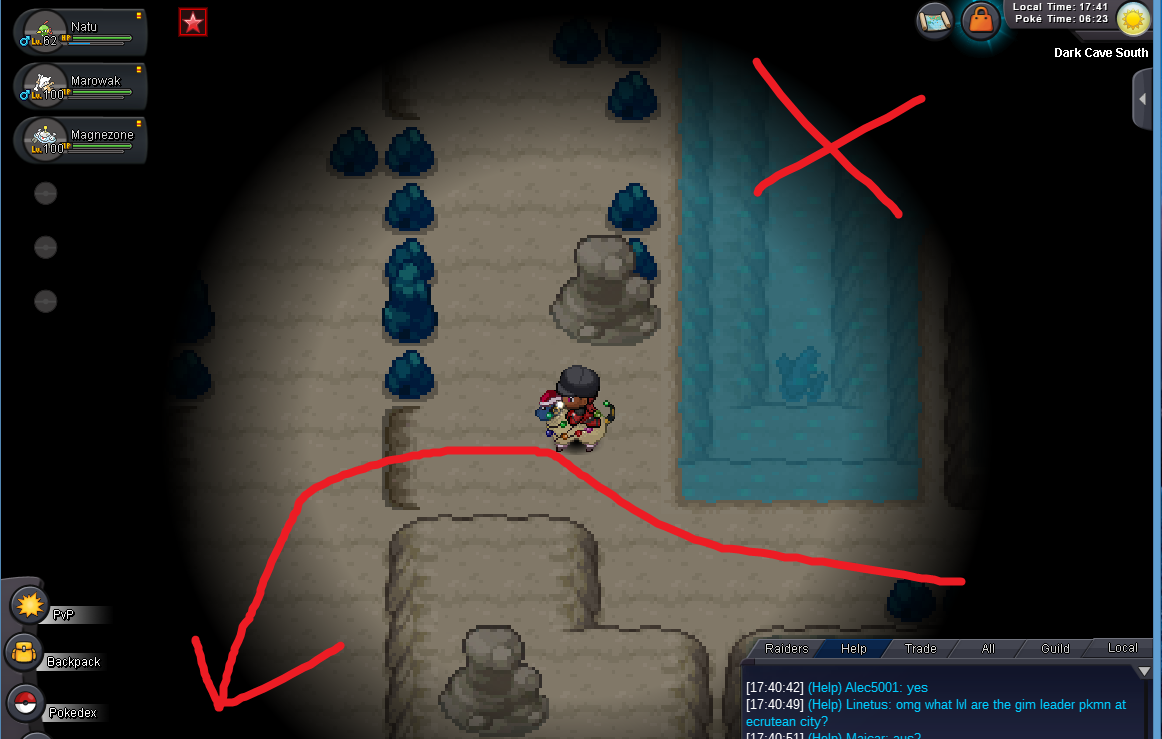
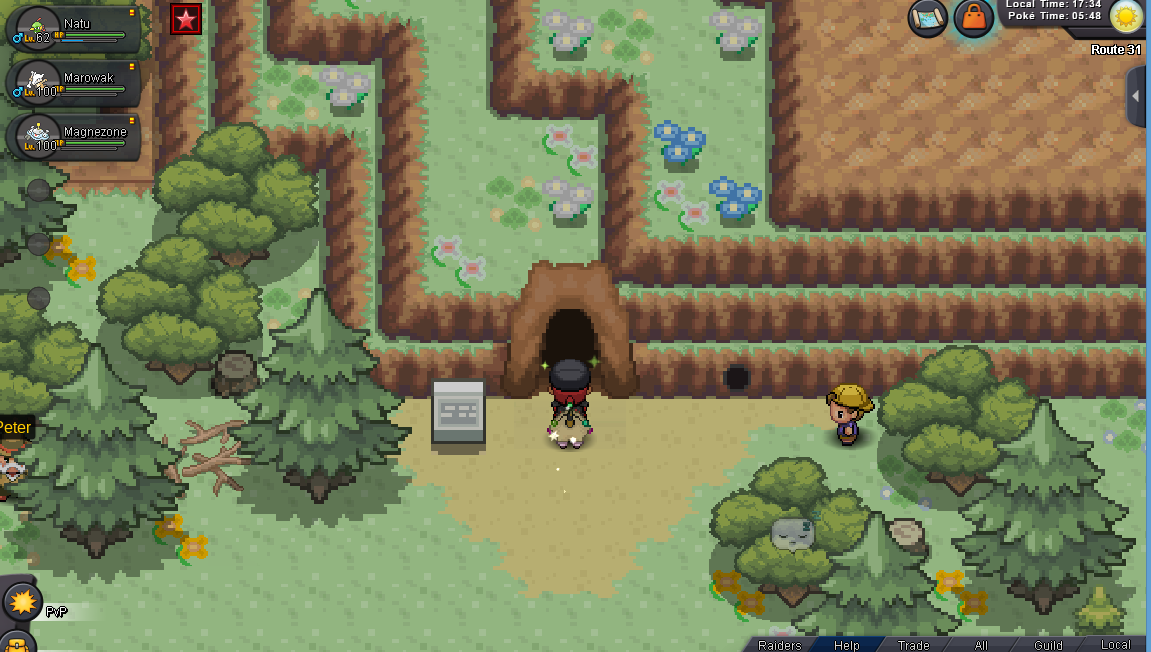
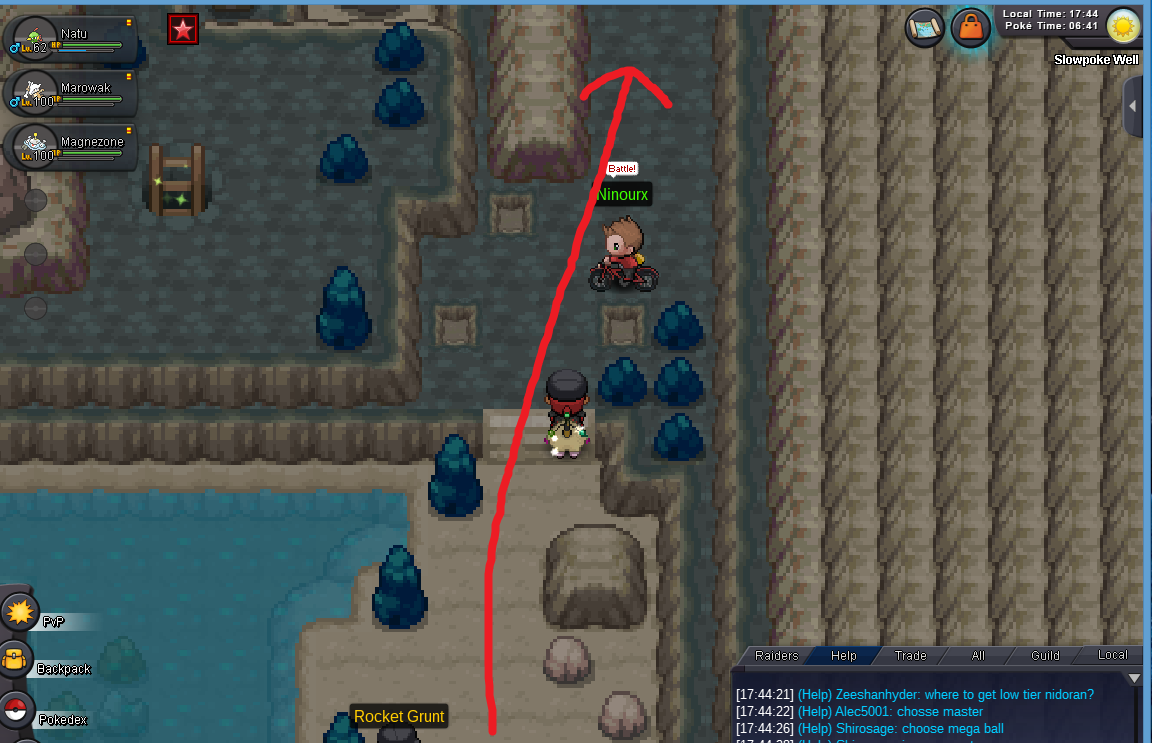
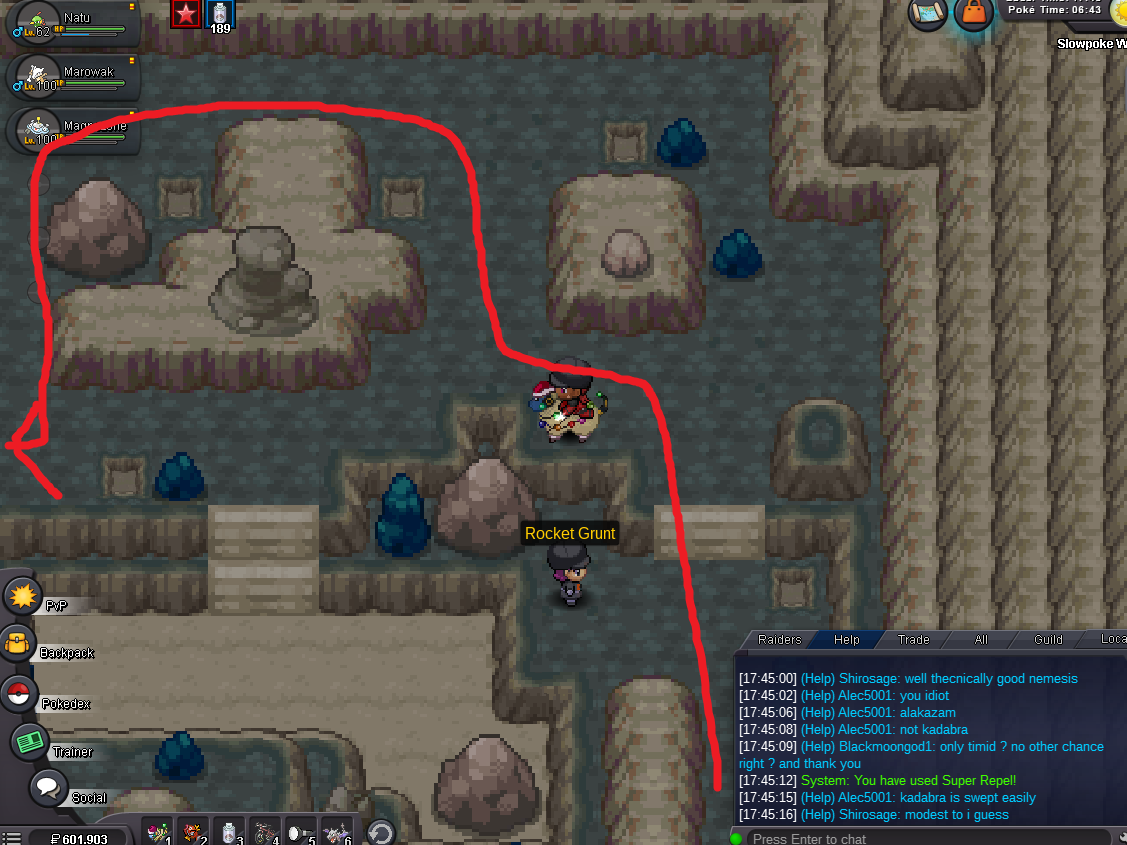
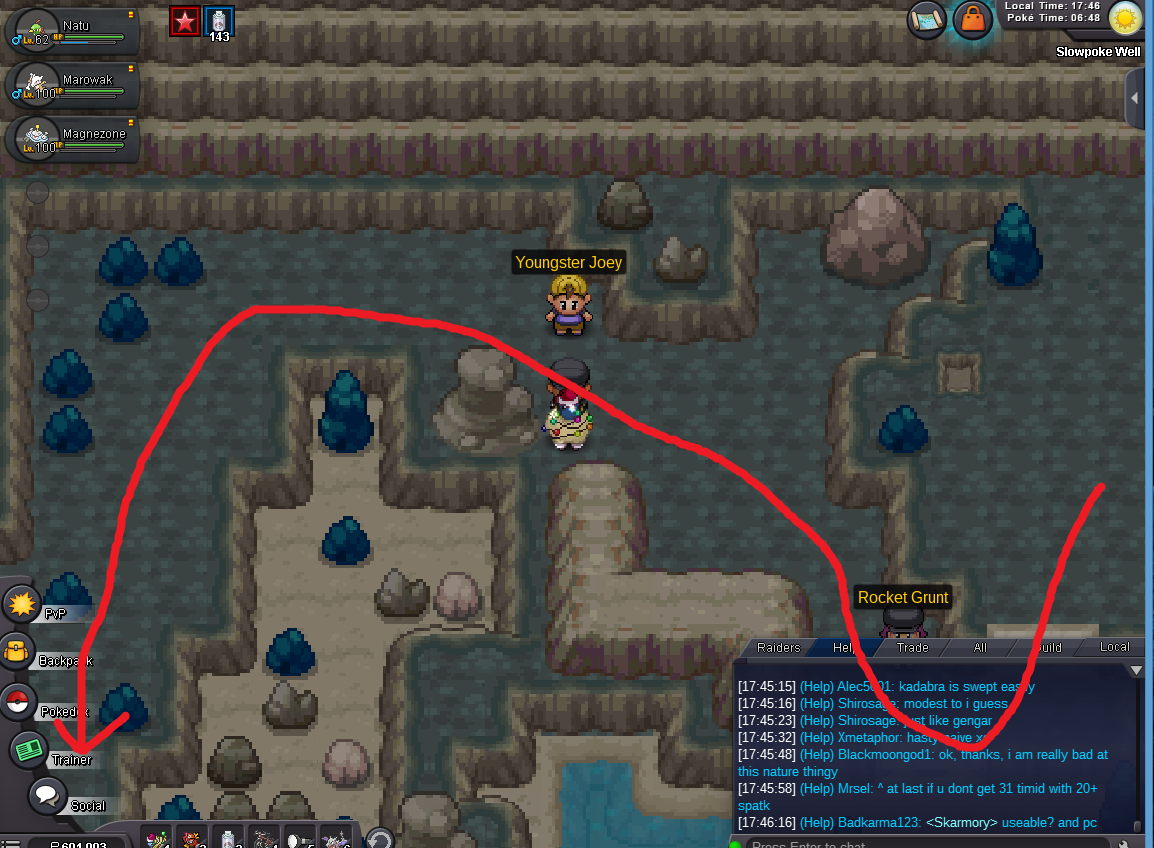
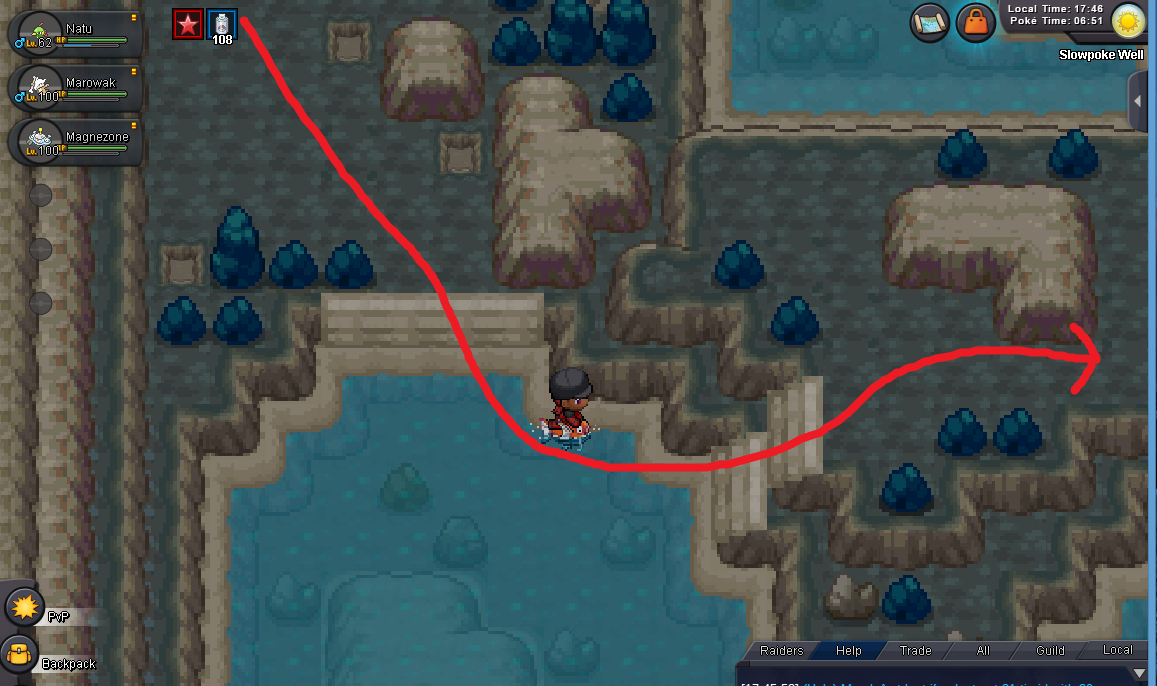
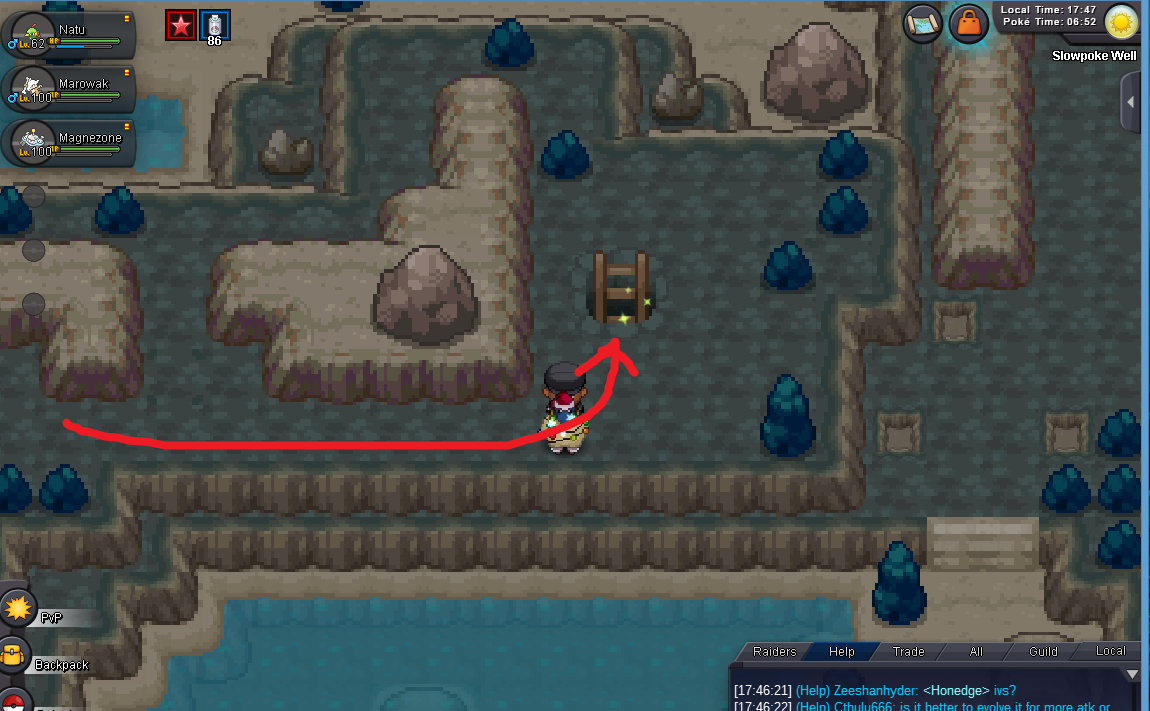
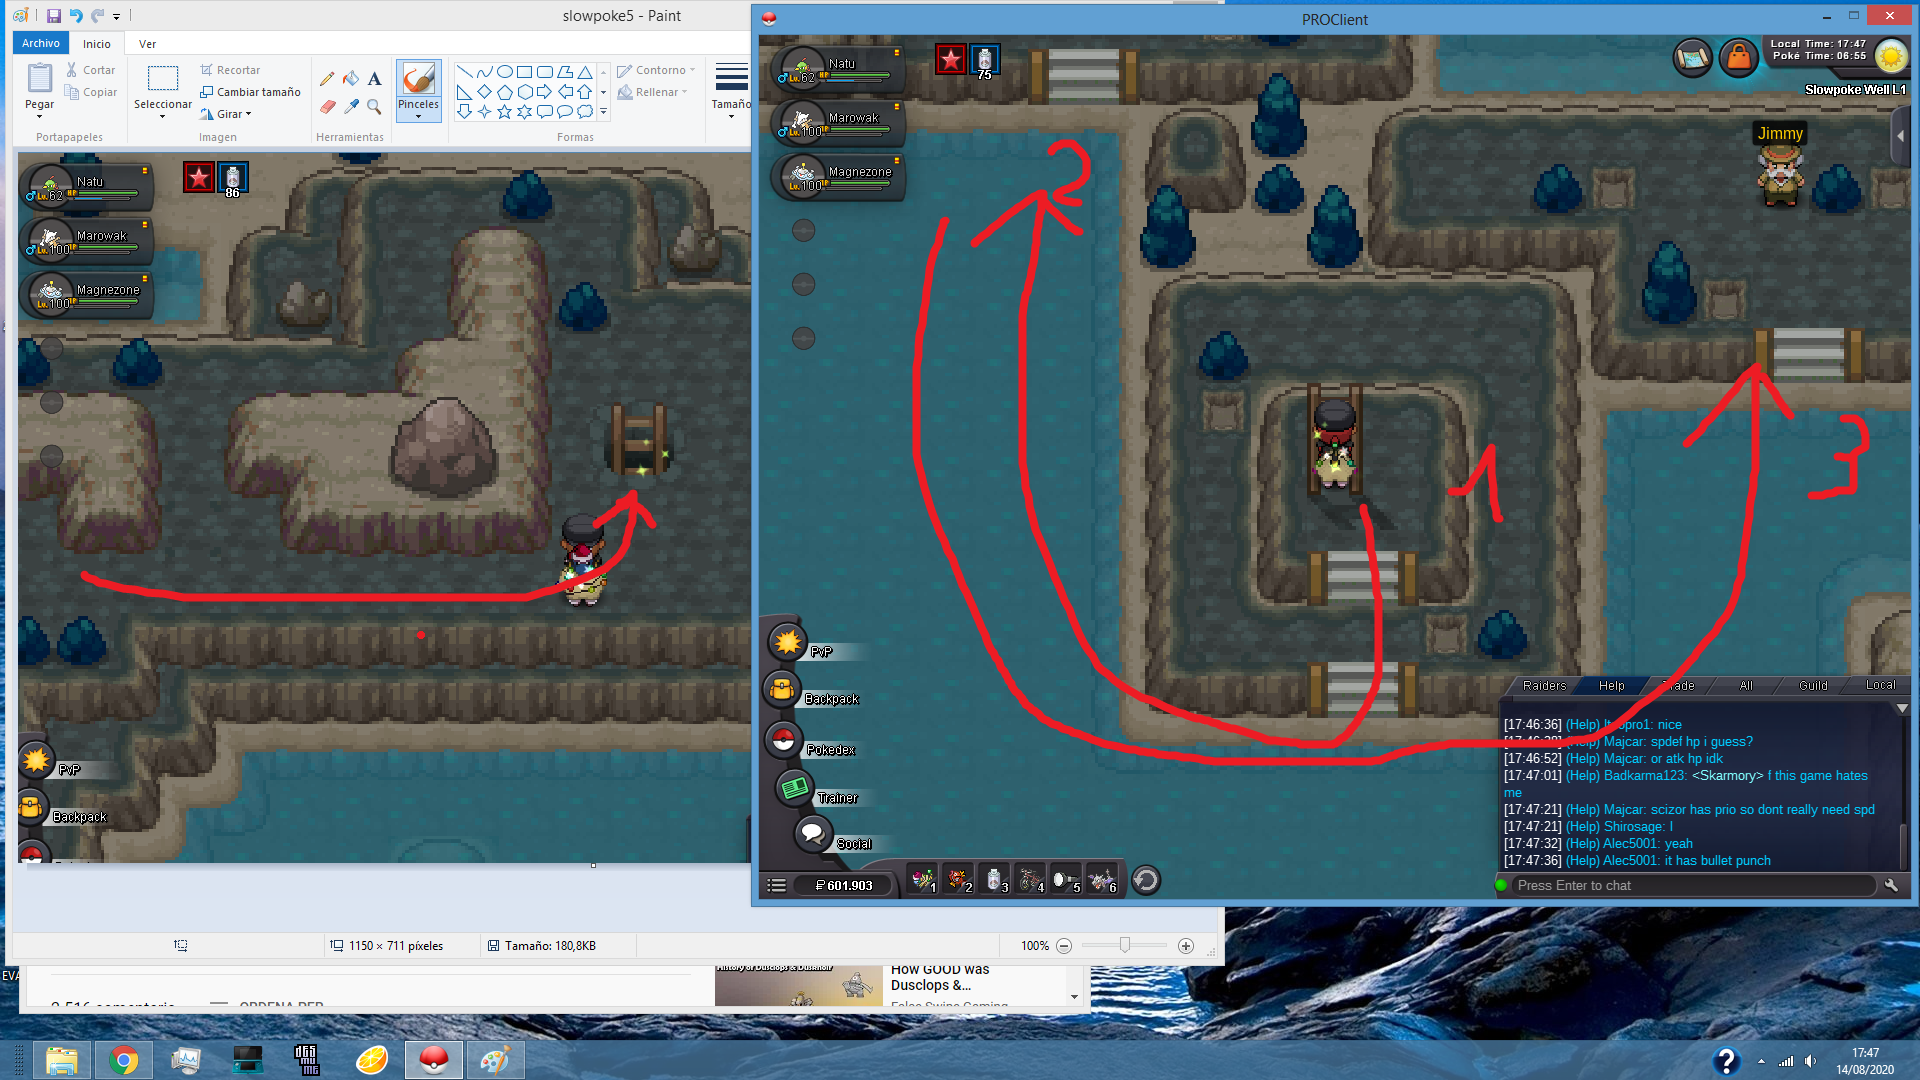
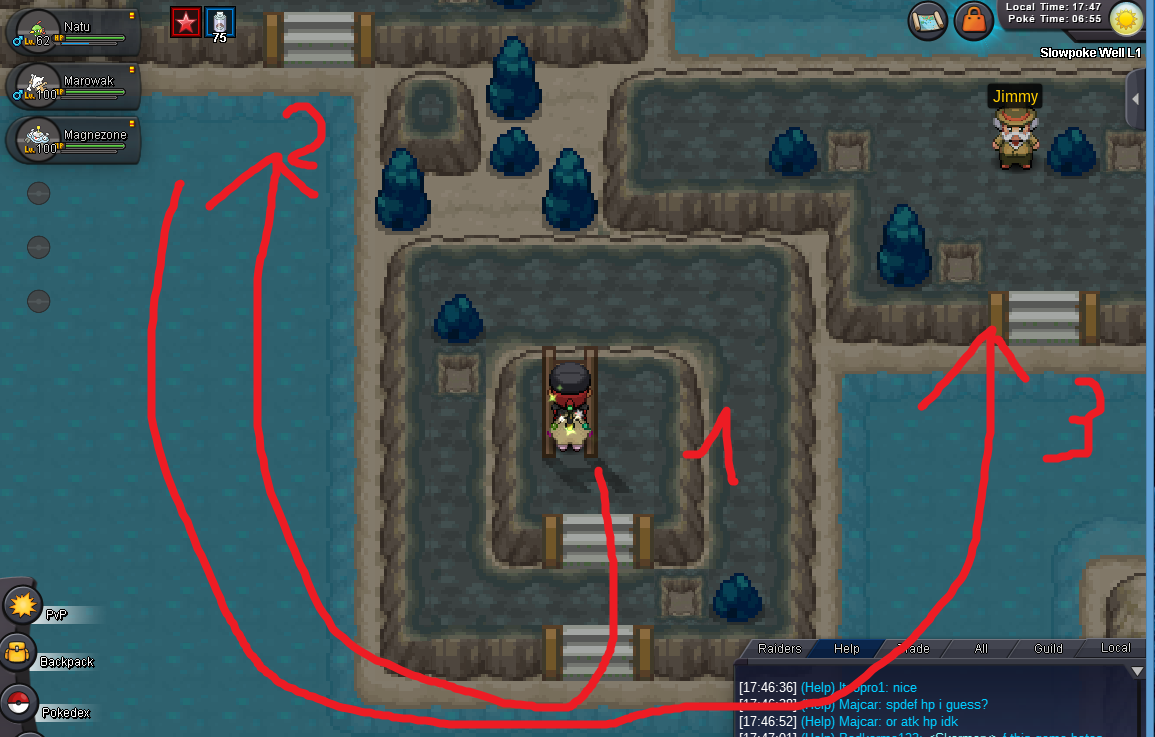
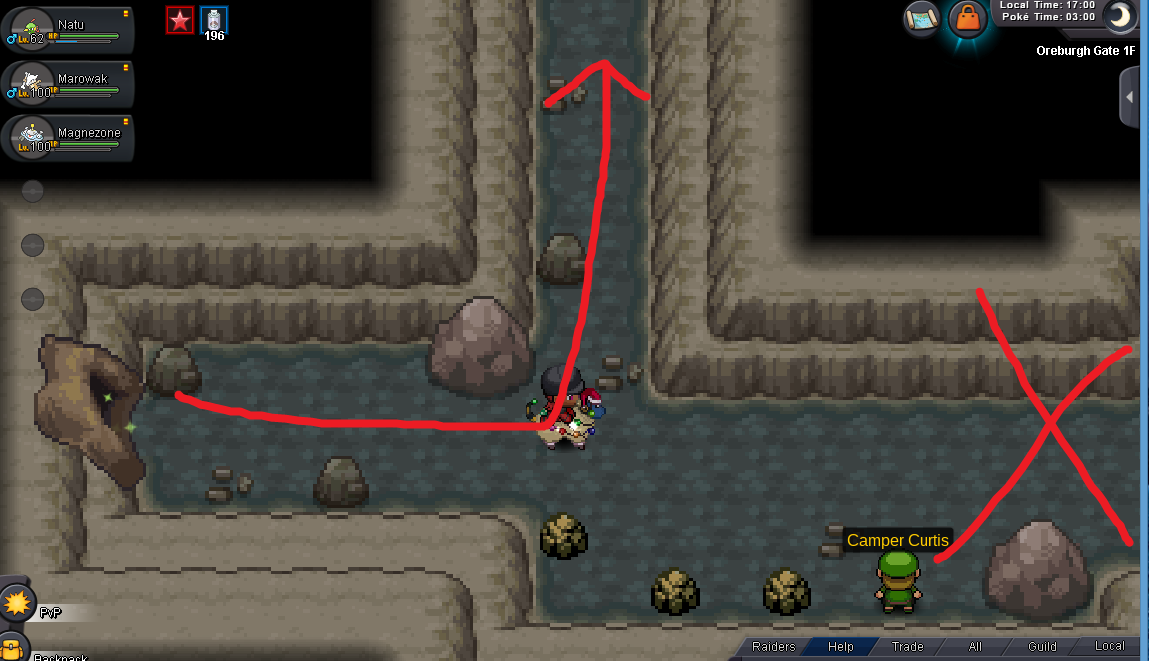
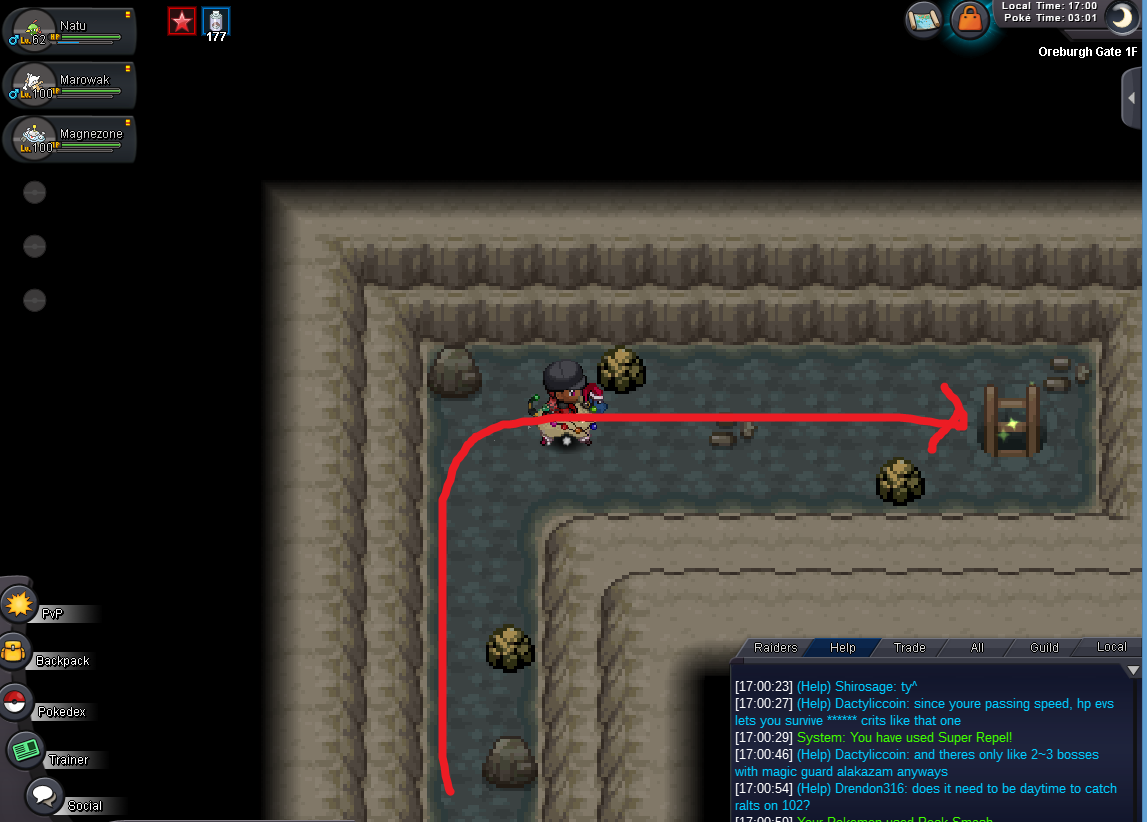
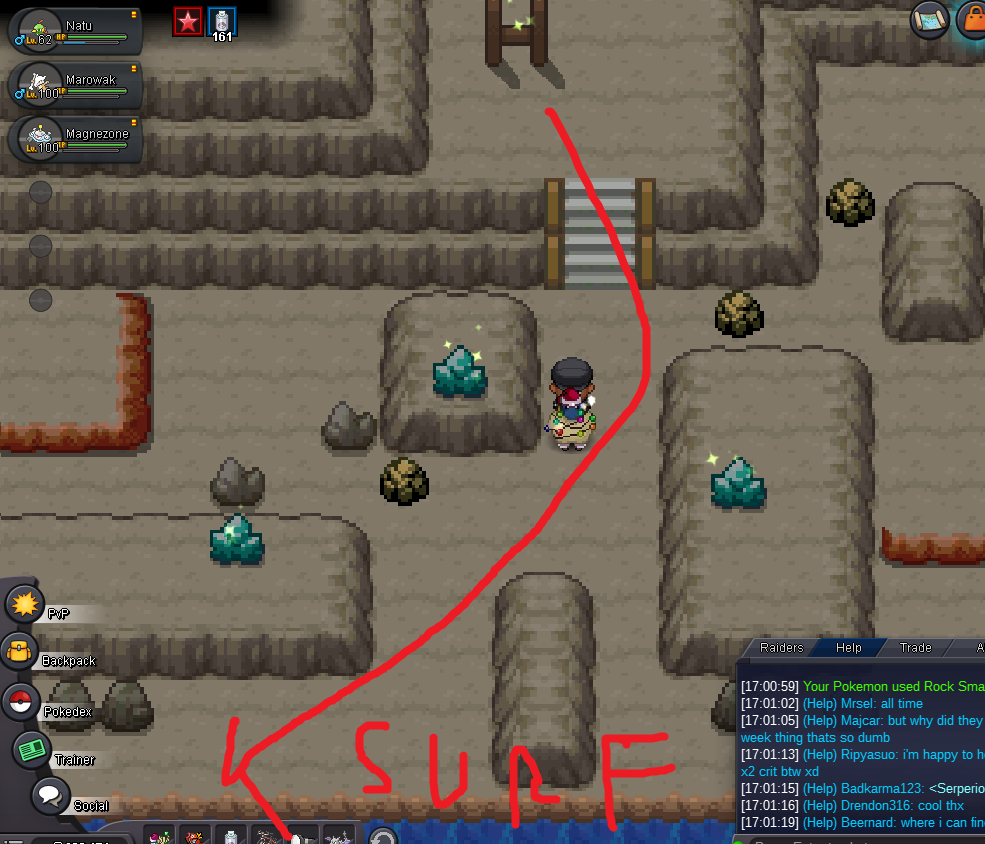
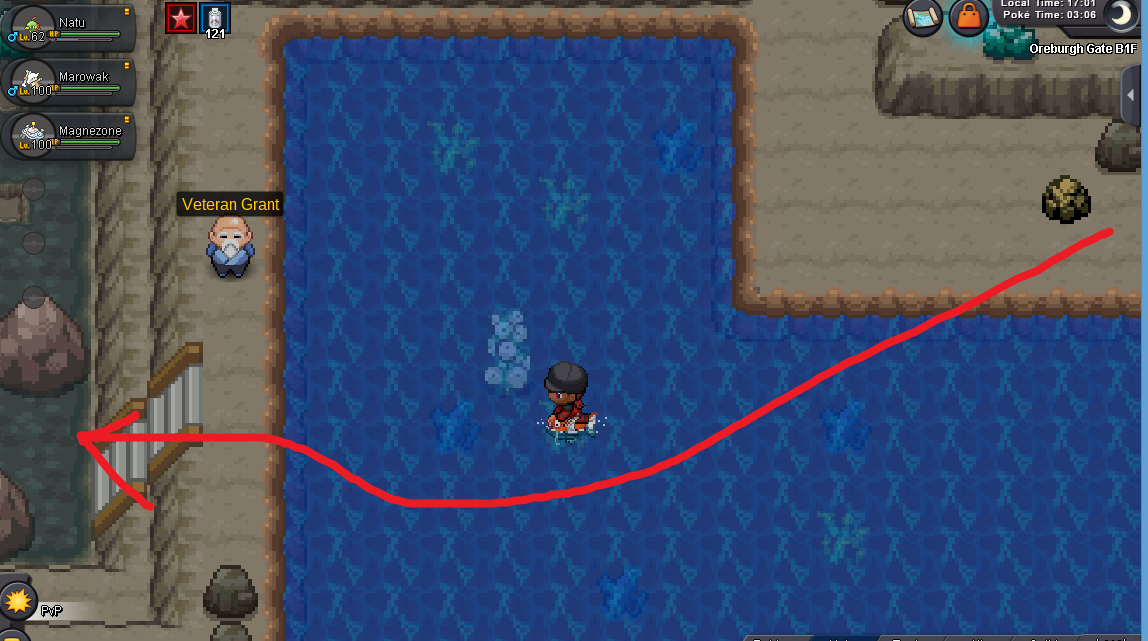
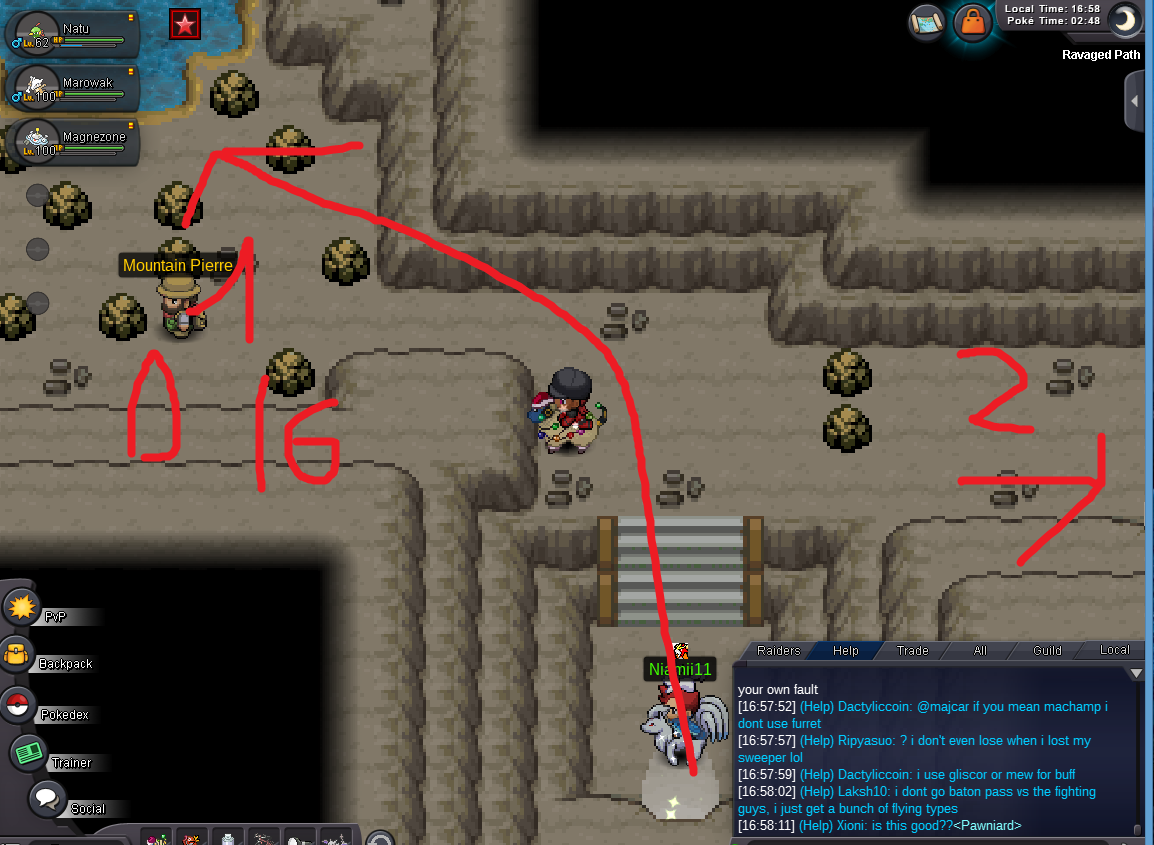
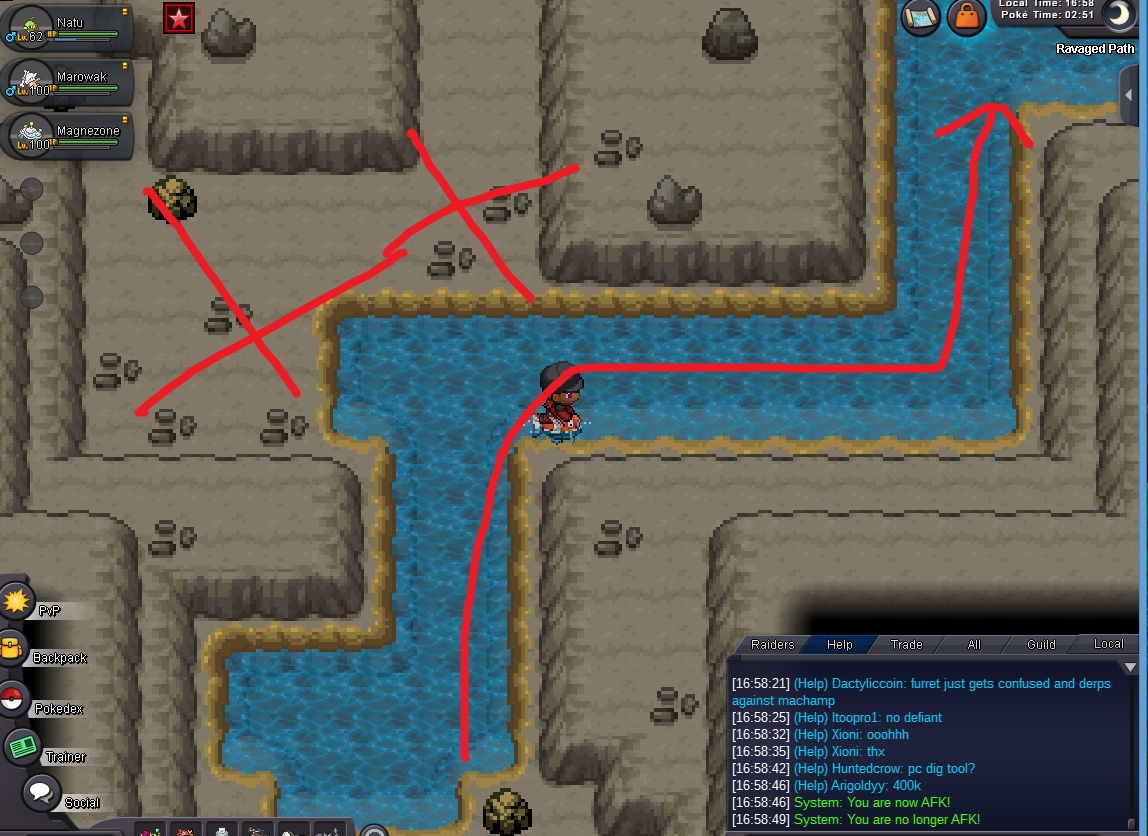
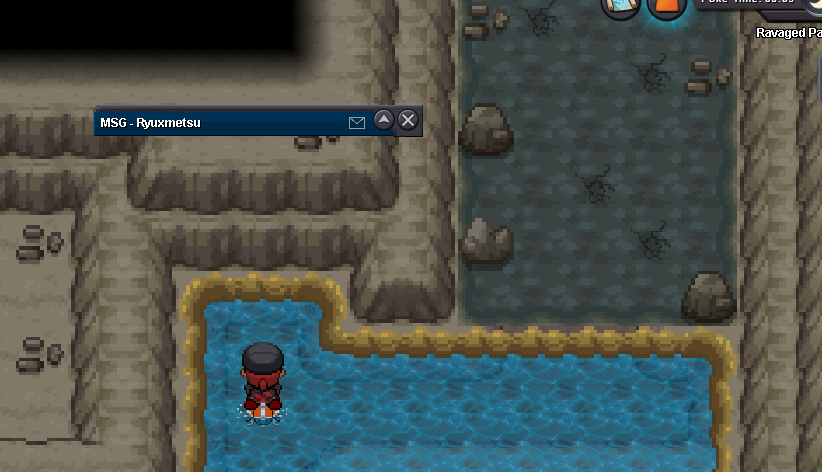
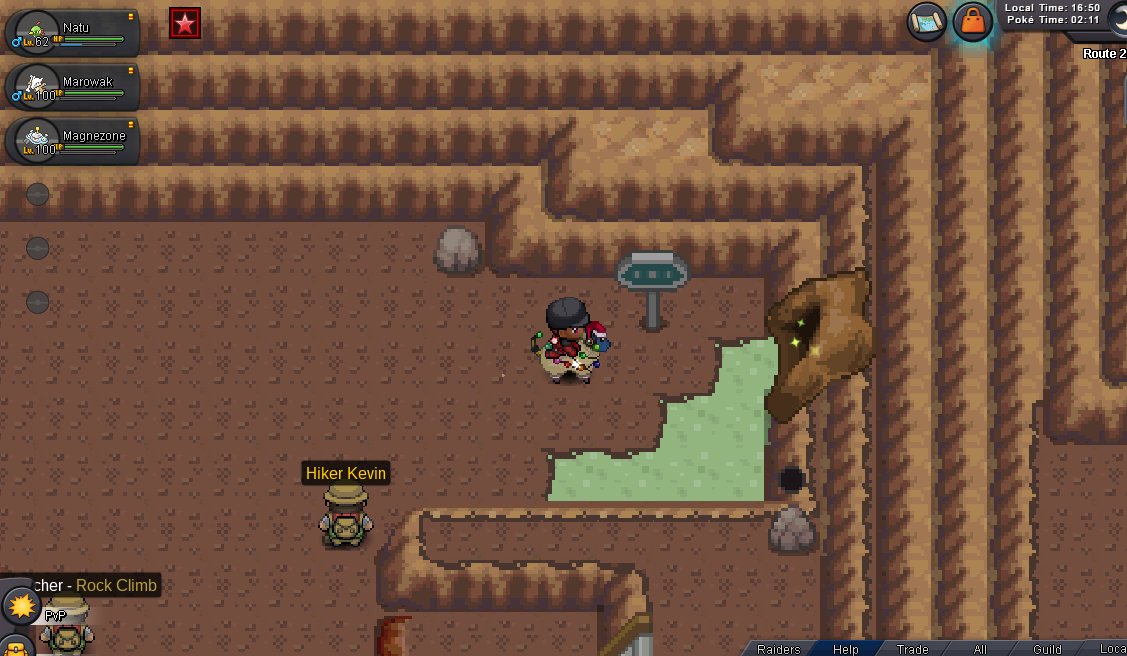
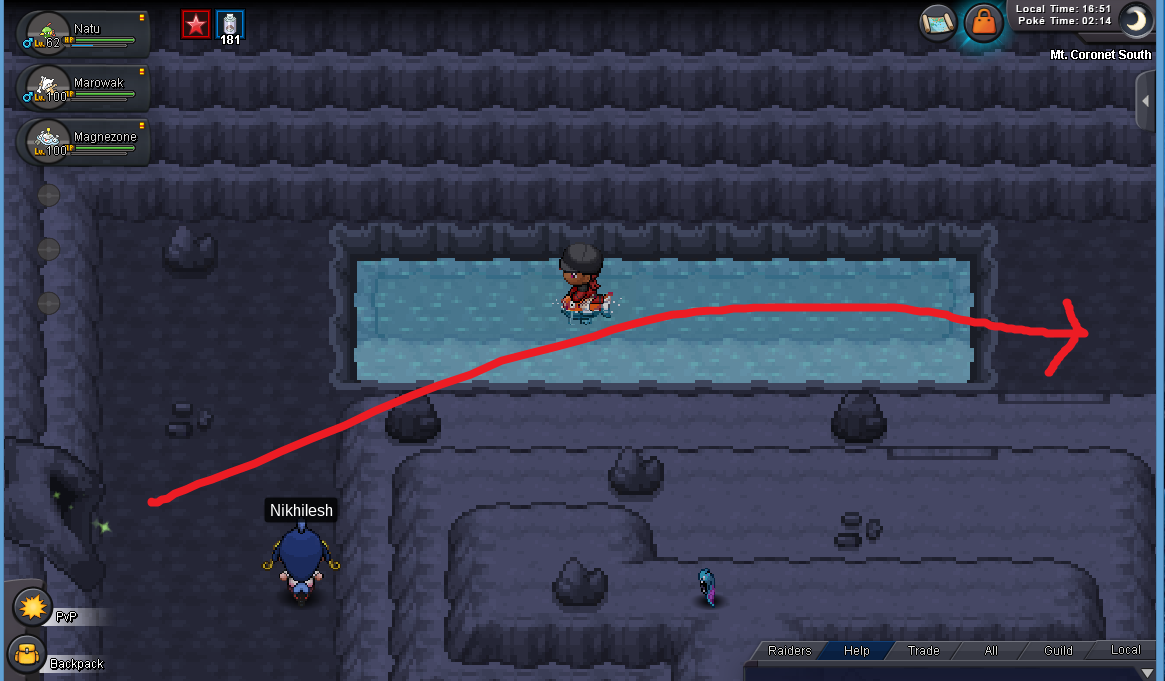
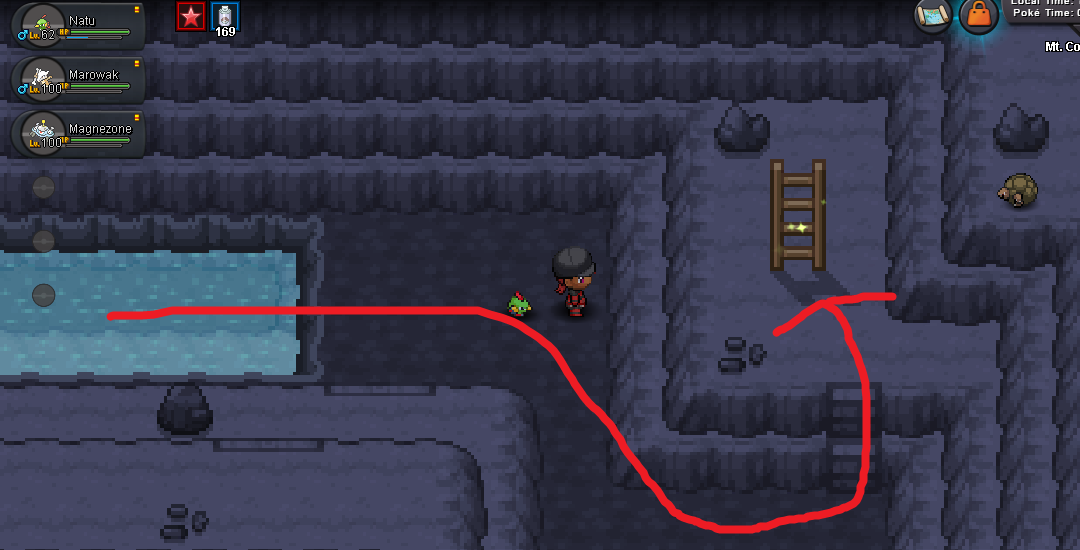
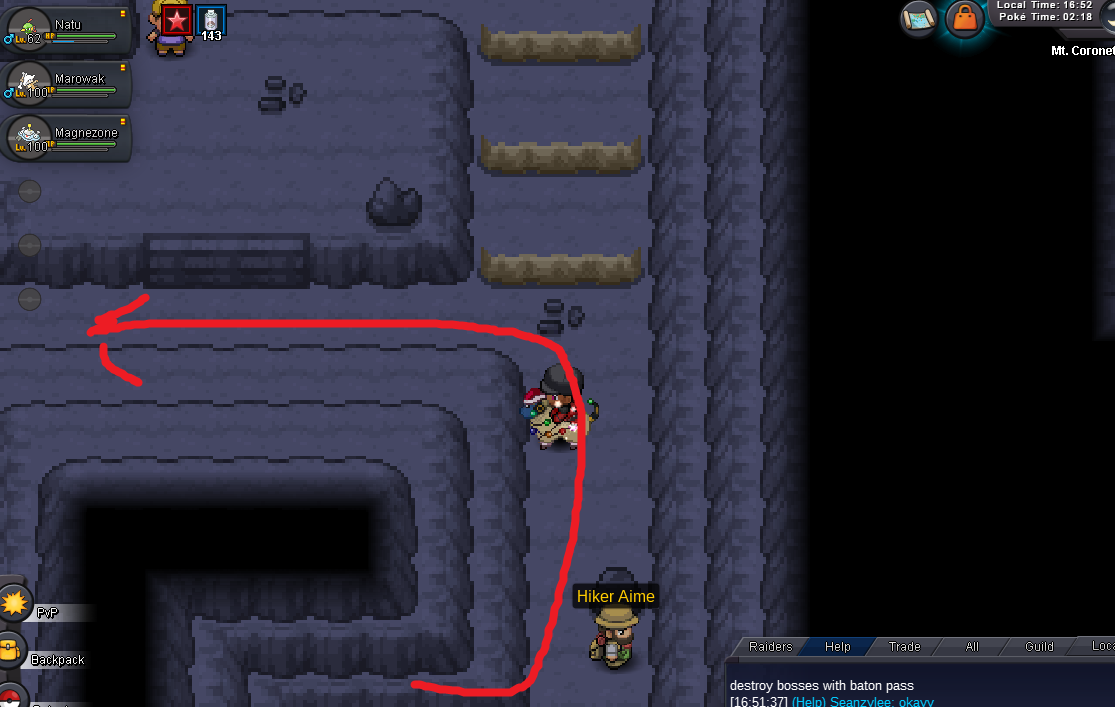
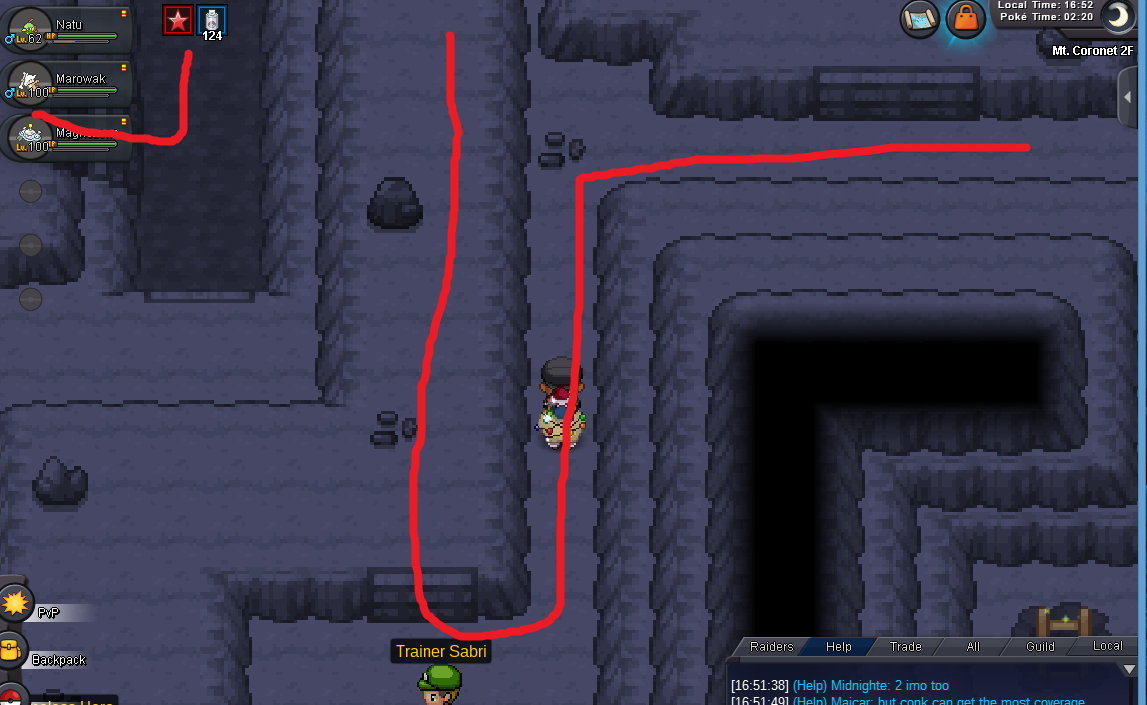
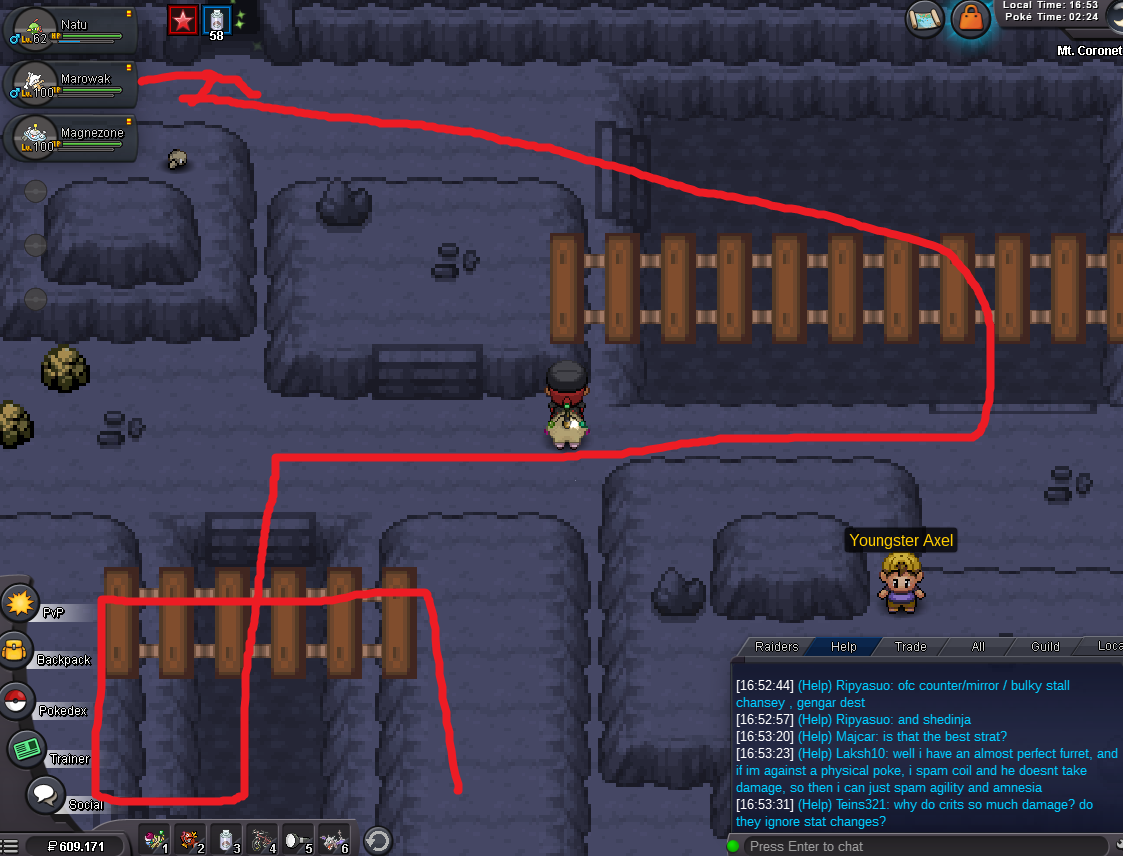
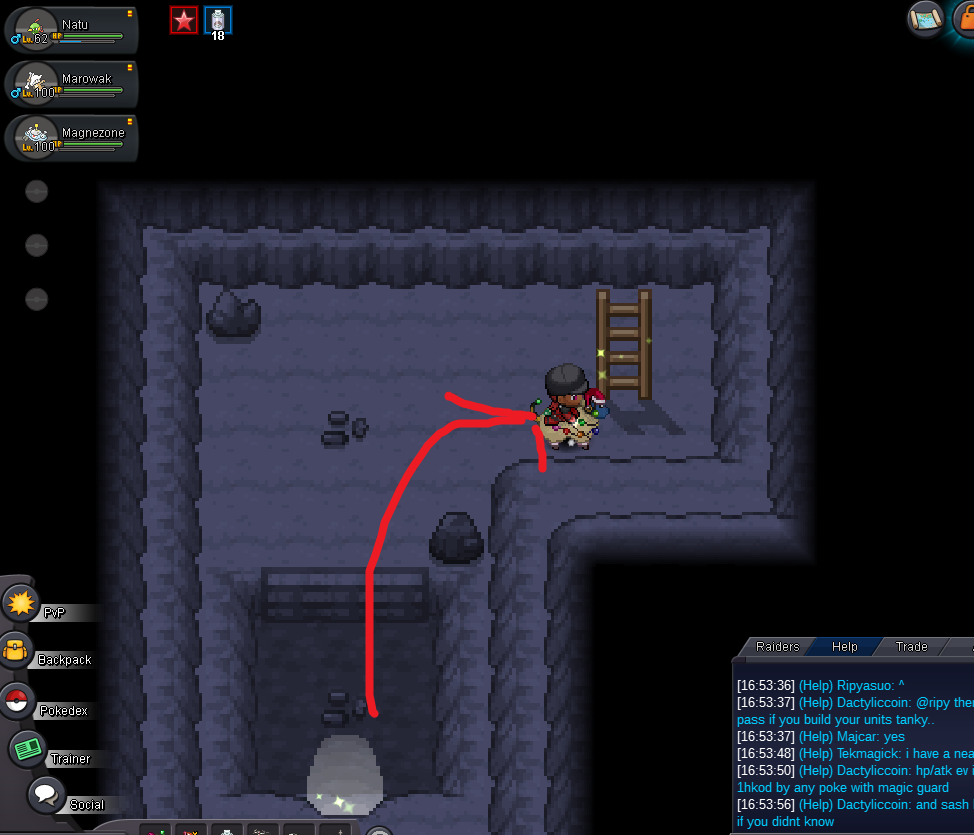
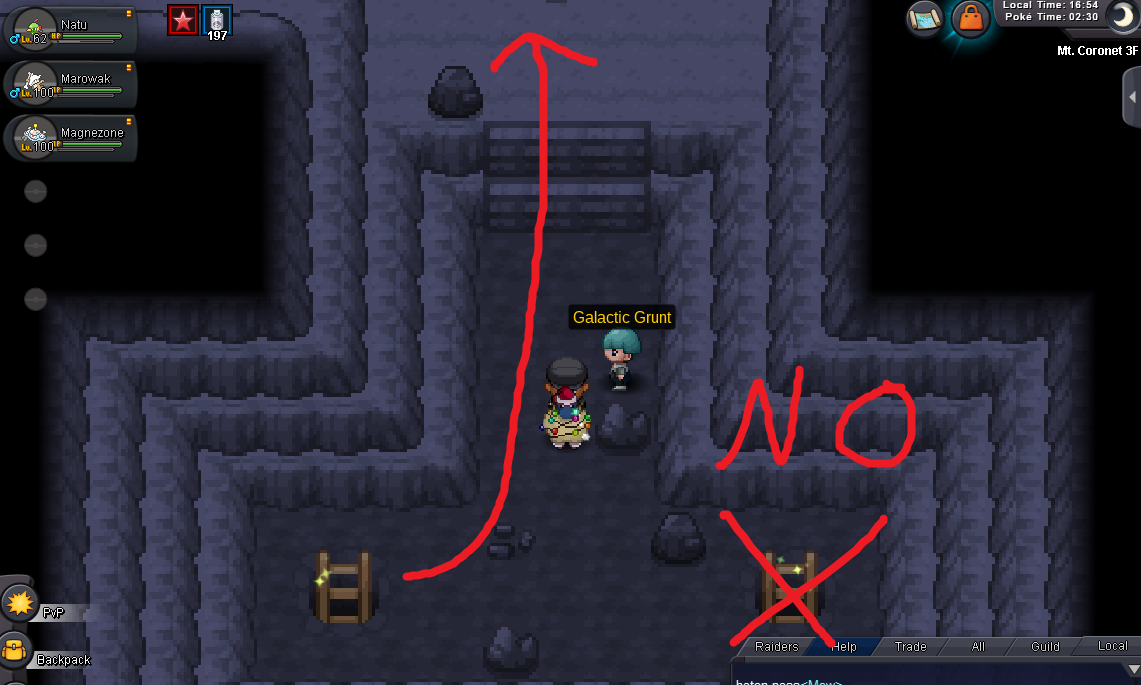
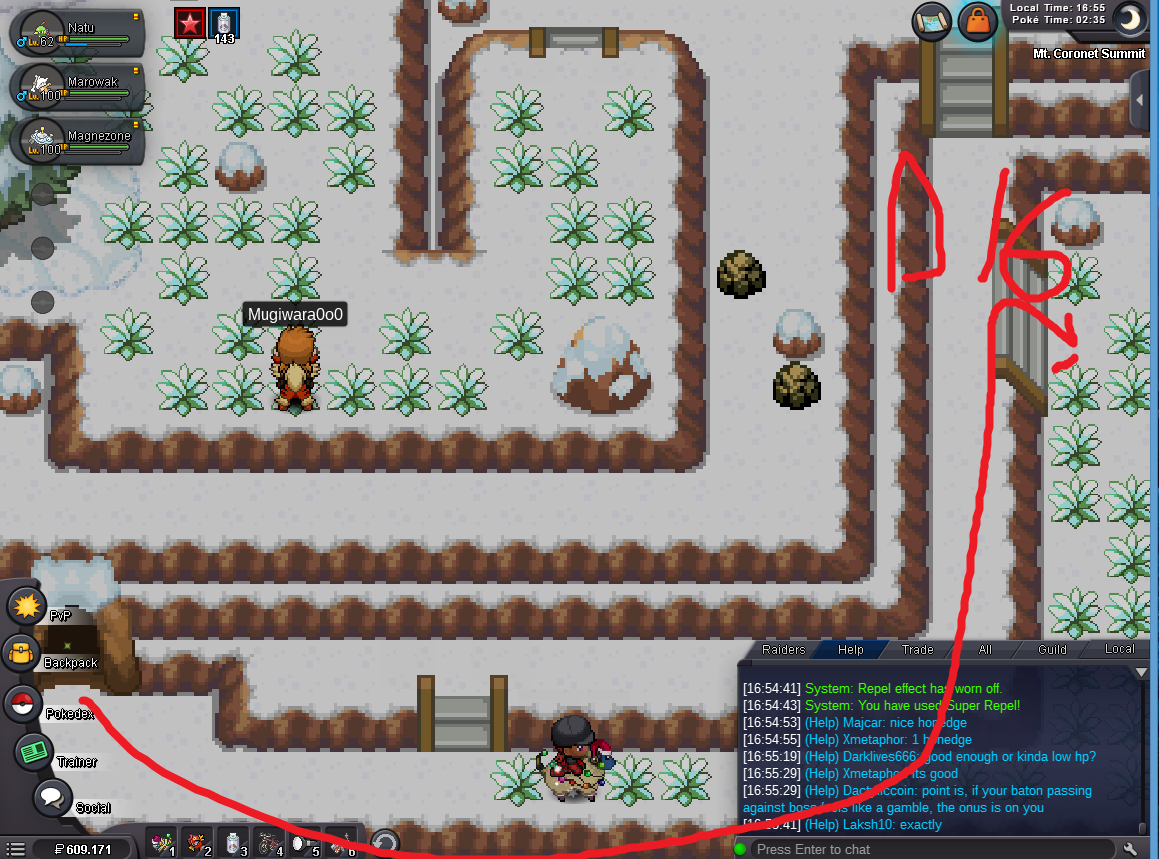
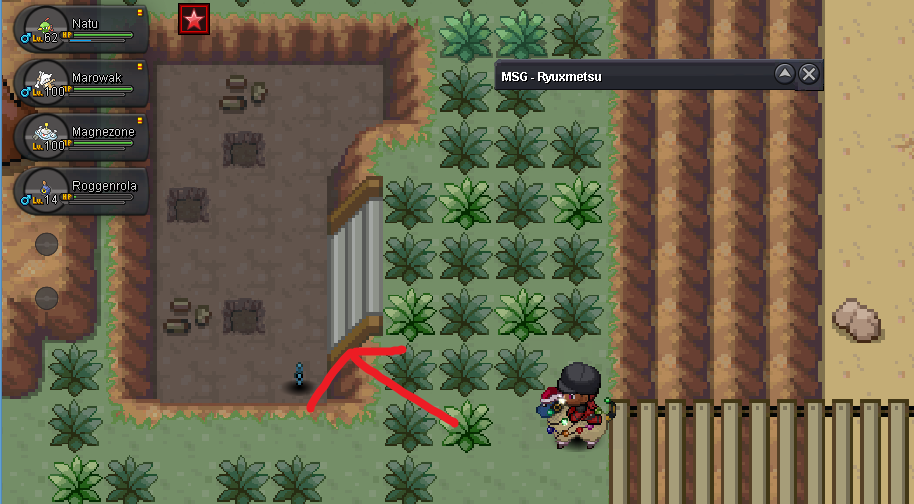
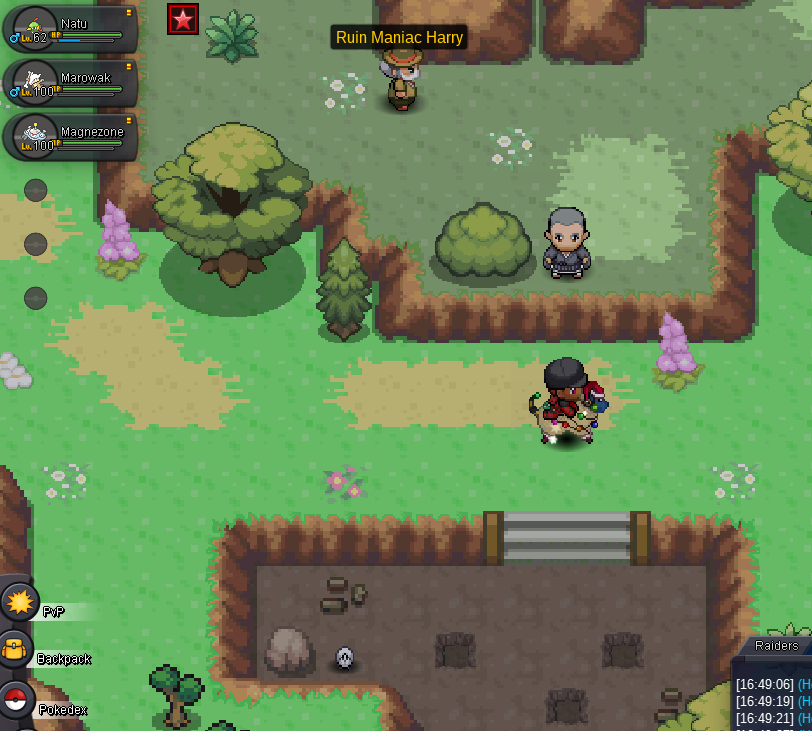
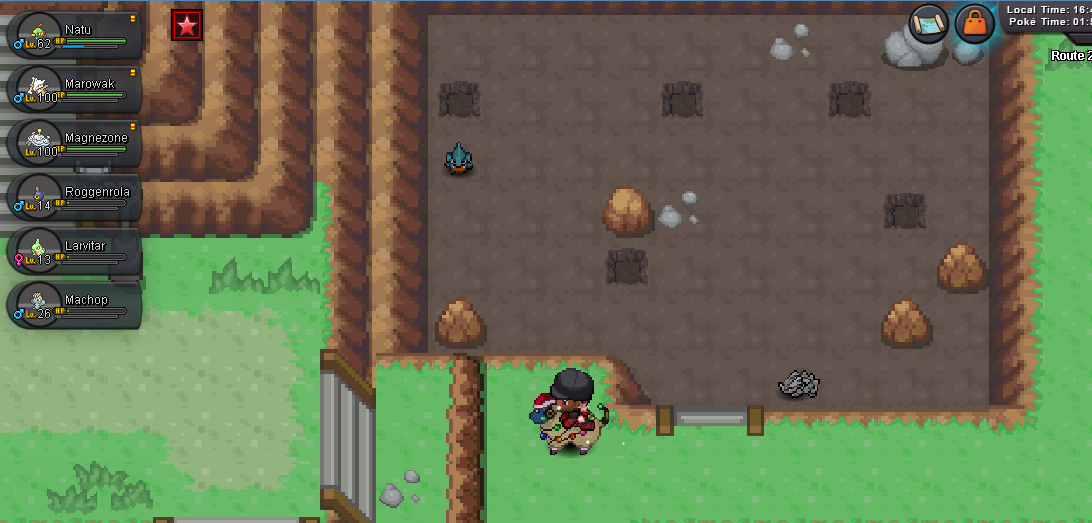
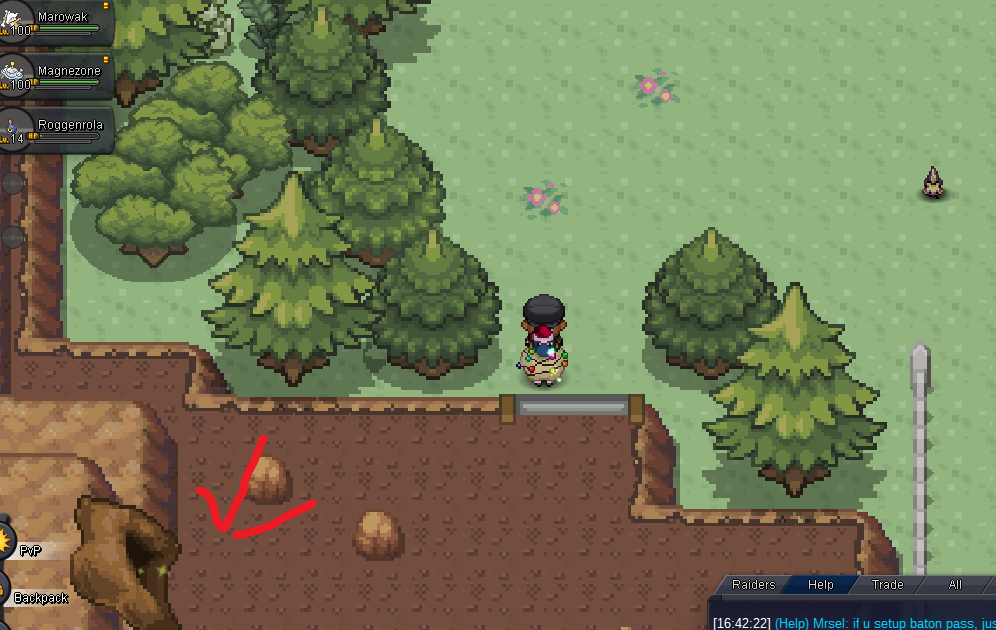
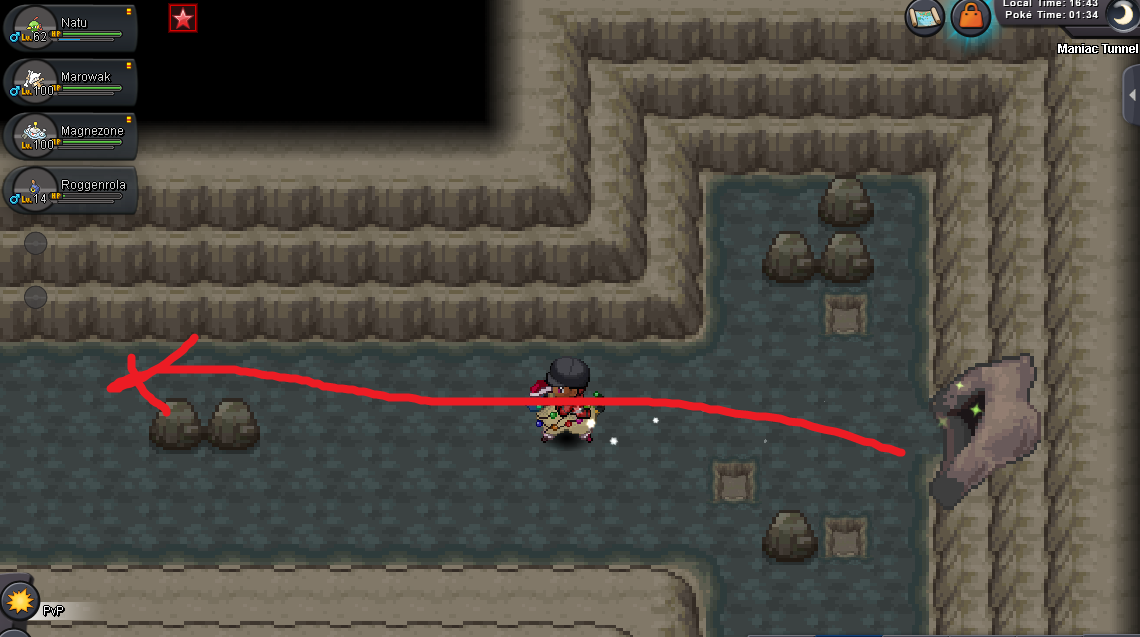
Welcome to the Mini-Guide on optimising your Dig Spots, Pokestops and Monetary Items route! This guide will aim to provide newbies, advanced and expert players a way to route their Dig Spots, Pokestops and some of the respawnable monetary items that you can pick up each week or every two weeks. This guide will also showcase the fastest (in theory) route to do this. I have done dig spots hundreds of times over the last years (four accounts, two times a week, you can start doing the maths) and while I believe starting from Viridian instead of Cerulean feels awkward, it’s still the best place to do so. The topic was covered in my money guide, but I guess it’s better to make a separate guide about it. This guide was requested due to popular request (not really, just Gore asked me to do it because he was too lazy to find it out himself and I could just pump this quick and add it to my Guide list, basically) as newbies throughout Kanto can use this to quickly do their dig spots and pokestops round, grab their hidden items and get their bike, old rod, thief tm to get smoke ball, etc etc. You get the point. This guide is just aimed to help you out and do these tasks twice a week while not taking too long and just doing it as fast as possible. It should only take you from 30 minutes to 1 hour to do all of them, once every 3 days per account. It takes me up to 4 hours as I do it in four accounts while I answer questions in Help Chat. It should take you just an hour as a max. I will try to also provide calculations at the end of how much money can you theoretically make at a minimum from these dig spots. However, I’ve estimated that the minimum amount of money you can get can be as little as 10k, but have a LOT of value in recyclable items or sellable items in help chat, or you get something as absurd as 200k but no recyclable items at all. Thus, the money gain from dig spots is very unstable and RNG base. However, as long as you know how to economise (haha rare candy selling go brrrr), you’ll be fine. Stock up on recyclable items, sell monetary items and then sell everything you got from it to get a few hundred thousand pokedollars a week if done properly. Only keep what is really needed! This guide will NOT cover all monetary items, just a few we can pick up (such as the Nugget in route 210, for which we have to detour). These items are already covered in two other forum guides (which, coincidentally, I made too). I’ll link them below. This guide also does not cover Tanoby Key and Water Path because you are forced to use a Membership and an entire Quest to get there, They’re not worth it at all. Shall we now begin? Let’s go! Minimum requirements for Kanto: Move Dig on a Pokemon with 150+ Happiness or a Shovel. Cut on any Pokemon or the tool to Cut trees. Flash or a Flashlight. Surf or a Surf mount. Remember that you also require the minimum badges for each HM. Also, you should have a HM Slave that can do most of these (Nidoking can Surf, Dig, Cut and Rock Smash for later regions, if needed, Parasect can use Cut, Flash, Dig, False Swipe, Spore, etc. He can be used if you go to Hoenn’s Petalburg Forest and grab the Shrooms there.) Minimum badge to do all of Kanto things: 5th badge (As you need Surf to access one Pokestop and the Hidden Items in Seafoam). 8th (to access Sevii Islands dig spots if you have a membership active for Tanoby Key and Water Path) or Cerulean Cave unlocked (there’s a weekly rare candy there and a biweekly nugget). Minimum requirements for Johto: Apply the same HM usages as before. However, we have to add in Rock Smash, as if we don’t have a Rock Smash pokemon we would have to travel around Blackthorn three times (Which is just beyond stupid). Dark Cave is REALLY annoying to go through. Minimum badge: We need the 8th badge as we cannot talk to Pokestops for items until the 8th badge. Minimum requirements for Sinnoh: Same HM usages as before. ROCK SMASH IS OBLIGATORY. We can’t access Oreburgh Gate dig spots without it. We DO NOT NEED ROCK CLIMB, we will use a route to totally avoid it. It’s boring, long and unnecessary. Minimum badge: We need the 7th badge to access the top of Mt Coronet. Optional tools we can use for our Dig Spots, Pokestops and Items: Smoke Ball (please, PLEASE bring one, because if you find a Diglett in a dig spot and it has Arena Trap and you have no moves to damage it, you’ll be stuck and forced to relog and will lose a LOT of time). Synch (equip Smoke Ball to it). I heavily suggest you change the synch sometimes from region to region, that you use the discord bot to check what synch can help with each individual dig spots section, as there are really, REALLY rare pokemon in some of them. With your Membership active, you can find Aegislash’s preevo and Larvitar in Mt Moon, and more rare pokemon elsewhere. I heavily recommend Adamant, Jolly, Brave, Careful, Impish, Relaxed and Sassy synchs. Bring them whenever you do dig spots. Always check spawns before you begin! Super Repels and Repels: Buy 100 Super Repels (in every account you will do dig spots) and 50 Repels. They will last for atleast 10 dig runs. 100 super repels = 50k. In 1 dig round you’ve already made up that cost easily, so do not worry. We will use them properly timed to avoid having to fight battles continuously. For example, we need two for Mt Moon, one for Rock Tunnel, one for Diglett Cave (this can be a normal repel), one for Dark Cave, one for Slowpoke Well, one for Mt Mortar (this can be a normal repel), one for Oreburgh Gate (normal repel if we relog to Jubilife, or super repel if you want to walk back), one for Ravaged Path (we can normal repel but going back to the exit might be annoying), and one for Mt Coronet (if you don’t have the dig spot unlocked in the top of the mountain, you’ll need 1 super repel to enter from below and get to the top to unlock it for future usage, or 1 normal repel that will barely let you go through the 4th floor, and another normal repel to go back from it). Thus, 10 super repels (or 8 supers and 2-3 normals). As mentioned above, you can bring any extra tools to avoid carrying too many HM slaves. I will link below the location of all hidden items and their respawn time in all regions in case you want to visit Hoenn to get shrooms and do excavations (don’t really recommend this personally, takes up daily time and it doesn’t always provide good rewards, it’s also a high investment if you don’t earn good stuff). I made a guide that you can use with pictures to check any of the places mentioned. Bring a Bike for Rare Candy in Route 16, or a mount to go fast, and a surf mount to avoid surfing slowly. https://pokemonrevolution.net/forum/topic/132722-url Let’s begin! From Viridian City, we want to pick up the Rare Candy at the southern bridge. This respawns every 7 days. We will also talk to the pokestop. Now, we will head to Viridian Forest, there’s a hidden Rare Candy next to the big tree to Viridian Maze (for some reason, this might respawn every 14 days and not 7, but I personally don’t know why). We will also talk to the Pokestop right to the east. We will leave from the south and use cut to skip the Forest through the Route 2 quick way. We will enter Pewter City’s pokecenter and we will go and talk to the pokestop in the Museum. Then, we’ll head back to Route 2, talk to the hole outside, enter Diglett Cave and use a Super/Normal Repel. We’ll get the 8 dig spots and talk to the Pokestop on the other side. When we leave, we’ll talk to the hole to leave it unlocked for future uses, and we’ll head east to Route 11 and south through Route 12. We’ll grab the Rare Candy here, which respawns every 7 days. We will continue south until Route 14, where we’ll dig the four spots, and we’ll then head west to dig a few more Route 15 spots. We’ll talk to any NPC to enter a fight, log out and be teleported back. Optionally here, you can travel and grab the Rare Candy in Route 16 (every week, requires a Bike), and the one time monetary items in Seafoam Island (make sure you find a map before you travel there!). We will now head to Route 3 and pick up the Stardust in one of the rocks and the dig spots just below the entrance. Then, we will reach the pokecenter and excavate the dig spots just below it. We will enter the pokecenter, and enter Mt Moon. Use your first super repel here. To the bottom left there’s 4 dig spots. We’ll then get the ones in the ladder in the middle (they’re at the end). If you see any pokeballs pick them up, the first one is a Star Piece (the second is just TM Water Gun). Go until the end down the ladder, pick up the dig spots, use your second super repel and go back to the main floor. Then, head northeast to the old man, excavate the dig spots, then go to the west until you see the next ladder. Go down, take all the dig spots, find an encounter and relog. We will now use the dig spot outside to teleport to the other side of Mt Moon (just talk to it from both sides to unlock it). We will surf northeast from Route 4, talk to the Pokestop in front of Cerulean Cave, go back, go to Route 5 below Cerulean to talk to the pokestop. Now, we’ll go east to Route 9 and then surf so we can quickly reach the Power Plant pokestop. There’s no need to repel here because until we enter Route 10, there are no water spawns. (No idea why this is like this). Surf back to Route 9, and go down to the pokecenter to heal up. Talk to the Pokestop outside, enter the cave, use your super repel, use flash and dig the 6 dig spots you’ll immediately see. Instead of going down the ladder, exit the cave and use the dig spot to teleport to the other side. (Pokecenter side) Immediately enter, go to the leftmost ladder, then go and pick the dig spots there. Find an encounter when your repel ends, relog, and teleport again (this is faster than trying to leave from the same exit). We’ll now head to Vermillion harbor and talk to the last Kanto pokestop there (aside from the Route 25 one, which we pick up at the end of the route), and jump on the boat to Olivine City! Enter the pokecenter and heal up. We will pick up the Pearl and Rare Candy hidden in Olivine and the Pokestop next to the lighthouse. We’ll now travel to Ecruteak and talk to the Pokestop. We’ll head east and in Route 42 we’ll enter Mt Mortar and use a normal repel. We will grab the dig spots, enter the next hole, then leave through the next one (they’re adjacent, don’t go up any stairs) and get the dig spots next to the hiker. When we leave the cave, surf left, enter the next cave there, grab the 4 dig spots and if you want to, you can go deep inside to get two Rare Candies, one in a pokeball and one hidden in Forest Pit (after you beat the Johto Elite Four). Another choice is to just enter a hole, grab the dig spots, leave and surf to the next one. I'll show the three entrances below. We will now head to Lake of Fury, talk to the Pokestop there, and head back and east until we reach Blackthorn. Teleport through Ice Path, and talk to the Pokestop in Dark Cave. Teleport to the other side (route 31), use a super repel inside, and use Flash, break the rocks, and go counter clockwise (left, down, east, north, then left again) to pick up all dig spots and try to head back to the route 31 exit. DON’T EXIT THROUGH THE SOUTH EXIT OF THE SMASHABLE ROCKS. Head to Violet City. Talk to the Pokestop and grab the Rare Candy behind the Gym Sign (you need surf). Head west to Route 36, then west and up to National Park. Talk to the Pokestop and then head south to Route 35. Pick up the Nugget, then head south to Ilex Forest and use a repel (if you want, not worth it much though). Talk to the Pokestop, head east to Slowpoke Well through Azalea Town and talk to the Pokestop. Don’t enter it though. First, go east to Union Cave and teleport through the dig tunnel. Talk to the Pokestop and go back. Now you can enter Slowpoke well. Use a super repel when you’re next to the first dig spot. You’ll be able to go through the entire two floors with a single one of them. Grab the first three, then go north and west continuously digging everything up. Then, head southwest for the last three and surf east to go down the ladder. Pick the two that are next to the ladder and then finally surf once west for three digspots and east for four of them. Find an encounter and log out. We’ll be in Olivine City! We will now grab the boat to Canalave. Surf south and find the big tree at the end, talk to it to find a Big Pearl. Enter the pokecenter in Canalave and heal up. We’ll now head to Jubilife and enter the pokecenter. From here, we’ll go east to Oreburgh Gate, and we’ll be using a Repel (not a Super) and trying to get all the dig spots in the depths. We’ll talk to the old man for a fight or find a wild pokemon and relog to Jubilife. We’ll then head north to Ravaged Path, the way to Floaroma town. We’ll use a super repel (or repel if you want, but on the returning way you might eat some encounters) and exit it. We’ll head to Floaroma and then to Eterna. The path splits here: if you’ve previously unlocked Mt Coronet’s dig teleport hole, we will simply excavate the dig spots in Route 211 and use the teleport hole, one repel and get the holes in the summit and teleport back. If you’ve not, I recommend you head south through the bike tunnel, then go east and when you see Mt Coronet’s entrance (to the other side you would reach Hearthorne), enter, use a super repel, surf, go upstairs, go around the area until you reach the northwestern door, then climb up until you get to the summit. Then, you just need to talk to the dig hole to unlock it. After you do all of that, head east to Celestic town and to Route 210. There’s a hidden nugget in one of the rocks. Continue east to excavate the five dig spots. Head south to the restaurant and go east until you reach Veilstone. Go south and in the route below enter the tunnel to the left. Dig the few spots and continue going left digging everything you see. Exit in Solaceon, head to the southern route (208), check the last dig spots and congratulations! You just finished the money route! From this point onwards, once you’ve practised this a bit, you can repeat this nonstop. Every week, keep getting the Kanto items I’ve indicated as they’re weekly (including the Rare Candy in Cerulean Cave’s entrance). I also heavily suggest you take a trip every two weeks to get the shrooms in Petalburg Forest. However, that’s already covered in my previous guides. Focus solely on Dig Spots and Pokestops for now! I hope you have enjoyed this guide and found a good use to it! Please, use the Monetary and Money guides I made to check out on all possible optional money items you can check out on if you take optional paths while you follow this guide. Remember some respawn and some others don't! You can also check their locations there if you can't find them in this guide.
1 point
-
Welcome to the leveling guide made for newbies! Are you tired of reading forum guides that tell you "bro you only need a Toxic Orb Pokemon with a False Swiper" yet you can't obtain it because you're still stuck against Giovanni, Sabrina or still struggling to survive against the Elite Four? You can't afford buying one because you're poor and the Pokemon they ask you to use IS A HOENN POKEMON? Or they ask you to buy half a million Focus Sashes, get Cerulean Cave access or impossible requirements for you poor fella who is still stuck in Kanto? Pro Newbie having a rage attack after being oneshot by Giovanni's Mewtwo for the 20th consecutive time (circa 2018, colorised) Are you headbutting your head against the wall (without the happiness requirement) because you have no idea how to find a False Swipe pokemon, you just started playing the game two days ago because that buddy told you HEY DUDE PLAY THIS GAME IT'S SO BIG AND FUN AND IT'S HARD but you actually now hate your friend because Sabrina keeps oneshotting your pokemon with Alakazam? I'm going to try and put some humour into an ACTUALLY EASY AND RELIABLE AND UNDERSTANDABLE GUIDE that ACTUALLY gives you FACTUAL information and DETAIL on how to REALISTICALLY level up your pokemon if you're a newbie and you have LITERALLY NO RESOURCES to start with. It doesn't matter if you're poor or just began playing 4 hours ago. You can start this method as soon as HAVING BEATEN THE 2ND KANTO BADGE. Yes, you heard me right, you can start it JUST WITH TWO BADGES. But Bhimoso, why are you making this guide? Well, I'm making this guide because a lot of guides are either half made or incomplete and tell you methods of leveling up your pokemon, but they have absurdly hard requirements for a newbie or literally put NO effort into teaching you how to level up your pokemon. I am going to treat you like children in this guide, so you can follow this better. Introduction This guide will aim to teach you MANY, MANY methods of leveling up ANY pokemon (attackers, tanks, utility pokemon, pokemon that cannot fight by themselves (Metapod, Ditto, me after eating too many pizzas), and other nearly useless pokemon you struggle with leveling up. I will try to indicate which minimum requirements you need for each method to be performed and why and when should you do it. Generally, the idea is to level up your pokemon using ANY of these methods below until it can fight by itself in high level areas. The idea is to bring it to around level 60 to 70, then let it level by itself. This, however, is not always possible. Newbies might be unable to level up Fire Types until they unlock more regions because Kanto is VERY restrictive in regards to Fire Type leveling spots. The main idea is to NOT evolve your pokemon so as to level them up incredibly faster for anything you might want to use them. With the methods we will use, you shouldn't take even one hour to level up something from level 10 to level 80. If you evolved your pokemon because you wanted to have fun in PRO blasting everything with your Charizard, you will still be able to follow this guide and enjoy the game. DO NOT FEEL RESTRICTED JUST BECAUSE YOU EVOLVED YOUR POKEMON TOO EARLY. DO NOT FEEL BAD, USE YOUR FAVOURITES AND ENJOY IT. This is A GAME, after all. You're supposed to have fun. This guide will be updated constantly, because there are MANY methods we will use and more that we can add in. However, I will keep this Kanto obtainable pokemon only for now, because I want to help out newbies specifically. If I make an exception, I'll notify it. Recommended mechanics that will help you out! Guilds Guilds give you an inherent EXP bonus JUST FOR BEING IN THEM. Depending on the size of the guild, this bonus goes from 2.5% to 10%. While at first this bonus may seem minimal, keep in mind 10% means that, one every ten fights you will basically get an extra fight worth of experience. Every ten fights, you will basically have fought eleven instead. It QUICKLY adds up while you faint hundreds of pokemon. If you join a LADDER Guild (a Guild that in the last season ended in the Top 10 spots in the Guild Ranked Ladder), you will additionally gain a 25% bonus EXP. Thus, this bonus can reach a 35% EXP bonus. Now you realise that, once every three fights, you've gained enough EXP for a fourth fight. That's an amazing amount of experience. Thus, if you're a newbie, no matter if your Guild is filled with newbies, JOIN A GUILD! There are NO penalties for joining and leaving one. Membership and EXP Potions If you want to go the Premium way and support this amazing game, there's also another extra help you can take. You can always donate to purchase a Coin Capsule, and then you have two amazing options. You can purchase the Membership Medallion, there is the 15 day, 30 day and 60 day version. Having a Membership active gives you a 50% exp bonus, which is the one we're interested in. No matter the duration, the bonuses are the same, but it lasts longer the bigger the Medallion is. A 50% EXP boost is INSANE. Once every 2 fights you get an extra fight worth of EXP. Not only that, did you know that an entire MONTH (yes, MONTH) of Membership is only FIVE euros? It's so cheap it's not even a joke. Instead of getting a pizza one night, you just go and donate the five euros you would've spent. For the ENTIRE month, you get 50% extra EXP, 100% bonus money (this is the best part, do you know that money you get from fights? Well, NOW YOU GET DOUBLE THE MONEY), access to exclusive very rare pokemon, rare bosses AND rare Membership Only areas. Memberships are incredible and I ALWAYS recommend dumping FIVE dollars a month. If you are unable to donate, there's no issue! Coin Capsules and MS Medallions are tradable, so you can purchase them with Pokedollars from other players (or trade other in-game items for them). EXP Potions are also another option. If you are going to train many, MANY pokemon, you can purchase an EXP potion that gives you a 25% EXP bonus for 72 hours. This is a very good option if you are a Service Provider and train pokemon for Pokedollars. I only suggest purchasing these if you are stacking the Guild Boost, an Active Membership and you must train 10 or more pokemon for someone (or for yourself). Held Items and Consumables Held items are a very, VERY important of Pokemon. Held items range from Berries that activate under specific conditions (a move runs out of PP, your health goes below 50% HP, etc etc and so on), PvP items that boost a stat but enable a secondary condition (Assault Vest boosts your SPDEF by 50% but does not let you use status moves), PvP/PvE (in reality they are PVP, however, these are more suited for PvE too) items that do something similar (Choice Items), type enhancing items (Miracle Seed, Hard Stone and so on, the Type Tables), and other items. Some of these items are consumable and some are not! Some are very recommended while others are only recommended in specific circumstances. I will list the types of items that are normally used in EXP training that you should (OR SHOULDN'T) use while leveling up. They will be classified in different sections. Recommended: Berries Berries are so overlooked that I'm even surprised people don't use them. Berries are obtainable ANYWHERE. You can farm them up extremely quickly, pick them up and equip them onto your pokemon. What I often recommend with your berry usage is that you equip Leppa Berry onto your pokemon if your pokemon is strong enough to fight constantly without stopping so that, when one of its moves reaches 0 PP, Leppa Berry will automatically restore 10 PP. This makes menuing faster in long periods. Additionally, you can also equip berries such as Lum Berry or other status berries (Persim, for example) to heal up any status you may find. While these are situational, Lum and Cheri berries are nice to have in Cerulean Cave if you keep fighting Electrode and Raichu, for example. In Stark Mountain, you want anti-Burn berries and anti-Poison berries too. Sitrus berries can also be an okay option to heal up some of your pokemon's HP if it goes down slowly fight by fight. Do not be afraid to use berries since they respawn! Healing Items When you get further into the game you'll realise you'll be stocking up on hundreds of Potions, Leppa Berries, Super Potions and other healing items you'll barely use in the Endgame because you just travel to the Pokecenter every time you train pokemon. Don't be afraid to use these items if your healing point is far away from where you are leveling up your pokemon. Choice Items The Choice Items are often overlooked at how good they are at leveling up in PvP. These items, more often than not restricted to PvPing as they provide great bonuses but leave you locked into a single move, are amazing features in PvE. Are you at level 30 fighting a level 50 and you're a bit slower than them but if you hit them you would oneshot them? Equip a Choice Scarf, now you outspeed, oneshot and faint the wild pokemon! You're now able to level up in high level zones. Choice Band will help your ATK increase a LOT and Choice Specs will also power up your SPATK moves. These are great items you can have your pokemon hold while leveling up. The 50% boost is massive as you'll be able to faint way higher level pokemon you normally would be unable to. Keep in mind these items will lock you into a single move unable to switch until the fight is over or until you switch to another pokemon. These items are easily obtainable in the Item Recycler. Assault Vest and Rocky Helmet The Assault Vest is one of the best items to powerlevel slow but tanky pokemon such as Tangela. This will power up your SPDEF stat by 1.5 stages while as a restriction it will not allow you to use status moves. This item can easily be used by offensive slow tanks that can benefit from Drain Punch or Giga Drain or Leech Life or other life draining and recovering moves while they level up. While it's way more restrictive than Choice Items, they allow you to switch between moves! The Rocky Helmet will deal a 12.5% of the opponent's max HP on every physical hit you are hit by if it makes contact. Contact: Tackle Not contact: Earthquake. The move MUST HAVE PHYSICAL CONTACT for this item to work. This item is heavily recommended for tanks like Ferroseed who can combo Iron Barbs + Leech Seed + this item + Giga Drain to level up. Eviolite Possibly one of the most broken items introduced in Gen 5 (if not the most), this item multiplies your DEF and SPDEF by 50% if your pokemon is not fully evolved. Thus, any slow or tanky pokemon that has not fully evolved into its final stage can equip this item to be disgustingly powerful. The prime example is Chansey, who abuses this to reach absurd extents. However, ANY unevolved form can use this item, so you can stick into ANY pokemon! Leftovers/Black Sludge Leftovers is probably the best PvE item in the game. This item heals a bit every single turn (as long as you don't get fainted, of course) while you are in battle. It's very easy to find in Dig Spots, wild Munchlax and Snorlax and it's a stick-to-anything item. Healing nonstop without restrictions? Why wouldn't you want this? Stick this onto any pokemon! And yeah, Black Sludge does the same but damages non-Poison Types and only heals Poison Types. A bit restrictive but eh, you can also try it! Wise Glasses and Muscle Band Probably some of the worst, most memeable items ever, Wise Glasses and Muscle Band power up... a 10%. Yes, only a 10%. Wise Glasses powers up any SPATK move by 10%, Muscle Band any ATK move by 10%. There is quite literally no reason to use this over Choice Band and Specs massive 50%, even if they restrict you into a single move, because you will normally avoid fighting any wild pokemon you can't beat anyway. Type Enhancing Items + Expert Belt Type enhancing items are REALLY easy to find. These items are the Plates of each type + held items such as Sharp Beak, Hard Stone or Soft Sand. These are easily found in Dig Spots and held by wild pokemon. I REALLY recommend you use them as a newbie because they are an easy to obtain 20% boost to the specific type's attack. Expert Belt also powers up any move by 20%, but it's not restricted to a specific type, but it must be a supereffective attack (for example, Water against Rock). Brightpowder This item provides you an extra 10% evasion boost. You can use this item as a gimmick 10% chance to dodge a hit. Imagine your opponent is a level 60 Gyarados with 1 HP left and your Caterpie is at level 3 with Brightpowder equipped. If you get lucky you'll dodge the hit, Tackle it and level up over 30 levels in a single fight. This is a gimmick we will often combine with Hoppip! King's Rock/Razor Fang Mostly pure gimmick items, these give you a 10% chance to flinch on most attacking moves. This can be easily abused with Skill Link pokemon or pokemon that use multi-hit moves such as Bullet Seed, Arm Thrust, Pin Missile, Bone Rush and so on, as the chance to flinch applies to every single hit. There's more moves: Fury Attack, Double Slap, Tail Slap (?), Rock Blast and more. Razor Claw/Scope Lens Another gimmick item, these two items increase your chances to critically strike opponents. These are mostly combined with abilities such as Super Luck or Sniper + Focus Energy or high critical chance moves such as Karate Shop, Night Slash, Leaf Blade, Slash and more. Quick Claw A fun gimmick item, this can be your solution to level up pokemon at extremely low levels after you have false swiped an opponent to 1 HP. Equip it to your pokemon and pray that you get lucky and manage to attack. You will get many levels in a single fight. This can be done until you think the pokemon can level up by itself! Smoke Ball/Logging Out The Smoke Ball has no effect in battle. However, it allows you to escape any unwanted fights. You can equip this item to a pokemon if you want to avoid fighting specific pokemon. For example, a Dark Type in Cerulean Cave can fight any Slowpoke or Slowbro because they only know Psychic type moves. However, it will have to put a fight against Golduck and Psyduck, who know Hydro Pump. TMs and HMs Fun and not so known fact: if you replace a learned HM move with another one, your PP will automatically be restored. Very useful to level up Water types that can learn Surf, Dive and Waterfall. You can teach them substituting the HM previously known without having to go back to a pokecenter to heal! Teach your pokemon useful TMs they may use to cheese high level pokemon! Shell Bell (not coded currently) This item heals you for 1/4 of the HP damage dealt to your opponent. However, this item is currently not coded (it would be too easy to abuse in PvE against bosses). Not recommended: Focus Sashes Before you begin reading: LET ME PERSONALLY SHOUT THAT I'M EXTREMELY AGAINST WASTING FOCUS SASHES TO LEVEL UP YOUR POKEMON. There's MANY methods you can use that avoid wasting Focus Sashes when you could instead spend them in PvP or farming Bosses. However, it is true that Focus Sashes will always give you a 100% chance to live a hit (as long as you're at FULL HP AND you don't get hit by a multi-hit move). For newbies, it is an optional choice to spend PvE coins into leveling up a few of their best elite pokemon from level 10 to level 50-60. However, THIS IS AN EXTREME WASTE OF RESOURCES. PvE coins can be better spent buying other rare items (such as Rerolls) that can be sold in the market for way, WAY better profit. And if you're not looking at profit and just leveling up your pokemon, there's MANY ways to avoid using Focus Sashes. Please, DON'T waste PvE coins on Sashes as a newbie. Use Sashes for PvP or to cheese PvE bosses. They are expensive to find and purchase. Gems Gems are truly, truly, truly outrageous. But you know what else they are? Expensive and rare. These can only be obtained from Excavation Artifact Pieces and from Dig Spots, which all run on temporary cooldowns. You know what this means? You're wasting consumable items that can be rather used in PvP instead. Don't waste them to level up your pokemon, there's way better methods. Abuse the Type Chart Immunities! While it may look basic as hell and you only think about the type chart as "haha Geodude get surfed go brrrrrrr", the type chart has a lot of in-depth potential. What's the basic concept of abusing the Type Chart? Well, we will always try to focus on leveling our pokemon in specific areas where it may be a good idea to level up our pokemon. For example, Flying and Fire types are more often than not leveled up in Pinkan Island because it's infested by Bug and Grass types. Grass and Water types are often leveled up in caves as they are infested by Ground and Rock type pokemon. We will always abuse the type weaknesses of our opponents. However, there's more to this. Do you also realise there's a few types that are immune to each other? This mechanic is borderline broken and can be exploited to very absurd levels. Let me explain. When you find a wild pokemon in the wild, check its Pokedex data. If it is a Quagsire at level 50, check the 4 moves it would learn before that level. At level 48 it learns Haze and Mist. At level 41 it learns Rain Dance. At level 36 it learns Earthquake. Thus, it will be its moveset, ALWAYS. So, how can we exploit this? Well, the consumable item Air Balloon gives us an immunity to Ground Type attacks. Now, let's pair this with any pokemon. Congratulations, you're now immune to everything 99% of Quagsire in the wild can attack you with. How do we make this better? Well, when you realise that the TM for Toxic is cheap, accessible in Fuchsia Gym for a low price, and can be learned by 95%+ of all pokemon in existence, which allows level 3 Rattatas and basically ANY low level pokemon to faint level 50 pokemon while being invincible... You get the point. We can exploit this by training 95% of all pokemon in PRO against specific pokemon in the wild, until they are at a high enough level to fight by themselves. And this is not the only trick there exists! For example, Golett and its evo, Sandyghast and its evo are immune to all attacks Raichu has in Cerulean Cave (it only has Quick Attack, Thunderbolt and Thundershock). Even Ground types (while not immune to Quick Attack) can level up against Raichu there. Slowbro and Slowpoke in Cerulean Cave only have Psychic type attacks, so you can Toxic them with a low level Dark Type pokemon and win 1 v 1s against them, even at level 5. Golduck and Psyduck there only have Water Type attacks, so you can use a Storm Drain, Water Absorb or Dry Skin pokemon at level 5 and still win against them. Need to train a Ghost Type? Fight level 57 or above Weezing in Stark Mountain! Want to level up a Flying Type or Levitate pokemon? Fight level 52 or below Quagsire in Mt Silver! And any pokemon holding Air Balloon too. There's also abilities that will grant you extra immunities. For example, you can level up Fire Type immune pokemon with Flash Fire if you also equip them with an Air Balloon by fighting high level Magcargo in Stark Mountain! Specific NPCs you should target, Copycat Lamsie, Trainer Refights, Elite Four, Gym Leaders If you have paid attention, check near each Gym in each city where you can find one. You will find an NPC named Copycat Lamsie. This NPC copies the last team a player used to beat that gym. Thus, they are an amazing source of experience: most players will beat the gyms with very high leveled pokemon. This is a small fun challenge, you'll be fighting real player's teams! You might find a level 90 unevolved starter and then 5 low level pokemon, a full high level evolved team... you can find anything. The important fact is that all of these teams will bring you a lot of experience and you'll be able to beat this NPC every time someone beats the gym. Thus, fight them whenever you can! They're an amazing EXP source. Aside from that, normal trainer NPCs allow you to refight them every 7 days. You should always refight NPC Trainers for two main reasons: they give you pokedollars AND each time you refight them, they will be a bit stronger than before and give you a lot of EXP. I recommend you fight all NPC trainers from the 4th to the 8th badge whenever you need to level up some low level pokemon. Carry your False Swipers with you! Gym Leaders can be refought once every week and they have very high level pokemon you can easily use to level up your pokemon against them. They also reward you with Gems! (wow, such amazing reward, note the sarcasm). Go around each region and refight high level trainers whenever you want to level up something in your team! As a small extra, remember that you can refight the Elite Four infinitely as long as you don't beat it. Thus, if you're stuck there, you might as well repeat the fights nonstop and slowly level up until you're able to beat them! Using Synchs to our advantage! You're now going to be like "Bhim wtf are you saying, THIS IS A LEVELING GUIDE, NOT A HUNTING ONE". Credits to DERWINS for this idea. Remember your Synch collection you use to hunt wild pokemon? Good. What does Synchronise do? It will make 50% of all wild pokemon have the same nature as your synch. Now, what happens if we use specific Synchs on purpose to make leveling easier? Let's observe some examples. I have a Gastly at level 50. I am fighting a Slowpoke at level 65. My Gastly with Shadow Ball deals around 90-95% of the Slowpoke's max HP. Now, the Slowpoke uses Psychic and my Gastly faints. How could we have prevented this? Well, let's remember the natures in the game. Adamant Brave Lonely Naughty Modest Quiet Mild Rash Jolly Timid Naive Hasty Relaxed Impish Bold Careful Calm Sassy. Lax, Gentle, Hardy, Quirky, Bashful, Serious, Docile (ignore these 7). Now, think a bit. What do these highlighted natures do? They reduce a defensive stat and increase an offensive stat. If the Slowpoke had a Naughty, Rash or Naive nature, it would've had less SPDEF. That 10% less SPDEF would've let my Gastly faint the Slowpoke in one hit. Do you understand now? If we strategically put a FAINTED Synchronise pokemon in the first slot of the party with the appropriate nature we want the wild pokemon to have, we will have an easier time when leveling up. If I want to level up a Magnemite in Cerulean Cave, I will surf there. When I surf there, only Psyduck, Golduck, Slowpoke and Slowbro spawn. These only use SPATK moves. Here I have a few options: -Carry an Impish Synch (reduces their SPATK, which makes them less dangerous, and gives them more DEF, which is irrelevant because Magnemite attacks with SPATK moves) -Carry a Relaxed Sync (reduces SPEED, if we want to outspeed Psyduck and Golduck, and gives them DEF, which is irrelevant). -Carry a Naughty Sync (reduces SPDEF, makes them more vulnerable to attacks, and increases their ATK, which is irrelevant). Now you understand how to exploit the Synchronise mechanic! Do you want to exploit it to the fullest? Do something like this: The first slot of your party is now a Naughty Sync. The slots two to six are all SPATK users. You'll now have an easier time! DO NOT SWITCH TRAIN YOUR POKEMON! I will not get tired of saying this: DO NOT SWITCH YOUR POKEMON MID BATTLE SO THAT THEY SHARE EXPERIENCE. Due to PRO's stupid formula, instead of each pokemon getting 50% of the total experience, most of the time you won't even get 10% per pokemon. Let me explain. Imagine a level 5 hoothoot and a level 5 pidgey share the experience of fainting a wild level 50 Quagsire. Individually you would gain 150000 experience. However, sharing experience would result in each pokemon only gaining 10k each. Not even a 15th of the total experience. How the level difference affects the experience you get. You earn more experience the less levels you have compared to your opponent. For example, a level 5 will gain an absurd amount of experience if you fight a level 60 pokemon compared to a level 50 pokemon fighting a level 60 pokemon. The difference is so absurd that a level 5 pokemon can gain up to 50 levels if you fight a level 60 pokemon and win (the best example is Magikarp). Use this strategically and take calculated risks to level up way faster! List of methods I recommend to level up your pokemon + requirements Method 1: Sturdy + Revengekill (priority or not) For this method, we will find a wild pokemon that has the ability Sturdy. We will attack it with a strong attack so we leave it with 1 HP. Then, we will spam moves until it faints. Afterwards, we will use a priority move with a low level pokemon, any attack while equipping a Focus Sash, or equip a Quick Claw and pray we are lucky! The low level pokemon will get all the experience. Example on how this method works. This method is possible as early as after the 1st badge, when Geodude and Graveler and Onix Spawn in Mt Moon. Method 1b: Sturdy + Endeavor + Revengekill (priority or not) For this method, we will use a low level Donphan, Aron or any of its evolutions with the ability Sturdy and the move Endeavor. We will fight any very high level pokemon while we use a low level Donphan or Aron. It is preferable that you do this trick against Water Type pokemon (surfing in Mt Silver, Dragon's Den or Cerulean Cave is the best idea here) because they will activate your Sturdy ability immediately. When you use Endeavor, the opponent's HP will be reduced to the same HP number you have. Thus, you will leave the opponent at 1 HP, ready to be fainted anytime. Example on how this method works. This method is only accessible if you have unlocked the daycare or a friend teaches your Donphan and Aron or evolutions the move Endeavor. Method 2: False Swipe + Toxic Orb + Revengekill (priority or not) For this method, we will find any wild pokemon while we navigate through maps with our False Swiper. We will have a Toxic Orb equipped so that Toxic Poison faints us in around five to six turns. After we have fainted we will be able to revengekill and get all the experience! Example on how this method works. This method is only accessible if you obtain a Toxic Orb (from PvE, PvP coins or the Bug Catching Contest prizes, also in other quests). Note that you can actually do this method by fighting wild Weedle in Route 2, letting yourself be poisoned on purpose, then traveling to the specific place you want to pull this trick. Thus, it's available as early as after the third badge (when you can capture Cubone, who learns False Swipe at level 27, or after the fourth, with Farfetch'd at level 45). Method 2b: False Swipe + Memento + Revengekill (priority or not) For this method, we will False Swipe an opponent until 1 HP, then we will Memento and immediately attack with the next pokemon. We normally only do this if the pokemon has a priority move or Focus Sash, Brightpowder, Focus Band or Quick Claw. Example on how this method works. Method 2c: False Swipe + Trick Room + Memento + Revengekill (priority or not) For this method, we will False Swipe an enemy pokemon until they are at 1 HP. then, we will Trick Room so that the slowest pokemon will move faster for the next five turns. We will Memento. Now, with the low level pokemon we're free to attack first and get all the experience! Example on how this method works. This method is unfortunately only available to Gallade, who needs the Daycare for Memento + the TM Trick Room from Hoenn + the TM False Swipe from Johto. Method 2d: False Swipe + Future Sight + Memento For this method, we will False Swipe until the wild pokemon is at 1 HP. Then, we will Future Sight, immediately afterwards we Memento. The pokemon we switch into will obtain all the experience. The method requires exactly the same as the one mentioned just above unfortunately. Example on how this method works. Method 2e: False Swipe + Life Orb + Revengekill For this method, we will False Swipe with any pokemon until the wild pokemon is at 1 HP. Life Orb will recoil and slowly kill us. Then, we'll revengekill with a lower level pokemon. I normally do this method with Shedinja because it will faint in a single hit with Life Orb Recoil. Example on how this method works. You can use any false swiper. As a final note, keep in mind you can just do this method but letting your opponent slowly kill you anyway. Method 2f: False Swipe + Toxic Orb + Trick Room + Revengekill (priority or not) For this method, we will False Swipe the opponent until 1 HP. Then, we will wait a few turns and Trick Room when we are about to faint. We will revengekill with the slower pokemon and take all the EXP. Example on how this method works. Method 3: Toxic + Memento + Air Balloon (or Flying type pokemon / Ground immune) This method utilises a pokemon with the move Memento, the move Toxic and an Air Balloon. The best example is to use a Hoppip, as it's already immune to Ground Type moves + it learns Toxic via TM + Memento via level up. We will Toxic a Quagsire, then Memento, then wait a few turns for the pokemon to faint as it cannot hit us while we hold the Air Balloon. Example on how this method works. This method is as early available as after the 5th Kanto Badge. Method 3b: Toxic + Flash + Memento This method is a bit rng reliant. We will use Toxic on the first turn, Flash for a few more turns and then finally Memento. We will need to be lucky and dodge the last hit. For this, we can use the item Brightpowder. We can also use a priority or strong move if we believe we'll be faster than the opponent (or just waste a Focus Sash if we think we need it). Example on how this method works. Method 3d: Toxic + Memento + Protect Exactly the same as the method mentioned just above. However, this method uses Protect, so it's 100% failproof. Example on how this method works. Method 3e: Toxic + Leech Seed + Flash + Memento If we want to make the method 3b faster. Example on how this method works. Method 3f: Toxic + Leech Seed + Flash + Memento + Protect If we want to make the method 3e safer. Example on how this method works. Method 4: Perish Song + Yawn + Healing Wish This is the most used method currently. If you have access to the daycare you can teach Chingling and its evos Perish Song and Memento. You can combine both with Protect to level up ANY pokemon. VIDEO HAS TO BE RERECORDED FOR THIS METHOD. Method 4c: Perish Song + Memento + Air Balloon If method 4b does not work because your pokemon cannot learn Protect, we'll do this in Mt Silver against Quagsire. Example on how this method works. Note that I don't repeat Method 4 because Method 4 does not require your pokemon to learn any specific moves. It's just in case there's a bugfix for the method. Method 5: Flying Types/Levitate/Air Balloon (mentioned above already) This method works for ANY pokemon that is immune to Ground Type attacks. Simply go to Mt Silver 1F, 2F or 3F and fight ANY Quagsire at level 52 or below. It only has Ground Type damaging moves until level 53. Thus, if you have an Air Balloon or are immune to Ground Type attacks, they are free experience. Note that this trick also works in Diglett Cave against level 18 to 22 Diglett and level 25+ Dugtrio. It is less reliable there though and gives less experience. Example on how this method works. To access Mt Silver, you must have beaten the Johto Elite Four. Method 6: Dark Types Dark Types are completely immune to Slowpoke and Slowbro's attacks in Cerulean Cave. Teach your Dark Type the TM Toxic and take care of them! Method 7: Water Immune Abilities Pokemon with abilities that grant them an immunity to the Water Type are invincible against Golduck and Psyduck in Cerulean Cave. Teach them the TM Toxic and beat them! Note: Dry Skin, Water Absorb and Storm Drain are these abilities. Same as above but you do this against Quagsire if your pokemon cannot learn Protect. Example on how this method works. Method 8: Steel Types Steel Types are completely immune to all attacks Arbok has in Cerulean Cave. Fight them for free experience! You can combine the Curse methods by Cursing and fainting on purpose against Arbok and switching in your Steel Type to get all the EXP. This is done here because Arbok is immune to Toxic. Method 9: Gastly Curse spam for newbies! If you are stuck against any Elite 4 (Kanto or Johto), there is a method you can use to level up any pokemon. Capture five Gastly at any level whose HP ends in 0, 2, 4, 6 or 8. You can also EV train its HP stat until its HP ends in this number. Find a wild pokemon who only has Ground, Fighting or Normal attacks (or a combination of both). To do this, open the Pokedex and check the wild pokemon's level up moves. For example: Quagsire before level 53 and around 40+ only has Ground type attacks. Ursaring, Marowak and Donphan only have Normal and Ground type attacks at 50+. Against these pokemon, use Curse once to lower your HP to half. The enemy pokemon will lose 25% of its max HP per turn. Wait until the enemy's HP is 25%. Use Curse. Switch to a new pokemon after Gastly and use Protect. You get all the EXP! This can be easily performed in Victory Road Kanto B3F. REQUIRES VIDEO RECORDING.
1 point
-
⋯⋯⋯⋯⋯⋯⋯⋯⋯⋯⋯⋯⋯⋯⋯⋯⋯⋯⋯⋯⋯⋯⋯⋯⋯⋯⋯⋯⋯⋯⋯⋯⋯⋯⋯⋯⋯⋯⋯⋯⋯⋯⋯⋯⋯⋯⋯⋯⋯⋯⋯⋯⋯⋯⋯⋯⋯⋯⋯⋯⋯⋯⋯⋯⋯⋯⋯⋯ Hi guys, with the release of the new Christmas event I've decided to make a guide to make sure what you need to do to experience the full joy of this event. Major Credits to Alixx7, Piinetree, Norex and XanthinaRose who helped me with information to make this guide. Couldn't do it without them, thank you. Additionally I would like to give a big thank you to Joltyena for checking and helping me fix any errors. Credits on this section belong to Alixx7 and Norex1 point
-
I have decided to compile and share many teams using Megas from Waves 1 & 2. While I made some of them, I also found others. As such, let me preface this thread by acknowledging the work and dedication of the players who created many of these teams. None of this would be possible without you. Please feel free to use and/or adjust any of them at will. If I ever have enough time, I will attempt to add a brief, explanatory description below each team, but I make no promises! These teams have now been released into the public domain. If you also wish to share some teams, you may do so here. After all, the main goal of this thread is to archive teams that can help players and make PvP more accessible. Please keep in mind that some Megas are currently missing. I will do my best to continually update this list by adding and removing teams as the meta continues to develop or changes altogether. Sample Teams Mega Abomasnow Mega Aggron Mega Altaria Mega Blastoise Mega Charizard X Mega Charizard Y Mega Gallade Mega Garchomp Mega Gardevoir Mega Gyarados Mega Heracross Mega Latias Mega Latios Mega Lopunny Mega Scizor Mega Steelix Mega Swampert Mega Venusaur Special thanks to @Dakivid for the 3rd Mega Lopunny team and to @Black for putting up with me and taking the time to review this list. Enjoy! Sources: The Charlotte Family: Lopunny Sand Bulky Offense ft. Future Sight Slowbro Your Favorite Teams of the Generation Triple Z Manaphy Rain (Qualified for OLT 8 Times, Peaked #1, 2213 Elo) [Peaked #3 ☆ 2057] ♪ Was du Liebe nennst ♪ Team Archive by CTC (ORAS Update) Enjoy, the last hurrah Masterclass' Masterpiece Ash-Greninja Balance by TDK Team Archive - Ske (June, 23, 2019) Ruins of Alph Sample Teams Mistaken's Might (Balance) Peaked 48-7 Triple Weather Is Stronk [Peaked #1] OU Bazaar SM OU Sample Teams Mega Lopunny Sand Offense by ABR & High Impulse Mega Latias Balance by GOD MARTH ORAS OU Sample Team Thread OU Teambuilding Workshop v31 point
-
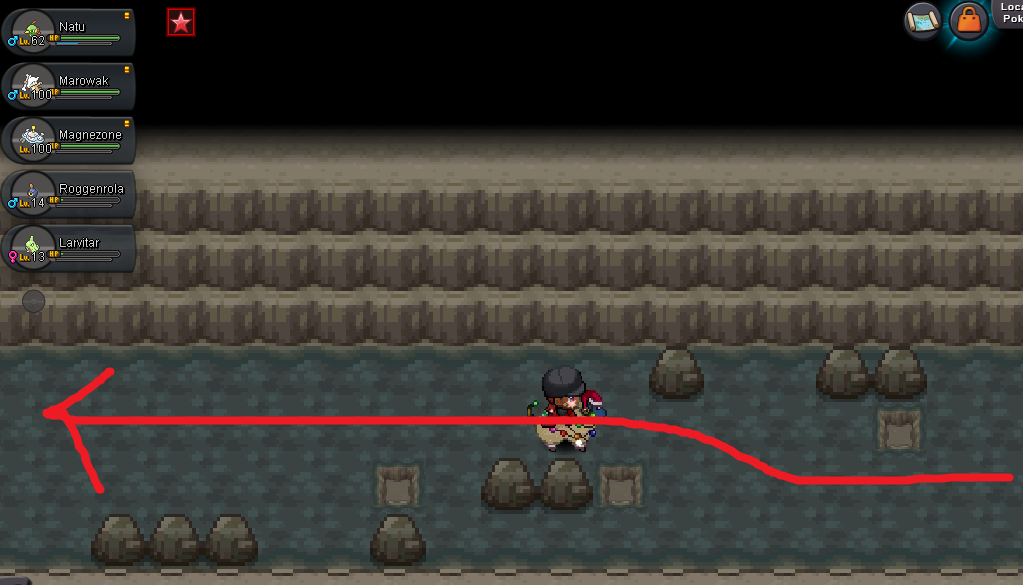
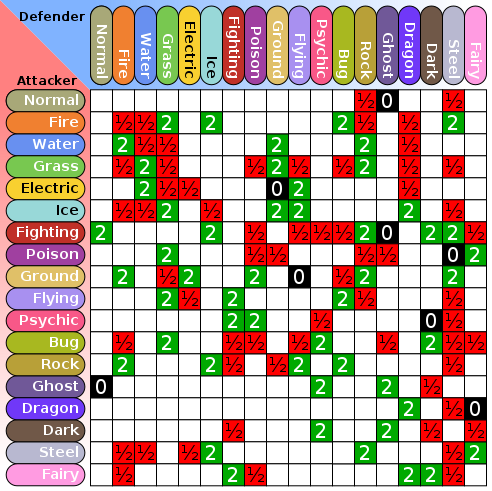
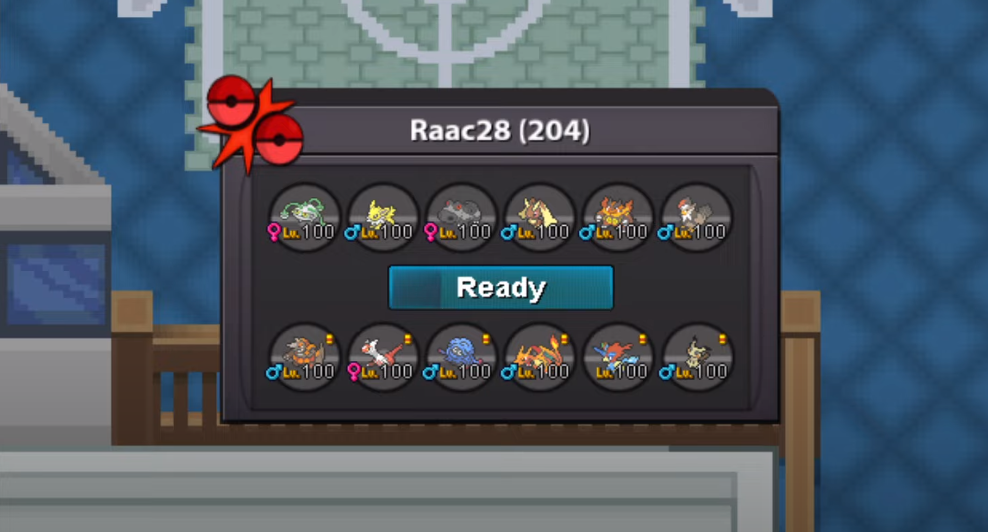
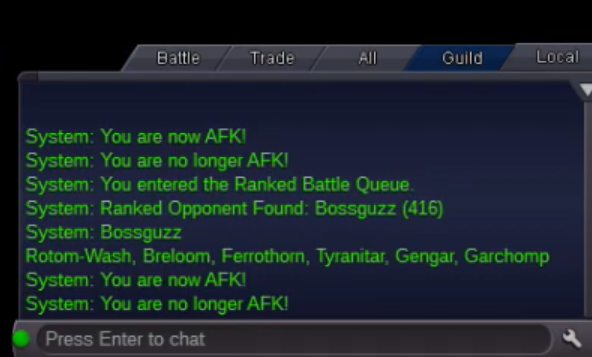
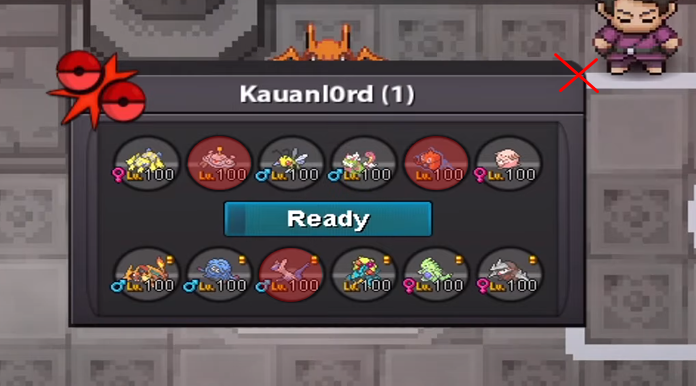
Let's start with the reason why the current team preview need a slightly rework; First, the current team preview was put in chat channel where a tons of random text, messages can show up anytime to wipe team preview away and you need yo scroll down to search for it which kinda annoying unless u dont give a fk about OP poke while pvp at all. Second, I showed in text message which 100% give you slower reaction time than in image. Third, It provide less info than it should. If u played Showdown, team preview should have ability to tell you which OP pokemon has been fainted, which one still alive, which move OP poke has been used and used for how many times. Thing like this is very useful or you can note all those info every turn and took x2 times longer to make a move. After all, I guess many ppl still disagree with that because they might think if someone have ability to remember all those things then it should be an advantage for them but this mindset was completely wrong for almost any competitive games. Ofc anyone can have ability to remember 6 pokemon by a quick looking but it will cause you to lose focus on the actual game plan, like which poke is useful in this matchup, which poke should I lead, etc... In fact there are so many things one person could focus on during a game plan and it shouldn't be team preview where it mainly focus on Memorizing and not Analyzing. Pokemon PvP is a strategy game and it's not designed to be memory contest. And when ppl can totally focus on the gameplay then the quality of the game can be improve, ppl play better, make a move faster... So how do we improve it: Step 1: less than 1 hour effort DONT CLOSE THIS WHEN BATTLE BEGIN, this is the real team preview everyone need during battle, instead give it a X button. If ppl dont like it then they can just close it. Step 2: Add ability to tell you which poke has been fainted during battle Last step: I think step 1 should be done instantly while the next 2 steps is just my suggestion.
1 point
-
Mine is to finally have enough time to finally start working on that living dex i wanted to do for so long. Whats yours?1 point
-
sammy910 top bidder (4.5m) (forgot to make a screenshot of shaoyuming 5m bid)
1 point
-
Want to buy this pokemon ^^
1 point
-
HI i would love to buy your Scyther Adamant for 115k with a Metal coat1 point
-
1 point
-
+1, one of the best suggestions related to pvp, i was about to include this in my own suggestion but you already did this, thanks again1 point
-
Welcome back Skilo!1 point
-
Good suggestion and well visualized. Definetly a +1.1 point
-
1 point
-
+1 I'm a big fan of blocked edges at least somewhere, and I know everyone's got their preferred hunting style, vertical or horizontal, I'm more horizontal, one of the areas that I hunted in was forest dungeon entrance, and boy is that ever a pain. Theres one long spawn on the whole map, and by long I mean it's 7, the next is like 4/5 and it's vertical, but has an edge missing1 point
-
I'm just waiting for all the pro alola spawns. It's my only wish1 point
-
i like this idea!1 point
-
Yes i try it @supertrainers Ok ty for answer, have a nice holiday! see in game @Midsommar1 point
-
Da will ich mal ein wenig Unterstützung liefern DarkFuture vom Silver Server wünscht euch viel Glück ^^1 point
-
1 point
-
1 point
-
1 point
-
Danke dir auch viel Spaß auf Silver ^^1 point
-
1 point
-
1 point