


New Trade Zone
Trade Zone is now live
Use the new Trade Zone for auctions and instant-price trades so Pokemon and item offers are easy to find.
Leaderboard
-

Akalaz
Registered User9Points21Posts -
Hanine
Registered User7Points192Posts -
Suncity
Suspended5Points5399Posts -

Moemoekyuuun
Suspended5Points2291Posts


Popular Content
Showing content with the highest reputation on 08/24/23 in all areas
-
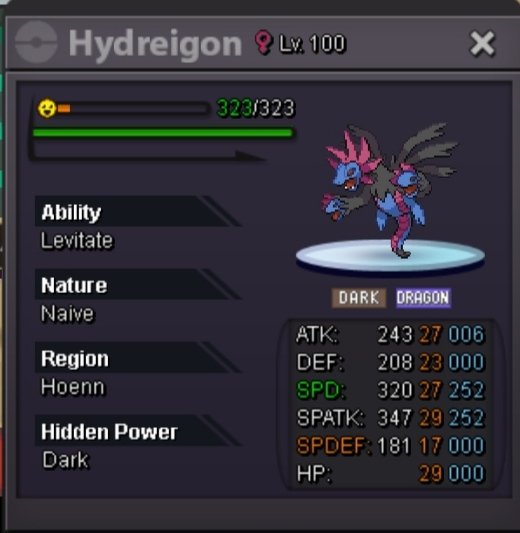
7 pointsS.O. (Start Offer) : 75M pokedollars Insta : None Minimum Bid : 500k Duration : 3 Days after the start (72 hours) Available Payements : Pokedollars B.O. (best offer) : --- Ending Time : --- ---------------------------------------------------------------------------------------------------------------------------------------------- S.O. (Start Offer) : 75M pokedollars Insta : None Minimum Bid : 500k Duration : 3 Days after the start (72 hours) Available Payements : Pokedollars B.O. (best offer) : --- Ending Time : ---
 7 points
 -
Hi, im back with new concept.. now is treecko what do you think? ^^


 6 points
 -
5 points
-
Hi, I try to make this concept for halloween event.. what do you think? ^^ i hope this concept approved and by the part of halloween soon event 😄 tell me pls if you like it and also suggestion for what pokemon i must try to make are open (sry if my english bad 😓) for my pleasure, god bless you ^^


 2 points
 -
2 points
-
2 points
-
2 pointsHi :DD So I decided to make some sprites and here's my first one. Hope you like it!

 2 points
 -
2 points
-
ABOUT US: We are a new guild that focusses on every aspect of the game, both PvP and PvE. Our goal is to create a community in which nobody feels forced to take part in activities that they don't enjoy. In Holydoof, you can enjoy every activity available on PRO! Our Staff Leader: Pinklax Officers: Aestre, Lupo93, Exzxay BENEFITS: ● Shadow area access (top 3 dungeon ladder reward); ● Guild bank; ● Chill and friendly environment; ● PvP and PvE support from some of the best players in the server! REQUIREMENTS: ● You must be able to speak english in a way that allows you to be understood by other members; ● You must have a Discord Account and use it to be active in the community; ● You must be active in game; ● You must have completed the story (all badges unlocked) and at least 300 hours gameplay; ● Alt accounts with mains in other guilds will not be accepted. ● Minimum age 18+ APPLICATION FORM: Please, provide a screenshot of your trainer card. ● What's your IGN? ● How old are you? ● Where are you from? ● What's your total playtime? ● What do you enjoy doing in the game? ● Would you like to offer some kind of service to the guild? (ex. Daycare service) (if not, it's totally alright!) And the most important question of them all: Which Bidoof Form do you like the most? -Suidoof, Raidoof or Endoof ? For further info, feel free to contact our staff!


 1 point
 -
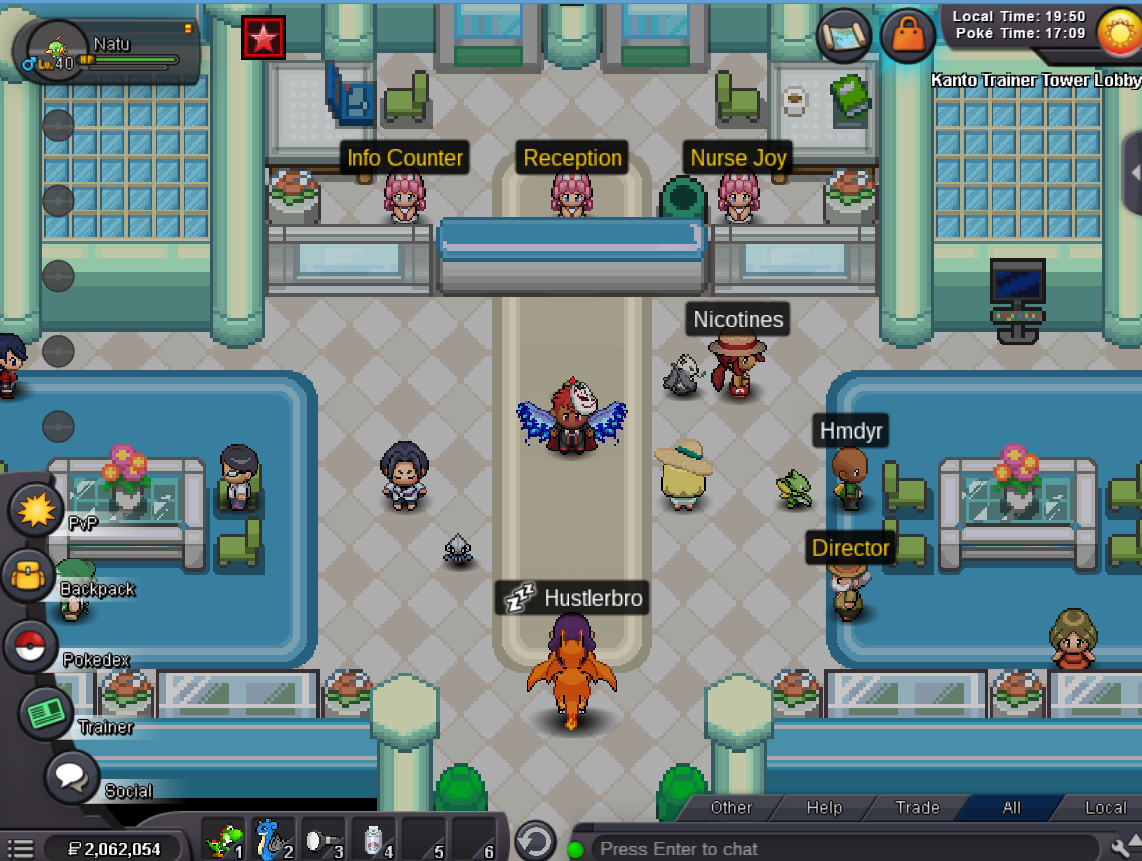
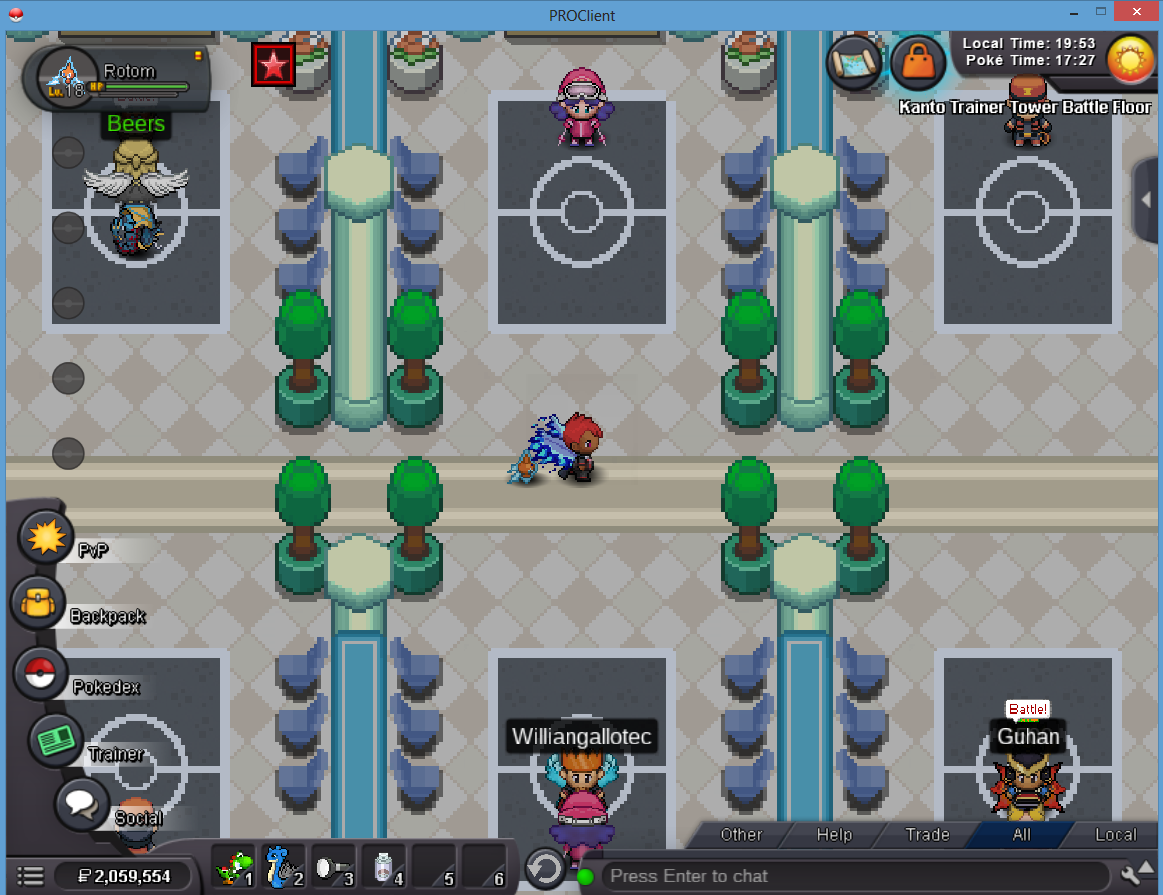
1 pointTrainer Tower Guide Welcome to the basic guide on how to make the most out of the Trainer Tower! The Trainer Tower is a new feature added to PRO after the Experience Rework. The Tower solves the current issues with experience training. Wild Battles are no longer really good for lategame players to level up their pokemon as the experience is low compared to fighting Trainer Battles. Gym Rematches, Copycats and Trainer Battles can help you level up 1 to 2 pokemon at a time. However, the Trainer Tower helps you level up an entire party at once! You can find the Trainer Tower in Route 13 in Kanto. Regardless of whether your pokemon participated in the fight or not, they will all gain experience as long as they’re not fainted! Since the rework, you can now evolve pokemon without penalisations. Pokemon now level up according to the original games’ experience curve. The Trainer Tower is filled with trainers, a Nurse Joy and a PC so you can train any pokemon in the game! The more pokemon you carry in your party, the less experience you will receive but it will be easier to climb the tower. The less pokemon, the more experience but riskier it will be! You can surrender against any of the trainers without a penalisation, being teleported or losing money. You only pay a small fee for entering the tower. You do not pay additional fees for climbing up floors in the tower! Just pay once and climb up several floors in a single journey! Prices go from 1.500 (from the first floor) to 9.000 (from entering from the 80+ level floor). To begin with, the Trainer Tower has multiple floors. Each floor’s trainer pokemon will have a maximum range of 10 levels. For example, floor 2 will have pokemon from level 20 to 29. Floor 5 will have pokemon from 50 to 59. This applies to all floors. All floors except floor 9 have 10 trainers in them. Floor 9 has 5 trainers whose pokemon range from 90 to 100. Each trainer will have more pokemon as you go up. For example, in floor 2 you might only find trainers with 2 pokemon that are not evolved. In floor 4, you might find trainers with 3 or 4 pokemon that might be evolved but can still evolve. In floor 6 and above, you should find trainers with 5 to 6 pokemon that are almost fully evolved. In floor 8 and above, trainers will have 6 pokemon that are fully evolved except very weird and rare occasions (such as finding Zweilous and Hydreigon in the same trainer). Each trainer will have a common theme: all of their pokemon will share one type. This leads to good and bad results: each trainer will for example have 6 ice types, but these might also have dual types (ice-flying, ice-grass, for example). Each trainer’s sprite also represents them. For example: The young girl is always the normal type trainer. The fire clown is always a fire type trainer. The sailor is always a water type trainer. The cute woman is always a grass type trainer. The trainer with orange clothes is always an electric type trainer, flying type trainer or normal type trainer. The woman with a ponytail and a backpack is always the rock type trainer. The skier is always an ice type trainer. The hiker is always a ground type trainer in higher floors (30+) or a steel type trainer in lower floors. (10-29) The scientist npc is either a steel type trainer or an electric type trainer. The kimono girl is always a fairy type trainer. The ace trainer is always a dragon type trainer. The rocket grunt is always a dark type trainer. The biker is always a poison type trainer. The male medium is always a psychic type trainer. The female medium is always a ghost type trainer. The karate trainer is always the fighting type trainer. The bug catcher is always the bug type trainer. To enter the tower, there are multiple floors a single pokemon is allowed to access specific floors directly. A level 1-9 pokemon can access floor 10-19. A level 10-19 pokemon can access floors 10-19, 20-29. A level 20-29 pokemon can access floors 10-19, 20-29, 30-39. A level 30-39 pokemon can access floors 20-29, 30-39, 40-49. A level 40-49 pokemon can access floors 30-39, 40-49, 50-59. A level 50-59 pokemon can access floors 40-49, 50-59, 60-69. A level 60-69 pokemon can access floors 50-59, 60-69, 70-79. A level 70-79 pokemon can access floors 60-69, 70-79, 80-89. A level 80-89 and above pokemon can access 70-79, 80-89, 90-100. A level 90-100 pokemon can access 80-89, 90-100. To enter the tower as a pokemon party, there are more restrictions. If your pokemon party has 10 to 19 levels of difference, these are the restrictions. A level 1-19 pokemon party can access floor 10-19. A level 10-29 pokemon party can access floors 10-19, 20-29. A level 20-39 pokemon party can access floors 20-29, 30-39. A level 30-49 pokemon party can access floors 30-39, 40-49. A level 40-59 pokemon party can access floors 40-49, 50-59. A level 50-69 pokemon party can access floors 50-59, 60-69. A level 60-79 pokemon party can access floors 60-69, 70-79. A level 70-89 pokemon party can access floors 70-79, 80-89. A level 80-100 pokemon party can access 80-89, 90-100 If your pokemon party has 10 to 29 levels of difference, these are the restrictions. A level 1-29 pokemon party can access floor 10-19. A level 10-39 pokemon party can access floor 20-29. A level 20-49 pokemon party can access floor 30-39. A level 30-59 pokemon party can access floor 40-49. A level 40-69 pokemon party can access floor 50-59. A level 50-79 pokemon party can access floor 60-69. A level 70-89 pokemon party can access floor 70-79. A level 80-100 and above pokemon party can access floors 80-89, 90-100 It is not possible to enter the tower with a higher level difference party than 29 levels. If the difference between levels in your party becomes higher than what I indicated above, you will NOT be able to climb more floors and you will have to leave the tower challenge, rearrange a new party that fulfills the conditions and reenter. For example, if I start the tower challenge with a 1-29 party but the pokemon at level 29 levels up to 30 and my lowest level pokemon is below 10, I will not be able to access floor 20-29. If I start the tower challenge with a 40-59 party but the level 59 pokemon goes up to 60, I will not be able to access floor 60-69. Check your level differences with what I wrote above. When you have paid the fee, you can choose which floor you want to access through the elevator. For example: I enter the tower with a level 60 pokemon and go directly to floor 60-69. I then talk to the elevator and go down to the 50-59 floor to fight a few trainers, then I take the elevator to go up to the 70-79 floor and then I go back to the 60-69 floor. If your pokemon is within the level range of any of the specified floors above, and you fulfill the conditions of these levels, you CAN switch freely between floors. If I enter the tower’s floor 60-69 with a level 69 pokemon and level up to 70 BEFORE I want to visit floor 50-59 for a bit extra experience before I continue climbing, I will NOT be able to do so anymore. The option in the elevator will disappear. The elevator calculates the levels of your party WHEN YOU TALK TO IT INSIDE THE TOWER. Thus, it takes your levels into account IN REAL TIME! When you level up inside of the tower, even if you get over the maximum level difference, you will NOT be kicked out! ^note: this might need some testing General Advice. Use the Nurse Joy NPC to heal often, 1 to 2 times per floor if needed. It only costs 1.5k and fully heals your party! Carry a LOT of Leppa Berry and Sitrus Berry. These items are insane in the tower: being able to heal 10 PP and 25% of your maximum HP is incredible inside. Carry a LOT of healing items THAT YOU OBTAIN THROUGH THE ITEM RECYCLER NPC IN JOHTO. Do a lot of Dig Spots periodically, recycle the gems and items you find in them. Revives, Revival Herbs, Ethers, Max Ethers, Elixirs and Max Elixirs are often never used and just sit in your PC. DON’T BE AFRAID TO USE HEALING ITEMS! It is worth it. Defeat ALL THE TRAINERS IN THE FLOOR BEFORE MOVING ON! If the difference of levels in your party is too large, you might not be able to continue climbing up and might need to rearrange an entire party. Have 1 to 2 maximum pokemon that can oneshot almost everything in the tower. Remember that the LESS pokemon you carry, the MORE experience is gained. The experience that the extra pokemon would gain goes into your pokemon! Use OFFENSIVE pokemon to get through the tower trainers. DON’T use tanks. It is simply too time consuming and not worth it. Trainer’s pokemon are COMPLETELY RANDOMISED and just follow a specific type pattern per trainer. A trainer can have multiple of the same pokemon at different levels. Trainer’s pokemon have no items AND their moves are the last 4 moves they learn by level up. OPEN UP YOUR POKEDEX AND CHECK THEIR LAST 4 MOVES! For example, a level 40 Bulbasaur will have Seed Bomb, Synthesis, Worry Seed and Double-Edge. Check the sprite of each trainer before you fight them. THEY LITERALLY TELL YOU WHAT TYPE OF POKEMON THEY WILL USE! Use very strong offensive pokemon for it. These pokemon MUST HAVE GOOD MOVESETS. DO NOT USE STRONG OFFENSIVE POKEMON WITH BAD MOVESETS. For example, Moxie Gyarados is better than Sheer Force Kingler because Moxie gets access to Earthquake (beats Electric, Rock, Fire), Iron Head (beats Ice, Rock, Fairy), Waterfall (beats Fire, Ground, Rock), Crunch (beats Psychic, Ghost), but Kingler barely learns reliable moves aside from Earthquake and Water Type moves. If you insist however, just use pokemon with really high ATK or SPATK stats. Abuse your pokemon’s abilities: Some enemies have Sturdy, Cursed Body and other BS abilities that are really annoying. Pokemon with Moxie, Adaptability, Mold Breaker are amazing sweepers for the tower (Gyarados, Crawdaunt, Pinsir). If possible, the offensive pokemon you use should be EV trained, have a good nature and IVs and moveset. It should also be fast. If the pokemon you intend to use is NOT level 100, You can choose to use the LEND function from a separate account and lend yourself the pokemon. Once you have finished training your party, you can send back the sweeper to its original level and reuse it in the future. Using setup moves is risky but worth it. However, you will be constantly taking hits all the time and have to heal up additional times. Teach good moves to the pokemon you are leveling up via T M moves or level up moves AND equip them with good items! They can use Choice items to help you against specific trainers in the tower you might have difficulties against. Pokemon I personally recommend after 25 to 30 hours of testing Adamant Gyarados equipped with Gyaradosite, Moxie ability. You can use an Expert Belt if you don’t have the Megastone. < by far the best. Iron Head, Earthquake, Crunch, Waterfall. Adamant Beedrill equipped with Beedrillite, which will become Adaptability < very easy pokemon to hunt as a newbie and very easy megastone to obtain as a newbie. Poison Jab, X-Scissor, Drill Run, Throat Chop. Adamant Haxorus equipped with Expert Belt, Mold Breaker ability < a more expensive option. Earthquake, Dragon Claw, Poison Jab, Throat Chop. Other Mold Breaker, Adaptability and Moxie users such as Pinsir, Crawdaunt or Salamance are viable too. Credits to Leeluckya and other players for coming up with the Gyarados + Lend trade strat! Credits to myself for the rest lmao


 1 point
 -
Im looking for: Shiny list: - ***shiny epic fail rare pokemon 20+ ivs 20+ millions -shiny mankey or evo careful h.epic 20m+ -shiny teddy or ursaring adamant or brave epic guts 30m+ -shiny charizard timid semi epic 150m+ -shiny gible jolly h.a semi epic 100+ m -shiny pawniard or evo defiant adamant 80+ million - shiny larvesta timid bold hp ground 80+ m - shiny medicham jolly 29+spd and atk good ivs semi epic 60m+ -Shiny milotic relaxed bold marvel scale semi epic 30+m -Shiny rotom bold calm good ivs 100m+ -Shiny pinsir jolly good ivs 20-70 m -Shiny brave azumarill huge power epic- semi epic 10-15m -shiny venusaur modest good ivs 40m+ -shiny jangmoo or evo naive careful jolly bulletproof 60+m -Shiny excadrill h.a jolly good spd atk 80m+ -Shiny slowbro ha bold relax semi epic epic 10m+ - shiny gliscor h.a careful good ivs 40+million -shiny metagross jolly good spd 70-100m ** i can always pay more if the pokemon is epic *****shiny hawlucka is my dream shiny Im looking unburden semi epic or adamant semi epic i will pay whatever you want... Just contact and we can make a deal... For ot pokemons i will Offer more. Discord Pasokoss#12061 point
-
1 pointHello and Welcome to The Pawké Services! Box Clean-Up Service: 10k per box(before clearing) Auctioning And Selling Service: 30% Story Lending: 3 Pokémon/Region for 12 hours 50k Boss Team Lending: Full Boss Team for 12 hours 50k Dex Service: 3k/Pokemon Price Check Service: 1 Pokemon = 10k 7+ Pokemon = 50k 15 Pokemon(1 Box) =120k 30 Pokemon(2 Boxes) = 220k 45 Pokemon(3 Boxes) = 320k Thank you

 1 point
 -
1 point
-
C.O. 4.5m by Perfectnight Min Bid 200k Ends in 72hrs from start End Point- 12:45am 28/08/23 Accept in-game currency and coin capsule (390k)
 1 point
 -
1 point
-
1 point
-
1 point
-
1 point
-
1 point
-
1 point
-
1 point
-
1 point
-
1 point
-
1 point
-
Looks good but mega scep has too much effect1 point
-
1 point
-
1 point
-
1 point
-
1 point
-
1 point
-
1 point
-
1 point
-
Since all my friend got was clown lowballing I'll leave it cancelled and return it.1 point
-
1 point
-
1 point
-
1 point
-
1 point
-
1 point
-
1 point
-
1 point
-
1 point
-
1 point
-
1 point
-
1 point
-
1 point
-
1 point
-
1 pointHextech Ball : effect: better catch rate on pokemon with league of legends skin An idea, when you throw a hextech Ball you have : 1% to have this sprite 10% to have this sprite 15% to have this sprite 25% to have this sprite 49% to have this sprite or base the sprite on the rarity (tier / event / pink / shiny ) of the pokemon encountered. inspired by : MasterWork Ball : inspired by :


 1 point
 -
GG everyone! I love all the ideas and forms you came up with, so I want to congratulate with all those who took part in the contest doing their best! <31 point
-
As the grading has been fierce to determine the winners -- an announcement will be made in the next 24 hours detailing our winners for the competition! Along with some very cool unexpected additional things!1 point
-
1 pointMost used Pokemon - February 2023: #Gold February 2023 Most used pokemon in ranked pvp (source: PRO database) #Rank Pokemon Count Percentage Win rate 1. Ferrothorn 8255 2.49% 48.75% 2. Clefable 7590 2.29% 47.84% 3. Rotom-Wash 7281 2.20% 47.15% 4. Zapdos 6754 2.04% 53.89% 5. Landorus 6151 1.86% 56.20% 6. Bisharp 5999 1.81% 52.14% 7. Garchomp 5778 1.74% 48.72% 8. Heatran 5514 1.66% 50.02% 9. Dragonite 5149 1.55% 44.73% 10. Mega Scizor 5027 1.52% 53.41% 11. Azumarill 4903 1.48% 50.60% 12. Volcarona 4851 1.46% 45.43% 13. Excadrill 4454 1.34% 48.36% 14. Chansey 4307 1.30% 47.43% 15. Weavile 4289 1.29% 47.96% 16. Keldeo-Resolute 4278 1.29% 54.77% 17. Mega Metagross 3943 1.19% 53.46% 18. Gengar 3901 1.18% 46.14% 19. Conkeldurr 3736 1.13% 50.43% 20. Tyranitar 3723 1.12% 45.58% 21. Serperior 3385 1.02% 48.06% 22. Tornadus 3362 1.01% 54.28% 23. Pelipper 3143 0.95% 47.92% 24. Gliscor 2895 0.87% 47.81% 25. Breloom 2852 0.86% 50.74% 26. Skarmory 2730 0.82% 49.08% 27. Kingdra 2674 0.81% 48.65% 28. Mega Swampert 2586 0.78% 48.61% 29. Mega Medicham 2582 0.78% 52.17% 30. Slowbro 2554 0.77% 48.00% 31. Aerodactyl 2489 0.75% 48.77% 32. Mega Gyarados 2468 0.75% 44.45% 33. Magnezone 2166 0.65% 51.43% 34. Manaphy 2022 0.61% 50.54% 35. Diggersby 1981 0.60% 53.86% 36. Mega Alakazam 1890 0.57% 50.79% 37. Togekiss 1834 0.55% 43.18% 38. Scizor 1834 0.55% 45.91% 39. Muk-Alolan 1764 0.53% 52.10% 40. Crawdaunt 1749 0.53% 51.29% 41. Hippowdon 1730 0.52% 55.32% 42. Mega Charizard Y 1646 0.50% 44.17% 43. Mega Pinsir 1608 0.49% 48.63% 44. Tangrowth 1579 0.48% 50.10% 45. Cloyster 1557 0.47% 46.31% 46. Tentacruel 1556 0.47% 55.53% 47. Gyarados 1534 0.46% 42.31% 48. Mega Lopunny 1515 0.46% 51.35% 49. Mega Manectric 1476 0.45% 55.01% 50. Blissey 1449 0.44% 44.93% #Silver February 2023 Most used pokemon in ranked pvp (source: PRO database) #Rank Pokemon Count Percentage Win rate 1. Ferrothorn 9710 2.66% 48.93% 2. Rotom-Wash 8715 2.39% 50.77% 3. Garchomp 8415 2.30% 52.57% 4. Clefable 7394 2.02% 52.20% 5. Azumarill 7056 1.93% 49.40% 6. Zapdos 6486 1.78% 53.68% 7. Landorus 5959 1.63% 54.35% 8. Weavile 5652 1.55% 46.48% 9. Heatran 5540 1.52% 52.27% 10. Mega Scizor 5512 1.51% 53.88% 11. Chansey 5155 1.41% 47.66% 12. Bisharp 4944 1.35% 52.87% 13. Keldeo-Resolute 4889 1.34% 53.81% 14. Dragonite 4883 1.34% 49.07% 15. Pelipper 4384 1.20% 44.96% 16. Gengar 3961 1.08% 48.57% 17. Volcarona 3957 1.08% 45.14% 18. Kingdra 3879 1.06% 44.81% 19. Gliscor 3697 1.01% 50.47% 20. Skarmory 3514 0.96% 51.99% 21. Excadrill 3484 0.95% 51.21% 22. Tornadus 3480 0.95% 56.24% 23. Tyranitar 3478 0.95% 53.42% 24. Mega Swampert 3419 0.94% 46.33% 25. Breloom 3384 0.93% 51.83% 26. Serperior 3255 0.89% 48.60% 27. Mega Metagross 3249 0.89% 52.11% 28. Magnezone 3087 0.85% 53.39% 29. Mega Medicham 2880 0.79% 53.61% 30. Mega Alakazam 2649 0.73% 53.45% 31. Mega Lopunny 2525 0.69% 50.89% 32. Conkeldurr 2521 0.69% 47.64% 33. Mega Gyarados 2460 0.67% 46.71% 34. Scizor 2456 0.67% 47.84% 35. Mega Charizard Y 2453 0.67% 46.27% 36. Togekiss 2429 0.67% 46.89% 37. Slowbro 2246 0.62% 50.40% 38. Torkoal 2195 0.60% 45.79% 39. Tangrowth 2075 0.57% 48.92% 40. Mega Venusaur 2014 0.55% 56.55% 41. Venusaur 1969 0.54% 48.15% 42. Manaphy 1952 0.53% 50.05% 43. Infernape 1883 0.52% 47.32% 44. Mimikyu 1861 0.51% 51.80% 45. Mega Charizard X 1844 0.50% 46.85% 46. Cloyster 1841 0.50% 45.79% 47. Suicune 1779 0.49% 54.69% 48. Cresselia 1762 0.48% 44.15% 49. Kyurem-Black 1755 0.48% 53.22% 50. Muk-Alolan 1724 0.47% 49.25%1 point