Leaderboard


Popular Content
Showing content with the highest reputation on 02/29/24 in all areas
-
Closed, reached my budget. ty.15 points
-
S.o = 6m min bid = 100k auction end 48h after 1st bid
 8 points
 -
I am in this guild for 5 years now. My stocks increased trice in value, everyone wants a partnership with me, my PvP skills got perfect and my car's service lamp doesnt light up anymore.2 points
-
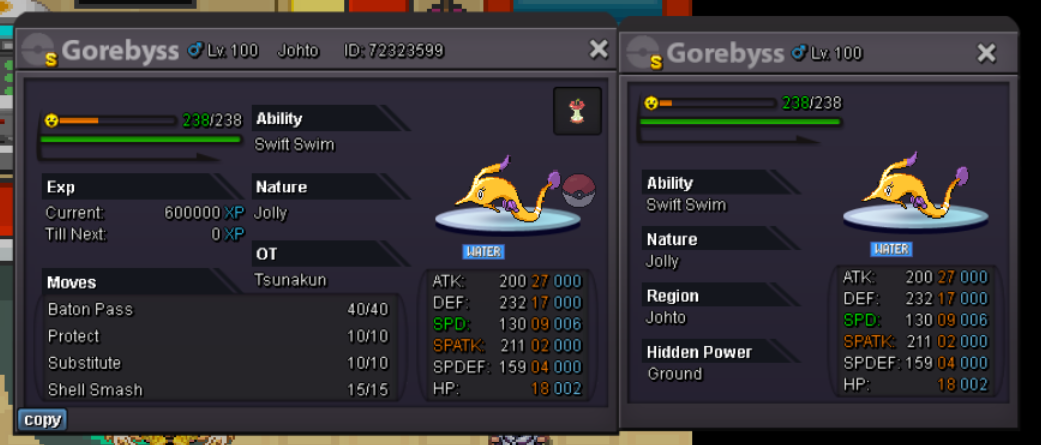
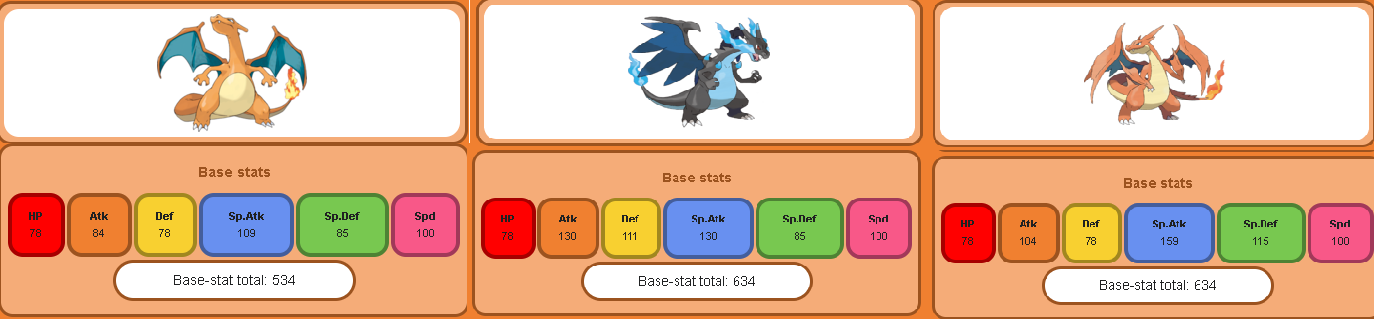
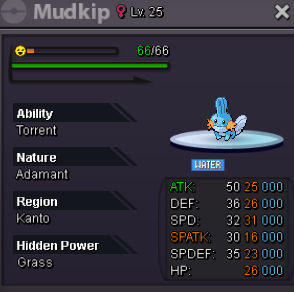
I regularly find many players asking what nature/ability is good for each pokemon. Through this topic, I attempt to make new players self dependent on finding the best Ability, Nature, Hidden power and Required IVs. All the pokemons have one of these specialties: Atk Offensive, Special Atk Offensive, Mixed Offensive, Def Bulk, Spdef Bulk, Mixed Bulk and Other Strategic. Now usually, Offensive pokemons prioritize Speed and then comes the Atk/Sp atk stat. If your pokemon has a high base speed and you think of using a choice scarf on it or it will set up speed with moves like dragon dance/Quiver dance, you may use Adamant/Modest as well. You can also choose Adamant/Modest for pokes which work with sticky web/Tailwind or works with weather like rain or sun (ability Swift swim/Chlorophill) So these Offensive pokemons Generally works with Jolly/Timid/Naive/Hasty or Adamant/Modest. Similarly, for tank pokes, you prioritize HP, then the respective Def/Spdef stat. Atk Offensive: Jolly/Adamant Special Atk Offensive: Timid/Modest Mixed Offensive: Naive/Hasty Def Bulk: Impish/ Bold/Relaxed Spdef Bulk: Calm/Sareful/Sassy and Other Strategic. I think the best way to explain is to lead by an example. Lets assume we wanna catch a Charmander. When ever you catch a pokemon, You need to identify what would be the best Ability, Nature, and hidden power (conditional) to go for. Remember: Priority-wise Ability>Nature>IVs. Many new players thinks good IVs= good pokemon and its absolutely wrong. Now back to Charmander. Charizard can be used in the same form, as Charizard X or Charizard Y. Have a look at the Base stats of each of these forms. Charizard in Normal form has good speed, and Special attack>Attack. Its Ability are Blaze and Solar power(h.a). Both these point that It will be a better Special attacker. Hence, Timid is a good nature to have on this poke. But another thing to consider is its move pool. It can use dragon dance, Belly drum and STAB moves like acrobatic. Considering this, Jolly is also possible. Conclusion: Charizard can be Atk offensive or Spatk offensive based on the moveset you use. Charizard X has 130 Atk and 130 Spatk and 100 speed. But look at the ability, it is Tough claw which bootst the Atk moves. Also it can learn dragon dance, so it is better as an Atk offensive. Charizard Y has 159 Spatk and 100 speed. And the ability Drought which doubles all fire type moves. Thats one great combination for a special atk offensive poke. So Charizard Y can be timid. Now for a Special attacker, Hidden power move is also a bonus. If it has an HP Ice, it can deal a good damage on pokemons like garchomp ,Landorus or Gliscor. So when you hunt a pokemon, you must look at the base stats first, find which category it belongs to, check what abilities it can have and how it can be utilised best, Check its move pool. Then identify which Ability, Nature and Hidden power pokemon you need, Put the respective sync poke first, have a Trace abi poke to identify the ability and hunt those pokes. The better the IVs on the poke the better it will be. But remember, for offensive pokes, speed is more important, for defensive, HP is more important. The Second priority IV must be 23+ and other IVs 20+ if you need pokes which are pvpable. In the end, it is all about your creativity and skill that determines the value of the pokemon you hold. I will try to explain this longer and in depth in the future, till then i hope it sheds some light on this topic for new players.
2 points
-
Weavile-Jolly-lvl100,ev treinado,2x31 ATK And HP, Aceito formas de pagamento, pokedollar, cápsula de moedas 400k, reroll IV 500k, reroll Nature250k, doces raros 7k Valor inicial 400k Insta 4m 100 HORAS APÓS A PRIMEIRA OFERTA Apelido: Lordgui Nick OT: Gelaspokemon
1 point
-
WTB Timid Rotom 25+ Discord: c0mp1 point
-
START AUCTION 1M - MIN BID 150K - INSTA 5M - END 48H AFTER 1ST BID
1 point
-
Auction Details: Start Price: 2m End Point: 48 hours (after start price is met) Insta Price: 5.5m (Buy it Now option) Minimum Raise: 100k Accepted Payments: Pokedollars, Coin Capsules (400k), IV Reroll Tickets (500k) Important Reminders: This is a Gold Server auction. If bidding from an alternative server, state that you will transfer upon winning. If you intend to purchase with an alt account, specify the account alongside your bid. Upon placing a bid, you must maintain sufficient funds in the associated account, until the conclusion of the auction, or until being outbid. If a bid is received in the final 15 minutes of the auction, the end point will be delayed by 15 minutes from that bid, and will be delayed by 15 minutes for each new bid thereafter, until the current offer has been held for a full 15 minutes. Happy Bidding!
1 point
-
Start offer- 400k Min bid- 50k No insta Accept cc 400 k rr 500 k 48 hours after 1st bid
1 point
-
Wts 270k PrO : Filament
1 point
-
1 point
-
1 point
-
1.6M1 point
-
1.3M1 point
-
1.1m1 point
-
Greetings @Jarlaxlebaenre I have moved your thread to the proper sub-forum. Please take a few minutes to take a look over General Trade Rules for a better understanding of how trade related sub-forums are supposed to be used. Moreover, you can not start your own auction. I have removed your post. Your auction is still yet to start. Kind regards1 point
-
start bagon, will transfer1 point
-
Glad to see it. I’ll go ahead and close this thread since the issue at hand has been solved. Please continue to use the Resolution Center for any questions or issues you may have in the future. We will be glad to assist you. Have a great rest of your day.1 point
-
Hello @Yuhpearl. My apologies for the inconvenience. I’ve forwarded your issue to the Developer team and they’ll look into it as soon as they are able to. When there is an update, either a Developer or myself will let you know. We kindly ask for your patience and understanding.1 point
-
Start: 200k Min Raise: 50k CC Accepted at 400k Ends 24 hours after first bid happy bidding1 point
-
Hiya @Unc3n Given what the rule in the red text in the below quote says, fighting bosses on both servers with the same account is indeed not allowed. To answer your question here, using both of your accounts to fight bosses in both Gold and Silver servers - is against the rules, even if you might be benefitting the same as using four accounts to do bosses. This is also subject to change with the upcoming accounts and servers merge as you may already know about from the Discord Announcement from last week. You will then be permitted to fight a total of 20 bosses every week on only one account across all of your characters. I understand that this raises further questions and has implications on a larger scale which would be addressed in an announcement on a later date. I hope this clears the questions that you had regarding the rules. Feel free to ask if you still have any more questions regarding this. Have a great day, Fusionflair1 point
-
@Alen20at this time we don't require everyone to do pvp its optional only those who has selected the pvp role in the guild server do pvp in game and we I @Gouwldrouwger Am and My Co-Leader @Shr have not discussed rewards given to pvpers as of yet we have only discussed small matters for the guild at every end of the season i cant go into detail but it has to do with the activity of our members and how often they are online in game or not We are currently (97) members total however only a select few have chosen the pvp role option in the guild server at the end of the season we might have new openings for potential pvpers to join the guild1 point
-
The outcome of the Dratini auction has been forced due to the auctioneer being currently banned. @Minhquangnguyen Your 2.5m was placed after the end point, therefore invalid. The Dratini has been transferred to @Ezzza from whom 2m and 1 Coin Capsule have been removed and added to @Fonikosgatos. Locked as the thread has served its purpose. Take care.1 point
-
2m's1 point
-
Start1 point
-
Auction Details: Start Price: 10k End Point: 1 hour (after start price is met) Insta Price: 200k (Buy it Now option) Minimum Raise: 10k Accepted Payments: Pokedollars, Coin Capsules, IV Reroll Tickets › 1x Coin Capsule = 400K, 1x IV Reroll Ticket = 500k Important Reminders: This is a Gold Server auction. If bidding from an alternative server, state that you will transfer upon winning. If you intend to purchase with an alt account, specific the account alongside your bid. Upon placing a bid, you must maintain sufficient funds in the associated account, until the conclusion of the auction, or until being outbid. If a bid is received in the final 15 minutes of the auction, the end point will be delayed by 15 minutes from that bid, and will be delayed by 15 minutes for each new bid thereafter, until the current offer has been held for a full 15 minutes. Happy Bidding!
1 point
-
Greetings @Ciuco420 In the future, please remember to provide evidence of the trade via a screenshot. Kind regards1 point
-
Greetings @Gralak21 Next time please don't forget to attach a screenshot of the trade. Kind regards1 point
-
6.8m1 point
-
1 point
-
1 point
-
1 point
-
thanks, meet in?1 point
-
auction over, @Honiden won! message me when youre on1 point
-
1 point
-
1 point
-
● What's your IGN? CallMeRengod ● How old are you? 25 ● Where are you from? Germany ● What's your total playtime? 7426h on main, in total ~9000h ● What do you enjoy doing in the game? I'm mostly a PvE player, collecting, hunting, running dungeons ● Would you like to offer some kind of service to the guild? (ex. Daycare service) (if not, it's totally alright!) I do offer EV/Lvl service from time to time, also don't mind lending PvP Pokemon And the most important question of them all: Which Bidoof Form do you like the most? -Suidoof, Endoof or Raidoof? Suidoof - simply because Crystal was my first Pokemon game
1 point
-
1 point
-
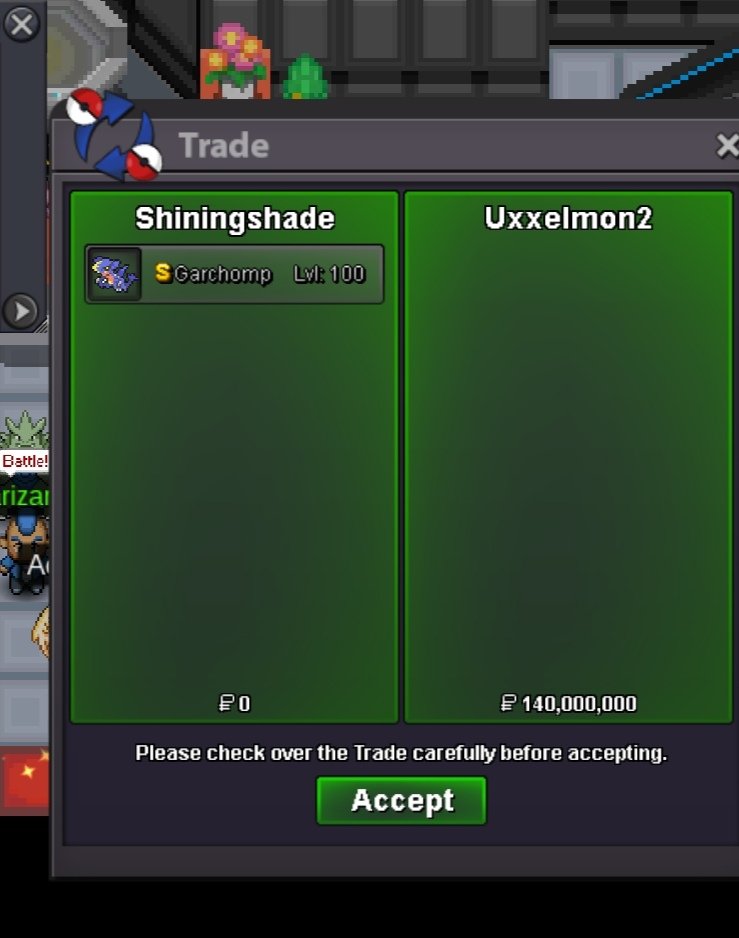
Garchomp sold
1 point
-
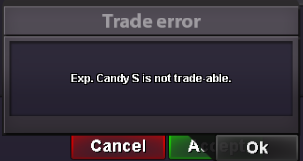
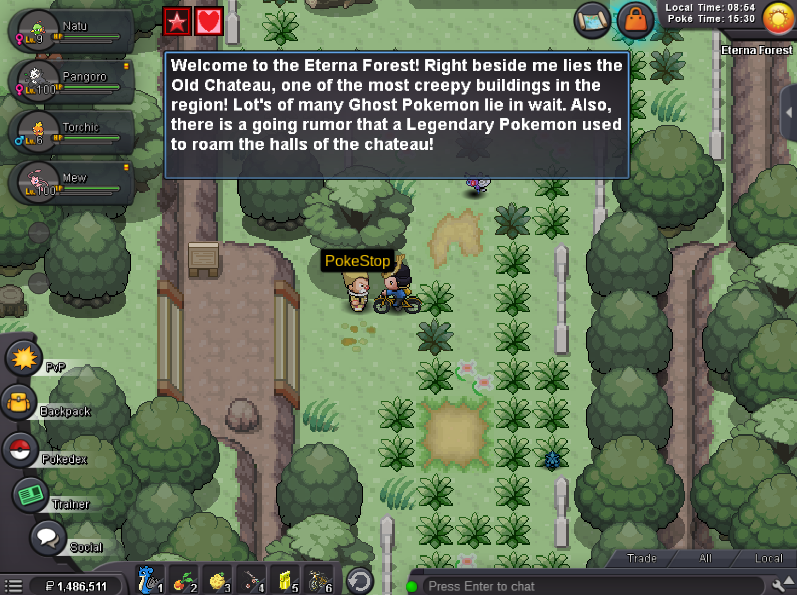
hi all , this is a small guide to the new pokestops location & rewards Hoenn 1- Lilycove City 2- Salteport City 3- Lavaridge Town 4- Mossideep City 5- Sootopolis City 6- Pacifidlog Town 7- Route 110 (south of Mauville City) 8- Petallburg Woods 9- Route 11 (north of Rustboro City) 10- Route 119A (outside Weather Institute; ouest of Fortree City) 11- Route 111 Desert Trainer Tower (north of Mauville City) Sinnoh 1- Solaceon Town 2- Jublife City 3- Hearthome City 4- Vielstone City 5- Pastoria City 6- Snowpoint City 7- Sunyshore City 8- Celestic Town 9- Sendoff Spring 10- Eterna Forest Kanto added PokeStop to Cinnabar Island & removed from Power Plant Rewards are random: Rare Candy, Revives ,Pp Up ... & the new amazing rewards to gain Exp & level up: Exp Candy we can claim our new rewards in two days (48 hours) n.b = Exp Candy is not tradeable. hope this guide is very helpfull; Feel free to post in here or send me a message if you have any informations regarding reworked Poke Stops. ps = don't forget to like my post & let a comment to encourage me
1 point
-
I will look into it and try to add it in the next client update. In general, it shouldn't be a problem. It will just be a bit tedious.1 point
-
Good for pvp, with more people, we will finally have a UU ladder ()1 point
-
Welcome to the Megastones Quest Guide: Wave 3! Welcome, everyone! As the last and final third wave was just released, we finally have the last remaining Megaevolutions to obtain! This guide will be completed with the community’s additions, like the other two guides (basically everyone does the job and I just sit with my fat belly and my half eaten pizza in my sofa while I write this). I will be editing this thread continuously as new details about the megaevolution quests are revealed. Are you ready? Let’s begin! Third Wave Megaevolutions Mega Aerodactyl Mega Alakazam Mega Camerupt Mega Manectric Mega Mawile Mega Metagross Mega Medicham Mega Pidgeot Mega Pinsir Mega Sableye Mega Salamance Mega Slowbro Mega Tyranitar Mega Sharpedo Mega Kangaskhan (?) Mega Lucario (?) Mega Aerodactyl Aerodactyl's Megastone can be bought in Historical Site in Excavations for 1000 Artifact Pieces (semi confirmed). Mega Alakazam Mega Alakazam’s quest can be started in Veilstone City's Casino. You will need a pokemon with 31 IV in Speed in your party and some Kelpsy Berries. You can find Kelpsy Berries in Viridian Maze or Safari EV Wald. Now talk to the Casino Owner. Talk to the Abra multiple times until he teleports and flees. Talk again to the Casino Owner. You will need to travel a LOT, so be ready. You must now visit Mt Coronet Summit. Talk to the Meditating Alakazam and give him a Kelpsy Berry. You need to choose that you want to battle him. BIG WARNING: THIS ALAKAZAM DID NOT SKIP LEG DAY. He is VERY fast, hits hard AND TANKS HITS LIKE A TRUCK. HE IS A SPECIAL FIGHT. BRUTE FORCE WILL NOT HELP HERE. A PvP Mimikyu Shadow Claw only does 10% to it, when it would normally do over 10 times that damage. To cheese this fight, use two Rattata with Endeavor, Quick Attack and Focus Sash equipped. Start with the first Rattata and use Endeavor as he will lower you to 1 HP with your Sash equipped. Use Quick Attack to revengekill. If Alakazam defeats you before you can Quick Attack (somehow), your second Rattata only needs to Quick Attack with the Sash equipped and you'll get the Megastone. Once you win, you will earn your Megastone! If you instead decide to be a pacifist, you can choose NOT to fight Alakazam and choose the "Compassion" option. You will begin a Fetch Quest. Very important: READ THE DIALOGUE TO KNOW WHERE YOU HAVE TO TRAVEL TO. There are multiple locations: Talk to Abra in front of Granite Cave, Hoenn. Give it a Twistedspoon. Talk to Abra in Route 205. Bring a Pokemon with Spore or Sleep Powder. Talk to Kadabra in Floaroma Town, it's near the entrance to the lower side of Floaroma Meadow. Bring a pokemon with the move Brick Break. Talk to Kadabra in Hearthome City. It's inbetween the two fountains, near Psychic Yukki NPC. Bring a pokemon that knows the move Trick. Talk to Alakazam in Sunnyshore City, it's in front of the lighthouse. Bring a pokemon with high SPATK stat (Gengar, for example) Talk to Kadabra in Lilycove City. He asks you to show him a Kirlia. After you talk to up to 3 of these mentioned above, he will grant you the Megastone! Personal comment: just use a Rattata with Endeavor, Quick Attack and Focus Sash and just beat him in the first turn. Mega Manectric Mega Manectric’s quest can be started in Route 123, Berry Garden. This one will make yourself want to rip your hair out, so get ready: Requirements. Level 100 pokemon (seriously, YOU NEED THIS). It should be a VERY strong attacking sweeper. DO NOT ATTEMPT THIS WITH TANK POKEMON. IT'S IMPOSSIBLE. Do not attempt with slow attackers or multi-hit moves either. I am using Diggersby Adamant with Choice Band equipped and Huge Power so I can powerforce myself through this nightmare of a quest. You need Cut, Surf and Rock Smash (either as learned moves or as tools). People suggest to use a light weight pokemon, but it has been beaten with a Dragonite (which is a bit fat, to be honest). Rotom Heat would fit here as it works really well against almost all the trainers (except if you get Blissey, in that case you just instantly lose). You need to talk to the Farmer inside of the Berry Farm. He will teleport you to a starting point. You have to go to the northwest dodging spinning and moving trainers, fighting two obligatory trainers and you need to interact with the Salamance Statue. Then, you need to head back in the same way. You need to return and talk to the Farmer as soon as possible. You need to do this in less than 120 seconds. Problems: -All the trainers have a randomised level 100 pokemon with them. It's between a pool of pokemon, from which I've found: Blissey, Shedinja, Ninjask, Steelix, Heracross, Shuckle and Alakazam. The problems: -If you don't have a Fire/Rock/Flying/Ghost/Dark type attack and find Shedinja, you've automatically lost if you have no way to Poison/Burn it. -If you're a special attacker and you find Blissey, you've lost. That thing is absurdly bulky. -If you're a physical attacker and you find Shuckle or Steelix, you will need to pray to defeat it in one hit. -Alakazam and Heracross will wreck you if you're unprepared. -Ninjask is just annoying and fast, but it has nothing else to it. -The only obligatory trainers are the Snorlax cosplayer and the monk next to the Rock Smash place. However, there's a catch: if you speak to them by accident, YOU WILL HAVE TO FIGHT THEM AGAIN. If you missclick, you're done and lost. You can only fight these 2 trainers 2 times each (once when you go in and once when you go out) if you want to earn the Megastone. Fighting any optional trainers means you've just lost and you'll not have enough time. If you manage to do all of this under 120 seconds, then you should earn your Mega Manectric Stone. I accidentally found a Shiny Manectric on the way while raging and walking back to the Megaquest spot over and over again, so I guess my suffering with this guide is being worth it lol. Mega Sharpedo and Mega Camerupt Mega Sharpedo's and Mega Camerupt's quest can be started in Slateport City. Talk to the NPC Charlene and participate in the Festival. You need to bring three specific pokemon. One pokemon that knows the move Rock Smash and Brick Break. You want BOTH. It is also commonly agreed that this pokemon should have the ability Mold Breaker or it must have a Base ATK stat of 135 or higher. (if you have no idea what this means, check this guide. Use a Rampardos! Another pokemon that is a Fire Type. You will get bonus points if you use a pokemon with the ability Magma Armor (Slugma, Magcargo, Camerupt). This ensures a win. A pokemon with the move Surf or a Surf mount. HEAVILY Recommended: 1.- Pokemon with Rock Smash, Brick Break and the ability Mold Breaker. So far, we've only been able to beat this with a Rampardos, Mold Breaker with these moves. It is possible that you only need the Ability + one of these two moves, but it is also implied that the pokemon should need a high ATK stat. 2.- Rotom-Mow with Thunderbolt and Leaf Storm, Timid/Modest and with a Choice Specs. This will take care of the third trial, which is by far the most obnoxious. Otherwise, just a very strong Electric type with also Grass type moves. 3.- A Surf Mount. I recommend: Rampardos with Mold Breaker and Brick Break and Rock Smash learned. This grants first place 100% of the time in the First Trial. Camerupt with Magma Armor. This grants first place 100% of the time in the Second Trial. Credits to Belzebel for Camerupt and Rampardos idea :V Sharpedo with Speed Boost or Ludicolo / Rotom Maw to fight the trainers. (unconfirmed if this grants you anything as a bonus in the Third Trial. Must be tested. The other two however are 100% guaranteed to work).Ç For the third trial, use a Grass/Electric pokemon + Surf Mount otherwise. Be ready to get lost many times because the map is gigantic and confusing as hell. It's also obnoxious. I'll go step by step. Talk to NPC Charlene in Slateport. You will have to show her the pokemon mentioned above. You can only bring in three pokemon. You will be teleported to the Hoenn Festival Map. Here you first have to talk to Charlene so that the Rock Breaking trial begins. When you've done so, you need to head for the northeast of the map and get to the rocky area. You need to walk around until you find a gigantic Black/Grey rock next to Fan Tony NPC. Walk into it and you will get a prompt asking you to use a pokemon. Use a High ATK pokemon with both Rock Smash and Brick Break. I'd honestly use Infernape for this one, or just any Fighting type like Machamp. You will get extra points for this. You need to now walk back to Charlene. Talk to her so she congratulates you and talk to her again to begin the second part of the trial. Walk back to the Rocky area and try to find your way until you find a wooden bridge to the west. It will bring you to the Magma area. Try to find an area where there's a Magma pond with all the participants in it and find a spot to sit in. Choose your Magma Armor pokemon to participate in it. After you do so, walk back to Charlene. THE WORST PART BEGINS NOW. Talk to Charlene yet again. She will tell you that the last trial will begin. Walk to the southeast of the map. You will find the other participants in a line. Before you participate, place your Grass/Electric type in the first slot of your party, use your Surf mount or your Surf pokemon and surf to them. You will now have to walk clockwise through water around the entire island. If a wild pokemon spots you (they will be swimming around the island), you will be teleported and will lose a masive amount. You will be forced to fight many trainers in the way without being able to use items in battle. These rectangular platforms will fully heal your party when you step on them. Be sure to use a Grass/Electric type pokemon that can defeat everything in a single hit or you will 100% be unable to beat this quest part. Finally, speak to Charlene to obtain your Megastones if you ended in first place! Mega Mawile Mega Mawile’s quest can be started in Valley of Steel, Eastern Peak. You need to bring a Level 100 Mawile with Max Happiness. Unconfirmed if OT or not and which requirements it needs aside from this. Talk to the NPC Looker first. Now, talk to the Granny and then talk to Looker again. Visit the Western Peak. You should only be able to enter it when it's Night Time. Hide inside. A Mysterious Girl NPC will appear. You have to hide from her. She will attempt to sleep twice. You need to try and wake her up twice without her noticing you. You need to follow her and avoid the Police Guardian if possible. You will now face her. Get your boss team ready and include in it a Mawile at Level 100 with full happiness. Her team is: Absol, Drifloon, Mimikyu, Spiritomb, Zoroark diguised as Banette and Mega Banette. When you win the fight, you need to go back to Eastern Peak and talk to Looker. Now, visit the Cave of Steel and fight Byron with your Mawile alone. His team has a Bastiodon, Omastar and Bronzong. If you win, you will obtain the Mawile Megastone. Credits to Ferocityy for the pictures and explanation with Yelovv! Mega Metagross Mega Metagross’ quest can be started in Steven's House, Mossdeep City. You will need to donate 2 Metang after you speak to the NPC Steven with over 100 IV total each. They do not need to have your OT, so you can buy some from other players. BIG WARNING: When you donate them, they will be permanently gone. Afterwards, you need to donate 3 non-Steel type pokemon that have less than 70 IV total. They also do not need to be your OT, but they must be caught AFTER you begin the quest. Finally, you will have to face his Mega Metagross and you can only use Steel Type Pokemon. Be ready because he's VERY Tough! (Claws. Get it? GET IT? I'm so funny I should be a comedian) Mega Medicham Mega Medicham’s quest can be started in Mt Pyre Exterior. This megaquest requires you to be the Sinnoh Champion. Speak with Brawly. He will be there with Medicham. Now speak to John. He will scam you with a false Megastone and run away. You need to follow him to Mt Pyre Summit. Brawly will try to help you and give you the Megastone, but his Medicham refuses and wants to first battle him. You need to bring a good nature Medicham with Jolly or Adamant nature that has been caught by you (OT) AFTER you've talked to this NPC (unconfirmed if it can be an old one) with Full Happiness. It is recommended that you equip it with a Focus Sash and just use Counter, the Medicham will defeat itself. After you defeat it, you will earn the Megastone! Mega Pidgeot Mega Pidgeot’s quest can be started in Viridian City. In Viridian City, cut the tree on the top left and go through until you see the Flying Type Lover NPC. You need to defeat him. Then, he will ask you to show him how you train a Pidgey. You need to capture a Pidgey below level 6 (5 is the maximum) and show it to him. It has to be PIDGEY, and not evolved forms! He will tell you if the Pidgey is appropriate. You now need to beat his level 80 Pidgeot with your Pidgey (you can evolve it and use Pidgeotto or Pidgeot!) in a 1 vs 1 fight. This is why you should train your Pidgey to 97 or so. After winning, you have to go to Indigo Plateau and find Blue in the Kanto Elite Four building. Show him the Pidgey and battle against him. You're allowed to use any pokemon so bring your full Boss Team! He will fight you with a Gyarados, Exeggutor, Alakazam, Rhyperior, Tyranitar, Arcanine, Machamp and Mega Pidgeot. Some of his pokemon seem to be randomized. All his pokemon use Life Orb as an item. Once you defeat him, go back to Viridian City, talk to the Flying Type Lover NPC and show him your Pidgey. You will obtain your Megastone! Mega Pinsir Pinsir's Megastone can be obtained through winning in the Bug Catching Contest. Unconfirmed if it's just winning once or three times like Beedrill's and Herracross' Megastones. Mega Sableye Mega Sableye’s quest can be started in Diamond Domain B1F, Love Island. Talk to the NPC Gem Collector. He will ask you to deliver a Sableye. You will need to go and catch one, with no requirements. Bring it to the NPC. I recommend Sky Pillar or Rustboro City Headbutt Trees. You will now need a high level Aurorus. You can obtain Aurorus by digging in Dig Spots and reviving Sail Fossils in Cinnabar Laboratory. You can now level it up. You will then fight a level 100 Sableye. As Yellovv and others recommended, it's a good idea to make it tanky (with HP EV Training). Toxic, Protect, Rest and another Status move equipped with Leftovers should do the job. You cannot challenge it if you have ANY attacking moves. You need 4 Status moves. The NPC will then ask you to bring a pokemon with the move Scald and one with the move Rock Smash (unconfirmed if it needs to be both in one or separate, but Azumarill can learn both. Explanation from Ferocityy for the final step: You will have to choose between two options. "Dig" "Collect" If you Dig too many times, the Gem will break and you will need to wait for a 30 minute cooldown. If you Collect too early, you will not get the Gem and you will have to wait for a 5 minute cooldown. Users suggest to Dig around 2 to 3 times and then Collect. It seems to be completely random between 1 and 5 though. Once you are lucky, you will be able to speak to the NPC and get the Megastone! Mega Slowbro Mega Slowbro’s quest can be started in Cliff Edge Gate, next to Cianwood City, Johto. Talk to the NPC Sam (investigator). He's in the water, in a small grounded space. You need to give him three random Shellders, no requirements at all. After that, he will teleport to Whirl Islands. Talk to him in Whirl Islands. B2F. Multiple Rocket Grunts will appear! They will kidnap the pokemon and travel to Slowpoke Well. You must now go to Slowpoke Well, Azalea Town. You will have to go through the wild pokemon and go to the 2nd floor, underground. Find Sam and defeat the Rocket Grunt Boss. You will earn your Slowbronite when you talk to Sam! The Rocket Grunt Boss has a Machamp, Houndoom, Gengar, Steelix, Crobat and Mega Slowbro at level 100! Mega Tyranitar Mega Tyranitar’s quest can be started in Gold's Gym, Saffron City. You need a level 100 Tyranitar with the natures Adamant, Jolly, Impish, Careful, Relaxed or Sassy with atleast 120 IV Total (counting all stats). It does not necessarily have to be yours. Talk to the Kung Fu Master NPC. You will have to beat his five pokemon. It seems you fight Muk first, then Graveler, Boldore, Lairon and Mega Steelix. There are other pokemon like Gigalith and Golem that can also appear. They all have Sturdy (except Muk and Mega Steelix). If you succeed, you will earn your Megastone! To win, you need to avoid being poisoned by Muk and you might be able to bruteforce through it, as you cannot use any items. The quest is a bit weird and some users have experienced having to fight less or more pokemon than others.1 point
-
What is your IGN? TheNikifreak What is your Discord? Niklas#4255 How old are you? 20 How many hours do you have? 656 Hours How much of a interest do you have in PvP on a scale of 1-10 (1 being very weak, 10 being very strong)? 6-7 Do you know the difference between IV's and EV's (Just a Yes or No)? Yes I do Do you know Pokemon Showdown? If yes, What is your IGN on Showdown? TheNikifreak Which Pokemon is your favorite in general(Could be for design, stats, whatever reason :] )? Rayquaza ,I just love how it looks especially in its mega Which Pokemon is your favorite for PvP? Serperior , its contrary ability with the moveset it can learn is just too good .1 point
-
What is your IGN? Finlandguy What is your Discord? Finlandguy#0364 How old are you? 21 years old currently How many hours do you have? 3330+ hours currently How much of a interest do you have in pvp on a scale of 1-10 (1 being very weak, 10 being very strong)? 7 Do you know the difference between IV's and EV's (just a yes or no)? yes Do you know pokemon showdown? if yes, What is your IGN on showdown? no, sorry i don't know anything about pokemon showdown, i just like to enjoy playing pokemon pro online. Which pokemon is your favorite in general (could be for design, stats, whatever reasons :] )? if you mean pokemon general games like the time before the whole pokemon pro has been created, when i played pokemon gold,silver and crystal, pokemon that i liked mostly is totodile as a starter pokemon when i played johto journey, also for emerald game, i liked mudkip as hoenn starter as well. Which pokemon is your favorite for pvp? well i do like pokemons that can create the sun torkoal or ninetales, but for my whole team for what favors me mostly and makes me use often in pvp are sun teams, that they made me like a belzewall team, i'm by the way serving for my queen belzebel and i've planned to find anything that they can counter againts rain team.1 point


.thumb.png.0444cf3c35fe6b52a07d1437c08474aa.png)


.thumb.jpeg.a555c7b353fd230174b5a4e75cc24e01.jpeg)


.png.44f352260947c0648eb4a3df4f2b735e.png)