Leaderboard


Popular Content
Showing content with the highest reputation on 06/08/20 in all areas
-
Post is currently broken after some forum changes - Will most likely have to do a new one when I have the time Welcome to my Unofficial tier list for bosses! This isn't a guide on how to beat bosses but an attempt to classify them by rankings. Due to the new changes, it was decided to make a thread based on the one by idkup. The top 15-20 spot of a boss list should be consistent for everyone. Choosing the last remaining bosses can be an entangled task if you're hesitating or confused. It especially becomes harsh when you're new to the variable PvE content of PRO. This is mostly to help people who are confused and want to weight and compare the multiple rewards Every changelog is posted at the bottom of the thread. Ranking S tier - The best of the best. Those are bosses that have an insane or very good pool of pokemon along with excellent items and money rewards. Do not skip those. A tier - Generally the most common bosses, which are worth doing as well. B tier - Suboptimal bosses compared to the other tiers; fighting them is not recommended, unless the goal is to fetch a certain reward. It could also be worth fighting them if you don't have access to enough bosses from the other tiers. The rankings were chosen based on 3 principal criteria, in that order; 1. Pokemon pool available (3rd reward and random reward) 2. Item's reward available 3. Money reward A good pokemon pool is better than a good money reward in my opinion. This could be showcased in certain situations. Tier List S+ Medusa and Eldir Lance Battle bot Urahara Entei Guardian S Shary and Shaui Terminator Tigerous Spectify Logan Saphirr Pewdie and Diepy Professor Oak Koichi Steven Bruno Professor birch Link A+ Officer Shamac Morty Letrix Neroli Maribela Chuck Lt.Surge A Brock Brock - Located in Diglett's Cave Notable rewards: Aerodactyl, Kabuto, Omanyte Rare candy, Stardust, Star piece, Dome/Helix Fossil, Old Amber, Nugget, Big nugget Decent money pool (20-40k) Professor Elm Toothless Officer Jenny Ash Westbrook Klohver Suicune Guardian Raikou Guardian Gingery Jones Erika Jessie & James Naruto Fanboy A- Misty Naero B+ Lorelei Xylos B Sage Pumpkin king MISSING DATA (FOR NOW) Professor Birch. Missing Item and pokemon rewards. Maribela. Missing Item and pokemon rewards. Officer Jenny. Missing Item and pokemon rewards. Please note that the reasoning behind the ranking is currently partly subjective due to the lack of different points of view. It will be updated following balances and changes that are made. Feel free to comment on your disagreement towards a ranking and I will thoroughly explore your suggestion(s). Changelogs Credits to waleed1301, Splittie for the help with some information. Credits to the wiki workers who worked their sweat to ensure that most of the information is correct. Credit to idkup for the overall inspiration for the guide.
 5 points
 -
Due to new updates people seem to not be interested can be closed.5 points
-
Hello guys it's togepoke, today i'm here with GDarch a very good player to talk about pvp. We think we should allow heatran to learn eruption in PRO with the Researcher Alan just like other event moves, and add a NPC for worry seed since celebi cannot learn it otherwise. Eruption is an event move and Heatran must have a Quiet nature to be legit. Quiet Heatran is outspeed by a lot of stuff (even with max speed and a Choice Scarf you're outspeed by +speed 106 base speed pokemon and anything faster like Infernape with Close Combat or Weavile Choice Band with Low Kick). Plus Eruption generally depends on your Pokémon not taking a hit before it can pull off the Eruption, that's why Heatran might only be helpful on Trick Room teams. In official games, legendary event moves force pokemon with a specific nature (Entei Extreme Speed with Adamant Nature) but PRO didn't put any restriction (surely because they are not that used on PVP). Adding eruption event move to heatran might need some restriction however, because how broken scarf heatran with eruption could be. Thanks for watching, i hope u can do something about it.4 points
-
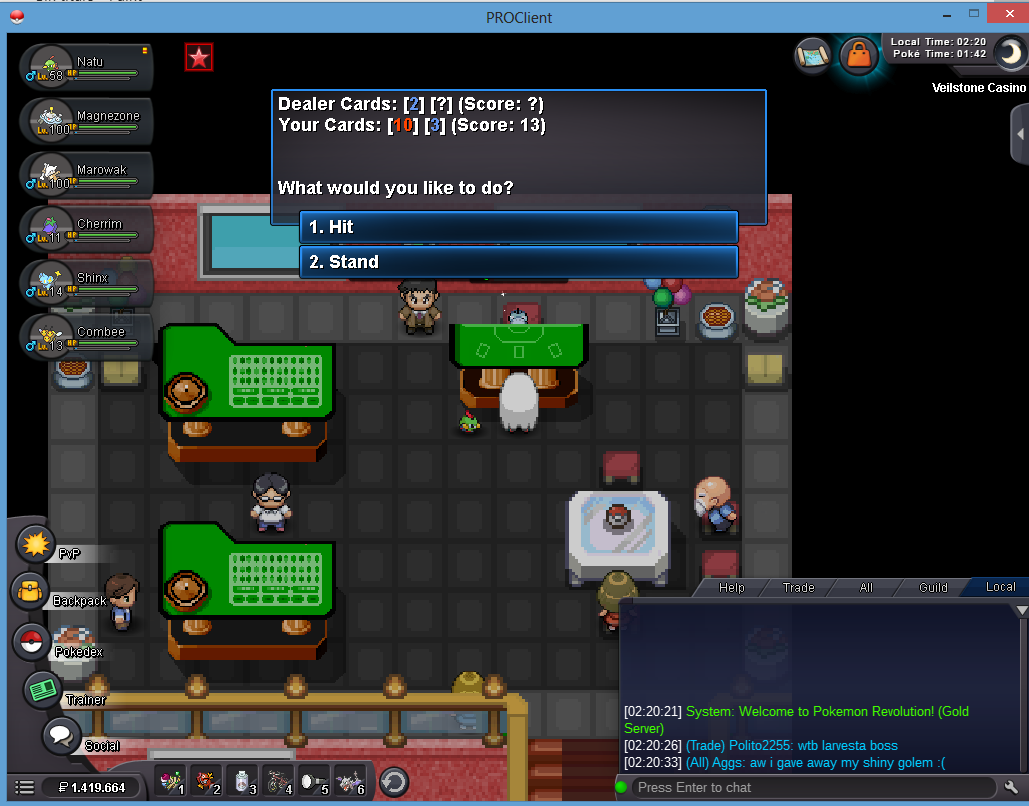
... why am I doing this guide lol. The idea to make this guide came as a joke/bet from @Frucht to try the game out and teach it to anyone who wants to bet on it. This guide is meant to be both a joke but actually a serious one on how to play the game and try and earn some prizes with the odds against you. Have a laugh and learn at the same time! Note: IT'S VERY ADDICTIVE BUT WILL CONSUME BOTH YOUR MONEY AND YOUR SOUL. Be very wary of how much money you use on this game. I'm a fan of card games, I've played Blackjack 21 for years and many other card games (The Liar, Wolf, and many more in my mother language that I have no idea how to translate). So I kinda wanted to try out how I'd do in the casino. Shall we begin betting our odds? Quack Jack, the Blackjack 21 of Pokemon! To start playing Quack Jack we need to visit the Casino of any of the Pokemon regions. We can visit the casino in Celadon, the one in Goldenrod, the one in Lilycove and the one in Veilstone. To give an example on this guide, I'll start in Veilstone (Mainly, because I'm extremely lazy and I didn't feel like moving to another region). Once inside, we can see there are two floors. We will go to the upper one. Looks nice on the outside. Pro players here gambling with their odds here after having hunted pokemon for 247 hours, trolled by RNG and having gone through a rough divorce. We will walk up slowly, menacingly to Jotaro and his Stand Star Platinum Shiny Psyduck (Quack Jack NPC) and the Casino Coin Seller. They look... shady. I wonder if they're from the Pokemafia from the Detective Pikachu movie. Once we talk to Quack Jack (Psyduck), he'll give us a few options. We can choose Yes! To play straight away. However, if what you want to do is lose all of your money, you should think twice. We'll stop, say no, thanks and turn our backs and leave this place and never come again ask him to explain us the rules, because we've come here to GAMBLE our MONTHLY pokemon salary (unless you're on Dig Spots welfare, basically). I will try and go through all of these. The goal of the game is to try and pick cards until we reach the number 21 or we reach the closest possible to 21. We are given an initial card, and so does Quack Jack get one. After you get your first one and examine it, you have to choose if you want to Hit (pick another card) or Stand (stop drawing cards). We are trying to reach the number 21. However, if we go higher than 21, we lose. If Quack Jack goes over 21, he also loses. So, how do we play? We first need to know the value of all cards. An Ace is worth one or eleven points, up to your choice. The cards with faces (Jack, Queen and King is this a One Piece reference are worth 10 points.). all the other cards are worth 2 to 10, as you will perfectly be able to see. (If it says two, it's worth two, or if it has two items in it, it's worth two. I think it's not hard to learn how to count to 10.) We will first choose how many coins we want to bet. We can buy 50 coins to the casino coin exchanger for 250k pokedollars (as certain famous guy said, it's just a small loan of 250k pokedollars). This is extremely expensive, I'm REALLY going to regret this if I don't win, but we will try our odds. (Frucht why did I agree to trying this out for the love of god how will I feed my pokemon children with no money left from betting) Now, we will bet 1 coin to start and understand how the game plays. I'll give you an example. Quack Jack gives you your starting cards. You get your first card. You can get as a maximum 11 points with a single card (you can get an Ace, which you can use either as one or eleven points, He has a hidden card, could be anything. You can then try to hit and get as close to 21 as possible. I got a 3 in my first hand. I'm very far away from 21. I hit again. I get an 8, now I have 11 points. I decide to hit again and I get a 7, I have 18 points now. Now, I choose to stand ZA WARUDO okay, I should stop with the Jojo references. Now, the dealer shows his cards. Oh, he got 20! I lose this one. However, the next game might go the opposite way and you may win. My personal advice: after 17, stand. It's a safe bet, and most times, Quack Jack would normally lose. 18 or 19 is already a strong enough number and the chances to get 21 are really against you. What happens if you hit exactly 21? Well, you Quack Jack. If you Quack Jack, you instantly win and win a bigger reward. Hitting 21 is the dream. However, it's not optimal, because our goal is to hit atleast 18 to 19, where our mathematical odds will benefit us more. We have to try and win by getting more points than that goddamn blue painted Psyduck, not try to risk it all and end up losing our savings or something else which we will not specify as it would be pretty, pretty terrifying. Before you start playing, I highly recommend you watch this youtube video which also applies to the Quack Jack (without the Psyduck, though). It will probably guide you a lot. Now, I'll start trying it out as an example! (Frucht I swear to god I am going to waste 250k for a forum guide are you kidding me lmao) I start up good, the dealer gets a really bad starting hand (just a 2, while I get a 10). This means he has to take many cards to try and reach 21. I got a 10 and 3, so I get 13, and I feel safe enough to bet and get to 21. I'm going to hit Hit and try my luck! ARE YOU KIDDING ME THIS IS RIGGED, I'M GOING FOR ANOTHER ROUND I AIN'T LETTING THIS BLUE MIDGET GO AWAY WITH MY MONEY. THIS IS BUSTED WHAT IN THE WORLD HE JUST GOT A QUACK JACK IN HIS STARTING HAND HOLY MOLY THIS GUY HAS ARCEUS TIER RNG I start with a 17. This is my time to shine! I try out to Stand and... I get Quack Jacked again. Mother of GOD this guy's luck is insane. Jokes aside, it's perfectly possible to win in this game. You only have to BELIEVE IN THE POWER OF THE CARDS, KAIBA, MY GRANDPA'S DECK HAS NO PATHETIC CARDS, KAIBA! be lucky enough and win a few times through maths and logic and being lucky (I thought the NPC was rigged at first lol). Now, we will try and see what we can buy with our single point we obtained from this (yes, I wasted 250k FOR A SINGLE CASINO POINT. This guide is being expensive.) We will go down and visit the Casino Points Exchanger and check out the options. As you can see, the Pokemon tab has some insanely rare and amazing pokemon to try and obtain them. Your other alternative is to try out and buy some items with these points. I only suggest spending them on Focus Sashes, I do not personally thing the others are worth it enough. I hope you've learned something with this guide. I had a ton of fun wasting 250k pokedollars down the drain because of a discord joke and a stupid bet of a friend to see if I could make an entire guide in less than two hours playing QuackJack and I hope you try it too! And have better luck than me, too. It is a worthwhile addiction and hobby to do if you're so reach that you use 500.000 pokedollar bills as socks or as a pillow to sleep on. There's a daily limit to playing this game because I actually got so good at it that I started winning more than 80% of my games and it would otherwise be incredibly busted. I guess now I have to go back to making serious guides lmaoo
3 points
-
Nice suggestion but the real question is : Spinda superpower when ?
3 points
-
C.O: 1.7m by Norex Insta: 4m Minimum raise: 100k The auction will end 48 hours after first bid If the auction receives a bid during the last 15 minutes, the ending point is delayed to +15 minutes from that bid, until someone being the c.o. for 15minutes wins. I will transfer the pokemon to silver so silver players can bid as well :)
2 points
-
SOLD Insta by GoldenP1kachu _ Minimun Raise: 200k - Auction goes for 72 hours after first offer - Accept cc´s as 350k and reroll ticket 700k - Insta 5m Rogg3rxD#2662
2 points
-
Username: Brax3 Server: Gold Country: London (GMT + 1)2 points
-
Username: Bingedrinker Server:Gold Country/Timezone: Belgium/GMT+22 points
-
Delusionnal i guess... Sorry but the game do not have all of the 7G poke, and Galarian pokes have 8G moveset which clearly means staff need to update our MOVESET GEN8, without Pursuit/hidden power by example. I really don't think they want to rework. Specially since all the 7G Abilities aren't coded right now. Was a good idea, but impossible to realize for now i think.2 points
-
2 points
-
Welcome to the leveling guide made for newbies! Are you tired of reading forum guides that tell you "bro you only need a Toxic Orb Pokemon with a False Swiper" yet you can't obtain it because you're still stuck against Giovanni, Sabrina or still struggling to survive against the Elite Four? You can't afford buying one because you're poor and the Pokemon they ask you to use IS A HOENN POKEMON? Or they ask you to buy half a million Focus Sashes, get Cerulean Cave access or impossible requirements for you poor fella who is still stuck in Kanto? Pro Newbie having a rage attack after being oneshot by Giovanni's Mewtwo for the 20th consecutive time (circa 2018, colorised) Are you headbutting your head against the wall (without the happiness requirement) because you have no idea how to find a False Swipe pokemon, you just started playing the game two days ago because that buddy told you HEY DUDE PLAY THIS GAME IT'S SO BIG AND FUN AND IT'S HARD but you actually now hate your friend because Sabrina keeps oneshotting your pokemon with Alakazam? I'm going to try and put some humour into an ACTUALLY EASY AND RELIABLE AND UNDERSTANDABLE GUIDE that ACTUALLY gives you FACTUAL information and DETAIL on how to REALISTICALLY level up your pokemon if you're a newbie and you have LITERALLY NO RESOURCES to start with. It doesn't matter if you're poor or just began playing 4 hours ago. You can start this method as soon as HAVING BEATEN THE 2ND KANTO BADGE. Yes, you heard me right, you can start it JUST WITH TWO BADGES. But Bhimoso, why are you making this guide? Well, I'm making this guide because a lot of guides are either half made or incomplete and tell you methods of leveling up your pokemon, but they have absurdly hard requirements for a newbie or literally put NO effort into teaching you how to level up your pokemon. I am going to treat you like children in this guide, so you can follow this better. Introduction This guide will aim to teach you MANY, MANY methods of leveling up ANY pokemon (attackers, tanks, utility pokemon, pokemon that cannot fight by themselves (Metapod, Ditto, me after eating too many pizzas), and other nearly useless pokemon you struggle with leveling up. I will try to indicate which minimum requirements you need for each method to be performed and why and when should you do it. Generally, the idea is to level up your pokemon using ANY of these methods below until it can fight by itself in high level areas. The idea is to bring it to around level 60 to 70, then let it level by itself. This, however, is not always possible. Newbies might be unable to level up Fire Types until they unlock more regions because Kanto is VERY restrictive in regards to Fire Type leveling spots. The main idea is to NOT evolve your pokemon so as to level them up incredibly faster for anything you might want to use them. With the methods we will use, you shouldn't take even one hour to level up something from level 10 to level 80. If you evolved your pokemon because you wanted to have fun in PRO blasting everything with your Charizard, you will still be able to follow this guide and enjoy the game. DO NOT FEEL RESTRICTED JUST BECAUSE YOU EVOLVED YOUR POKEMON TOO EARLY. DO NOT FEEL BAD, USE YOUR FAVOURITES AND ENJOY IT. This is A GAME, after all. You're supposed to have fun. This guide will be updated constantly, because there are MANY methods we will use and more that we can add in. However, I will keep this Kanto obtainable pokemon only for now, because I want to help out newbies specifically. If I make an exception, I'll notify it. Recommended mechanics that will help you out! Guilds Guilds give you an inherent EXP bonus JUST FOR BEING IN THEM. Depending on the size of the guild, this bonus goes from 2.5% to 10%. While at first this bonus may seem minimal, keep in mind 10% means that, one every ten fights you will basically get an extra fight worth of experience. Every ten fights, you will basically have fought eleven instead. It QUICKLY adds up while you faint hundreds of pokemon. If you join a LADDER Guild (a Guild that in the last season ended in the Top 10 spots in the Guild Ranked Ladder), you will additionally gain a 25% bonus EXP. Thus, this bonus can reach a 35% EXP bonus. Now you realise that, once every three fights, you've gained enough EXP for a fourth fight. That's an amazing amount of experience. Thus, if you're a newbie, no matter if your Guild is filled with newbies, JOIN A GUILD! There are NO penalties for joining and leaving one. Membership and EXP Potions If you want to go the Premium way and support this amazing game, there's also another extra help you can take. You can always donate to purchase a Coin Capsule, and then you have two amazing options. You can purchase the Membership Medallion, there is the 15 day, 30 day and 60 day version. Having a Membership active gives you a 50% exp bonus, which is the one we're interested in. No matter the duration, the bonuses are the same, but it lasts longer the bigger the Medallion is. A 50% EXP boost is INSANE. Once every 2 fights you get an extra fight worth of EXP. Not only that, did you know that an entire MONTH (yes, MONTH) of Membership is only FIVE euros? It's so cheap it's not even a joke. Instead of getting a pizza one night, you just go and donate the five euros you would've spent. For the ENTIRE month, you get 50% extra EXP, 100% bonus money (this is the best part, do you know that money you get from fights? Well, NOW YOU GET DOUBLE THE MONEY), access to exclusive very rare pokemon, rare bosses AND rare Membership Only areas. Memberships are incredible and I ALWAYS recommend dumping FIVE dollars a month. If you are unable to donate, there's no issue! Coin Capsules and MS Medallions are tradable, so you can purchase them with Pokedollars from other players (or trade other in-game items for them). EXP Potions are also another option. If you are going to train many, MANY pokemon, you can purchase an EXP potion that gives you a 25% EXP bonus for 72 hours. This is a very good option if you are a Service Provider and train pokemon for Pokedollars. I only suggest purchasing these if you are stacking the Guild Boost, an Active Membership and you must train 10 or more pokemon for someone (or for yourself). Held Items and Consumables Held items are a very, VERY important of Pokemon. Held items range from Berries that activate under specific conditions (a move runs out of PP, your health goes below 50% HP, etc etc and so on), PvP items that boost a stat but enable a secondary condition (Assault Vest boosts your SPDEF by 50% but does not let you use status moves), PvP/PvE (in reality they are PVP, however, these are more suited for PvE too) items that do something similar (Choice Items), type enhancing items (Miracle Seed, Hard Stone and so on, the Type Tables), and other items. Some of these items are consumable and some are not! Some are very recommended while others are only recommended in specific circumstances. I will list the types of items that are normally used in EXP training that you should (OR SHOULDN'T) use while leveling up. They will be classified in different sections. Recommended: Berries Berries are so overlooked that I'm even surprised people don't use them. Berries are obtainable ANYWHERE. You can farm them up extremely quickly, pick them up and equip them onto your pokemon. What I often recommend with your berry usage is that you equip Leppa Berry onto your pokemon if your pokemon is strong enough to fight constantly without stopping so that, when one of its moves reaches 0 PP, Leppa Berry will automatically restore 10 PP. This makes menuing faster in long periods. Additionally, you can also equip berries such as Lum Berry or other status berries (Persim, for example) to heal up any status you may find. While these are situational, Lum and Cheri berries are nice to have in Cerulean Cave if you keep fighting Electrode and Raichu, for example. In Stark Mountain, you want anti-Burn berries and anti-Poison berries too. Sitrus berries can also be an okay option to heal up some of your pokemon's HP if it goes down slowly fight by fight. Do not be afraid to use berries since they respawn! Healing Items When you get further into the game you'll realise you'll be stocking up on hundreds of Potions, Leppa Berries, Super Potions and other healing items you'll barely use in the Endgame because you just travel to the Pokecenter every time you train pokemon. Don't be afraid to use these items if your healing point is far away from where you are leveling up your pokemon. Choice Items The Choice Items are often overlooked at how good they are at leveling up in PvP. These items, more often than not restricted to PvPing as they provide great bonuses but leave you locked into a single move, are amazing features in PvE. Are you at level 30 fighting a level 50 and you're a bit slower than them but if you hit them you would oneshot them? Equip a Choice Scarf, now you outspeed, oneshot and faint the wild pokemon! You're now able to level up in high level zones. Choice Band will help your ATK increase a LOT and Choice Specs will also power up your SPATK moves. These are great items you can have your pokemon hold while leveling up. The 50% boost is massive as you'll be able to faint way higher level pokemon you normally would be unable to. Keep in mind these items will lock you into a single move unable to switch until the fight is over or until you switch to another pokemon. These items are easily obtainable in the Item Recycler. Assault Vest and Rocky Helmet The Assault Vest is one of the best items to powerlevel slow but tanky pokemon such as Tangela. This will power up your SPDEF stat by 1.5 stages while as a restriction it will not allow you to use status moves. This item can easily be used by offensive slow tanks that can benefit from Drain Punch or Giga Drain or Leech Life or other life draining and recovering moves while they level up. While it's way more restrictive than Choice Items, they allow you to switch between moves! The Rocky Helmet will deal a 12.5% of the opponent's max HP on every physical hit you are hit by if it makes contact. Contact: Tackle Not contact: Earthquake. The move MUST HAVE PHYSICAL CONTACT for this item to work. This item is heavily recommended for tanks like Ferroseed who can combo Iron Barbs + Leech Seed + this item + Giga Drain to level up. Eviolite Possibly one of the most broken items introduced in Gen 5 (if not the most), this item multiplies your DEF and SPDEF by 50% if your pokemon is not fully evolved. Thus, any slow or tanky pokemon that has not fully evolved into its final stage can equip this item to be disgustingly powerful. The prime example is Chansey, who abuses this to reach absurd extents. However, ANY unevolved form can use this item, so you can stick into ANY pokemon! Leftovers/Black Sludge Leftovers is probably the best PvE item in the game. This item heals a bit every single turn (as long as you don't get fainted, of course) while you are in battle. It's very easy to find in Dig Spots, wild Munchlax and Snorlax and it's a stick-to-anything item. Healing nonstop without restrictions? Why wouldn't you want this? Stick this onto any pokemon! And yeah, Black Sludge does the same but damages non-Poison Types and only heals Poison Types. A bit restrictive but eh, you can also try it! Wise Glasses and Muscle Band Probably some of the worst, most memeable items ever, Wise Glasses and Muscle Band power up... a 10%. Yes, only a 10%. Wise Glasses powers up any SPATK move by 10%, Muscle Band any ATK move by 10%. There is quite literally no reason to use this over Choice Band and Specs massive 50%, even if they restrict you into a single move, because you will normally avoid fighting any wild pokemon you can't beat anyway. Type Enhancing Items + Expert Belt Type enhancing items are REALLY easy to find. These items are the Plates of each type + held items such as Sharp Beak, Hard Stone or Soft Sand. These are easily found in Dig Spots and held by wild pokemon. I REALLY recommend you use them as a newbie because they are an easy to obtain 20% boost to the specific type's attack. Expert Belt also powers up any move by 20%, but it's not restricted to a specific type, but it must be a supereffective attack (for example, Water against Rock). Brightpowder This item provides you an extra 10% evasion boost. You can use this item as a gimmick 10% chance to dodge a hit. Imagine your opponent is a level 60 Gyarados with 1 HP left and your Caterpie is at level 3 with Brightpowder equipped. If you get lucky you'll dodge the hit, Tackle it and level up over 30 levels in a single fight. This is a gimmick we will often combine with Hoppip! King's Rock/Razor Fang Mostly pure gimmick items, these give you a 10% chance to flinch on most attacking moves. This can be easily abused with Skill Link pokemon or pokemon that use multi-hit moves such as Bullet Seed, Arm Thrust, Pin Missile, Bone Rush and so on, as the chance to flinch applies to every single hit. There's more moves: Fury Attack, Double Slap, Tail Slap (?), Rock Blast and more. Razor Claw/Scope Lens Another gimmick item, these two items increase your chances to critically strike opponents. These are mostly combined with abilities such as Super Luck or Sniper + Focus Energy or high critical chance moves such as Karate Shop, Night Slash, Leaf Blade, Slash and more. Quick Claw A fun gimmick item, this can be your solution to level up pokemon at extremely low levels after you have false swiped an opponent to 1 HP. Equip it to your pokemon and pray that you get lucky and manage to attack. You will get many levels in a single fight. This can be done until you think the pokemon can level up by itself! Smoke Ball/Logging Out The Smoke Ball has no effect in battle. However, it allows you to escape any unwanted fights. You can equip this item to a pokemon if you want to avoid fighting specific pokemon. For example, a Dark Type in Cerulean Cave can fight any Slowpoke or Slowbro because they only know Psychic type moves. However, it will have to put a fight against Golduck and Psyduck, who know Hydro Pump. TMs and HMs Fun and not so known fact: if you replace a learned HM move with another one, your PP will automatically be restored. Very useful to level up Water types that can learn Surf, Dive and Waterfall. You can teach them substituting the HM previously known without having to go back to a pokecenter to heal! Teach your pokemon useful TMs they may use to cheese high level pokemon! Shell Bell (not coded currently) This item heals you for 1/4 of the HP damage dealt to your opponent. However, this item is currently not coded (it would be too easy to abuse in PvE against bosses). Not recommended: Focus Sashes Before you begin reading: LET ME PERSONALLY SHOUT THAT I'M EXTREMELY AGAINST WASTING FOCUS SASHES TO LEVEL UP YOUR POKEMON. There's MANY methods you can use that avoid wasting Focus Sashes when you could instead spend them in PvP or farming Bosses. However, it is true that Focus Sashes will always give you a 100% chance to live a hit (as long as you're at FULL HP AND you don't get hit by a multi-hit move). For newbies, it is an optional choice to spend PvE coins into leveling up a few of their best elite pokemon from level 10 to level 50-60. However, THIS IS AN EXTREME WASTE OF RESOURCES. PvE coins can be better spent buying other rare items (such as Rerolls) that can be sold in the market for way, WAY better profit. And if you're not looking at profit and just leveling up your pokemon, there's MANY ways to avoid using Focus Sashes. Please, DON'T waste PvE coins on Sashes as a newbie. Use Sashes for PvP or to cheese PvE bosses. They are expensive to find and purchase. Gems Gems are truly, truly, truly outrageous. But you know what else they are? Expensive and rare. These can only be obtained from Excavation Artifact Pieces and from Dig Spots, which all run on temporary cooldowns. You know what this means? You're wasting consumable items that can be rather used in PvP instead. Don't waste them to level up your pokemon, there's way better methods. Abuse the Type Chart Immunities! While it may look basic as hell and you only think about the type chart as "haha Geodude get surfed go brrrrrrr", the type chart has a lot of in-depth potential. What's the basic concept of abusing the Type Chart? Well, we will always try to focus on leveling our pokemon in specific areas where it may be a good idea to level up our pokemon. For example, Flying and Fire types are more often than not leveled up in Pinkan Island because it's infested by Bug and Grass types. Grass and Water types are often leveled up in caves as they are infested by Ground and Rock type pokemon. We will always abuse the type weaknesses of our opponents. However, there's more to this. Do you also realise there's a few types that are immune to each other? This mechanic is borderline broken and can be exploited to very absurd levels. Let me explain. When you find a wild pokemon in the wild, check its Pokedex data. If it is a Quagsire at level 50, check the 4 moves it would learn before that level. At level 48 it learns Haze and Mist. At level 41 it learns Rain Dance. At level 36 it learns Earthquake. Thus, it will be its moveset, ALWAYS. So, how can we exploit this? Well, the consumable item Air Balloon gives us an immunity to Ground Type attacks. Now, let's pair this with any pokemon. Congratulations, you're now immune to everything 99% of Quagsire in the wild can attack you with. How do we make this better? Well, when you realise that the TM for Toxic is cheap, accessible in Fuchsia Gym for a low price, and can be learned by 95%+ of all pokemon in existence, which allows level 3 Rattatas and basically ANY low level pokemon to faint level 50 pokemon while being invincible... You get the point. We can exploit this by training 95% of all pokemon in PRO against specific pokemon in the wild, until they are at a high enough level to fight by themselves. And this is not the only trick there exists! For example, Golett and its evo, Sandyghast and its evo are immune to all attacks Raichu has in Cerulean Cave (it only has Quick Attack, Thunderbolt and Thundershock). Even Ground types (while not immune to Quick Attack) can level up against Raichu there. Slowbro and Slowpoke in Cerulean Cave only have Psychic type attacks, so you can Toxic them with a low level Dark Type pokemon and win 1 v 1s against them, even at level 5. Golduck and Psyduck there only have Water Type attacks, so you can use a Storm Drain, Water Absorb or Dry Skin pokemon at level 5 and still win against them. Need to train a Ghost Type? Fight level 57 or above Weezing in Stark Mountain! Want to level up a Flying Type or Levitate pokemon? Fight level 52 or below Quagsire in Mt Silver! And any pokemon holding Air Balloon too. There's also abilities that will grant you extra immunities. For example, you can level up Fire Type immune pokemon with Flash Fire if you also equip them with an Air Balloon by fighting high level Magcargo in Stark Mountain! Specific NPCs you should target, Copycat Lamsie, Trainer Refights, Elite Four, Gym Leaders If you have paid attention, check near each Gym in each city where you can find one. You will find an NPC named Copycat Lamsie. This NPC copies the last team a player used to beat that gym. Thus, they are an amazing source of experience: most players will beat the gyms with very high leveled pokemon. This is a small fun challenge, you'll be fighting real player's teams! You might find a level 90 unevolved starter and then 5 low level pokemon, a full high level evolved team... you can find anything. The important fact is that all of these teams will bring you a lot of experience and you'll be able to beat this NPC every time someone beats the gym. Thus, fight them whenever you can! They're an amazing EXP source. Aside from that, normal trainer NPCs allow you to refight them every 7 days. You should always refight NPC Trainers for two main reasons: they give you pokedollars AND each time you refight them, they will be a bit stronger than before and give you a lot of EXP. I recommend you fight all NPC trainers from the 4th to the 8th badge whenever you need to level up some low level pokemon. Carry your False Swipers with you! Gym Leaders can be refought once every week and they have very high level pokemon you can easily use to level up your pokemon against them. They also reward you with Gems! (wow, such amazing reward, note the sarcasm). Go around each region and refight high level trainers whenever you want to level up something in your team! As a small extra, remember that you can refight the Elite Four infinitely as long as you don't beat it. Thus, if you're stuck there, you might as well repeat the fights nonstop and slowly level up until you're able to beat them! Using Synchs to our advantage! You're now going to be like "Bhim wtf are you saying, THIS IS A LEVELING GUIDE, NOT A HUNTING ONE". Credits to DERWINS for this idea. Remember your Synch collection you use to hunt wild pokemon? Good. What does Synchronise do? It will make 50% of all wild pokemon have the same nature as your synch. Now, what happens if we use specific Synchs on purpose to make leveling easier? Let's observe some examples. I have a Gastly at level 50. I am fighting a Slowpoke at level 65. My Gastly with Shadow Ball deals around 90-95% of the Slowpoke's max HP. Now, the Slowpoke uses Psychic and my Gastly faints. How could we have prevented this? Well, let's remember the natures in the game. Adamant Brave Lonely Naughty Modest Quiet Mild Rash Jolly Timid Naive Hasty Relaxed Impish Bold Careful Calm Sassy. Lax, Gentle, Hardy, Quirky, Bashful, Serious, Docile (ignore these 7). Now, think a bit. What do these highlighted natures do? They reduce a defensive stat and increase an offensive stat. If the Slowpoke had a Naughty, Rash or Naive nature, it would've had less SPDEF. That 10% less SPDEF would've let my Gastly faint the Slowpoke in one hit. Do you understand now? If we strategically put a FAINTED Synchronise pokemon in the first slot of the party with the appropriate nature we want the wild pokemon to have, we will have an easier time when leveling up. If I want to level up a Magnemite in Cerulean Cave, I will surf there. When I surf there, only Psyduck, Golduck, Slowpoke and Slowbro spawn. These only use SPATK moves. Here I have a few options: -Carry an Impish Synch (reduces their SPATK, which makes them less dangerous, and gives them more DEF, which is irrelevant because Magnemite attacks with SPATK moves) -Carry a Relaxed Sync (reduces SPEED, if we want to outspeed Psyduck and Golduck, and gives them DEF, which is irrelevant). -Carry a Naughty Sync (reduces SPDEF, makes them more vulnerable to attacks, and increases their ATK, which is irrelevant). Now you understand how to exploit the Synchronise mechanic! Do you want to exploit it to the fullest? Do something like this: The first slot of your party is now a Naughty Sync. The slots two to six are all SPATK users. You'll now have an easier time! DO NOT SWITCH TRAIN YOUR POKEMON! I will not get tired of saying this: DO NOT SWITCH YOUR POKEMON MID BATTLE SO THAT THEY SHARE EXPERIENCE. Due to PRO's stupid formula, instead of each pokemon getting 50% of the total experience, most of the time you won't even get 10% per pokemon. Let me explain. Imagine a level 5 hoothoot and a level 5 pidgey share the experience of fainting a wild level 50 Quagsire. Individually you would gain 150000 experience. However, sharing experience would result in each pokemon only gaining 10k each. Not even a 15th of the total experience. How the level difference affects the experience you get. You earn more experience the less levels you have compared to your opponent. For example, a level 5 will gain an absurd amount of experience if you fight a level 60 pokemon compared to a level 50 pokemon fighting a level 60 pokemon. The difference is so absurd that a level 5 pokemon can gain up to 50 levels if you fight a level 60 pokemon and win (the best example is Magikarp). Use this strategically and take calculated risks to level up way faster! List of methods I recommend to level up your pokemon + requirements Method 1: Sturdy + Revengekill (priority or not) For this method, we will find a wild pokemon that has the ability Sturdy. We will attack it with a strong attack so we leave it with 1 HP. Then, we will spam moves until it faints. Afterwards, we will use a priority move with a low level pokemon, any attack while equipping a Focus Sash, or equip a Quick Claw and pray we are lucky! The low level pokemon will get all the experience. Example on how this method works. This method is possible as early as after the 1st badge, when Geodude and Graveler and Onix Spawn in Mt Moon. Method 1b: Sturdy + Endeavor + Revengekill (priority or not) For this method, we will use a low level Donphan, Aron or any of its evolutions with the ability Sturdy and the move Endeavor. We will fight any very high level pokemon while we use a low level Donphan or Aron. It is preferable that you do this trick against Water Type pokemon (surfing in Mt Silver, Dragon's Den or Cerulean Cave is the best idea here) because they will activate your Sturdy ability immediately. When you use Endeavor, the opponent's HP will be reduced to the same HP number you have. Thus, you will leave the opponent at 1 HP, ready to be fainted anytime. Example on how this method works. This method is only accessible if you have unlocked the daycare or a friend teaches your Donphan and Aron or evolutions the move Endeavor. Method 2: False Swipe + Toxic Orb + Revengekill (priority or not) For this method, we will find any wild pokemon while we navigate through maps with our False Swiper. We will have a Toxic Orb equipped so that Toxic Poison faints us in around five to six turns. After we have fainted we will be able to revengekill and get all the experience! Example on how this method works. This method is only accessible if you obtain a Toxic Orb (from PvE, PvP coins or the Bug Catching Contest prizes, also in other quests). Note that you can actually do this method by fighting wild Weedle in Route 2, letting yourself be poisoned on purpose, then traveling to the specific place you want to pull this trick. Thus, it's available as early as after the third badge (when you can capture Cubone, who learns False Swipe at level 27, or after the fourth, with Farfetch'd at level 45). Method 2b: False Swipe + Memento + Revengekill (priority or not) For this method, we will False Swipe an opponent until 1 HP, then we will Memento and immediately attack with the next pokemon. We normally only do this if the pokemon has a priority move or Focus Sash, Brightpowder, Focus Band or Quick Claw. Example on how this method works. Method 2c: False Swipe + Trick Room + Memento + Revengekill (priority or not) For this method, we will False Swipe an enemy pokemon until they are at 1 HP. then, we will Trick Room so that the slowest pokemon will move faster for the next five turns. We will Memento. Now, with the low level pokemon we're free to attack first and get all the experience! Example on how this method works. This method is unfortunately only available to Gallade, who needs the Daycare for Memento + the TM Trick Room from Hoenn + the TM False Swipe from Johto. Method 2d: False Swipe + Future Sight + Memento For this method, we will False Swipe until the wild pokemon is at 1 HP. Then, we will Future Sight, immediately afterwards we Memento. The pokemon we switch into will obtain all the experience. The method requires exactly the same as the one mentioned just above unfortunately. Example on how this method works. Method 2e: False Swipe + Life Orb + Revengekill For this method, we will False Swipe with any pokemon until the wild pokemon is at 1 HP. Life Orb will recoil and slowly kill us. Then, we'll revengekill with a lower level pokemon. I normally do this method with Shedinja because it will faint in a single hit with Life Orb Recoil. Example on how this method works. You can use any false swiper. As a final note, keep in mind you can just do this method but letting your opponent slowly kill you anyway. Method 2f: False Swipe + Toxic Orb + Trick Room + Revengekill (priority or not) For this method, we will False Swipe the opponent until 1 HP. Then, we will wait a few turns and Trick Room when we are about to faint. We will revengekill with the slower pokemon and take all the EXP. Example on how this method works. Method 3: Toxic + Memento + Air Balloon (or Flying type pokemon / Ground immune) This method utilises a pokemon with the move Memento, the move Toxic and an Air Balloon. The best example is to use a Hoppip, as it's already immune to Ground Type moves + it learns Toxic via TM + Memento via level up. We will Toxic a Quagsire, then Memento, then wait a few turns for the pokemon to faint as it cannot hit us while we hold the Air Balloon. Example on how this method works. This method is as early available as after the 5th Kanto Badge. Method 3b: Toxic + Flash + Memento This method is a bit rng reliant. We will use Toxic on the first turn, Flash for a few more turns and then finally Memento. We will need to be lucky and dodge the last hit. For this, we can use the item Brightpowder. We can also use a priority or strong move if we believe we'll be faster than the opponent (or just waste a Focus Sash if we think we need it). Example on how this method works. Method 3d: Toxic + Memento + Protect Exactly the same as the method mentioned just above. However, this method uses Protect, so it's 100% failproof. Example on how this method works. Method 3e: Toxic + Leech Seed + Flash + Memento If we want to make the method 3b faster. Example on how this method works. Method 3f: Toxic + Leech Seed + Flash + Memento + Protect If we want to make the method 3e safer. Example on how this method works. Method 4: Perish Song + Yawn + Healing Wish This is the most used method currently. If you have access to the daycare you can teach Chingling and its evos Perish Song and Memento. You can combine both with Protect to level up ANY pokemon. VIDEO HAS TO BE RERECORDED FOR THIS METHOD. Method 4c: Perish Song + Memento + Air Balloon If method 4b does not work because your pokemon cannot learn Protect, we'll do this in Mt Silver against Quagsire. Example on how this method works. Note that I don't repeat Method 4 because Method 4 does not require your pokemon to learn any specific moves. It's just in case there's a bugfix for the method. Method 5: Flying Types/Levitate/Air Balloon (mentioned above already) This method works for ANY pokemon that is immune to Ground Type attacks. Simply go to Mt Silver 1F, 2F or 3F and fight ANY Quagsire at level 52 or below. It only has Ground Type damaging moves until level 53. Thus, if you have an Air Balloon or are immune to Ground Type attacks, they are free experience. Note that this trick also works in Diglett Cave against level 18 to 22 Diglett and level 25+ Dugtrio. It is less reliable there though and gives less experience. Example on how this method works. To access Mt Silver, you must have beaten the Johto Elite Four. Method 6: Dark Types Dark Types are completely immune to Slowpoke and Slowbro's attacks in Cerulean Cave. Teach your Dark Type the TM Toxic and take care of them! Method 7: Water Immune Abilities Pokemon with abilities that grant them an immunity to the Water Type are invincible against Golduck and Psyduck in Cerulean Cave. Teach them the TM Toxic and beat them! Note: Dry Skin, Water Absorb and Storm Drain are these abilities. Same as above but you do this against Quagsire if your pokemon cannot learn Protect. Example on how this method works. Method 8: Steel Types Steel Types are completely immune to all attacks Arbok has in Cerulean Cave. Fight them for free experience! You can combine the Curse methods by Cursing and fainting on purpose against Arbok and switching in your Steel Type to get all the EXP. This is done here because Arbok is immune to Toxic. Method 9: Gastly Curse spam for newbies! If you are stuck against any Elite 4 (Kanto or Johto), there is a method you can use to level up any pokemon. Capture five Gastly at any level whose HP ends in 0, 2, 4, 6 or 8. You can also EV train its HP stat until its HP ends in this number. Find a wild pokemon who only has Ground, Fighting or Normal attacks (or a combination of both). To do this, open the Pokedex and check the wild pokemon's level up moves. For example: Quagsire before level 53 and around 40+ only has Ground type attacks. Ursaring, Marowak and Donphan only have Normal and Ground type attacks at 50+. Against these pokemon, use Curse once to lower your HP to half. The enemy pokemon will lose 25% of its max HP per turn. Wait until the enemy's HP is 25%. Use Curse. Switch to a new pokemon after Gastly and use Protect. You get all the EXP! This can be easily performed in Victory Road Kanto B3F. REQUIRES VIDEO RECORDING.
1 point
-
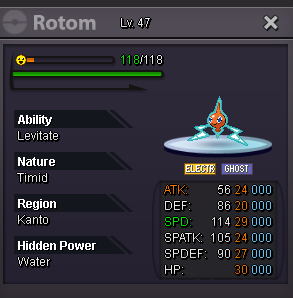
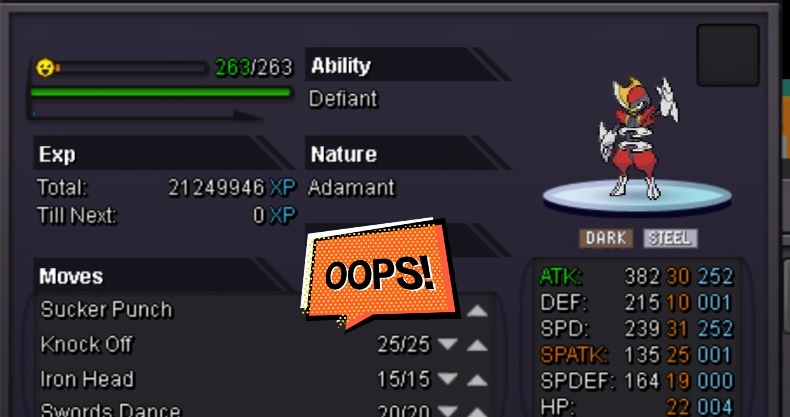
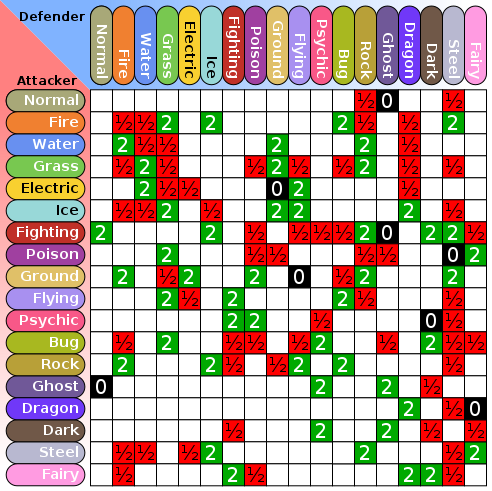
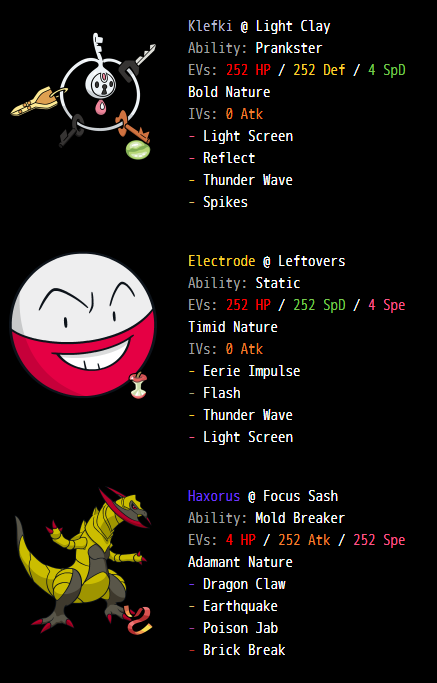
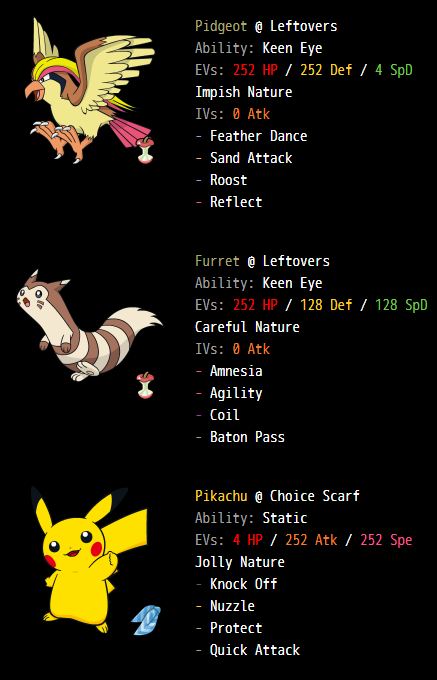
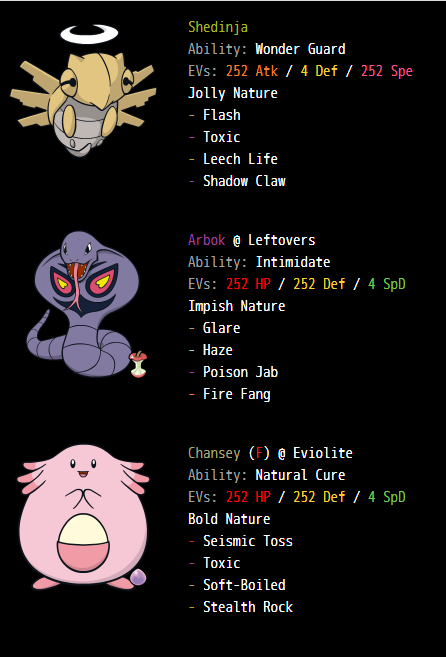
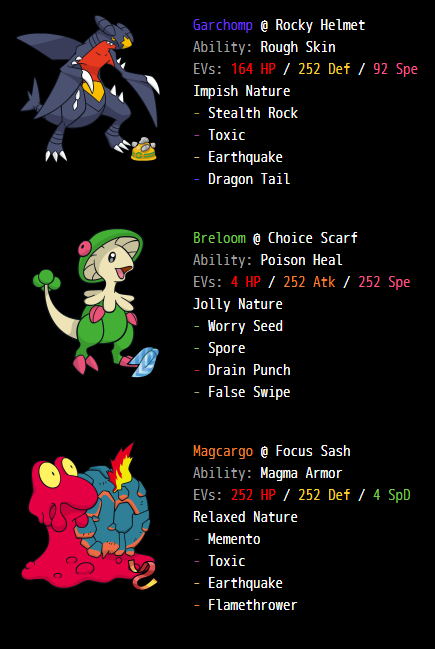
Boss Guide Main Strategy :- ⦁ Start With Klefki , Do Light Screen (for Spatkers) and Reflect (for Atkers) according to the opponent . Then Paralyze the Foe with Thunder Wave and after that set Spikes until Klefki dies or switch out if all spikes are set up and Klefki is still alive. ⦁ If attacker then after klefki go to Pidgeot , Lower its atk using Feather Dance thrice , then lower its accuracy by Sand Attack 6 times (Use Roost in Between if Pidgeot's life is half or lower) , then switch out . ⦁ If Special attacker then after klefki go to Electrode , Lower its Spatk using Eerie Impulse thrice , then lower its accuracy by Flash 6 times , then switch out . ⦁ After Pidgeot or Electrode , go to Furret and maximize its stats by using Coil (x6) , Agility (x3) and Amnesia (x3) , after that use Baton Pass and switch to Haxorus . ⦁ Now Sweep with Haxorus according to opponents type weaknesses , remember if all move are normal on a poke always use Dragon Claw because of its STAB , except on Steel and Fairy types. Here are Set Details of all 12 Pokemon :- [spoiler=MAIN BOSS TEAM] [spoiler=EXTRA POKEMON] Note - For Shedinja and Magcargo set details doesnt matter much , you can use any type of set just they should have the first 2 moves , other 2 moves also doent matter . For Breloom and Arbok set matters but moves doesnt , you only need Worry seed on Breloom and Glare , Haze on Arbok . Note - For Bosses Erika , George , Entei Guardian , Officer Jenny , Thor use Lum Berry on Garchomp Instead of Focus Sash . Exception Pokemons :- ⦁ Arbok - Bosses like Bruno , Raikou Guardian (See its Article to clear about Zekrom) , Shamac , Toothless , Link , Naruto Fanboy , Pofessor Rowan use Ground type pokemon as starters which cannot be Paralyzed by Thunder Wave . To Paralyze them you have to set up with Klefki first and then switch to Arbok and paralyze them using Glare and then go on to Pidgeot or Electrode . ⦁ Shedinja - Many bosses like Erika , Suicune Guardian , Lt. Surge , Professor Oak , Terminator , Urahara and Lorelei use pokemon as Starters which cannot do anything to Shedinja because of its ability Wonder Guard . So taking advantage of that just start with Shedinja and do Flash 6 times and then switch on to Klefki and follow the main steps . (Erika , Terminator , Lt. Surge and Urahara can also be defeated with Normal Strategy) ⦁ Breloom - Chuck - Machamp (No Guard) - Attack never misses Misty - Milotic (Competitive) - Spatk is raised if any stat is lowered The Pumpkin King - Bisharp (Defiant) - Atk is raised if stat is lowered James - Malamar (Contrary) - Every stat changes is reversed Steven - Metagross (Clear Body) - Stats cannot be lowered So for all the above bosses use Breloom having the move Worry Seed . Start with Breloom and just do Worry Seed and let him die , and then go on with the main strategy . (You can use any poke with Worry Seed but i prefer breloom because everyone use it as an false swiper ) ⦁ Pikachu - Lance (Dragons Shrine) , Pewdie , Koichi and Nikola bosses use their Starter with life orb which gets killed due to recoil before u can set up and Tigerous uses Salamence with Lum berry which could also be a problem . So start with Pikachu holding Choice Scarf and use Knock Off to remove their Life Orb (Use Nuzzle for Tigerous Boss) and then go on with the main straegy . Note - Pikachu needs at least 12 spd ivs to outspeed nikola's Mewtwo while holding choice scarf . Some Bosses Which Need Different Strategies :- ⦁ Bugsy - For Bugsy , Start With Impish Garchomp and set up Stealth Rock and then use Dragon Tail on Scyther because Scyther uses Brick Break which Breaks Reflect , that could be a problem for Pidgeot to lower its atk cause it also knows Swords Dance . ⦁ Shary and Shaui - This is One of the Hardest Boss in Game , so to defeat this you have to bring Shedinja , Garchomp , Electrode , Furret , Klefki and Haxorus (No PIdgeot) . For Shary , start with Garchomp and use Earthquake on Flareaon (Life Orb) and kill her . Now comes Mienshao , he will use High Jump Kick on Garchomp , switch to Shedinja and Mienshao will get hurt because of crash damage . Then he will use Stone Edge so switch to Garchomp again . Then repeat this process until Mienshao dies , then comes Meleotta . Let shedinja die and then go to klefki and follow the main strategy using electrode. For Shaui , Start With Klefki , set up light screen , paralyze Shaymin , then go to electrode and lower its Spatk and Accuracy and then switch to Garchomp and set Stealth Rock cause Azelf have Focus Sash and we have to break it . Then just setup with Furret and Baton Pass to Haxorus and sweep . Note - Shaui have 2 pokes with focus sash , Azelf and Alakazam , azelf's sash will get broken by stealth rock but alakazam's wont because of its ability Magic Guard. So Remember to put Focus Sash on Haxorus Before Battling Shaui , so that he can survive a critical hit from HP Ice . ⦁ Raikou Guardian - Start with Shedinja and Kill it's Zekrom (Life Orb) and then let Shedinja die , set up with Klefki and then switch out to Arbok because its second Pokemon is Excadrill (Ground Type) , paralyze him and then continue the main strategy using Pidgeot . Team :- Shedinja , Arbok , Klefki , Pidgeot , Furret , Haxorus (No ELectrode) . ⦁ Xylos - Xylos starts with Victini which OHKO's Klefki and Electrode and Pidgeot too , if reflect is not up . So , for that u have to start with Klefki , use Reflect and then go to Pidgeot and use Feather Dance and then Roost twice and then Feather Dance , use Roost time to time whenever pidgeot's life is half or less . After lowering its stats , switch to electrode paralyze her and then Set up with Furret . ⦁ Saphirr - Start with Magcargo and use Memento and then go to klefki use Light Screen and then Reflect and set up spikes if he still survives . Now just follow main strategy using Pidgeot . If you are using absiel rope then you can use Arbok in 6th slot to paralyze Groudon after klefki . Note - You need a Fire Type pokemon in team and a pokemon with Rock Climb or an Abseil Rope to reach Saphirr . So team will be Magcargo , Klefki , Pidgeot , Furret , Haxorus and Rock Climb Pokemon / Arbok (If using Abseil Rope). ⦁ Professor Birch - Birch uses Medicham which gets Killed From High Jump Kick's Crash Damage before Furret can set up and it knows Fire Punch too so we cant kill him using Shedinja . So use Pikachu holding Focus Sash this time . Start with Pikachu , use Protect he will use High Jump KIck and will get Damaged then Attack him using Quick Attack or Knock Off , Pikachu will survive bcoz of sash , now again use Protect and Medicham will die bcoz of Crash Damage . Now go to Klefki and Follow the main Strategy . Team :- Pikcahu (Focus Sash) , Klefki , Pidgeot , Electrode , Furret , Haxorus ⦁ Ash Westbrook - (There is a glitch with Ash Westbroook for now , Knock Off Doesnt Remove Arceus's Life Orb . Hope it gets fixed soon , for now there is a different strategy) Ash starts with Dialga which Knows Roar , and will eventually use it when u set up with furret , so use Chansey . Start with her and Kill Dialga with Seismic Toss and also set up Stealth Rock with Chansey , then comes Reshiram which has Life Orb and also Knows Roar . So Kill Reshiram Too Using Toxic and Seismic Toss . (Dont forget to do Softboiled to recover chansey's HP) . Then Comes Arceus , do the same with arceus too and if chansey dies just go Garchomp and Kill Arceus . Now , let Garchomp die in front of Infernape . Infernape knows Fire Blast and sometimes kills Klefki even if u set up Light screen , So U have to paralyze Infernape . Then go to Pidgeot and use Reflect first , now follow the main strategy . Team :- Garchomp , Chansey , Klefki , Pidgeot , Furret , Haxorus ⦁ Thor - For Thor , you just ave to put Garchomp in 6th Place because it's easy to set up and sweep with haxorus but his last pokemon is Lugia which could survive a Dragon Claw from Adamant Haxorus depending on your Atk IV's and lugia will survive a Jolly Haxorus's Dragon Claw Definitely and will kill Haxorus in a Critic from Aeroblast . So Before setting up with Furret you have to Set Stealth Rock using Garchomp . (Sometimes Klefki is not able to set Spikes becuase of which Mamoswine survives due to its focus sash and damages Haxorus and then lugia kills it in an aeroblast without a crit becuase u will take damage from Zapdos's Rocky Helmet too . So it is mandatory to set Rocks up and also Use Lum Berry on Haxorus instead of Focus Sash to cure the paralysis from Zapdos's Static Ability) After Limit is put on Bosses many people asked me to make a list of top 20 bosses to do . So i compared rewrads of every bosses and came up with this list . Hope U like it . :- [spoiler=TOP 20 BOSSES] The 20 Most Viable Bosses for Older and Newer Players :- 0. Battle Bot - If you have active membership (Not for newer players) (All Dual Bosses give higher money than single bosses) 1. Shary & Shaui - High Tier Pokemon Rewards (Need 120 Gen 1 caught dex and 38 evolved ex to access the area) 2. Medussa & Eldir - Alolan Grimer and Alolan Vulpix + Mini MS 3. Pewdie & Diepy - High Tier Pokemon 4. Thor - Tier 9 Pokemon 5. Tigerous - Gives Eumi Tokens which give good rewards 6. Urahara - Tier 9 Pokemon + PvP items 7. Brock - Fossil Pokemon + Nugget and Big Nugget 8. Morty - Gives Rotom (The best pokemon to sell) 9. Professor Oak - Gives Starters 10. Professor Elm - Gives Starters 11. Professor Birch - Gives Starters 12. Professor Rowan - Gives Starters 13. Spectify - Gives Nugget and Big Pearl + Good Pokemon 14. Lt. Surge - Gives Rotom 15. Terminator - Gives Rotom , Alolan Grimer + Good items 16. Entei Guardian - Chance to give Choice Band (Not for newer players) 17. Raikou Guardian - Chance to give Choice Scarf (Not for newer players) 18. Suicune Guardian - Chance to give Choice Specs (Not for newer players) 19. Erika - Gives Larvesta , Ferrothorn 20. Logan - Gives 2x Life Orb + Logan Mask + Good Pokemon Others 4 Bosses for Newer Players (If not able to fight Shary and Shaui) :- 21. Chuck - Gives Timburr , Mienfoo 22. Naruto Fanboy - Gives Big Pearl + Sash + Rare Candy 23. Link - Good Pokemon + Good Items 24. Misty - Pearl + Good Pokemon ⦁ Some Frequently Asked Questions :- Q. Can we use different pokemon instead of These who learns the same moves ? A. You can but i recommend to use these pokemon only . Why ? Because Firstly i used Pokemon Like Pidgeot , Electrode , Furret , Pikachu and Arbok which are easier to find for New Players . Secondly Using These Pokemon Satisfy the Type Requirements of many Bosses like Klefki for Steven , Electrode for Lt. Surge , Haxorus for Lance , Shedinja for Morty . Q. I use Staraptor , Ampharos , Gorebyss and Conkeldurr in Place of Your pokes , is it OK ? A. Gorebyss is Good , Staraptor is even better than Pidgeot because of Intimidate but i'd say using electrode is better then Ampharos because Electrode can outspeed many pokemon Only with +nature and helps in Paralyzing pokes which Klefki is not able to , like Entei Guardian's Entei . Ampharos have a very low Spd which can pose a Problem if Entei Crits Klefki and then Him too . (Anything Can Happen , Its RNG , so its good to play safe) I highly recommend Don't Use any Attacker other Than Haxorus becuase Haxorus have the Second Highest attacking Stat and he have a high Speed and He learns great Variety of Moves to Counter Different Types . Most Importantly , He has the Ability Mold Breaker which Ingores the ability of Oppssing Pokemons which is very Useful to OHKO Dragonite (Multiscale) , Lugia (Multiscale) , Sturdy Pokemons like Donphan and Unaware Clefable and Quagsire which are the greatest threat because Unaware ability ingores the Stat changes . Q. Do i need Epics IV'S on all pokes ? A. No u dont need epic IV'S , Just 20+ in their required stats . Like 20+def and HP for Pidgeot and 20+ Spdef and HP for Electrode , etc. Feel Free to ask any question in comments below . If you want know more about mechanisms of this team , you can check out my youtube channel . Here is the Link - https://www.youtube.com/channel/UCzdwC5N6AuK3ZXjPwG9ARTw?view_as=subscriber You can join my discord - https://discord.gg/RReR9Xa Thanks for Visiting !! :) You can visit my shop in forum (Silver server) :-
1 point
-
Hey guys it's me Eiden, I just installed this game. Would like to join a guild or just make new friends :) Have fun and stay safe everyone1 point
-
closed1 point
-
I want to buy a mudkip (or evos) with all stats above 20 or 25 and max atk (31), any ability works, I will pay 1m for the minimum requirements also if stats go above 25 like 28+ or 29+ I can pay even to 4 - 5M. Leave a comment if you have one, or pm me on Discord (frshavocado#2002). Thanks in advance!!1 point
-
1 point
-
1 point
-
start tyra sassy 1.1 by me1 point
-
Nice guide bro ^^1 point
-
I am unable to see the picture. =c1 point
-
Yes. You will be asked if you want to evolve at each Level up :-) Except when it's a little bugged like it was in your case. But you know what to do then now. Greetings, M3ru3m1 point
-
Username :oshay Server: gold Country: The netherlands Timezone: gmt+11 point
-
Another bump to let it be seen by newbies and other news: I'm working on analysin a LOT of the Kanto Pokedex Pokemon to make sets viable for bosses :)1 point
-
1 point
-
Hello @chtc8, Sorry for the inconvenience. First of all I would like to inform you that you shouldn't evolve your Pokes too early since higher Evos need more Exp. per Level. So a Charmander will be much easier to level then a Charmeleon. So many people don't evolve their Pokes before Level 85+ during Story. If you still want to evolve your Charmander try to let it faint one time, then log out for about 30 secs, log back in, heal up at Nurse Joy inside any Pokecenter and then it should work with the next Level up. I hope that helped. Greetings, M3ru3m1 point
-
Sold Insta by Allsmell: Will contact you on discord1 point
-
Start Offer: 500K Minimum Bid: 50K Insta Price: 1M Start Offer: 1M Minimum Bid: 100K Insta Price: 2M The auction lasts 24 hours from my acknowledgement of first bid. You can pm me in game or on forum. Payment Metods - Coin Capsule (350K) - IV Reroll Ticket (650K) - Nature Reroll Ticket (325K) - Poke Dollars
1 point
-
Torkoal c.o 550k, Volca c.o 1.25m
1 point
-
1 point
-
Why not ! Keep doing good suggestions !1 point
-
+1 I wanna try Spinda with Superpower1 point
-
Good idea! I agree with all 3 of them1 point
-
What is your IGN? Karyyy How many hours do you have in PRO?1000h+ Where are you from? (Optional) How old are you? (Optional) How far are you in the story? completed Are you interested in PvP? Y What was your highest rating in ranked? around 150 cause I don't ladder much, mostly testing team Why do you want to be a "Defiant"? cause it raise my attack when a stat is lowered How often are you in Discord? usually What is your Discord ID? Kary#47431 point
-
Don't gamble, kids. Also instructions not clear, ended up selling my house.
1 point
-
SOLD To SINLIGHT Thanks for visiting!!!
1 point
-
it happened to me 2 games in a row but in the second game neither of us switched his jynx slept my rotom and to be honest i was so tilted it happened again i just stayed in and clicked buttons but due to the bug when my rotom died, it didnt actually die on my side of the field so i could still use moves on it without picking a new mon and the game just locked up and neither me or my opponent could do anything1 point
-
No problem. Locked as resolved.1 point
-
Imma admit, i didn't even know that this existed, but I'm happy you made a guide about it. Not only did you expand my knowledge --making me from 5head to galaxy brain-- but u made an amazing guide about it. I'm very proud of u him. you should be proud of yourself too. *pat pat*1 point
-
Hello @Bhimoso, Thanks for bringing it under our attention first of all. I have cleaned up the guides subforum now. Community coordinators or staff members in general look on the forums and whenever we see something that needs moving, we move it to the right subforum, but we don't really go looking for this kind of stuff or check every subforum daily to see if there are no invalid posts on the subforum. Anyways, if you come across a subforum with a lot of threads that aren't in the correct place, feel free to report and we will take care of it. Hope this has answered it for you. Kind regards, Contrary1 point
-
That's what I'm saying. Not to replace the WQ but to add an alternative.1 point
-
None of the bosses stand out in difficulty particulalrly, think this is a solid -1 from me. I say this as someone who's only got 8 wq completions while also having every legendary available from them. 14 wq completions will give you a 68% chance of getting all 7. For people who have loads of completions(30+) and still don't have them all, mabye there is an argument for some description of a smoother. But you get to pick the one you want of all sets in the 1st instance. Also you can force legends you want by not making others available, since it's always 50% chance for legend.1 point
-
Hello @brunecia since you failed to follow the instructions properly and the insta has been negotiated your auction will be voided and you will be punished for this. Please go over the trade rules before you make a new auction: https://pokemonrevolution.net/forum/topic/119709-url The trade will be reversed. Please make a proper thread so it is clear to every player bidding. Have a nice day, Sincerely Hawluchaa.
1 point
-
-1, it's indoors and you're walking on carpet, be respectful so they don't have to vacuum everything. They may be the bad people, but respect their home1 point
-
1 point
-
your name so cute lol1 point
-
Most used Pokemon - May 2020: #Gold May 2020 Most used pokemon in ranked pvp (source: PRO database) #Rank Pokemon Count Percentage Win rate 1. Gengar 11657 26% 51% 2. Ferrothorn 11613 26% 51% 3. Dragonite 10733 24% 51% 4. Rotom-Wash 10116 23% 55% 5. Clefable 9588 21% 48% 6. Azumarill 8595 19% 52% 7. Conkeldurr 8535 19% 55% 8. Garchomp 8487 19% 53% 9. Weavile 8354 19% 52% 10. Chansey 7925 18% 51% 11. Togekiss 6920 15% 49% 12. Scizor 6368 14% 51% 13. Volcarona 6203 14% 42% 14. Greninja 5856 13% 48% 15. Bisharp 5717 13% 52% 16. Gliscor 4663 10% 46% 17. Tyranitar 4450 10% 44% 18. Pelipper 4450 10% 50% 19. Torkoal 4078 9% 47% 20. Lucario 3967 9% 48% 21. Skarmory 3680 8% 58% 22. Gyarados 3569 8% 40% 23. Heatran 3437 7% 55% 24. Kingdra 3375 7% 50% 25. Muk-Alolan 3351 7% 57% Unique Teams: 43953 #Silver May 2020 Most used pokemon in ranked pvp (source: PRO database) #Rank Pokemon Count Percentage Win rate 1. Ferrothorn 18418 31% 52% 2. Rotom-Wash 13505 23% 53% 3. Garchomp 13459 23% 54% 4. Gengar 13356 23% 51% 5. Clefable 12771 22% 50% 6. Dragonite 12516 21% 51% 7. Weavile 11564 20% 53% 8. Azumarill 11559 20% 55% 9. Conkeldurr 11005 19% 51% 10. Chansey 8712 15% 51% 11. Lucario 7622 13% 50% 12. Heatran 7456 12% 54% 13. Volcarona 7399 12% 44% 14. Greninja 7206 12% 47% 15. Togekiss 6722 11% 49% 16. Bisharp 6382 11% 53% 17. Scizor 6239 10% 51% 18. Pelipper 6137 10% 48% 19. Gliscor 5592 9% 48% 20. Excadrill 5377 9% 51% 21. Tyranitar 5376 9% 47% 22. Kingdra 4763 8% 49% 23. Tangrowth 4341 7% 51% 24. Serperior 3814 6% 50% 25. Muk-Alolan 3772 6% 56% Unique Teams: 575781 point
-
I'll give this a bump so I get a few more answers and then this can stay buried until I have to link it to a newbie :harold:1 point
-
I seen in the recent update logs that there was a bunch of new hair styles added and I went to buy a magic mirror for my alt to see them and change my hair but I didn't see any of them. Is this a bug or was it not added into the magic mirror choices?1 point
-
Hi, i've been wishing for this in years but finally came in forums. The fact is, i've always tryed to hear these maps songs, but battle music just keeps restarting them, so I pretty much just listen to the beginning of theses songs and battle music. Can you guys make a way to mute battle music? It could be an option, just like the way you did for bike/surf mount. I truly think it would be a great add to this game. Pls consider, love you all.1 point